1
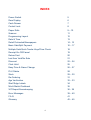
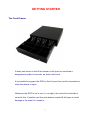
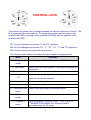
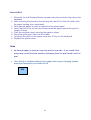
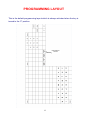
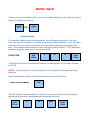
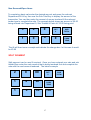
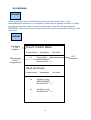
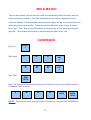
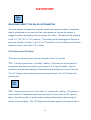
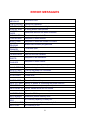
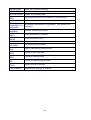
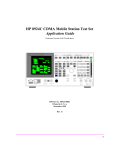
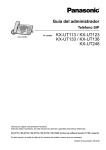
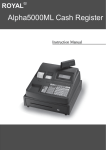
SX-695 End User Guide Retail 1 SX-695 Feature Guide 299 departments 18500 PLU‟s (standard) 35600 PLU‟s (extra memory) 58mm thermal receipt & journal printers 99 clerk interrupt holds with auto store after pre set time limit PC link for easy programming and advanced sales reporting Scanning with easy programming, price check, PLU delete and re-ordering features Optional Pre-loaded Retail File Shelf Edge Labels Mix and Match Stock Control & Advanced Reports – Best Sellers / Non Movers Programmable keyboard layout Drawer alarm with programmable timer Advanced Training mode Management control Age Verification Supports Newspapers and Magazines IRC Networking Dallas Key Kitchen & Wide Receipt Printer Link 2 Please Note: By amending program details using this user guide you automatically accept full responsibility for any changes you make to your system as a result of using the information contained in the guide. Please ensure that any changes made to your system are carried out by a suitably qualified person who understands the implications of those changes. It is always preferable that you talk to the reseller who supplied you as your terminal may have been configured specially for your needs. Changes made by you may conflict with settings originally made by your supplier. Specifications are subject to change without notice and whilst all efforts have been made to ensure the validity of these documents, we accept no responsibility for any omissions or errors contained in them. 3 INDEX Power Switch 5 Rear Display 6 Cash Drawer 7 Control Lock 8 Paper Rolls 9 – 10 Scanner 11 Programming Layout 12 Date & Time 13 Retail Preloaded/Newspapers 14 - 15 Basic Sale/Split Payment 16 – 17 Multiple Sale/Quick Tender Keys/Price Check 18 Receipt On-Off/Cancel 19 Return/Void 20 Last Item Void/No Sale 21 Discount 22 – 24 Clerk Hold 25 Easy Price & Name Change 26 – 27 PLU Delete 28 Stock 29 – 30 Re-Ordering 31 Age Verification 32 – 33 Shelf Edge Labels 34 Mix & Match/Cashback 35 X/Z Report/Housekeeping 36 - 38 Error Messages 39 – 40 F.A.Q 41 Glossary 42 – 45 4 GETTING STARTED The Main Power Switch The main power switch is located on the right-hand side of the SX-695. The switch must be in the ON position before the ECR is operational. 5 GETTING STARTED The Display The customer display screen can be lifted and rotated for the best viewing angle. By programmable option, the control lock position can be temporarily displayed and a warning tone sounded each time the key position is changed. 6 GETTING STARTED The Cash Drawer A delay can be set so that if the drawer is left open for more than a designated number of seconds, an alarm will sound. It is possible to program the ECR so that it cannot be used for transactions when the drawer is open. Whenever the ECR is not in use (i.e. at night), the control lock should be turned to the „L‟ position and the cash drawer emptied & left open to avoid damage in the event of a break in. 7 CONTROL LOCK The control lock allows you to change between the various functions on the till. The till is equipped with nine positions. To change the position use the owner‟s key (marked with [OW]), manager‟s key (marked with [MA]) and the operator‟s key (marked with [OP]) OP : Key for Operator can access "L" and "R" positions MA : Key for Manager can access "P1", "L", "R", " X1", "V" and "Z1" positions. OW: Key for Owner can access all key positions The following table shows the modes the cash register is equipped with. Mode P1 - Program 1 Functions Used to program "Date", Department, PLU, Tax etc. mode L - Lock mode R - Register mode Read mode X1 Used to lock the cash register. This position disables all operations. Used to process sales transaction Used to read and print the Sales Reports. (T) Used for training the operator. V - Void mode Used to void the registration. Z1 - Reset mode Used to reset and print the Sales Reports X2 - Periodical read Used to print periodicals information report. mode Z2 - Periodical reset Used to read and reset the periodical sales information. mode P2 - Program 2 mode Used to program "SYSTEM FLAG", "KEY LAYOUT", "TRANSACTION NAME" etc. System mode is accessible from the P2 mode. 8 PAPER ROLLS Installing the Paper Rolls into your SX-695 Your cash register comes fitted with 2 thermal printers which use 58mm paper rolls. Receipt Roll 1. Lift up the printer cover from the back 2. Press the Receipt Release Button located under the protective flap above the keyboard 3. Remove the old till roll & drop the new till roll into the holder with the paper feeding from underneath 4. Push the set plate down securing the paper in place 5. To feed the paper press the RF button on the keyboard 9 Journal Roll 1. Press the Journal Release Button located under the protective flap above the keyboard 2. After removing the previous Journal drop the new till roll into the holder with the paper feeding from underneath 3. Feed enough paper in order to connect to the printer spool 4. Insert the end of the roll into the slit and wind the paper around the spool a couple of times 5. Push the set plate down securing the paper in place 6. Place the audit spool back into the cradle 7. To tighten the slack on the paper press the JF Key on the keyboard 8. Replace the printer cover Note As thermal paper is used you can only print on one side. If you install it the wrong way round (the heat sensitive side away from the print head) it will not print. Once the till is installed whenever the paper rolls require changing, please press the Release Key to enable the till. RLS 10 GETTING STARTED Scanner The SX-695 has a connection for a handheld scanner to be attached in a retail environment. The connection port for the scanner is located on the rear of the till (Com 1). Once the scanner is connected and till powered on the scanner will beep to acknowledge connection. You will then need to reboot the till in the 'P2' position with the RF Key held down. 11 PROGRAMMING LAYOUT This is the default programming layout which is always activated when the key is turned to the „P‟ position. New BkSpace Feature 12 DATE & TIME SETTINGS Insert the manager program key (MA) in the control lock and turn to the P1 program position Press the down arrow once to DATE and press enter ENTER To set the date, enter as year-month-day format. Example: For 16th June 2010 DATE: 20100616 Enter Key 2 0 1 6 0 1 0 ENTER To set the current time, use 24 hour format. Example: To set 10:15 AM TIME: 1015 Enter Key 1 0 1 5 13 ENTER 6 RETAIL PRELOADED Your system may have been preloaded with a stock file containing popular products etc. This section will describe the operation of getting the most out of this preloaded system. There is no need to program an item from scratch. Simply add the price at the point of sale and the product name will be automatically stored for future sales. If the item is not in the retail file, the department name will be used instead. With the key in the 'R' Position scan your product. The till will prompt PRICE+DEPT? Enter the price followed by the relevant department this product applies to. The example below shows if a customer brings a can of drink to the till that has price of £1.20: 1 2 0 DRINKS If this item is in the database, the next time it is scanned through the till it will display the name of the product and the price that was set (in this case £1.20) If the product is not in the database it will still sell at the desired price and use the department name. Note If the incorrect dept/category was selected, you can use the Dept Link button in the P1 position to rectify. NEWSPAPERS Newspapers have barcodes which change every day. The SX-695 will allow the user to scan a Monday Newspaper and enter the price. This will now work automatically for each weekday as the SX-695 has an intelligent Newspaper system. The Newspaper names are already pre-loaded for convenience On the Saturday the till will recognise it is as a Saturday barcode & request the price. 14 Magazines and Local Newspapers are also pre-loaded and also adopt this simple function. To add a newspaper to the system, scan the newspaper in the R position. Enter a price (e.g 40p) and press the Newspaper Dept on the keyboard. 4 0 NEWSPAPERS NOTE: The following can be actioned when the till is live in shop or before installation. If this is setup prior to use, you will need to take a 'Z2' report in order to reset the sales before live transactions begin. Please see Reports section. 15 BASIC SALE To sign on the the till either enter your user number followed by the Clerk No. key or press your direct user button. CLERK No. OR CLERK 1 Scanned Items To complete a basic sale scan the product, this will display the price of the item. Then use the Sub-Total Key to display the amount of the transaction. You can then enter the amount of money tendered & the relevant tender type to complete the sale. The example below shows an item scanned (bottle of drink, £1.20) and being tendered using the cash key for an amount of £5. SCAN ITEM 5 SUB TOTAL 0 0 CASH TEND The till will then issue a receipt and indicate the change due. In this case it would be £3.80 NOTE: If your scanner is not being used you are still able to sell barcode listed products. Enter the barcode number of the product followed by the PLU Key BARCODE NUMBER PLU This will sell the relevant product. Now you can continue the sale as normal by entering more items or sub-totaling and tendering the sale. SUB TOTAL 1 0 00 16 CASH TEND Non Scanned/Open Items To complete a basic sale enter the desired amount and press the relevant Department/PLU Key, then use the Sub-Total Key to display the amount of the transaction. You can then enter the amount of money tendered & the relevant tender type to complete the sale. The example below shows an amount of £5.00 being entered into Department 9, Sub-Totaled & Cash of £10.00 being paid. 5 0 0 1 0 0 DPT 9 0 SUB TOTAL CASH TEND The till will then issue a receipt and indicate the change due. In this case it would be £5.00 SPLIT PAYMENT Split payment can be used if required. Once you have entered your sale and sub totaled then enter the cash amount that is being tendered first and complete the sale with the card amount tendered. The below example 2 0 00 1 0 00 1 0 00 DPT 2 CASH TEND CARD 17 SUB TOTAL MULTIPLE SALE Q/F Enter the Quantity, press the multiply button, enter the amount followed by the relevant Department/PLU button. The example below shows 2 items of £2 being sold into Department 7. 2 Q/F QUICK TENDER KEYS 00 2 DPT 7 CASH TEND £10 You can use the quick tender keys to complete a sale instead of just pressing cash or manually entering your amount. These buttons are marked £50, £20, £10 & £5. The example below shows a sale of £7.99 in Department 4 and tendered using the £10 quick tender button. 7 99 PRICE CHECK £10 DPT 4 PRICE CHECK To check a price of a product, press the PRICE CHECK button before pressing an item. This will display the price of the product without selling it. To sell the item press the item again. 18 RECEIPT ON/OFF RECEIPT ON/OFF It is possible to switch the receipt print off and on by pressing the Receipt On/Off button. If you require a receipt after the sale has completed. Press the 2nd Receipt button. When the receipt is off an LED indicator will be on the Display. RECEIPT ON/OFF CANCEL Please note, If using Clerk Interrupt then sign on firstly before pressing the receipt button 2nd RECEIPT CANCEL To cancel a transaction whilst in process press the Cancel Key at any point during the Sale. The below example details a sale being canceled after three entries: 7 9 5 3 9 9 1 5 00 DPT 3 DPT 2 DPT 1 CANCEL 19 RETURN RET You can return an item sold outside of the original transaction by pressing the Return key, entering the amount, selecting the relevant Department/PLU and using the Tender key. The example below shows a Return a sale of £5.99 into Department 3. 5 RET VOID 9 9 DPT 3 CASH TEND VOID You can void an item outside of the original sale by turning the key to the 'V' Position, pressing the Void Key and entering the transaction as was sold. The below example shows a Void on a transaction of £20.00 into Department 2. VOID 2 00 0 20 DPT 2 CASH TEND LAST ITEM VOID EC You can void the last item entered during a transaction by pressing the Error Correct Key. The below example shows two items being entered and the last item voided using this function. 4 0 00 2 0 00 DPT 8 CASH TEND DPT 7 CASH TEND EC This will then void the last item (£20.00 into Department 7) NO SALE #/NS The No Sale Key can be used to open the draw outside a transaction. Press the button and the draw will open and a ticket prints for confirmation that a No Sale has been actioned. #/NS 21 DISCOUNT -% You can discount an amount (monetary or percentage) from individual items or off the total sale value. NOTE: by default on our programs these are preset at 10% The below example shows a £10 sale being discounted 10% by the preset -% button 1 0 00 DPT 1 SUB TOTAL -% CASH The below example shows an item of £5 being discounted 10% by pressing the -% button 5 0 0 DPT 3 -% SUB TOTAL CASH 22 NOTE: If the -% button does not have a preset discount then simply enter your required amount (10 = 10%) before pressing the -% button. The below example shows a transaction of £20 being discounted £1 by pressing the - button 2 0 00 DPT 2 SUB TOTAL - CASH The below example shows a transaction of £2 being discounted £1 by pressing the - button 2 0 0 DPT 6 - SUB TOTAL CASH NOTE: If the - button does not have a preset discount then simply enter your required amount (100 = £1) before pressing the – button. 23 NOTE: A charge can also be added to items/transactions. This operates in the same manner as the procedures above only with the +% button. +% 24 CLERK HOLD CLERK No. The SX-695 can place a transaction on hold, allowing the user to serve another customer. When the held transaction is to be recalled, the hold button can be pressed, recalling the previous sale. Further items can be added, or the transaction can be tendered. Sign On with your relevant ID followed by the Clerk button. e.g. 1 CLERK No. Start a sale 2 0 00 DEPT 7 Press the HOLD key to store the sale HOLD The till can now be operated by other Clerks To retrieve the previous sale simply press the HOLD key. HOLD Note It is possible that your dealer has configured Clerk Interrupt. This is very similar to the above example but Clerk Interrupt allows up to 40 individual holds, and the clerks can simply overlap each other. This feature requires compulsory sign on for every transaction. 25 EASY PRICE/NAME CHANGE PRICE CHANGE PRICE CHANGE This button is used to change the prices of PLUs that are located on the keyboard. Turn the key to V position on the control lock Press PRICE CHANGE. PRICE CHANGE Enter the new price and press the item button. The new price has now been set. 3 5 0 COKE Repeat the above until all desired products have been completed Press PRICE CHANGE again to finish entering price changes. PRICE CHANGE NAME CHANGE This button is used to change the names of PLUs that are located on the keyboard. Turn the key to 'V' position on the control lock Press NAME CHANGE. NAME CHANGE 26 Enter the new name using the alpha text buttons. T E A Press the 00 button 00 Press the required product TEA Repeat the above until all items have been changed. Press NAME CHANGE again to finish making name changes. A list of changed items will be printed on the receipt roll. NAME CHANGE 27 PLU DELETE PLU DELETE (V) The PLU batch delete function allows PLUs to be easily removed from the system without the need to reprogram in „P1‟ Individual PLU Delete Turn the key to the „V‟ position on the control lock. Enter 99 followed by the PLU Delete button. 9 9 PLU DELETE (V) This will display the message DELETE PLU MODE? Enter 99 followed by the PLU Delete button to confirm 9 9 PLU DELETE (V) This will display the message PLU DELETE ON Press the PLU to delete on the keyboard or scan the barcode, continue until you have actioned all the items that require deleting. Once complete press PLU Delete to end the function. PLU DELETE (V) NOTE: Any PLUs with sales against them will not clear, instead the message „REPORT NOT CLEAR‟ will appear. These PLUs can only be deleted after all the sales against them have been cleared. 28 STOCK CURRENT STOCK The Stock Level is programmed in P1, PLU INVENTORY or PLU. STANDARD: Enter the minimum stock level into this field. Used to trigger the Low Order Warning and the Re-Order List. INVENT NOW: The current stock level, modified by INVENT IN and INVENT OUT. INVENT IN: Used to add newly arrived stock to an existing inventory item. INVENT OUT: Used to take stock out of the store‟s inventory, for example, transfer to another store etc. NOTE: If the Low Order Warning is enabled when the sales are beneath the level set any attempt to sell the item will display the current level of low stock. CHECKING STOCK FOR SCANNED ITEMS There are 2 ways of checking stock. The first way is to press the PRICE/STOCK CHECK button PRICE/ STOCK CHECK 29 Scan the desired item. The price and stock level for this product is displayed. The second method is to turn the key to P1 on the control lock and press the CURRENT STOCK button. CURRENT STOCK Scanning the desired item will display the stock level for that product. UPDATING STOCK/INVENTORY FOR SCANNED ITEMS It is easy to update the inventory of products. To add new stock to an existing Item, turn the key to P1 on the control lock. Press the ADD STOCK button ADD STOCK Scan the item and enter the quantity of stock to be added e.g. 10 = 1000 followed by the ENTER button. SCAN ITEMS 1 0 0 0 ENTER Repeat for any additional stock items NOTE: The same procedure is used for deleting stock items or adjusting the minimum stock levels. Just substitute the ADD STOCK button for the relevant one below. DELETE STOCK MINIMUM STOCK 30 RE-ORDERING REORDER Once a product‟s stock level falls below the low level stock value, it will automatically be placed on a re-order list, which can be printed out later. It is also possible to manually select an item to be placed on this list. Simply press the REORDER button, and scan the desired items or press the product buttons on the keyboard. REORDER PLU Group 2 Title (Supplier) French Cuisine Baker Current Stock EAN Number (Only If Programmed) 2x Description Re-Order French Stick 5000478044037 Re-Order QTY ----> Cash and Carry Current Stock Description Re-Order 5x Digestive 250g 5000412006602 Re-Order QTY ----> 4x Cornflakes 1 Kg Re-Order QTY ----> 31 PLU Description AGE VERIFICATION AGE VERIFY The SX-695 has the ability to mark products for age verification. If any of these items are sold, the system will enforce an age verification entry. Once verified this will allow all products to be sold until the end of the transaction. Once prompted, there are two ways of verifying the age. The first method is if the person buying the product looks over the required age and does not need to produce any identification. By simply pressing the AGE OK button this will verify the item and allow all further items to be sold until the end of the transaction. The example below shows a sale of cigarettes for £6.15 using the Age OK button and tendered using the cash button. AGE OK SCAN PRODUCT (CIGARETTES) 6 SUB TOTAL 1 5 CASH The second method is if Identification is required. By entering the date of birth the form of identification followed by the AGE VERIFY button, this will check the required age before allowing the transaction to continue. The birthday is printed on the receipt and journal for security reasons. The example below shows a sale for cigarettes using the date of birth 15th July 1979 and the Age Verify key to allow the sale. SCAN PRODUCT (CIGARETTES) The till will ask the operator to verify the customers age. Type in the date of birth in the format below & press the Age Verify button. You can then re-scan the item & continue/complete the transaction. 32 1 5 7 9 0 7 1 AGE VERIFY SCAN PRODUCT (CIGARETTES) SUB TOTAL 6 5 1 33 CASH 9 SHELF EDGE LABELS SHLF EDGE The SX-695 can print out a Shelf-Edge label for each product. The Shelf Edge label will have the product name, price, barcode number and barcode. When a product has been changed in the „P1‟ position, or by using the easy price/name change feature, it is marked for a shelf edge label. When the Print SEL command is used, any product marked will print. To print the shelf edge labels, turn to the „X2‟ position and press the Shlf Edge button. See the programming layout. SHLF EDGE To print single shelf edge labels, turn to the 'R' position and press Manual Label MANUAL LABEL (R) change and then scan. NOTE: The shelf edge label can print double size. Please contact your dealer if you want to activate this feature. 34 MIX & MATCH The mix and match function can be used to automatically discount items that are sold as a pre-set quantity. The Mix and Match promo will be displayed on the customer display. When programmed these will trigger during a normal transaction discounting the relevant offer. There are various different types of mix & match. Buy 2 get 1 free. Buy a specific amount of products for a fixed price and the free gift offer. Your dealer will be able to set the relevant offer up for you. CASHBACK Sign On Sell Items CLERK 1 7 4 Sub Total 9 9 9 9 DPT 3 DPT 5 SUB TOTAL Enter the Cashback amount and press the Cashback button and finalize with the Cashback Tend function. 1 0 0 0 CASH BACK CASH BACK TEND NOTE: There needs to be enough Cash In Drawer to complete the CASHBACK Function 35 X/Z REPORT FULL RPT READ AND RESET THE SALES INFORMATION The cash register is designed to maintain totals of all transaction data. Transaction data is maintained in the memory of the cash register as long as the system is plugged in and/or the battery back-up system is in effect. This data can be obtained in the "X1","X2","Z1" or "Z2" positions. The reading for the Management Reports is the same whether it is taken in the "X" or "Z" positions. The only difference is that the totals are reset to zero after a "Z" is taken. X1 Position and X2 Position There are two types of report that can be taken in the "X" position "X1" - Commonly known as a "mid-day" reading. This prints an accumulation of transaction data and is not reset to zero unless a "Z1" report is taken. Use this position to print periodic readings of transaction data during the course of the day. The “X1” Report can be taken simply by turning the Key to the “X1” Position and pressing the FULL RPT "X2" - Commonly known as a "mid-week" or "mid-month" reading. This prints an accumulation of transaction data and is not reset to zero unless a "Z2" report is taken. Use this position to print periodic reading of transaction data during the course of several days. The “X2” Report can be taken simply by turning the Key to 36 the “X2” Position and pressing the FULL RPT Z1 Position and Z2 Position There are two types of reports that can be taken in the "Z" position "Z1"- Commonly known as an "end-of-day" reading. This prints transaction data and resets all transaction totals to zero except the non-resettable ground total (NRGT). The machine will, however, still accumulate totals in memory until a "Z2" report is taken. The “Z1” Report can be taken by turning the Key to the “Z1” Position and pressing FULL RPT "Z2" - Commonly known as a "weekly" or "monthly" reading. This prints transaction data either on a weekly or monthly basis and resets all transaction totals to zero except the Non-resettable ground total (NRGT). The “Z2” Report can be taken simply by turning the Key to the “Z2” Position and pressing FULL RPT NOTE: If you do not have a pre-programmed Full Report button on your Keyboard then this report can also be taken by turning the Key to the relevant reporting position and pressing the Enter Key 3 times. ENTER X3 37 OTHER REPORTS Other reports are available on the SX-695. Below is a selection of popular ones. The below reports can be taken in the X2 position by pressing the relevant report button. Best Sellers (Q) Quantity This report will print the Top 10 (customisable to 50) best sellers which have sold by quantity Best Sellers (P) Price This report will print the Top 10 (customisable to 50) best sellers which have sold by price Worst Sellers (Q) Quantity This report will print the Top 10 (customisable to 50) worst sellers which have sold by quantity. This indicates that maybe the price is too high, or the product requires improved marketing. Worst Sellers (P) Price This report will print the Top 10 (customisable to 50) worst sellers which have sold by price. This indicates that maybe the price is too high, or the product requires improved marketing. HOUSEKEEPING Once the system has gone live for a period of time, it is possible to delete items from the system to free PLU memory. There are 2 options: Non Mover Report – Deletes Items not Sold since last Z2 Non Mover Report 2 – Deletes Items that have had no price allocated If you require this function please contact your dealer who will assist you. 38 ERROR MESSAGES No.ERROR MESSAGE 1 KEY OP ERR DESCRIPTION Wrong key operation. 2 ENTRY OVER 3 ENTRY ERR 4 MEMRY OVER 5 PLS CLERK The exceeded number of digits was entered. A wrong button was inputted. 7 ENTER AMT Required to enter amount. 8 ENT CVRS 11 NOT PROGMD 12 CLS DRAWER 13 INSERT CHK Required to enter the number of covers. 14 NEW ROLL 15 STOP RGSTR 16 PLS CASHIER 21 CHK RJ PRT New till roll to be installed. Sales total amount has been exceeded. Required to input clerk ID. Button has not been programmed. Till drawer open. Required to set the paper. Required to do finalization. Required to enter cashier Check the receipt or journal printer. 24 NO SPT TND Split tendering is not allowed. 25 OFF 5 SEC Turn off the power for 5 seconds. 26 PRESS CLR Press the Clear key. 27 PLS WAIT Please wait. 28 MLT DEF 31 PRS S TTL 34 PL LFT MNY Double definitions. Press the Subtotal key. Money in drawer is exceeding the preset amount. 37 RJ TEMP Heat trouble on receipt or journal printer. 38 RJ HEAD UP Printer header arms are not closed. 40 CHK ECR 41 PRESS RLS 42 EJ ERROR 43 EJ NEAR ERR 44 EJ FINL ERR Operation error. Check the register. Press the RLS key Electronic journal memory error. 45 EJ FULL E/J memory is full. E/J memory capacity is nearly full. E/J memory capacity is very nearly full. 39 48 BIRTHDAY Input the customer‟s birthday. 49 CAN‟T SELL Age Verification. 52 CHK INVENT 55 RJ COM ERR 56 OP ERROR 60 CLE->RLS>2ND REPT TO RELEASE 101 NO NUMBER 102 CASH DECL 104 CA-ID REQD 105 EN CLK ID 106 NO JOURNAL 130 POWER FAIL 145 LOGO WR ERR 152 LOGO LD ERR 163 DATA LD ER 164 WRONG DATA 165 ERASING Check the inventory data. Communication error of the receipt or journal printer. Operation error. Exceeded items/amount in registration. Sale needs to be tendered. Number entered is incorrect. Cash declaration is required. Press the Clerk ID key. Enter clerk ID number. No electronic journal data. Report canceled by power failure. Failed to write logo data. Failed to load logo data. Failed to load the program data. Data in the file is corrupt. Internal flash memory is erasing. 40 FAQ Q: Till has no lights on display. A: Ensure that till is running through a working power source and the power switch is in the correct position. Also check that the key is not in the R position Q: Receipt and/or Journal is feeding but printing blank A: The till uses thermal paper so will only print on one side. Ensure the paper has been installed the right way round. The shiny side should be the side the data prints on. Q: The till has power but will not respond A: Turn the control lock to the 'P2' position. Turn the till off for 30 seconds. When switching the till back on leave the control lock in the 'P2' position. Q: The scanner has lost it‟s power A: Firstly check that there is power to the Cash Register. Ensure that the scanner is connected securely to Com 1. If required perform a P2 reset Q: The Drawer clicks but does not open A: Ensure that the drawer is unlocked. 41 GLOSSARY The following list describes the SX-695’s general terms and explanations for the functionality of the machine DEPARTMENT A department can be used for grouping purposes. When a product is sold, it will report under the heading of the designated department that the product is linked to e.g. Stationery. Departments can also be placed on the keyboard for manual price entry. Key in the amount and press the relevant Department key PLU PLU stands for Price Look Up. These are the actual products that are sold on the cash registers e.g. Pen, Pencil. The PLU must be linked to a Department category to function. HALO HALO stands for High Amount Lock Out. This allows the user to program a limit for each PLU/DEPT. e.g. an amount of no more than 10.00 can be entered or sold for a designated product PRICE OVERIDE The Price Override feature allows the user to override the pre-set price of a product. Key in the amount and sell the desired PLU CASH, CHEQUE AND CARD After items have been registered, a method of payment can be selected. The amount of money given by the customer can be entered and the change given will be displayed The totals report as cash in drawer, cheque in drawer and card in drawer. 42 These will all add up to the net total when a report is taken. CLERK ID Each user (Clerk) can have their own unique password for operating the Cash register. This is useful for security and for reporting purposes. The Clerk ID key can also be used to toggle the receipt on and off. For further information on programming of this feature see page 14 CLERK HOLD This will allow a clerk to hold their sale in the ECR while another Clerk carries out a transaction. Example: Sign on the Clerk, register some items and press the Hold key. The sale is stored in the cash register and the Display will show which clerks have outstanding sales. There are a maximum of 5 clerk holds on the Cash register. # / ST The # key is the function for No Sale. This will open the drawer. The ST key is the function for Sub Total. After registration of a few products, the Sub total key when pressed will display the total amount due and print on the receipt. TOTAL The total key is used to display the total amount due including any add on taxes. The Total key is also used for printing a receipt after sale 43 X-TIME The X-Time key is used for multiplication. Example: 2) (X/TIME) (1.00) (DPT 1) would register a sale of 2.00 in Dept 1. The key is also used for displaying the current time on the display FC The FC key is used for tendering in a foreign currency for example the Euro. For further information to setting up this feature see page 27 RA The RA key is the function for Received on Account. An amount that is entered into the RA key as cash will increase the cash in drawer. A popular use for this function would be to pay in a float. Example: Enter Amount – Press RA – Press Cash PO The PO key is the function for Paid Out. An amount that is entered into the PO key as cash will decrease the Cash in drawer. A popular use for this function is a Float out system. Example: Enter Amount – Press PO – Press Cash CANCEL The Cancel key is used to Cancel the whole current transaction. All items within the transaction will be voided automatically. Press Cancel at any point during the current transaction 44 EC The Error Correct key will void the last item that was registered. Simply press the EC key to void the last item VOID The Void key is used for voiding any item in the current transaction. Example: Press Void – 1.00 – DPT 1 or Press Void – Press/Scan PLU RETURN The Return key is used for voiding any item that was registered in a previous transaction. Example: Press Return – 1.00 – DPT 1 or Press Return – Press/Scan PLU DISCOUNT (- Key) The – key is used to discount a whole amount from a transaction total. For example a 50p Coupon. Simply enter the amount to be discounted and press the – key. The user can pre-set the – key if required. % Discounts The -% key is used to discount a percentage from either a single item or a sub total of multiple items. The user can pre-set the -% key if required. The +% key is used to add a percentage to either a single item or a sub total of multiple items. The user can pre-set the +% key if required. 45