1
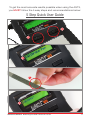
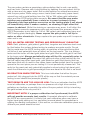
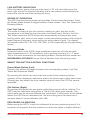
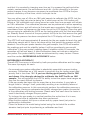
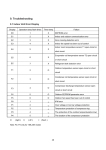
AuRACLE AGT3
®
Digital Gold & Platinum Tester
EASY OPERATION GUIDE
& OWNERS MANUAL
Congratulations on your purchase of the AuRACLE AGT3 digital gold and
platinum tester from GemOro Superior Instruments, the most trusted name in
testing instrumentation for the jewelry industry.
PLEASE BE CERTAIN TO READ THE ENTIRE EASY OPERATION GUIDE
AND OWNERS MANUAL BELOW BEFORE USING YOUR GEMORO
AURACLE AGT3.
GemOro AuRACLE® AGT3 Digital Gold & Platinum Tester
EASY OPERATION GUIDE
The advanced AGT3 is the world’s most accurate gold and platinum verification
device in its class and a true leap forward in technology. To achieve the greatest
benefits from the state-of-the-art AGT3, be sure that the variables caused by
dirt, body oils, liquids and pen probe pressure which could impact the testing
results are controlled. This can be accomplished by adhering to the following
cautionary notes.
Accurate gold and platinum testing can be achieved with the AGT3 only if an
accurate calibration is achieved. See the PEN PROBE CALIBRATION section
below.
The pen probe calibration procedure must be done every time the AGT3 is
powered up or anytime the pen probe has been replaced, but it is considered
a good standard operating procedure to check the calibration periodically
throughout prolonged testing.
The following steps need to be observed to assure an accurate calibration:
1. Always be sure that the pen probe’s tip is slightly moist and not “dripping”
the internal saline solution electrolyte. Simply dab the pen probe’s felt tip on
a clean and dry paper towel until any excess liquid is absorbed.
2. Clean the pen probe’s felt tip on a clean and dry paper towel periodically
prior to testing. A buildup of salt crystals or dirt on the pen probe’s felt tip
can cause inaccurate readings and by simply wiping it on a paper towel is
sufficient to remedy this.
3. When calibrating the pen probe with a piece of known 14K or 18K YELLOW
GOLD it is very important to lightly file the gold calibration piece to insure
that any dirt or body oil is removed and that a new clean gold surface is
exposed.
4. When in the calibration mode, lightly touch the filed area on the 14K or 18K
calibration sample with the pen probe’s felt tip while using slightly more
pressure than the weight of the pen probe.
5. Always press and hold the calibration piece against the testing plate’s
surface with your fingers to insure good contact.
GemOro AuRACLE® AGT3 Digital Gold & Platinum Tester 2
6. The “Success!” message indicates that the calibration is complete. If for
some reason the pen probe moves or slips off the calibration piece before
this message is displayed, the calibration process must be repeated.
7. The choice of using a 14K or 18K calibration piece will depend on what the
user has available and what they wish to test. However, it is recommended
that an 18K calibration piece is used whenever possible because this will
increase the AGT3’s accuracy when testing gold that is 18K and above.
8. Keeping the pen probe, calibration piece, the gold you wish to test and the
testing plate clean is extremely important for obtaining the most accurate
testing results.
9. Read the INCREASING ACCURACY section below.
10. If erratic test readings are seen after recalibrating the pen probe, try
recalibrating the AGT3 with a different pen probe.
EASY OPERATION GUIDE & OWNERS MANUAL 3
To get the most accurate results possible when using the AGT3,
you MUST follow the 5 easy steps and recommendations below:
5 Step Quick User Guide
D
A
B
C
E
GemOro AuRACLE® AGT3 Digital Gold & Platinum Tester 4
Before using the AGT3 it is important to always use common sense
as a regular part of your testing process. Be certain to first look for
the karat stamp so you can compare it to the testing results. Always
evaluate the color of the metal, and feel the weight of the jewelry
in your hand for obvious signs of it being genuine or alternatively,
costume jewelry. Review the Common Sense Guidelines on page 16 of
this booklet.
STEP 1: AGT3 POWER UP
After the battery and/or AC adaptor is installed and the pen probe is fully
plugged into the unit, turn the AGT3 on by pushing the MODE/POWER
button A . The AGT3 will then go through a quick self-test and then the
display will read CALIBRATE PEN B , prompting you to calibrate the device.
STEP 2: Remove the pen probe cap, then gently wipe the pen probe’s felt tip
on a clean, dry paper towel to clean it and absorb any of the pen probe’s excess
saline solution, leaving the pen probe’s felt tip moist, yet not dripping.
STEP 3: CALIBRATION PROCESS
Take a piece of known standard plumb 14K or 18K YELLOW GOLD that is made
from a typical gold/alloy composition, that is non-plated (some gold jewelry is
lightly plated to brighten its appearance) and file the gold’s surface C . Then lay
the gold on the AGT3 testing plate with the filed area facing up. Press the CAL
button D and release it for 14K calibration or press and hold it down
approximately 2 seconds for 18K calibration. (Once the calibration procedure
has been initiated you have approximately 8 seconds to perform the calibration.
If you wait beyond this time the display will read Cal Failed and then Calibrate
Pen, prompting you to perform the calibration procedure again.)
While holding the calibration piece firmly against the testing plate, after the
calibration has been initiated, lightly touch the end of the pen probe’s felt tip to
the filed area on the gold and steadily hold it there until the display reads
Success! E .
Be aware that 14K or 18K yellow gold with an uncommon mixture of
alloys may not provide a proper calibration.
STEP 4: RECHECK CALIBRATION
Touch the end of the pen probe’s felt tip to the calibration piece once again
to reconfirm that the display reads the correct karat and if not, wipe the pen
probe’s felt tip again on a clean and dry paper towel and simply repeat the
calibration process.
If when rechecking the pen probe’s calibration the display shows the incorrect
karat, trying an alternate piece of 14K or 18K yellow gold when calibrating the
AGT3 may also resolve the problem.
EASY OPERATION GUIDE & OWNERS MANUAL 5
STEP 5: TESTING GOLD AND PLATINUM
· To test gold and platinum, always first file a small area on the surface of
the metal and rest it on the testing plate with the filed area facing up.
· Press the MODE button once for Fast Test Yellow and press it again for the
Enhanced Mode:
FAST TEST YELLOW - This mode is meant to give the quickest reading
on gold, and due to this convenience it will likely be the most often test
mode used. While in the Fast Test Yellow mode the AGT3 will perform
exceptionally well especially when testing yellow gold, yet in rare cases
potentially performing with a slightly lesser degree of accuracy when testing
the other colors of gold. The display will indicate either 8K, 10K, 14K, 18K,
22K, or 24K depending on the gold being tested.
ENHANCED MODE - This mode offers high-resolution that will indicate
karat values in 1 karat increments, with a general accuracy of +/- 1 karat.
This mode is the AGT3’s most accurate test mode, and while it may be
used to test any karat gold, it is especially accurate when testing karat
ranges less than 18K. Please read the section on INCREASING
ACCURACY to get the full benefits from this mode.
· Touch the pen probe’s felt tip to the filed area and the test results will be shown
on the LCD display.
· If inconsistent test results are experienced always dab the pen probe’s felt tip
on a clean, dry paper towel and as needed recalibrate the AGT3 while in use.
· Always replace the pen probe’s cap until it snaps on when not in use to avoid
contamination and to keep the pen probe’s felt tip from drying out.
GemOro AuRACLE® AGT3 Digital Gold & Platinum Tester 6
The PATENTED AGT3 is an accurate testing device meant for the purposes of
quickly and easily purchasing standard karat gold as well as platinum. It has
been designed with the needs of a gold and platinum buyer in mind. Although
it is considered the most accurate electronic tester in its class, the AGT3 is not
meant to be used as a tool for rigorous scientific assay. There are many alloys
used to create gold jewelry of the various colors (white, yellow, green and red).
As the vast majority of gold being purchased is 10K, 14K and 18K, your AGT3
has been designed to primarily focus on these ranges. While high karat gold
is the most challenging for any electronic gold tester to discern, the enhanced
software in the AGT3 allows it to provide reasonably good testing results in the
22K and 24K ranges as well.
As the percentage of gold content in a piece of gold moves closer to pure, the
presence of other metals becomes smaller and the electro-chemical reaction
has less contaminant’s to detect. As such, gold higher than 18K may potentially
test inconsistently among the higher karat ranges. It is important to note that
over 99% of all gold stamped or cast of this quality is marked or stamped or
backed by the mint that has produced it. Government mints almost exclusively
produce coins made of high karat gold, and there are many reference sources
that one can turn to for their identification. From a practical perspective, the
gold of this purity is easy to identify by its rich color and you will observe that
it is very heavy in the hand. All high karat gold will test with reasonably good
accuracy above the 18K range when using your AGT3, but it is best to rely on
the visual karat marks, reference sources and common sense.
Troubleshooting & Helpful Tips
RECOGNIZE THAT THE CHEMISTRY IN THE PEN PROBE IS CONSTANTLY
CHANGING OVER TIME AS IT IS EXPOSED TO GOLD AND OTHER
METALS, CONTAMINANT’S, THE ENVIRONMENT AND DIRT. The genius of
the AGT3 is that by recalibrating the device and cleaning the pen probe’s felt tip
as needed; this allows the AGT3 to adjust itself to the chemistry in the pen probe
at that time. Since the AGT3 can be calibrated in only a matter of seconds and
the pen probe’s felt tip may be quickly and easily cleaned if needed, these simple
steps should be a regular part of problem solving and your testing process.
CLEANING OF THE PEN PROBE’S FELT TIP AS NEEDED AND REGULAR
CLEANING OF THE TESTING PLATE: Periodically wipe off the gold particles
and other metal particles coming from costume, gold plated or gold filled jewelry
that may remain on the pen probe’s felt tip to avoid contamination. The metal
particles remaining on the pen probe’s felt tip that are naturally rubbed off during
the testing process, and especially metal filings from other karat gold, copper,
brass or other base metals that have been filed and remain on the pen probe’s felt
tip could potentially cause incorrect test results. Therefore, cleaning the pen probe
periodically when needed is important. It is advised to regularly clean the AGT3’s
testing plate.
EASY OPERATION GUIDE & OWNERS MANUAL 7
The pen probe contains a proprietary saline solution that is safe, non-acidic,
and non-toxic. Remove salt crystal buildup by dabbing the pen probe’s felt tip
with a clean and dry paper towel. Salt crystal buildup is a natural occurrence
with the pen probe. While using a warm, moist (from water only) paper towel,
wipe off any salt crystal buildup from the 14K or 18K yellow gold calibration
piece and the AGT3 testing plate area only. Be aware that the pen probe
solution may potentially leave a stain or in some instances it may
ultimately over time produce corrosion on the testing plate if not wiped
off immediately after it makes contact, so cleaning it right after this
occurs is advised. While this staining or corrosion may occur, it will affect the
testing plates cosmetic appearance only and not impact the accuracy of the
AGT3. Remember to dry both the 14K or 18K yellow gold calibration piece and
AGT3 testing plate thoroughly. Never expose the pen probe’s felt tip to
water or other chemicals. Always replace the pen probe cap until it snaps on
when not in use.
FILE ALL METAL BEFORE TESTING AND PERIODICALLY CLEAN THE
FILE: Gold, platinum, gold plated, gold filled, tungsten and stainless steel must
be filed below the surface before testing to produce accurate results. Do not
file the metal over the AGT3 testing plate, as particles of the metal being filed
will fall on it and potentially have an effect on the test results. This is a surface
tester and the tester will read gold plated and gold filled as solid gold if not filed
to the base metal. Always periodically wipe off the file, especially prior to
testing high karat gold. Be aware that gold and other metal particles on the
file that came from other karat gold, gold plated or gold filled jewelry that has
also been filed with it could in rare cases cause contamination from the metal to
spread to the next piece you are testing if it is not periodically cleaned off. This
rarity for the most part only potentially applies to when testing high karat gold
since the differences in gold percentages from one karat to the next is so small.
NO REACTION WHEN TESTING: This is an indication that either the pen
probe isn’t fully plugged into the AGT3 all the way or that the material you are
testing is non-conductive (example: plastic).
TEST RESULTS ARE TOO HIGH OR LOW: This is an indication that the AGT3
is out of calibration, or perhaps there is a presence of a high silver content,
palladium or rhodium or possibly the side of the pen probe’s felt tip is touching
the gold instead of the very end of it.
IMPORTANT NOTE: If a proper calibration isn’t performed, the AGT3
will not provide accurate test results. If repeated attempts to calibrate
the AGT3 are unsuccessful, it is likely that your calibration piece may have a
higher karat gold plating on it or something unusual about its composition is
making the reading inconsistent. If this occurs, an alternate calibration piece or a
different pen probe should be tried.
GemOro AuRACLE® AGT3 Digital Gold & Platinum Tester 8
Please never hesitate to call the GemOro AGT3 helpline @ 800.527.0719
if needed and we will gladly assist you to quickly troubleshoot and fix any
problems you may encounter.
Other Precious Metals
TUNGSTEN AND STAINLESS STEEL: Be aware that if tungsten or stainless
steel isn’t filed first it may test in the high karat range or even as platinum, but if
it is filed it will then test as Not Gold. ALWAYS FILE IT FIRST!
RHODIUM: Be aware that rhodium will react as platinum on the AGT3. It is
rarely used as solid finished jewelry, but instead is commonly used as a plating
material to make white gold or platinum appear brighter or whiter. If white gold
is plated with rhodium and filed, it will then test accurately or possibly as a
higher karat than marked since it is taking an average reading of the two metals.
ALWAYS FILE IT FIRST! If white gold tests higher than marked, it is probably
rhodium plated.
PALLADIUM: Be aware that the AGT3 is not a palladium tester. Pure
palladium will test somewhere between 16K and 24K on the AGT3. In the case
of palladium being mixed with white gold it will drive the reading up to a higher
karat than it is. If you see a reading on white gold that is higher than marked, it is
possible that it is mixed with palladium.
WHITE GOLD WITH HIGH NICKEL OR HIGH SILVER CONTENT: Be aware
that white gold with high nickel content may test as a lower karat than marked.
While it could be under karat gold in this instance, it is likely the karat marked.
White gold commonly has 4% to 7% silver content. Although rare, if white gold
has an uncommon high silver content above 7% it may test as a slightly higher
karat than marked.
EASY OPERATION GUIDE & OWNERS MANUAL 9
GemOro AuRACLE® AGT3 Digital Gold & Platinum Tester
COMPLETE OWNERS MANUAL
CONDITIONS FOR IDEAL OPERATION:
The AuRACLE AGT3 should ideally be used in the following environmental
conditions. By not following these instructions you could possibly risk
compromising the accuracy of the test.
· Use at Room Temperature: The AGT3 is capable of performing well in most any
normal or professional environment, with a room temperature of approximately
65-75F being the best. While it has proven to work just fine in temperatures
as high as 100F, ideally it is suggested to avoid using the AGT3 in extreme
temperatures so you may always obtain the best results.
· Test Dry Metal: The metal being tested must be dry. If the surface of the metal
is wet or has any type of surface moisture or chemical contaminates it may not
test correctly.
· Test Clean Metal: The metal being tested must be clean of any obvious dirt or
chemical contaminants that might interfere with the electro-chemical reaction
between the pen probe and the metal. The tester may be used otherwise with
minimal concern for normal or light surface dirt.
AuRACLE AGT3 ADVANCED FEATURES:
· Identifies the karat of 6K-24K yellow, white, green and pink gold with a non
destructive test
· If simple steps are followed, identifies non-gold, gold plate and gold filled
material as Not Gold
· Identifies platinum
· Tests most any size piece of gold and platinum jewelry
· Fast test results may be achieved with no waiting between tests
· NEW Enhanced software
· NEW Durable nickel plated stainless steel testing plate
· NEW Easy one-step calibration using 14K or 18K yellow gold
· NEW LCD display shows both gold karat value and gold percentage
· NEW Dual testing modes
· NEW Smart two button operation
· NEW Test results are indicated on a large dynamic alphanumeric LCD display
· NEW Pen test and battery life indication functions
· NEW Data port
· Replaceable pen probe provides thousands of tests if used properly
· Pen probe uses no messy gel, no staining chemicals and no dangerous acid
· Low battery and pen probe replacement indication
· Portable with both AC and battery power capability
· Includes: AGT3, pen probe, file, 9V alkaline battery, AC adaptor, rubberized
carrying case with handles and built-in storage compartments for 10K, 14K,
and 18K gold samples (not included)
· Designed in the USA - Made in Singapore
· One year limited factory warranty – CE
GemOro AuRACLE® AGT3 Digital Gold & Platinum Tester 10
AuRACLE AGT3 Diagram:
11
12
1
3
2
13
7
6
8
1.
2.
3.
4.
5.
6.
7.
8.
9.
10.
11.
12.
13.
LCD display
Power/Mode button
Calibration button
Data port
AC receptacle
Testing plate
Pen probe
Pen probe protective cap
Pen probe male connection jack
Battery compartment
Pen probe storage compartment
AC Adaptor
File
5
9
4
10
EASY OPERATION GUIDE & OWNERS MANUAL 11
SPECIFICATIONS:
· Working Voltage: DC 9V (1) × 9V alkaline battery (approximately 11.5 hours of
continuous use).
· Warm-Up Stabilization Time: Approximately 3 seconds.
· Ideal Working Temperature: Room temperature of 65F to 75F is best, although
at higher and lower temperatures it may work very well.
· Ideal Air Relative Humidity: 25% to 50%. As with any electronics, do not use
the AGT3 in or around water.
CAUTION:
Disassembling the AGT3 other than opening the battery compartment door for
battery replacement will void the warranty.
VIDEO OPERATIONAL INSTRUCTIONS:
Please go to www.auracletester.com or www.gemoroproducts.com
DETAILED OPERATION INSTRUCTIONS:
1. Battery and AC Adaptor Installation
Install the 9V alkaline battery as follows. First, always be mindful that the AGT3
is a delicate instrument and can be broken if it is not handled with care. Open
the battery compartment door located on the bottom side of the AGT3 by
pressing and then sliding the battery compartment door off with your thumbs.
Remove the battery connector and attach the supplied 9V alkaline battery to it
with the direction of the positive (+) and negative (-) polarity correctly positioned.
Reinsert the battery and wiring back into the compartment so that the door may
be replaced. Replace the battery compartment door. To conserve the battery life,
be certain to always power down the AGT3 when not in use.
2. Powering Up / Down
The AGT3 may be powered by either its AC adaptor or 9V alkaline battery. When
an AC adaptor is installed the AGT3 will automatically be powered by it while
preserving the battery life. Alternatively, if no AC adaptor is being used and the
battery is installed, the AGT3 will be powered by it.
To power up the AGT3 simply press the Power/Mode button. When the unit is
first switched on it will run a quick self-test, then it will immediately notice that
the pen probe has not been calibrated and will prompt you to do so. To power
down the AGT3 press and hold the Power/Mode button for more than two
seconds.
The display will indicate its power source on the first line, along with the
battery’s remaining power level if the battery is being used. The second line will
display a 5 second count down timer. If the timer reaches zero then the AGT3
will power down. Pressing either button during the count down will abort the
count down and return the AGT3 to normal operation.
GemOro AuRACLE® AGT3 Digital Gold & Platinum Tester 12
LOW BATTERY INDICATION
When the battery power drops to a low level, a “B” will start flashing on the
lower right side of the display indicating that a new battery should quickly be
inserted to ensure maximum testing accuracy.
MODES OF OPERATION
The AGT3 has two testing modes of operation that are described below. Press
the Power/ Mode button to toggle between these modes: Fast Test Yellow and
Enhanced Mode.
Fast Test Yellow
This mode is meant to give the quickest reading on gold, and due to this
convenience it will likely be the most often test mode used. While in the Fast
Test Yellow mode the AGT3 will perform exceptionally well especially when
testing yellow gold, while in rare cases it could potentially perform with a slightly
lesser degree of accuracy when testing the other colors of gold. The display
will indicate either 8K, 10K, 14K, 18K, 22K, or 24K depending on the gold being
tested.
Enhanced Mode
Enhanced mode is the AGT3’s high-resolution mode that will indicate gold
value measurements in 1K increments, with a general accuracy of +/- 1 karat.
This is the most accurate of the two testing modes. Please read the section on
INCREASING ACCURACY to get the full benefits from this testing mode.
SMART TWO BUTTON CONTROL FUNCTIONS
Power/Mode Button (Left)
Pressing this button will toggle between the two operating modes, Fast Test
Yellow and Enhanced Mode.
By pressing this button for more than two seconds the remaining battery
capacity will be displayed, wall power status, and then begin a shut down timer.
Pressing any key before the timer reaches zero will return the AGT3 to normal
operation.
CAL Button (Right)
By pressing this button the pen probe calibration process will be initiated. The
AGT3 may be calibrated using either a 14K or 18K yellow gold sample. Only
yellow gold may be used to calibrate this instrument. A short press of this button
allows the AGT3 to be calibrated with 14K and a long press for more than 2
seconds allows it to be calibrated with 18K.
PEN PROBE CALIBRATION
Before using the AGT3, it must be calibrated to the pen probe being used. It is
important to recognize that the chemistry in each pen probe is slightly different
EASY OPERATION GUIDE & OWNERS MANUAL 13
and that it is constantly changing over time as it is exposed to gold and other
metals, contaminants, the environment and dirt. As the chemistry in the pen
probe changes it may become necessary to recalibrate the AGT3 to the pen
probe’s chemistry at that time, which is simple to do.
You may either use a 14K or an 18K gold sample to calibrate the AGT3, but the
gold must be filed just prior to doing so. A short press of the CAL button will
initiate a 14K calibration and a long press for more than two seconds will initiate
an 18K calibration. The calibration process can be performed in either operating
mode at any time, and will return to that mode once complete. When initiated, a
countdown timer will appear on the lower line of the LCD display. Place the gold
you are using to calibrate the AGT3 on the testing plate with the filed area facing
up. Steadily touch the end of the pen probe’s felt tip to the filed area on the gold
and once the process has been completed the LCD display will read “Success!”.
The AGT3 will wait approximately 8 seconds for the pen probe to touch the gold
calibration sample and if this is not done within that period the process will be
aborted. Once the pen probe touches the gold sample, the AGT3 will monitor
the readings and wait for stability before it will be considered a successful
calibration. If the pen probe’s reading doesn’t stabilize within 20 seconds, the
operation will fail and abort. A failed calibration does not indicate a defective
pen probe. Pen probe stability times are determined by many factors. Please
read the section INCREASING ACCURACY below.
INCREASING ACCURACY
Overall AGT3 accuracy is affected by both pen probe calibration and its usage.
The same tips apply for each.
· An accurate pen probe calibration is absolutely essential to ensure testing
accuracy. Calibration on a 14K sample is generally fine for testing most gold
jewelry that is less than 18K. If you are testing gold jewelry that is 18K
and above it is strongly advised to calibrate the AGT3 with an 18K
sample. This will optimize the AGT3’s ability to test the upper karat ranges as
they are the most difficult to discern.
· If the pen probe has been idle for more than a few minutes, it may take a
longer time to “charge” itself, potentially resulting in an instability failure of
the calibration process. In this case simply perform the calibration process a
second time. Having an adequate electrically charged pen probe is essential
in the calibration and testing process. Please note that each time the tester is
used it electrically charges the pen probe.
· Try to keep the pen probe in a vertical position the entire time it is in use,
especially just after a calibration has been performed.
· Wipe the pen probe’s felt tip on a clean and dry paper towel just prior to
performing a calibration.
· Clean the area on the metal being tested using the included file or other
abrasive tool just prior to performing a calibration and test.
GemOro AuRACLE® AGT3 Digital Gold & Platinum Tester 14
· Use a steady and very light pressure on the tip to the sample. Slightly more
than the weight of the pen probe is usually enough. Be gentle and apply
constant light pressure. This is especially important when reading the upper
karat ranges of 18K and above. Use the same pressure and pen probe angle
as used during the pen probe calibration process.
· The amount of contact area between the pen probe and gold being tested can
be crucial to obtain the most accurate readings. For example, if you touch the
tip of the pen probe to a flat area on the calibration sample during calibration
process, make sure to touch the pen probe to a flat area on the sample being
tested. Measuring along a sharp edge may result in errors if the pen probe was
calibrated to a flat area.
· Try to keep the pen probe as vertical as possible to the metal using only the
very end of the felt tip. Touching the pen probe to the sides or lower parts of
the felt tip or by applying excessive pressure can cause a variety of problems
that may impact the calibration and test results.
· You may begin performing your tests after the calibration has been performed.
It is recommended that you leave both your “unique” calibration piece and gold
to be tested on the testing plate at the same time, simply going from one to
the other while being mindful not to mix up your calibration piece with the gold
being tested. Somehow tagging your calibration piece might be a good idea in
order to keep it segregated.
· Calibrate only as needed, and always calibrate using an 18K sample if higher
karat values are to be tested.
PEN TESTER
A pen probe testing function has been included in the AGT3. It will allow you
to test the viability of your pen probe using a 14K yellow gold sample. To enter
this mode, press and hold both smart buttons until a “-“ is displayed and then
release the buttons. Now press the Power/Mode button on the left to start the
tester. The display will show “Pen Tester”, display its testing criteria, and then
the prompt “Test Pen” will be shown.
Using a 14K sample, simply touch the pen probe to the 14K yellow gold to begin
the test. The AGT3 will monitor the pen probes charge up until it stabilizes. It
will either PASS or FAIL the pen probe based on the amount of time it took to
stabilize, and whether or not the reading was within an acceptable range. For
now, the pass criterion is to have the pen probe test read within 230mv-480mv
and stabilize within 25,000ms (25 seconds).
If the test passes, the results will be displayed on the screen. Press any button
to return to the “Test Pen” prompt where you can run another test or exit the pen
tester function.
If the test fails it will display the results on two consecutive screens. Press any
key to get past each screen until you return to the “Test Pen” prompt.
Note: Depending on temperature and other factors, a pen probe may take longer
to stabilize than is allowed for in this test, especially the first time it’s tested
EASY OPERATION GUIDE & OWNERS MANUAL 15
during the session. In this case, just re-run the test. The display shows live
readings during the test. With a little experience it is easy to judge if a pen probe
is malfunctioning. The test may be repeated as many times as necessary.
You can exit this mode by holding both keys down for a few seconds while the
display is showing “Test Pen”. The unit will resume normal operation.
USE COMMON SENSE BEFORE INTERPRETING THE TEST RESULTS.
You should always follow some common sense guidelines before making your
final determination of the karat or authenticity of the precious metal being
tested. Please keep in mind that those misrepresenting fake jewelry as real can
be extremely clever and will use many tricks to make you think it is real. Be
aware that scam artists may allow you to test a real piece of gold jewelry and
then while distracting you they will switch the piece for a fake.
Some Common Sense Guidelines
GUIDELINE A. Check the markings on the piece for a karat stamp (10K or .417,
14K or .585,18K or .750, 22K or .916, 24K or .999, GF or gold filled, GEP or
gold electroplated, YGF or yellow gold-filled, HGP or heavy gold plated, RGP or
rolled gold plated, etc.) and then if when tested the results indicate anything to
the contrary, the metal should be suspect.
GUIDELINE B. Be aware that any piece that tests as Not Gold is not gold.
GUIDELINE C. Check the weight of the metal you are about to test and if it
seems too light, while it could be hollow gold, it should be suspect as it is likely
costume jewelry, gold plated or gold filled. Gold is a dense metal and has an
associated greater weight than most other non-precious metals. Platinum is an
even denser metal than gold, while weighing approximately 1/3 more than 18K
gold.
GUIDELINE D. Check the color of the gold, and be aware that non-gold
base metals are often gold plated with 24K gold to enhance its color and
consequently the gold color will look too yellow. Since 24K gold is a rich yellow
color and this pure gold is very uncommon in jewelry, any rich yellow gold color
should be suspect. Look for tarnishing or variations in the color and finish of the
jewelry as a sign of it being a fake.
GUIDELINE E. Check the clasp used on the jewelry. Costume jewelry often
has a spring ring style clasp and this should be suspect. Karat jewelry more
often than not will have a lobster style clasp. Do not test the clasp only as it
is common for a karat gold clasp to be attached to a fake gold necklace or
bracelet in an attempt to fool you.
GemOro AuRACLE® AGT3 Digital Gold & Platinum Tester 16
While these facts and common sense guidelines will prove to be very
helpful when buying gold and platinum, they should not be your only
tools to determine the authenticity of the jewelry in question.
WARRANTY
Your AGT3 features a ONE YEAR LIMITED WARRANTY against defects in
materials and workmanship as determined by the factory. The pen probe is
covered by a 30 DAY LIMITED WARRANTY against defects in materials and
workmanship as determined by the factory. The pen probe is not covered
against overuse, misuse and drying out due to the user not replacing the
protective cap after use. The battery is not covered by this warranty. These
warranties become effective from the date of original purchase after the
purchaser fills out the WARRANTY REGISTRATION FORM at
www.gemoroproducts.com/warrantyregistration within 30 days of its purchase.
The purchaser shall incur the cost for return postage, insurance and handling
for all warranty and non-warranty repairs and/or replacements. Warranty repairs
and/or replacements will be shipped back to the customer FOB Destination to
the location of the customer’s choosing if located within the Continental United
States (U.S.). Non-warranty repairs will be shipped back to the customer FOB
Factory. Should the customer require the repair and/or replacement unit to
be shipped outside the Continental U.S., the customer will be required to pay
any related shipping charges and any related taxes/duties for the respective
destination country regardless of whether it is a warranty or non-warranty claim.
EASY OPERATION GUIDE & OWNERS MANUAL 17
GemOro AuRACLE® AGT3 Digital Gold & Platinum Tester 18
EASY OPERATION GUIDE & OWNERS MANUAL 19