1
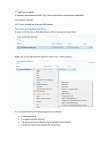
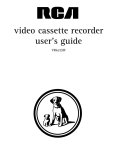
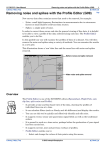
BitLocker To Go – USB Flash Drive encryption – User Guide
Introduction
BitLocker To Go is a new feature of Windows 7 which allows encryption of easily misplaced
portable storage devices such as USB Flash Drives and external hard drives. Encryption is a
way to enhance the security of a message or file by scrambling the contents so that it can be
read only by someone who has the right encryption key (password) to unscramble it.
Encryption is used when you want a strong level of protection for your information. With
the increase in the use of very small, large capacity USB flash drives the potential for
sensitive data to be lost or stolen has become more of a concern.
BitLocker allows you to encrypt a USB flash drive/external hard drive and restrict access
with a password. Without the password, the USB drive is inaccessible. When you connect a
BitLocker encrypted USB drive to a Windows 7 computer you will be prompted for a
password, after entering the password correctly you can read and write to the drive as
normal.
Turning on BitLocker To Go on a USB Flash drive on Windows 7
•
First open up My Computer and Right-click on the flash drive you want to encrypt
and select Turn on BitLocker.
•
BitLocker will then initialise the drive. A window will be displayed as follows:
•
After BitLocker initializes the flash drive you will be asked to choose how you want to
unlock the drive. Select the first option: Use a password to unlock the drive. As
detailed passwords should contain upper and lowercase letters, numbers, spaces
and symbols.
•
Next you will be prompted to store the recovery key in the event that you forget
your password. Ensure that you don’t store the recovery key on the drive you are
encrypting. We recommend that you store the recovery key on your personal H:
drive so that it is backed up on the network.
•
After you save or print the recovery file you will see a confirmation message. The
following screen with then be displayed. Click start encrypting to begin the
encryption process.
•
While the drive is encrypting a status bar will be displayed:
•
A notification will be displayed when encryption is complete. Note that the drive
icon will change to indicate that it is now encrypted with BitLocker.
•
Now when you open my computer you will notice that the lock icon is displayed in
grey – indicating that the drive is unlocked.
•
When you right click on the drive and select Manage BitLocker, options are
displayed as follows:
Using a BitLocker To Go encrypted drive in Windows 7
•
The next time you insert your USB flash drive into a Windows 7 PC you will notice
that it is displayed with a gold lock symbol – this indicates that the drive is locked.
•
When you insert your USB flash drive into a Windows 7 PC you will be prompted to
enter the password you created in order to gain access to the drive. If you want you
can also select the option to automatically unlock this drive on this computer.
Using a BitLocker To Go encrypted drive in Windows Vista or Windows XP
You can also use your encrypted flash drive on PCs with Windows Vista and Windows XP.
When you insert your flash drive you will be prompted for the password to launch BitLocker
To Go Reader (the utility is automatically installed on your USB Flash drive when setting up
encryption). Please note that a BitLocker encrypted USB Flash drive will be a read-only
device when using them with Vista or XP environments
•
When you insert your USB Flash Drive into a Vista/XP machine you will see the
following auto play pop up – click open folder to view files
•
This will open an explorer window with the BitLocker To Go Reader software (as
stated above this is automatically installed when you set up encryption on a
Windows 7 machine)
•
Click on the BitLocker ToGo application to install the BitLocker ToGo Reader
software.
•
You will know be prompted to enter your password to unlock the drive
•
BitLocker To Go Reader will now open as a Windows Explorer type navigation utility
for showing the content of the drive as shown below:
•
When you open any of the files stored on your drive you will be presented with the
following option:
•
You can only copy files from your USB flash drive onto the Vista/XP machine. You cannot
save anything back to the drive. It is read-only. To edit documents and save them onto the
USB Flash Drive you need to use a Windows 7 machine.
Recovering encrypted USB drive using BitLocker recovery key
•
If you forget the password for the encrypted drive, the BitLocker recovery key which
was either saved or printed when setting up encryption will enable you to unlock the
drive and create a new password.
•
Insert your USB Flash drive into a Windows 7 machine and click on I forgot my
password as shown below:
•
Now click on Type the recovery key as shown below. This should have been either
printed or stored on your H: drive (or both) at the time of setting up encryption on
your USB Flash drive.
•
Enter the BitLocker recovery key and click next. If you saved the recovery key in a file you
can simply copy and paste it.
•
You will now have temporary access to your drive. Click on Manage BitLocker
•
You will now see several options. Click change password to unlock the drive
•
Type in a new password and click next
•
Confirmation will be displayed advising that you have succesfully changed your password.
You should now be able to use the drive as normal.
What to do if you forget your password and loose your recovery key
If you forget your password and loose your recovery key unfortunately you will loose the
data forever as you will be unable to unlock the drive. Therefore it is essential to both
memorise your password and also keep the recovery key stored in secure location (as
mentioned before IT Services recommends your H: drive where it will be backed up on the
network).
If you have forgotten your password and lost your recovery key but would still like to use
your USB flash drive you can format the drive by following the instructions below.
•
Right click on the USB drive icon and select format
•
The following windows will appear. The file system should be the default (FAT). Click
on start to format the drive. This will erase the drives contents.
•
A warning will appear advising you that formatting will erase all data. Click OK to
continue.
•
When formatting is complete a pop up box will be displayed:
•
Click on close. You will now be able to access your USB flash drive as normal.