1
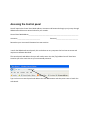
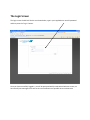
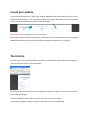
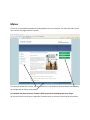
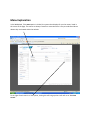
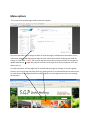
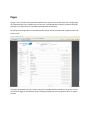
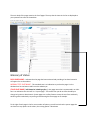
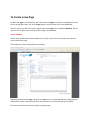
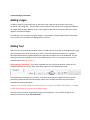
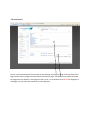
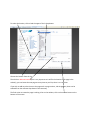
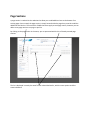
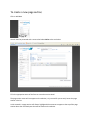
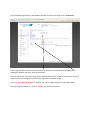
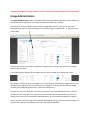
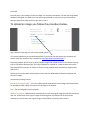
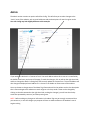
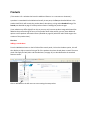
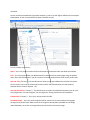
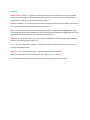
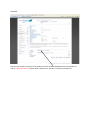
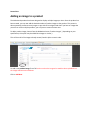
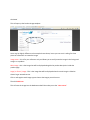
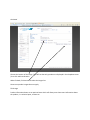
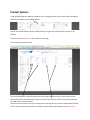
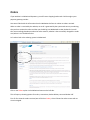
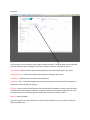
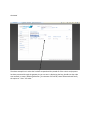
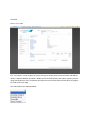
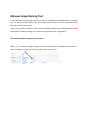
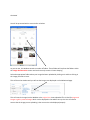
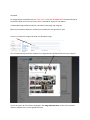
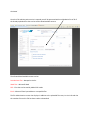
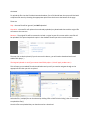
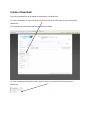
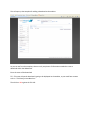
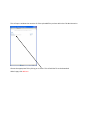
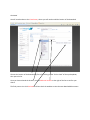
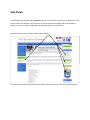
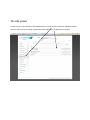
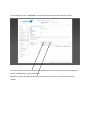
User Guide
Webwizard User Guide
This user guide is designed to help you understand our Webwizard Content Managed System.
Web wizard is a powerful content managed website control panel that has been fully designed in house
and is under constant development to bring you the latest in technology and features.
Webwizard Overview
The wizard, as its name implies has been designed to allow you, the customer to quickly and easily make
changes to your website real time without causing any “down time”.
We are constantly adding new functionality to the system and strive to keep the CMS up to date with
the latest requirements at all times.
There are 3 points to remember when creating new items within the system.
This can be referred to as the three 8’s procedure.
The three 8’s are –
Create
Locate
Activate
If you can remember this procedure then you are more than halfway there !
Please remember now that you have your access details to the webwizard, this is the Start of your
relationship with Wida Group Ltd and not the end.
Call us on 0115 9214797 and we will be happy to help.
Accessing the Control panel
You will require the Control Panel Web Address, Username and Password to begin your journey through
Webwizard and these are written below for your records:
Control Panel Web Address______________________________________________________________
Username ____________________________
Password___________________________
Remember your Username & Password are case sensitive.
Launch the Webwizard control panel, this can be done on any computer that has internet access and
requires no software download.
The control panel web address that you will need to enter into the (Top) address bar will have been
issued to you at the same time as your username & password.
Type in the correct control panel web address into the web browser and then press enter to launch the
web wizard.
The Login Screen
The login screen should look like the one shown below, type in your supplied user name & password
and then press the “log in“ button.
Once you have successfully logged in, you will be presented with the web wizard welcome screen, on
here we will post messages from time to time and notifications of possible server maintenance.
Launch your website
If you have not already done so, launch your website. Webwizard will automatically launch the correct
website by clicking on the “ VIEW “ wording at the top of the page. If the website is still on the preview
server you may be asked for a password to view the website.
Enter Preview1 as the password ( this is case sensitive )
By having the website launched and available, you will be able to see the changes you make through the
Webwizard immediately after you have refreshed the page on the website ( by pressing F5 ).
The Controls
All of the controls for the Webwizard are located in the menu down the left hand side of the page and
should initially look similar to the image below.
By clicking on each of the options, they will expand to reveal further options and the controls to allow
you to make the changes.
A standard Webwizard menu will look similar to the one in the picture above.
On the next few pages we will go through the various functions of the Webwizard.
Content
This is an example of what your website could contain
The information contained in the brackets () after the option indicates the quantity of each item that has
already been created. In the example above, this website has 22 pages that have been created.
Menus
The menus in the Webwizard websites are designated areas on the website. The items that make up the
menu content are pages within the system.
This example website has 3 menus, the main menu which is located on the left hand side, the secondary
on the right and the footer at the bottom.
Your website may have the menus located in different positions depending upon your design.
All menus work in the same way, irrespective of whether they are vertical or horizontal on the website.
Menu Explanation
In the Webwizard, if the menu option is clicked, the system then displays for you the menus, listed in
the centre of the page. The menus are always named in a convention that is easy to understand where
abouts they are located within the website.
To the right of each menu is a view option, clicking this will bring up what I will refer to as “the view
screen”.
Menu options
This screen will show what pages make up the menu options.
This screen will allow you to change the order in which the pages are displayed on the website. This is
achieved by dragging and dropping the pages into their new order and then confirming that order by
clicking on “save order” ( NOTE, you can only drag the items when the mouse pointer has changed to a
double ended arrow, to get this, position the mouse to the right of the item you want to move. Not
directly over it )
To create sub menus, the new pages will be located inside the page, for example, if you were garden
services, your services page may have Servicing, cleaning and so on, these would be the sub menu items.
To create these, the new pages would be located inside the services page not the menu, thus creating
the sub menu.
Pages
A page is a very versatile item type within Webwizard, it can be used to build simple text / image pages
on the website right up to multiple layer menu items. It all depends what content you add to the page
and where you locate it within the website which dictates its behaviour.
By clicking on the Pages option in the Webwizard menu you will be presented with a page that will look
similar to this
The page is presented to you as an alpha numeric list of pages already entered into the system. Across
the top of the page are the different ways of finding your page that you may want to edit or change in
any way.
The main body of the page contains the list of pages. The way that the items in the list are displayed to
you represents its status in the website.
Glossary of status
BOLD PAGE NAME – Indicates that the page has been activated and providing it has been located it
will appear live on the website
NORMAL TYPE PAGE NAME - This standard text is an indication to you that the page is in the
database but has not been made live on the website yet.
ITALIC PAGE NAME ( will always be in bold type face ) – Any page name that is represented in an italic
font is an indication that this item is a “system page”. This means that you do not have the ability to
change its location or deactivate it. System pages are a safety feature to stop the user from accidently
switching off the website by say moving or deactivating the Home page as an example.
To the right of each page in the list are a number of options, you will notice that the system pages do
not have as many options as the others, the missing option is deactivate.
The options and what they do....
View
This is the most important option within the Webwizard, the screen is split into 2 parts, the top part
shows a brief overview of the main content of the page, including its name, any thumbnail images and
the main body text that may appear on that page. The bottom part of the view screen shows the
location of the page within the website and whether that page contains any additional items such as
page sections top or side images, videos and downloads if you have them available in your package. All
optional extras available to purchase and add to your website after “go live” are listed in the back of the
user guide.
Edit Details
This page will allow you to make changes to the page name (system pages excluded), page title, override
title and description if applicable, thumbnail and in text images and the main body text. Once the
changes are saved on an active and located page, the new information will immediately be viewable on
the website.
Deactivate / Activate
A page that is active on the website will have the option of Deactivate and a non active page will be
given the option to activate. This essentially switches the page on and off from the website.
More
Within the more option we have 1 or 2 further options depending whether the page is active or not.
When the page is active we have Lock, which when selected will remove the Edit details option to
prevent accidental changing of the page. When the page is not active, the additional option is Delete.
You CANNOT delete an active page within Webwizard.
To Create a new Page
To add a new page to the website you will need to have the Pages area open on the Webwizard, if this
has not already been done, click on the Pages option on the left hand menu in the Webwizard.
Once this is open you will see 2 options appear underneath Pages, they are List and Add New. The List
option shows an alpha numeric listing of all the pages in the database.
Click on Add New
You will be presented with a blank template for you to fill in with all of the necessary information to
create a basic blank page.
The template will look something like this (example )
Depending on whether this page is going to be a menu item or a fully populated text / image page will
all depend how much information you enter here and where you locate the page once finished.
The minimum information you need to give is the page name.
Create new page ( continued )
Adding images
To add an image to a page simply click on edit next to the image you wish to add ( this may be a
thumbnail, main image etc ). This will launch a new window that shows all of the images uploaded into
the image administration database. Click on the image that you wish to use and you will see its name
appear in the webwizard page.
Your website may have options for other images i.e. side images, multiple images which will be unique
to you, however the procedure for adding them is the same.
Adding Text
Add your text into the body text window ( there is a 4000 character limit that can be displayed per page,
please be aware of this when entering your content. We recommend that all body text is created in
Microsoft Word and then copied and pasted into the body text editor area of the webwizard. This will
always give you a copy should you over run the 4000 character limit. If you require more text to be
displayed please see Page Sections )
Note Important information – if you have composed your text in Microsoft Word or similar then it is
recommended that you use the “Paste from Word” option on the webwizard text editor
The reason we put it through the text editor is that Word processors will embed into the text special
formatting commands that wreak havoc with website text. The body text editor will remove those
embedded formatting commands.
Under no circumstances should you attempt to paste an image into the BODY TEXT EDITOR. For adding
images please follow the instructions for adding images.
Once you have entered the required information click on Add Item. This will add the page to the
database and will then open “the view screen”.
“The View Screen”
You can see the split between the 2 sections on this example, the top part being a brief overview of the
page content and any images that have been used inside the page. The bottom part is where we locate
the page within the website. A new page will state –none—as the location which MUST be changed to a
valid page or menu within the website for it to be displayed.
To select the location, click to load the upper of the 2 drop downs
Choose the location from the list.
Then click on add new location (this is very important as it will fix the location of the page in the
website), you can locate the new page as many times as you like, there is no restriction.
If you wish to add any other items to the page such as page sections, side images etc, these can be
selected from the contents drop down in the same way.
The final action to create the page is making it live on the website, click on the activate button at the
bottom of the screen.
Page Sections
A page section is used within the webwizard to allow you to add additional text to the bottom of an
existing page. Once created, the page section is simply located inside the page that you wish to add the
additional text block to. The same limit of 4000 characters apply to each page section, however you can
add as many page sections to a page as you like.
By clicking on the page section in the menu, you are presented with the list of already created page
sections.
The list is displayed in exactly the same format as described earlier, with the same options and font
status indications
To create a new page section,
Click on Add New
You will then be presented with a screen that looks similar to the one below
Fill in the appropriate areas of the form to create the section detail.
The page section name will not appear on the website, it is just used for you to easily locate the page
section in the list.
A title entered in a page section will allow a highlighted title sentence to appear at the top of the page
section above the main body text that will be shown on the website.
Continued
A page section can, similar to the pages display an image within the body text area that is shown on the
website. You have the ability to display this image in the top right, top left of the text area with the text
wrapping around the inserted image. The other two image position options are centre which will
centralize the image at the top of the text box displayed on the website and the main body text will be
shown underneath the image and block which behaves in the same way as centre except that the image
is displayed on the left hand side and effectively blocks the area off to the right of the image, with the
text being displayed underneath.
Please note that the main image, inserted using the above procedure will be displayed on the website in
the size it was originally uploaded. Make sure it will fit the page, if not resize and re upload the image.
The main text of the page section is entered into the body text section, this offers the same options as
the page, whereby you will have the option of making changes to the style of text, adding hyperlinks etc.
Under no circumstances should you attempt to paste an image into the BODY TEXT EDITOR. For adding
images please follow the instructions for adding images.
When complete press Add Item.
This will add the page section to the database and take you directly through to the “view screen”.
On this page you will see a brief overview of the page content in the top half and the bottom part is
showing the location and active status of the section.
To locate the section, click on the upper of the two drop down menus to load its content, then click and
select from the list the page that you want this page section to appear inside.
You MUST click “add new location” to confirm your chosen page and assign it to this page section.
The final thing you need to do is click on “activate” to make the section live.
Important information on image copywrite can be viewed on the Welcome page of your control panel
Image Administration
The Image Administration section of the Webwizard is where uploaded images are stored. It allows you
to upload all of the images that you require to be displayed within your website.
There will be a number of folders contained within image administration, these are for your house
keeping and they will be named according to the areas the images are destined for. i.e. a folder may be
called “page”.
Once you have chosen your folder to upload your images into by clicking it you will be shown a page
similar to the one above.
It is an alpha numeric listing of all the images that you have uploaded into that particular folder.
Each image is listed by its name as uploaded ( It is a worthwhile job renaming any images that are to be
uploaded from a digital camera to something more meaningful, as the camera will name the images
something like DSC01229.jpg which has no informative description ).
The next item is the size of the file in Kb. Bear in mind that if a file is uploaded directly from a camera,
the file size of the image will be so large that it will be unusable. We recommend that you resize any
images to the correct size in pixels before uploading them ( we can provide these details if required ).
You can preview any of the images that have been uploaded by clicking on the small preview image. This
will show the image in a new window at the size it was originally uploaded.
Continued
The final entry is the number of times the image is in use within the website. The way the image admin
database is designed is to allow you to use any image uploaded as many times as you wish without
having to upload the image each time you want to use it.
To Upload an image you follow the procedure below.
At the bottom of the page you will see the upload options.
It is recommended that you use the batch upload ( if you cannot see this button your computer will
need to have flash installed. This is available at http://get.adobe.com/flashplayer/ )
The batch uploader will allow you to select multiple images and upload them all in one session by using
shift or CTRL whilst selecting them. The original uploader is retained for customers who cannot have
flash installed for one reason or another or they are using a web browser that does not support flash,
(Mac users )
Before you choose the Batch Upload, please choose how the Webwizard will deal with duplicate file
names on images.
You have the following choices:
Overwrite the original image – This is the default option any duplicate named images will automatically
be uploaded and will replace all instances of the image in the website.
Skip – The new image will not be uploaded
Rename The original – Webwizard will automatically rename the original image and will then upload the
new one. All instances of the original image will be changed on the website for the new version,
however you will still retain the original image in the database, should you want to use it.
Admin
The Admin section contains an option called Site Config. This will allow you to make changes to the
“static” parts of the website, such as email addresses and site descriptions for search engine results.
Your site Config may look slightly different to this example.
If your website is built with a “contact us form” the email address where this is sent to is controlled by
the default email entry at the top of the page. To make the changes, click on edit on the right hand side
and then change the details. Pressing Save will instantly update the contact form. This email address will
also change the displayed email address if it is shown in the header or footer areas of the website.
You may choose to change some of the Meta Tag information within the website such as the description
that is returned against the website on search engines or the key words. These can be changed by
clicking on the edit command to the right hand side, making the changes ( you will see that the key
words are separated by commas ) and then pressing save.
NOTE - Before making any changes to information in the Meta Tag area we strongly recommend that
you contact us, in case the changes you propose will have an adverse effect on the website’s search
engine ranking
Products
( This section is for websites that have this additional feature i.e. e-commerce or showcase )
A product is created within the Webwizard usually in two parts, the first part detailed below is the
product itself which will contain the product detail, description, pricing and a thumbnail image, The
second part detailed on page 27 of the product creation is adding the product images.
( Your website may differ slightly from this as you may only have one product image which would be
added to the product during the entry of the product detail. Alternatively you may have additional
options such as product information boxes ( detailed on page 29 ) which will add a third stage to the
creation of the product item ).
First Part
Adding a new Product.
From the Webwizard menu on the left side of the control panel, click on the Products option, this will
then display an alpha numerical listing of all of the products that have already been created. The same
visual rules apply for Bold, Italic and Standard text ( see page 10 ) as described under the standard
features section.
Click on Add New on the left menu to start creating the new product.
Continued
You will now be presented with the product template. ( Yours may look slightly different to the example
shown below, as you may have different options available to you )
Fill in the details as necessary :Name – this is the product name and will be displayed on the website under the detail entered here.
Title – This is an optional field, the Webwizard will by default title the product page using the product
name. Enter information here if you do not want to have the product name shown as the product title.
Override Title ( if shown ) - The override title will allow you to enter additional text which will replace
the text shown in the top bar of the web browser and the Tabs if displayed in your web browser,
example above is Internet Explorer. ( IE )
Override Description ( If shown ) – This will allow you to replace the default description as set up in the
site configuration ( for search engines ) for this page only. Leaving it blank will use the defaults.
Product Code ( If shown ) – This is your unique product ID code
Thumbnail Image – This is the small image that will be used to link from the products listing pages
through to the product itself. Make sure that the image has already been uploaded into the Image
Admin database ( see section on Image Admin) then click edit to choose the image.
Continued
Option Label # ( If shown ) – The option names will allow you to have different versions of a product
shown on the same page i.e. different colours, sizes etc. If you are using the colour option the label
name which is displayed on the website would be “Colour”
Option # ( If shown ) – this is where you will list the options that match the option label. i.e. Red, Green,
Blue. Type each option then click Add to enter it into the list.
Price – This is the normal price that a standard item will sell for, enter the amount without the £ sign.
( for example: £56 should be entered as 56.00 ) If you have options and want to display different prices
based upon those selected see the “Edit Options” section below.
Old Price – This is used for “Sale” items, the old price is displayed on the website and scored through
with the” price” being displayed next to it.
Note – if you are using the item options to create a price table, you do not need to enter any prices in
the Price and Old Price fields.
Body Text – This is where you will type in the main description of the product.
When you have entered all of the information you require, click on “Add Item”
This will enter the product into the database and will then take you to the view screen.
Continued
Here you can choose the location of the product from the locations dropdown menu ( Remember to
click on “add new location” and then when ready click on “Activate” to make the product live.
Second Part
Adding an image to a product
The Webwizard products have been designed to display multiple images per item. Once the product has
been created, you can now add the desired number of product images to the product. This process is
done separately to allow as many images as you wish to be assigned and also if you have an image that
you wish to use for multiple products, you only have to create the item once.
To add a product image, choose from the Webwizard menu “Product Images”, ( depending on your
specification, this option may be called Extra Images or similar ).
This will show all of the images already created, listed in alpha numeric order.
To Add a new product image, first of all make sure that the image to be used has been uploaded into
the Image Administration database.
Click on Add New
Continued
This will open up the Product image template
Yours may be slightly different to the example shown above, but as you can see it is asking for three
pieces of information to create the image.
Image name – this is for your reference only and allows you to easily locate the image in the listings and
assign it to a product.
Main Image – this is the image that will be displayed alongside the product description inside the
product page.
Large ( or Zoom ) image – This is the image that will be displayed when the main image is clicked to
show a larger zoomed version.
Click on edit against each image type to choose the images you wish to use.
Then click Add Item
This will save the image into the database and will then take you to the “view screen”.
Continued
Choose the location of the image, ( You will see that only products are displayed in the dropdown menu
) then click add new location.
When finished, Click Activate to make the images live.
Content on product images does not apply.
Third stage
Product information boxes are an optional extra which will allow you to show more information about
the product, i.e. technical specs, reviews etc.
Product Options
If your website allows the addition of options when creating products you will have filled in the Option
Labels and created a list of available options.
You can use the Edit Options facility to add specific pricing for each selected option chosen on the
website.
To do this, Click on Edit Options at the bottom of the page.
This will show the options screen.
From each drop down, choose the option you wish to add a specific price to ( you can see from the
above example that this website has 2 options ), add the price and the old price if necessary and then
click add new to create the option.
Continue with the options until you are happy with the pricing matrix you have created. When finished,
click on the item button which will take you back to the product page and then press Save changes.
Orders
If your website is a Webwizard Supastore, you will have a shopping basket and a link through to your
payment gateway provider.
Here we will deal with the information that the Webwizard collects in relation to orders received.
When an order is received by the website, an email is generated by the system and sent to you advising
that you have received an order and that you should log into Webwizard to view the details. You will
then act accordingly based upon what the order contains, whether it has successfully charged the credit
card, where it is to be delivered etc.
Let’s take a look at the ordering system in Webwizard.
Click on the Orders option in the Webwizard menu on the left side.
This will open up showing options for orders, transactions, basket delivery rates and basket VAT.
First of all to view the orders received, we will click on Orders, this will show the orders screen with no
criteria assigned.
Continued
The first thing you will need to do at this stage is display the orders. The drop down menu underneath
the Order Administration wording will show you a number of options, These options will be : Unprocessed – Orders that have been received, payment successful and waiting for your action
Awaiting Dispatch – Orders that have been picked and are waiting to be sent out.
Processed – Completed orders that have been Dispatched
Cancelled – This is a manually assigned status that you would place the order into if for example you
processed a refund through the gateway.
Pending – These are orders that have been fully processed by the Website but have returned a failed
transaction from the Payment Gateway or no update has been received from the Gateway. As a rule,
any transaction that is still awaiting authorisation after 30 minutes could be a failure.
Returns – Returned goods
If you do not have any orders that fall into one of the above categories, then you will not have that
option available as yet.
Continued
The above example has 1 order that has been accepted and has passed all of the criteria and payment
has been processed through the gateway. As you can see it is displaying the Day, date & time the order
was received, its status ( Awaiting Allocation ), the Amount of the Order, Name & Postcode and finally
the option to “ View “ the order.
Continued
Click on View order
The “ View Order “ screen is split into 3 parts, the top part shows you the customer Name and Address
details, Telephone Number, and Email. Middle section the order details, description, quantity price etc
along with the delivery rate. The bottom part shows the current order status and the ability to progress
the order to the next stage.
The status options are displayed below.
Continued
Orders that are in the status of Pending have NOT been authorised by the card merchant services and
SHOULD NOT be processed through the Webwizard. We recommend that you telephone the shopper on
the number they provided on the order and ask them for other means of making payment for the goods
ordered and processing it using your normal way for taking payments.
Once payment has been received, you will be able to click on “manual” and then process the order
through the Webwizard as normal. The order status will then move to unprocessed.
Orders can be searched for by Order ID ( quickest ), Full Name or Postcode, The Webwizard will always
generate a confirmation email at the point of order to the customer which contains an order number.
To view the payment transaction details relating to any order, choose the transaction option from within
the Webwizard menu. You can toggle between failed and successful transactions.
Marquee Image Resizing Tool
To help with the resizing of images within your website, the Webwizard is equipped with a “ Marquee
Tool ” to allow you to easily select a part of an image which will be the correct size and aspect ratio for
the location within your website.
Areas in your website that do not have this facility enabled will display the standard Webwizard Image
Administration window allowing you to select the image directly from a graphical list.
The standard Webwizard image selection process.
When “edit” is selected to assign an image ( this can be anywhere within the Webwizard that has the
ability to include an image, such as a page, page section, product etc )
Continued
You will be presented with a screen similar to below.
As you can see, this window contains a number of folders. These folders will replicate the folders within
the image administration section and are there only to assist in house keeping.
Select the appropriate folder where your image has been uploaded by clicking on it and then clicking in
the image you wish to insert.
This will close the window and you will see the image name displayed on the Webwizard page.
This will insert the image into the Website at the original size it was uploaded. This is ideal for page main
images or gallery zoomed images which can be displayed in the website at any size. You will need to
ensure that the image you are uploading is the correct size to be displayed properly.
Continued
For images within the website that are “fixed width” in size, the “marquee tool” will automatically be
launched to allow you more control over what is selected for display on the website.
A fixed width image would normally be a thumbnail, side image, top image etc.
Below is an example of what you will expect to see when the marquee tool is used.
Press edit to select the image to be used as a thumbnail image
This will automatically launch the marquee tool image selection window which will simply “pop up”.
You will be shown all of the folders displayed in the image administration, similar to the standard
selection window, but in a more graphical format.
Continued
Any images that are displayed with an exclamation warning triangle at the bottom of the image will not
be suitable for this application as they are smaller than the minimum size required. If you want to use an
image that is not suitable, you will have to upload it into the image administration database again in a
larger size.
Select either the image or navigate to the image via the folders and then click on the image to select it.
You will then be shown the image on screen with the “marquee tool” asking you to select the area of
the image you wish to use.
To resize the selected area, drag the bottom right corner diagonally down until the desired width is
reached ( You will notice that the aspect ratio of the selected area stays constant. This is indicating the
shape of the location on the website ).
Continued
Here we have selected a larger area.
But as you can see we have cut off the persons feet. We have a lot of sky in this picture so we can simply
move the whole selected area down ( by dragging it ) until we show the correct part of the image.
Downloads
If your website is built with the option of having downloadable content such as price lists or specification
sheets, you will have on your Webwizard side menu two additional options.
These options are
File Administration
Downloads
The file administration section is where you will upload into the files database the documentation you
wish to make available as downloadable content. This material can be text or word documents, excel
spreadsheets or pdf files.
The “ downloads “ option is where you will give your download a name that will appear on the website,
choose the document you wish to use and then assign it to its location within the website.
Upload the files
The first thing we need to do is upload any documents into the Webwizard that we wish to use as
downloadable content.
This is done by chosing File Administration from the Webwizard side menu.
Continued
Once the File Administration section is opened you will be presented with an alphabetical list of all of
the already uploaded files that can be used as downloadable content.
The allowed downloadable content can be:
Standard text files – Notepad or similar
Word files – Microsoft Word
PDF – Files that can be read by Adobe PDF reader
Excel – Microsoft Excel spreadsheet or compatible files.
The file Administration screen also displays in addition to the uploaded file name, its size in Kb and also
the number of times this file has been used as a download.
Continued
To upload the files into the File Administration database, first of all decide how the system will deal with
a duplicate file name by choosing the appropriate option from the three at the bottom of the page.
These are
Skip – the new file will be ignored / and NOT uploaded
Overwrite – the new file will replace the one already uploaded, any downloads that used the original file
will now use the new one.
Rename – The original file will be renamed to include –original as part of its name and the new file will
be uploaded. This option keeps both copies in the database should you wish to use them both.
Then we click on Batch Upload ( If you do not see this button, you will need to download and install
Adobe Flash player. )
The Original uploader is used if you cannot install Flash player. ( this will apply to Mac users )
This will open your standard file selection Window and you will just need to navigate through to the
appropriate files that you wish to upload.
Select the file ( multiple files can be selected by holding CTRL or SHIFT whilst clicking ) then click on open
to upload the file(s).
Once the files are uploaded they can then be used as a download.
Create a Download
Any of the uploaded files can be added as a download in the Webwizard.
To create a download, we need to open the Downloads section from the menu on the left side of the
Webwizard.
This will display any downloads that have already been created.
To create a new download, we will need to click on the Add New option on the left menu of the
Webwizard.
This will open up the template for adding a download to the website
As you can see from the template, there are only two pieces of information needed to create a
download within the Webwizard.
Enter the name of the download
TIP – The name is how the download is going to be displayed on the website, so you could have a name
such as “ Click here for New Brochure “
Then click on edit against the File URL.
This will open a window that contains all of the uploaded files you have within the File Administration.
Choose the appropriate file by clicking on its name. This will add the file to the download.
When happy click Add Item
Continued
You will now be taken to the View Screen, where you will need to add the location of the download.
Choose the location of the download by first of all clicking on the “click to load” of the top dropdown,
then open the list.
Once you have selected the location, click on Add new location to the right of the list to confirm your
choice.
The final process is to click Activate and then check the website to view the new downloadable content.
Side Panels
If your website was specified with side panels, these are customisable “boxes” that are displayed on one
or both sides of the website. They will remain in view throughout the website and can be displayed
either as a text only, image or image and text depending upon your specification.
Examples of side panels are shown on the website below
This website has both left and right side panels and is showing a mixture of text only and image panels.
The side panels
From the menu on the left side of the Webwizard click on Side Panels to open the side panels section.
Here you will see a list of already created side panels displayed in an alphanumeric format.
To create a new side panel/or edit existing side panel
In the Webwizard, click on the option called Side Panels
This will then list all of the panels you have already created.
Click on Add New and you will then be shown the Side panel template ( yours may look slightly different
to the one shown below
Name – This is the name of the side panel
Title – If you do not specify a Title, the panel name will be displayed.
Main Image – This is to be used if the panel is to be displayed with an image as the link
Main Image Alt – The Alt or alternative description is used to add more information to the image used
for example if the image is of a bunch of roses you can specify here that they are a bunch of and
elaborate on the image.
Style –Depending upon your website design, the available styles will change the colour of the box
outline and the way the box is displayed. This will be specific to your website.
Link – The side panel can be configured either as an information panel that just displays either an image,
text or a combination of both, or as a link to another page, either internal or external to your website.
You will enter the URL link into this area.
New Window – This works in connection with the Link as above. By ticking the box will force the link to
open in a new window, stopping the user from closing your website when they close the link down.
Leaving the box empty will make the link open in the same window as your website, so ideal for internal
links.
Body Text – This is where you will type in the information that will be displayed in the side panel.
Type in the name of the panel ( this will be displayed on the website ) and give the panel a title if
required.
Then depending on whether your panel needs to display an image, you can choose the image to be
included by clicking on the Edit option next to the Main Image. This will launch the image library window
and will allow you to navigate through the folders to choose the appropriate image to use.
Enter the link url
TIP: if the link is internal to your website you can enter the link as the page name.
Example your page you want to link to is www.yourwebsite.co.uk/pages/promos then all you need to
enter in the link is /pages/promos
An external link will need to be the full url ( http://www.yourwebsite.co.uk )
Enter any body text you may want to use and then click on Add Item
This will take you to the ”view screen ” which will allow you to locate and activate the panel
To locate the panel, press click to load on the top drop down menu and then choose either side panels
right or left depending on your specification.
Remember to press the “add new location” and then finally “activate” to set the panel live on the
website.
Training Videos
Within the training video section, we have a number of videos produced real time outlining the most
commonly asked questions we receive.
These videos are available to you anytime you are logged into the Webwizard and launch in their own
window.
The videos have audio and speech bubbles for instruction and clarification.
Contact Us
The contact us section opens a contact form for you to make contact with us regarding any queries or
requests you may have outside of office hours. Pressing send will direct your question directly to our
developers.