1
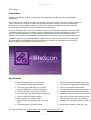
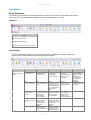
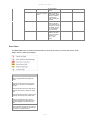
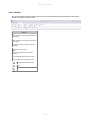
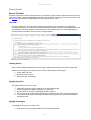
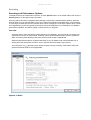
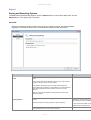
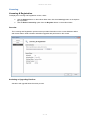
SiteScan User Guide Copyright © 2006 - 2015 by ByteShift Ltd. All Rights Reserved. SiteScan User Guide Table of contents Welcome ....................................................................................................................3 Overview ................................................................................................................3 Table of Contents ....................................................................................................5 User Interface .............................................................................................................6 Tool Ribbon ............................................................................................................7 Results Grid .......................................................................................................... 10 Properties Panel .................................................................................................... 14 Out-Links Panel ..................................................................................................... 15 In-Links Panel ....................................................................................................... 18 Images Panel ........................................................................................................ 20 Styles Panel .......................................................................................................... 22 Scripts Panel ......................................................................................................... 24 Emails Panel ......................................................................................................... 26 Source Panel ......................................................................................................... 27 Options ..................................................................................................................... 29 Scanning .............................................................................................................. 30 Export .................................................................................................................. 34 Licensing .............................................................................................................. 36 2 / 39 SiteScan User Guide Welcome Welcome Overview Table of Contents 3 / 39 SiteScan User Guide Overview Introduction SiteScan is a Windows desktop program which checks websites for broken links and analyzes page performance. From a starting URL, SiteScan will spider and analyze every page or file on a web site or intranet. It will find issues such as slow, mistyped or broken links and allow the user to drill down to perform detailed page analysis and locate the relevant code in the HTML source. Results a displayed in real-time and can be interacted with immediately as scanning continues in the background. Intuitive and ready to run out-of-the box, SiteScan is easy to use and highly configurable. It provides many user defined options such as scan depth, timeouts, scheme/protocol and file type exclusions rules. It runs from any Windows desktop PC or server and communicates directly with the website being scanned. SiteScan does not use any intermediate cloud based services during processing for complete data privacy. Available in both free and registered editions, SiteScan Broken Link Checker is licensed to an individual user with heavily discounted bulk licensing are available for corporate and educational users. The free edition of SiteScan is provided for non-business use. Key Features Spider websites for slow or broken links. Set spider speed, pause and resume. Find mistyped or badly formatted URLs Check any type of web page, file or media. Spider all hyperlinks or only first occurrence. Control scan depth, page & link count limits. Scan http, https, file, mailto & javascript schemes. Server & client-side redirect support. Spider intranet file:// linked content. Measure response, download and HTML load time. Review page titles, description and alt text. Export spider results to XLSX, XLS, CSV. Set timeouts to highlight slow loading pages. Save, load & refresh existing results. View all in-links and out-links for any page or Highlight results with conditional formatting. Work with results in real-time during scannin Sort, group, search & filter results like Excel. One-click filtering for all errors & warnings. Highlight URL and image markup in HTML so For more information visit: www.byteshift.co.uk or email [email protected] 4 / 39 SiteScan User Guide 5 / 39 SiteScan User Guide Table of Contents Welcome Overview Table of Contents User Interface Tool Ribbon Results Grid Properties Panel Out-Links Panel In-Links Panel Images Panel Styles Panel Scripts Panel Emails Panel Source Panel Options Scanning Export Licensing 6 / 39 SiteScan User Guide User Interface User Interface Tool Ribbon Results Grid Properties Panel Out-Links Panel In-Links Panel Images Panel Styles Panel Scripts Panel Emails Panel Source Panel 7 / 39 SiteScan User Guide Tool Ribbon Quick Reference The following quick reference provides an overview for each menu and icon on the SiteScan tool ribbon. Hover over any menu item within the application to see this information in a tool-tip. File Menu File Save Save current results to file. Options Display the Options dialog. Exit Exit SiteScan (prompts to Save if required) Home Ribbon The Home ribbon provides access to the most frequently used features, including: starting and stopping scans, filtering data and manipulating results in the grid. Settings Options Display the Options dialog. Scan Start Start a new scan. Results Load Load existing scan results from file. Filter Clear Filters Removes any applied filters to display all results. Grid Layout Help Column Choose link information columns to display on the results grid. Buy Now Visit the SiteScan website to purchase a license key or enter a purchased key to activate SiteScan. Stop Save Errors Best Fit Stop a running scan. Save current results Allows results to be Auto-size column to file. filtered for all or only widths to fit screen. specific categories of errors. See the Error Filters section below. Pause Pause / resume scanning. Refresh Refresh performance and status for existing results without spidering. Crawl Clear Slow down a running Clear all existing scan. results or only performance and status data. Styles Filters the results to display on linked CSS stylesheets. Scripts Filters the results to displayed only linked script files (e.g. JavaScript) Export Emails Export results to Filters the results to Excel or CSV format. display only email addresses specified 8 / 39 Features Show / hide grid features such as Group By, Find Panel or Filter Rows. User Guide Display the SiteScan user guide. SiteScan User Guide using the mailto: scheme. Print HTML Print or print-preview Filters the results to results. display HTML pages. Filtering is based on the content type header returned from the server. Files Filters the results to display linked files by looking in the content type header for keys such as application, binary and audio. Images Filters the results to display only images linked to by <A href=""> style markup. Error Filters The Error Filter menu provides predefined filters to allow quick viewing of results with specific HTTP Status Codes or warning messages. Error Filter Clear Error Filter Clear any applied filters and displays all results. Show All Errors and Warnings Filters the results to show only those with Client Errors, Server Errors and SiteScan warnings. Client Errors Filters the results to show only Client Errors beginning with the 400 or 800 HTTP status code. Server Errors Filters the results to show only Server Errors beginning with the 500 HTTP status code. SiteScan Warnings Filters the results to show only warning messages suggested by SiteScan such as slow loading pages or possible mistyped URLs. Custom Filter Displays the filter creation pop-up window to allow creation of user defined, complex filter expressions on multiple columns. 9 / 39 SiteScan User Guide Source Ribbon The Source ribbon work exclusively with the Source Code preview panel and provides access to edit, format, save and print source code. Source Undo Undo the last text or formatting change to the source code. Redo Redo the last text of formatting change to the source code. Print Print or Print Preview the source code with formatting. Save As Save the source code to file. Copy Copy any selected text to the Windows clipboard. Find Find and highlight text in the source code. Replace Find and replace text in the source code. Change selected text font color. Change selected text highlight color. Clear formatting from selected text. 10 / 39 SiteScan User Guide Results Grid Results Grid The Results Grid is used to display and interact with scan results. Results are displayed in real-time as a scan runs or existing results loaded from file for further analysis or refresh. Overview Results are displayed in an Excel-like grid with full sort, filtering and grouping capabilities. The most common features are described below with many additional features accessible by right-clicking on various places within the grid, such as column headers, cells or group headers. Hover over any column heading for a detailed description of the information the columns contains: Column Groups (important) All columns which can be displayed in the results grid belong to one of two groups (also referred to as bands). These are: Source Page or Target Link Columns which appear in the Source Page group contain information and links pertaining to the source or referring page on which the Target Links were found. Clicking a URL in the Source Page 11 / 39 SiteScan User Guide group will load the referring page in to the preview Browser then load its properties links, images, etc, for examination. Columns which appear in the Target Links group contain information and the links found ON the source or referring page. Clicking a URL in the Target Links group will load the page that link points to ( the target) in to the preview Browser then load it's properties links, images, etc for examination. This distinction is important. For example, when you wish to find and highlight a broken link in Browser or Source Code, you must load the Source Page, as this is the page on which the broken link can be found, then choose the link to highlight from the Links panel. For more information on highlighting links, see Links Panel or Browser Preview. Choosing Columns Several columns are available to be shown on the grid, each displaying different information about the page or file which was scanned. Several of the most frequently used columns are shown by default, with other columns added via the Columns button in the Grid Layout section of the toolbar ribbon. To add columns: 1. Click the Columns button on the toolbar ribbon to display the list of available columns. 2. Drag a column from the pop-up window to the grid To remove columns: 1. Click and drag a column heading off the grid. The cursor will change to a large X when the column can be dropped to be removed. Previewing a Result Individual results can be inspected in detail using the Page Analysis tabs below the main results grid. To preview a result, select it by clicking its row in the results grid. 12 / 39 SiteScan User Guide Filtering Results can be filtered in several ways: By selecting a predefined error filter from the Filter Errors drop-down button in the Filters section of the tool ribbon. By selecting a predefined content type filter from the Filters section of the toolbar ribbon (such as Email, Styles or Scripts). By typing in to the auto-filter row immediately below the column header. By hovering over a column header to display the drop-down filter icon then selecting a column value to filter on. Sorting Results are sorted by clicking on a column header. Clicking the header multiple times will toggling sorting between ascending, descending and unsorted. Grouping Results are grouped by dragging a column header to the Group By row shown immediately above the column headers. Nested groupings can be created by dragging multiple column headers to the Group By row. To remove a grouping, drag the column header out of the Group By row. Saving Results are saved by clicking the Save icon on the Results section of the tool ribbon. Results are save in XML format. Two files are created: A file with a .xml extension contains all scan results (filtering is ignored when saving) A file with a .xmlr extensions contains all referrer data (all pages found which point to links in the results) When backing up, copying or moving results both files should be moved and kept together. Note: The main .xml results can be loaded without referrer data, but any referrers will not be displayed in the In-Links panel. Loading Results are loaded by clicking the Load icon on the Results section of the tool ribbon. When loading SiteScan will first load the main .xml results file, then any referrer data from the .xmlr file if found. Exporting Results can be exported for external analysis in three formats: Excel .xlsx format Excel .xls format 13 / 39 SiteScan User Guide Comma separated .csv format The .csv format is fastest as cell formatting is removed. 14 / 39 SiteScan User Guide Properties Panel Properties Panel The Properties panel displays meta-data and performance measurements for the page currently selected in the main crawl Results Grid. Properties are refreshed, loaded and displayed whenever a page is selected in the results grid. Overview The properties displayed in Properties panel and the columns shown on the Results Grid are the same. When a row is selected in the Results Grid the data obtained during spidering is displayed for the selected result. Properties are grouped in to categories with each displaying related information. Values are read-only, but can be selected and copied to the Windows clipboard. By default the properties for each link is only refreshed whenever the page is selected in the main Result Grid. See the Refreshing section below for information on refreshing properties. Refreshing Properties can be refresh directly from the web server by either: Double-clicking the related row in the main Results Grid. Clicking the green Refresh icon to the right of the tab headings. Exporting Properties can be exported to Excel in XLSX format. Click the XLSX icon to the right of the tab headings. 15 / 39 SiteScan User Guide Out-Links Panel Out-Links Panel The Out-Links panel displays all internal or external hyperlinks to other HTML pages (or files) from the page currently selected in the main crawl Results Grid. Out-Links are loaded and displayed whenever a page is selected in the results grid. Overview The links displayed in the Out-Links panel are obtained at the point the page was crawled and take in to account any spider rules specified in options (such as scheme or file type filtering specified). Therefore, the Out-Links listed may only be a subset of all links on the web page. Out-Links are only listed once in this view regardless of how many times they may appear on a page. Each Out-Link displays the HTML Title of the page to which the link points, the Link Text used in the anchor tag and the absolute URL of the link. The Relative URL is also available to be shown by rightclicking on the grid column headings. Out-Links are cross referenced with available scan results to show their current HTTP status (e.g. OK, 404 Not Found, 500, etc) and are color coded to highlight errors and warnings. As a scan runs and more scan results become available, the appropriate status will be shown against each link. By default the HTTP status for each Out-Link is only refreshed whenever the page is selected in the main Result Grid. See the Refreshing section below for information on refreshing status. Navigating to an Out-Link in Results To jump to the corresponding result in the main Results Grid for any link: Double-click the link's row. Previewing an Out-Link Result in the Browser To open a link in the browser: Hold the [Shift] key and click the URL in the Page URL column. 16 / 39 SiteScan User Guide Highlighting Out-Links in the HTML Source Links can be highlighted in the Source code preview tab: Click any link row to select it. Click the Source tab to view the source. A number will be appended to the Source tab caption to indicate how many occurrences of the selected link were found. Each occurrence of the link found is highlighted in yellow. Refreshing Out-Links can be refresh for the current page directly from the web server by either: Double-clicking the related row in the main Results Grid. Clicking the green Refresh icon to the right of the tab headings. Exporting Out-Links can be exported to Excel in XLSX format. 17 / 39 SiteScan User Guide Click the XLSX icon to the right of the tab headings. 18 / 39 SiteScan User Guide In-Links Panel In-Links Panel The In-Links panel lists all pages with links pointing to the page or file currently selected in the main Results Grid. Overview The list of In-Links displays the Page Title, Link Text and absolute URL of all source pages found during scanning which contain a link to the selected page or file. In-Links are subject to any scan depth and filtering rules specified in Options. For example: If a scan is performed on the URL www.mysite.com/products with the scan depth filter set to only extract and follow links "On the same level of beneath the starting URL", then only referring pages at or below the URL www.mysite.com/products will be reported. By default the In-Links for each page or file are only refreshed whenever the page is selected in the main Result Grid. See the Refreshing section below for information on refreshing In-Link data. Navigating to a Referrer in Results To jump to the corresponding result in the main Results Grid for any referrer: Double-click the referrer row. Previewing a Referrer in the Browser To open the referring page in the browser: Hold the [Shift] key and click the URL in the Referring Page URL column. Refreshing The list of In-Links can be refresh from the current crawl results by either: 19 / 39 SiteScan User Guide Double-clicking the related row in the main Results Grid. Clicking the green Refresh icon to the right of the tab headings. Exporting In-Links can be exported to Excel in XLSX format. Click the XLSX icon to the right of the tab headings. 20 / 39 SiteScan User Guide Images Panel Images Panel The Images panel lists images declared using <img src='...'/> on the page currently selected in the main Results Grid. Images are displayed whenever a page is selected in the results grid. Overview Images are only listed once in this view regardless of how many times they may appear on a page. The list of images displays the ALT text for the first occurrence of the image found on the page along with the Absolute URL to the image file. The Relative URL is also available to be shown by right-clicking on the grid column headings. Previewing an Image in the Browser To open an image in the browser (or native associated application): Hold the [Shift] key and click the URL in the Image URL column. Highlighting Images in the HTML Source Images can be highlighted in the Source code preview tab: Click any image row to select it. Click the Source tab to view the source. 21 / 39 SiteScan User Guide A number will be appended to the Source tab caption to indicate how many occurrences of the selected image were found. Each image found is highlighted in yellow. Refreshing The list of images found on the page can be refresh directly from the web server by either: Double-clicking the related row in the main Results Grid. Clicking the green Refresh icon to the right of the tab headings. Exporting The list of images can be exported to Excel in XLSX format. Click the XLSX icon to the right of the tab headings. 22 / 39 SiteScan User Guide Styles Panel Styles Panel The Styles panel lists all style-sheet type links found on the page currently selected in the main Results Grid. Overview The list of style-sheets displayed are obtained at the point the page was crawled and take in to account any spider rules specified in options (such as scheme or file type filtering specified). Therefore, those listed may only be a subset of all style-sheets on the web page. Each style-sheets is only listed once in this view regardless of how many times it may appear in a page. Each style-sheet link displays its HTTP status, file name, absolute URL, load time in seconds and size in both bytes and kilobytes. Each style-sheet link is cross referenced with the available scan results to show its current HTTP status (e.g. OK, 404 Not Found, 500, etc) and are color coded to highlight errors and warnings. As a scan runs and more scan results become available, the appropriate status will be shown against each link when refreshed. By default the HTTP status for each style-sheet is only refreshed whenever its page is selected in the main Result Grid. See the Refreshing section below for information on refreshing style-sheet status. Navigating to a StyleSheet in Results To jump to the corresponding result in the main Results Grid for any style-sheet: Double-click the style-sheet row. Previewing a StyleSheet in the Browser To open the style-sheet page in the browser: Hold the [Shift] key and click the URL in the File URL column. Refreshing The list of style-sheets can be refresh from the page on the web server by either: Double-clicking the related page row in the main Results Grid. Clicking the green Refresh icon to the right of the tab headings. 23 / 39 SiteScan User Guide Exporting The list of style-sheets can be exported to Excel in XLSX format. Click the XLSX icon to the right of the tab headings. 24 / 39 SiteScan User Guide Scripts Panel Scripts Panel The Scripts panel lists all JavaScript type links found on the page currently selected in the main Results Grid. Overview The list of script files displayed is obtained at the point the page was crawled and takes in to account any spider rules specified in options (such as scheme or file type filtering specified). Therefore, those listed may only be a subset of all scripts on the web page. Each script is only listed once in this view regardless of how many times it may appear in a page. Each script link displays its HTTP status, file name, absolute URL, load time in seconds and size in both bytes and kilobytes. Each script link is cross referenced with the available scan results to show its current HTTP status (e.g. OK, 404 Not Found, 500, etc) and color coded to highlight errors and warnings. As a scan runs and more scan results become available, the appropriate status will be shown against each file when refreshed. By default the HTTP status for each script link is only refreshed whenever its page is selected in the main Result Grid. See the Refreshing section below for information on refreshing script link status. Navigating to a Script File in Results To jump to the corresponding result in the main Results Grid for any script link: Double-click the script link row. Previewing a Script File in the Browser To open the script file in the browser (or other native associated application): Hold the [Shift] key and click the URL in the File URL column. Refreshing The list of script links can be refresh from the page on the web server by either: Double-clicking the related page row in the main Results Grid. Clicking the green Refresh icon to the right of the tab headings. 25 / 39 SiteScan User Guide Exporting The list of scripts can be exported to Excel in XLSX format. Click the XLSX icon to the right of the tab headings. 26 / 39 SiteScan User Guide Emails Panel Emails Panel The Emails panel lists all email addresses, linked using the mailto: scheme prefix, found on the page currently selected in the main Results Grid. Overview The list of email addresses is obtained at the point the page was crawled. Each email address is only listed once in this view regardless of how many times it may appear in a page. Each email link displays a status (OK or a SiteScan 9xx warning where it appears to be mistyped), link text and the email link as specified in the href attribute of the anchor tag in which it was found. Navigating to a Email Address in Results To jump to the corresponding result in the main Results Grid for any email address: Double-click the email link row. Refreshing The list of email addresses can be refresh from the page on the web server by either: Double-clicking the related page row in the main Results Grid. Clicking the green Refresh icon to the right of the tab headings. Exporting The list of emails addresses can be exported to Excel in XLSX format. Click the XLSX icon to the right of the tab headings. 27 / 39 SiteScan User Guide Source Panel Source Preview The Source preview is used to display the source code from the page currently selected for analysis in the main Results Grid. It provides highlighting of links as well as editing, formatting and printing of source code. The Source toolbar ribbon provides features for working with source code. Overview The Source preview is a rich text editor display with support for line numbering, text highlighting, formatting and saving. Its contents are synchronized with the page selected in the Results Grid as well as Properties, Out-Links, Images, In-Links and so on. Its primary function is to allow highlighting of erroneous links via selection from the Links or Images panels. Loading Source Source code is loaded automatically when a page is selected for analysis in the main Results Grid. SiteScan current supports previewing source code for the following content types: HTML, XML and Text Style-sheets (e.g. CSS) Script files (e.g. JavaScript) Highlighting Links To highlight a link in the source code: 1. 2. 3. 4. 5. Select the row for the page to analyze in the main Results Grid. Click the Links tab to display all HTML <A> style links. Scroll to the link you wish to highlight and click to select it. All occurrences of the link will be highlighted in the source code using a yellow background. The Source panel caption will display a number showing how many occurrences SiteScan managed to find. Highlighting Images To highlight an image in the source code: 1. Select the row for the page to analyze in the main Results Grid. 28 / 39 SiteScan User Guide 2. 3. 4. 5. Click the Images tab to display all images on the page. Scroll to the image you wish to highlight and click to select it. All occurrences of the image will be highlighted in the source code using a yellow background. The Source panel caption will display a number showing how many occurrences SiteScan managed to find. Saving Source Source code can be saved in various formats by clicking the Save As button in the Source toolbar ribbon. 29 / 39 SiteScan User Guide Options Options Scanning Export Licensing 30 / 39 SiteScan User Guide Scanning Scanning and Performance Options To display Scanning and Performance options: click the Options button on the toolbar ribbon then click the Scanning button on the Options pop-up window. Scanning options should be configured before starting a scan and are saved between SiteScan sessions. Several options can be changed while a scan is in progress and will take immediate effect, such as adding or removing a file extension from an exclusion filter or even changing the scan depth. Options which cannot be changed during a scan are typically those which require the application to be restarted or are related to performance utilization, and will be grayed out while a scan is in progress. Overview Scanning options are at the heart of getting the best out of SiteScan; we recommend you explore and experiment to uncover its full potential. Scanning options provide detailed control over the speed and depth of scanning while allowing limits to be set and exclusion filters implemented. SiteScan ships with all options configured and ready to run: By default it will scan downward from a starting URL and test all links it finds for errors, response time and HTML body load time. The information icon adjacent to each option provides a tool tip summary of the feature along with guidance and best practice, where applicable. Options in Detail 31 / 39 SiteScan User Guide General Settings Option Maximum number of pages to spider for links Description The maximum number of pages on the website which will be scanned and spidered for links to follow. When set to zero, all pages on the website will be scanned (provided they meet any Scan Depth and Filtering criteria specified) Maximum number of links to test & follow Maximum number of links (found on spidered pages) which will in turn be scanned and spidered for new links to follow. 32 / 39 Note SiteScan User Guide When set to zero, all links found on all pages will be scanned (provided they meet any Scan Depth and Filtering criteria specified). This setting is ignored when Refreshing existing results. Scan resource utilization Give priority to The maximum number of concurrent web requests which SiteScan will make when scanning pages and spidering links. Use with caution, too high a value time-outs due to excessive server A higher value will result in greater CPU and memory usage as well as increasing demand on the web server. In link heavy sites, application per impaired. The default value of 20 point. Scale this number up or dow optimum performance with overlo network or web server. Spidering Pages: Priority is given to link extraction. Select this option when gauging the size of a site or the potential workload is a priority. Testing & timing: Priority is given to testing found links by capping the backlog of links waiting to be tested at 500. Select this option when knowing the number of links waiting to be tested is less important than the actual testing. Only scan the first occurrence of each page. Select this option to scan and report on every page in a site only once. Subsequent links to the same page from other pages will be ignored. De-select this option to see all occurrences of links to all pages throughout the site. Ideal when you wish to find all links in a site pointing to a particular page. Use intelligent data copying Select this option to allow SiteScan to copy existing link performance and status data rather that scanning identical links multiple times. When selected both scanning time and web server load are significantly reduced. Server response timeout The length of time in seconds to wait for a response from the web server before skipping. Body load timeout The duration in seconds to wait for the HTML content of a web page to be fully received from the web server before skipping. Maximum automatic redirections to follow The maximum number of automatic server redirections that will be followed before skipping the requested page or file. Use default proxy settings and user credentials? Select this option to use: The recommended setting for this 1. Any proxy settings as configured in Internet Options (via Control Panel). When checked, performance can reduced if proxy settings are miss Control Panel > Internet Options. 2. The currently logged on users network credentials for website authentication (if requested by the site). Scan Depth and Filtering Option Description Only scan pages or files on these Select the scheme (sometimes referred to as protocol) types you wish to schemes allow when spidering pages and following links. Only extract and follow links from Select one of the three options to set the depth to which SiteScan will pages found: scan. The depth increases with each option and will result in longer scans and larger result sets. An explanation an example of each option follows: On the same level or beneath the Starting URL If the starting URL is www.mysite.com/products then: 1. Only links found at that level or below will scanned. On the same sub-domain as the Starting URL 33 / 39 Note SiteScan User Guide If the starting URL is www.mysite.com/products then: 1. All links found at that level or below will be scanned. 2. All links found adjacent to or above that level will also be scanned. For example, the following links would also be scanned: www.mysite.com/default.html www.mysite.com/services On the same sub-domain as the Starting URL or any sub-domain If the starting URL is www.mysite.com/products then: 1. All links found at that level or below will be scanned. 2. All links found adjacent to or above that level will also be scanned. 3. All links found on any sub-domain of mysite.com will be scanned. For example, the following links would also be scanned: www.mysite.com/default.html www.mysite.com/services products.mysite.com/catalogue Skip pages or files with the following extensions Pages or files with extensions listed here will not be scanned to check if they are responsive or inspected for additional links to follow. Enter a comma separated list of file extensions, such as: .aspx, .exe, .zip, .mp4 Include the following link types in Select any non-navigation type links to also display in scan results. results Non-navigable links cannot be checked for a server response. They will be listed in the PageURL column to allow further analysis; such as filtering by a specific email address. Performance Measures Option Description Measure server response time Measure the time it takes for the web server to acknowledge the request for a page or file and return a response (e.g. OK or 404 not found) Measure HTML document load time Measure the time it takes to obtain and load only the HTML <body> content of each web page. All external resources such as images, stylesheets and scripts are ignored. Applies to web pages only. All other file types are automatically ignored. This is a good measure of page performance on the server, particularly for dynamic pages such as ASPX, PHP, etc. 34 / 39 Note SiteScan User Guide Export Saving and Exporting Options To display Saving and Exporting Options: click the Options button on the toolbar ribbon then click the Export button on the Options pop-up window. Overview Saving and Exporting options provide control over how results are saved, exported and allows triggering of convenience actions such as automatically opening results after export. Option Save referrer data when saving results Description Note Select this option to also save referrer data whenever scan results are saved. Saving referrer data with results allows viewing of all In-Links found for any page or file when results are later loaded. When selected, loading and saving of results will take longer and produce larger files, particularly on large websites. The referrer data file will be saved alongside the main results file and have a .xmlr file extension. These file should be kept together if sharing results or moving them between computers. Include hyperlinks when exporting to Excel Select this option to create functioning hyperlinks when exporting results to Excel. Excel can sometimes become unr attempting to create functioning h result sets which contain restricted De-select this option to export hyperlinks as plain text (faster). If you encounter this problem, dechoose CSV as the export format. Open file after export Select this option to launch the newly exported file in Excel (or other native application) when the export has completed. 35 / 39 SiteScan User Guide 36 / 39 SiteScan User Guide Licensing Licensing & Registration To display the Licensing and Registration screen, either: click the Options button on the toolbar ribbon then click the Licensing button on the Options pop-up window click the Enter License Key option from the Buy Now button on the toolbar ribbon Overview The Licensing and Registration options screen provides information on the current SiteScan edition and license status. Initial activation and edition upgrades are performed on this screen. Activating or Upgrading SiteScan Activation and upgrade follow the same process: 37 / 39 SiteScan User Guide 1. Copy the license key from your order confirmation email to the Windows clipboard. 2. Paste the key in to the text box adjacent to the Activate button. 3. Click the Activate button. The license key will then be validated and if successful a similar to the following will be displayed: Current activation status and edition information can be viewed at any time: 38 / 39 SiteScan User Guide 39 / 39