1
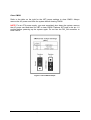
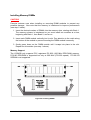
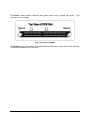
PGA Processor and Heatsink Installation
CAUTION!
When handling the processor package, avoid placing direct pressure on the label area
of the fan. Also, do not place the motherboard on a conductive surface, which can
damage the BIOS battery and prevent the system from booting up.
IMPORTANT: Always connect the power cord last and always remove it before adding,
removing or changing any hardware components. Make sure that you install the
processor into the CPU socket before you install the CPU heat sink.
Upgrading the CPU
The new Intel Xeon processor uses a new 603-pin core package technology Micro Pin
Grid Array, or Micro-PGA. This package utilises a 603-pin zero insertion force socket
(PGA-603). Thermal solutions are attached directly to the back of the processor core
package with the use of a thermal plate or heat spreader.
When the processor is mounted in the socket 603 connector, it is secured by the ZIF
(Zero Insertion Force) socket.
The design of the VIG340B Motherboard makes it a simple job to replace or upgrade
the processors. Follow the instructions below for instructions on how to upgrade the
processors:
1. Before commencing any work inside your Viglen system please read the warnings
and cautions section.
2. Remove the lid from the computer by removing the screws at the rear of the case.
3. Locate the Micro-PGA processors covered with a heat sink by referring to Figure 5 if
necessary.
4. Carefully remove the heat sink by pushing down an out the retention mechanism, to
free it from the socket.
5. The CPU is clamped into place using a lever. Gently lift this lever, which is located
at the side of the socket 603. This will free the CPU and allow you to lift it clear of
the socket. Do not attempt to remove the CPU with the lever in the down position.
6. You can now fit the additional or replacement processor and heatsink into the socket
603 interface.
Viglen LX245 Server User Guide
59