1
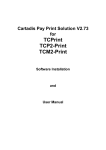
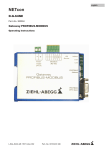
MORS MULTIPLE SHIFTS USER GUIDE CONTENT 1. INTRODUCTION 1 -Software Version 1 -New Functionality 1 -Outline of Functionality 2 2. SYSTEM START UP & INTRODUCTION 3 3. ADDING A NEW SHIFT PATTERN 5 4. RAISING MULTIPLE SHIFTS 7 5. MANAGING A SHIFT PATTERN 12 MORS MULTIPLE SHIFTS FUNCTIONALITY 1. INTRODUCTION This document details the methods and procedures needed to operate the newly integrated multiple shifts functionality of the MORS recruitment platform. The document uses the latest version of the Metropolitan MORS platform to illustrate the use of this part of the system. Software Version Version V2.8.0 of the MORS online recruitment platform will be used to demonstrate the usage of the multiple shifts functionality. New Functionality Figure 1 shows a screenshot of part of the latest functionality to be added to the MORS recruitment platform. This addition enables the end user to create, raise, and manage multiple shifts. The new multiple shifts functionality intends to make the latest version of MORS more efficient and user-friendly over its predecessor. This new feature is one which saves time and enhances the user’s experience of the system. Figure 1 PPS Works Ltd Page 1 Outline of Functionality Below is a brief outline/summary of the new features provided by the multiple shifts functionality. Users are able to do the following: Adding a new Shift Pattern An enhancement of the MORS system is the ability for the user to create shift patterns based on their requirements. Once created, these shift patterns are stored on the system for the user to select when raising shifts in the future. An example of various shift patterns is shown in Figure 2 below: Figure 2 This feature saves time as it invalidates the need for the user to input shift specific details every time a shift is being raised. Please note that shift patterns are only stored for the job they are being used for. Raising Shifts The Multiple Shifts functionality enables users to create multiple shifts within a single request. This is a big improvement on the previous version of MORS as users were only able to raise one shift per request. MORS now provides the end user with an inbuilt calendar function which makes it easier for the user to create multiple shifts. Users are also able to raise retrospective shifts using this feature. Managing a Shift Users can manage shift patterns by either deleting unwanted shifts or editing them as required. This helps the user to streamline the list of available shift patterns to select from. All the above outlined functionality will be detailed further in this document. PPS Works Ltd Page 2 2. SYSTEM START UP & INTRODUCTION In order to access the multiple shifts functionality, the user must first start the MORS recruitment platform. To do this, please take the following steps: 1. Open up the web browser (Internet Explorer preferred for optimal usage). 2. Navigate to the Metropolitan MORS recruitment platform by entering the following address in the address bar: http://mht.ppsworks.co.uk/portal.php 3. Login to the system using your username and password. 4. Once logged in, you will see a webpage similar to Figure 3 below. This is the Metropolitan MORS homepage. Figure 3 5. Please note that the new multiple shifts functionality only applies to Bank recruitment. Therefore to access this functionality, click on the menu button labelled “Bank” on the navigation bar. Please See Figure 4. Figure 4 PPS Works Ltd Page 3 6. Once the Bank menu button has been selected, the user will be directed to the Bank section of the system. When this page has loaded, the user will be ready to use the multiple shifts functionality. The Bank Section of the system automatically defaults to the Multiple Shifts page. This page can also be accessed from other locations within the Bank Section if the user clicks on the “Worker Request” button. This is outlined red in Figure 5 below: Figure 5 7. The user is now ready to use the multiple shifts functionality. PPS Works Ltd Page 4 3. ADDING A NEW SHIFT PATTERN The Multiple Shifts functionality enables users to create shift patterns which act as templates when raising shifts. An example of various shift patterns is shown in Figure 6 below: Figure 6 If the user requires additional shift patterns to be added, MORS allows users to do this in accordance with their requirements. To add additional shift patterns, please follow the steps below: 1. On the multiple shifts page, please click on the “Add Shift” button which can be found in the “Select a Shift” section. This button can be found here. 2. When this button is clicked, the system inserts a new line in which the user can enter the desired shift values. This is outlined red in Figure 7 below: New shift options Figure 7 3. To add a new shift, please follow these steps: I. Within the ‘New Shift Options’, please input the name of the shift. II. From the drop down list, select the shift type. The options available are ‘Early’,’Late’,’Waking Night’ and ’Other’. III. The next step is to tick the check boxes as appropriate. The first check box will be ticked if the shift is “on call”. The second check box will be ticked if the shift is a “Sleep in”. IV. Within the next two text boxes, the user must enter the start and end time of the shift. V. Finally, to add the new shift pattern, please click on the green tick icon. PPS Works Ltd Page 5 4. Once the user has added the new shift pattern, it will appear at the end of the shift table. This is shown in Figure 8 below. The new shift pattern is now ready to select in order to raise shifts. Figure 8 PPS Works Ltd Page 6 4. RAISING MULTIPLE SHIFTS In order to raise multiple shifts, please follow the steps below: 1. Please ensure that you are in the Bank section of MORS. Steps to access this part of the system are outlined in the previous section of this document. The webpage should look similar to the one shown in Figure 9 below. This section shows a list of job roles assigned to the line manager who is logged into the system. Therefore, this section will vary with different MORS login accounts. Figure 9 2. The first step to raising a shift is to select the job role that shifts need to be raised for. To do this, please select the relevant job role from the list on the left hand side of the page. This is outlined in blue in Figure 9. 3. Once a role has been selected the webpage will display further information and options to the user. This is shown in Figure 10 below: This section of the webpage provides the user with further information about the selected job role. The “Support Worker” role has been selected in this instance by the user. This section of the webpage allows the user to select, add, edit, or delete a shift pattern. This will be explained later in this document. Figure 10 PPS Works Ltd Page 7 4. The user will now have to select a shift pattern from the selection available. To do this, please click on the circle next to the name of the required shift pattern. This can be found underneath the column headed “Shift name”. Figure 11 shows that the “Morning” shift has been selected. To select a shift pattern, please click on the circle next to the “Shift Name”. Figure 11 5. Once the required shift has been selected, a “Select a reason for the vacancy” box will appear. This box will prompt the user to select the reason for the vacancy. This is shown in Figure 12 below: Figure 12 6. When the user has selected an option from the “Reason for vacancy” box, the main calendar function will appear. This is the main section which allows the user to select the date/s that shifts will need to be raised on. This function is detailed in Figure 13 below: This drop down list enables the user to select how many dates in the past they would like displayed on the calendar function. This is useful for raising retrospective shifts. Number inside each date box shows the number of shifts to be raised for the corresponding date. Calendar function enabling the user to select dates to raise shifts for. Figure 13 PPS Works Ltd Page 8 7. IMPORTANT RULES TO REMEMBER: To use the calendar function, please follow these steps carefully: o Use the mouse to click on the date the shift needs to be raised on. The +1 symbol will appear as shown on the 7th March in Figure 13. Every time a date is clicked on, it will increment the number by one. Figure 13 shows that the user is about to raise 9 shifts for the 4th of March, 5 shifts for the 5th of March, 4 Shifts for the 6th of March and 1 Shift for the 7th of March. o The user can only raise 9 shifts per date at one time. Clicking on a same date 10 times will reset the shift number to 0. In the unlikely case that more than 9 shifts are needed on a specific date, the user will have to go through the process again. o To raise a retrospective shift, select the drop down box shown in Figure 13 and select the number of days you would like the calendar to back date. o Please note: The system will only allow users to raise 1 retrospective shift per date. To raise more than one retrospective shift per date, the user will have to go through the multiple shift raising process again. 8. Once the user has set the number of shifts required on the calendar, a quick summary can be viewed below the calendar function. This section shows a summary of all shift selections made. This is shown in Figure 14 below: Figure 14 By clicking on the “Show/Hide breakdown” button, the user can toggle between showing and hiding this summary. 9. If the user has chosen to raise retrospective shift/s, the system will prompt the user to enter the name/s of the worker/s that filled the retrospective shift/s. This is shown in Figure 15: Figure 15 In this example, the user has chosen to raise two retrospective shifts on the 1 st & 2nd of January 2013. Therefore, the system has asked for the names of the workers who filled these retrospective shifts. Please note: The system will not allow the user to raise retrospective shifts if names have not been entered into the relevant fields. If this is the case, the MORS will prompt the user with the messages shown in Figure 16: Figure 16 PPS Works Ltd Page 9 10. The final section of the shift raising form enables the user to specify preferred workers along with any specific requirements for the job role. This section is shown in Figure 17 below: The user can type the names of up to 3 workers which they prefer to assign to the shifts being raised. The user can specify specific requirements which may be needed for the shifts. Whilst the user types in names, an auto fill box will appear suggesting names to the user. Form Options. To raise the shifts, please click the “Raise Shifts” button or cancel or reset the form as appropriate. Figure 17 11. Once the “Raise Shifts” button has been clicked, the user will be directed to a summary page which outlines the selections made. Before authorising these shifts, it is strongly advised that the user goes through the summary to ensure that all data is correct. The summary page is shown in Figure 18 below: Figure 18 12. Once the user is sure that all data is correct, they can click on the “Authorise Shifts” button to record the shifts on the system. 13. When this button has been clicked, a request confirmation page will appear. The multiple shifts have now been raised. The user can now choose to raise further requests or continue using MORS as required. PPS Works Ltd Page 10 14. Once shifts have been raised on the system, information regarding the shift frequency is reflected on the calendar function. When the user selects a shift pattern, the calendar function will automatically colour code the dates where shifts have been raised with the colour assigned to the selected shift pattern. This is illustrated in Figure 19 below: Dates colour coded where morning shifts have been raised. The number in the bottom right corner symbolises the number of shifts raised. Figure 19 15. As can be seen in Figure 19 above, the user has selected the morning shift. As a result the system has colour coded the dates on the calendar where morning shifts have been raised. Where applicable, numbers found on the bottom right of each date box symbolise the number of shifts raised on that day. If the user wishes to raise additional shifts on the colour coded dates, they can do so by following the normal procedures. 16. To view the shifts raised, the user will have to click on the “Job summary” tab which can be found on the sub menu. However this will not be covered within this user guide. PPS Works Ltd Page 11 5. MANAGING A SHIFT PATTERN In some instances, users may wish to edit/delete the shift patterns available for selection. This section will outline ways of doing this. In order to edit or delete a current shift pattern, please follow the steps below: 1. Within the Shift Pattern section of the webpage, click on the edit icon corresponding to the shift pattern you wish to edit. This is illustrated in Figure 20 below: Edit Icon Figure 20 2. Once the edit icon has been clicked on, the user will be presented with various options for the shift in question. This is shown in Figure 21 below: Figure 21 Cancel Edit Icon Update Shift Icon Delete Icon 3. The user can now either edit or delete a shift. 4. To edit a shift, change the fields of the shift as required. Once the fields have been changed in accordingly, click on the ‘Update Shift’ icon. The shift pattern will now be updated with the edited information. 5. To cancel the edit, click on the ‘Cancel Edit’ icon. The system will not make any changes and will revert back to the previous settings. 6. To delete a shift pattern click on the ‘Delete’ icon. Once clicked, the user will be presented with a confirmation message shown in Figure 22 below: Figure 22 7. Click OK to delete the shift pattern. The shift is now deleted and will not appear on the list. END PPS Works Ltd Page 12