1
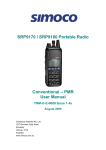
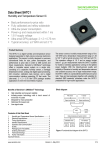
TNM-U-E-0117, Issue 1.1 (Jul 13)
© Simoco 2013
Press the PTT to answer a call in most cases (config.
dependant).
TYPICAL DISPLAY
C1s 1
SDP650 PORTABLE RADIO
BRIEF USER GUIDE
Volume
LED
Antenna
F5
Earpiece
F6
PTT
F13
Accessory
Connector
TO MAKE A CALL
Select the required Zone and Channel using either the menu
system or the function keys. Select the individual/talkgroup to
call.
KEYS
With the default configuration, the F1 key provides access to
the Menu features of the Radio. The Up/Down keys move
through the entries in each menu. The F1 key selects the
entry. The F4 key (Back) returns to the previous level. These
four keys are also re-configurable if required.
When
All other Function Keys can be programmed to any of the
functions listed in the field programmer.
BEFORE USE
PROBLEMS AND HINTS
Before operating the Radio:
The SDP650 Radio is a high quality reliable product. In the
unlikely event of a problem, please check the following points
before contacting your supplier:
Ensure that a fully charged battery is fitted to the radio. Ensure
that the antenna is firmly secured.
F7
1
2
F1
If the Radio fails to work, check that the battery is charged and
correctly fitted and that the radio is switched on. If the radio
does not receive or send calls, check that the antenna is
correctly fitted and the volume is turned up.
Consider that there maybe insufficient signal strength at your
position. Try moving to an area where the signal strength
maybe stronger.
F11
F12
Release the PTT button to end the transmission.
transmitting, the status LED is illuminated red.
When Function Key F5 is programmed as an Alarm Key,
pressing the key automatically runs a pre-programmed alarm
sequence. To reset the Radio after an alarm call, switch the
radio off and then on.
BATTERY
F4
Press and hold the PTT button and speak into the microphone
to transmit.
F8
(On/Off)
If the Radio displays an error message at switch on, please
refer to your supplier.
Speaker
CARE OF YOUR RADIO
Mic.
Note.
The SDP600 Series has two variants, one with a key
pad (SDP660) and one without (SDP650).
To remove battery: Slide latch down (1) and lift out (2).
To fit battery: Seat lower end first (2) and push down on latch
to locate battery top in.
Battery condition is indicated by the LED. If the battery is low
the status LED flashes orange and an audible warning sounds.
SWITCH ON THE RADIO
INTRODUCTION
The SDP600 series radios are software defined portable twoway radio transceivers with many customisable parameters to
suit individual requirements.
Menus and Key Functions can be configured to customer
requirements.
For greater operational functional detail, refer to the main User
Guide, TNM-U-E-0115, which is available for download, along
with a comprehensive list of other documentation, on the
Simoco website http://www.simocogroup.com via the Partner
Portal.
To turn the radio on, press the red handset F12. A welcome
message is displayed while the radio boots up. Adjust the
volume control to about mid position.
TO RECEIVE CALLS
Select the required channel using the Up/Down keys (hold
down either key for fast scroll).
If the channel is busy, the status LED flashes yellow.
On radios with selective signalling, only the calls relevant to
you are heard.
Simoco Group, Field House, Uttoxeter Old Road, Derby DE1 1NH
Tel: +44 (0) 1332 375500. Fax: +44 (0) 1332 375501. http://www.simocogroup.com
To keep your Radio clean use a slightly DAMP soft cloth for all
exterior surfaces - DO NOT use chemical, aerosol or abrasive
cleaners.
To ensure efficient operation, the battery contacts should be
periodically cleaned with a soft damp cloth.
Batteries must be disposed of in accordance with your local
Health & Safety Regulations. Do NOT incinerate or dispose of
as normal waste.
ACCESSORIES
A wide range of accessories are available, contact your
supplier for details.
TNM-U-E-0117, Issue 1.1 (Jul 13)
© Simoco 2013
IMPORTANT SAFETY
WARNINGS
Use only approved SIMOCO battery, part number PAR600BATL2 or PAR600BATL3.
SDP660 portable radio equipment is only to be connected to
Simoco approved chargers and accessories.
Battery connection, disconnection, and charging must only be
carried out in non-hazardous areas.
Menus
Zone
Channel
Contacts
Metal belt clips must NOT be used in hazardous areas.
Approved accessories may only be connected and
disconnected outside the hazardous area.
GENERAL WARNINGS:
Do NOT operate the radio if the antenna has become
disconnected or damaged.
Obey the 'Turn Off Two-way Radios' signs where these are
posted, e.g. on a petrol station forecourt.
Do NOT operate your radio in an explosive atmosphere –
unless the radio level of IECEx approval is approved for use in
that atmosphere.
Call Log
Scan
Settings
Do NOT operate your portable radio without a hands-free kit
whilst driving a vehicle.
Do NOT touch the antenna while the radio is transmitting.
Mute Level
Do NOT use or store the battery above +60 °C
Do NOT dispose of batteries in a fire.
RSSI
Only recharge batteries in an approved battery charger.
Radio Info
RX/TX LED
Green LED when receiving a signal.
Flashing Green. Radio in talk-back hang
time (Digital Channel only).
Flashing Yellow. Channel busy.
Red LED when the radio is transmitting.
Flashing Red – Emergency Mode active.
Flashing Orange – Low Battery.
Flashing Blue. Bluetooth enabled. (Rate of
flash indicates whether paired/not paired
and active).
Options
(all menus may not be programmed)
▲ ▼ Scroll through list of zones.
Select zone and return to main
F1
screen.
▲ ▼ Scroll through list of channels.
Select channel and return to main
F1
screen.
▲ ▼ Scroll through contact list.
PTT
▲▼
PTT
▲▼
F1
F4
Press to call selected entry.
Scroll through r’cd stored calls.
Press to call back.
Select On/Off scan options.
Press to Start/Stop scan.
Return to previous menu level.
Scroll through Settings sub▲▼
menus.
Press to access selected subF1
menu.
F4 Return to previous menu level.
▲ ▼ Change Mute level.
Accept change and return to
F1
previous menu level.
F1 View RSSI level.
Scroll through Radio info: Radio
▲▼
ID, Serial No., S/W Ver etc.
Press to view selected Radio Info
F1
screen.
F4 Return to previous menu level.
Enable/Disable/adjust: Key Beeps,
Backlight, Brightness, Contrast, Alert Vol,
Speaker Vol.
Scroll through Options sub▲▼
menus.
Press to access selected subF1
menu/function.
When function selected, use to
▲▼
adjust the level of the function.
F4 Return to previous menu level.
KEYS
Key
Symbol
Function
F11 key
Turning the knob clockwise to
increase volume, anti-clockwise
to decrease volume.
Push-To-Talk. Hold the radio
about 10 cm from mouth, press
and hold the PTT switch.
Release to listen.
Prog. Function Key. Default –
Menu select.
Press this key to enter the
menu system, then use (▼) or
(▲) to select the desired menu
Prog. Function Key. Default –
Back.
Prog. Function Key. Default –
Alarm.
Prog. Function Key.
Prog. Function Key. Default –
Up key for scrolling.
Prog. Function Key. Default –
Down key for scrolling.
Prog. Function Key.
F12 key
Prog. Function Key. On/Off.
F13 key
Prog. Function Key.
Volume
PTT
F1 key
–
F4 key
=
F5 key
F6 key
F7 key
▲
F8 key
▼