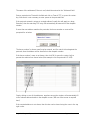
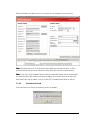
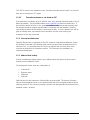
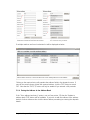
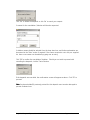
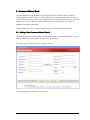
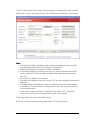
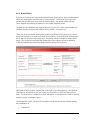
1
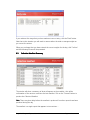
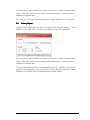
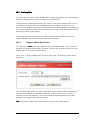
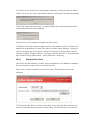
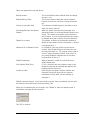
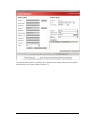
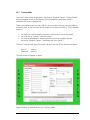
Royal Mail Customer Systems
Despatch Express
User Guide
Version 1.2
16/07/2007
Royal Mail Despatch Express User Guide V1.2
Page 1 of 69
Contents
1
INTRODUCTION................................................................................................................
5
INTRODUCTION
1.1
1.2
2.
EQUIPMENT REQUIREMENTS................................................................................................... 7
SETUP....................................................................................................................................... 7
STARTING TO USE DESPATCH
DESPATCH EXPRESS ......................................................................... 8
2.1
2.2
2.4
2.5
3.
STARTUP .................................................................................................................................. 8
LOGIN........................................................................................................................................ 8
QUICK DESPATCH ..................................................................................................................... 9
QUICK MANIFEST.................................................................................................................... 10
CREATING A DESPATCH ................................................................................................. 11
3.1
ADDRESS DETAILS ................................................................................................................. 12
Postcode Address File (PAF) Lookup ................................................................................. 12
International Addresses..................................................................................................... 15
Address Book Lookup ........................................................................................................ 15
Saving the Address in the Address Book .......................................................................... 16
Safe Place .......................................................................................................................... 17
3.2
DESPATCH DETAILS AND PRINTING ...................................................................................... 18
3.2.1 Multiple Items to the Same Address ................................................................................. 20
3.2.2 Multiple Senders References for the Same Item.............................................................. 21
3.1.1
3.1.2
3.1.3
3.1.4
3.1.5
4.
CHANGING AND SAVING ADDRESSES IN DESPATCH
DESPATCH ...................................................... 23
4.1
4.2
5.
AMENDING AN ADDRESS BEFORE DESPATCH ....................................................................... 23
SAVING DESPATCH ADDRESSES TO THE ADDRESS BOOK .................................................... 23
DESPATCH ENQUIRY ...................................................................................................... 24
5.1
5.2
6
LABEL REPRINTING ................................................................................................................ 25
CANCELLING A DESPATCH...................................................................................................... 26
CUSTOMER ADDRESS BOOK
BOOK .......................................................................................... 29
6.1
6.1.1
6.2
6.3
6.4
7.
ADDING A NEW CUSTOMER ADDRESS RECORD..................................................................... 29
Branch Direct ..................................................................................................................... 31
AMENDING AN EXISTING CUSTOMER RECORD ...................................................................... 32
DELETING A CUSTOMER RECORD .......................................................................................... 33
IMPORTING MULTIPLE ADDRESSES FROM A FILE ................................................................ 34
MAILSHOTS OR MULTIPLE
MULTIPLE DESPATCHES
DESPATCHES ...................................................................... 35
7.1
7.2
8.
SETTING UP A MAILSHOT ...................................................................................................... 35
REPEATING A MAILSHOT........................................................................................................ 39
END OF DAY PROCESS ................................................................................................... 40
8.1
8.2
8.3
9
COLLECTION MANIFEST ......................................................................................................... 41
INPUT DAILY RATE WEIGHTS................................................................................................. 41
COLLECTION MANIFEST SUMMARY....................................................................................... 42
REPORTS ...................................................................................................................... 45
9.1
9.2
9.3
9.4
9.5
9.6
COLLECTION MANIFEST REPRINT......................................................................................... 45
POSTING LIST ....................................................................................................................... 45
DEPARTMENT REPORT ......................................................................................................... 46
CUSTOMER REPORT .............................................................................................................. 47
DESPATCH REPORT............................................................................................................... 47
COUNTRY REPORT................................................................................................................. 48
Royal Mail Despatch Express User Guide V1.2
Page 2 of 69
10
BACKUPS AND ARCHIVES
ARCHIVES .......................................................................................... 49
10.1
DATABASE BACKUP ................................................................................................................ 49
10.2
ARCHIVING DATA ................................................................................................................... 50
10.2.1
Customer Address Data Archive................................................................................... 50
10.2.1
Despatch Data Archive ................................................................................................. 51
11
SYSTEM OPTIONS.....................................................................................................
53
OPTIONS
12
SPECIAL CONDITIONS ................................................................................................ 55
12.1
12.2
13.
13.1
13.2
BFPO DESPATCHES ................................................................................................................ 55
LABEL(S) WITH NO ADDRESS ................................................................................................ 56
HINTS AND TIPS ........................................................................................................ 58
CUSTOMER NUMBERING TO SIMPLIFY MAILSHOT FACILITY................................................. 58
USE OF KEYBOARD WEDGE SCANNER TO IMPROVE SPEED .................................................. 58
14.
PRINTER SETUP
61
SETUP.........................................................................................................
ETUP
15.
HELP..........................................................................................................................
HELP
65
15.1
15.2
CUSTOMER SYSTEMS HELPDESK .......................................................................................... 65
FREQUENTLY ASKED QUESTIONS .......................................................................................... 66
APPENDIX A.
SAMPLE LABELS.........................................................................................
67
LABELS
APPENDIX B.
FEATURES NOT COVERED IN THIS GUIDE .................................................. 69
Royal Mail Despatch Express User Guide V1.2
Page 3 of 69
1 Introduction
This Guide covers all the main functions of Despatch Express. There are two other guides
available :
•
•
Despatch Express – Getting Started.
This was supplied as part of the Despatch Express installation pack along with
the installation CD
Despatch Express - Interfacing with Your System
Despatch Express is primarily designed to produce address labels for the Royal Mail
services that require a barcode. However, it can be used to produce address labels without
barcodes for some services.
The system contains a copy of the Postal Address File (PAF) in order to assist the
completion of the delivery address from the Postcode, along with a mechanism to ensure
that it is up-to-date.
Despatch Express is a replacement system for the earlier Worldwide Distribution Manager
(WDM) and Royal Mail Despatch Manager (RMDM) systems.
The system should only be used in conjunction with the label stock provided by Royal Mail.
These labels are plain white with the Royal Mail cruciform, and have precisely located tearoff strips. They are to be used for all services. Despatch Express will print a Printed Postage
Impression (PPI) and return address on each label. Some services require a coloured
service ‘flash’ in addition to the address label. These are
•
•
•
Recorded
International Airsure
International Signed For
You must supply a PC-compatible computer, a thermal label printer and a connection to
the Internet. The quality of the printer is important, as the printed barcodes must meet
Royal Mail’s stringent requirements. Existing WDM users already in possession of a Zebra
LP2844 printer may use this printer with Despatch Express.
In order to operate correctly, Despatch Express must connect with Royal Mail back-office
systems once a day. During this time it will:•
•
•
•
Send details to Royal Mail for Billing purposes
Retrieve any updates to your Accounts and Services
Retrieve any software updates
Retrieve any Postal Address File (PAF) updates
This connection is via the Internet, but does not require you to use a web browser.
Royal Mail Despatch Express User Guide V1.2
Page 5 of 69
The main despatch screen has been designed so that the use of a mouse is minimised,
although a mouse will be needed for some other functions. Despatches can usually be
created by the use of the keyboard only.
It is a requirement of Despatch Express that you are an account Customer and that you are
using either E*Pro or Online Business Account (OBA) for Billing purposes.
Royal Mail Despatch Express User Guide V1.2
Page 6 of 69
1.1 Equipment Requirements
To enable optimum performance, the PC running Despatch Express needs to meet the
following criteria. Additional processor, memory and hard disk capacity may improve the
speed of operation.
•
•
•
•
•
•
•
•
•
•
•
•
IBM Compatible PC
300 MHz processor
128Mb RAM
Windows 2000 (Service Pack 2 or greater) or Windows XP
5 Gb Free hard disk space (during installation)
3.5 GB hard disk space (ongoing operation)
CD ROM Drive (Installation set is on CD)
1024 X 768 VGA Monitor (or better)
Printer for reports (Laser is recommended either local or networked)
Thermal Printer for bar-coded address labels (e.g. Zebra LP2844). A minimum of
200 dpi (dots per inch) will be needed. Royal Mail will verify that your barcodes are
acceptable by requesting sample labels to be submitted.
Suitable device for backing up databases (e.g. recordable CD or networked drive)
Internet connectivity, although a web browser is not required
1.2 Setup
Before starting to use the system, the guide “Despatch Express – Getting Started” should be
followed. This will ensure that the printer(s) are properly configured, and that initial system
options are set up. It also provides guidance if you have previously used Worldwide
Distribution Manager (WDM) or Royal Mail Despatch Manager (RMDM). The guide was
supplied as part of your installation pack.
Royal Mail Despatch Express User Guide V1.2
Page 7 of 69
2. Starting to use Despatch Express
This section provides a fast track to printing single item labels and a collection manifest.
More detail and a number of additional facilities are covered in the remainder of this guide.
2.1 Startup
To open the Despatch Express application, double click the Despatch Express icon on the
screen desktop. The following ‘Welcome screen’ appears. Clicking off the check box will
prevent this screen appearing in future. Click on ‘continue’ to proceed.
2.2 Login
The login screen will now appear.
For normal use enter the User ID and Password as follows :User ID
Password
super
agates
Royal Mail Despatch Express User Guide V1.2
Page 8 of 69
User IDs and passwords are not case-sensitive.
Press <enter> or click ‘Login’.
The main Despatch Express window and ‘despatch screen’ will then appear as below. The
despatch screen is described in more detail in section 3.
2.4 Quick Despatch
To do a quick single item despatch to a UK address, first open the despatch window (if it is
not already open) by using the ‘Despatch’ menu at the top of the screen, and selecting
‘Create Despatch’.
Key the name of the addressee, if there is one, into the ‘addressee’ field.
Now enter the postcode into the field marked ‘Postcode’. Press <enter> or <F3>.
If requested, enter the house number / name.
So long as the postcode is valid, this will now fill in the address details for you.
If the address needs to be changed, or a business name needs to be added, then click on
the ‘Enable (F4)’ button or press <F4>. This will allow you to edit these entries.
Royal Mail Despatch Express User Guide V1.2
Page 9 of 69
If the required service is not showing on the right hand side of the screen, then select the
service from the drop-down box labelled ‘Service’, and select the weight in the same way.
Now click the ‘Print/Confirm Despatch’ button at the bottom of the screen, and Despatch
Express will produce a barcode label.
See more details in section 3.
2.5 Quick Manifest
When the day’s despatches are complete you will need to print a collection manifest for the
driver to take with him. Note that this process will automatically update the Royal Mail
billing system.
To do this, select the <Reports> menu, and then <Collection Manifest>, and then <Print
Manifest>. Click on ‘Proceed’, and Despatch Express will produce the manifest report on the
screen.
Note:
Note There may be a delay before the manifest is produced for the first time.
To print the manifest, click the small printer icon at the top of the report. Closing the screen
will send the information to Royal Mail.
See more details in section 8.
Royal Mail Despatch Express User Guide V1.2
Page 10 of 69
3. Creating a Despatch
The following describes the Create Despatch screen in detail. It assumes that a mouse is to
be used.
It possible to use this screen without a mouse. If you wish to do so you need to be aware of
which keys are used to navigate between fields.
•
•
•
•
•
Press the <Tab> key to move to the field where you want to next enter data
Within a field, use the cursor keys to move between characters
o <Left arrow> and <Up arrow> move the cursor left
o <Right arrow> and <Down arrow> move the cursor right
Within a drop-down box, use the arrow keys to move between entries
Within the No of items field, the <Up arrow> increments the number of items, the
<Down arrow> decrements the number.
Individual Item details may be selected using either the <Tab> key or the <Up arrow>
or <Down arrow> keys.
The main function buttons can be either clicked with the mouse, or can be selected by
pressing the function key shown on the button.
Where a confirmation is required (e.g. a button showing OK) then pressing the <enter> key
is the keyboard alternative. Where a Yes or No response is required then pressing the <Y>
or <N> keys is the alternative.
Royal Mail Despatch Express User Guide V1.2
Page 11 of 69
This is the main despatch screen, and is used to create labels for despatches, or shipments,
using Royal Mail services.
If the screen is not visible then select Despatch / Create Despatch from the menu or press
<F6>
3.1 Address Details
The system is able to process despatches to both UK and International addresses, with 3
methods of inputting the destination address:
•
•
•
Postcode lookup (UK addresses only)
Address book lookup
Manual entry of the address
Despatch Express always attempts to find an address from the address book before
searching PAF.
3.1.1 Postcode Address File (PAF) Lookup
This assumes that the address is not already held in the address book.
Royal Mail Despatch Express User Guide V1.2
Page 12 of 69
The name of the addressee (if there is one) should be entered in the ‘Addressee’ field.
Enter a postcode into ‘Postcode’ the field and click on ‘Search (F3)’, or press the <enter>
key. Note that it is not necessary to enter spaces in the postcode field.
If the postcode entered is unique to a single address (usually this will apply to a large
Business), then the matching PAF entry will automatically be entered into the despatch
window.
If more than one address matches the postcode, the house number or name will be
prompted for as below:
The house number (or house name) may be entered, and if a match is found against the
postcode, then the address will be inserted into the despatch window.
If the house number / name is not known, then click OK (or press the <enter> key) to
present the selection box shown below (this example is for the postcode LE5 6GA).
Simply clicking on one of the addresses, anywhere across the window, will automatically fill
in the relevant address details in the despatch screen. (NB use of the mouse is required
here)
If the required address is not shown, then this box can be closed using the cross in the top
right corner.
Royal Mail Despatch Express User Guide V1.2
Page 13 of 69
When the address has been found, it is inserted into the despatch screen as below:
Note: The addressee and / or the business name fields must contain an entry, so if the
postcode lookup has not found a business name, then one of these must be entered.
Note: If any of the ‘grey’ address fields found by the postcode lookup need to be amended
(for example where the business name has changed, or a new house name is required),
then these fields can be edited. Click on ‘Enable (F4)’ to enable these fields for editing.
3.1.1.1
Postcode Not Found
If the postcode is not found, the following error box appears.
Royal Mail Despatch Express User Guide V1.2
Page 14 of 69
Click ‘OK’ to return to the despatch screen. Check the postcode entered, and if it is incorrect
then correct it and press <F3> again.
3.1.1.2
Postcode not known or not found on PAF
If the postcode is not known for a UK address, then every attempt should be made to find it
before proceeding. The Royal Mail website www.royalmail.com should be useful here. If
the postcode cannot be found, or the system is unable to find the postcode provided, then
the address should be entered manually before continuing with the despatch. However,
care should be taken that the address is entered accurately. In such a situation you will be
given a warning when you attempt to print the label, and you must confirm your
acceptance if you wish to proceed.
3.1.2 International Addresses
Despatch Express has no equivalent of the PAF lookup for International addresses. Unless
the address is recorded in the address book (see next section) then the address must be
entered in full. It is important that the Country is selected from the drop-down list of
countries at the bottom of the address section. The Postcode is not mandatory on
International addresses.
3.1.3 Address Book Lookup
If there are addresses already saved in your address book, then these can be accessed
directly from the despatch screen.
On the despatch screen enter any combination of
•
•
•
•
Customer ID
Business name
Addressee
Postcode
Note that the first few characters of these fields can be provided. The system will match
what is entered against entries in your address book and will then display a table of all the
matching entries. If only one entry matches, then this will automatically be entered into the
despatch screen – as below.
Royal Mail Despatch Express User Guide V1.2
Page 15 of 69
Shortened Customer ID and Postcode entered
<F3> finds this entry to match.
If multiple matches are found a selection list will be displayed as below
Clicking on the required entry will populate the address fields in the despatch screen. If
none of the entries shown contain the required address, click the ‘PAF’ button to search
PAF. Note that the ‘PAF (F3)’ button will only be enabled if you entered a full postcode.
3.1.4 Saving the Address in the Address Book
If the “Auto-address book entry” option is not set (see section 11) then the ‘Update to
address book (F10)’ button will be available. If you wish to add this address to the address
book for further reference then click the button before proceeding to entering the despatch
details.
Royal Mail Despatch Express User Guide V1.2
Page 16 of 69
3.1.5 Safe Place
Some Royal Mail services (e.g. Royal Mail Tracked) offer the concept of “Safe Place” – this is
an instruction to the delivery postman to tell him what action to take if he is unable to
deliver the item. An example here might be “Leave in the shed”. If you use any of these
services, then your despatch screen will present an extra field as shown below :
Once the address has been found, the safe place text can be entered as below.
Royal Mail Despatch Express User Guide V1.2
Page 17 of 69
If the service selected offers the Safe Place concept then this text will be printed on the
label (see example in Appendix A). If the service selected does not offer the Safe Place
concept then any text entered will be ignored.
3.2 Despatch Details and Printing
The default number of items to be despatched is 1. Please refer to section 3.2.1 if multiple
items are to be despatched to the same address.
If the required Royal Mail Service is not shown in the ‘Service’ box, click on the drop arrow
(see below) to select the required Service. A list of the services to which you have access for
this Country will be shown as a drop down list. Select the service you require by clicking.
The system will then select the first account for this service. If you have multiple accounts
for the service, this can be changed by clicking the drop arrow on the ‘Account Number’
box.
If you select a service where the format is required (Letter, Large Letter or Packet) or the
class (1st or 2nd) is not inferred by the service, then these will be requested as below.
Royal Mail Despatch Express User Guide V1.2
Page 18 of 69
Select the required Format and Class (if these are requested) by clicking the appropriate
button.
Next, click on the Despatch Weight drop arrow and select the required weight/size range
from the list provided. If you have an “average weight” agreement with Royal Mail for the
selected service, then the weight selection here is of no consequence.
A Department Name can be entered, enabling you to use the Department report, and to
search for items by department. Clicking the drop arrow by the Department Name field to
show Departments that have already been set up on the system. If you wish to add a new
Department then type it into the Department Name field – it will subsequently appear in the
drop down list.
You can record one or more ‘Senders References’ against the despatch. This typically
equates to an order number or account number and can be useful for subsequently finding
the despatch. You can also arrange for this to be printed on the label (see section 11).
Where a single reference is required then enter this into the field provided. Where multiple
references are required (e.g. two orders have been put into a single package) please see
section 3.2.2.
Finally, if applicable, a Service Enhancement may be selected from the drop down list
provided.
•
•
•
For Special Delivery this will present the various values of Consequential Loss.
For domestic non-barcoded services (e.g. Standard Tariff Letters 1st & 2nd Class) the
option “Recorded” will be presented (this will result in a barcode being printed on
the label).
For International non-barcoded services (e.g. Overseas Letters Airmail) the options
for Airsure and International Signed For (barcoded services) will be presented.
Clicking the ‘Print / confirm despatch (F12)’ button will save the despatch details, and cause
the appropriate label(s) to be printed. A label example can be seen in Appendix A.
Royal Mail Despatch Express User Guide V1.2
Page 19 of 69
Where a UK address has been keyed manually (this may be necessary for a very new
postcode) and the postcode cannot be found on the Postal Address File (PAF), then the
following box will appear.
Check the postcode again and then click ‘Yes’ (or press <Y>) to print the label, or ‘No’ (or
press <N>) to change the address.
If no postcode has been supplied for a UK address then the following box will be shown.
It is not recommended that UK items are despatched without showing a postcode. However
it is recognised that occasionally this is necessary (e.g. new building). If no postcode can be
found then click ‘Yes’ (or press <Y>) to print the label, or ‘No’ (or press <N>) to enter a
postcode.
Note that if the appropriate option is set (see section 11) then every address used for a
despatch will be automatically added to the address book for future use, except for those
UK addresses not showing a postcode. These will not be added, but will present the
following message.
Click ‘OK’ to proceed.
3.2.1 Multiple Items to the Same Address
If you have multiple items to the same address, then click on the No. of Items field to
change it from the default of 1, then press the <Tab> key or click on another field (e.g.
Service) to enable the ‘Add Item (F7)’ button. ‘Weight/Size’ must be entered for each item
in the despatch. Similarly, ‘Senders Reference’ information can be recorded against each
item.
Royal Mail Despatch Express User Guide V1.2
Page 20 of 69
Having selected the ‘Weight/Size’ and entered ‘Senders Reference’ information for the first
item, click the ‘Add Item (F7)’ button. This fills in the ‘Item Details’ box for that item (see
below). Now enter the details for the second item and press ‘Add Item’ again. Repeat for
each item required. Errors may be corrected by selecting the item in the ‘Item Details’ table
and then either re-entering the required details, or by clicking ‘Cancel Despatch Item (F8)’
to start again.
3.2.2 Multiple Senders References for the Same Item
If you would like to record multiple sender’s references against a single item (for example
multiple orders being packed into the same box) then enter the first ‘senders reference’ in
the field provided and click the ‘More (F9)’ button. This will present
To add a senders reference, please enter the required details and click ‘Add (F7)’. To
remove a senders reference that has already been added, select the entry to be removed
and click ‘Delete (F11)’. To return to the main despatch screen click ‘Back (F2)’.
Royal Mail Despatch Express User Guide V1.2
Page 21 of 69
It is even possible to have multiple sender references with multiple items in a despatch.
These appear in the ‘Item Details’ box as shown below:
Please note, however, that only the first Sender Reference can be printed on the label.
Royal Mail Despatch Express User Guide V1.2
Page 22 of 69
4. Changing and Saving Addresses in Despatch
4.1 Amending an address before Despatch
When an address has been automatically filled in on the despatch screen – either by a
postcode lookup, or by selecting the address from the address book - the details may be
changed before the label is printed. To do this, simply click the ‘Enable (F4)’ button and the
address fields will be re-enabled. If the address was selected from the address book then
any changes made will not change the address book entry. To make permanent changes to
entries in the address book, see Section 6.
Note that if the appropriate option is set (see section 11) then the revised address will be
automatically added to the address book (as a new entry) unless the address book entry
had been originally set up with a Customer ID (see section 6).
4.2 Saving Despatch addresses to the address book
An address used in a despatch can be saved to the address book for future use if required.
Before clicking on ‘Print / confirm despatch (F12)’, use the ‘Update to address book (F10)’
button. This saves the address on screen to the address book. Please note that a customer
ID is not mandatory here, but may be entered to enable the address to be found in future
by, for example, an account number.
It is also possible to set an option in the client configuration (section 11) to force the system
to save every address automatically, when the ‘print/confirm despatch’ button is used. If this
option is set then the ‘Update to address book (F10)’ button is greyed out.
Royal Mail Despatch Express User Guide V1.2
Page 23 of 69
5. Despatch Enquiry
To search for or re-print despatch labels please use the following procedure:
Use the ‘Despatch’ / ‘Search Despatch’ menu option to open the search window as below.
Any of the criteria shown may be used for searching – singly or in combinations.
Also, each entry may be a partial entry. For example, entering ‘LE’ in the postcode field
would find all despatches to Leicester postcodes.
Click ‘Search (F3)’ to bring up a list the matching despatch(es). The following was the result
of entering s20 in the postcode
Royal Mail Despatch Express User Guide V1.2
Page 24 of 69
To select the required despatch from the list, simply click on it. The selected despatch will
be displayed in a new Despatch Item window as below.
You can click the barcode in the Item details window to link directly to the Royal Mail
website to view the status of the item.
Clicking ‘Back to Search Results’ returns to the previous search results in order to enable a
further despatch to be interrogated. The Search Despatch window should be closed before
proceeding with further despatches.
5.1 Label reprinting
The label reprint facility is designed to cover the situation where the original label(s) were
not printed correctly or have been damaged in some way. Find the despatch using the
process above then click the ’Reprint (F11)’ button to produce another copy of the label(s).
Note this button will only be available if the item has not been included on a daily collection
manifest. The system will provide a warning that the original label(s) must be destroyed.
Royal Mail Despatch Express User Guide V1.2
Page 25 of 69
Note that this process must not be used to produce a label for a second despatch to the
same address, as the barcode number(s) produced on reprint will be the same as the
original.
5.2 Cancelling a Despatch
Note: A despatch can only be cancelled if the daily collection manifest has not yet been
produced. The cancel despatch option is separate from the Despatch Enquiry function as
the searching is restricted to despatches that have not been included on a manifest.
Use the ‘Despatch’ / ‘Cancel Despatch’ menu option to bring up a despatch search window
as above. Find the required despatch using the consignment searching process above, and
display it on the screen.
The despatch can now be cancelled by clicking on the <Cancel despatch (F2)> button.
Despatch Express will ask for confirmation before cancelling / deleting the despatch:
Royal Mail Despatch Express User Guide V1.2
Page 26 of 69
Click ‘Yes’ to delete the despatch or click ‘No’ to cancel your request.
A reason for the cancellation / deletion will then be requested :
A deletion reason should be selected from the drop down box, and further explanation can
be entered in the ‘Note’ section if required. If the reason required is not in the pre-supplied
list, then a new reason can be added by typing over an entry.
Click ‘OK’ to confirm the cancellation / deletion. Should you not wish to proceed with
cancelling the despatch, click the ‘Cancel’ button.
If the despatch was cancelled, the confirmation screen will appear as above. Click ‘OK’ to
proceed.
Note:
Note Any barcode label(s) previously printed for this despatch must now be destroyed to
prevent accidental use.
Royal Mail Despatch Express User Guide V1.2
Page 27 of 69
A subsequent despatch enquiry on a cancelled despatch will show “Despatch Cancelled” in
red on right hand side of the Despatch screen.
To view the reason for the despatch cancellation, click the ‘Deletion Reason’ text or press
the <Enter> key. The reason for cancellation and any note that was entered will be shown
as below.
Click the ‘OK’ button to continue.
Royal Mail Despatch Express User Guide V1.2
Page 28 of 69
6 Customer Address Book
Customer addresses may be stored in the Despatch Express Address Book so that the
Create Despatch process (section 3) can be improved by minimising keystrokes. All entries
in the Address Book (other than those created during Create Despatch) must have a unique
identifier by which the address can be referenced (known as Customer ID), and all UK
addresses must have a postcode.
To add, delete or amend a customer address entry, use the ‘Address Book’ menu.
6.1 Adding a New Customer Address Record
To add a single new customer address to the address book use the ‘Address Book’ / ‘Create
Address Book Entry’ menu option, or press <F5> at any point.
This brings up the ‘Add New Address’ window as below.
Here the details of the address can be entered.
Royal Mail Despatch Express User Guide V1.2
Page 29 of 69
The ‘PAF’ lookup button can be used in the same way as on the despatch screen to find an
address from a full UK postcode entered in the Postcode field. An example is shown below:
Notes:
• The customer ID field is mandatory when entering new addresses in this way, and
may subsequently be used to find the address for despatches.
• Either Business name or Addressee (or both) is mandatory.
• If the returned address is incorrect in any way (e.g. incorrect Business name) then
use the ‘Enable (F4)’ button to enable the address fields that have been returned
from PAF.
• At least the first address line is required.
• Postcodes are mandatory where the country is ‘UK’, but not required for International
addresses.
• The email address and telephone number are optional, and are not used elsewhere
in the system. They are here only as memo items for the user, but may form part of
a future enhancement.
• Some services offer the concept of “Safe Place” (see section 3.1.5). Safe Place
instructions can be held in the address book for later use if required.
To save the details, click on the ‘Save (F12)’ button.
If you wish to clear the details and start again, click the ‘Clear (F11)’ button.
Royal Mail Despatch Express User Guide V1.2
Page 30 of 69
6.1.1 Branch Direct
If you are a Customer who uses the Royal Mail Branch Direct service, then the addresses to
which you can despatch are effectively a “closed network”. The Branch Direct service(s)
require that the addresses are held in the address book – you cannot create a Branch
Direct despatch by entering the address on the Create Despatch screen.
The Branch Direct Helpdesk will supply addresses for your use – these can be loaded into
Despatch Express using the Bulk Address Import facility – see section 6.4.
There may be an occasional requirement to add a new Branch Direct location (e.g. a new
branch has opened) or to amend a Branch Direct address. Click the ‘Branch Direct address’
box or tab to it and press the <space> bar. A message will be presented in red as shown
below. This serves as a reminder that despatches to this address will not be delivered
unless a scheduled visit has been arranged with the Branch Direct service.
Each Branch Direct location requires that a hub code is recorded against it – the required
Hub Code will be notified to you from either your head office or from the Branch Direct
team. The Hub Code is a single letter which will appear on the label and is used for sorting
purposes, and is a mandatory entry.
On the despatch screen, a Branch Direct address can be found from the address book by
any combination of :•
Customer ID
Royal Mail Despatch Express User Guide V1.2
Page 31 of 69
•
•
•
Business Name
Addressee
Postcode
6.2 Amending an Existing Customer Record
To amend an existing customer record, select the ‘Address Book’ / ‘Edit Address Book Entry’
menu option. This brings up a search window as below – here with addresses found by
entering part of the Business Name.
Royal Mail Despatch Express User Guide V1.2
Page 32 of 69
Select the required address by clicking on it once, and the details will then be displayed as
below.
Make the required changes to the address details, and click on ‘Save (F12)’ to complete.
6.3 Deleting a Customer Record
To delete a customer from the database, select the ‘Address Book’ / ‘Delete Address Book
Entry’ menu option.
Complete the search process as in 6.2 above, and then use the ‘Delete (F12)’ button.
Royal Mail Despatch Express User Guide V1.2
Page 33 of 69
If the address has been used for despatches, you will be asked to confirm the deletion.
Click ‘Yes’ or press <Y> to confirm, or click ‘No’ or press <N> to cancel.
Note : Deleting an address from the address book has no impact on despatches previously
completed. The address will continue to be visible on Despatch Enquiry. The warning is to
make you aware that this address was (relatively) recently used and that you may wish to
retain it.
6.4 Importing Multiple Addresses
Addresses from a File
Despatch Express provides the facility to import files of addresses (for example from an
order system) into the address book in a single operation. This feature is described in a
separate document called “Despatch Express - Interfacing with your System”.
For Clients who are migrating from the earlier Worldwide Distribution Manager (WDM)
system there is a facility to import addresses from WDM. This is described in the separate
document “Despatch Express – Getting Started” which was provided with the Despatch
Express installation CD.
Royal Mail Despatch Express User Guide V1.2
Page 34 of 69
7. Mailshots or Multiple Despatches
Despatch Express provides a function to organise addresses from the address book into
groups or ‘mailshots’. Once organised, the system can produce a despatch label for every
address in the Mailshot – for the same service, weight etc.
A defined Mailshot can be used repeatedly as required. A single addresses can be a
‘member’ of many mailshots.
An example of usage might be to despatch point of sale material to every large branch in a
retail network. These large branches could be grouped into a mailshot and then having
packed the required number of identical contents, Despatch Express could be used to
produce a label for every branch in a single process.
7.1 Setting up a Mailshot
Mailshot
The mailshot facility is accessed from the main menu – ‘Despatch’ / ‘Mailshot’, and the
following screen is shown.
The list shows any mailshots that have already been set up.
To set up a new mailshot, click on ‘New Mailshot (F2)’. This displays an entry box below the
mailshot window, where the new mailshot name should be entered :-
Royal Mail Despatch Express User Guide V1.2
Page 35 of 69
Key in a mailshot description – to enable you to identify the mailshot again – and confirm
for which country the mailshot is required. If you are using the Royal Mail Branch Direct
service (UK only) then click the ‘Only Branch Direct addresses’, otherwise ignore the
selection box.
Click ‘Save’ to continue.
The ‘Process Mailshot’ window is now shown.
Addresses to be added to the mailshot are selected by entering key data into the one or
more of the ‘search’ boxes at the top, and clicking ‘Search (F3)’.
Here the Customer ID has been used to find Customer IDs beginning with “UAT”, and one
address has then been highlighted. To highlight an entry either click on the required line or
use the <up> or <down> keys. The addresses can be sorted by clicking the appropriate
column heading.
Royal Mail Despatch Express User Guide V1.2
Page 36 of 69
Clicking on ‘Add to List (F2)’ will put the highlighted address into the mailshot itself. This can
be repeated may times, and additional searches done. Alternatively, clicking on ‘Add all to
list (F4)’ will put all the addresses found by the search into the mailshot.
Royal Mail Despatch Express User Guide V1.2
Page 37 of 69
With 3 addresses added from two searches, the window will look something like this.
Addresses may be removed from the mailshot by highlighting them in the ‘Addresses for
Mailshot’ box and clicking ‘Remove from list (F10)’. To clear all selected addresses click
‘Remove all from list (F11)’. Removing addresses from the list will add them to the ‘Search
results’ above so that they can be re-selected if need be.
Note:
Note The sequence in which labels are to be printed may be defined by changing the
sequence in which the addresses are shown on the screen. This is done by clicking on one
of the column headings in the ‘Addresses for Mailshot’ window. For example, clicking on the
Postcode header will sort the addresses into ascending postcode order.
The details of the Mailshot (including addresses, sequence of printing and service / account
selections) can be saved without actually running the Mailshot. Just click ‘Save (F12). This
allows for setting up a Mailshot in advance.
Royal Mail Despatch Express User Guide V1.2
Page 38 of 69
By selecting the service, account and other details in the bottom box, and clicking ‘Process
Mail Shot (F9)’, a label for each address will be printed.
Note that the Format and Class fields will only be presented if required for the selected
service.
These settings (and the selected addresses) will now be saved on the system for the
mailshot to be run again. However all these entries can be changed next time if required.
The system will maintain any number of different mailshots.
7.2 Repeating a Mailshot
Once a mailshot has been set up it can be run many times.
For each run, each item will receive a label for the same service, and care should be taken
to ensure that all the addresses in the mailshot are intended to be included. This is to avoid
having to subsequently delete despatches which are not required.
The mailshot facility is accessed through the ‘Despatch’ / ‘Mailshot’ menu options.
Select the required mailshot by clicking on one that is displayed (or use the <up> or <down>
keys), and then click the ‘Continue to Process Mailshot (F4)’ button. Despatch Express then
displays the main Mailshot execution box as in section 7.1 above.
The details can be changed, if required, before selecting the ‘Process mailshot (F9)’ button
to produce the required labels.
Royal Mail Despatch Express User Guide V1.2
Page 39 of 69
8. End Of Day Process
Although this section refers to the End of Day process, it should be followed for each
Collection. Some Clients have multiple collections each day. When a collection is made, the
Royal Mail driver will expect to receive :1. The items to be despatched
2. A printed manifest summarising the items that have been labelled by Despatch
Express
3. Confirmation documentation that the information has been recorded on the Royal
Mail Billing systems.
Despatch Express includes a function to print the manifest (item 2 above). As well as
printing the manifest, this function will automatically connect (via the Internet) to Royal Mail
central systems in order to :•
•
•
•
Pass information into the Billing Systems
Retrieve any changes to the accounts and services used
Retrieve any updates to the Postal Address File (PAF)
Retrieve any Despatch Express software upgrades
Items despatched via the Branch Direct service do not require either the printed manifest
or confirmation that information has been passed to Billing. However, it is important that
the process is followed so that any changes can be retrieved – even if no other services are
used.
Royal Mail Despatch Express User Guide V1.2
Page 40 of 69
8.1 Collection Manifest
Before the collection driver arrives, follow the instructions below to produce a Collection
Manifest.
From the menu select ‘Reports’ / ‘Collection Manifest’ / ‘Print Manifest’. If no “Daily Rate”
services have been used (such as Packetpost Daily Rate 1st Class), the window shown in
section 8.3 will appear. The following window will only be shown when “Daily Rate”
services have been despatched
8.2 Input Daily Rate Weights
Daily Rate services are priced on the basis of an average weight for the day. This screen
allows you to input either a total weight or an average weight (but not both) for each
combination of service and format used. Please enter either a total weight or average
weight (in grams) against each line. An example is shown below
Click on the ‘Proceed’ button and Despatch Express will calculate the total weight or
average weight as shown below :
Royal Mail Despatch Express User Guide V1.2
Page 41 of 69
If you realise at this stage that you have made an incorrect entry, click the ‘Back’ button.
Note that in this situation you will need to remove either the total or average weights as
you correct the entries.
When you are happy that you have entered the correct weights for the day, click ‘Confirm’
and the following screen will be presented.
8.3
Collection Manifest Summary
The window will show a summary of what will appear on the manifest – this will be
confirmation of the services used since the last manifest. Click on the ‘Proceed’ button to
produce the Collection Manifest.
Note:
Note There may be a delay before the manifest is produced if no other reports have been
produced during the day.
The manifest is a single report that appears in two sections :-
Royal Mail Despatch Express User Guide V1.2
Page 42 of 69
1. Tracked Items. This is produced in two sub-sections; one shows summary totals by
service and weight and the other shows ranges of barcodes for Royal Mail scanning
purposes.
2. Non-Tracked Items. This includes any despatches that did not have barcodes on the
labels, plus any Recorded Signed For despatches (these are not tracked through the
Royal Mail network)
Both sections will appear even if there are no items to be included in the relevant section.
Branch Direct items do not appear on the manifest, and if only Branch Direct items have
been despatched there will be no manifest produced.
Your company name and collection address will be shown at the top of each page, and is
used by Royal Mail to identify where the manifest originated. Should you change name or
move to a different address it is important that you change this (see section 11).
The report should now be printed by clicking on the printer icon at the top left of the page.
This opens the normal Windows print selection window.
Royal Mail Despatch Express User Guide V1.2
Page 43 of 69
Print
Close
When the report has been printed then it must then be closed using the cross in the top
right corner. This initiates the Internet communication with the Royal Mail central systems.
If the system was unable to connect to Royal Mail then the following message will be
presented.
The most likely reason for this is that your connection to the Internet has failed in some
way. It is important that the situation is resolved. If you are able to remedy the problem,
select ‘Tools’ / ‘Send Data to Royal Mail’ to retry. If you are unable to resolve the problem,
then contact the Royal Mail Customer Systems Helpdesk for advice. If the problem cannot
be resolved before the collection driver arrives, then you will need to explain to him that
you have been unable to send your Billing data due to an Internet problem. Every attempt
must be made to send the data later – the data can be sent when the problem is resolved.
Your system will cease to operate if there is unsent Billing data outstanding for more than
5 days.
Despatch Express will send the billing information to E*Pro unless you have been migrated
to Online Business Account (OBA). Instruction on how to use these systems is not covered
in this document.
Royal Mail Despatch Express User Guide V1.2
Page 44 of 69
If you are using E*Pro you should allow 5 minutes for the information to reach the system,
then print a Statement of Mailing report to hand to the driver – this will include your
Despatch Express billing information and is evidence that the information has been passed
to Royal Mail.
9
Reports
Despatch Express produces a number of reports for your own use and these are described
below.
9.1
Collection Manifest Reprint
Production of the Collection Manifest is covered in Section 8 – End of Day Process.
However, there may be occasions when you wish to reprint a manifest. This is covered
here :
From the menu, select ‘Reports’ / ‘Collection Manifest’ / ‘Reprint Manifest’. The following
screen will be presented showing manifests that have been printed previously.
Note that where more than 1 manifest is produced in a single day then the ‘Series’ number
increments for each manifest produced. Select the required manifest by clicking or by use
of the <up> or <down> keys and click the ‘Proceed’ button. The Manifest printed will be
identical to that produced originally.
9.2
Posting List
The Posting List Report provides a detailed listing of what has been despatched (including
the full delivery address), and includes the barcode numbers allocated to each despatch
item. If you despatch many items then please be aware that this may be a large report. It
is effectively a detailed breakdown of a Collection Manifest (which is a summary report).
Royal Mail Despatch Express User Guide V1.2
Page 45 of 69
From the menu, select ‘Reports’ / ‘Posting List Report’ and the following screen will be
presented.
Note that this screen is virtually identical to the one shown in the Collection Manifest
Reprint in the previous section. Select the required manifest by clicking or by use of the
<up> or <down> keys and click the ‘Proceed’ button.
9.3
Department Report
If you wish to report on items by Department it is important that you record the
Department each time you make a despatch (see section 3.2). A report of items by
Department can be produced by selecting ‘Reports’ / ‘Department Report’ from the main
menu. The following selection screen will be presented.
You can choose to limit the report by a range of Customer IDs and for a specified date
range. Clicking the downward arrow against each date presents a calendar to assist in
selecting the required dates.
Although the report will be presented in Department sequence, you can additionally choose
to sort on either Sender Reference or Customer ID as a secondary sequence within
Department.
Royal Mail Despatch Express User Guide V1.2
Page 46 of 69
9.4
Customer Report
If you wish to report on items by Customer it is important to remember that the Customers
should be recorded in the address book so that they have a Customer ID. A report of items
by Customer ID can be produced by selecting ‘Reports’ / ‘Customer Report’ from the main
menu. The following selection screen will be presented.
You can choose to limit the report by a range of Customer IDs and for a specified date
range. Clicking the downward arrow against each date presents a calendar to assist in
selecting the required dates.
Although the report will be presented in Customer ID sequence, you can additionally choose
to sort on either Department or Sender Reference as a secondary sequence within
Customer ID.
9.5
Despatch Report
A report of items Despatched can be produced by selecting ‘Reports’ / ‘Despatch Report’
from the main menu. The following selection screen will be presented.
Royal Mail Despatch Express User Guide V1.2
Page 47 of 69
You can choose to limit the report by a range of Customer IDs and for a specified date
range. Clicking the downward arrow against each date presents a calendar to assist in
selecting the required dates.
You can choose to sort the report by Department, Sender Reference or Customer ID.
9.6
Country Report
A report of items Despatched overseas can be produced by selecting ‘Reports’ / ‘Country
Report’ from the main menu. The following selection screen will be presented.
You can choose to limit the report by a range of Customer IDs and for a specified date
range. Clicking the downward arrow against each date presents a calendar to assist in
selecting the required dates.
The report will exclude domestic items despatched to the UK. Although the report will
appear in Country sequence, you can choose to sort the report by Department, Sender
Reference or Customer ID as a secondary sequence within Country.
Royal Mail Despatch Express User Guide V1.2
Page 48 of 69
10
Backups and Archives
It is important to maintain regular backups of the information held by Despatch Express, in
case it is needed to restore the system. Despatch Express also provides an archive process
to save old information away from the ‘live’ database, to control the file sizes and maintain
the overall performance of the system.
It is strongly recommended that both these processes be carried out on a regular basis.
10.1
Database Backup
Taking a backup of the database should be established as a regular part of the daily
routine. In the unlikely event that the Despatch Express system fails, or hardware
problems occur, the database can be restored to get the system working again. Should you
ever have need to restore from a Database Backup you will need to contact the Royal Mail
Customer Systems Helpdesk for advice.
If you forget to backup the database, then you will receive a reminder. This reminder will
be presented when a number of days have elapsed since the last backup was taken. This
number of days is shown in the System Options (see section 11).
To access the backup process, select <File> / <Backup Database> from the main menu. The
following window appears:
Backups may be made to the same location each time – for example to a removable media,
or to a server on the network. The default location can be set in the System Options
(section 11). The filename is created automatically by Despatch Express and is made up
from the date and time of the backup. Click ‘Start’ to run the backup, and Despatch Express
will confirm completion of the process.
Royal Mail Despatch Express User Guide V1.2
Page 49 of 69
10.2
Archiving Data
To reduce the size of the working database and to speed up operation, it is recommended
that the archive process be run on a regular (e.g. monthly) basis.
Archiving stores old data away from the live system. It may still be viewed by the use of a
spreadsheet (or similar), but the live database size will be reduced. If archiving is not
performed the database may become so large that performance problems are experienced.
It is recommended that archiving should be done every month with three months’ worth of
data being retained on the system.
Two archive processes can be used – to archive unused customer addresses from the
address database, and to archive historic despatch information.
10.2.1
Customer Address Data Archive
You may elect to never remove any addresses from your address book – just in case you
despatch to the same address again. However, if you do wish to archive entries from your
address book, the process is described here.
Select <File> / <Archive Addressbook> from the main menu. The following screen will be
presented
The “threshold” date will be set to the current date. If you leave this date unchanged, you
will archive all addresses except those used today. Click the down arrow to present a
calendar to assist date selection. The concept is that all addresses that have not been
accessed since the given date will be archived.
Note: Care must be taken to ensure the date in this box is the required date.
Royal Mail Despatch Express User Guide V1.2
Page 50 of 69
The location of the archive file can be changed, if required, by clicking the ‘Browse’ button.
Clicking ‘Start’ runs the archive, and Despatch Express confirms with the following message:
Clicking ‘OK’ brings the next prompt – to confirm whether the archived addresses should
now be deleted from the active database.
Selecting ‘Yes’ or ‘No’ completes the address archive process.
The address archive file contains a single record for every address archived. The file can be
opened with a spreadsheet (or similar) but does not contain column headings. Should you
wish to interrogate this file, the layout is identical to that used in Export Address (see the
separate document “Despatch Express - Interfacing with Your System”). It can subsequently
be re-imported using ‘Address Book’ / ‘Import Addresses’ if necessary.
10.2.1
Despatch Data Archive
Most Clients find that retaining 3 months’ worth of despatches in the database is adequate,
but you may elect to retain more (or even less) than this.
Select <File> / <Archive Despatch> from the main menu. The following screen will be
presented
The “threshold” date will be set to the current date. If you leave this date unchanged, you
will archive all despatches except those created today. Click the down arrow to present a
Royal Mail Despatch Express User Guide V1.2
Page 51 of 69
calendar to assist date selection. The concept is that all despatches created before the
given date will be archived. For example 01/01/2006 would archive all despatches that
were created prior to 01/01/2006.
Note: Care must be taken to ensure the date in this box is the required date.
The location of the archive file can be changed, if required, by clicking the ‘Browse’ button.
Clicking ‘Start’ runs the archive, and Despatch Express confirms with the following message:
Clicking ‘OK’ brings the next prompt – to confirm whether the archived despatches should
now be deleted from the active database.
Selecting ‘Yes’ or ‘No’ completes the despatch archive process.
The archive file contains a single record for every item despatched (NB a despatch may
consist of multiple items). The file can be opened with a spreadsheet (or similar) but does
not contain column headings. Should you wish to interrogate this file, the layout is identical
to that used in Export Despatch (see the separate document “Despatch Express Interfacing with Your System”).
Royal Mail Despatch Express User Guide V1.2
Page 52 of 69
11
System Options
This section is also covered in the document “Despatch Express – Getting Started” that was
supplied with the Despatch Express installation, but is covered again here for reference.
There are some options which can be set by the user to change how the system operates.
These are accessed from the main menu by selecting ‘Tools’ / ‘Client Configuration’. This
opens the following window:
The Despatch Address appears on the collection manifest and is used to identify the
Manifest to Royal Mail staff. It should include your Business Name and despatching
address. The Return Address will appear on the despatch labels and is used in the event
that an item needs to be returned.
Royal Mail Despatch Express User Guide V1.2
Page 53 of 69
Other local parameters may also be set –
Backup location
Backup Warning Days
Archive records older than
Percentage Barcode User Before
Reorder
Default No. of items
Maximum No. of Despatch Items
Default Department
Auto-Address Book Entry
Include on Label
This is the default location offered when the backup
process is run.
This is the number of days after which Despatch
Express will warn the user that a backup should be
run.
This indicates the default age for the oldest records
which will not be archived
When the system exhausts this percentage of its
allocated numbers, it will automatically request a new
range. This request is automatic and is invisible to
the Customer. It is not recommended that the setting
is changed other than on advice from the Helpdesk.
This number is shown on the despatch window by
default as the number of items to despatch. It should
normally be set to 1.
In a despatch, if the user selects more than this
number, then Despatch Express will warn the user
that they have done so. This may be used to reduce
errors in keying numbers of items. If you never (or
very rarely) despatch multiple items to the same
recipient then set this to 1.
When a despatch is made, this will show as the
default department.
If ‘Yes’ is selected, then every address used on the
despatch screen will be automatically added to the
address book for future use.
Each of these two options may be selected, and
Despatch Express will then print the selected
information on each label. See the example in
Appendix A.
Make the desired changes. If you have made errors but have not updated, you can reset
the setting to those previously stored by clicking ‘Clear’
When you are satisfied with your changes, click ‘Update’ to store the changes made. A
confirmation message will be presented.
Click ‘OK’ to continue.
Royal Mail Despatch Express User Guide V1.2
Page 54 of 69
12
Special Conditions
This section describes some special situations that may arise
12.1
BFPO Despatches
Despatches to HM Forces address are usually defined as BFPO (British Forces Post Office)
services with an associated number (e.g. BFPO 123). These are currently treated as
domestic addresses for most purposes, and use the domestic services such as Special
Delivery.
BFPO addresses are defined as part of the UK, so Country UK should be selected. However,
BFPO addresses do not have a postcode – which is usually a mandatory field for UK
addresses. The following approach is recommended :
•
•
•
Enter the recipient in the addressee field
If there is no address information to enter (other than the BFPO number), enter
“HM Forces” (or similar) in Address line 1 (mandatory field)
Enter the BFPO number in the Town / City field
An example is shown below
Royal Mail Despatch Express User Guide V1.2
Page 55 of 69
When you click ‘Print / confirm despatch (F12)’ the following message will be presented
Clicking Yes will accept the address and print the required label.
BFPO addresses cannot be added to the address book (section 6) as postcode is a
mandatory field for UK addresses.
12.2
Label(s) with no address
Note that the following is only possible for UK despatches.
Some Clients have a requirement to produce barcoded labels with no address. At first sight
this appears to be a meaningless requirement. However, such Clients produce their own
address label on the item, and require a barcoded label for tracking and proof of delivery
purposes. This section describes how this special situation is covered.
Proper use of these labels requires a link between the barcoded label produced by
Despatch Express and the address label produced by other means. The Sender Reference
field should be used for this purpose. It is expected that an order number, or some other
identifying information, will be entered into this field.
It is not normally possible to enter an address with no information – there are several
mandatory fields. However, there is an “invisible” entry in the address book to cover this
situation. The Customer ID for this entry is XXX (or as many X characters as are necessary
to find the unique entry – you may already have Customer IDs commencing with X
characters). Entering this in the Customer ID field and clicking ‘Search (F3)’ presents the
address as shown below. A sender reference has been entered to show how this might be
used.
Royal Mail Despatch Express User Guide V1.2
Page 56 of 69
The printed label will show no address, but could show the sender reference if this option
was selected in the System Options (section 11)
Royal Mail Despatch Express User Guide V1.2
Page 57 of 69
13.
Hints and tips
13.1
Customer Numbering to Simplify Mailshot Facility
Some Clients do not have a numbering system for their own Customers, but the Mailshot
facility depends address book entries having a unique Customer ID. In such a circumstance
the following may be useful, and is demonstrated by an example.
Example :
A Client’s main Customers are retail outlets. The retail outlets can be
classified as small, medium and large. Periodically the Client wishes to send
a mailshot to each retail outlet, but wishes to send a different package to the
different category of outlet (small, medium and large).
In this example, the Client could allocate a 6-digit number to each outlet, with the small
outlets commencing 01, the medium commencing 02 and the large commencing 03.
When he wishes to create a mailshot to the small outlets (for example) he could select to
mailshot Customer IDs 010000 to 019999. He could then create separate mailshots for
medium and large outlets.
Note that the Customer ID can consist of any combination of letters and numbers. An
alternative to the above could be to number the outlets S0001 to S9999 (small), M0001 to
M9999 (Medium) and L0001 to L9999 (large).
13.2
Use of Keyboard Wedge Scanner to improve speed
This approach has been adopted by a number of Clients to speed up the process and
improve the accuracy of using the Despatch Express system.
Example :
A Client takes orders for goods to be despatched. Her own system produces
a picking note which is used by warehouse staff to fulfil each order. The
Client system prints the Customer Account number as a barcode on each
picking note. The Client has ensured that her Despatch Express address
database uses the account number in the Customer ID field. When the order
has been packed, the packer will go to the Despatch Express system and
enter the account number in the Customer ID field to retrieve the delivery
address. This account number field is 11 digits long, and the Client wants to
minimise the need for keying and to reduce errors.
All the Client needs to do is to connect a “keyboard wedge” scanner in the cable between
the keyboard and the Despatch Express PC. There are no changes necessary to the
Despatch Express system. When the packer is ready to produce a label, she will scan the
account number from the picking note into the Customer ID field – this will appear to
Despatch Express as though he had keyed it – and the delivery address will be presented.
Royal Mail does not provide keyboard wedge scanners (or any other hardware for use with
Despatch Express), but these devices are readily available from a number of suppliers.
Royal Mail Despatch Express User Guide V1.2
Page 58 of 69
13.3
Training Mode
Use of the Training Mode is described in the manual “Despatch Express – Getting Started”
that was supplied as part of the Despatch Express installation pack (along with the
installation CD), and is repeated here.
There are situations where you may wish to use the system but do not want the labels to
be actually used, and do not want the information to be passed for Billing. These situations
might be
•
•
•
You have new Staff member(s) and wish to train them on use of the system
You may wish to “practice” using the system
You may be developing an interface, and wish to test its operation (see the
document “Despatch Express - Interfacing with Your System”)
To access Training Mode, start the system and enter the User ID and Password as below
User ID
Password
training
training
The main screen will appear as below
There should be no doubt that you are in Training mode!
Royal Mail Despatch Express User Guide V1.2
Page 59 of 69
While using Training mode, the system will operate as normal except:
•
•
•
Any labels produced will show a clear indication that they are for Training purposes
only
Each despatch will be automatically marked as “Cancelled” once the label has been
printed
A Collection Manifest cannot be produced (as there will be no items despatched)
Address labels produced while in Training mode must not be used on items despatched
under any circumstances
Royal Mail Despatch Express User Guide V1.2
Page 60 of 69
14.
Printer Setup
This section describes how to align the printer, and to ensure that a thermal printer is
allocated to each service.
It is described in the “Despatch Express – Getting Started” that was supplied as part of the
installation pack. However, there may be occasions when you need to make changes to the
printer configuration :•
•
•
Your printing is getting out of alignment with the physical label. This may happen
(for example) when a new label roll is put into the printer.
You have started to use a new Service
You have changed printer(s) for some of your services
Select ‘Tools’ / ‘Printer Configuration’ from the main menu to display the screen below.
If you have been using Despatch Express then there will probably already be a printer in
the right hand column for some (or all) of the services. The example above shows entries
for most of the label layouts in use – you may only have some of these presented.
Royal Mail Despatch Express User Guide V1.2
Page 61 of 69
In the Label Type drop-down box select any label that will include a barcode. The labels
with barcodes are :•
•
•
•
•
•
Special Delivery Next Day
Special Delivery by 9am
Recorded Signed For
Airsure
International Signed For
Branch Direct
From the drop-down list of printers, select the Thermal printer that you wish to use then
click ‘Print Test’ to print a test label. A sample test label is shown below
Make sure that the peel-off
“blobs” align with the label
cut-outs
Make sure that the bottom
line of the box is present
Note that the horizontal lines of the address box should be continuous. If there is a break
in the lines (it will be in the same place on each line) then your printer is faulty and requires
an engineer.
Check whether the peel-off “dots” align with the cut-out portions on the physical label. If
not, change the vertical and / or horizontal adjustment and retry. Continue until the
alignment is correct. The bottom of the address box should also be complete – adjust
vertically if necessary. When you are happy with the alignment, click ‘Save’. You will receive
a message to confirm.
Royal Mail Despatch Express User Guide V1.2
Page 62 of 69
Now select the next label type from the drop-down box (if you have more than one). All
the settings will remain from the previous label type. Click ‘Save’ and then repeat for each
label type.
Note: it is important that the horizontal and vertical settings are the same for each label
type on a given printer (they may be different if you are using multiple printers).
When complete the screen should look like the one below, with no blank entries in the
printer column.
Royal Mail Despatch Express User Guide V1.2
Page 63 of 69
The screen can now be closed in readiness for despatching.
Royal Mail Despatch Express User Guide V1.2
Page 64 of 69
15.
Help
15.1
Customer Systems Helpdesk
The Royal Mail Customer Systems Helpdesk can be contacted on the following number
08705 333999
When you ring this number you will need to explain that you are using Despatch Express
and will be asked for your company name. In the initial welcome message, you may hear
references to “WDM” or “WDM Online”. The latter refers to the system used by Parcelforce
Worldwide and the helpdesk for this is now handled by a different team. The former refers
to the system that preceded Despatch Express. Both Despatch Express and WDM
(Worldwide Distribution Manager) are supported by the same helpdesk.
Royal Mail Despatch Express User Guide V1.2
Page 65 of 69
15.2
Frequently Asked Questions
Question
Answer
I am running out of labels. How can I get
more?
You should have received an initial supply of
labels with your installation pack, along with
instructions on how to order further labels. If
you have lost these instructions, please contact
the Royal Mail Customer Systems Helpdesk
(section 15.1) and ask for advice. The label
reference number is printed on the reverse of
each label, and will be required by our supplies
department.
Check username and passwords are correct.
They do not need to be case sensitive.
You may not have the required services set up
for the destination or Country selected. If you
believe that these have been agreed with your
Royal Mail Account Handler, then you should
contact the Royal Mail Customer Systems
Helpdesk and ask for advice.
If you want to add another service to your
Despatch Express system, please contact your
Royal Mail Account Handler. When new
Services are set up on our finance systems they
will automatically be enabled on your system 2
working days later. Please be aware that
Despatch Express does not support every Royal
Mail Service.
It is possible that you are trying to use a service
to a Country where that service is not available.
Check the Royal Mail website at
www.royalmail.com.
These are the barcode numbers which go onto
your items and uniquely identify each despatch.
They are automatically allocated by the
Despatch Express system. When your system
is running low it will automatically retrieve new
numbers from the Royal Mail central systems.
Contact the Royal Mail Customer Systems
Helpdesk and ask for advice.
Refer to section 14 Printer Setup
I am unable to log on to Despatch
Express.
I have no Services or Accounts available.
I want to use a Service which is not
showing.
I cannot select the required Service for
an overseas Country
Will I run out of tracking numbers
I have problems with my thermal printer
My labels are not aligned properly
Royal Mail Despatch Express User Guide V1.2
Page 66 of 69
Appendix A.
Sample Labels
Labels
The label shown below is for a Special Delivery Next Day service. The layout is similar for
all labels, but for the service at the top left.
PPI
Service
Barcode with number
shown above and below
Customer ID
Sender Reference
Return Address
Royal Mail Despatch Express User Guide V1.2
Page 67 of 69
The label shown below is for a Royal Mail Tracked item, and shows how Safe Place
information appears on the label
Royal Mail Despatch Express User Guide V1.2
Page 68 of 69
Appendix B.
Features not Covered in this Guide
You may come across features of Despatch Express that are not covered in this document
(for example in the menus). The following features are covered elsewhere. References will
be made to two other documents
•
•
Despatch Express - Getting Started
Despatch Express - Interfacing with Your System
The first of these was supplied with your installation pack. If you require a further copy,
please contact the Royal Mail Customer Systems Helpdesk (see section 15). The second can
be downloaded from the same website location as this User Guide.
Feature
Where Described
System Installation and Set Up
Migration from WDM
Import Address WDM Database
Batch Import
Import Addresses
Direct Feed
Export Data (Despatch)
Export Data (Addressbook)
Despatch Express - Getting Started
Despatch Express - Getting Started
Despatch Express - Getting Started
Despatch Express - Interfacing with Your System
Despatch Express - Interfacing with Your System
Despatch Express - Interfacing with Your System
Despatch Express - Interfacing with Your System
Despatch Express - Interfacing with Your System
+ + + + + + + End of Document + + + + + + +
Royal Mail Despatch Express User Guide V1.2
Page 69 of 69