1
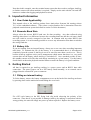
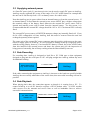
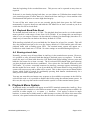
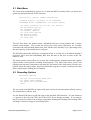
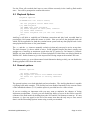
AntiLog
RS232 Data Logging System
User Guide
DOC/ANTILOG/UG/2003001_1.2
19-May-2003
G Hatto
(c) Anticyclone Systems Limited
DOC/AntiLog/UG/2003001_1.2
Page 1 of 20
Mr Geoff Hatto
(c) Anticyclone Systems Ltd, 2003
www.anticyclone.co.uk
DOC/AntiLog/UG/2003001_1.2
Page 2 of 20
Table of Contents
1. Introduction..................................................................................................................... 4
2. Important Information..................................................................................................... 5
2.1 User Guide Applicability..........................................................................................................................5
2.2 Recorder Baud Rate................................................................................................................................5
2.3 Battery Life..............................................................................................................................................5
3. Getting Started............................................................................................................... 5
3.1
3.2
3.3
3.4
Fitting an internal battery.........................................................................................................................5
Supplying external power........................................................................................................................6
Data Recording.......................................................................................................................................6
Data Playback.........................................................................................................................................6
4. Basic Operation.............................................................................................................. 7
4.1
4.2
4.3
4.4
Recording mode......................................................................................................................................7
Playback Mode........................................................................................................................................7
Playback Baud Rate Reset ...................................................................................................................8
Erasing stored data.................................................................................................................................8
5. Playback Menu System.................................................................................................. 8
5.1
5.2
5.3
5.4
5.5
5.6
5.7
5.8
Main Menu...............................................................................................................................................9
Recording Options ..................................................................................................................................9
Playback Options..................................................................................................................................10
General options.....................................................................................................................................10
Locking user options.............................................................................................................................11
Battery Check........................................................................................................................................12
Baud rate selections..............................................................................................................................12
X-Modem playback................................................................................................................................13
6. Connector Wiring......................................................................................................... 15
6.1 RS232 Connections..............................................................................................................................15
6.2 DC Power..............................................................................................................................................15
7. LED flash codes........................................................................................................... 16
7.1 Recording Errors...................................................................................................................................16
7.2 Playback Modes....................................................................................................................................16
7.3 Playback Error.......................................................................................................................................16
8. Problem Solving........................................................................................................... 17
8.1
8.2
8.3
8.4
8.5
8.6
8.7
AntiLog will not switch on......................................................................................................................17
I can't see the terminal menu in playback mode...................................................................................17
The data I logged appears corrupted....................................................................................................18
I get three flashing red LEDs in recording mode ..................................................................................18
Why is my X-Modem uploaded file too big?..........................................................................................18
My PC says it wants to install new drivers when I boot up....................................................................18
The unit won't respond to either the 'On' or 'Off' button........................................................................18
9. Abbreviations................................................................................................................ 19
10. Equipment Specifications........................................................................................... 20
10.1 Absolute maximum parameters..........................................................................................................20
10.2 Normal operation.................................................................................................................................20
DOC/AntiLog/UG/2003001_1.2
Page 3 of 20
1. Introduction
AntiLog is a very effective way to log RS232 data from a vast range of
products including GPS navigation receivers, laboratory equipment,
process control systems and serial output from PC programs. It can
operate stand alone with its own PP3 battery, or it can be fed with an
external DC power source for extended operation.
The design goal was to establish an incredibly simple to operate data logging system that only
requires two panel mounted buttons - 'On' and 'Off'. Even though AntiLog is simple to
operate, there is no compromise on its capabilities. The embedded microcontroller in the
product is able to perform full speed real time capture of RS232 data without any hold off
(e.g. Flow control) which could, for example, upset the timing of equipment under
investigation.
The system is configured for operation using a standard RS232 terminal. All user settings are
stored in non-volatile memory. Flat batteries or battery changes have no effect on the settings
or on any previously stored data as this is written to non-volatile flash memory media.
The standard AntiLog product has the following features:
•
•
•
•
•
•
•
•
•
•
•
•
•
Fully unattended operation possible including automatic power and logging shut down.
Ideal for recording GPS NMEA data in the field.
32 MByte non volatile storage (64, 128 and 256MB options).
Programmable receiver baud rates from 110 up to 230400.
Guaranteed full rate 115200 baud data capture.
Selectable RTS/CTS handshaking for playback.
'Real time' NMEA recorded data playback to simulate a GPS receiver output.
X-Modem aware for uploading recorded data to a host machine.
At least 36 hours of recording time from a single PP3 Alkaline battery
Extended operation possible with long life PP3 Alkaline cells.
Can operate from an external DC power source in the range 4.5 to 18V.
Small boxed profile 90mm x 60mm x 25mm.
Also available as an OEM product to embed in your own applications.
AntiLog only needs the two operator buttons on the front panel for successful recording and
playback of RS232 data. However, the key to AntiLog's advanced capabilities lies in the
ability to configure the system before trials or other recording sessions take place.
The default settings shipped with Antilog will almost certainly need changing to suit your
recording needs. For example, you can use AntiLog to test GPS navigation receiver
application software on a PC in a repeatable way. To do this, you would configure AntiLog
for NMEA real time playback and configure the record and playback baud rates to be the same
as the GPS receiver being used via the AntiLog terminal menu system. You would then
record the NMEA output from the receiver for a representative period of time and switch the
unit off. Next, connect AntiLog to the PC using a NULL modem cable and press and hold the
'On' button so that the unit powers up in playback mode to start the testing. You can then stop
and restart the data stream as you wish using the 'On' and 'Off' buttons or even restart from the
beginning of the log data at any time by just pressing the 'On' button.
DOC/AntiLog/UG/2003001_1.2
Page 4 of 20
Note that in this example, once the terminal menu system has been used to configure AntiLog,
no further contact with a host machine is required. Simply use the unit with the 'On' and 'Off'
buttons to conduct data logging and playback sessions.
2. Important Information
2.1 User Guide Applicability
This manual refers to the AntiLog product from Anticyclone Systems Ltd running release
V1.2 of the embedded software. (The release version number can be determined from the
playback terminal menu system described in section 5 of this document.)
2.2 Recorder Baud Rate
Always select the correct RS232 baud rate for data recording. Any data collected using
AntiLog where there is a difference between the recording baud rate and the real source baud
rate will result in severely corrupted or lost data. In common with any other RS232 data
recording system, it is not normally possible to recover any information from data recorded at
the wrong baud rate.
2.3 Battery Life
If you are running from an internal battery, always use a new one when recording important
trials data. To maintain the life of the battery, it is recommended that it is disconnected
completely from the system if AntiLog is not to be used for more than a week or so. This is
because AntiLog supports active power management which means that there is a very small
current drain on the battery when AntiLog is switched off. Over extended periods of time,
this standby current will effect the total charge remaining in a given battery. Use the battery
check feature at the main playback terminal menu to ensure the battery is in good condition.
3. Getting Started
All that is required to get AntiLog working is a power source and an RS232 data cable
connection. The power source can be a PP3 battery fitted internally, or an external source
plugged into the external DC power connector.
3.1 Fitting an internal battery
To fit the battery, remove the battery compartment cover on the back of the AntiLog enclosure
by pressing down on the marked area and sliding the cover back.
Fit a PP3 style battery to the PP3 flying lead clip inside observing the polarity of the
connector. Note that it is not possible to damage AntiLog by making a connection with the
wrong polarity, the unit will simply not power up when requested. Replace the battery cover.
DOC/AntiLog/UG/2003001_1.2
Page 5 of 20
3.2 Supplying external power
A 6.5mm DC power jack (2.1 mm inner pin size) can be used to supply DC power to AntiLog.
AntiLog accepts regulated DC power in the range 4.5 to 18V which means for example that
the unit can be fed directly from a 12V car battery source for vehicle trials.
Note that AntiLog gets its power either from an internal battery or from the external source. If
an internal battery is fitted then the external power source MUST have a higher voltage than
the terminal voltage of the battery fitted, otherwise the external DC power source will be
ignored and instead, power will be taken from the internal battery. For this reason, it is
recommended that the external DC voltage should be 10V to 18V if an internal PP3 is already
fitted.
The external DC power source will NEVER attempt to charge any internally fitted cell. If you
do fit a PP3 rechargeable cell into AntiLog, then this must be removed from the unit and
recharged separately when required.
The centre pin of the external DC power connector must be positive with respect to the outer
barrel to supply power to AntiLog. It is not possible to damage AntiLog by applying power
with the wrong polarity, however, if an internal PP3 battery is fitted, the power will be taken
from this instead of the external source and hence the system may give the impression of
being powered externally, but will stop working when the internal battery runs out.
3.3 Data Recording
For recording data, AntiLog is designed to look like a PC COM port so that equipment
designed to plug into the serial port of a PC will plug straight into AntiLog without any need
for additional cabling.
RS232 data source.
E.g. A GPS receiver.
1:1 RS232 cable
AntiLog
If the cable connecting the equipment to AntiLog is incorrect or the baud rate specified within
AntiLog does not exactly match that of the source data, then successful recording will not be
possible.
3.4 Data Playback
When playing back data, the connection appears as though it is coming from a PC. To
connect AntiLog to a real PC therefore requires a NULL modem cable. A NULL modem
cable crosses over the transmit and receive lines as well as handshake lines to achieve
successful communications.
PC, PDA or other
RS232 host
DOC/AntiLog/UG/2003001_1.2
RS232 NULL modem cable
AntiLog
Page 6 of 20
If the cable is not correct, or the host machine (e.g. a PC) is not configured to a baud rate
exactly matching the AntiLog playback baud rate then no successful communication will be
possible.
4. Basic Operation
There are two push buttons and a single bi-coloured, high intensity LED
mounted on the front panel of the case. The green push button labelled
'On' is fundamentally used to switch the unit on, and the red push button
labelled 'Off' is used to switch the unit off.
However, the buttons are sensitive to the amount of time they are held down to allow the unit
to operate in different ways. The buttons can also be used when AntiLog is already powered
on to perform other functions, e.g. the 'On' button can be used to start the playback of recorded
data and the 'Off' button can stop any data playback.
4.1 Recording mode
If you press the 'On' button momentarily (i.e. hold it for less than one second) when the unit is
powered down then the unit will power up and enter the recording mode. The bi-coloured
LED will light red for a second or so and then proceed to flash red to show the unit is in
recording mode. The unit can now record any data seen on the 9 way D connector. You will
know if data is being received and recorded because the panel LED will flashes once in red
and then flash once in green followed by a pause to show data is present. If no input data is
present, only a single red flash is seen. Pressing or holding down the 'On' button during
record mode has no further effect so pressing it accidentally cannot upset your data recording
session.
To terminate a logging session, the off button is used. However, you cannot simply press the
'Off' button to turn the unit off, you must hold it down for at least one whole second to
terminate the logging and to turn the power off. This feature helps to reduce the incidence of
data recording loss due to accidental activation of the 'Off' button by knocking it during trials.
You may repeat the 'On' and 'Off' cycling of the power in record mode as many time as
required to add more data to the AntiLog store without the fear of losing data already stored.
Data is simply appended to the current store.
4.2 Playback Mode
With AntiLog switched off, press and hold the 'On' button until the bi-coloured LED shines
green. At this point you can release the button and the unit is in playback mode. The bicoloured LED will now flash green to indicate playback mode. If you have a terminal
program connected to AntiLog set to the current Antilog playback baud rate then you will see
a menu screen on the terminal's display.
With the unit already power up in playback mode, you can press the 'On' button again
momentarily to start the replay of record data straight from the AntiLog store. You can also
initiate playback from the terminal menu system. Data can be replayed at full rate, or using a
special NMEA playback mode in which recorded GPS NMEA data is played back in one
second blocks to simulate the receiver's original output. When playing back data, the 'Off'
button can be used to stop the output. The 'On' button can then be used to restart playback
DOC/AntiLog/UG/2003001_1.2
Page 7 of 20
from the beginning of the recorded data store. This process can be repeated as may times as
required.
If the unit is not already playing back data, you can initiate an X-Modem data transfer from
your terminal program to allow data to be transferred from AntiLog to a host machine with
checksummed data packets to ensure high data integrity.
To turn off the unit, ensure you are not currently playing back data (press the 'Off' button
momentarily if you are) then press and hold the 'Off' button for at least a second as you do to
switch the unit off in record mode.
4.3 Playback Baud Rate Reset
The default playback baud rate is 115200. The playback baud rate can be set via the terminal
menu system to a wide range of rates from 110 to 230400. If you change this rate and forget
what it is (or you suspect someone else has altered it without your knowledge) then there is a
simple way to return the rate back to the factory default of 115200.
With AntiLog switched off, press and hold the 'On' button for at least five seconds. This will
force the playback baud rate to be set to the factory default of 115200 and the unit will enter
playback mode with a flashing green LED. The terminal menu system will appear on a
terminal set with a baud rate of 115200. No other settings are modified during this process.
4.4 Erasing stored data
Normally, you may erase all stored data in AntiLog via the terminal menu system. However,
it is possible to erase all stored flash data during a playback power on sequence. To do this,
ensure the unit is off then hold down the 'Off' button and whilst holding it down, press and
hold the 'On' button for at least a second. The bi-coloured LED should light green showing
you that playback mode has been established. Now release the 'On' button followed by the
'Off' button. If you have a terminal connected to AntiLog a message appears informing you
that the media has been erased. If you do not hold the 'On' button down for long enough, the
system will not power up and no data will be erased. This is done to prevent accidental media
erasure which could be caused by accidentally pressing both buttons simultaneously for a
short period of time with the power off.
You may not want this two button erase sequence to be available to operators in the field for
critical trials work so it is possible to disable this facility using the terminal menu system. In
this case, the only way data can be erased from the system is via the terminal menu system.
5. Playback Menu System
In playback mode, text menus will appear on an RS232 terminal connected to AntiLog. Keys
are typed into this terminal to select different menu options. Keyboard options available are
enclosed in either angled (<>) or square ([]) brackets. If an option is shown in angle
brackets, it means that a further menu or other prompt or action will follow this menu item
selection, else square bracketed items show that an item is selectable directly on the page.
DOC/AntiLog/UG/2003001_1.2
Page 8 of 20
5.1 Main Menu
The main menu automatically appears on a connected RS232 terminal when you power the
system up in playback mode for the first time.
AntiLog V1.2 (Serial number ASL/16/nnn)
(3148395 byte(s) recorded, 9% of 31860744)
(PLAYBACK mode, X-MODEM and 'On' button aware)
<S>
<R>
<P>
<G>
<L>
<B>
<A>
<U>
?
Start playback now (or use 'On' button)
Recording options
Playback options
General options
Lock user options
Battery check
About AntiLog
Shut down
The first line shows the product name, embedded software revision number and a unique
product serial number. The second line shows how many bytes (characters) are currently
recorded to the on board flash media store, how full the store currently is (as a percentage) and
the total capacity of the installed store (in bytes).
The third line shows that AntiLog is in playback mode, it is ready for an X-Modem upload if
requested, and it will start transmitting data from the start of the store as soon as the 'On'
button is used.
The menu options present allow you to enter the recording menu, playback menu and a global
options menu (covering both recording and playback). The other items allow you to start
playing back data now (equivalent to pressing the 'On' button on the front panel), lock the user
options, check the battery status, show more about the program or request a system power shut
down (equivalent to holding the 'Off' button).
5.2 Recording Options
Recording Options
<B> Set record serial BAUD rate
*[L] Panel LEDs enabled
<E> Erase all recorded data
<Esc>
?
The set record serial BAUD rate option will open a baud rate selection menu offering a preset
list of baud rates to choose from.
Use the Panel LED item to toggle the state of the playback LED function. If a star character
(*) appears to the left of the item, the LEDs will be active during recording. If you want to
run for as long as possible from a battery supply then disabling the flashing red recording LED
will help to conserve energy to extend battery life.
DOC/AntiLog/UG/2003001_1.2
Page 9 of 20
Use the 'Erase all recorded data' item to erase all data currently in the AntiLog flash media
store. You will be prompted to confirm this action.
5.3 Playback Options
Playback Options
(X-MODEM and 'On' button aware)
<B> Set playback serial BAUD rate
*[P] RAW Playback
[N] NMEA real time playback
[R] RS232 Request To Send (RTS) enabled
[L] Panel LEDs enabled
<S> Start Playback now (or use 'On' button)
<Esc>
?
AntiLog is still able to establish an X-Modem connection and play back recorded data by
pressing the 'On' button whilst this menu is visible. Here you can set the playback baud rate
which will be applicable for both the terminal menu system and any data played back via the
start playback menu item or 'On' panel button.
The [P] and the [N] items are mutually exclusive in that only one may be active at any time.
The start character (*) shows which is active. RAW playback implies the data is simply sent
straight out of AntiLog at maximum speed when the [S] option (or 'On' button) is selected.
NMEA real time playback mode uses a filtered playback in which lines are delayed based on
NMEA 0183 format content to give the impression of being output at the nominal 1Hz rate.
To conserve power (or to avoid unwanted visual distraction during a trial) you can disable the
flashing playback LED from this menu.
5.4 General options
General Options
[A] Audio enabled
*[E] Keypad two button hold ERASE available
<R> Reset all options to factory defaults
<Esc>
?
The general options cover both playback and record modes. The AntiLog hardware is capable
of playing back audio samples. This facility has been disabled internally in the current release
of the embedded software (V1.2) and the option is provided here for a later release.
If you are working on important trials you may want to minimise the chances of losing
important recorded data. As such, you can disable the ability of a user in the field to erase the
contents of the flash media by holding down the 'Off' and the 'On' buttons at start-up. If a star
character (*) does not appear to the left of the menu item then the only way to erase stored
data is via the 'Recording Options' menu using a serial port terminal.
DOC/AntiLog/UG/2003001_1.2
Page 10 of 20
5.5 Locking user options
The user is able to change the recording, playback and general options with simple key presses
using the three menu items discussed above. However, if AntiLog is accidentally connected
to a live source of RS232 data and the unit is powered on in playback mode instead of the
intended recording mode, AntiLog will think the incoming characters are user menu input and
may attempt to change the AntiLog settings. For example, if the incoming input stream just
happens to have the characters 'REY' at the point when AntiLog is at the root menu, then
AntiLog will go into the recording options (R), select 'Erase all recorded data' (E) and will
confirm the deletion (Y).
The user options lock prevents any input in playback mode from altering any of the AntiLog
system settings. It does not stop the unit functioning in playback mode, it just prevents any
alteration to the data and/or user settings. Type an 'L' key at the root menu and you will see the
main menu change as follows:AntiLog V1.2 (Serial number ASL/16/nnn)
(3148395 byte(s) recorded, 9% of 31860744)
(PLAYBACK mode, X-MODEM and 'On' button aware)
<S> Start playback now (or use 'On' button)
!LOCKED! Recording options
!LOCKED! Playback options
!LOCKED! General options
<L> UnLock user options
<B> Battery check
<A> About AntiLog
<U> Shut down
?
It is now only possible to start data playback (which is always a non destructive action),
attempt to unlock the options lock (discussed here later), display more about AntiLog (read
only) or to safely shut the system down. Attempts to request the Recording, Playback and
General options menu are ignored.
To unlock the options lock, you need to go through a set sequence. With the root menu
locked, type 'L' and confirm that you want to release the options lock by typing a 'Y' key at the
'Are you sure?' prompt. The following display shows the screen output to this stage:Are you sure?
<Y> Yes
<N> No
<Esc>
? Y
Unlock User Options
**** Press the 'On' button now to unlock user options ****
Escape key or 'Off' button to cancel the operation
<Esc>
?
DOC/AntiLog/UG/2003001_1.2
Page 11 of 20
At this moment in time the options lock is STILL active. Press the main green 'On' button to
actually release the lock. If instead you press the 'Off' button at this point the operation is
cancelled and the options lock will remain on. If you type a space character, RETURN or
LINEFEED character then the display is refreshed waiting for the 'On' key once more but no
other actions are taken. Any other keyboard input will cancel the unlock operation and the
options lock will remain on.
5.6 Battery Check
A battery check will show the current condition of the AntiLog power source. The testing is
performed against the current power supply input which is either through the external DC
socket or via the internal PP3 clip. Note that if a PP3 battery is fitted but an external power
source is simultaneously applied with a terminal voltage higher than the PP3 voltage, then the
test results will relate to the external power source, not the PP3 battery. Typing a 'B' key at
the AntiLog main menu to show the battery condition check menu.
Battery condition check
If power goes off during a check then battery needs replacing.
A check will take approximately 20 seconds to complete.
<B> Start a battery condition check.
<Esc>
?
Type another 'B' key to actually perform a battery check. During the check, a number of '#'
characters are filled into a bar style display as shown below. When all of the '#' characters
have been drawn (which will take no more than about 20 seconds), the test results are shown.
Performing battery condition check
[--------------------]
[####################]
***
***
***
***
***
Test Results:Battery voltage, min load = 9.0V
Battery voltage, max load = 8.9V
ADVISE: More than 24 hours remaining
Testing complete
If the bar display appears to lock up (i.e. The display is not completed within about 20
seconds) then the check detected that the supply had fallen below an internal cut-off voltage
limit and the unit has automatically shut down. This action indicates the the source battery
needs replacing immediately.
5.7 Baud rate selections
The following menu is used to select the record baud rate:Set RS232 serial port BAUD rate for recording
[0]
[1]
[2]
[3]
[4]
230400
115200
76800
57600
38400
DOC/AntiLog/UG/2003001_1.2
Page 12 of 20
[5] 28800
[6] 19200
[7] 14400
[8] 9600
*[9] 4800
[E] 2400
[F] 1200
[G] 600
[H] 300
[I] 110
<ESC>
?
This menu us used to set playback baud rate:Set RS232 serial port BAUD rate for playback
(X-MODEM and 'On' button aware)
[0] 230400
*[1] 115200
[2] 76800
[3] 57600
[4] 38400
[5] 28800
[6] 19200
[7] 14400
[8] 9600
[9] 4800
[E] 2400
[F] 1200
[G] 600
[H] 300
[I] 110
<S> Start playback now (or use 'On' button)
<ESC>
?
These two baud rate selection menus appear when a change of baud rate is requested. The star
character (*) shown which baud rate is currently active. Note that for playback baud rate
selection, there is an additional option to allow immediate playback of stored data and the
menu is 'On' button and X-Modem aware.
If you have set a playback baud rate which you cannot remember, you may not be able to view
the terminal menu system again until you select the correct terminal baud rate on the host
machine. Use the 'playback baud rate reset' power up sequence to restore the playback baud
rate to a known value if you do not know the current setting.
5.8 X-Modem playback
As soon as AntiLog is switched on in playback mode it is able to respond to a host request for
logged data using the X-Modem file transfer protocol. X-Modem transfers can be initiated by
a connected terminal program whilst AntiLog displays a menu which states it is X-MODEM
aware.
DOC/AntiLog/UG/2003001_1.2
Page 13 of 20
Most terminal software hosted on PCs and PDAs can support data transfers using the XModem (or X-Modem 1k) protocol. Hyperterminal supplied as standard with the Microsoft
Windowstm operating system for example supports X-Modem file transfers.
If AntiLog is connected to the host machine via an appropriate cable (e.g. a NULL modem
cable) and it is showing a menu which states it is X-MODEM aware then there is no need to
perform any other action other than to ensure the AntiLog playback baud rate matches the
baud rate of the software intending to perform the X-Modem transfer.
When you request a file transfer at the terminal using X-Modem (or X-Modem 1k) transfer,
the terminal software normally requires the user to specify a destination path and file name for
the log data received. This is because the X-Modem file transfer protocol does not include a
file name specification. Once a path and file name have been entered, the host will negotiate
with AntiLog and a file transfer will commence. The host software may give a real time
indication of progress and AntiLog will repeatedly flash four green LED flashes in a row
followed by a time gap to show it is in X-Modem playback mode. When the transfer has
completed, the green LED will go back to flashing once followed by a time gap.
DOC/AntiLog/UG/2003001_1.2
Page 14 of 20
6. Connector Wiring
6.1 RS232 Connections
Pin
RS232 Function
AntiLog connection
Direction
1
Carrrier Detect
[No connected]
-
2
Receive Data
Receive Data
in
3
Transmit Data
Transmit Data
out
4
Data Terminal Ready
Data Terminal Ready
out
5
Signal Ground
Signal Ground
-
6
Data Set Ready
Data Set Ready
in
7
Request To Send
Request To Send
out
8
Clear To Send
Clear To Send
in
9
Ring Indicator
[Not connected]
-
6.2 DC Power
External DC power can be supplied via the 6.5/2.1mm power jack. Note that the power jack
does not disable the internal PP3 cell so the voltage supplied must exceed the battery terminal
voltage of the fitted PP3, otherwise power will be taken from the battery in preference to the
external source.
Power supplied through the DC socket cannot charge the internal cell. If a rechargeable PP3
battery is used then this must be taken out of the AntiLog case and charged separately.
DOC/AntiLog/UG/2003001_1.2
Page 15 of 20
7. LED flash codes
7.1 Recording Errors
A time gap immediately followed by a flashing red LED indicates AntiLog is in record mode.
If a red LED flash is immediately followed by a green LED flash then this indicates that data
is being read in from the RS232 port and is being written to the internal flash media store. If
no green LED flash follows the single red LED flash then the system is not seeing new data.
If more than one red LED flash is seen (and no green flashes are seen), this indicates an error.
The total number of flashes following each time gap indicates an error condition as follows:Total Number of red LED
flashes during recording mode
Error Condition
2
Flash media store is full
3
Flash media store not present (not detected)
7.2 Playback Modes
A gap immediately followed by a flashing green LED indicates AntiLog is in playback mode.
Total Number of green LED
flashes during playback mode
Error Condition
1
Playback mode, terminal menu system active.
2
Playing back data in RAW playback mode.
3
Playing back data in 'real time NMEA' playback mode.
4
X-Modem data transfer in progress.
7.3 Playback Error
If one or more of the LED flashes immediately following the first green flash is red, then an
error condition has been detected. The following table shows the errors detected in terms of
the total number of red flashes seen following the playback green flash.
Total Number of red LED
flashes during playback mode
Error Condition
2
Flash media store not present (not detected)
DOC/AntiLog/UG/2003001_1.2
Page 16 of 20
8. Problem Solving
8.1 AntiLog will not switch on
AntiLog is switched on by pressing the 'On' button either briefly (recording mode) or for just
over a second (playback mode). You should then see a solid red or green long flash from the
bi-coloured LED. If pressing the 'On' button appears to have no effect then work through
these check-lists.
For internal battery operation.
• Remove the battery cover and ensure the battery connection is correctly made. Important do this actively by disconnecting the battery using the PP3 clip and reconnecting it. Try
switching on again.
• Either replace the battery immediately with another cell or check the voltage of the battery
with a meter. For a PP3 battery, this should be at least 8V or more. Even though the
battery may register sensible looking results off load, attempt to switch the unit on whilst
monitoring the battery voltage. You may find the voltage drops to 3V or less under load –
replace the battery.
• In an extreme case, the PP3 clip cable or 'On' button wiring may be defective. Check the
connections to the clip and to the 'On' button from the main circuit board. This may
involve undoing the four cross head screws on the base of the unit.
For an external DC power source.
• Ensure you really are supplying the power you expect with the positive supply being fed to
the centre pin in the DC external power feed. If the unit has an internal battery fitted and
appears to have been working before but has suddenly stopped it may be because the
external power is not really present and the unit has run down the internal cell instead.
• Ensure the DC power socket is designed to fit with the 6.5 mm barrel and 2.1 mm inner pin
size and not the larger 2.5mm inner pin type.
• The external power source should be regulated and able to supply at least 50mA during
start up and about 20mA (5V supply) or 10mA (9V supply) for normal continuous
operation.
• In an extreme case, the button wiring may be defective. Check the connections to the 'On'
button from the main circuit board. This may involve undoing the four cross head screws
on the base of the unit.
8.2 I can't see the terminal menu in playback mode.
•
•
•
•
•
Ensure you are using the right RS232 cable. For connections to a PC or PDA you should
be using an RS232 NULL modem cable, not a cable with 1:1 pin connections.
Check the baud rate of the terminal program matches the playback baud rate last set.
Try typing the space bar or return character in your terminal program to initiate a refresh of
the playback menu currently active.
Ensure you are seeing a single flashing green LED from AntiLog. If there is more than one
green flash then AntiLog thinks it is transmitting data so press the 'Off' button and check
again.
To restore AntiLog to a known playback baud rate, switch off AntiLog by holding down
the 'Off' button. Now press and hold the 'On' button for at least five seconds (or count five
flashes of the green LED). This will force AntiLog to reset the playback baud rate to a
known 115200 speed. Configure your terminal to this speed and try again.
DOC/AntiLog/UG/2003001_1.2
Page 17 of 20
8.3 The data I logged appears corrupted
•
•
•
The record baud rate must match the source baud rate. Double check on both rates.
The cable used for recording (or playback) may be defective (e.g. The ground wire may be
disconnected giving the illusion of working properly some of the time.).
Cable length excessive at high baud rates (e.g. 230400). Use only short length cables for
recording 230400 baud source data.
8.4 I get three flashing red LEDs in recording mode
•
The flash media card cannot be detected or it may be defective. In an extreme situation
(i.e. If the unit gets dropped) the flash memory card may have become unseated from its
holder. Undo the four main screws on the underside of the unit and carefully lift the lid to
one side. Undo the single screw securing the PCB to the base of the box and carefully lift
the whole PCB out. On the underside of the card you will see the flash memory card and
holder. Remove and replace the flash memory card to ensure a positive connection. Refit
the PCB into the case, fit the board retaining screw, and replace the lid and four screws
ensuring no wires are trapped as you secure the lid.
8.5 Why is my X-Modem uploaded file too big?
•
When you use X-Modem to transfer a file from AntiLog to a host machine, the transfer is
done in 1024 byte blocks as defined in the X-Modem specification. An uploaded data file
therefore should be an integer number of 1024 bytes long but 128 byte packets are also
allowed. This means that in most cases, 1024 byte blocks are transmitted followed by a
fixed number of 128 byte blocks to minimise on the number of pad bytes to apply to the
end of the file. The padding character used is in accordance with the X-Modem
specification and is ASCII character code 26 (Control-'Z'). The uploaded file size will
therefore be an integer number of 128 bytes long. Note that byte padding is not applied to
data played back from AntiLog in either RAW or NMEA playback modes.
8.6 My PC says it wants to install new drivers when I boot up
If you boot your Windows PC with AntiLog switched on in playback mode, you may see
messages saying your system has found new hardware and wants to install new driver
software (for example it may say it has found a new bus mouse). This is because the plug and
play system under Microsoft Windows wants to recognise equipment connected to the serial
bus and may send commands to the serial bus to establish what equipment is connected. If it
does do this, and you don't have the options lock active in the playback menu system then it is
possible that AntiLog settings could get changed.
•
•
•
Cancel any requests to install new hardware.
Insure your AntiLog settings are still correct using a terminal program.
If you want to boot your PC with AntiLog switched on, consider using the options lock.
8.7 The unit won't respond to either the 'On' or 'Off' button.
•
•
•
In an extreme situation, it may just be possible to cause the unit to stop responding to the
'On' and 'Off' buttons. Remove the battery cover and disconnect the battery for a few
seconds and reconnect it again. The unit should now work as normal.
The 'On' or 'Off' switch wiring has become disconnected from the board or the switch.
Check the button wiring.
Replace the PP3 battery.
DOC/AntiLog/UG/2003001_1.2
Page 18 of 20
9. Abbreviations
COM
CTS
GPS
LED
OEM
PC
PDA
RTS
PC serial communications port
Clear To Send (RS232)
Global Positioning System
Light Emitting Diode
Other Equipment Manufacturer
Personal Computer
Personal Data Assistant
Request To Send (RS232)
DOC/AntiLog/UG/2003001_1.2
Page 19 of 20
10. Equipment Specifications
10.1 Absolute maximum parameters
Parameter
Min
Max
External DC Operating voltage
4.3V
20.0V
PP3 clip supply voltage
4.3V
20.0V
-25.0V
25.0V
Min
Typical
Max
36 Hours
40 Hours
48 Hours
54mW
63mW
92mW
-
91μW
-
4.5V
12V
18V
o
0C
-
70oC
-
0.15kg
-
RS232 baud rate
110
-
230,400 (1)
Size (W x L x D)
-
65 x 93 x 30mm
-
Maximum guaranteed sustained
full rate data logging speed.
-
115200
-
RS232 data input voltage levels
10.2 Normal operation
Parameter
Operating duration from internal
PP3 cell.
[Test conditions: Continuous data
logging of NMEA data from GPS
receiver at 4800 baud using a
Duracell Plus PP3 cell]
Power consumption
Power consumption (off - standby)
External DC Operating voltage
Operating temperature
Weight (with battery fitted)
Media Life Expectancy.
[Media card specific, card
supplied]
300,000 write
operations
1. The RS232 driver chip used in the AntiLog design is only rated for transmit at up to 140,000 baud into a full 3 kOhm,
1000pF load.
Similarly, the receiver baud rate may be effected by long cable lengths. For this reason, it is
recommended that the highest baud rate used is 115,200. The upper baud rate of 230,400 is possible with short cable
lengths. Note that the 'standard' serial port UART fitted to most PCs cannot operate at such a high speed, the top baud
rate available is fixed at 115,200.
DOC/AntiLog/UG/2003001_1.2
Page 20 of 20