1
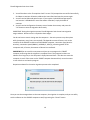
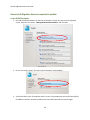
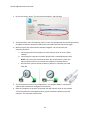
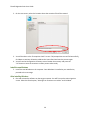
Zinstall Migration Suite User Guide Zinstall Migration Suite User Guide Thank you for purchasing Zinstall Migration Suite. If you have any questions, issues or problems, please contact us: Support email: Sales email: Visit our website: [email protected] [email protected] www.zinstall.com Copyright © ZVT, Inc., all rights reserved. “Zinstall”, “Zinstall XP7”, “Zinstall zPOD”, “Zinstall WinWin”, “Zinstall HDD”, “Zinstall WinServ”, “Zinstall Migration Suite” and the Zinstall logo are registered trademarks of ZVT, Inc. “Windows”, “Windows XP”, “Windows Vista”, “Windows 7”, “Windows 8”, “Windows 10” are registered trademarks of Microsoft Corporation. All other trademarks and copyrights referred to are the property of their respective owners. Distribution of modified versions of this document is prohibited without the explicit permission in writing of the copyright holder. Distribution of this work or derivative work for commercial purposes is prohibited unless prior permission is obtained from the copyright holder. DOCUMENTATION IS PROVIDED “AS IS” AND ALL EXPRESS OR IMPLIED CONDITIONS, REPRESENTATIONS AND WARRANTIES, INCLUDING ANY IMPLIED WARRANTY OF MERCHANTABILITY, FITNESS FOR A PARTICULAR PURPOSE OR NON-INFRINGEMENT, ARE DISCLAIMED, EXCEPT TO THE EXTENT THAT SUCH DISCLAIMERS ARE HELD TO BE LEGALLY INVALID. 2 Zinstall Migration Suite User Guide Contents Introduction .................................................................................................................................................. 4 System Requirements ................................................................................................................................... 5 Preparing for Migration ................................................................................................................................ 6 Running and activating the software ............................................................................................................ 7 Scenario 1: Rescuing a broken computer / Migration from a separate hard drive .................................. 9 Scenario 2: SSD Target (hybrid storage mode) ......................................................................................... 9 Scenario 3: Transfer via intermediate storage location - without a direct connection ............................ 9 Scenario 4: Transfer from a physical machine to a Virtual Machine (P2V) .............................................. 9 Scenario 5: Migration from one computer to another ........................................................................... 10 Scenario 6: Upgrade to Windows 7 / 8 / 10 in-place, on the same physical computer ......................... 10 Scenario 7: Backup to a folder, restore to a folder ................................................................................. 10 Scenario 8: Restoring from a 3rd party backup ....................................................................................... 10 Transferring profiles, settings and data – but NOT applications ............................................................ 11 Selective Migration ................................................................................................................................. 11 Command Line Execution ....................................................................................................................... 11 Performing the Transfer.............................................................................................................................. 12 Scenario 1: Rescuing a broken computer / Migration from another hard drive .................................... 12 Scenario 2: SSD mode ............................................................................................................................. 15 Scenario 3: Transfer without a direct connection .................................................................................. 16 Scenario 4/5: Migration from one computer to another ....................................................................... 20 Scenario 6: Upgrade to Windows 7 / 8 / 10 in-place, on same physical PC ........................................... 25 Scenario 7: Backup to a folder, restore to a folder ................................................................................. 29 Scenario 8: Restoring from a 3rd party backup ....................................................................................... 29 Transferring profiles, settings and data – but NOT applications ................................................................ 30 Selective Migration ..................................................................................................................................... 31 Command Line Execution ........................................................................................................................... 36 Appendix A .................................................................................................................................................. 38 Message Codes ........................................................................................................................................... 41 After the Migration ..................................................................................................................................... 46 Zinstall Migration Suite User Guide Introduction Zinstall Migration Suite supports multiple migration scenarios, among them: 1. Rescuing a broken computer / Migration from a separate hard drive: by transferring applications, settings and files directly off the source computer’s hard drive 2. SSD Target (hybrid storage ode): accommodating a situation where the target computer has a smaller, faster SSD for OS and applications, and a larger ,slower HDD for data 3. Transfer via intermediate storage location - without a direct connection: Capturing a machine into a container file, and deploying a container file on another machine – used when both machines are not available at the same time, or to use a separate storage location instead of a network transfer. 4. Transfer from a physical machine to a Virtual Machine (P2V) – including to Windows XP mode or Hyper-V 5. Migration from one computer to another: over the network or via a direct network cable 6. Upgrade to Windows 7 / 8 / 10 in-place, on the same physical computer – when the new Windows is installed on an existing machine 7. Scenario 7: Transferring profiles, settings and data, but NOT applications – available in all scenarios, to skip application transfer and only transfer data and personalization In each of the scenarios, the Kit allows to transfer the entire user workspace, including applications, settings, personalization, documents, domain settings, security policies and data files. Zinstall Migration Suite performs a native migration, implanting all of the above directly into the target environment. Windows OS, security suites/antiviruses and special purpose drivers are not transferred from the source system. 4 Zinstall Migration Suite User Guide System Requirements Migration Target Minimum Intel Pentium 4 or AMD Athlon XP CPU 1GB RAM Recommended Intel or AMD Dual core CPU 2GB RAM or higher Hard drive free space 1GB and, in addition, enough space for transferred applications and files 20GB and, in addition, enough space for transferred applications and files Network Adapter 10/100 network adapter / wireless Gigabit network adapter Processor Memory Operating system supported Operating system Windows 10 Windows 8 Windows 7 Windows Vista Windows XP Source (Old) Yes Yes Yes Yes Yes Target (New) Yes Yes Yes Yes Yes Notes Zinstall software must be executed with administrative privileges on both source and target systems Zinstall software cannot be executed when the Windows OS is running in safe mode If the Windows operating system is malfunctioning, or any of Windows subcomponents are corrupt, the migration might not work properly Internet connection is required to perform online product activation Zinstall Migration Suite User Guide Preparing for Migration Before You Begin Before beginning the transfer process, it is strongly recommended to prepare your system according to the following checklist. Doing so will ensure the migration is successful and not affected by possible system issues. 1. Uninstall / disable all security software, antivirus or firewalls. 2. Close all running applications. 3. It is recommended – especially for older machines – to verify file system consistency by running the standard Windows CHKDSK utility. For further instructions, see page 39, CHKDSK 4. If one of the hard drives you are using (either SOURCE or TARGET) is formatted with the FAT32 file system, it is required to convert them to NTFS before performing the migration. For further instructions, see page 39, Converting a FAT32 drive to NTFS file system. 5. Make sure there is at least 1 GB free space on each hard drive. Anti-virus / Internet security software Some releases of anti-virus / internet security software products lack a proper identifying mechanism and might mistakenly consider Zinstall software to be a threat. Zinstall code is digitally signed, according to policy, by official worldwide Certification Authority; nevertheless, some of the anti-virus / internet security software might automatically, and without asking the user, prevent Zinstall from normal execution. It is recommended to uninstall anti-virus / internet security software before performing the migration. Alternatively, contact the vendor of the anti-virus / internet security software, in order to get instructions on how to add Zinstall to the “white list” of permitted software. Domain considerations If you are migrating between two computers in a domain environment, you must add the target machine to the domain before the migration, and log in as the same user on both machines. Furthermore, during the migration process, the target computer should be on the domain network, in order to allow it to authenticate the transferred profiles. Zinstall Migration Suite User Guide Running and activating the software The first step in performing the migration is running the software on your computers. IMPORTANT: If you have two computers (migrating from one to another, i.e. an old one and a new one), you need to run the software on both the source and the target computer. Follow this guide on each of the computers involved: 1. If an Internet connection is available, connect the computer to the Internet to simplify product activation. 2. Put the Zinstall software on the SOURCE computer a. If the Zinstall product was purchased electronically, download the software using the link from the Zinstall License Information email received after purchasing. b. If the Zinstall product was obtained as a packaged CD, install the software from the CD. 3. Run the software 4. Perform product activation: a. When Zinstall software is purchased electronically over the Internet, the serial number is obtained from the License Information email, which is sent from Zinstall Support upon purchase. b. When Zinstall software is purchased as a packaged CD, the serial number is printed on a sticker on the CD package. c. You need to supply the serial number when prompted by the software. d. When Zinstall software runs for the first time, you will be asked to enter the serial number and your email address: 7 Zinstall Migration Suite User Guide e. It is very important to provide a correct email address, otherwise you may experience difficulties in receiving support – Zinstall Support System recognizes licensed users by email address. 5. Enter the serial number and email address a. If a red “X” appears to the right of the serial number, this means that the serial number has been accidentally mistyped. Double-check all of the characters, and correct the typo. b. When a green checkmark appears to the right of the serial number, this means that the number has been typed correctly. 6. Press the “Activate” button. An “Activation in progress” message will appear: 7. a. If the computer is connected to the Internet, activation will be performed automatically over the Internet. b. If the computer cannot be connected to the Internet, the activation can be performed using any other Internet connection (“offline activation”). If this is the case, see Appendix A, Web Activation for further instructions. After a successful activation, the following message will appear: 8 Zinstall Migration Suite User Guide What is your migration scenario? Before you begin the migration process, check which of the scenarios below best matches your situation and goals. Then, follow the appropriate guide to complete your migration. Scenario 1: Rescuing a broken computer / Migration from a separate hard drive When the old computer is broken, cannot be turned on, or its Windows OS is malfunctioning (VSS failure, WMI problem etc.), the transfer can still can be performed – directly off the hard drive of the source computer. The hard drive may be connected either internally or externally (using a USB adapter or hard drive enclosure). Refer to page 12 for a detailed, step-by-step guide. Scenario 2: SSD Target (hybrid storage mode) When the target computer has a smaller. faster SSD for OS and applications, and a larger, slower HDD for data, the transfer must take that into account – transferring application configurations to the SSD, and the bulk of the data to the HDD. This “SSD mode” is not a separate scenario – instead, it is a special option that can be enabled when starting a migration in any of the other scenarios. SSD mode is enabled in the appropriate “Target Selection” screen – as instructed by the guide. Refer to page 15 for detailed, step-by-step instructions. Scenario 3: Transfer via intermediate storage location - without a direct connection This scenario allows to perform the transfer not directly, but instead in two separate phases: first, capture the source machine into a container file, stored on a network storage, external hard drive or other storage media and then –deploy the captured container onto the target machine. This allows to perform the transfer even when the source and the target machines are not available at the same time, when the Phase Two need to be delayed or if network storage or external physical storage is the desired way of transfer. See page 16 for a detailed, step-by-step guide. Scenario 4: Transfer from a physical machine to a Virtual Machine (P2V) The Target may be not a Physical, but a Virtual machine. This includes migrating to the built-in Windows XP Mode or Hyper-V. In order to perform such migration, see the instructions for “Migration from one computer to another”, page 20. 9 Zinstall Migration Suite User Guide Scenario 5: Migration from one computer to another For transfers between two computers – a Source and a Target – when both computers are fully functional and connected to the same network. IMPORTANT: This transfer is performed with the computers connected to the same network, same router or directly with a network cable. When your computers cannot connect to each other properly, refer to Scenario 1 (transfer by connecting the source computer’s hard drive directly to the target computer). See page 20 for a detailed, step-by-step guide. Scenario 6: Upgrade to Windows 7 / 8 / 10 in-place, on the same physical computer When a new Windows is installed on an existing, personalized machine. Typically, this will be an in-place upgrade of an XP machine to Windows 7 / 8 / 8.1 / 10. This upgrade is performed using Scenario 3, first capturing the XP machine into a container file, then installing Windows 7 / 8 / 8.1 / 10 on the machine, and finally restoring applications, settings and files back from the container. See page 25 for a detailed, step-by-step guide. Scenario 7: Backup to a folder, restore to a folder Used for creating a full backup of a machine, while making the contents of that backup easily accessible by the user. The backup folder may be placed on any storage location, for example an external drive, and its contents (i.e., all the files and data from the source machine) are easily usable by the user. If and when the user decides to perform a migration from this folder, it is possible as well. See page 29 for a detailed, step-by-step guide. Scenario 8: Restoring from a 3rd party backup Zinstall can be used to perform a restore of programs, settings and files from any mountable 3rd party image backup. Once the 3rd party backup image is mounted, use Scenario 1 to perform the migration. See page 29 for a detailed, step-by-step guide. 10 Zinstall Migration Suite User Guide Transferring profiles, settings and data but NOT applications In all scenarios, the product allows to transfer only profiles, settings and data – without transferring applications. An example of such transfer is when migration is performed to a machine which already has a corporate standard “golden image”, where applications are already installed, but data and settings are missing. This option is toggled by a switch on the main Scenario Selection screen on the Target computer. It is available in all scenarios. Selective Migration In all of the scenarios above, the product allows to perform a selective migration: transferring only chosen parts of the source system, instead of all of its applications, settings and files. Command Line Execution Zinstall Migration Suite may also be executed from a command line interface, instead of manual GUI selection. 11 Zinstall Migration Suite User Guide Performing the Transfer IMPORTANT NOTE for migrations in a domain environment: If your computers are in a domain, make sure to add the target machine to the domain before starting the migration. If you are moving between two machines, make sure to also log in as the same domain user on both machines. During the transfer, make sure the target machine has connectivity to the domain (i.e., not disconnected from the network). Scenario 1: Rescuing a broken computer / Migration from another hard drive To connect the SOURCE internal hard drive externally to the TARGET computer, you need a USB hard drive enclosure, or any suitable adapter (USB / eSATA / Firewire).An adapter can be purchased separately (usually available at a computer store for a few dollars). IMPORTANT: The Source hard drive should contain the entire Source system. Just copying some of the files – even when performed using some of the third-party hard drive cloning software / backup products–may not be enough to perform a migration. If the entire hard drive needs to be copied before the migration, it is recommended to use the Zinstall HDD product for this purpose. To perform the transfer: 1. Turn off the SOURCE computer 2. Dismount the SOURCE hard drive from the SOURCE computer 3. Connect the SOURCE hard drive to the TARGET computer - either internally, or using an external enclosure / adapter 4. Turn the TARGET computer on, and start Windows 12 Zinstall Migration Suite User Guide 5. Run and activate the software on the target computer. You will first see the main migration screen. Select the second option, “Moving from old hard drive”, and click Next. 6. You will be taken to the “Prerequisite check” screen. If all prerequisites are verified successfully, click Next to continue. Otherwise, address the issues found and start the process again. 7. You will next see the will see the “Source selection” screen. The source hard drive will appear in the description area. If more than one hard drive is connected, select the appropriate source hard drive from the list. If you need to perform a Selective Migration, see the “Selective Migration” section below the scenarios in this guide. 8. Once you have completed the Source selection, click Next to continue. 9. You will see the SSD mode option screen. If you require a hybrid SSD storage support, see Scenario 3: SSD Mode for more information. Otherwise, simply click Next to continue. 13 Zinstall Migration Suite User Guide 10. You will see the Configuration Summary screen. Review the summary and press the "Go" button to start the migration when ready. IMPORTANT: During the migration process Zinstall Migration Suite shows how migration stages advance. No user action is required at these stages. You do not have to remain sitting near the computers – the entire process may take quite a while (sometimes, many hours are required). This depends on several factors, such as the condition of the SOURCE hard drive and the SOURCE computer, connection type (wired or wireless), connection speed (10Mbit/s, 100Mbit/s, 1Gbit/s), processing power of the computers and, of course, the amount of data to be transferred. IMPORTANT: Do not touch the computers until you see a message on the TARGET computer confirming that the migration is complete! Even if the progress bar does not advance for a long time, or the computer’s display becomes black – this does not mean the computer is stuck. If the screen on the TARGET computer becomes black, move the mouse to turn it back on and see the progress. Be patient and wait for the entire migration process to be completed: Once you see the message above on the new computer, the migration is complete. Press “Reboot” to finish the process. 14 Zinstall Migration Suite User Guide Scenario 2: SSD mode If the Target computer has a hybrid SSD-HDD configuration, e.g. a smaller SSD for OS and applications, and a larger HDD for data, you can use the dedicated SSD migration mode. In this mode, migrated data will be put onto the larger HDD drive, while the application settings and user settings will be integrated into the OS on the smaller SSD drive. This scenario is not a separate process. Rather, in each of the other scenarios, you will be given an option to use SSD Mode - after the Target selection screen. In order to initiate SSD Mode, select the second option – “SSD Mode / Optimized target selection”. Then, select the larger drive from the dropdown list below. Once done, click Next and continue with the appropriate transfer scenario according to its appropriate section of this guide. 15 Zinstall Migration Suite User Guide Scenario 3: Transfer without a direct connection Use to perform the migration in two stages: first, capturing the source machine into a container file, stored on network storage, external hard drive or other storage media. Then, deploying the captured container onto the target machine. This allows to perform the transfer even if both machines are not available at the same time, or if network storage or external physical storage is the desired way of transfer. On the SOURCE computer 1. Run and activate the software on the source computer. You will first see the main migration screen. Select the third option, “Moving from machine to container”, and click Next. 2. On the next screen, select the location where the container file will be created: 16 Zinstall Migration Suite User Guide 3. You will be taken to the “Prerequisite check” screen. If all prerequisites are verified successfully, click Next to continue. Otherwise, address the issues found and start the process again. 4. You will see the Configuration Summary screen. Review the summary and press the "Go" button to start the container creation process when ready. 17 Zinstall Migration Suite User Guide On the TARGET computer 1. Run and activate the software on the target computer. You will first see the main migration screen. Select the fourth option, “Moving from container to machine” and click Next. 5. On the next screen, browse to locate the container you will be deploying on this machine: 18 Zinstall Migration Suite User Guide 2. You will be taken to the “Prerequisite check” screen. If all prerequisites are verified successfully, click Next to continue. Otherwise, address the issues found and start the process again. 3. You will see the SSD mode option screen. If you require a hybrid SSD storage support, see Scenario 3: SSD Mode for more information. Otherwise, simply click Next to continue. 4. You will see the Configuration Summary screen. Review the summary and press the "Go" button to start the migration when ready. IMPORTANT: During the migration process Zinstall Migration Suite shows how migration stages advance. No user action is required at these stages. You do not have to remain sitting near the computers – the entire process may take quite a while (sometimes, many hours are required). This depends on several factors, such as the condition of the SOURCE hard drive and the SOURCE computer, connection type (wired or wireless), connection speed (10Mbit/s, 100Mbit/s, 1Gbit/s), processing power of the computers and, of course, the amount of data to be transferred. IMPORTANT: Do not touch the computers until you see a message on the TARGET computer confirming that the migration is complete! Even if the progress bar does not advance for a long time, or the computer’s display becomes black – this does not mean the computer is stuck. If the screen on the TARGET computer becomes black, move the mouse to turn it back on and see the progress. Be patient and wait for the entire migration process to be completed: Once you see the message above on the new computer, the migration is complete, and you can safely exit the software on the SOURCE computer as well, by pressing the “Cancel” button. 19 Zinstall Migration Suite User Guide Scenario 4/5: Migration from one computer to another On the SOURCE computer 1. Run and activate the software on the source computer. You will first see the main migration screen. Select the first option, “Moving between two machines” and click Next. 2. On the next screen, select “This is the source computer” and click Next. 3. You will be taken to the “Prerequisite check” screen. If all prerequisites are verified successfully, click Next to continue. Otherwise, address the issues found and start the process again. 20 Zinstall Migration Suite User Guide 4. The following screen will appear, which means the SOURCE computer is ready to start the transfer. Do not exit the software until the migration is complete. You now need to continue the guide, running the software on the target computer . On the TARGET computer 1. Run and activate the software on the target computer. You will first see the main migration screen. Select the first option, “Moving between two machines” and click Next. 21 Zinstall Migration Suite User Guide 2. On the next screen, select “This is the target computer” and click Next. 3. You will be taken to the “Prerequisite check” screen. If all prerequisites are verified successfully, click Next to continue. Otherwise, address the issues found and start the process again. 4. Make sure you have connected the computers together. You can connect your computers by either: a. Connecting each of the computers to same Internet router or home / office network. b. Connecting one computer to another directly with a network(Ethernet) cable. NOTE: If you only have one Ethernet cable, you can disconnect it from your Internet router and use it to connect one computer to another directly c. See below for a picture of what a network / Ethernet / LAN cable you need looks like: 5. You do not have to perform any configurations – just plug the cables in, and Zinstall software will automatically configure the connection. 6. After the computers are properly connected, they will find each other on the network. You will know that this has happened when a green checkmark appears on the old computer. This may take a few minutes. 22 Zinstall Migration Suite User Guide 7. IMPORTANT: Note regarding wireless connections: Zinstall software supports performing a migration via a wireless network connection. However, wireless connections significantly increase transfer times, and may disconnect spontaneously, preventing Zinstall software from completing the migration or even causing the migration process failure. It is strongly recommended to use a wired connection instead whenever possible. To ensure the computers connect using the wired connection, wireless should be disabled on the both computers. 8. Once the computers are connected and have located each other, you will see the Source computer’s description appears on the “Source selection” screen. NOTE: The “handshake” may take several minutes until the computers connect over the network, during which time the description area will remain blank. If you need to perform a Selective Migration, see the “Selective Migration” section below the scenarios in this guide. 9. Once you have completed the Source selection, click Next to continue. 10. You will see the “SSD mode” option screen. If you require a hybrid SSD storage support, see Scenario 3: SSD Mode for more information. Otherwise, simply click Next to continue. 11. You will see the “Configuration Summary” screen. Review the summary and press the "Go" button to start the migration when ready. During the migration process Zinstall shows how migration stages advance. No user action is required at these stages. IMPORTANT: Do not touch the computers until you see a message on the TARGET computer confirming that the migration is complete! Even if the progress bar does not advance for a long time, or the computer’s display becomes black – this does not mean the computer is stuck. The entire transfer process may take a very long time – it’s depending on many several factors, mainly – of the Source computer - such as hard drive condition and bad sectors, hard drive speed, overall performance etc. Accordingly, the progress bar may not show progress for hours – it is normal. 23 Zinstall Migration Suite User Guide If, after a while, the screen on the Target computer becomes black, move the mouse to turn it back on and see the progress. Be patient and wait for the entire migration process to be completed: Once you see the message above on the new computer, the migration is complete, and you can safely exit the software on the SOURCE computer as well, by pressing the “Cancel” button. 24 Zinstall Migration Suite User Guide Scenario 6: Upgrade to Windows 7 / 8 / 10 in-place, on same physical PC Use to upgrade a computer from in place to a new Windows version (for example, upgrade an XP machine to Windows 7 / 8 / 10). Overview: 1. First, capture the existing Windows into a container file, stored on an external hard drive, on network storage, or any other storage media. 2. Then, install the new Windows on the machine. 3. Finally, deploy the captured container onto the target machine. Already installed the new Windows? If you have already installed the new Windows, without capturing the original installation, you still have a chance to migrate. Select the last option – “Windows 7, Windows 8 in-place migration. If your Windows installation has not completely wiped the original data, Zinstall will locate the Windows.old folder and migrate from it. If you have not yet installed the new Windows, use the following steps instead for a safer transfer: On the existing Windows 1. Run and activate the software on the source computer. You will first see the main migration screen. Select the third option, “Moving from machine to container”, and click Next. 25 Zinstall Migration Suite User Guide 2. On the next screen, select the location where the container file will be created: 3. You will be taken to the “Prerequisite check” screen. If all prerequisites are verified successfully, click Next to continue. Otherwise, address the issues found and start the process again. 4. You will see the Configuration Summary screen. Review the summary and press the "Go" button to start the container creation process when ready. Install the new Windows 5. Install the new Windows on the computer. Once Windows is installed to your satisfaction, proceed to the new stage: After installing Windows 6. Run and activate the software on the target computer. You will first see the main migration screen. Select the fourth option, “Moving from container to machine” and click Next. 26 Zinstall Migration Suite User Guide 7. On the next screen, browse to locate the container you will be deploying on this machine. If you need to perform a Selective Migration, see the “Selective Migration” section below the scenarios in this guide: 27 Zinstall Migration Suite User Guide 8. You will be taken to the “Prerequisite check” screen. If all prerequisites are verified successfully, click Next to continue. Otherwise, address the issues found and start the process again. 9. You will see the SSD mode option screen. If you require a hybrid SSD storage support, see Scenario 3: SSD Mode for more information. Otherwise, simply click Next to continue. 10. You will see the Configuration Summary screen. Review the summary and press the "Go" button to start the migration when ready. IMPORTANT: During the migration process Zinstall Migration Suite shows how migration stages advance. No user action is required at these stages. You do not have to remain sitting near the computers – the entire process may take quite a while (sometimes, many hours are required). This depends on several factors, such as the condition of the SOURCE hard drive and the SOURCE computer, connection type (wired or wireless), connection speed (10Mbit/s, 100Mbit/s, 1Gbit/s), processing power of the computers and, of course, the amount of data to be transferred. IMPORTANT: Do not touch the computers until you see a message on the TARGET computer confirming that the migration is complete! Even if the progress bar does not advance for a long time, or the computer’s display becomes black – this does not mean the computer is stuck. If the screen on the TARGET computer becomes black, move the mouse to turn it back on and see the progress. Be patient and wait for the entire migration process to be completed: Once you see the message above on the new computer, the migration is complete, and you can safely exit the software on the SOURCE computer as well, by pressing the “Cancel” button. 28 Zinstall Migration Suite User Guide Scenario 7: Backup to a folder, restore to a folder If you are using Zinstall to create a backup of a machine, while making the contents of that backup easily accessible by the user, you can use the “Moving from machine to folder” to create this backup. This works very similar to Scenario 3, only instead of using a single-file container, we use a folder for storing the source machine’s contents. This folder may be placed on any storage location, for example an external drive, and its contents (i.e., all the files and data from the source machine) are easily usable by the user. If and when the user decides to perform a migration from this folder, it is possible as well – using the “Migrating from a folder image” option. For a step-by-step guide, see Scenario 3: Transfer without a direct connection. Instead of the “container” options, choose the “folder” options when needed. Scenario 8: Restoring from a 3rd party backup Zinstall can be used to perform a restore of programs, settings and files from any mountable 3rd party image backup. To perform the restore: 1. Mount the 3rd party backup image as a virtual drive (refer to the 3rd party backup’s instructions on doing this) 2. Once the 3rd party backup image is mounted as a drive, use Scenario 1 to perform the migration – selecting the mounted backup drive as your migration source. 29 Zinstall Migration Suite User Guide Transferring profiles, settings and data but NOT applications In all scenarios, the product allows to transfer only profiles, settings and data – without transferring applications. An example of such transfer is when migration is performed to a machine which already has a corporate standard “golden image”, where applications are already installed, but data and settings are missing. This scenario is not a separate process. Instead, this option is available in all scenarios. It is toggled by a switch on the main Scenario Selection screen on the Target computer. To perform a migration WITHOUT migrating programs (but WITH migrating profiles, settings, and files) – switch the selection to the second option, “Migrate settings and user profiles only”. FOR ADVANCED USERS ONLY: If you are synchronizing two computers with the same user, where the source computer has the more updated profile, you can choose the 3rd option to OVERWRITE current user’s profile using the source user profile. DO NOT select this option if you are not sure about this. 30 Zinstall Migration Suite User Guide Selective Migration In all of the scenarios above, the product allows to perform a selective migration: transferring only chosen parts of the source system, instead of all of its applications, settings and files. IMPORTANT: This is an advanced configuration. Defining selective rules incorrectly may lead to inconsistent migration results. If you are not sure about your selective migration, contact a migration specialist before proceeding. To perform a Selective Migration in one of the scenarios above: 1. During migration configuration on the new computer, press the “Advanced” button. It will be present on the “Source Selection” screen when migrating over the network, and on the “Target Selection” screen when migrating from a container / folder: 2. The “Settings” menu will open. Press the “Activate Advanced Settings Mode” button to initiate selective migration options. NOTE: This process will take a while to complete. Wait until you see the selection list to continue. 31 Zinstall Migration Suite User Guide 3. Once the initialization is complete, Selective Migration options become available in 4 separate tabs: Files and Directories, Programs, User Profiles, and Registry. 4. Files and Directories selection: In the Files and Directories tab, Exclude and Include rules can be defined on chosen files or folders. 32 Zinstall Migration Suite User Guide a. To add a new rule, browse for, or type in, the path in the path input on the top right, and select Exclude / Include on the left. Then, click the “Add Rule” button. a. If you are typing the path manually, make sure to type in the full path, including the drive letter b. If you are browsing for the path, make sure to toggle “Directory” or “File” in the left combo box, and choose the appropriate drive letter from the combo box after the word “volume”: b. An Exclude rule means that the file or folder will not be transferred to the target system. It will appear with an unchecked check box in the Type column, and with the word “Exclude” in the Action column. To toggle the rule to Include, just click the checkbox on the left. For example: excluding the folder “E:\temp” means that “E:\temp” and all of its contents will not be transferred (while everything else will be). c. An Include rule means that the file or folder will be transferred to the target system, even if their parent folders have been excluded. It will appear with a checked check box in the Type column, and with the word “Include” in the Action column. To toggle the rule to Exclude, just click the checkbox on the left. For example: including “E:\temp\subfolder” means that it will be transferred, even though the rest of “E:\temp” will not because of the exclude rule in the previous section. 33 Zinstall Migration Suite User Guide 5. Programs selection: In the Programs tab, you can prevent programs from transferring to the target system. a. By default, all programs are marked with a checkmark on the left, meaning that they all will be transferred to the target system. You can also change click the “Clear All” button if you prefer to start with no programs being transferred. b. By click the checkmark on the left of each program description, you can toggle whether it will or will not be transferred to the target system. c. If you choose to uncheck a program, for which the path to its files is unknown, you will be prompted to provide said path. If you do not know where the files are stored, cancel that prompt. In such case, some of the files may be transferred, but the program will still be excluded from the target system. 34 Zinstall Migration Suite User Guide 6. At any point, you can save your current rules into a configuration file, by pressing the “Save…” button. You can then load the rules you have defined at a later point, or if you decide to run this migration again. It is strongly recommended to save your rules before starting the migration. 7. Once you have defined the rules as needed, click the “OK” button to return to the Source Selection screen and continue with the migration process. 35 Zinstall Migration Suite User Guide Command Line Execution Zinstall Migration Suite may also be executed from a command line interface, instead of manual GUI selection. Available command line flags are as follows: --serial=<serial_number>: Specify the Serial Number, without dashes or spaces. --email=<email_address>: Specify the email address (use if support is contact required). --eula=yes: Confirm acceptance of EULA. --method=m2c Scenario type. m2c: Machine to container c2m: Container to machine --container=<path_where_to_create_container>: Path where the container will be created (m2c), or path to existing source container (c2m). Expected to exist and be accessible. --enablelog=yes Create a short text log in the execution path. Examples: To migrate a machine to a container: zinstall_migration_suite.exe --serial=<serial_number> --email=<email_address> --eula=yes --method=m2c --container=<path_where_to_create_container> --enablelog=yes zinstall_migration_suite.exe --serial=AAAABBBBCCCCDDDDEEEEFFFFGGGGHHHHJJ [email protected] --eula=yes --method=m2c --container=c:\temp\container.vmdk --enablelog=yes 36 Zinstall Migration Suite User Guide To migrate from a container to a machine: zinstall_migration_suite.exe --serial=<serial_number> --email=<email_address> --eula=yes --method=c2m --container=<path_where_to_create_container> --enablelog=yes zinstall_migration_suite.exe --serial=AAAABBBBCCCCDDDDEEEEFFFFGGGGHHHHJJ [email protected] --eula=yes --method=c2m --container=c:\temp\container.vmdk --enablelog=yes To run the product in an interactive mode (GUI wizard), but automatically enter the serial number and accept EULA: zinstall_migration_suite.exe --serial=<serial_number> --email=<email_address> --eula=yes zinstall_migration_suite.exe --serial=AAAABBBBCCCCDDDDEEEEFFFFGGGGHHHHJJ [email protected] --eula=yes 37 Zinstall Migration Suite User Guide Appendix A Web Activation If a computer is not connected to the Internet, Zinstall Migration Suite will be unable to activate itself automatically. In this case, Zinstall Migration Suite will prompt you to perform a Web Activation manually. 1. On any computer with an Internet connection, open a browser (for example, Internet Explorer) 2. Go towww.zinstall.com/activation – It doesn’t matter which computer you use for this - you can even use your phone. 3. In browser Web Activation form, enter the Activation ID, Serial Number and email as they are shown in the running Zinstall Migration Suite window. 4. Click Activate in the browser. 5. The Web Activation form will show you a Confirmation ID. 6. Enter this Confirmation ID in the running Zinstall Migration Suite window. 7. Click Activate in the running Zinstall Migration Suite window. 38 Zinstall Migration Suite User Guide CHKDSK To perform a Windows CHKDSK hard drive consistency check, and fix possible errors, do the following: On Windows XP / Vista / 7: 1. 2. 3. 4. 5. Open Start Menu, then "My Computer" Right click on your hard drive, select "Properties" Go to the "Tools" tab In the "Error Checking" box, click on "Check Now" Make sure both options are checked: "Automatically fix file system errors" and "Scan for and attempt recovery of bad sectors" 6. Click Start 7. If you are prompted to reboot, accept. On Windows 8 / 10: 1. 2. 3. 4. Right-click on the Start button (bottom-right corner of the screen) Select “Command Prompt (Admin)” If prompted to allow the application to run, click Yes. In the window that opens (black window, white text), type the following command. Instead of F:, type in the drive that you want to check (could be C:, D:, E:, F: etc.) Make sure to type a colon (“:”) after the drive letter: chkdsk /f /r /x F: 5. Press enter 6. If you are prompted to reboot, accept. If you have several hard drives, you need run CHKDSK for each of them. Converting a FAT32 drive to NTFS file system If some of the drives on your SOURCE computer are using the FAT32 file system, they should be converted into the NTFS file system in order to ensure a reliable transfer. Do the following for each of the FAT32 partitions: 1. Open a command prompt by going to Start Menu -> All Programs -> Accessories -> Command Prompt 2. In the command prompt, type the following command and press enter: convert c: /FS:NTFS 3. If you are asked to provide a "volume label", type in the label the drive has as seen in My Computer. For example, if My Computer has "Drive C: [My Drive]", you need to type in "My Drive". 4. Answer YES to question about “volume in use, do you wish to force?” 39 Zinstall Migration Suite User Guide 5. Answer YES to question about “system volume, schedule for next boot?” 6. Restart your computer 7. When windows begins to start , let it do a disk check (it will show the message “the type of the file system is FAT, press any key to cancel disk check” - do NOT press any key at this stage ) 8. Once a disk check is done, conversion to NTFS will begin. This may take some time. Wait for it to finish 40 Zinstall Migration Suite User Guide Troubleshooting Guide Message Codes Message Code Troubleshooting instructions 10 A currently running application is preventing Zinstall from operating properly. Close down all applications running on your computer and run Zinstall Migration Suite again. If you are unsure which application to close - restart your computer and run Zinstall again. 11 No activations remaining Your license has been activated on too many computers, and cannot be activated on more computers. Another license is required. 13 You are trying to activate the wrong product with your serial number / Anti Virus or Firewall blocking Zinstall from loading 1. Make sure the serial number you are using fits the product you are trying to activate it with. For example, if you are activating Zinstall WinWin, make sure you are using a WinWin serial. 2. Make sure antiviruses and firewalls are uninstalled or fully disabled. 122 In-place upgrade attempt without a Windows.old folder You have chosen the “in-place upgrade” scenario, however your Windows does not have an old Windows.old archive. Without Windows.old, there is nowhere to migrate from. If you have previously created a container of your original Windows, you need to use the “Migration from container to machine” scenario to continue. 190 191 Critical Windows service is corrupted on your computer This message code appears when an essential standard Windows component is either malfunctioning or corrupted. Although such malfunctioning / corrupted component is not part of Zinstall software, it needs to be fixed in order to allow proper execution of Zinstall within the Windows installation. When this message is shown, it also includes detailed information about the name of the malfunctioning component and a failure code which can be used for troubleshooting. Troubleshooting: 1. If the problem is caused by Microsoft Windows Management Instrumentation service 41 Zinstall Migration Suite User Guide (WMI) – i.e. Microsoft component malfunction – it should be fixed by utilizing Microsoft’s support resources. Instructions can also be found on the following page: http://windowsxp.mvps.org/repairwmi.htm 2. The following instructions initiate a built-in Windows component repair: a. Open Control Panel -> Add/Remove programs b. Click “Add/Remove Windows Components” on the left panel c. Click “Next”, and then “Finish” in the dialog that pops up d. Windows will try to reinstall its standard components The network connection between your computers has been disconnected during the migration. This may be caused by Faulty network adapter on the SOURCE computer Faulty network switch that fails during the migration, because of its failure to handle of large volumes of data copied Firewall/antivirus/security software interfering with network traffic. 252 Troubleshooting: 1. Make sure the network cable and adapters are properly connected physically. 2. Make sure both SOURCE and TARGET computers are online and not turned off / hibernating 3. Make sure there are no firewalls/antiviruses/security software installed / running on either SOURCE or TARGET computers 4. If you are using a direct cable connection, use a router connection instead. 5. If you are using a router connection, use a direct cable connection instead 6. Close all programs on both computer before starting the migration again If the problem persists, the recommended solution is: 1. Remove the hard drive from the SOURCE computer and connect it to the TARGET computer. 2. Perform the migration using that hard drive as migration source (see User Guide for detailed instructions) 254 VSS issue Volume Shadow copy Service (VSS) is a Windows component that allows creating a snapshot of a volume in order to copy it in a consistent manner. For more details, see Volume Shadow Copy Service Overview. Zinstall uses VSS on the source computer in order to create a consistent copy of all its disks. In case of a VSS problem, Zinstall can still perform the migration, but this may cause issues in later stages of the migration, if file system and/or registry activity happens on the source computer during the migration. 42 Zinstall Migration Suite User Guide If Zinstall Migration Suite shows a warning about VSS, either close all applications on the source computer in order to lower the chances of problems later on, or resolve the VSS problem before proceeding with the migration process, according to the following guide. How to solve VSS problems? Windows XP 1. On your SOURCE computer, download the vshadow utility from: http://www.zinstall.com/sto/tools/vshadow.exe 2. Open a command prompt and for each volume on your source computer, run "vshadow x:" where "x" is the volume drive letter. For example: "vshadow c:" This should result in a lot of text being printed out. 3. If the VSS is working fine, the output should end with the line "Snapshot creation done." 4. If a VSS problem is still present, the output will end with a detailed problem description and error code. 5. You can use this problem description and error code to either contact Microsoft's support or try and find a solution using available knowledge base and Internet sources. Once you get VSS to work, run the migration again. 262 General error Troubleshooting: 1. Perform a CHKDSK - hard drive consistency check - on the hard drive of the SOURCE computer 2. Make sure there are no firewall/antivirus/security software installed / running on 3. Restart both the SOURCE and the TARGET computers 4. Then run the migration again One or more of the FAT32 file system For a reliable transfer, FAT32 partitions should be upgraded to the NTFS file system. 298 Troubleshooting: Please do the following for each of the partitions mentioned in the message you have seen. 1. Open a command prompt by going to Start Menu -> All Programs -> Accessories -> Command Prompt 2. In the command prompt, type the following command and press enter: convert c: /FS:NTFS 3. If you are asked to provide a "volume label", type in the label the drive has as seen in My Computer. For example, if My Computer has "Drive C: [My Drive]", you need to type in "My Drive". 43 Zinstall Migration Suite User Guide 4. 5. 6. 7. Answer YES to question about “volume in use, do you wish to force?” Answer YES to question about “system volume, schedule for next boot?” Restart your computer When windows begins to start , let it do a disk check (it will show the message “the type of the file system is FAT, press any key to cancel disk check” - do NOT press any key at this stage ) 8. Once a disk check is done, conversion to NTFS will begin. This may take some time, please wait for it to finish 9. Once the conversion is finished, Windows will reboot itself once more. Your file system is now upgraded to NTFS. SOURCE and TARGET computers cannot connect The SOURCE and TARGET computers cannot find each other on the network. 322 Troubleshooting: 1. Make sure a network cable (not a USB cable!) connects the computers 2. Make sure Zinstall Migration Suite is running on both - the SOURCE and the TARGET computers, and the appropriate Zinstall Migration Suite windows appear on both computers’ screens 3. Make sure the network cable and adapters are physically connected properly and securely. 4. Make sure no firewall/antivirus/security software is installed and running on either old or new computers 5. Make sure network adapters are installed properly on both computers – the adapters have to be shown in Control Panel -> Network Connections 6. Make sure network adapters are enabled on both computers (marked as “Enabled” in Network Connections) If the problem persists: 1. If a direct cable connection was used, try using a router connection instead. 2. If a router connection was used, try using a direct cable connection instead. 3. Close all programs on both computers before starting the migration again If nothing of the above helped to overcome the problem, use an alternative transfer method: 1. Remove the hard drive from the SOURCE computer and connect it to the TARGET computer. 2. Perform the migration using that hard drive as migration source - see User Guide for detailed instructions. 328 VSS warning To troubleshoot, see Message 254 (above) 44 Zinstall Migration Suite User Guide 375 467 469 470 Migration from 64 bit to 32 bit is not allowed for this system Your Source OS is 64 bit, while the target is 32 bit. In order to complete the transfer, upgrade the target Windows to 64 bit. Then, run Zinstall again. Source hard drive or storage location has disconnected during the migration The source hard drive (or source storage location) has disconnected from the target machine during the migration process. This can also be caused if the source has a major corruption of its data, preventing the data from being read. Steps to resolve: - Make sure the source drive is securely connected to the target machine - Run CHKDSK on the source drive (see Appendix above). - Restart the computer Then, run Zinstall again. Windows updates required on target Your target Windows must be up-to-date before continuing the migration. Run Windows Updates on the target machine until it is fully updated, including Service Packs (such as Windows 8.1 upgrade). Then, run Zinstall again. Source computer has disconnected Migration source has disconnected during the migration process. This error may also be caused by a hard drive corruption issue on the source machine. 471 472 Restart both machines, ensure the network cables are properly connected. It is strongly recommended to avoid low quality connections, such as unstable wireless networks. To fix any possible hard drive corruption, run CHKDSK on the source drive (see Appendix above). 45 Zinstall Migration Suite User Guide After the Migration Software activation In some cases, third-party vendors require re-activation of their software, when it determines that system's component(s) are changed. Vendor policy in this regard varies and depends on several factors, such as: which and how many hardware components were changed, and which particular edition of the software is used. In most cases, software re-activation can be done online through the software itself (when prompted to re-activate), or via the vendor website. Example of software requiring re-activation is Microsoft Office. As stated above, Microsoft Office supports fully automatic re-activation online. Incompatible applications When using Zinstall Migration Suite to transfer between XP and Windows 7 or Windows 8, or between 32-bit and 64-bit systems, you may find that some of the applications are inherently incompatible with the TARGET system. For example, an application using 32-bit drivers will not run on a 64-bit system “out of the box”, and software such as Outlook Express cannot be used on Windows 7 or Windows 8 under any circumstances. When you encounter such applications, you should contact the software vendor to check whether a different version of the software, compatible with the TARGET system – and how the incompatibility can be fixed. Alternatively, some applications can be made to run using the Windows built-in “compatibility mode” setting (configurable by right-clicking on the application and selecting “Properties”). If your primary concern in the migration is to continue using legacy/incompatible applications, consider using Zinstall XP7 to perform the migration. How to revert the TARGET computer to its original state before the migration If you would like to revert the TARGET computer to its original state, before the migration, this can be done using Windows System Restore standard procedure. This option is useful if you would like to perform the migration “from scratch”, or if you have encountered a problem with the new computer you cannot fix in any other way. Windows System Restore is a built-in Windows service which allows you to revert all changes made to applications, system, drivers etc. You can select the date to which you want to revert. System Restore does not change or revert documents and non-application files. To revert the computer to its original state, before the migration, revert to a System Restore snapshot taken just before the migration. It is recommended to use the snapshot taken automatically before the migration is started – it has the word “Zinstall” in its description. 46 Zinstall Migration Suite User Guide For detailed instructions on how to use System Restore, please see the following guide: http://www.zinstall.com/support/common-issues-and-solutions-1/revert-computer-original-state-syste m-restore Applications using an SQL server database installed on a client-side computer In some rare cases, when SQL server database engine is installed on a client-side computer, such applications may not function correctly after the transfer. To resolve this issue manually, mark the SQL server service to launch as the “SYSTEM” user. Alternatively, go to “Control Panel” -> “Add/Remove Programs”, and select “Repair” for the required application. 47