1
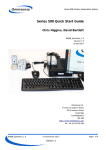
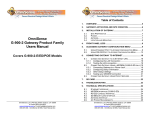
Series 500 Cluster Geolocation System
Series 500 CLS 503 User Guide
Christopher Higgins
RM009_CLS503_1.0
Revision 1.0
8 May 2013
Omnisense Ltd.
3 Floor, St Andrew's House
59 St Andrew's Street
Cambridge
Cambridgeshire
CB2 3BZ
http://www.omnisense.co.uk/
Tel: +44 (0)1223 651390
rd
RM009_CLS503_1.0
© Omnisense 2013
VERSION 1.0
Page 1 of 11
Series 500 Cluster Geolocation System
Table of Contents
1
2
3
4
Introduction.......................................................................................................... 3
Startup................................................................................................................ 3
Shutdown............................................................................................................. 4
System settings...................................................................................................... 4
4.1 Changing the keyboard layout.............................................................................. 6
4.2 Adjusting the display......................................................................................... 7
4.3 Setting the time and date................................................................................... 8
5 Networking........................................................................................................... 8
6 More Information.................................................................................................. 11
RM009_CLS503_1.0
© Omnisense 2013
VERSION 1.0
Page 2 of 11
Series 500 Cluster Geolocation System
1 Introduction
The Omnisense CLS 503 is a small PC used to collect the Series 500 device data, compute their
locations and optionally display graphics. It can also serve a stream of location data to another
application over the network.
The operating system on this computer is Ubuntu 12.04, which is a distribution of the GNU/Linux
operating system, often called simply Linux for short.
You may not be familiar with Ubuntu or with Linux, so this guide contains pointers on how to
achieve some common tasks.
2 Startup
Figure 1: Startup screen
The picture above shows the screen when we first start up. The CLS 503 is configured to
automatically login and startup the Firefox web browser.
The CLS 503 is configured with a single user: name “oms” and password “omspass”. If the
screensaver kicks in you may need the password to unlock.
The picture shows the main elements of the Ubuntu desktop. Down the left-hand side is a column
of icons with applications (such as Firefox) and the trash can. Along the top is a menu-bar, with
the application's menus on the left and system menu's on the right. In the picture above Firefox's
menus are not visible, but they become visible when the mouse enters the menu area.
RM009_CLS503_1.0
© Omnisense 2013
VERSION 1.0
Page 3 of 11
Series 500 Cluster Geolocation System
3 Shutdown
To shutdown the CLS 503 choose shutdown from the right-most menu:
Figure 2: The system menu
Figure 2 shows the system menu with “Shut Down...” at the bottom.
Hint: Firefox does not shut down cleanly if you simply use the “Shut Down” menu item. It is best
to close Firefox before choosing “Shut Down”. If it is not closed, on reboot Firefox will come up a
window prompting you to “Restore the last session”. Choose this option to restore your previous
tabs.
4 System settings
Perhaps your display does not look quite right? Perhaps the keyboard layout is not right? Do you
need to set the local timezone? These things can be done using the “System settings” application
which is on the dock:
Figure 3: System settings
application icon
RM009_CLS503_1.0
© Omnisense 2013
VERSION 1.0
Page 4 of 11
Series 500 Cluster Geolocation System
Figure 4 shows the application window:
Figure 4: System settings window
The system settings window shows the “Keyboard Layout” application in the “Personal” section at
the top, the “Displays” application in the “Hardware” section in the middle, and the “Time &
Date” application in the “System” section at the bottom.
RM009_CLS503_1.0
© Omnisense 2013
VERSION 1.0
Page 5 of 11
Series 500 Cluster Geolocation System
4.1 Changing the keyboard layout
Figure 5: Keyboard layout window
Figure 5 shows the keyboard selection window. Use the “+” button at the bottom-left to add a
new keyboard layout.
RM009_CLS503_1.0
© Omnisense 2013
VERSION 1.0
Page 6 of 11
Series 500 Cluster Geolocation System
4.2 Adjusting the display
Figure 6: Displays window
Figure 6 shows the displays window. Choose the best resolution for your monitor.
Hint: If a “phantom” screen appears, alongside your actual display, uncheck “Mirror displays”,
select the phantom screen, and turn it off (using the on/off slider at the top).
RM009_CLS503_1.0
© Omnisense 2013
VERSION 1.0
Page 7 of 11
Series 500 Cluster Geolocation System
4.3 Setting the time and date
Figure 7: Time & Date application
Figure 7 shows the Time & Date application. Use the vertical grids to choose your timezone and
select your location. You can set the time manually or automatically from the internet.
The “Clock” tab has a number of options for how times and dates are displayed.
5 Networking
The CLS 503 is configured to obtain an IP address using DHCP. This means the address is allocated
to it dynamically by your local network.
To find out what this IP address is, start the “Terminal” application from the left-hand application
dock, and type ifconfig eth0. You should see something like this:
RM009_CLS503_1.0
© Omnisense 2013
VERSION 1.0
Page 8 of 11
Series 500 Cluster Geolocation System
Figure 8 shows the output of the ifconfig command. The IP address is called “inet addr” and
appears on the third line of the text above. In this case it is 192.168.59.47.
Most CLS 503s have two ethernet ports and you may have plugged the cable into the one called
eth1. If so typing ifconfig eth1 brings up its information. In fact typing ifconfig alone
brings up the information for all interfaces.
Once you know your IP address you can connect to the CLS 503 using it. For example, using ssh to
login, or connecting to Omnisense's location server to receive location output over a TCP/IP
connection. When using DHCP it is likely that the DHCP server assigns the same address to the CLS
503 each time it is booted up. However, it may be assigned a new address, at least in principle. It
may also be that you are in a situation where you are not using DHCP, for example, in a site where
the “network” is the CLS 503 and your laptop. So there are some situations where you may want
to set the IP address yourself.
To change the IP address, select “Edit Connections” from the “Networking” menu:
Figure 9: Networking menu
This brings up the Network Connections window as shown in Figure 10. Select the wired
connection and click “Edit”.
RM009_CLS503_1.0
© Omnisense 2013
VERSION 1.0
Page 9 of 11
Series 500 Cluster Geolocation System
Figure 10: Network connections
Clicking “Edit” brings up the “Editing connection” dialog:
RM009_CLS503_1.0
© Omnisense 2013
VERSION 1.0
Page 10 of 11
Series 500 Cluster Geolocation System
Figure 11 shows the “Ipv4 Settings” tab of the window for “Wired connection 1”. The “Method”
dropdown has been set to “Manual”. (Automatic using DHCP is another option.)
In the “Addresses” section, we see the setting of a manual address (192.168.59.238 on the left)
with a gateway (192.168.59.1 on the right). These two addresses will need changing to suit your
local network. The netmask will probably be suitable, but check with your IT administrators.
6 More Information
You can find out more about ubuntu on the net, www.ubuntu.com is one starting point. The
version of Ubuntu being used is 12.04 LTS, where the LTS means “long term support”.
You can contact Omnisense on [email protected].
RM009_CLS503_1.0
© Omnisense 2013
VERSION 1.0
Page 11 of 11