1
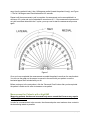
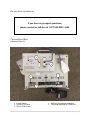
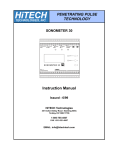
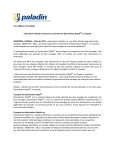
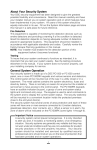
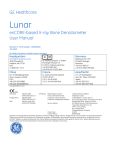
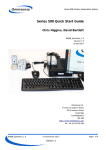
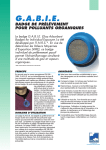
Setting Up and Using the Omnisense 8000S Quick Reference Notes Technical Support: Call Toll Free: 1-877-590-9555 x345 Table of Contents Setting Up the Omnisense 8000S .............................................................................................. 1 Omnisense Set-up Tips.............................................................................................................. 1 SQV Measurement ................................................................................................................. 2 New Patient ........................................................................................................................ 2 Required Information .......................................................................................................... 3 Performing a Patient Measurement ........................................................................................ 3 To measure the distal radius ............................................................................................... 3 Measurement for Patient’s with a High BMI ............................................................................ 4 Unexpected Results ............................................................................................................... 5 Shutting Down the Omnisense Unit ........................................................................................ 5 Troubleshooting Tips.................................................................................................................. 5 You are able to do an SQV Measurement but unable to get a reading on the patient. ........ 5 Device is frozen and you are unable to move the cursor on the screen or use the keyboard. ........................................................................................................................................... 5 Screen displays “Disk Error” at startup. ............................................................................... 5 Do you have questions?............................................................................................................. 6 Connections Map ....................................................................................................................... 6 Reference Photo “A” ............................................................................................................... 6 Contents for an Osteoporosis Clinic ...................................................................................... 7 Pick Up by FedEx: ..................................................................................................................... 7 Pear Healthcare Solutions Inc. 1625 Flint Road Toronto, ON M3J 2J6 Phone: 416-236-9555 Toll-Free: 1-877-590-9555 x345 Setting Up and Using the Omnisense 8000S CCCEP accredited clinical education on osteoporosis is online at http://www.healthelearning.ca Setting Up the Omnisense 8000S See Reference Photo “A” for map showing the proper connections. Keyboard & Mouse – This is a wireless combination unit with the ON/OFF switch at the top right edge. Foot Pedal – Plug the foot pedal into COM 2 only, marked on the back of the Omnisense unit. Ultrasound Probes – CM probe connects to Slot #1; CS probe connects to Slot #2. Ensure the screws that secure the probes to the slots are tightened with the screwdriver provided. The SQV measurement must be performed after setup is complete. For more information on this, see the section marked, “SQV Measurement”. For operating instructions and information about interpreting results, please see the “Omnisense Ultrasound Bone Sonometer” orientation video and the user manual, included in the case. You must watch the orientation video on another computer. The video cannot be viewed on the Omnisense unit. Turn on the device and log in. Omnisense Set-up Tips What you will need for set-up: Antiseptic baby wipes to clean the probe Paper towels Garbage pail Log in: Username: sunlight Password: omni 1|P a g e Note: Use the patient’s non-dominant arm. If the patient has had a bone fracture or open sores or abrasions in the measurement area, then you can use the dominant arm for screening. Positioning: Patient Operator Set-up in the configuration as shown above will make it easier for the operator to scan the arm. Any technical support or shipping questions can be answered by our staff by calling tollfree at 1-877-590-9555: Press extension 0 for immediate assistance. Enter extension 345, for after hours and weekends. Leave a message and you will receive a callback. SQV Measurement Perform this measurement once per day on both probes before measuring patients to verify the probes are working properly. To review how to perform the SQV Measurement, select “System Quality Verification” from the “Measurement Type” drop-down list, and then click on the “Measurement Methodologies” icon located on the top toolbar. New Patient Click on the “New Patient” icon located on the top left corner of the toolbar. A window will be displayed that enables you to create a “New Patient” profile. All fields marked with a red square must be completed to proceed. 2|P a g e Required Information Patient ID: A unique identifier for the patient’s profile. A suggestion could be to enter your store number followed by “1” for the first patient, “2” for second patient, etc. Family Name & First Name: For best practice with respect to ensuring your patients privacy, use a patient’s initials or an “X” instead of personal identifiers. Gender: Choose either male or female. Date of Birth: Must be entered as day/month/year. Reference Database: Select “American.” NOTE: this includes a wide cross section of the North American population and many ethnicities. This is the default population for screening purposes. Performing a Patient Measurement Technique is critical to obtain an accurate result. Please take time to read through the following section and practice as much as possible before your screening event. To ensure that you are performing the measurement properly, perform multiple measurements on the same person. The results from the device are reproducible; to verify this each measurement should be within .1 - .2 standard deviations. Make sure the “Measurement Type” drop-down menu has “Single Site” selected. When measuring the forearm, the “Site” drop-down menu should have “DISTAL RADIUS” displayed and you should use the CM probe. At any time you may click on the “Measurement Methodologies” icon for a video demonstration on how to measure a patient. To measure the distal radius, determine which is the patient’s non-dominant arm and verify the distal radius has never been fractured by asking the patient. If this bone has been fractured, you can measure the dominant arm. Using the measuring tape provided, measure the length of the forearm to the tip of the middle finger and mark the halfway point with the marking pencil. Apply a generous amount of gel to the arm and the CM probe. The measurement methodologies video may show a cap that covers the probe. This is not required or included as part of this system. Click “Measure” located on the toolbar; then press the foot pedal to begin measurement. Use a slow, smooth motion back and forth on the measurement site. An audible tone is used to alert the technician that the ultrasound probe is making proper contact with the bone. (No tone means that you are not making contact with the bone.) Keep your attention on the probe as you carefully move it back and forth; you do not need to look at the screen. To scan the distal radius, start with the probe upright at 90 degrees. The side of the probe marked with a “T” should be near the skin mark. Scan 70 degrees lateral (toward the outside or 3|P a g e away from the patient’s body), then 140 degrees medial (toward the patient’s body), see Figure 1. The full 140-degree scan should take about 4-5 seconds. Repeat until the measurement cycle is complete. A measurement can be accomplished in a minimum of 3 cycles and can be extended to a maximum of 5. If the measurement process did not yield consistent data within the 5 cycles, you may need to start the measurement process again. Figure 1 Once you have completed the measurement recorded the patient’s results on the results sheet. You can use the graph on the screen to counsel to the result with your patient or use the laminated paper chart included with your kit. Before moving on to the next patient, click the “Save and Close” button after you have printed the patient’s results and in order to measure a new patient. Measurement for Patient’s with a High BMI Measuring patients that have an increased body mass around their forearm may require a different procedure. In order for a measurement to be accurate, the ultrasound probe must make as close contact to the bone being tested as possible. 4|P a g e In some cases, it may be moderately or very difficult to measure patients with too much body mass between the bone and the probe. If this is the case, you may need to default to FRAX which is a paper-based risk assessment. This assessment has been provided as an item in this clinic’s shipping case. Unexpected Results IMPORTANT: If you receive an unusual or unexpected result, either a very high or very low TScore (a low result in an otherwise healthy person, or a high T-score in a person who is at risk), please re-test the patient to verify the result. Shutting Down the Omnisense Unit 1. Click on the “Patient” drop-down menu on the top left of the screen. 2. Click on “Exit.” Another window will appear; select “Shutdown” (Note: this is not the default selection.) 3. Click “OK.” 4. Once the screen displays the Windows logo and reads, “It is now safe to turn off your computer,” you can turn off the unit using the power switch located on the back (see Reference Photo “A” for button location). 5. It is now safe to disconnect all plugs and connectors and pack the unit in the shipping case supplied. Troubleshooting Tips You are able to do an SQV Measurement but unable to get a reading on the patient. Ensure that you have selected the correct probe on the Omnisense program, “CM” (large probe) or “CS” (small probe). Also, ensure the probe is tightly inserted into the slot at the back of the unit and that it is in the correct slot. Device is frozen and you are unable to move the cursor on the screen or use the keyboard. Press the power button on the keyboard to start a safe shutdown process. If this fails, turn off the main power switch and restart the unit. Screen displays “Disk Error” at startup. This indicates a hard drive problem and the machine must be exchanged. 5|P a g e Do you have questions? If you have any support questions, please contact us toll-free at 1-877-590-9555 x345. Connections Map Reference Photo “A” 2 3 5 1 4 1. Power Switch 2. Slot #2 (CS Probe) 3. Slot #1 (CM Probe) 4. USB port for wireless transmitter 5. Foot pedal attached to COM2 port 6|P a g e Contents for an Osteoporosis Clinic Please ensure that the following steps are completed by the end of your clinic day: Turn off the laptop, disconnect all cables, and pack up supplies. Ensure all of the pieces are in the case as listed: Omnisense 8000S Device USB Foot pedal Ultrasound CM probe Bottle(s) of ultrasound gel (that came with the unit) Phantom (clear plastic bar calibrated for SQV measurement) Armrest Measuring devices including arm measuring tape and marking pencil Cables: power cord for Omnisense, extension cord Screwdriver Shipping Information Envelope (includes the shipping instructions) Quick Reference Notes Frax risk assessment paper Omnisense orientation DVD User Manual Pick Up by FedEx: You will receive a return waybill with the device. The return waybill is sent in a Pear envelope marked “RETURN WAYBILL”. Do the following: - Insert the waybill into the FedEx clear plastic waybill pouch already on the case handle tag where the original was placed when you received the unit. Replace the old waybill with the new one. Pear Healthcare Solutions Inc. will arrange for FedEx to pick up between 9:00a.m. and 6:00p.m. the next business day following your clinic. Keep the shipping case in a safe area within the pharmacy and inform you Customer Service Desk and/or the Shipper/Receiver that the pharmacy as a pick up scheduled for FedEx. 7|P a g e