1
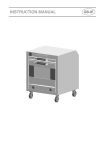
ESSEH60RC
User Guide & Installation
Handbook
Part No 083342100 Date 05/12/2013
CONTENTS & INTRODUCTION
CONTENTS
•
SAFETY
•
USING THE PRODUCT
•
CLEANING
•
INSTALLATION INSTRUCTIONS
•
TECHNICAL DATA
•
CUSTOMER CARE
INTRODUCTION
Thank you for buying this Britishbuilt appliance from us.
This guide book is designed to help you
through each step of owning your new
cooker, from installation to use. Please
read it carefully before you start using
your product, as we have endeavored to
answer as many questions as possible,
and provide you with as much support as
we can.
If, however, you should find something
missing, or not covered, please contact
our Customer Care team. Their number is
located on the back page of this book.
WARRANTY
Your new appliance comes with our 2 year
electrical and mechanical breakdown warranty. To register your appliance please
call:
01759 48 78 32
Alternatively, complete the registration
form included or register online at the
web address located on the back page of
this book.
For full terms & conditions of the manufacturer’s guarantee, refer to the website
on the back of this book.
In addition, you may wish to purchase
an extended warranty. A leaflet explaining how to do this is included with your
appliance.
Our policy is one of constant development
and improvement, therefore we cannot
guarantee the strict accuracy of all of our
illustrations and specifications - changes
may have been made subsequent to
publishing.
For customers outside the UK and Northern Ireland, please contact your local
supplier.
3.010
SAFETY
BEFORE USING THE PRODUCT
Make sure that you have removed all
packaging and wrapping. Some of the
items inside this appliance may have
additional wrapping.
It is advised that you turn the ovens and/
or grill on for a short while. This will burn
off any residues left from manufacturing.
There may be a smell which accompanies
this process - but this is nothing to worry
about and is harmless.
It is recommended that you wash the
oven shelves, baking tray, grill pan and
grill pan trivet before their first use in hot
soapy water. This will remove the protective oil coating.
Please note:- these safety warnings
cover both gas and electric products.
GENERAL
WARNING! - The
appliance and its
accessible parts become
hot during use. Care
should be taken to
avoid touching heating
elements. Children less
than 8 years of age shall
be kept away unless
continously supervised.
This appliance can
be used by children
aged from 8 years and
above and persons with
reduced physical sensory
or mental capabilities or
lack of experience and
knowledge if they have
been given supervision
or instruction concerning
the use of the appliance
in a safe way and
understand the hazards
involved. Children
shall not play with the
appliance. Cleaning and
user maintenance shall
not be made by children
without supervision.
WARNING! Unattended cooking on
a hob with fat or oil can
be dangerous and may
result in fire.
NEVER try to extinguish
a fire with water, but
switch off the appliance
and then cover the flame
with a lid or damp cloth.
WARNING! - Danger of
fire: Do not store items
on the cooking surfaces.
WARNING! - Servicing
should be carried out
5.1
SAFETY
only by authorised
personnel.
• The appliance must
never be disconnected
from the mains
supply during use,
as this will seriously
affect the safety
and performance,
particularly in
relation to surface
temperatures
becoming hot and gas
operated parts not
working efficiently.
The cooling fan (if
fitted) is designed
to run on after the
control knob has been
switched off.
• Do not spray aerosols
in the vicinity of this
appliance while it is in
operation.
• Do not store or use
flammable liquids or
items in the vicinity of
this appliance.
• Do not modify this
appliance.
CAUTION: The use of
a gas cooking appliance
results in the production
of heat, moisture and
products of combustion
in the room in which it is
installed. Ensure that the
kitchen is well ventilated
especially when the
appliance is in use:
keep natural ventilation
holes open or install a
mechanical ventilation
device (mechanical
extractor hood).
Prolonged intensive use
of the appliance may call
for additional ventilation,
for example opening
of a window, or more
effective ventilation,
for example increasing
the level of mechanical
ventilation where
present.
5.1
SAFETY
WARNING! Do not operate the
appliance without the
glass panel correctly
fitted.
WARNING! Never put items directly
on the base of the oven
or cover the oven base
with
foil, as this can cause the
base element
to overheat.
WARNING! The top element gets
extremely hot when in
use, so take extra care to
avoid touching it.
WARNING! Do not modify the outer
panels of this appliance
in any way.
WARNING! This appliance must be
earthed.
WARNING! -
There is a risk of electric
shock, so always make
sure you have turned
off and unplugged your
appliance before starting.
Always allow the product
to cool down before you
change a bulb.
WARNING! - Do not
use harsh abraisive
cleaners or sharp metal
scrapers to clean the
ovendoor glass since
they can scratch the
surface, which may well
result in shattering of the
glass.
GAS WARNING! If you smell gas:
Do not try to light any
appliance.
Do not touch any
electrical switch.
Contact your local gas
supplier immediately.
CAUTION: This
appliance is for cooking
5.1
SAFETY
purposes only. It must
not be used for other
purposes, for example
room heating.
OVEN / GRILL
Do
• Always take care when removing food
from the oven as the area around the
cavity may be hot.
•
•
•
Always use oven gloves when
handling any utensils that have been
in the oven as they will be hot.
Always make sure that the oven
shelves are resting in the correct
position between two runners. Do
not place the oven shelves on top
of the highest runner, as this is not
stable and can lead to spillage or
injury.
Always use the Minute Minder (if
fitted) if you are leaving the oven
unattended - this reduces the risk of
food burning.
Do Not
•
Never place items on the door while
it is open.
•
Never wrap foil around the oven
shelves or allow foil to block the flue.
•
Never drape tea towels near the oven
while it is on; this will cause a fire
hazard.
•
Never pull heavy items, such as
turkeys or large joints of meat, out
from the oven on the shelf, as they
may overbalance and fall.
Never use this appliance to heat anything
other than food items and do not use it
for heating the room.
5.1
USING THE HOB - ELECTRIC (SOLID)
Before using the hob for the first time, it
should be primed and seasoned - refer to
the instructions in the cleaning section.
To switch on a hotplate element
Turn the selected hotplate control knob
clockwise or anti-clockwise, depending on
the required setting.
The high speed hob ring(s) are identified
by its central red spot. A high speed hob
ring has a faster response time. To switch
off, return the control knob to the “off”
position.
Using the hob
Do not operate the hotplate elements
without a pan on, or leave them running
after removing a pan.
The electric hob uses a sealed hob system
where heat is transferred by conduction.
Decorative covers should not be used over
the hotplates as these can trap moisture
and cause intense heat.
When you have finished cooking check
that all controls are in the off position.
CLEANING
Caution: Any cleaning agent used incorrectly may damage the hob.
Always let the hob cool before cleaning.
Some cooking operations generate a
considerable amount of grease. This,
combined with spillage, can become a
hazard if allowed to accumulate on the
hob through lack of cleaning. In extreme
cases this may amount to misuse of the
appliance & could invalidate your guarantee.
Do not use caustic pastes, abrasive cleaning powders, coarse wire wool or any
hard implements, as they will damage the
surfaces.
All parts of the hob can be safely cleaned
with a cloth wrung out in hot soapy water.
Control knobs
Only use hot soapy water. Control knobs
can be removed for cleaning, but take
care to ensure that they are repositioned
correctly after cleaning.
Facia / hob control panel
When cleaning the facia area, care must
be taken on symbols / markings. Only use
hot soapy water.
Vitreous enamel surfaces (Enamel
hobs only)
HOB SPILLAGE WELL
Use a mild cream cleaner.
Stainless Steel surfaces
HOB SPILLAGE WELL (STAINLESS STEEL
MODELS ONLY), SOLID PLATE SPILLRINGS
Only use a clean cloth wrung out in hot
soapy water, and dry with a soft cloth.
Stubborn marks can be removed using
a stainless steel cleaner. We recommend
that you clean the whole of the stainless
steel area to maintain a uniform finish.
Do not use undiluted bleach or any
products containing chlorides as they can
permanently damage the steel.
Extra care should be taken when cooking food in salted water. Some foods are
corrosive - eg; vinegar, fruit juices and
especially salt - they can mark or damage stainless steel if they are left on the
surface. Turn off and wipe any spillage
immediately, taking care to avoid skin
contact with any hot surface or spillage.
Sharp objects can mark the surface of
stainless steel, but marks will become
less noticeable with time. To maintain the
finish of the stainless steel, or to remove
any greasy marks, wipe the stainless steel
surface sparingly with a minimum amount
of Baby Oil and kitchen paper. Do not
use cooking oils, as these may contain
salt, which can damage the stainless steel
surface.
Solid plate elements
Care and maintenance:
Before using the hob for the first time, we
recommend that you prime then season
the hotplates.
To prime the hotplates, switch on each
element in turn for a short period, without
a pan, to harden and burn off the coating.
Use a medium - high setting for 3 - 5 minutes. A non-toxic smoke may occur during
this process. Allow hotplates to cool, then
season.
To season, first heat the hotplate for 30
seconds on a medium setting, then switch
off. Pour a minimum amount of unsalted
vegetable oil onto a clean dry cloth or
paper towel, and apply a thin coat of oil
to the hotplate surface. Wipe
off any excess oil, then heat the hotplate
on a medium setting for 1 minute. Occasional seasoning will help to maintain the
appearance of the hotplates.
To restore the finish of the hob, a solid
electric hotplate polisH can be used. Refer
CLEANING
to the manufacturer’s instructions before
use, and take care to avoid the red dot on
the high speed hotplate(s).
Cleaning:
Important: Ensure that elements are
switched off and cool before cleaning.
For normal cleaning wipe with a clean
damp cloth. When cleaning, follow the
circular grooved pattern on the hotplate.
Rinse off cleansing agent thoroughly, then
switch on to a
low - medium setting for a few minutes
to dry.
For heavy cleaning use a clean damp
cloth or scouring pad with a cream or
powder cleaner. Take care, when cleaning,
to avoid the red dot on the high speed
hotplate(s).
INSTALLATION INSTRUCTIONS
Clearances & dimensions
Secure hob to worktop
The room should have good light and
ventilation but be free from draughts.
The worktop should be at least 600mm
deep, & 30mm thick to enable the
cutout to be made to the dimensions
shown below.
Place the hob in the cutout and secure in
place using the four brackets and screws
provided. The brackets should be
orientated to suit the worktop thickness
as shown, then inserted into the four
slots (two on the front edge and two
on the rear) and screwed into the underside of the worktop using the woodscrews
provided.
We recommend ceramic tiling for the
rear wall directly behind the hob.
No shelf or overhang of combustible
material should be closer than 650mm
above the hob.
Extractor or cooker hoods should only
be fitted above the hob in accordance
with the manufacturer’s instructions.
The screw should be tightened just sufficiently to secure the hob and pull the top
pressing flush with the worktop.
No combustible materials or flammable
liquids should be stored below the hob.
Sufficient length of cable should be
allowed so the hob can be removed for
servicing, but make sure it is routed
away from the underside of the hob and
does not get trapped during installation.
Important: Ensure that you route all
electrical cables and flexible tubing well
clear of any adjacent heat source - eg;
oven / grill.
If the base of the hob is accessible after
installation then a partition must be fitted
20mm below the base to prevent
access.
INSTALLATION INSTRUCTIONS
Connect to the electricity supply
We recommend that the hob is installed
by a competent person who is a member
ofa “Competent Person Scheme” & who
will comply with I.E.E. & locall regulations.
The electrical supply must be:
220 - 240V ~ 50Hz.
Connection must be made using a double
pole cooker control unit of 30
ampere minimum capacity, with 3mm
minimum contact separation at all poles.
Connection should be made using a cable
suitable for the max. load of the hob (see
Technical Data Section).
Strip the wires & connect to the terminal
block as appropriate:L
N
Earth = Brown
= Blue
= Green/Yellow.
Fit the cable clamp & secure with the
screws provided.
Close the terminal box, ensuring that the
cover is closed and all screws in place.
The hob MUST earthed.
If the switch is directly behind the hob,
it should be at least 460mm above it and
the supply cable must be protected from
the heat.
Important: Make sure the electric supply is switched off before connection is
made.
INSTALLATION INSTRUCTIONS
Installation advice - cabinetry
Dealing with sides, cross-rails & back-panels in cabinetry
Depending on the cabinets, the worktop thickness & the hob positioning, it
is possible for the hob base and/or the
clamp brackets to interfere with parts of
the cabinet. These can be dealt with as
follows;
Cabinet sides
If the hob is to be installed across the top
of two cabinet housing units, then the
base of the hob may interfere with the
sides of these units. It will be necessary
to cut away the top of the unit sides
locally to clear the hob and/or the clamp
brackets.
Cross-rails
1. Interference with hob base If there
are any cross-rails which obstruct
the hob base by running across the
worktop cutout, they can simply be
removed or locally cut-away to allow
the hob to be installed, depending on
the particular installation. Any modifications must ensure that the strength
of the cabinet is maintained.
2. Interference with clamp brackets
If there are any cross-rails which
prevent the clamps from being
positioned on the front or rear edges
of the hob, then they can be removed or locally cut-away around the
brackets to allow the brackets to be
installed. Any modifications must ensure that the strength of the cabinet
is maintained.
Back-panel
If the cabinet has a back-panel which
prevents the clamps from being positioned on the rear edge of the hob, then
this panel can be completely removed or
locally cutaway to allow the brackets to
be installed.
Stone (Granite or equivalent) worktops
Depending on the type of worktop being
used, there may or may not be any backing material to screw the clamp screws
into.
1. If the worktop is a composite type
(backed with MDF or similar) there
may be enough backing to screw
directly into. This will depend on the
worktop thickness and backing thickness and will have to be assessed at
the installation. In this case, install
the hob as for a standard worktop.
2. If there is insufficient backing material to screw into, or if the worktop is
completely solid in construction, then
it will be necessary to glue a strip
of wood, MDF, fibreboard or similar
to the underside of the worktop,
along the front and rear edges of the
cutout. Use a strong, proprietary adhesive to bond these strips and allow
to cure before attempting to clamp
the hob into position.
Connect to the electricity supply
We recommend that the hob is installed
by a competent person who is a member
of a “Competent Person Scheme” & who
will comply with I.E.E. & locall regulations.
The supply must be: 220 - 240V ~ 50Hz.
Connection must be made using a double
pole cooker control unit of 30 ampere
minimum capacity, with 3mm minimum
contact separation at all poles.
Connection should be made using a cable
suitable for the max. load of the hob (see
opposite). The hob MUST earthed.
If the switch is directly behind the hob,
it should be at least 460mm above it and
the supply cable must be protected from
the heat.
Make sure the supply is switched off
before connection is made.
INSTALLATION INSTRUCTIONS
Warning: This electric hob must be earthed.
Technical Data
Data badge: Underside of the hob base
Electrical supply: 220 - 240V ~ 50Hz
Electrical connection: Rear Right-Hand Side
Electrical element ratings at 240V:
Models with; Front Left-Hand Side
Rear Left-Hand Side
Rear Right-Hand Side
Front Right-Hand Side
Maximum load at 240V
1 red spot
* 2000W
1000W
1500W
1000W
5500W
2 red spots
* 2000W
1000W
1500W
* 1500W
6000W
* High speed ‘red spot’ element
Countries of destination: (GB) Great Britain, (IE) Ireland
Please keep this handbook for future reference, or for anyone else
who may use the appliance.
Please keep this handbook for future reference, or for anyone else
who may use the appliance.
CUSTOMER CARE
To contact essentials about your appliance, please call
Warranty Registration
01759 48 78 32
to register your appliance
Customer Care Helpline
0843 507 3431
in case of difficulty within the UK
Please ensure that you have the product’s model no and serial no available when you
call. These can be found on the silver data label on your product which is located:
Ovens
High-level grill products
Hobs
Open the door; adjacent to the oven cavity
Inside the base compartment
On the underside of the product
Enter appliance numbers here for future reference:
Model No
Serial No
SERVICE RECORD
Date of purchase
Installed by
Installation Date
Part(s) replaced
Engineer’s name
Place of purchase:
Date
For customers outside the UK and Northern Ireland, please contact your local supplier.
Waterline Limited. Crown House, North Crawley Road,
Newport Pagnell. MK16 9TG