1
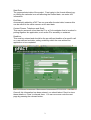
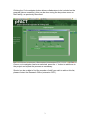
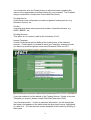
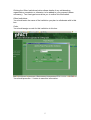
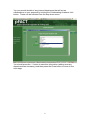
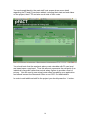
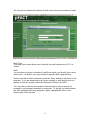
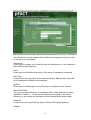
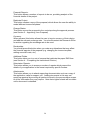
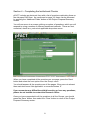
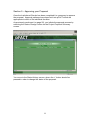
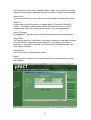
pFACT User Guide
In order to log into pFACT you will need you user ID and password. If you are
unsure of these, please contact the Research Office on extension 5390.
Once logged into the system, you will be presented with the pFACT menu
screen.
Creating a project
Step 1 – General Information
Select project proposal from the left hand menu, then add a new project by
clicking the ‘Add New Project Proposal’ button in the upper left-hand corner.
The Add New Project Proposal screen pops up. This is completed using a
combination of free type boxes, drop down menus and calendars.
Title:
Self explanatory, though note that space is limited. A longer title can be
added later in the setup.
Academic Unit:
This is the department to which the PI belongs. At PI-user level access is
restricted to the user’s department.
Activity:
Another drop down menu, you should select research.
Code:
The Research Office will assign a RAR number in this field upon receipt of the
proposal.
Sub Activity:
A drop down menu will present you with only one option here, defined by the
user’s department - either lab based or class based.
Principle Investigator:
A further drop down menu offers a choice of PI from the user’s department.
This field will be automatically populated with the user’s name; however you
are able to narrow the search by entering all or part of the name in the filter
box.
1
Start Date:
The proposed start date of the project. Free typing in the format dd/mm/yyyy
or clicking the calendar icon and selecting the desired date, can enter this
information.
End Date:
Automatically added by pFACT as one year after the start date, however this
can be edited in the same manner as the start date.
Contact Person, Telephone and Email:
This may be someone other than the PI or a Co-Investigator that is involved in
putting together the application, such as the PI’s secretary or assistant.
Deadline:
This must be entered and should be the pre-defined deadline of a specific call
or a user-defined end date, setting a date by which the user wishes the
application to be completed.
Once all this information has been entered, you should select ‘Save’ to store
these details or ‘Close’ to discard them. You can now move onto the next
page by pressing the relevant button.
2
Clicking the Co-Investigator button allows collaborators to be included on the
proposal (when necessary); this can be done using the drop down menu or
filter facility, as previously described.
Once a co-investigator has been selected, press the ‘+’ button to add them to
the project and repeat the process as necessary.
Should you be unable to find the member of staff you wish to add on this list,
please contact the Research Office (extension 5971).
3
You should now click the Funder button to add information regarding the
nature of the organisation providing funding for your proposal. This is added
using a combination of drop down menus and filter boxes.
Funding Source:
A drop down menu will present a number of generic funding sources, e.g.
Research Council, etc.
Funder:
A second drop down menu presents a number of specified funders, e.g.
AHRC, BBSRC, etc.
Funding Scheme:
This option is not currently used by the University of Hull.
Income Template:
A fourth list presents options defining the funding rules of the selected
sponsor. A description is included to assist your selection, however should
you have any questions please contact the Research Office ext 5971.
If you are unable to find the details of the Funding Source, Funder or Income
Template you require, please contact Phil Wiles (extension 5390).
You should press the ‘+’ button to save this information; you will notice that
the funder now appears in the table below the drop down menus, highlighted
in a blue font. You can alter the income template of this funder by clicking on
their name.
4
Clicking the Other Institutions button allows details of any collaborating
organisations, academic or otherwise, to be added to your proposal (where
necessary). Two free-type boxes allow you to outline this information.
Other Institutions:
You should enter the name of the institution you plan to collaborate with in this
box.
Code:
You should assign a code for this institution in this box.
You should press the ‘+’ button to save this information.
5
You can provide details of any internal department that will act as
collaborators on your proposal by clicking the Collaborating Academic Unit
button. These can be selected from the drop down menu.
You should press the ‘+’ button to save this information (adding as many
departments as necessary) and then press the Close button to move to the
next stage.
6
You are then taken to the Project Proposal Summary screen.
A number of buttons highlighted in blue on the lower left of the page allow you
to build the cost of your proposal
Funder/Income Template:
This button allows you to alter the way your proposal is funded.
Staff Cost:
This button allows you to add staff to the project, identify their work spells and
calculate their cost within the proposal (see Section 2 – Adding Staff Costs).
Facilities & Equipment Cost:
This button allows you to add equipment costs to the project (Section 3 –
Adding Equipment and Non-Staff Costs).
Non Staff Cost:
This button allows the addition of travel and consumable costs to the project
(see Section 3).
FTE Related Cost:
This button displays a breakdown of the indirect costs of the project.
Income:
This button outlines the income that will be received as defined by the income
template.
7
Section 2 – Adding Staff Costs
To add staff costs you should select the blue ‘Staff Cost’ button on the Project
Proposal Summary screen.
You move to a screen where details of the Principle Investigator and any CoInvestigators you have included are displayed.
No staff costs are displayed at the moment and these are generated by
assigning work spells, which can be added by clicking on the name of the
individual.
8
You then move to a new page where you provide details of the work spells of
the individual you have selected by use of a number of boxes:
Start & End Date:
These define length of the work spells in which the individual is involved, the
default dates are those identified as the start and end date of the project in
Section 1. These can be edited by free typing in the format dd/mm/yy or by
clicking the calendar icon and selecting the desired date.
Unit Type:
A drop down menu presents various denominations of work spell. Different
Unit Types will be of relevance in different circumstances.
Units:
These relate to the previously defined Unit Type.
An individual may have a number of work spells on the same project reflecting
different levels of involvement at different times, or a single spell covering the
duration of the project.
In our example, Marcus Brody commits only 10% of his time for the first two
years of the project, before committing 20% for the last one.
Should you have any questions please contact the Research Office.
You should press the ‘+’ button (adding as many work spells as necessary)
and then press the Close button.
9
You are brought back to the main staff cost screen where more detail
regarding the PI and CI has been added, including their start and end dates
on the project, their FTE and also a sub total of their costs.
You should note that the academic salary costs viewable with PI-user level
are based upon a pay band. Thus this amount represents the mid point of an
individual’s pay scale rather than actual salary figures to provide a level of
privacy. You will need to use actual costs when completing your application
and should contact the Research Office on ext 5971 for these details.
In order to add additional staff to the project you should press the ‘+’ button.
10
The next screen allows the addition of both current and new members of staff.
Staff Type:
This drop down menu allows you to identify the staff member as a PI, CI or
neither.
Staff:
You are able to choose a member of staff from within your faculty from a drop
down menu. As before, you may search for specific staff using the filter.
Once a member of staff is selected, press the ‘Save’ button to add them to the
proposal. If you are searching for a current member of staff and they do not
appear on this list, please contact the Research Office on ext 5971.
You may wish to add a new member of internal staff to your proposal, for
example a new research assistant or technician. To do this you should select
the ‘Non standard staff using payscale’ option, highlighted in blue in the
bottom right of this window.
11
Staff Name:
This free type box allows you to enter a name for the individual.
Pay Scale:
A drop down menu provides details of all University of Hull pay scales.
Full Time:
This check box allows the user to add full time staff without the need to add a
work spell.
Spine Point:
A drop down menu provides the spine points for the Pay Scale chosen.
Maximum Spine Point:
A drop down menu allows a ceiling to be added the staff member’s salary.
Staff Type:
This drop down menu identifies the staff member as a PI, CI or neither.
Increment Date:
This will be automatically populated in line with the Pay Scale selected.
Number of Entries:
This allows identical staff to be added from this page.
Department:
A drop down menu allows a department to be selected for the staff member.
12
You should press the ‘Save’ button to save this information (adding as many
new staff members as necessary) and then press the ‘Close’ button to return
to the main Staff Cost screen, where you should add work spells as
appropriate.
Once you have added all the staff and work spells you require you should
return to the main Staff Cost screen and press the ‘Close’ button to return to
the Project Proposal Summary screen.
13
You will see that an amount has been added next to the Staff Cost heading
representing those costs you have included during Section 2.
You will also see that a number of other figures have appeared next to the
other headings as pFACT starts to calculate the full economic cost of the
proposal.
FTE Related Cost:
This figure is the total of the estate and indirect support costs that have been
assigned to each staff member on the project. These are calculated in
proportion with the individuals involvement on the project.
Full Economic Cost:
At this stage, this figure is the total of the Staff Cost and the FTE Related Cost
Income:
This figure is the amount of funding we will receive from the sponsor in line
with their funding guidelines, outlined in the Income Template selected in
Section 1.
Surplus/Deficit:
This figure is the difference between the Full Economic Cost and the Income.
Deficits are highlighted in red.
14
Section 3 – Adding Equipment and Non-Staff Costs
To add equipment costs you should select the blue ‘Facilities & Equipment
Cost’ button on the Project Proposal Summary screen.
You move to the main Facilities & Equipment Cost screen, where new items
are added by pressing the ’+’ button.
You move to a page where you can add equipment from the list of items
defined within pFACT, however you should select the ‘Add new item not on
the list’ option, highlighted in blue in the bottom part of the screen.
15
You should now provide details of the facilities and equipment cost you wish
to include on your proposal.
Description:
A free type box allows you to identify what the equipment is, in our example a
Remote Sensing Equipment.
Units:
A free type box identifies how many of the piece of equipment is required.
Unit Type:
A drop down menu presents various denominations, different Unit Types will
be of relevance in different circumstances.
@ Rate:
A free type box allowing the cost of the item of equipment to be entered.
Start & End Date:
The period in which the piece of equipment will be used, defaulted to those
identified in Section 1. These can be edited by free typing in the format
dd/mm/yy or by clicking the calendar icon and selecting the desired date.
Category:
A drop down menu provides the option of New or Existing Equipment.
Inflation:
16
A drop down menu gives a choice of inflation rates the piece could attract.
This will be automatically populated when you select the Category.
VAT Type:
A drop down menu gives a choice of VAT Types the piece could attract. This
will be automatically populated when you select the Category.
VAT Rate:
A free type box allows you to enter an appropriate rate for VAT. This will be
automatically populated when you select the Category.
Rate on Date:
This identifies the date at which you received the information regarding the
Unit Rate. The default setting for this will be the date on which you enter the
item.
The Purchasing Office will be able to offer guidance regarding the cost of
equipment from approved University Suppliers.
You should press the ‘Save’ button to save this information (adding as many
new items of equipment as necessary) and then press the ‘Close’ button to
return to the main Facilities & Equipment screen.
Press the ‘Close’ button to return to the Project Proposal Summary Screen.
17
To add costs for travel, consumables, tuition fees or for other headings, you
should select the blue ‘Non Staff Cost’ button on the Project Proposal
Summary screen.
The addition of Non Staff costs follows the same procedure as the addition of
Facilities & Equipment costs with similar screens requesting similar
information from the same fields as outlined on page 16.
For information on overseas subsistence rates, allowances for
accommodation and with any other questions, please contact the Research
Office.
18
When you return to the Project Proposal Summary screen, you should now
see that all the costs you have specified have now been included.
You will notice that there are a number of button down the right-hand side of
the screen:
Edit:
This button allows the information that was entered in Section 1 to be
amended.
Long Title:
If the title of the proposal was too long to fit in the Project Name field of
Section 1, this button allows the full title to be described.
Notes:
This button provides the ability to create a diary of notes regarding the
proposal as it is compiled. Note that a lighter shade will be visible until a note
is added.
Change Start Date:
Does just that, but also changes all other dates outlined in the proposal (e.g.
work spells) to tie in with this new date.
Change End Date:
Does just that, but also changes all other dates outlined in the proposal (e.g.
work spells) stretching these to tie in with this new date.
19
Financial Reports:
This button allows a number of reports to be run, providing analysis of the
financial details of the project.
Replicate Project:
This button creates a copy of the proposal, which allows the user the ability to
model different income templates.
Change Status:
This button moves the proposal to the next step along the approval process
(see Section 5 – Approving Your Proposal)
Currency:
When pressed, this button allows the user to input a currency of their choice
and add the relevant exchange rate. You should contact the Research Office
for advice regarding the exchange rate to be used.
Recalculate:
You should press this button when you make any alterations that may affect
the financial aspects of the proposal (e.g. changing the income template,
adding new staff costs, etc.)
Additional Fields:
This button takes you to a set of screens that replicate the paper RAR form
(see Section 4 – Completing the Institutional Checks.)
Submission Reports:
This button allows you to access a number of reports which present the
details of your application in the format required by specific funders.
Attachments:
This button allows you to attach supporting documentation such as a copy of
the application, case for support, etc. Adding documents in this way can
speed up approval by ensuring all parties involved in the process have access
to all the information they may require. Note that a lighter shade will be visible
until a document is attached.
20
Section 4 – Completing the Institutional Checks
pFACT includes an electronic form with a list of questions replicating those on
the old paper RAR form. As mentioned on page 19, these can be accessed
by pressing the ‘Additional Fields’ button on the Project Proposal Summary
screen.
You will now move to a screen outlining a number of questions, which you will
respond to using a number of different predefined methods. These are text,
numerical, check box, yes/no/not applicable drop down menu.
When you have completed all the questions on one page, press the ‘Save’
button and select the next option from the ‘Group’ menu.
You should answer all the questions on all the pages, if they are not relevant
then mark text boxes ‘Not applicable’ or numerical boxes ‘0’.
If you encounter any difficulties with this section or have any questions,
please do not hesitate to contact the Research Office.
Once you have responded to all the questions in all the Groups, you should
press the ‘Save’ button, then select the ‘Close’ button to return to the Project
Proposal Summary screen.
21
Section 5 – Approving your Proposal
Once the Institutional Checks has been completed it is necessary to approve
the proposal. Approval pathways have been built into pFACT which are
appropriate to each of the individual faculties.
As previously mentioned (on page 20), you initiate the approval process by
selecting the ‘Status Change’ button on the Project Proposal Summary
screen.
You move to the Status History screen, where the ‘+’ button should be
pressed in order to change the status of the proposal.
22
The next screen is the main ‘Change Status’ screen, you should now provide
details of the necessary changes to status you wish to make to your proposal.
Status From:
This box identifies the current status of your proposal and cannot be altered.
Status To:
A drop-down menu from which you should select ‘2 Research Office fEC
Check’. A member of the Research Office team will pick up your pFACT
proposal and check the details against those in your actual application.
Date of Change:
As suggested. This field is automatically populated and cannot be altered.
Target Date:
The date by which you wish action to be taken, bearing in mind that a number
of further levels of approval may be required. Free typing in the format
dd/mm/yy or clicking the calendar icon and selecting the desired date, can
enter this information.
Submitted To:
You do not need to complete this section.
Notes:
A free type box in which you can add any notes you feel would be of use to
the recipient.
23
You should press the ‘Save’ button when all the information is completed,
doing so takes you through to the Email message screen.
On this screen you can review the email to sent and amend your notes if
necessary.
24
A number of names will automatically appear dependent upon the department
involved. In our example the PI appears along with members of the Research
Office team. Other names can be added to this list by completing the ‘Name’
and ‘Email ID’ boxes or selecting a name from either the staff or user lists
highlighted in blue. Pressing the ‘+’ button adds this new person to the list.
Pressing the ‘E-mail’ button creates a standard email outlining the project
details and required action. You will receive a message informing you the
mail has been sent successfully. An example of the email follows:
Notes:
Research Office advice sought regarding eligible
costs
pFACT Status Change requested by 28-Feb-2007 - Hunt for the Lost Ark
FOR ACTION BY
Awaiting
Target date for achieving new status
Funder
Not assigned
Research Office fEC check
28-Feb-2007
AHRC
Project Name & ID
Hunt for the Lost Ark [1211]
25
Previous Status
Date Of Status Change
Change entered by
Under Construction
22-Feb-2007
acsmb
Date Change Authorized
22-Feb-2007
Principal Investigator
Academic Unit
Project Start Date
Project End Date
Deadline for completion of project
Brody Marcus
Archaeology
01-Oct-2007
30-Sep-2010
01-Mar-2007
You should now press the ‘No Email’ button to return to the Project Proposal
Summary Screen.
26
You can keep a check on the ongoing status of you proposal by pressing the
‘Change Status’ button:
You will notice that you are now unable to affect any further changes to this
proposal. You will be informed by email of further changes to status; however
you will no longer be able to view the proposal when the status is changed to
Faculty Approval.
Should you wish to access any information relating to a proposal you are
unable to view, please contact the Research Office.
27