1
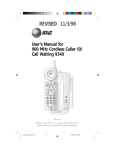
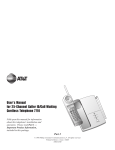
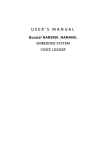
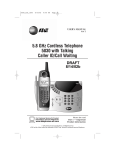
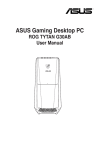
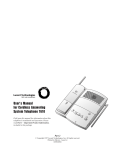
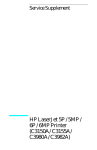
Intelligent Recording Call Tracker Installation Guide
Call Tracker
and
Call Tracker Manager
Installation & User Guide
Call Tracker User Guide V1.2
Intelligent Recording © 2015
Page 1
Intelligent Recording Call Tracker Installation Guide
Contents
CALL TRACKER STAND-ALONE VOICE RECORDER ..........................................................................4
CALL TRACKER OVERVIEW .................................................................................................................5
CALL TRACKER RECORDING STORAGE HD & SD ...........................................................................5
CALL TRACKER FRONT ..............................................................................................................................6
CALL TRACKER REAR ................................................................................................................................6
CALL TRACKER STAND (REMOVE RUBBER FEET THE SCREW INTO STAND) .................................................7
CALL TRACKER WALL MOUNT BRACKETS (REMOVE FEET THEN ATTACH) ......................................................8
CALL TRACKER PLUS OVERVIEW: .....................................................................................................9
CALL TRACKER PLUS RECORDING STORAGE .............................................................................9
CALL TRACKER PLUS- FRONT VIEW .................................................................................................. 10
CALL TRACKER PLUS REAR................................................................................................................ 10
CALL TRACKER CONNECTIVITY DIAGRAM: ................................................................................................ 11
TOUCH SCREEN OPERATION .................................................................................................................. 12
SETTING S……………………………………………………………………………………………………….13
Channel Setting ................................................................................................................................. 13
System Setting ................................................................................................................................... 14
Auto Screen Lock Setting .................................................................................................................. 14
Network Configuration ....................................................................................................................... 15
TOOLS …………………………………………………………………………………………………………15
CDR (CALL DETAIL RECORDING) ............................................................................................................ 16
SEARCH CDR ........................................................................................................................................ 17
CHANNEL MONITOR................................................................................................................................ 18
CHANNEL STATUS .................................................................................................................................. 18
CALL TRACKER MANAGER ............................................................................................................. 19
PC SYSTEM REQUIREMENT: .......................................................................................................... 19
SMDR Data ........................................................................................................................................ 21
Recording Announcement Management ........................................................................................... 21
Repair database ................................................................................................................................ 22
Software upgrade .............................................................................................................................. 22
Restore system defaults .................................................................................................................... 23
Channel Status View ......................................................................................................................... 25
Start Monitor ...................................................................................................................................... 25
PHONE BOOK ........................................................................................................................................ 33
CHANNEL PARAMETERS.......................................................................................................................... 39
VOICE TRIGGER PARAMETERS ................................................................................................................ 43
THESE SETTINGS ARE USED IF VOICE TRIGGER IS SELECTED UNDER TRIGGER METHOD FOR THE CHANNEL. . 43
START THRESHOLD: LEVEL TO TRIGGER START OF A RECORDING (LOWER IS MORE SENSITIVE) .................. 43
Call Tracker User Guide V1.2
Intelligent Recording © 2015
Page 2
Intelligent Recording Call Tracker Installation Guide
VOLUME LEVEL: SETTING TO DETERMINE LEVEL OF SILENCE. .................................................................... 43
NETWORK SETTING ................................................................................................................................ 44
HARD DISK PARAMETERS AND LOGS ....................................................................................................... 45
SCHEDULED RECORDING TIME SECTION ................................................................................................. 46
SMDR INTEGRATION.............................................................................................................................. 47
PABX SMDR PROTOCOL....................................................................................................................... 49
OTHER SETTINGS .................................................................................................................................. 50
MANAGER SET-UP AND PERMISSIONS ..................................................................................................... 52
ONLINE USER: SHOWS MANAGERS THAT ARE CURRENTLY LOGGED INTO THE CALL TRACKER SYSTEM ...... 52
USER MANAGEMENT .............................................................................................................................. 53
ADD NEW ACCOUNT ................................................................................................................................ 53
Call Tracker User Guide V1.2
Intelligent Recording © 2015
Page 3
Intelligent Recording Call Tracker Installation Guide
Call Tracker Stand-Alone Voice Recorder
This manual includes basic set-up and installation instructions for the Call Tracker and Call
Tracker Plus Stand-Alone Recording systems. The Call Tracker and Call Tracker Plus have
different hardware configurations, but share the same programming and Client PC software,
Call Tracker Manager.
The options and Part Numbers for the Call Tracker and Call Tracker Plus are listed below:
Part #
Call Tracker
CT2
CT4
CT8
Product Name
Call Tracker 2
Call Tracker 4
Call Tracker 8
Call Tracker Plus
CTP08
Call Tracker Plus 8
CTP16
Call Tracker Plus 16
CTP24
Call Tracker Plus 24
CTP32
Call Tracker Plus 32
Call Tracker User Guide V1.2
Description
2 Line Recorder with LCD, No HD
4 Line Recorder with LCD, No HD
8 Line base unit no LCD, No HD
8 Port Recorder, LCD 1 TB HD, Rack Mount
16 Port Recorder, LCD 1 TB HD, Rack
Mount
24 Port Recorder, LCD 1 TB HD, Rack
Mount
32 Port Recorder, LCD 1 TB HD, Rack
Mount
Intelligent Recording © 2015
Page 4
Intelligent Recording Call Tracker Installation Guide
Call Tracker
Call Tracker Overview
•
System boots in 20 sec
•
SD card model, max 64GB
(recordings can be moved to
network drive for long term storage)
•
CT 2 is fixed at 2 Lines (not
expandable) CT4 is Expandable to 8
lines. CT 8 is fixed at 8 line max.
•
Touch screen operation
•
Remote control by network
•
Instant playback through speaker
•
Full embedded device, no PC
required
•
Lower power dissipation supports
7x24x365 running
Call Tracker Recording Storage HD & SD
8GB
560
Hour(SD Card)
32GB
2240
Hour(SD Card)
64GB
4480
Hour(SD Card)
Call Tracker User Guide V1.2
Intelligent Recording © 2015
Page 5
Intelligent Recording Call Tracker Installation Guide
Call Tracker Front
1. Power LED
2. USB Host for backup or system upgrade
3. SD Slot for optional SD card model. No use for HDD model
Call Tracker Rear
1
2
3
4
5
6
7
Card 1, Channel 1-4 (RJ11)
Card 2, Channel 5-8 (RJ11)
RJ45 Port x 2
RS232 Port for SMDR data
RS232 data indicator
Power Input :DC-19V
Power Switch
Call Tracker User Guide V1.2
Intelligent Recording © 2015
Page 6
Intelligent Recording Call Tracker Installation Guide
Call Tracker Stand
Call Tracker User Guide V1.2
(Remove Rubber Feet the Screw into Stand)
Intelligent Recording © 2015
Page 7
Intelligent Recording Call Tracker Installation Guide
Call Tracker Wall Mount Brackets (Remove feet then attach)
Call Tracker User Guide V1.2
Intelligent Recording © 2015
Page 8
Intelligent Recording Call Tracker Installation Guide
Call Tracker Plus
The Call Tracker Plus is a 1U
Rack
Mountable
embedded
recorder consisting of a 667MHz
CPU, latest Samsung ARM chip
and Embedded Call Recording
software. The Call Tracker Plus
starts from 8 channels and is
expandable to 32 channels of
Analog
Recording.
The
hardware and software create a
simple stand- alone call recording device with touch screen, speakers, and a network connection, no
PC required. The Call Tracker Plus can be set-up using the touch screen or connect to your network
for full PC Set-Up and Management with the included XTR Telephone Recorder software. Playback
of calls is possible both through the device and of course through the included Management software
and XTR Desktop Player software.
Call Tracker Plus Overview:
•
High capacity SATA HDD 500G/1T/2T
•
Expandable from 8 to 16, 24 and 32 channels
•
Touch screen operation
•
Remote control by network
•
Instant playback through speaker or via Management Software
•
Removable & hot swappable SD recording card
•
Removable HDD
•
Full embedded device, no PC required
•
Quick System Boot, aprox 20 seconds
•
Lower power dissipation supports 7x24x365 operation
Call Tracker Plus Recording Storage
500GB :
36,000 Hours
1000GB(1T) :
72,000 Hours
2000GB(2T) :
144,000 Hours
Call Tracker User Guide V1.2
Intelligent Recording © 2015
Page 9
Intelligent Recording Call Tracker Installation Guide
Call Tracker Plus-
1. 5” touch screen,
Front View
800 x 480
2. USB Host for upgrade or backup HDD
3. Volume 4. Volume +
5. Earphone (Main)
6. Earphone (Sub)
7. Card 1 (Channel 01-08)
8. Card 2 (Channel 09-16)
9. Card 3 (Channel 17-24)
10. Card 4 (Channel 25-32)
Call Tracker Plus Rear
1. DB37 for Channel 17-32
5. RJ45 for WAN (SIP record)
2. DB37 for Channel 1-16
6. SATA HDD
3. Power input : DC-19V
7. HDD lock
4. RS232 for SMDR
8. External power
5. RJ45 for LAN
9. Power switch
Call Tracker User Guide V1.2
Intelligent Recording © 2015
Page 10
Intelligent Recording Call Tracker Installation Guide
Physical Installation (Both Call Tracker & CT Plus)
Call Tracker Connectivity Diagram:
Call Tracker
1)
Connect Analog Lines
The Call Tracker or Call Tracker plus is connected directly to the Analog Line or Analog Signal
(ie
Radio Channel). In a typical phone line application this is done before the phone system, as shown
above. The wiring can be a parallel tap off each line, then connected into the appropriate line jack (RJ11)
on the Call Tracker , or you can wire In and Out using the Jack next to each Line position labeled ‘Phone’.
2)
Connect to LAN.
Connect Call Tracker to your network Hub/router. This will enable remote programming access as well
as storage on your LAN/WAN, polling and remote monitoring of channels. If no LAN is available it can
function as a purely stand-alone recorder.
3)
Connect to SMDR output of PBX (optional)
If SMDR integration option is desired, connect the Call Tracker to the SMDR output of the PBX (RS232)
or if LAN accessible, this can be set later during the set-up process.
4)
Connect to External Power, Power-Up device
Call Tracker User Guide V1.2
Intelligent Recording © 2015
Page 11
Intelligent Recording Call Tracker Installation Guide
Touch Screen Operation
Once Powered, the Main Screen will appear as shown below. Much of the basic programming can
be done through the touch screen, or complete set-up can be done via the Call Tracker
Administration Software that is described in the next section.
There are 8 function areas on the touch screen, including CDR, Search, Channel Monitor, Status,
Settings, Network, Tools and System.
The Default Screen can be changed to the Monitor Screen, by selecting Settings > System >
Other Settings and checking Auto Go to Monitor Window.
If using the provided Call Tracker Manager Software for setup and the Call Tracker is connected
your LAN, skip forward to the Call Tracker Admin Software section of the manual for instructions on
set-up using the Call Tracker Admin Software.
Call Tracker User Guide V1.2
Intelligent Recording © 2015
Page 12
Intelligent Recording Call Tracker Installation Guide
Setting
The first step in set-up using the Touch Screen would be to properly configure the channels for your
installation, Select the Channel Setting Option.
Channel Setting
Under Channel Setting, first select the channel you want to setup, then select Recording Condition
option. This is where you configure what type of trigger you want to determine the start and stop of a
call. If using standard analog telephone line, select Voltage Mode as shown below. Other options include:
Key Mode : Start Stop by pressing a Digit on your Phone
Voice Mode: Used for Radio Channels, or Handset tap or External Mic Voice Activated Recording
Continuous Mode: Always-on recording
Polarity Mode: Another Option (less common) for Telephone Line triggering
Call Tracker User Guide V1.2
Intelligent Recording © 2015
Page 13
Intelligent Recording Call Tracker Installation Guide
System Setting
The user can select language options as well as set a password to prevent unauthorized access to the
system settings:
Auto Screen Lock Setting
This prevents unauthorized access; default password is ‘1111’
Call Tracker User Guide V1.2
Intelligent Recording © 2015
Page 14
Intelligent Recording Call Tracker Installation Guide
Network Configuration
This is used to reference the Call Tracker’s IP address. Select automatically assign IP address once
connected to the network, and then uncheck the function once it is set if you will be setting up remote
polling functionality.
Tools
The Tools area allows you to update the system firmware by connecting a USB drive to the Call Tracker.
You can also Backup Files in case of system failure.
After a System Update, be sure to restart the Call Tracker.
Call Tracker User Guide V1.2
Intelligent Recording © 2015
Page 15
Intelligent Recording Call Tracker Installation Guide
CDR (Call Detail Recording)
This allows the user to review and playback calls directly from the Call Tracker. Although in most all
cases this is easiest from the PC software, this is a quick and simple way to test that calls are being
recorded properly upon installation.
•
Back
Back to main menu
Recording of Channel
Outbound call
Inbound call
Missed call
Telephone number 0200
Start time and date
Recording elapse HH:MM:SS
Audio file
Flag symbol for important call. Red: flagged Grey: None
Page Down & Page Up. (Effective on bright one)
Current page/Total page
Call Tracker User Guide V1.2
Intelligent Recording © 2015
Page 16
Intelligent Recording Call Tracker Installation Guide
Search CDR
This area allows you to search for specific calls directly from the device if desired. The Advanced Setting
option allows you to search also by Channel, Caller ID, Ext Number, Inbound or Outbound calls. It is
highly recommended that any detailed searches be done using the provided Call Tracker Manager PC
Administration software, search speed will vary based on number of calls records in time span selected.
Call Tracker User Guide V1.2
Intelligent Recording © 2015
Page 17
Intelligent Recording Call Tracker Installation Guide
Channel Monitor
You can view up to 8 Channels at a time directly from the Call Tracker screen, click on the scroll
down arrow to view additional channels. This view shows Channel number, the Caller ID or Number
Dialed of the connected outside call, recording time and status. By selecting the Live Monitor button
you can monitor live conversations directly from the device. This can also be done from the Call
Tracker Admin Software.
Channel Status
This view shows all channels without Caller Detail:
•
Dialing
Idle
Inbound call
Outbound call
Power off ( Line Disconnected)
Ringing
Call Tracker User Guide V1.2
Intelligent Recording © 2015
Page 18
Intelligent Recording Call Tracker Installation Guide
Call Tracker Manager Software Requirements
The Call Tracker Manager software allows for complete management of recordings as well as the
programming and customization of the Call Tracker. The Call Tracker Manager software is designed for
both on-site management and for accessing Call Trackers at remote locations.
For management of several Call Trackers, you would may also require the Central Management
Software. This software is described in a separate document.
PC System Requirement:
Windows 8/7/Vista/XP/2000
1GB HDD
Pentium 400MHZ CPU
Network RJ45
256MB RAM
Audio output (Play & Monitor)
Main System Menu
The Main System Menu provides access to many of the core system Features of the Call Tracker
System as well as restore, upgrade and repair issues with the recorder system.
Log-In to Call Tracker
Same Local Area Network Connection
First, select Auto Find, this will find a Call Tracker located on your same network. Next, select the device
and enter the user name and password, this will connect to the Call Tracker that is installed on the same
Local Area Network.
User Name: admin
Password:
1111
Call Tracker User Guide V1.2
Intelligent Recording © 2015
Page 19
Intelligent Recording Call Tracker Installation Guide
Remote Connection
If the Call Tracker is located on a different network, you can log in remotely using a Static IP Address or
if used behind a router, you will need to setup Port Forwarding to enable remote access.
Protocol Type: TCP
Private/Public IP sharing port: 6066
From the example on the left, the IP sharing
can be configured as a virtual server (some
routers call this Port Forwarding). This allows
remote access to a specific port on the Local
Network
from
a
remote
location
and
automatically redirects the log-in to the Call
Tracker.
(in
this
case
Call
Tracker
192.168.0.103 in the LAN).
Port Forwarding Set-Up Example
WAN IP address
To locate your IP Address, you can visit
the following web site from a PC on the
network:
http://www.whatismyip.com/
If you need assistance setting up port
forwarding please contact your IT
Professional or Router provider.
Call Tracker User Guide V1.2
Intelligent Recording © 2015
Page 20
Intelligent Recording Call Tracker Installation Guide
SMDR Data
This setting is to enable or disable the SMDR (Station Message Detail Recording) configuration. SMDR
Integration allows for integration to the Telephone System so that the extension that made the call can
be tracked to the phone call.
With SMDR Enabled, and the physical connection from the phone system to the Call Tracker also
established, the Call Tracker will receive data from the telephone system. The format needed for each
phone system may vary. Detail on set-up is covered in a later section on SMDR setup.
Recording Announcement Management
A Pre-Recorded Announcement can be played when a call is answered. By selecting this option you
can upload recorded announcements to be played. This needs to be in IMA-ADPCM format. Maximum
length of this recording is 30 seconds.
You can upload a recording announcement file to the Call Tracker; it will be played to both parties once
the call is established.
Call Tracker User Guide V1.2
Intelligent Recording © 2015
Page 21
Intelligent Recording Call Tracker Installation Guide
Note: Recording announcement file cannot be longer than 30s. Format is IMA-ADPCM.
Repair database
The Call Tracker Plus uses an SQLITE database, it saves recording files to
\\Hard Disk\\SQLite\\2012\\201207\\CDR20120730.db daily. You can repair the database in the event
there is a power outage or if records disappear.
Software upgrade
Call Tracker User Guide V1.2
Intelligent Recording © 2015
Page 22
Intelligent Recording Call Tracker Installation Guide
Call Tracker can easily be upgraded in the field. Place the upgrade file on a USB drive, insert the
USB drive into the USB Port on the Call Tracker, and then click OK. Be sure to not power off the
device during upgrade, it is also suggested to make sure channels are not active (you can disconnect
lines). After upgrade, you will be prompted to restart the device.
Restore system defaults
Changing back to System Defaults requires admin login. Once reset, former settings or
recordings cannot be recovered.
Call Tracker User Guide V1.2
Intelligent Recording © 2015
Page 23
Intelligent Recording Call Tracker Installation Guide
Main Tool Bar
The Main Tool Bar is used for Log-In/ Log-Out as well as to change the language of the program. The
Red Banner identifies the area of the program you have as a current active window, in this case the
Status window is active:
Memory Usage on SD Card or Hard Drive, and CPU Utilization
For the Call Tracker Plus, it also shows the status of installed cards, in example below cards 1 and 4
are installed correctly, cards 2 and 3 are not installed or there is an error:
Access Panel
Call Tracker User Guide V1.2
Intelligent Recording © 2015
Page 24
Intelligent Recording Call Tracker Installation Guide
The access Panel is used to navigate to the different sections of the Call Tracker
manager program. These are used to monitor channels, listen to recordings as well
as program and customize the device.
Channel Status View
Start Monitor
This allows for live monitor of an active call from the software, select the Channel then choose Start/Stop
Monitor.
Channel Parameters
Call Tracker User Guide V1.2
Intelligent Recording © 2015
Page 25
Intelligent Recording Call Tracker Installation Guide
This allows for quick access to change parameters on the selected
channel, functions that can be changed shown to the right.
Icon View
This shows an expanded view of Port Status
Refresh
This will update the view with any new information.
Main Status Display:
The Main Status Window shows the live status of activity on all
channels, showing time, channel status, and other info, if desired, the user can hide unwanted columns.
Play – Indicates that the Recorded Announcement is
currently playing on the channel
Mute- Shows indication if user has activated the Mute recording function, the Mute function is a
Manual Start/Stop function using DTMF digits that are set in the System Parameter section.
Note: For this feature to work on incoming calls the ‘Accept DTMF During Incoming Calls’
selection under System setting must be set to ‘Yes’.
Monitor – Indication that the selected
channel is being monitored
Save – Indicates if the Call is being Recorded or not , Green is Yes, Red is No. This only works with
Hot-Key start/stop recording, if out of scheduled recording time, or if a specific number has been
Call Tracker User Guide V1.2
Intelligent Recording © 2015
Page 26
Intelligent Recording Call Tracker Installation Guide
programmed to NOT record. In most cases all calls are recorded and indication will be blank.
Recording Playback and Management
Search
Call Tracker User Guide V1.2
Intelligent Recording © 2015
Page 27
Intelligent Recording Call Tracker Installation Guide
There are several default time spans for quick search.
If an Advanced Search is selected the user can use much more detailed
information to quickly find a specific call as shown below:
Play Recordings
Select the desired file from the list and press Play or double-click, it will launch the player:
Call Tracker User Guide V1.2
Intelligent Recording © 2015
Page 28
Intelligent Recording Call Tracker Installation Guide
This downloads the recording files to the Local PC. It is recommended to do this when the
system is idle. It will not download the same files twice as long as directory of the download stays the
same.
Highlights the call in the list as an important call.
Comments can be associated with the recording.
There are 2 Options when deleting , the first completely
deletes the Recording and CDR ( Call Detail Record). The
second deletes the Recording, but leaves the record of the
call in the list.
This allows for the export of the full list of calls in view or the select calls to Excel.
Attaches either full the Recording and Detailed information, or just CDR information to
an outbound email, take note of the file size before attempting to send via standard email.
This shows the approximate time the call rang before being answered in seconds.
Call Tracker User Guide V1.2
Intelligent Recording © 2015
Page 29
Intelligent Recording Call Tracker Installation Guide
Statistic Reports can be run for a Day, Week or Month. The reports show breakdown of
Inbound/Outbound and Missed Calls. There is also a section for Audio. These reports can be exported
to Excel.
Call types are distinguished with different color.
A few examples are shown below:
Statistics by Week, listed by Day:
Statistics by month, listed with dates
Call Tracker User Guide V1.2
Intelligent Recording © 2015
Page 30
Intelligent Recording Call Tracker Installation Guide
Backing Up Recordings
Call Tracker User Guide V1.2
Intelligent Recording © 2015
Page 31
Intelligent Recording Call Tracker Installation Guide
The user can set a scheduled backup of files onto the local PC or
manually stop and stop a backup as desired..
Auto backup is carried out by day, week or month:
Set the Start and End Times for Backing Up calls, it is
recommended to occur at off-hours to minimize load on
Call Tracker and your LAN.
There are 2 time ranges for backup that can be set.
Select Start Date for Backup , the system also displays the last backup date as well as history of backups
in list below:
NOTE- Set the Destination folder for Backup under Settings> Other Tab
This Stops current Task, such as Delete, Downloading and Playing
User can clear previous backup
condition. System will start next
backup from new specific date
and downloaded file will be
skipped.
Do not change backup directory
to avoid duplicated files.
Call Tracker User Guide V1.2
Intelligent Recording © 2015
Page 32
Intelligent Recording Call Tracker Installation Guide
Phone Book
The Phonebook settings are divided into several areas as shown below, it used for creating exception
lists, black lists and associating extension numbers with names when used with SMDR , as well as
other functions discussed below:
Extension setting: The parameter works with the SMDR function, it associates a name with the
extension numbers:
Phone Book: Inbound and outbound number will be matched and saved with phone book information.
Exception extension numbers: This works only with SMDR setup. It defines which extensions should
NOT be recorded.
Call Tracker User Guide V1.2
Intelligent Recording © 2015
Page 33
Intelligent Recording Call Tracker Installation Guide
Exception Phone Number: You can configure specified phone not to be recorded
Alert List: Alert message will be generated to admin when call is received or made to an Alert List
number, this is helpful to identify that an important client may be on the line, or other purposes to ensure
employees to not make or take excessive calls from a specific phone number. The optional Pop-Up
needs to be set on Other Tab in the Settings section.
Call Tracker User Guide V1.2
Intelligent Recording © 2015
Page 34
Intelligent Recording Call Tracker Installation Guide
System Parameters
These settings are system-wide settings, shared by all channels. To update a specific setting, check the
box next to the setting and then click on update in lower right corner.
To determine current settings select the All check box, then select Read, all current setting will be
displayed.
Creates a delay before recording starts from time first digit is dialed. This may be needed if using
commands to start/stop/mute recordings. If the value is 0, the call will be recorded entirely from pick up.
Sets a minimum time of a recording to be saved, helps eliminate misdials and very short calls from being
saved.
Recommend: 5s
It limits recording time to avoid large audio file. If calls are longer than specified value, a new recording
will be created for the balance of the call.
Timer to Start Recording ‘x’ seconds after dialing finishes.
This is a timing parameter that measures the time between rings. When this is exceeded it is determined
that the call was a missed call.
Recommend: >5 s
This sets the interval time between two DTMF digits. Once timer is exceeded, any further DTMF digits
Call Tracker User Guide V1.2
Intelligent Recording © 2015
Page 35
Intelligent Recording Call Tracker Installation Guide
on the call will not be saved. If the interval time is 0, all the DTMF digits will be displayed.
Recommend: 7s
The format of Recorded calls can be selected by the user. If using other Intelligent Recording
Management Software, XTR format recommended.
This provides a record of missed calls if selected..
Enable/disable to save call records for outbound calls not recorded.
Enable/Disable to accept DTMF digits dialed during incoming call. Yes to save all digits including
extension number dialing from an inbound call.
Enable/Disable to save tmp file while a live call is being recorded. In addition to the recording file, the
system will generate a tmp file with CDR information for each call. It is recommended to enable this
function; it will be used for system repair if needed.
Determines inbound call, helps differentiate from random digits that may be detected by the system
(noise).
Recommend:3
Is device connected to Call Tracker internal Battery Backup?
Call Tracker User Guide V1.2
Intelligent Recording © 2015
Page 36
Intelligent Recording Call Tracker Installation Guide
Time and Time Zone setings. Time can be set to PC time or synched with FSK Caller ID.
To start or stop recording by DTMF digits during a call. For this to work on inbound calls, make sure that
‘Accept DTMF During Incoming Call’ is set to Yes. Also Channel trigger mode should be set to ‘Key
Control’.
The above 2 settings can be used to hide DTMF digits. This can be used to hide digits after a specific
sequence has been detected. The second setting determines the length of the digits.
For example, if the first setting is 556 and the second is set to 10. As long as system receives
556 during the call, it will show * 10 times instead of digits dialed.
This is used to set a DTMF digit command to Mute and Resume recording. If this is selected, be sure to
delay Start after dialing setting is set to avoid muting a call by dialing a number. Also, to work on incoming
calls, you must set ‘Accept DTMF During Incoming Call’ to Yes.
This determines the number of digits compared with Phone Book to determine a match.
Use buffer to reduce time writing to Hard Disk.
Recommend: Yes
If no line connected to channel, report status to log?
Recommend: No.
Determines which changes to Parameters are reported in log information.
Call Tracker User Guide V1.2
Intelligent Recording © 2015
Page 37
Intelligent Recording Call Tracker Installation Guide
If using the optional Central Management Software, this will keep a log of downloads from the local Call
Tracker.
Determines how the program will compare the Do Not Record Numbers listed on the phone book, either
exact match, or approximate match
Example: if 949-587-1226 is a non-record number and set for aprox match, a call from 949-587-1222
would not be recorded.
Use caution setting this to Approx. as important calls may not be recorded.
Allows the user to customize busy tone recognition. ON/OFF 500 and 500 is default.
This is a volume level that determines is user is still on the line..
.
The Call Tracker can be set to Auto-Answer and play a pre-programmed greeting to callers. This is
typically dome on non-work days to alert caller of workday schedule, if no aouto-attendant greeting is
available in phone system.
.
.
Call Tracker User Guide V1.2
Intelligent Recording © 2015
Page 38
Intelligent Recording Call Tracker Installation Guide
Channel Parameters
This section is for setting
parameters that are unique to
each channel on the Call Tracker
system. Be sure to first select the
Channel Number from the drop
down list. The settings are unique
to each Channel.
You can create a name for each channel. The name will be included with the recording file, it also will
be shown on the monitor view.
This parameter associates the Channel with the Line on the Phone System. It is used for SMDR
integration.
Voltage: For Analog CO Line Recording
Key recording: Manually recording by press DTMF key while on a call. Refer system setting
hot keys (p.34)
Voice trigger:
This setting is used for recording Radio Channels, Microphones or Handset
Taps. DTMF signal will not be recorded.
Continuous Recording: This setting provides Non-stop recording, it is usually used for a
microphone. DTMF during the call will not be recorded.
Polarity Reversal: Start recording when polarity reversal signal is received. Check with your
telephone line provider if this is provided (not common).
Call Tracker User Guide V1.2
Intelligent Recording © 2015
Page 39
Intelligent Recording Call Tracker Installation Guide
This provides a manual adjustment on the channel for recording volume. If Recording on CO lines using
Voltage Trigger , suggest selecting AGC option (auto gain control).
This determines and adjusts the default volume of recorded announcements and tones played to both
sides of the call when activated.
Enable/Disable recording announcement that will be played to both sides of a call and it will be saved
in the recording file.
Choose from uploaded announcement files.
Enable to play beep-tone recording reminder to both sides during a call.
Reminder file “ rec-remind.wav” is less than 2second and cannot be modified.
Time between beep tones of recording reminder
Allows blocking of leading digit(s) on a call, ie. If you dial 9 to access an outside line, you would block 1
Digit to remove the ‘9’ as a lead digit on an outbound call.
Call Tracker User Guide V1.2
Intelligent Recording © 2015
Page 40
Intelligent Recording Call Tracker Installation Guide
This is voltage level to verify if the channel is connected to outside line.
Recommend:
3V
This is minimum voltage setting to determine On-Hook status of a line.
Recommend: 25V
AGC: Automatic Gain Control, this balances both sides of the recording to increase recording quality.
Recommend: Disable this function if using Voice Trigger recording, enable for Voltage Trigger.
Time elapse setting for specified voltage of ON/OFF hook.
Power on: <value
Power off: >value
Time setting for specific voltage to verify ringtone ON and OFF.
Defines of polarity reversal duration.
Call Tracker User Guide V1.2
Intelligent Recording © 2015
Page 41
Intelligent Recording Call Tracker Installation Guide
Channel Auto-Answer- a separate setting to the system-wide setting that determines days when the
auto-answer feature will operate, this allows for Auto-Answer during non-work hours on business days.l
Set Time Frame(s) , then choose announcements from uploaded files.
You can select certain times of the day per channel to start and stop recording. The time periods are set
in the Scheduled Recording Tab.
Call Tracker User Guide V1.2
Intelligent Recording © 2015
Page 42
Intelligent Recording Call Tracker Installation Guide
Voice Trigger Parameters
These settings are
used if Voice Trigger
is selected under trigger method for the channel.
Start Threshold: Level to Trigger Start of a Recording (lower is more sensitive)
Silence Time-Out: The period of time (ms) to end recording when level drops below threshold
(5000ms = 5 seconds of silence)
Volume Level: Setting to determine level of silence.
.
Call Tracker User Guide V1.2
Intelligent Recording © 2015
Page 43
Intelligent Recording Call Tracker Installation Guide
Network Setting
This allows the installer to set the network setting of the Call Tracker and establish connection with
Central Management Server (if used)
Call Tracker User Guide V1.2
Intelligent Recording © 2015
Page 44
Intelligent Recording Call Tracker Installation Guide
Hard Disk Parameters and Logs
Reserved Space: This reserves space on the drive for buffering, Recommended setting 10%
Loop recording: When enabled, the Call Tracker will record over oldest recordings when hard drive
is full. If disabled and hard drive is full, recording will stop until hard drive is changed.
.
.
Hard Drive System log: The critical operations will be recorded in system log.
Call Tracker User Guide V1.2
Intelligent Recording © 2015
Page 45
Intelligent Recording Call Tracker Installation Guide
Scheduled Recording Time Section
Turned on by Channel in Channels settings, this is the area where installer can define time periods for
starting and stopping recording by channel if desired.
Call Tracker User Guide V1.2
Intelligent Recording © 2015
Page 46
Intelligent Recording Call Tracker Installation Guide
SMDR Integration
SMDR integration is an advance interface to most PBX phone systems . The settings are
programmable in this section and meant for installers familiar with SMDR integration with 3rd Party
applications. It is important to note that this will not work in every case as some telephone systems
handle transferred calls in such a way that it is very difficult to track using the SMDR output.
Connection to PBX: There are ways to connect the Call Tracker to the Host PBX for SMDR
integration :
1) RS232 connection
2) TCP/IP connection to the Host PBX.
First step in setting this up is to obtain or analyze the SMDR output from the Host PBX. This will be
the basis of the entries in this section of the program.
Call Tracker User Guide V1.2
Intelligent Recording © 2015
Page 47
Intelligent Recording Call Tracker Installation Guide
Outbound SMDR
Call symbol: This is a mark to distinguish the call type (Outbound/Inbound call) in character string.
Many PBX system use “TO “ to indicate outbound call.
Extension position: From the SMDR output from the PBX, count the extension number starting position
in character strings from left to right and enter in this space.
Extension number length: Extension number length
PABX channel number position: Position the PBX Channel or Line identifier is in the string from left
to right..
Channel number length: PABX channel/line number length.
The following is an example from an outbound SMDR string:
1. Call symbol: $TO
2. Extension position: 14th
3. Extension number length: 2.
4. PABX channel position: 24th
5. Channel number length: 2
Note: The Call Tracker is able to decode the DTMF for the called number , the phone number from
SMDR will be ignored.
Outbound call SMDR Output:
Call Tracker User Guide V1.2
Intelligent Recording © 2015
Page 48
Intelligent Recording Call Tracker Installation Guide
PABX SMDR Protocol
no SMDR
Please refer to your PBX user’s manual to determine
the
serial
communication
for
windows
HyperTerminal operation.
SMDR through TCP/IP
Many modern PBX Systems support TCP/IP SMDR. Please refer to your PBX user’s manual to
obtain the following settings:
•
PBX IP address:
•
Connect Port: Port for PC connection (Provided by PBX)
•
Output Port: Normally it is same as connection port. If not, can set separately.
•
User Name: User name to login PBX.
•
Password: Password to login PBX
The IP address assigned to PBX
Do not check this option if there’s no IP SMDR
Call Tracker User Guide V1.2
Intelligent Recording © 2015
Page 49
Intelligent Recording Call Tracker Installation Guide
The above settings instruct the system to create a new call record when the call is put on hold and
transferred to another extension.
Other Settings
The above settings set options to enable or disable screen pop alert when criteria for same are met
within the program. This includes information from Phone Book, Alert List notifications etc.
Example of Small Window Pop-Up
Full Size Pop-Up, populated by information in the Phone Book if used :
Call Tracker User Guide V1.2
Intelligent Recording © 2015
Page 50
Intelligent Recording Call Tracker Installation Guide
Duration Pop-Up window remains on Desktop of PC
On start-up software will display call records from selected time frame.
This sets the directory where calls are downloaded to. It is important to not change this directory very
often to avoid downloading calls more than once.
Settings for use with Central management Software
Call Tracker User Guide V1.2
Intelligent Recording © 2015
Page 51
Intelligent Recording Call Tracker Installation Guide
These are preference settings that determine behavior of the software upon start-up or network loss.
Manager Set-Up and Permissions
Online user:
Shows Managers that are currently logged into the Call Tracker System
Shows online time, online duration, IP address, software version and MAC address
Call Tracker User Guide V1.2
Intelligent Recording © 2015
Page 52
Intelligent Recording Call Tracker Installation Guide
User Management
This section is used to add multiple users to the Call Tracker system. Users can be given full or restricted
access to the features and recordings by channel.
Add new account
User name: Max. 16 characters
Password: Max 16 characters
New users are given permissions over features as
well as over which Channels they can access or
monitor as shown to the right.
Manager List:
Contact Us:
Call Tracker User Guide V1.2
Intelligent Recording © 2015
Page 53
Intelligent Recording Call Tracker Installation Guide
Intelligent Recording
In USA +1-800-930-8135
In UK +44 (0) 1909 512 148
[email protected]
[email protected]
www.usbcallrecord.com
Call Tracker User Guide V1.2
Intelligent Recording © 2015
Page 54