1
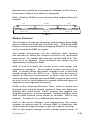
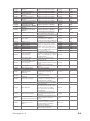
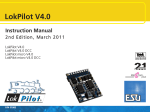
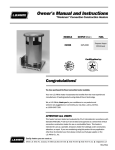
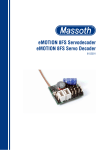
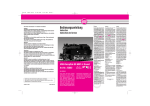
Operator’s Manual
Paragon 2
Diesel Locomotives
RELEASE 1
DC Users See Page 2
DCC Users See Page 8
12/22/08
Paragon 2
1
Table of Contents:
DC Operation...............................................................................2
DCC Operation............................................................................8
DCC Programming Quick Reference & Tips...................... 22
Throughout the manual we will use “DC” to refer to
operation using a traditional DC power supply and “DCC”
to refer to operation with a NMRA compliant Digital
Command Control system. Almost every operational
feature of this locomotive can be configured to suit your
personal taste by setting configuration variables (CV’s).
Many of these apply to DC and to DCC operation. See
the list of configuration variables in this manual and the
Paragon 2 Technical Reference Manual available at www.
broadway-limited.com for more information.
Operation with a DC Power Pack
Your Paragon 2 diesel locomotive is ready-to-run. Simply
place the locomotive on a track powered by any DC power
pack with a variable output up to 16 volts DC. As you
increase the track voltage, the sound system will begin
functioning at around 7 volts DC. If you increase track
power slowly, you will hear the sound of a diesel locomotive
starting, then idling. As you slowly increase track voltage,
you will hear the brake release sounds followed by the
sound of a diesel engine increasing in speed as the
locomotive prepares to move. Once under way, you will
hear the engine increasing its RPM. There are a number
of sounds the locomotive will produce automatically to
simulate the sound of a full-size diesel locomotive.
If you do not use DCC, the DC Master Analog Control
Module (BLI stk# 1011 or PCM stk# 1001), is required for
activation of the whistle, bell and some other sounds, and
to control the volume. It can also program CV’s without
a DCC system. The DC Master is shown in figure 1,
connected between the power pack and the track.
2
Broadway Limited Imports
Figure 1.
Paragon 2
3
Manually Activated Sounds
Horn Plays when the “horn” button on the
DC Master is pressed. The Paragon 2
horn is highly playable. A quick press
and release plays a short horn blast.
Holding down longer and releasing
produces a long horn blast. Holding
the horn active for a long blast,
releasing quickly and pressing again,
then releasing, plays an alternative
horn ending. This ending is unique
for each locomotive. There are 3
horns, selected by setting CV224 to
0, 1, or 2.
The horn can be set to automatically
play warning blasts when the loco
starts and stops by setting CV 227 to
6. Set back to 2 to turn off.
Bell
The bell turns on when the “bell”
button on the DC Master is pressed.
It turns off when the “bell” button on
the DC Master is pressed a second
time. The interval between bell rings
can be adjusted by setting CV180. A
Lower number is faster.
Air Compressor
Press the “AUX” button on the
DCMaster while the locomotive is
stopped.
Dynamic Brakes Press the “AUX” button on the
DCMaster while the locomotive is
moving.
Automatically Activated Sounds
4
Startup
The sound of a diesel locomotive
starting is heard when the track
power is turned on.
Shutdown
The sound of a diesel locomotive
being turned off is heard when track
Broadway Limited Imports
power is lowered to about 5 volts.
Brake Set
Plays automatically when
locomotive shuts down.
the
Brake Release
Plays automatically
locomotive starts up.
when
the
Brake Squeal
Plays automatically when
locomotive is slowed quickly.
the
Diesel Rev Levels
The sound of a diesel locomotive
speeding up and slowing down is
heard when the model changes
speed or load.
Randomly Activated Sounds
The following sounds will be heard when the locomotive
is running or sitting at idle. Various other random sounds
may play if appropriate for each locomotive.
Spit Valve
Air release
Compressor
Air filling
Volume/Mute
To mute the sounds, press the “Vol” button once. To turn
the sounds back on, press the “Vol” button once. Horn
and bell still work when the other sounds are muted.
Your Paragon 2 locomotive’s sound system has 8 volume
levels that can be set from the DCMaster. At startup, it
is at the loudest setting. To lower the volume, press the
“Vol” button on the DCMaster two times quickly (like
double-clicking a mouse button on a PC). The volume will
decrease 1 level each time you do this. When the lowest
level is reached the volume will start to increase with
subsequent double-clicks of the button until the highest
volume level is reached, at which point the locomotive
brake sound will play to signal maximum volume.
Tip: To make the locomotive always start at a lower
volume, set CV 133 to some number lower than 128. 0 is
off, 128 is max.
Paragon 2
5
Tip: The volume of many sound features can be set
independent of the overall volume by setting CV’s 135
through 156 with the DC Master. See the next section.
Setting Configuration Variables (CV’s) without
DCC
Your Paragon 2 locomotive’s sound system is highly
configurable even without DCC by using the DCMaster.
Most of the locomotive’s functions are controlled by
setting Configuration Variables (CV’s). To change a CV:
1. Place the locomotive on the track with track
power off. Hold down both the “Aux” and Vol”
buttons on the DCMaster while turning track
power on to maximum voltage. The locomotive
will not move. The display on the DCMaster will
read “E01.”
2. Press the bell(-) button or horn(+) button to scroll
past E15, then to the CV numbers which range
from 1-255 (There is no ‘E’ in front of the CV
numbers.) Stop at the one you want to change
and press the “Vol” button.
3. Use the bell(-) button or horn(+) button to scroll
to the new value, then press “Vol” to accept.
The locomotive will make a ‘beep’ sound to
acknowledge. It will not beep if the CV was
already set to the number entered.
4. Turn off track power to finish programming.
Tip: The locomotive you are setting should be the only DC
Master compatible locomotive on the track. Otherwise all
locomotives on the track will have their CV’s reset.
Changing the function of the AUX button.
The AUX button can be made to do other functions by
changing CV222 with the DC Master. Select the desired
function from the table on page 15 and enter it into
CV222. See page 9 for a listing of the functions and their
descriptions.
6
Broadway Limited Imports
Commonly used DC settings are shown below:
#
CV8
CV131
CV135
CV136
CV137
CV138
CV139
CV140
CV141
CV142
CV143
CV144
CV145
CV148
CV149
CV150
CV151
CV152
CV153
CV155
CV156
CV180
CV184
Name
Master Reset
Analog Sound
Unit Startup
Horn Volume
Bell Volume
Diesel Volume
Horn2 Volume
Coupler Slack
Volume
Coupler
Volume
Uncouple
Volume
Wheel Flange
Volume
Compressor
Volume
Manual Air
Release
Volume
Air Filling
Volume
Spit Valve
Volume
Radiator
cooling fan
Volume
Dynamic
Brake Volume
Brake Squeal
Volume
Fuel Fill
Volume
Passenger
/Freight
Message
Volume
Maintenance
/ Radio
Volume
City / Farm
/ Industrial
/ Lumber
Volume
Bell Ring
Interval
DC Brake
Control
CV188 Pitch Shift
Analog AUX
CV222 Select for
DCMaster
CV 224 Horn Select
CV230
DC Easy
Consist
Froward/
CV 227 Reverse
Warning
Enable
CV245 Alternate
Horn Ending
CV248 Start Up Delay
Enhanced DC
CV251 Motor Control
Vmax
Enhanced DC
CV252 Motor Control
Vmin
Paragon 2
Usual
values
Factory
Setting
8
38
0-255
72
0-255
0-255
0-255
0-255
128
128
128
128
higher number is louder.
0-255
128
higher number is louder.
0-255
128
higher number is louder.
0-255
128
higher number is louder.
0-255
128
higher number is louder.
0-255
128
higher number is louder.
0-255
128
higher number is louder.
0-255
128
higher number is louder.
0-255
128
higher number is louder.
0-255
128
higher number is louder.
0-255
128
higher number is louder.
0-255
128
higher number is louder.
0-255
128
higher number is louder.
0-255
128
higher number is louder.
0-255
128
higher number is louder.
0-255
128
Description
Setting CV8 to 8 resets everything to
factory settings.
A lower number causes the sounds
to start at a lower track voltage.
higher number is louder.
higher number is louder.
higher number is louder.
higher number is louder.
Increasing increases the time
0-255
between bell rings
Increase to play the brake sound
0-255
more frequently
Change to alter pitch of all sounds.
0-255
Makes 2 locomotives sound different
Selects which function is controlled
by the Aux button.
Selects one of 3 horns
Set consist position as front, middle
or rear locomotive. Rear locomotive
is facing rear. 0=single locomotive
1=front locomotive 2=middle eng.
3=rear locomotive
Set to 6 to turn on automatic horn
toot when starting. Set to 2 to
turn off.
16=disable
17=enable
40 (varies)
20
128
see p. 23
5
0,1,2
0
0-3
0
2,6
2
16,17
17
Delays motor start to let engine start
up sounds finish before moving.
0-255
Each number is 0.1 seconds.
Voltage at which 100% of track
power is sent to motor. (Must be
0-255
greater than Vmin)
Track voltage at which motor will
start moving.
0-255
A Lower Value = Lower Start Voltage
20
120
84
7
Consists
Paragon 2 locomotives can be set to run in a DC consist with
each other by setting CV 230 to 1,2, or 3, which designates
the locomotive as front, middle or rear facing rear
locomotive, respectively. The rear loco facing backwards
since railroads commonly run the rear loco in reverse. This
automatically sets the lights, bell and horn to respond
appropriately. To break the consist, simply program zero
into CV230. (To make the rear facing loco forward facing,
Set CV230 to 3, then change CV229 to 1 to enable the
rear light.)
BLI’s Paragon 2 Locomotives are programmed from the
factory to start-up just like the prototype, utilizing a realistic
motor start-up delay that lets the diesel engine starting
sounds finish before the train moves. To minimize this
delay and allow the locomotive to start moving instantly,
decrease CV 248 to a value of 0 using the DC Master (See
Page 6 of this manual).
Paragon 2 locomotives start moving at a higher track
voltage than non-sound locomotives. This is done to allow
the sound system to start working before the locomotives
moves. As a result, it is difficult to consist a sound
locomotive with a non sound locomotive in DC operation.
DCC Operation
Paragon 2 Locomotives come equipped with an integral
DCC decoder. Is automatically detects if you are using a
DCC system and responds appropriately.
FACTORY DEFAULT ADDRESS = 3.
To Reset, set CV8 = 8.
When programming on the main line in Operations Mode,
the locomotive will beep to indicate when a CV is changed.
It will not beep if the same number is programmed into a
CV. It will not beep on the program track.
8
Broadway Limited Imports
DCC Programming
To change the engine ID, first, make sure you can run
the locomotive as engine #3 and blow the horn. Then,
reprogram the engine ID on the main track or the program
track following the procedure for your DCC system. (Note:
Lenz systems do not allow changing address on the main
line. Use the program track. See page 22.)
Diesel Function Key Definition
Paragon 2 locomotives have the ability to use dozens of
functions. If your DCC system does not support this many
functions, the function you want to use can be assigned
to the function keys available on your DCC system. The
default function keys are listed below. To change the
assignments, see page 15.
Function Key
Description
F0
F1
F2
F3
F4
F5
F6
F7
F8
F9
F10
F11
F12
F13
F14
F15
F16
F17
F18 F19 F20
F21
Front Light/Rear Light
Diesel Bell
Diesel Horn
Coupler Slack/Couple
Compressor / Dynamic Brake
Ramp Diesel Engine Up
Ramp Diesel Engine Down/
Startup
Ditch or MARS light On/Off
(if equipped)
Volume/Mute
Startup Diesel Engine/
Shutdown Diesel Engine
Radiator Cooling Fan
Air Filling/Air Release
Brake Set/ Brake Release/
Brake Squeal
Grade Crossing Horn
Passenger Announcements
Freight Announcements
Maintenance Sounds
Radio Sounds
City background sounds
Farm background sounds
Industrial Background Sounds
Lumber Background Sounds
Paragon 2
9
F22
F23
F24
F25
F26
F27
F28
Toggle to second horn
Reserved for some cool new feature.
Cab Light
Rule 17 light dimmer.
Play record macro
Record Start/Stop
Brake Squeal
Front and Rear Light (F0)
Pressing F0 turns the front and rear light on and off. The
light intensity can be adjusted with CV 231.
Diesel Bell (F1)
Pressing F1 turns on the bell. Most controllers allow
the bell to stay on until the F1 is pressed a second time.
Lower CV 180 to speed up the bell.
Diesel Horn (F2)
Pressing F2 activates the horn. The Paragon 2 horn is
highly playable. A quick press and release plays a short
horn blast while holding down and releasing produces a
long horn blast. Holding the horn active for a long blast,
releasing quickly and pressing again, then releasing, plays
an alternative horn ending. This ending is unique for each
locomotive.
There are 3 horns, selected by setting CV 224 to 0,1, or 2.
There is an alternate horn, which can be toggled in place
of the main horn by pressing F22.
Some DCC controllers, including Digitrax DT400 and NCE
Procab, have the ability to “quill” the horn. This model is
equipped with a variable “analog” horn function that will
operate if your system is capable of sending the signal.
See P. 22.
The horn can be set to automatically play warning blasts
when the loco starts and stops by setting CV 227 to 6. Set
back to 2 to turn off.
10
Broadway Limited Imports
Coupler (F3)
Pressing F3 when the locomotive is moving causes a
coupling sound effect to play. The effect simulates two
cars coupling. The sound of the slack between the cars
being removed may be simulated by pressing F3 when the
locomotive is stopped. This action arms the sound, making
it ready to play. The actual slack sound effect plays when
the engine starts moving.
Compressor and Dynamic Brakes (F4)
Pressing F4 activates the compressor when the locomotive
is stopped. Pressing F4 again shuts the compressor off.
The dynamic brake is activated by pressing F4 when the
locomotive is moving. Pressing F4 again or stopping or
increasing the speed shuts the dynamic sound brake off.
The sound heard is the sound of the cooling grid fans that
come on when the dynamic brake is used. The engine
RPM will ramp down when the dynamic brake is on.
Diesel Engine Rev Up (F5) or Down (F6)
The diesel sound RPM level is normally controlled
automatically based on the loading of the motor. A
heavier load, curve and hills all cause the sounds to run
at a higher RPM. Going down a hill will cause the engine
sounds to run a lower RPM. To control manually, press F5
to increase the engine RPM to one level per press. Press
F6 to decrease. The engineer can increase the engine
RPM, then start moving the locomotive. Once the F5 or
F6 buttons have been used to manually control the RPM
level, the level will stay where it was set until the throttle is
returned to zero, at which time the engine RPM sound will
return to automatic operation.
Mars Light (F7)
Pressing F7 will turn on the Mars or ditch lights. Pressing
F7 again will turn off the Mars or ditch lights. The ditch
lights will be on steady and will oscillate when the horn is
blown. (See the Technical manual “L1” output for more
options.)
Paragon 2
11
Master Volume and Mute (F8)
To mute the sounds, press the F8 button once. To turn the
sounds back on, press the F8 button once. Horn and bell
still work when the other sounds are muted.
There are 8 volume levels that can be set from the DCC
handheld controller. At startup, it is at the loudest setting.
To lower the volume, press the F8 button two times
quickly (like double-clicking a mouse button on your PC).
The volume will decrease one level each time you do this.
When the lowest level is reached the volume will start
to increase with subsequent double-clicks of the button
until the highest volume level is reached, at which point
the locomotive brake sound will play to signal maximum
volume. Tip: To make the locomotive always start at a
lower volume, set CV 133 to some number lower than
128. 0 is off, 128 is max.
Startup/Shutdown Diesel Engine (F9)
In DCC, the engine powers up with all sound effects off.
The startup sequence is played by pressing F9. If the
locomotive is already playing sound effects, pressing F9
initiates the shutdown diesel locomotive sound effect.
The sound effects can also be started by increasing the
throttle, which will not cause the startup sequence to
play.
Radiator Cooling Fan (F10)
Pressing F10 activates the radiator cooling fan. Once the
fan is active, pressing F10 turns the fan off.
Air Filling and Air Release (F11)
Pressing F11 while the locomotive is stopped activates the
air filling sound effect. While the locomotive is moving,
pressing F11 activates the air release sound effect.
Brake Set and Brake Release (F12)
When the locomotive is at speed step zero, pressing F12
activates the brake set sound effect. When the locomotive
is above speed step zero, pressing F12 activates the brake
12
Broadway Limited Imports
release sound effect.
Automatic brake set and brake release may be enabled
by setting bit 0 of CV227 to 1.
Above speed step 5, F12 plays the brake squeal.
Passenger Sounds (F14)
When stopped, press F14 to play a passenger train
departing message. Do not press this button if you do not
have a passenger train, as this will cause unprototypical
operation. After pressing, other passenger departure
sounds will be heard when the train starts to move. If the
train has been moving for over 30 seconds, pressing F14
will play station arrival messages.
Freight Sounds (F15)
When stopped, press F15 to play a Freight train departing
message. Do not press this button if you do not have a
Freight train, as this will cause unprototypical operation.
After pressing, other Freight departure sounds will be
heard when the train starts to move. If the train has been
moving for over 30 seconds, pressing F15 will play freight
yard arrival messages.
F16 - F21 play one of 4 messages in random order.
F16 is Maintenance Facility Sounds.
F17 is Crew Radio Messages
F18 is sounds heard in a city.
F19 is sounds heard on a farm.
F20 is industrial sounds.
F21 is lumber mill sounds.
Caution: Do not press these buttons if the corresponding
background sound is not appropriate for your layout.
Macro Recording (F26 and F27)
When operating in DCC, the operation of the locomotive
can be recorded and later played back. To use this
function, press F27. (If your DCC system does not have an
F27 key, assign that function to a key you do have using
the directions on P15.) The front light will flash and the
Paragon 2
13
sound will momentarily stop. Once the sound starts again,
every keystroke will be recorded. Operate the train as you
normally would, being careful not to adjust the throttle too
much, as this uses recording space quickly. When finished
recording, press F27 again to stop recording. The rear
light will flash indicating the recording has been saved. Be
careful not to accidentally hit F27 again, as this will start
recording over your previous recording. If this happens,
interrupt track power before hitting F27 again.
Press F26 to replay. During replay, the DCC controller
cannot control the engine. To interrupt the playback,
either interrupt track power, or press the emergency stop
button.
CV 238 controls the number of times the recording will
repeat, between 1-14 times by setting the value to 64 plus
the number of repeats. Setting CV 238 to 79 makes the
recording repeat indefinitely. The timing of the loop can
be shortened by setting CV239. Its range is from 0-255.
Each number shortens the loop by 0.1 seconds.
The engine contains a pre-recorded sequence. To load it,
set CV8 to a value of 10. Then press F26 to play. This
works well for demonstrations and will repeat indefinitely
if CV238 = 79.
NOTE: There is a very limited amount of recording
space available. If the space is used up, the engine will
repeatedly make a coupler clanking sound to indicate the
memory is full. The engine can run for a long time without
using more space, but changing the throttle uses space
quickly. 28 speed step mode is best for recording, since
it uses less space.
14
Broadway Limited Imports
Function Key Mapping
Most DCC systems have between 8 and 28 function keys
or buttons. Since the Paragon 2 sound system has more
functions than there are buttons available, the functions
can be made to work on any function button. This is done
by entering the value of the function into the CV associated
with the button.
Button
CV
F0
CV 33
F1
CV 34
F2
CV 35
F3
CV 36
F4
CV 37
F5
CV 38
F6
CV 39
F7
CV 40
F8
CV 41
F9
CV 42
F10
CV 43
F11
CV 44
F12
CV 45
F13
CV 46
F14
CV 47
F15
CV 48
F16
CV 49
F17
CV 50
F18
CV 51
F19
CV 52
F20
CV 53
F21
CV 54
F22
CV 55
F23
CV 56
F24
CV 57
F25
CV 58
F26
CV 59
F27
CV 60
F28
CV 61
Paragon 2
15
The table below shows the available functions. To assign
one of these function to a function button, enter the value
into the CV for the desired function button. For Example, to
assign Grade Crossing to Function 7, enter 50 into CV40.
Description
16
Value
Nothing
0
Headlight & Rear Light on/off
1
Bell on/off
2
Horn
3
Couple/Uncouple
4
Compressor/Blower
5
Diesel Ramp up/Startup
6
Diesel Ramp Down
7
Ditch or Mars Lights
8
Volume/Mute
9
Startup/Shutdown
10
Cooling Fan
11
Air Fill/Release
12
Brake
13
Fuel Fill
14
Spit Valve
15
Wheel Flange
16
Coupler Slack
17
Brake Squeal
18
Horn 2 Toggle
19
Play Macro
40
Record Macro
41
Grade Crossing Horn
30
Passenger Sounds
50
Freight Sounds
51
Maintenance Sounds
52
Radio Chatter
53
City Sounds
54
Farm Sounds
55
Industrial Sounds
56
Lumber Sounds
57
Cab Light on/off
60
Rule 17 dimming
61
Broadway Limited Imports
The function keys can be mapped to closely match the
functions of several other sound systems by setting CV8
to the manufacturers code for the engine you want to
match.
CV8 = 38 matches F0 - 12 with BLI Blueline Engine
CV8 = 113 matches most QSI equipped engines.
CV8 = 141 matches Sound Traxx Tsunami equipped
engines.
Brake Squeal
A sudden decrease in throttle activates the brake squeal
sound effect. DCC Brake Control (CV185) controls how
sensitive the brakes are to changes in throttle. The
factory value is 20. Increasing this value decreases the
brake sensitivity while decreasing this value increases the
sensitivity. Set to 5 for 28 speed step operation.
Randomly Activated Sounds
The following sounds will be heard when the locomotive
is running or sitting at idle. Various other random sounds
may play if appropriate for each locomotive.
Spit Valve
Air release
Compressor
Air filling
Tip: The volume of many sound features can be set
independent of the overall volume by setting CV’s 135
through 156. See page 20.
CV Programming
The sound and operation of Paragon 2 locomotives can
be customized by setting a number of configuration
variables (CV’s). A list of DCC settings is shown on page 20.
Broadway Limited Imports recommends programming
your Paragon 2 locomotives on the main track using
Operations Mode programming or using Direct mode or
Paged mode on the programming track.
Paragon 2
17
Reading CV’s
Digitrax and Lenz systems can read Paragon 2 CV’s in any
mode. Most MRC and NCE systems require a programming
track booster to read CV’s, such as the Power Pax by DCC
Specialties. A booster is not required to operate the train
or to program CV’s.
Resetting to Factory Default
The Paragon 2 sound system can be reset to the factory
default by setting CV8 to a value of 8. If this cannot be
accomplished, the system can be manually reset by
holding down the tiny reset button on the sound circuit
board while turning on track power.
DCC Easy Consist
Start with each engine having a unique address.
You can create a consist by designating each engine as
front, middle, or rear, then setting the consist address.
CV230 designates the position in the consist as follows:
CV230 = 1 for the Front Engine
CV230 = 2 for allMiddle Engines
CV230 = 3 for the Rear Engine
Front Engine: Set CV230 = 1. Pick a consist address
between 1 and 127 (10 for example) and program it into
CV19.
Middle Engines: Set CV230 = 2. Set CV19 = consist
address (10 for example). (For a rear facing engine, Set
CV 19 = the consist address plus 128. (138 for example if
the consist address is 10).
Rear Facing Rear Engine: Set CV230 = 3. Set CV 19 = the
consist address plus 128. (138 for example if the consist
address is 10).
Front Facing Rear Engine: Set CV230 = 3. Set CV19 =
Consist Address, then set CV 229=1 to set the lights.
18
Broadway Limited Imports
Operate the consist by selecting its address as if it were a
locomotive (Select loco #10 for example).
Note: Setting CV19 to zero removes the engine from the
consist.
F
Rear
Middle
Front
Eng#3000
Eng#6000
Eng#5000
CV230=3
CV19=138
CV230=2
CV19=10
F
F
CV230=1
CV19=10
Consist #10
Motor Control.
The Paragon 2 system features outstanding back EMF
speed control for both DC and DCC use. The back EMF
feature can be turned off by changing CV10 to 0. Change
to 1 to turn back EMF on again.
The motor movement can be delayed after turning
the throttle to allow the engine sound to rev up before
movement. To enable this feature, set CV 245 to 3. Set
back to 1 to disable. Once enabled, the delay can be
adjusted by setting CV 248.
CV2, 6 and 5 control the motor start, mid range and
maximum voltages. The possible values are from 0 to
255. 0 would cause the motor voltage to be 0 and 255
would cause it to be 100 % on. These can be used to
adjust 2 different locomotives to start and run at the
same speeds. Usually the back EMF must be turned off
on one or all of the engines to enable different types of
engines to run together smoothly.
CV95 is the Forward/Reverse Trim, used to make the
forward and reverse speed match if they are different.
Setting the value from 1-127 makes the engine run
slower in reverse. 1 is the slowest. Setting CV95 to from
129 to 255 makes it run faster in reverse. 255 is the
fastest. A value of 0 or 128 disable the feature.
CV2 is the start voltage, and determines the motor
voltage at speed step 1. If back EMF is disabled, this
value must be high enough to get the engine moving.
CV6 is the motor voltage at the middle speed step. It
Paragon 2
19
must be greater than CV2 and less than CV5.
CV5 is the motor voltage at the highest speed step.
CV3 sets the acceleration rate. Its range is from 0 to
255. Setting to 20 makes the engine take an additional
20 seconds to accelerate from stopped to full speed.
CV4 sets the deceleration rate. Its range is from 0 to
255. Setting to 20 makes the engine take an additional
20 seconds to decelerate from full speed to stopped.
Speed Table: If setting CV2, 5, and 6 is not sufficient
to make 2 engines run together through the entire speed
range, the speed at each step can be set using CV’s
67 through 94. To use these values, CV29, bit 4 must
equal 1. See Paragon 2 Technical Reference Manual for
specifics. This should only be attempted by experienced
users.
DCC CV’s, descriptions, and default settings:
#
Name
CV1
CV2
CV3
CV4
Primary Address
V START
Acceleration delay
Deceleration delay
CV5
CV6
CV7
CV8
CV10
CV15
CV16
CV17
CV18
CV19
CV21
CV22
CV29
CV33-61
CV67-94
CV133
CV135
CV136
CV137
CV138
CV139
CV140
CV141
CV142
CV143
20
Description
DCC address
motor voltage at step 1
Simulates heavy train
Simulates heavy train
Motor Voltage at top speed
V MAX
step
Motor voltage at middle
V MID
speed step
Manufacturer Version Read only software version
NMRA manufacturers ID
Manufacturer ID
number
Set to 0 to turn off back
Back EMF on/off
EMF speed control. Set to
1 to turn on.
Unlock ID Code
Unlocked when CV15=CV16
Lock ID Number
Lock
Extended Address
Valid when CV29 bit 5 =1,
MSB
see tech manual
Extended Address
Valid when CV29 bit 5 =1
LSB
Consist Address
 See page 16
Consist Address
see tech manual
Functions Type 0
Consist Address
see tech manual
Functions Type 1
Configuration Bits
see tech manual
Function Key
selects which function is
assignment
activated by keys F0-F28
Speed Table Entries See Tech Manual
Sound Unit Master
Volume at start up. Higher
Volume
number is louder.
Horn Volume
higher number is louder.
Bell Volume
higher number is louder.
Diesel Volume
higher number is louder.
Horn2 Volume
higher number is louder.
Coupler Slack Volume higher number is louder
Coupler Volume
higher number is louder.
Uncouple Volume
higher number is louder.
Wheel Flange Volume higher number is louder.
Compressor Volume higher number is louder.
Usual
values
Factory
Setting
0-255
250
0-255
50

Varies
38
38
0, 1
1
0,1,2,3
0,1,2,3
0-255
0
0
Engine
128
Engine
128
0
0-255
255


 See P 22

0-128
128
0-255
0-255
0-255
0-255
0-255
0-255
0-255
0-255
0-255
128
128
128
128
128
128
128
128
128
1-127
0-255
0-255
0-255
0-10239
0-10239
3
1
5
5
Broadway Limited Imports
CV144
CV145
CV146
CV147
CV148
CV150
CV151
CV152
CV153
CV155
CV156
Manual Air Release
Volume
Air Filling Volume
Brake Set Volume
Brake Release
Volume
Spit Valve Volume
Dynamic Brake
Volume
Brake Squeal Volume
Fuel Fill Volume
Passenger /Freight
Message Volume
Maintenance / Radio
Volume
City / Farm /
Industrial / Lumber
Volume
CV180
Bell Ring Interval
CV185
DCC Brake Control
CV188
Pitch Shift
CV193
CV194
CV195
CV196
CV197
CV198
RPM Level 1
RPM Level 2
RPM Level 3
RPM Level 4
RPM Level 5
RPM Level 6
CV199
RPM Level 7
CV208
DCC Cab Light
Throttle Stop
CV209
DCC Brake Set
Throttle Stop
CV210
DCC Brake Release
Throttle Stop
CV 224
Horn Select
CV225
CV226
DCC Control One
DCC Control Two
CV227
FWD/Reverse
Warning
CV229
CV230
CV 231
CV238
CV239
CV240
CV245
CV248
higher number is louder.
0-255
128
higher number is louder.
higher number is louder.
0-255
0-255
128
128
higher number is louder.
0-255
128
higher number is louder.
0-255
128
higher number is louder.
0-255
128
higher number is louder.
higher number is louder.
0-255
0-255
128
128
higher number is louder.
0-255
128
higher number is louder.
0-255
128
higher number is louder.
0-255
128
0-120
Varies
0-255
20
0-255
128
0-255
0-255
0-255
0-255
0-255
0-255
105
120
130
160
210
225
0-255
240
0-255
3
0-128
1
0-128
1
0,1,2
0


 2 or 6
 2


0,1,2,3
0
4-100
100
65-79
79
0-255
0
1-20
4
0,1,2,3
1
0-255
20
Increasing increases the
time between bell rings
increasing decreases brake
sensitivity
Change to alter pitch
of all sounds. Makes 2
locomotives sound different
For Automatic RPM control,
these CV’s set the motor
power at which the sound
system shifts to the next
level. The setting for each
must be higher than that of
the preceding CV.
If equipped, cab light is
turned on below this speed
step. 0 is always on. 255
is always off.
Brake is set below this
throttle level.
Brake is released when
speed exceeds this throttle
level.
Selects one of 3 main
horns.
see tech manual
see tech manual
2 turns off horn toots to
ward when starting. 6
turns on.
DCC Extended Consist
see tech manual
Lighting
0=single locomotive,
DCC Easy Consist
1=front, 2=middle, 3-rear
locomotive in consist.
Decrease to dim headlight
Headlight brightness
and rear light.
Set to 64 plus the number
of repeats, up to 14. 65=
1 repeat, 66=2 repeat,
Loop Repeat
etc. Set to 79 to repeat
indefinitely.
Increasing by 1 shortens
Macro Loop Adjust
the playback loop by 0.1
second.
Increasing decreases how
Random Sound
often random sounds
Generator Occurrence
occur.
0=both disabled
Enable Alternate Horn
1= horn ending enabled
Ending and start
2=Start Delay enabled.
delay
3=Both enabled.
sets start delay in 0.1
Motor Start Delay
second increments.
Paragon 2
21
Write down your favorite settings:
CV #
Name
Value
__________ _______________________ ___________
__________ _______________________ ___________
__________ _______________________ ___________
__________ _______________________ ___________
__________ _______________________ ___________
__________ _______________________ ___________
__________ _______________________ ___________
DCC Programming Quick Reference Guide
FACTORY DEFAULT ADDRESS = 3
FACTORY RESET: Set CV 8 = 8
Programming Paragon 2 locomotives using
locomotives using Lenz Digital Plus system.
The Lenz system does not allow programming locomotive
ID on the main track. To program on the program track:
Press F, then 8.
The display should flash “PROGRAM”. Press enter.
Press the “ENTER” key until the display reads “DIR”.
Press enter, then press + repeatedly until the display
22
Broadway Limited Imports
reads “ADR” then press enter.
The display should read “A*_”. Enter the address, 2477
for example, and press enter. The engine should beep
several times and display the new address as A*2477
**If an error occurs, you will get a message like “ERR02”.
Press “ESC” and quickly re-enter the address. (You may
have to do this several times. This is because the sound
decoder has a capacitor that charges when the track
power is turned on to begin programming. This interferes
with the programming signal. Once the signal is sent
quickly several times, the capacitor will be fully charged
and will no longer interfere. If this is not successful, the
address can be entered manually by setting CV 17, 18
and 29. Call service for assistance.
To RESET Paragon 2 locomotive to factory default
using Lenz system on the Program Track: Place the
locomotive on the programming track.
Press F, then 8. The display should flash PROGRAM.
Press enter. Press the + key until the display reads CV.
Press 8. Press Enter.
Press 8. Press Enter. The locomotive should not beep to
indicate the CV was changed.
Press ESC twice.
The locomotive ID # is now 3.
To enable the quillable analog horn function
using the Digitrax DT400.
Press the “OPTN” button, then press “enter” twice.
The display should read “Option 3=XXX”, where xxx is
a number, x01 for example. Add 80 to that value by
spinning the right throttle, to make it x81. Press “Exit”.
The horn button is now pressure sensitive and will change
the horn sound depending on how hard the button is
pressed. Notice that the bar graph on the display now
shows how hard the button is being pressed.
To enable the quillable analog horn function
Paragon 2
23
using the NCE Procab system.
NOTE: The NCE system must have software dated March
2007 or later. To check, press “Prog” until “Set CMD
Station” is displayed. Press “Enter”. The software date
will show. If you need to update, NCE will send a new
chip to install in the system for a nominal fee.
To enable, press “Prog” until “SET CAB PARAMS” is
displayed. Press enter repeatedly until “ANALOG HORN
CHANNEL” is displayed. Press “127, then “ENTER”.
Press Enter until ANALOG BIAS is shown. Press 8, then
ENTER. Press ESC.
Now, while pressing the horn button, the pitch can be
changed by turning the throttle.
To enable Functions F13-28 using the NCE
Procab system.
NOTE: The NCE system must have software dated March
2007 or later. To check, press “Prog” until “Set CMD
Station” is displayed. Press “Enter”. The software date
will show. If you need to update, NCE will send a new
chip to install in the system for a nominal fee.
With the system on, disconnect the plug from the
handheld. Hold down the “Select Loco” key while
plugging the cable back in. Press “enter” repeatedly
until “Program Option Key Value” is displayed. Press
122, enter. Press Esc.
Now, pressing the option key 1 time will make keys F1-9
act as 11-19, pressing twice will make keys F1-9 act as
functions 20-29.
Pressing EXPN will now show the status of all 28
functions.
24
Broadway Limited Imports
Notes: __________________________________
_______________________________________
_______________________________________
_______________________________________
_______________________________________
_______________________________________
_______________________________________
_______________________________________
_______________________________________
_______________________________________
_______________________________________
_______________________________________
_______________________________________
_______________________________________
_______________________________________
_______________________________________
_______________________________________
_______________________________________
_______________________________________
_______________________________________
_______________________________________
_______________________________________
_______________________________________
Paragon 2
25
_______________________________________
_______________________________________
_______________________________________
_______________________________________
_______________________________________
_______________________________________
_______________________________________
_______________________________________
_______________________________________
_______________________________________
_______________________________________
_______________________________________
_______________________________________
_______________________________________
_______________________________________
_______________________________________
_______________________________________
_______________________________________
_______________________________________
_______________________________________
_______________________________________
_______________________________________
_______________________________________
26
Broadway Limited Imports
_______________________________________
_______________________________________
_______________________________________
_______________________________________
_______________________________________
_______________________________________
_______________________________________
_______________________________________
_______________________________________
_______________________________________
_______________________________________
_______________________________________
_______________________________________
_______________________________________
_______________________________________
_______________________________________
_______________________________________
_______________________________________
_______________________________________
_______________________________________
_______________________________________
_______________________________________
_______________________________________
Paragon 2
27
More great Paragon 2 products are coming.
Preorder the following with your dealer
today:
PARAGON 2: EMD SWITCHER SW7, HO
PARAGON 2: NYC J1E/D 4-6-4, HO
with Synchronized Puffing Smoke
PARAGON 2: PRR I1SA 2-10-0, HO
with Synchronized Puffing Smoke
MUCH MORE TO COME!
Broadway Limited Imports, LLC
28
9 East Tower Circle, Ormond Beach, FL 32174, USA
www.broadway-limited.com
email: [email protected]
TEL: 386-673-8900 | FAX: 386-673-8080
Broadway Limited Imports