Transcript
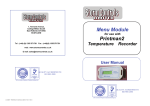
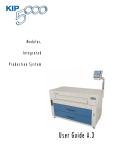
Main Features &
FIG. 1
USER OPERATING INSTRUCTIONS
PRINTMAN 2
STORM
DESCRIPTION
There are three buttons on the PRINTMAN key pad and a green power-on LED.
After initial set up the green power LED light will be on, indicating the unit is recording
normally.
There is no functional set-up required, as the unit is factory
SAMPLE OF
set to operate as follows.
DELIVERY TICKET
TICKET PRINTING
Pressing the keypad buttons operates the printer to print as
lows:Pressing this button starts the printing of a
DELIVERY TICKET.
The Delivery Ticket shows Company Name and Vehicle
identification number (if loaded on initial set-up) then date,
time
and current values of temperature for sensors T1 (normally
turn air) & T2 (normally compartment air).
A space is provided for the drivers signature before handing to
customer as proof of temperature at delivery.
STORM CONTROLS
VEHICLE PMP02000
DATE 12/08/10 TIME 14:37
fol-
DELIVERY TICKET
T1
19.5
CURRENT VALUES
T2
-19.9
SIGNED . . . . . . . . . . . . . . . .
Pri
TO REPLACE COVER, LOCATE
SLOT AT TOP THEN PUSH SHUT
AT BOTTOM THEN TURN LATCH
1/4 TURN TO SECURE.
ENSURE PAPER IS FED
THROUGH SLOT AND IS FREE
TO BE PULLED OUT.
GREEN
Power-on LED
re-
Pressing this button starts the printing of a
JOURNEY TICKET.
The journey ticket shows the Company Name and Vehicle
Identification number, date, time and current values of sensors T1 & T2 similar to the delivery ticket then prints the recorded sensor
temperature readings back every 15 minutes ( or other set sample rate) for 24 hours.
A space is also provided for a signature verifying the results have been
checked before the Daily Journey ticket is filed for future reference.
The printing can be stopped at any time if only a partial ticket is required.
To stop the printing function, wait until a few Sensor temperature lines have been printed
out then, Press and hold down the “JOURNEY TICKET” button until the printing stops.
Then release the button, the printer will start again and print out the “Signed line” before
stopping completely.
Pressing this button starts the printing of a PRINTALL TICKET.
The Printall Ticket shows the same information as the Journey Ticket
but continues beyond 24 hours and will print all the data stored in memory.
The Printall Ticket is used if a Journey Ticket is not taken on a journey but
a record is still required for greater duration than 24 hours.
The printing can be stopped at any time if only a partial ticket is required.
To stop the Printing function, wait until a few Sensor temperature lines have been printed
© SCL 2009-2011
TO GAIN ACCESS TO PRINTER
RIBBON, PAPER ROLL , AND
RS232 COMMS. PORT , TURN
BLACK LATCH 1/4 TURN ANTI
CLOCKWISE USING A COIN
THEN REMOVE PRINTER
COVER, BY LIFTING FROM THE
BOTTOM.
FIG. 2
REMOVE PRINTER RIBBON, BY LIFTING OFF.
FIT NEW PAPER ROLL IN PAPER BIN WITH PAPER
AT THE BOTTOM.
PUSH FREE END OF PAPER INTO PAPER FEED SLO
THE BOTTOM OF PRINTER MECHANISM AND TUR
RUBBER PAPER FEED ROLLER USING THUMB, TO
PAPER ROUND ROLLER AND OUT OF FRONT OF P
THEN PULL TO LEAVE 150 mm APPROX LENGTH O
PAPER.
ALTERNATIVELY THE PAPER CAN BE FED THROU
WITH THE PRINTER RIBBON FITTED AND WHEN T
PAPER IS PUSHED INTO THE PAPER FEED SLOT PR
ING ANY PRINT BUTTON TO TURN ROLLER & FEE
PAPER THROUGH PRINTER MECHANISM.
REMEMBER TO REFIT THE INK RIBBON IF IT WAS
MOVED & TENSION THE RIBBON USING THE SMA
TENSION WHEEL ON THE RIBBON PLASTIC COVE
REFIT THE PRINTER COVER AS DESCRIBED IN FIG