1
INSTALLATION INSTRUCTIONS
PREPARATION
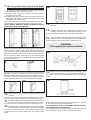
The heater will arrive separately from its
storage bricks, 4 bricks will be required.
(2 Packs) Catalogue No. XT8300
MODEL ONLY - The Room Sensor is located at the
3. XLS6N
rear of the right hand side of the heater. Remove sensor
from plate, carefully slide the sensor plate down from its transit
position to its operational position. Refit sensor to plate.
3.
the heater on its feet and in the desired position
4. Place
against the wall. Ensure the heater is based on a firm
level surface at least 75mm from any end wall and at least
250mm below any shelf or similar projection. Cut away any
gripper rod or carpet which would prevent the heater sitting
firmly on the floor.
4.
WARNING - This appliance must be earthed
Only heat resisting cable (min. rating T85) should be
used. The wires in the mains cable will be coloured as
follows:GREEN & YELLOW EARTH
BLUE
NEUTRAL
BROWN
LIVE
SUGGESTED FIXINGS
SOLID BRICK/BLOCK: No. 10 Size plastic inserts,
8mm drill bit. Drill hole 15mm deeper than rawlplug
length.
PLASTERBOARD - If possible locate studding and use
No. 10 woodscrews directly into the wood, otherwise
M5 rawlplug intersets are suitable.
the position of the two outside corners of the wall
5. Mark
bracket with the heater pushed tight against the wall.
Remove the wall bracket from the heater by removing
the screw at each end. Place the heater to one side and
reposition the bracket against the wall using the corner marks
for alignment.
Four fixing positions must be chosen for this heater. Mark the
positions for the fixing holes - one at each end. Remove the
bracket from the wall, drill the holes in the positions marked,
and insert suitable fixings previously described. Secure the
wall bracket to the wall.
5.
NOTE: FOR OTHER WALL TYPES (e.g. Timber frame
and hollow concrete) SEEK SPECIALIST ADVICE.
FIXING ASSEMBLY
1.
ENSURE THAT FIXING KIT AND FEET HAVE BEEN
LOCATED BEFORE DISPOSING OF PACKAGING.
Fit the feet with the open end of the foot to the front of
the heater. Secure each foot using two taptite screws
provided in the fixing kit.
2.
2.
connection is to be made from the left side, at
6. Ifthismains
point the mains lead must be secured to the back of
the heater using ties provided in the fixing kit.
6.