1
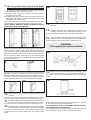
7. THE FOLLOWING MUST BE APPLIED WHEN 12.
FIXING THE HEATER TO THE WALL BRACKET
i) If no skirting board is present secure the heater through
the wall bracket slots closest to the wall.
ii) If 100mm (4in.) skirting is present secure the heater
through the outer slots.
iii) If skirting taller than 150mm (6in.) is present this must be
reduced to 150mm (6in.) over the entire width of the heater
plus 25mm (1in.) at each end.
Do not fully tighten these screws until the bricks are loaded
into the heater as some settling of the heater may occur.
NOTE: NEVER REMOVE THESE SCREWS WITHOUT
FIRST UNLOADING THE HEATER.
7.
the front bricks again with the recess towards the
13. Fit
element.
14.
Replace the inner front complete with insulation by
locating its bottom edge behind the front lip of the
chassis and inserting retaining screws along both sides.
the mains cable through the cable clamp and
15. Feed
make connections as marked on heater. Pull back any
slack through the clamp and tighten clamping screw.
Remove the front panel by removing the two self tapping
8.
screws along its bottom edge. With hands positioned on
each side of the panel, lift upwards to unhook the top edge
whilst pressing down on the top panel with your thumbs. The
panel can now be lifted clear and set to one side. Discard
the packing which had been sandwiched between the inner
front and outer front.
WARNING
This appliance must be earthed
15.
8.
Replace outer front panel and grille by hooking the grille
the inner front by removing the screws along its 16.
into its retaining slot on the top panel and lowering it
9. Remove
sides. As the front insulation is attached care must be
taken when lifting this panel from the heater and placing it to
one side. Remove the internal packing by sliding it up and
off the elements taking care not to damage the insulation.
9.
10.
into position. Secure the front panel with the two self tapping
screws.
16.
the element to allow access for the back rows
10. Remove
of bricks.
Loosen the two screws securing the element tails in the ceramic
connector block, and lift the element up and out of the heater.
Carefully fit the bottom rear brick with the narrow end of
the recess over the slot in the base insulation. Fit the
top rear brick with the narrow end of the recess to the top.
11.
t the element which had been removed by feeding
12. Refi
the tails down through the hole in the base insulation
and into the connector block. Ensure the element is fully
pushed home then securely tighten the two screws in the
block.
that the screws securing the heater to the wall
17. Check
bracket have been fully tightened.
IT IS ESSENTIAL THAT ALL SCREWS ARE REPLACED
TO ENSURE EARTH CONTINUITY.
Once installed do not attempt to reposition the heater without
first obtaining the services of a competent electrician.