1
ASSEMBLY
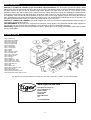
STANDARD LEGS: Attach the legs if required. We suggest that
the two legs with fixing holes be fitted to the back of the stove, for
neater appearance. If the hearth is uneven, fit one or more
washers between any leg and the stove body to lengthen it. Fix the
stove down to the hearth, through the legs, using the screws and
plugs provided.
'AMERICANA' COOKTOP KIT OPTION (supplied separately):
Remove the two bolts located to the left and right inside the
underneath of the standard top. Remove and discard the standard
top, taking care not to damage the fibre seal. Fit the 'wings' to the
cooktop and bolt the whole assembly back onto the stove body. Do
not over tighten.
'EUROPA' HI-LEG KIT OPTION (supplied separately): Assemble
the left, and right hi-legs loosely to the central bridging member.
Attach to the underside of the stove using the bolts supplied before fully tightening. Note the 'Installation Clearances' on
page 1. When used as a log store, logs must not be placed higher than the central 'bridging' member.
FITTING
*
Rear flue connection into
chimney with sealing collar.
Cleaning door on opposite
side.
Top outlet through fully-sealed steel
closure plate (fitted with cleaning door)
into old, oversized, chimney with steel
sealing collar.
Top outlet with 45 degree bend Rear outlet connected to
sealed into masonry chimney
top outlet by 'T' piece
with cleaning door on opposite
with cleaning door, to
side.
bring stove forward.
FLUE CONNECTION: Fasten the flue outlet and blanking plate to the top or back flue outlet with screws and nuts
provided.Tiger can be connected to the chimney (using approved flue pipe components) in several ways, four of which are
shown above. Whichever method is used it is imperative that: (1) The route for gases from the stove to the chimney
terminal is completely air-tight-seal all joins with fireproof cement and/or heatproof rope. (2) It is possible to sweep the
entire length- access doors may be required. (3) The entire construction is of durable fireproof materials- composite board
is not a suitable material for closure plates, which should be of steel or concrete. Tiger should be secured to the hearth by
bolting through the fixing holes drilled in the legs.
AIR SUPPLY Tiger needs air to breathe - there must be a permanent air supply into the room in which the fire is installed
equal to at least 15cm². A extractor fan can remove this air, even if fitted in a different room.
LIVING WITH A TIGER
LIGHTING Empty the ashes. Place two or three firelighters
close together, or screwed-up paper covered with dry
sticks, at the back of the grate and light them. When they
are burning well gently fill the fire very full with dry fuel,
close the door and set the air control slide to the 'high'
(right) position. To prevent castings from cracking, the
first fire lit in your Tiger should be small- made with
little fuel and the air slide set to 'low'.
FILLING: When using mineral fuel, don't fill above the level
of the lining bricks.
CONTROL How fast the fire burns depends on how much
air reaches the fuel. Move the air control slide below the
window to the right for highest output, to the left for 'low'.
Fuels which produce their own oxygen (such as some
types of wood) or those which give off large amounts of
volatile gas (housecoal, lignite etc) will be more difficult to
control.
ECONOMY Surprisingly, best economy is achieved with
the firebox very full and the air control set to 'low'. The fire
will burn much more efficiently than if you use 'little and
often' and will need less frequent refuelling.
2