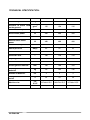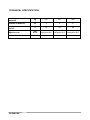
1
Operating Instructions
FOR SCRUBBER DRIER
MODELS 31-41-61-71-91-101-121-131
B/BF
Clemas & Co. Unit 5 Ashchurch Business Centre, Alexandra Way,
Tewkesbury,
Gloucestershire, GL20 8NB.
Tel: 01684 850777
Fax: 01684 850707
Web: www.clemas.co.uk
Email: [email protected]
ENGLISH 1
INDEX:
1.
IMPORTANT WARNINGS……………………………………
2.
INSTRUCTIONS BEFORE OPERATING…………………… 5
3.
PRACTICAL GUIDE FOR THE OPERATOR………………
6
4.
INSTRUCTIONS…………………….…………………….…
8
5.
TROUBLESHOOTING…………………….…………………
12
6.
CLEANING AND MAINTENANCE…………………….…… 15
7.
OPTIONAL ACCESSORIES…………………….…………… 16
8.
CE CONFORMITY DECLARATION………..…….………… 17
9.
TECHNICAL SPECIFICATION…………………….………… 22
3
SPECIAL INFORMATION FOR
10. USING THE BATTERIES AND CHARGER………………… 23
CONTROL AND MAINTENANCE
11. OPERATIONS…………………….…………………….……
2 ENGLISH
27
1.
IMPORTANT WARNINGS:
1.1. IMPORTANT! This appliance is not suitable for removing dusts
hazardous to health.
1.2. IMPORTANT! This appliance is not suitable for washing carpet or
textile floors or wood floors not treated with non-absorbent resin.
1.3.
This appliance is not approved for use on public roads or highways.
1.4. This appliance may only be used by personnel fully trained in its
correct and appropriate use.
1.5. In order to prevent unauthorised use of the machine always remove
the key from the key switch before leaving the appliance
unattended.
1.6. Lower the brushes before leaving the machine unattended to prevent
accidental movement.
1.7. When using the machine the operator should take care not to
endanger any third persons, particularly children.
1.8.
The appliance may not be used on slopes of greater than 2%.
1.9. We expressly draw your attention to the fact that original parts and
accessories not supplied directly by Gansow have not been tested
or authorised by Gansow.
The installation and/or use of such items may therefore adversely
affect the efficiency and characteristics of your floor cleaning
machine, jeopardising its active and passive safety.
The manufacturer declines all liability for damage occurring as a
result of the use of non-original parts or accessories.
1.10. Before any cleaning or servicing work is carried out on the machine,
the following precautions must be taken:
- unplug the plug from the charger from the charger
ENGLISH 3
socket; - remove the key from the control panel.
ATTENTION !
Before changing the main fuse, disconnect the battery cables from
the respective terminals (danger of short circuit).
1.11. Under no circumstances may the charger leads (connecting the
charger to the machine) supplied be modified.
1.12. All electrical functions of the machine are interrupted immediately as
soon as the plug is plugged into the charger socket.
1.13. This appliance may be used with the brushes provided by the
producer only.
ATTENTION !
The safety of the appliance will be jeopardised by the use of other
brushes.
1.14. *IMPORTANT - battery gas is highly explosive; avoid sparks or open flames close to the batteries!
To avoid the build-up of gas inside the machine, the tank and tank
lid must remain in the raised position throughout charging. The
caps of all battery cells must also be unscrewed and/or removed
(not necessary in the case of gel batteries).
1.15. *IMPORTANT - battery acid is corrosive!
When topping up with distilled water make sure the level of liquid
is the same in all the battery cells. Dry cells shorten battery life
and may cause irreparable damage to the entire battery (not
relevant to gel batteries).
1.16. IMPORTANT! Rooms where batteries are being charged should
always be well ventilated.
* Not relevant to maintenance free gel
batteries
4 ENGLISH
2.
INSTRUCTIONS BEFORE OPERATING:
2.1. Before operating a battery-powered machine, please read all the
following instructions and the instructions for use of the charger (if
purchased).
2.2. Note that the batteries deliver maximum power only after eight to ten
charging cycles. During this period, the machine should not
therefore be used for excessively heavy cleaning.
2.3. To provide your battery with even greater protection, the machine is
equipped with a charge indicator and hour counter.
By means of variously coloured LEDs (seven yellow and one red),
this provides a constant indication of the charge and automatically
shuts the brush motors down when the charge drops below the
safety level.
The LEDs indicate the following stages:
YELLOW ON: batteries within the charge limit
YELLOW FLASHING 15 seconds of running time remain before the
brush motors shut down.
RED ON: the battery is flat and the brushes are blocked. You should
immediately go to the charging area to avoid damaging the batteries.
The transition of one LED to another with a delay of just 15 seconds
ensures a prompt response in the event of flat batteries to avoid
discharging them further and therefore irreparably reducing their working
life.
2.4. IMPORTANT! The machine must not under any circumstances be
started up with the front and top lids raised.
ENGLISH 5
3.
3.1.
PRACTICAL GUIDE FOR THE OPERATOR:
*IMPORTANT - Seal the battery cells by screwing on the caps.
* Not relevant to maintenance free gel
batteries
3.2. After turning the charger off, unplug the connection lead from the
charger from the battery socket to power the machine.
3.3. Lift the top lid and use a hose or bucket to fill the clean water tank (on
the left) with cold water up to a maximum of 3 cm from the top of
the tank (the water should preferably be cold and in any case
never hotter than 60°C).
IMPORTANT! Use low foam detergent as excessive foam could
jeopardise the efficiency and function of the machine.
Close the top lid, lifting slightly on the hinge side to make sure it
fits perfectly to the tank.
IMPORTANT! If the lid does not fit perfectly, there would be no
vacuum at the squeegee and therefore no flow-back of liquid to the
collection tank (on the right). If necessary, repeat the operation
correctly.
Avoid resting heavy objects on the lid as this could warp it and
prevent it from fitting perfectly to the tank.
3.4. Make sure the cap of the dirty water tank (on the right) drain hose is
correctly in place. Perfect closure of the cap is essential to obtain a
vacuum in the collection tank and therefore maximum suction
power.
3.5.
Turn the key switch clockwise to start the machine.
3.6. Light pressure and a slight sideways movement of the pedal release
the brushes which are lowered in contact with the ground.
6 ENGLISH
3.7. To activate brush rotation, press the corresponding button on the left
side of the control panel.
MACHINES WITH DIAPHRAGM: Pressing this button opens the
water solenoid valve and turns the water pump on.
Turn the knob on the control panel clockwise to adjust the
quantity of water to the brushes (from 0 to 7 litres).
MACHINES WITHOUT DIAPHRAGM: Pressing this button opens the
water solenoid valve.
To adjust the quantity of water to the brush in accordance with
the dirt to be removed (more dirt=more solution), use the red
lever at the bottom on the operator's right. When the lever is
horizontal, the cock is fully open, when vertical it is completely
closed.
3.8. Lower the squeegee to the ground, using the control lever in front of
the operator under the handle.
3.9. Turn on suction to convey the dirty water to the collection tank, using
the button marked with a fan on the right of the control panel.
ENGLISH 7
4.
4.1.
INSTRUCTIONS:
SERIES "B" MODELS WITHOUT DRIVE:
The appliance is equipped with a patented drive system - as the
brush rotates in contact with the ground, it draws the whole
machine along at the correct working speed.
By pushing slightly, the drive speed can be increased as required.
Holding it back slows it down.
SERIES "BF" MODELS WITH DRIVE:
Push the drive lever gradually forwards to advance the machine at
the required speed. The maximum possible speed is 5.5 km/h.
On curves, adjust speed by moving the drive lever backwards.
When the lever is released completely, the drive motor stops
automatically.
ATTENTION!
The drive unit is fitted with a crush prevention device consisting of a
square red button at the centre of the handle which changes the
direction of movement if touched while the appliance is in reverse.
This prevents the operator being crushed in the event of incorrect
manoeuvres.
4.2.
Clean in parallel strips overlapping by 3 to 4 cm.
Rollers on the ends of the squeegee act as bumpers and also
enable you to clean at a tangent to the edges. The extreme
manoeuvrability of the squeegee which can be swung freely and
widely to both sides enables you to clean around any obstacle.
The squeegee then returns to the central position when the
obstacle or curve has been passed. When consigning the machine
or during a demonstration, our service technician can advise you
on the best way of cleaning your own particular floor surface.
8 ENGLISH
4.3. By means of a vacuum created inside the collection tank, the used
water and the dirt are completely absorbed and conveyed to the
dirty water tank.
To prevent dirty water or foam damaging the vacuum motor, the
collection tank is protected by two sensors (electrodes) which shut
the machine down when the tank is full (they also detect the level
of any foam present).
4.4. After finishing the work or when the solution in the tank is used up
(indicated with a red flashing light on the switch board), stop brush
rotation by pressing the corresponding button. This also stops the
flow of water. Raise the head using the pedal.
4.5. To collect the remaining dirt, continue for a further 3-4 metres with
suction activated and the squeegee lowered, than turn both
functions off by pressing the suction button and raising the
squeegee lever. This empties all water left in the circuit into the
collection tank.
IMPORTANT!
After you have finished cleaning, you are recommended to raise the
tank lid and turn the suction motor on again for a few minutes. The
dry air sucked in will evaporate any remaining moisture, extending
the working life of the motor.
4.6. Empty the collection tank into a container or drain using the black
drain hose and proceeding as follows:
-
detach the hose from the control panel;
keeping the hose raised above the level of the tank at all times,
remove the cap;
-
lower the hose gradually towards the container.
4.7. IMPORTANT! After each cleaning session, you are recommended to
drain the dirty water and rinse the tank to avoid unpleasant smells
or the formation of harmful germs. To make this operation faster,
simpler and more effective, the appliance is fitted with an
exclusive system:
-
the tank tilts backwards, after raising the lid, lift the tank until it rests
ENGLISH 9
-
on the chassis (empty before tilting);
after removing the cap, lower the drain hose to allow the water to run
off rapidly;
wash the collection tank with running water;
-
leave the tank tilted until the next time you use the machine.
-
The appliance has been designed to facilitate thorough
maintenance. A little attention improves the efficiency of your
appliance and extends the already long working life.
4.8.
When parking the machine, you are recommended to lower
the brush head to anchor it to the ground.
4.9.
The machine has a rapid brush replacement system:
1- turn the key to the off position (anticlockwise as far as it will go),
2- use the pedal to lift the brush head,
3- hold the brush with both hands and turn it sharply in the normal
direction of rotation. In the case of heads with two motors, the
direction of rotation is always towards the centre of the head.
Hold the bayonet coupling firmly in position and release the
brush.
4- remove the brush and position the replacement in the centre of
the housing, precisely under the bayonet coupling,
5- use the pedal to raise the brush head,
6- switch the appliance on and activate brush rotation for a few
moments, then turn off again,
7- finally, raise the brush head and make sure the brush is correctly
fitted. If necessary, repeat operations 1 to 6.
4.10.
The key switch should be turned off before recharging the
batteries.
4.11.
In order to avoid any build-up of gas inside the machine,
the tank (previously emptied) covering the batteries must
be raised and remain in that position throughout charging.
Similarly, the caps of all battery cells must also be
unscrewed and/or removed (not necessary in the case of
maintenance-free gel batteries).
10 ENGLISH
PRECAUTIONS
Battery gas is highly explosive. Avoid sparks and open flames near
the batteries.
When topping up with distilled water make sure the level of liquid is the
same in all the battery cells. Dry cells shorten battery life and may cause
irreparable damage to the entire battery (not relevant to maintenance-free
gel batteries).
ATTENTION!
If the battery is damaged, the acid is highly corrosive!
4.12.
IMPORTANT! Rooms where batteries are being charged
should always be well ventilated.
Before using battery-powered models, read carefully the
instructions on use and maintenance of the machine, batteries and
charger; procedures and precautions to be observed while charging
batteries and connecting the charger and inspection and
maintenance of batteries and maintenance schedules.
ENGLISH 11
5. TROUBLESHOOTING:
5.1.
No water is delivered, check that:
-
5.2.
the brush is moving,
if necessary, activate the brush by using the button on the left of the
control panel,
there is water in the tank and the level is above the filter (the red LED
on the switch board is flashing),
if necessary, top up and add detergent,
the clean water filter is not clogged,
if necessary, remove and clean with air from the outside inwards,
the water solenoid valve is operating correctly,
if necessary, remove and clean,
the water cock is open (lever horizontal = fully open, lever vertical =
fully closed),
the knob on the control panel (diaphragm machines only) is not on
zero.
The water flow does not stop:
-
close the water cock, then remove the solenoid valve and thoroughly
clean the inside, including the closure spring housing, - open the cock
again and check it works,
-
replace the valve if necessary.
5.3.
The suction motor does not start:
-
reset by using the key switch to turn the appliance off then on again,
-
clean the collection tank around the sensor electrodes and the
electrodes themselves.
ATTENTION!
Do not move the electrodes from their original position. Make sure
they are not already out of position. By modifying the distance
between them, or between the electrodes and the side of the tank, the
power cut-off mechanism may be activated by mistake. Contact the
Gansow Distributor Technical Assistance Service if necessary.
12 ENGLISH
-
check the main fuse.
-
check the charge of the batteries and if necessary, charge.
5.4.
Water is not sucked up, although the motor is operating;
-
-
5.5.
make sure the cap is correctly in place on the drain hose.
make sure the suction hose between the squeegee and the dirty water
tank is not blocked. If necessary unblock and fix the hose well to both
connecting pieces.
make sure the top lid is correctly in place on the tank, raise and lower
as described in point 3.3,
check the batteries are not flat.
The squeegee leaves wet marks or stripes:
-
-
clean the blades of the squeegee and remove any trapped grit or
paper,
check the wear of the squeegee blades and if necessary, turn or
replace,
PARABOLIC SQUEEGEE: make sure that when moving forwards with
suction on, the squeegee is perfectly horizontal. If necessary, adjust
the central nuts.
carry out the checks described in point 5.4.
IMPORTANT!
When dealing with large amounts of fluff, this may accumulate under
the rear squeegee blade causing leakage and therefore preventing
perfect drying. If this occurs, the squeegee should be raised while at
the same time moving the machine backwards to pick up the dirt left
on the ground, proceeding in a diagonal direction.
5.6.
The squeegee sticks to the floor due to strong suction:
-
-
check the state of the front blade and in particular the inlet slits. If
obstructed or worn, clean or enlarge them slightly, or cut one to three
additional slits until the squeegee functions correctly,
turn round or replace excessively worn squeegee blades. They can be
reversed to extend the working life,
STRAIGHT SQUEEGEE: adjust pressure on the ground using the
ENGLISH 13
-
5.7.
screw on the mobile support, tightening lightens the pressure,
unscrewing increases pressure.
PARABOLIC SQUEEGEE: adjust pressure on the ground by
tightening the adjustment nuts above the levelling wheels on the back
of the squeegee.
The brush motor shuts down:
-
5.8.
the automatic battery protection device has tripped. Stop working and
recharge the batteries immediately.
The dirty water does not drain out through the hose:
-
make sure the tank is not blocked near the drain outlet.
-
remove any blockages in the drain hose itself.
5.9.
The machine leaves a smeary mark:
-
no water flow,
no solution in the tank (fill the tank), or solution tank filter dirty (clean
filter),
check the brush feed pipe which could be blocked, open
the
water cock if closed.
carry out the additional checks described in point 5.1.
5.10. The machine does not move forward or moves forward too
slowly (BF SERIES MODELS WITH DRIVE ONLY)
-
check and remove any oxidation on the battery terminals, then tighten,
the squeegee is stuck to the ground by excessive suction. See point
5.6.
-
the batteries are flat, stop work and recharge.
14 ENGLISH
6. SERVICE AND MAINTENANCE:
6.1. Before any servicing or maintenance work is carried out on the
machine and before any parts are replaced:
-
drain both tanks completely,
unplug the plug from the charger from the charger socket,
-
turn off the key switch.
6.2.
The electrodes in the dirty water tank should always be kept
clean and in their original position. By modifying the distance
between them, or between the electrodes and the tank, the
power cut-off mechanism may not activate correctly.
6.3.
Clean the dirty water tank thoroughly and regularly to prevent
the formation of unpleasant odours and bacteria. Tilt the tank to
facilitate cleaning.
6.4.
The tank lid should always be left open between cleaning
sessions to enable the internal surface to dry out. Never place
heavy objects on the top lid as this could warp it.
6.5.
After each cleaning session, clean the outside of the machine to
remove any chemical residues which could accelerate wear and
affect the appearance of the materials.
6.6.
The filter in the clean water tank should be cleaned regularly
twice a week.
6.7.
Check the state of the squeegee blades regularly and if
necessary turn them over or replace them. See also sections
5.5.
and 5.6.
6.8.
Perform battery maintenance regularly to maintain their
efficiency and extend their working life. They are expensive and
should be kept in good condition.
ENGLISH 15
6.9.
The outlet slits on the suction motor should be checked and
cleaned regularly, especially where there is a considerable
amount of fluff in the atmosphere.
6.10.
A general control by authorised Gansow personnel is
recommended at least once every six months.
7. OPTIONAL ACCESSORIES:
7.1. Depending on the type of floor and dirt, you may want to use
brushes other than those supplied as standard.
The following are available from your Gansow Distributor:
-
7.2.
Black soft and PES brushes for delicate floors (gyms, sealed wood,
etc);
in polycarbonate of various hardnesses for a more energetic and deep
treatment.
As an alternative to the brushes, you can use a pad, available
in three versions with different colours:
-
black = abrasive
red/green/purple = medium hard
-
brown/yellow/white = soft.
The brush does not need to be removed to use the pad, which can be
fitted directly to the brush itself. Alternatively, a special pad holder can
be provided.
16 ENGLISH
8.
TECHNICAL SPECIFICATION:
31 B 46/50
41 B/BF 53/57
61 B/BF 53/57
Cleaning width
mm
460/500
530/570
Squeegee width
mm
870
870
530/570
870
Capacity per hour theor.
m²/h
1840
2120/2930
2120/2930
Maximum speed
km/h
4
4/5,5
4/5,5
Number of brushes
no.
1
1
1
Brush diameter
mm
460
533
533
kg
24
31.5
31.5
g/cm2
110
109
109
rpm
180
200
200
W
600
650
650
-
Mechanical
B : MECHANICAL
BF : ELECTRONIC
B : MECHANICAL
BF : ELECTRONIC
Nominal drive motor
power
W
/
B:/
BF : 200
B:/
BF : 200
Suction motor power
W
350
410
550
dB(A)
83
83
83
Solution tank
l
26
40
62
Collection tank
l
26
40
62
Diaphragm
/
-
-
Yes
Drive wheel diameter
mm
160
230
230
Pivoting wheel diameter
mm
125
125
125
kg
100
no.
2
B : 129 BF
: 142
2
B : 135 BF
: 148
2
V
24
24
24
cm
X/Y/Z
124x51x95
128,5x60,5x108,5
143x60,5x108,5
128,5x60,5x113
143x60,5x113
Max. brush pressure
Pressure of brush head
on the ground
Brush rotation speed
Brush motor power
Drive
Sound pressure
Net weight without
batteries
Number of batteries
Voltage of batteries in
series
Machine size
ENGLISH 17
Total oscillation value
18 ENGLISH
m/s²
<2,5
<2,5
<2,5
TECHNICAL SPECIFICATION:
61 B/BF 65/68
71 BF 70/72
71 BF 85
Cleaning width
mm
650/680
700/720
850
Squeegee width
mm
1000
1000
1150
Capacity per hour theor.
m²/h
2120/2930
3850
4675
Maximum speed
km/h
4/5,5
5,5
5,5
Number of brushes
no.
2
2
2
Brush diameter
mm
345
370
430
kg
31,5
40
45
g/cm2
125
156
135
rpm
180
180
180
W
250
400
400
-
B : MECHANICAL
BF : ELECTRONIC
Nominal drive motor
power
W
B:/
BF : 200
400
400
Suction motor power
W
550
550
550
dB(A)
83
82
82
Solution tank
l
62
70
70
Collection tank
l
62
70
70
Diaphragm
/
Yes
-
-
Drive wheel diameter
mm
230
230
230
Pivoting wheel diameter
mm
125
160
160
Net weight without
batteries
kg
B : 137 BF
: 150
185
187
Number of batteries
no.
2
4
4
V
24
24
24
Max. brush pressure
Pressure of brush head
on the ground
Brush rotation speed
Brush motor power
Drive
Sound pressure
Voltage of batteries in
series
19 ENGLISH
ELECTRONIC ELECTRONIC
TECHNICAL SPECIFICATION:
Machine size
cm
X/Y/Z
124x69x113
139x69x113
163x76x111
167x86x111
Total oscillation value
m/s²
<2,5
<2,5
<2,5
91 BF 70/72
91 BF 85
101 BF 70/72
Cleaning width
mm
700/720
850
700/720
Squeegee width
mm
1000
1150
1000
Capacity per hour theor.
m²/h
3850
4675
3850
Maximum speed
km/h
5,5
5,5
5,5
Number of brushes
no.
2
2
2
Brush diameter
mm
370
430
370
kg
40
45
40
g/cm2
156
135
156
rpm
180
180
180
W
400
400
400
-
ELECTRONIC
ELECTRONIC
ELECTRONIC
Nominal drive motor
power
W
400
400
400
Suction motor power
W
550
550
550
dB(A)
82
82
85
Max. brush pressure
Pressure of brush head
on the ground
Brush rotation speed
Brush motor power
Drive
Sound pressure
20 ENGLISH
TECHNICAL SPECIFICATION:
Solution tank
l
90
90
100
Collection tank
l
90
90
100
Diaphragm
/
Yes
Yes
Yes
Drive wheel diameter
mm
230
230
230
Pivoting wheel diameter
mm
125
125
160
Net weight without
batteries
kg
169
171
179
Number of batteries
no.
4
4
4
V
24
24
24
Machine size
cm
X/Y/Z
139x76x113
139x86x113
163x76x115,5
Total oscillation value
m/s²
<2,5
<2,5
<2,5
101 BF 85
121 BF 70/72
121 BF 85
Voltage of batteries in
series
Cleaning width
mm
850
700/720
850
Squeegee width
mm
1150
1000
1150
Capacity per hour theor.
m²/h
4675
3850
4675
Maximum speed
km/h
5,5
5,5
5,5
no.
2
2
2
Number of brushes
ENGLISH 21
TECHNICAL SPECIFICATION:
Brush diameter
mm
430
370
430
kg
45
40
45
g/cm2
135
156
135
rpm
180
180
180
W
400
400
400
-
ELECTRONIC
ELECTRONIC
ELECTRONIC
Nominal drive motor
power
W
400
400
400
Suction motor power
W
550
550
550
dB(A)
85
82
82
Solution tank
l
100
120
120
Collection tank
l
100
120
120
Diaphragm
/
Yes
Yes
Yes
Drive wheel diameter
mm
230
230
230
Pivoting wheel diameter
mm
160
160
160
Net weight without
batteries
kg
181
194
196
Number of batteries
no.
4
4
4
V
24
24
24
Machine size
cm
X/Y/Z
167x86x115,5
163x76x115,5
167x86x115,5
Total oscillation value
m/s²
<2,5
<2,5
<2,5
Max. brush pressure
Pressure of brush head
on the ground
Brush rotation speed
Brush motor power
Drive
Sound pressure
Voltage of batteries in
series
22 ENGLISH
TECHNICAL SPECIFICATION:
101 BF 70/72 S
101 BF 85 S
131 BF 100 S
Cleaning width
mm
700/720
850
1000
Squeegee width
mm
1000
1150
1150
Capacity per hour theor.
m²/h
3850
4675
5500
Maximum speed
km/h
5,5
5,5
5,5
Number of brushes
no.
2
2
2
Brush diameter
mm
370
430
370
kg
40
45
54
g/cm2
270
225
240
rpm
180
180
180
W
600
600
600
-
ELECTRONIC
ELECTRONIC
ELECTRONIC
Nominal drive motor
power
W
850
850
1100
Suction motor power
W
550
550
660
dB(A)
83
83
85
Solution tank
l
100
100
130
Collection tank
l
100
100
130
Diaphragm
/
Yes
Yes
Yes
Drive wheel diameter
mm
250
250
250
Pivoting wheel diameter
mm
160
160
160
Max. brush pressure
Pressure of brush head
on the ground
Brush rotation speed
Brush motor power
Drive
Sound pressure
ENGLISH 23
TECHNICAL SPECIFICATION:
Net weight without
batteries
kg
212
221
268
Number of batteries
no.
4
4
6
V
24
24
36
Machine size
cm
X/Y/Z
163x76x115,5
167x86x115,5
168x102x115,5
Total oscillation value
m/s²
<2,5
<2,5
<2,5
Voltage of batteries in
series
24 ENGLISH
9.
CE CONFORMITY DECLARATION
We hereby declare that the machine described below complies with the
relevant basic safety and health requirements of the EU Directives, both in
its basic design and construction as well as in the version put into
circulation by us. This declaration shall cease to be valid if the machine is
modified without our prior approval.
Product:
Floor cleaner
Type:
Premium Green Line
Relevant EU Directives
2006/42/CE
2004/108/CE
2000/14/CE
Applied harmonized standards
EN 50106:2009-07-01
EN 55014-1: 2007-06
Applied national standards
DIN EN 60335-1: 2007-02
DIN EN 60335-2-72
DIN EN 60529: 1991 + A1: 2000
25 ENGLISH
10.
SPECIAL INFORMATION FOR USING THE BATTERIES
AND CHARGER
Do you know how much a set of batteries costs?
Between about 650 and 2000 € according to the size of your machine.
Should you have armoured tube batteries, the cost of a set is between
2500 and 2100 €.
Reason enough, we think, to give these expensive energy units the
necessary daily attention required, in order to achieve the greatest possible
working life from them.
To ensure even greater protection for your batteries, we stock a battery
condition indicator which shows the state of the battery at any given time.
This instrument (type: BEM) is a panel type and can be fitted in the panel
on any of our battery-powered machines.
Luminous diodes of various colours are used to indicate the different levels
of voltage. The device can also be used to switch the brush motor(s) off
automatically as soon as the battery reaches an fix state of discharge.
Please feel free to consult the staff at our local sales depots or dealers for
information on using and fitting these instruments as well as on the way
they work.
Points you really must take notice of:
- Never discharge the batteries too low.
Every battery should only be discharged to 70 or 80% of its rated capacity.
You will overburden the batteries,
a)
if you use your machine too long, too often. How long you can
safely work your machine, will be explained to you, when our
service personnel installs your equipment.
You can ask our service personnel at any time, or call our nearest
service depot. For machines fitted with a BEM the brushes will
automatically be switched off when the battery voltages becomes
too low.
26 ENGLISH
b)
if you use your machine regularly more than once within 24 hours
to a certain extend. A good battery charger requires continuously
approx. 10 - 12 hours (according to type) to recharge empty
batteries. If you interrupt the charging process, the batteries will
never become fully charged, and will be quickly ruined.
c)
if you do not recharge the batteries immediately after having used
them to about 70 or 80% of their rated capacity. Empty batteries do
not have the power for a further operation, and will be quickly
ruined. For machines fitted with a BEM the brushes will
automatically be switched off when the battery voltages becomes
too low.
If you use your machine daily for (a) short period(s) only, ask at
your nearest agency, or our service personnel. We will inform you
as to the most practical way to use your charger to avoid
premature corrosion of the battery.
- Storage of batteries
f batteries are taken out of service for a lengthy period they should
be stored fully charged in a dry, frost-free room. To ensure the
battery is always ready for use a choice of charging methods can
be made:
a)
A quarterly full charge.
If loads are connected, e.g. BEM, a full charge could be needed after 3
weeks.
b)
Float charging at the instructed charging voltage.
- Correct connection of the battery charger.
Please take careful note that:
ENGLISH 27
d)
e)
f)
the plug of the charger cable is firmly plugged into the machine;
the mains plug is firmly fitted into the wall socket. Confirm that the
wall socket has electrical feed overnight and hang a notice on the
plug, saying, that during the charging period the plug, must not be
removed;
the battery charger will switch itself on automatically after 15
seconds.
Before leaving the machine, please check carefully, that all connections are
properly made and that the charger is switched on. Many batteries have
been damaged prematurely because something has been overlooked.
Please read the operating instructions of the type of charger in use with
you.
- Secure seating of the post terminals on the cables, that join the
batteries together.
Loose battery post terminals are dangerous because a layer builds up that
hinders the flow of electricity. When recharging the batteries, full electrical
charge cannot flow, the batteries will not become fully charged and are
therefore damaged prematurely. Should you find loose post terminals,
please do not simply tighten them, but remove them, clean the post and the
terminal inside and out, smear with battery grease and refit tightly.
- Run-in instruction
Note that brand-new batteries need a running-in period and thus can not
yet supply full power during the first 8 - 10 discharges. Therefore, the
machine should be kept off heavy duty jobs during that time.
Should you have any further questions about the handling of your battery
machine, please call our nearest office or agency.
- *Never let the batteries get dry.
28 ENGLISH
The electrolyte must cover the cell plates at all times, it should be at least
5/8 ths of an inch over the plates. Cell plates that are continuously dry or
part dry, build up a layer that prevents the cells from charging, rendering
the battery useless within a short time.
- *Never overfill the batteries.
Too much electrolyte is as bad as too less. Only top up to approx. 5/8 ths
of an inch above the cell plates.
Important in breaching with battery acid - corrosive!
- *Always top up the batteries with distilled water, never acid.
The only thing that vaporises when the batteries are warm, is the distilled
water, therefore it is only necessary to top up with distilled water. Topping
up with acid, makes the electrolyte too strong, and causes corrosion on the
cell plates.
Important in breaching with battery acid - corrosive!
*this does not apply to maintenance-free batteries
- *Never top up with tap water.
Tap water has an electrical conductivity and will destroy the batteries. You
can purchase distilled water at Electrical Wholesalers, from us, or from
Petrol Stations.
If you have any further questions about the handling of our battery
machines then please contact your nearest Gansow representative or our
head quarter in Unna / Germany.
*this does not apply to maintenance-free batteries
ENGLISH 29
11.
CONTROL AND MAINTENANCE OPERATIONS:
IMPORTANT!
Repairs should preferably be performed by qualified personnel.
Only original spare-parts may be used. Modification of the machine without
the approval of the manufacturer or the use of unauthorised materials
invalidates the warranty as the structural condition of the machine may
differ from that described in the certificate
After any repair work by unauthorised personnel the machine must be
officially approved by Gansow or a technician authorised by the company
to confirm conformity with the original conditions and therefore the validity
of the general terms of the warranty.
Before any cleaning or servicing work is carried out on the machine,
disconnect the charger cable and remove the key from the key switch to
guarantee operator safety.
IMPORTANT SAFEGUARDS
The following tasks should be carried out daily before or after each
work session:
-
remove dirty water and rinse out the tank,
clean the machine (do not use water jets or water cleaners)
rinse the suction hose by running water from inside the tank,
charge battery and check that the battery terminals and power plug are
securely in position
-
clean the electrodes and check the level of the dirty water and foam,
make sure the tank lid fits correctly to the tank.
30 ENGLISH
Table of recommended checks, inspections and maintenance and
schedule, based on daily use of about four hours;
Description of control
interval interval interval interval interval
WK.LY MTH.LY 4/MTH 6/MTH YR.LY
1. General controls
Check the fixing and condition of the brush
X
X
Check for water leaks from the tanks
Clean the solution tank filters
X
Make sure the switches and indicator lights
on the panel are working correctly
Check that the squeegee blades are not
worn or damaged
Check that the squeegee is correctly
adjusted and adheres to the ground when
suction is activated
Grease the head raising and squeegee
lever rotation pins
Make sure there are no foreign bodies in the
drive wheels and check the tyres are not
worn
2. Motors
X
X
X
X
X
Check, if possible, wear of the drive motor
carbon brushes and replace if necessary
Check wear of the brush motor carbon
brushes and replace if necessary (battery
powered models only)
Check wear of the suction motor carbon
brushes and replace if necessary
3. Drive
X
Ensure cables are not damaged or loose
X
X
X
ENGLISH 31
Description of controls
interval interval interval interval interval
WK.LY MTH.LY 4/MTH 6/MTH YR.LY
4. Collection tank
Make sure the drain hoses are not blocked
X
X
Make sure the suction hose is not blocked
5. Batteries
Check the condition of the cables and the
seal of the cell caps.
If the machine is not used and the batteries
are active, recharge every three months
Top up the level of battery fluid in all cells.
(not necessary with gel batteries)
Grease the battery terminals (not necessary
with gel batteries).
Call the authorised Gansow technical
assistance service for a full control
32 ENGLISH
X
X
X
X
X