1
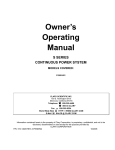
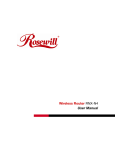
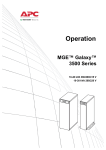
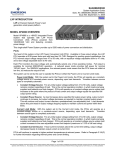
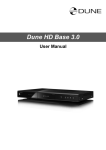
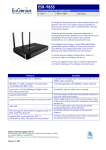
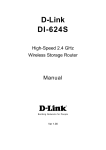
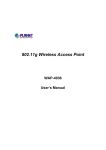
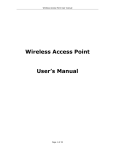
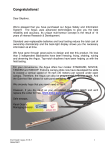
Wireless 11g Broadband Router User’s Manual Version: 1.0 Wireless 11g Broadband Router Version 1.0 Table of Contents 1 INTRODUCTION .................................................................................................................... 5 1.1 1.2 2 UNDERSTANDING THE HARDWARE .................................................................................. 7 2.1 2.2 2.3 2.4 2.5 3 FEATURES & BENEFITS ..................................................................................................... 5 PACKAGE CONTENTS ........................................................................................................ 6 OVERVIEW ....................................................................................................................... 7 FRONT PANEL .................................................................................................................. 7 REAR PANEL .................................................................................................................... 8 CONNECTING TO THE ROUTER........................................................................................... 9 TCP/IP CONFIGURATION .................................................................................................. 9 TYPICAL CONFIGURATION ................................................................................................11 3.1 LOGGING IN .....................................................................................................................11 3.2 SETTING THE TIME ZONE ................................................................................................ 12 3.3 CONNECTION TYPE ......................................................................................................... 12 3.3.1 Cable Modem........................................................................................................... 13 3.3.2 xDSL PPPoE............................................................................................................ 14 3.3.3 xDSL PPPoE............................................................................................................ 15 3.3.4 xDSL PPTP.............................................................................................................. 16 3.3.5 BigPond Cable ......................................................................................................... 17 3.4 WIRELESS SETTINGS ...................................................................................................... 18 3.5 SUMMARY ...................................................................................................................... 18 4 CUSTOMIZED CONFIGURATION ....................................................................................... 19 4.1 LOGGING IN .................................................................................................................... 19 4.2 SYSTEM SETTINGS ......................................................................................................... 20 4.2.1 Time Zone................................................................................................................ 20 4.2.2 Password Setting ..................................................................................................... 21 4.2.3 Remote Management .............................................................................................. 22 4.2.4 Firmware Upgrade ................................................................................................... 22 4.2.5 Restart ..................................................................................................................... 23 4.2.6 Factory Default......................................................................................................... 23 4.2.7 System Status.......................................................................................................... 24 4.2.8 Statistics................................................................................................................... 24 4.2.9 Event Log................................................................................................................. 25 4.2.10 Diagnostic ............................................................................................................ 26 4.2.11 Use as Access Point............................................................................................ 26 4.2.12 Backup Setting .................................................................................................... 27 4.3 INTERNET SETTINGS ....................................................................................................... 28 4.3.1 Connection Type...................................................................................................... 28 4.3.1.1 DHCP Client .................................................................................................... 28 4.3.1.2 PPPoE............................................................................................................. 29 4.3.1.3 Fixed IP ........................................................................................................... 30 4.3.1.4 PPTP ............................................................................................................... 31 4.3.1.5 BigPond........................................................................................................... 32 4.3.2 MAC Clone............................................................................................................... 33 4.3.3 DNS.......................................................................................................................... 33 4.3.4 Dynamic DNS .......................................................................................................... 34 4.4 LAN SETTINGS ............................................................................................................... 35 4.4.1 IP Setting ................................................................................................................. 35 4.4.2 DHCP Server ........................................................................................................... 36 2 Wireless 11g Broadband Router Version 1.0 Table of Contents 4.4.3 DHCP-IP-MAC mapping .......................................................................................... 37 4.4.4 DHCP Client List ...................................................................................................... 38 4.4.5 MAC Filter ................................................................................................................ 38 4.4.6 UPnP Setting ........................................................................................................... 39 4.5 WIRELESS SETTINGS ...................................................................................................... 40 4.5.1 SSID & Channel....................................................................................................... 40 4.5.2 Radio Setting ........................................................................................................... 41 4.5.3 Authentication & Encryption..................................................................................... 42 4.5.3.1 Open & Shared Key Authentication without Encryption.................................. 43 4.5.3.2 Open & Shared Key Authentication with WEP Encryption ............................. 44 4.5.3.3 Shared Key Authentication with WEP Encryption........................................... 45 4.5.3.4 802.1X Authentication without Encryption ...................................................... 46 4.5.3.5 802.1X Authentication with WEP Encryption .................................................. 47 4.5.3.6 WPA Authentication with TKIP Encryption...................................................... 48 4.5.3.7 WPA-PSK Authentication with TKIP Encryption ............................................. 49 4.5.4 Wireless Bridge (WDS) ............................................................................................ 50 4.5.5 Associated Client List............................................................................................... 52 4.5.6 Association Control .................................................................................................. 53 4.6 NAT SETTINGS .............................................................................................................. 54 4.6.1 Static NAT Setting.................................................................................................... 54 4.6.2 Virtual Server ........................................................................................................... 55 4.6.3 Special Applications................................................................................................. 56 4.7 FIREWALL SETTINGS ....................................................................................................... 57 4.7.1 Basic Setting ............................................................................................................ 57 4.7.2 Service Filters .......................................................................................................... 58 4.7.3 Policies..................................................................................................................... 59 4.7.4 Notification ............................................................................................................... 60 4.7.5 Virtual DMZ .............................................................................................................. 61 APPENDIX A – SPECIFICATIONS............................................................................................... 62 APPENDIX B – FCC INTERFERENCE STATEMENT ................................................................. 65 3 Wireless 11g Broadband Router Version 1.0 Revision History Version Date Notes 1.0 June 28, 2004 Initial Version 4 Wireless 11g Broadband Router Version 1.0 1 Introduction T he Wireless 11g Broadband Router, based on the cutting-edge IEEE 802.11g wireless technology, is a high quality and reliable Internet routing and security device, capable of wirelessly transferring bandwidth-consuming applications with enhanced security and privacy. With inherently Nitro™ technology enhancement, the performance is significantly increased in 802.11b and 802.11g mixed networks. This multi-functional and versatile device provides the most flexibility to your network set-up. Simply install the device, connect to Cable/DSL modem, and surf Internet without extra efforts. Also, it supports WDS (Wireless Distribution System) that could repeat wireless signals and easily extend your networks coverage. Acting as a 10/100Mbps 4-port Ethernet switch as well, with all ports supporting MDI/MDI-X, allows you to use CAT5 cable to uplink to other routers/switches. The Wireless 11g Broadband Router is featured with most advanced security technology, supporting WPA (Wi-Fi Protected Access), TKIP, AES, and 802.1x. With the Wireless 11g Broadband Router, your network is armed with the highest levels of protection. 1.1 Features & Benefits Features Benefits High Speed Data Rate Up to 54Mbps Capable of handling heavy data payloads such as MPEG video streaming IEEE 802.11b/g Compliant Fully interoperable with IEEE 802.11b/IEEE802.11g compliant Four built-in 10/100Mbps Switch Ports (AutoCrossover) Scalability, able to extend your network Nitro Technology support Optimized distance and throughput Lets users assign a fixed host and domain name to a dynamic Internet IP address. DDNS Support NAT/NAPT support Shares single Internet account and providing a natural firewall Connection Filtering Filter the connection based on MAC/ IP/ Ports to protect your Internal Network Firewall supports Virtual DMZ, IP Filter, ICMP Blocking, DoS, SPI, VPN Pass-through(L2TP, PPTP) WPA(TKIP/ Pre-shared key) support WDS (Wireless Distribution System) Avoids the attacks of Hackers or Viruses from Internet Universal Plug and Play (UPnP™) Powerful data security Make wireless AP and Bridge mode simultaneously as a wireless repeater Works with most Internet gaming and instant messaging applications for automatic Internet access 5 Wireless 11g Broadband Router Version 1.0 Filter Scheduling The filter can be scheduled by days, hours or minutes for easy management Real time alert The detection of a list for Hacker log-in information Web configuration Helps administrators to remotely configure or manage the Router via Telnet/Web-browser 1.2 Package Contents h h h h h One Wireless 11g Broadband Router One Power Adapter 12V/1A One RJ-45 Cable One Quick Start Guide One CD-ROM with User’s Manual Included 6 Wireless 11g Broadband Router Version 1.0 2 Understanding the Hardware This chapter describes the hardware of the device. The ports on the rear panel are described along with the status of the LEDs on the front panel. The hardware installation procedure is also covered in this chapter. 2.1 Overview Antenna Antenna LEDs 2.2 Front Panel The following in an image of the front panel LEDs. The table below lists the labels on the LEDs and their descriptions. WLAN WAN POWER Local Network 1 ~ 4 7 Wireless 11g Broadband Router Version 1.0 Label WLAN LED OFF Green – steady Green - blinking WAN OFF Green – steady Green - blinking POWER OFF Blue OFF Green – steady Green - blinking Local Network 1 ~ 4 Description No wireless connection Wireless connection ready transmitting or receiving over wireless network No WAN connection Device connected to port Device transmitting or receiving on port No power Power ON No LAN connection Device connected to port Device transmitting or receiving on port 2.3 Rear Panel The following is an image of the ports on the rear panel. The table below lists the labels and their description. RESET Label RESET RF ON/OFF LAN ports 1 ~ 4 WAN port 12V A DC RF ON/OFF LAN ports 1 ~ 4 WAN port 12V A DC Description Press & hold this button for 1 or 2 seconds to reset the device to its current settings. ** Press & hold this button for more than 5 seconds to rest the device to its default factory settings. Push this button IN to turn OFF RF functionality. Push this button OUT to turn ON RF functionality. Connect the network devices to these ports using RJ-45 cables. Connect the xDSL modem or Cable modem to this port for Internet connection. Plug-in the power adapter into the DC-inlet. 8 Wireless 11g Broadband Router Version 1.0 2.4 Connecting to the Router Follow the steps below to connect the Router to your computer or network. 1. Make sure that your xDSL or cable modem is powered OFF. 2. Connect one end of the RF-45 cable to the WAN port of the Router, and the other end to your xDSL or cable modem. 3. To build a wired Internet connection, plug one end of another RJ-45 into one of the LAN ports, and the other end into your computer. 4. Power ON your xDSL or cable modem. 5. Plug-in the DC-end of the power adapter supplied into the DC-inlet of the Router, and the other end to the power-socket. 6. Verify the status of the LEDs to make sure that the Router is connected properly. 2.5 TCP/IP Configuration Follow the steps below in order to configure the TCP/IP settings of your PC. A. In the Control Panel double click Network Connections, and then double click on the connection of your Network Interface Card (NIC). You will then see the following screen. B. Select Internet Protocol (TCP/IP) and then click on the Properties button. This will allow you to configure the IP address of your PC. You will then see the following screen. 9 Wireless 11g Broadband Router Version 1.0 C. Select Use the following IP address radio button, and then enter an IP address and subnet mask for your PC. Make sure that the Router and your PC are on the same subnet. The default IP address and subnet mask of the Router are 192.168.1.254 and 255.255.255.0 respectively. D. Click on the OK button, your PC’s TCP/IP settings have been configured. 10 Wireless 11g Broadband Router Version 1.0 3 Typical Configuration The Router can be configured in two different ways using the web-browser. This chapter describes the steps necessary to configure the device using the setup wizard. This configuration type is called Typical Configuration. configurations refer to Chapter 4. To create customized 3.1 Logging In To configure the Router through the web-browser, enter the IP address of the Router (default: 192.168.1.254) into the address bar of the web-browser, and press Enter. You will then see the login page. Enter admin as the password and then click on the Login button. After successfully logging in, you will see the following menu. Select Typical Configuration. h Typical Configuration: Provides a step-by-step setup wizard to guide you through the basic settings of the router. After completing the steps, the Router will be able to connect to the ISP. 11 Wireless 11g Broadband Router h h Version 1.0 Customized Configuration: Allows you to customize the network settings of the router for specific purposes such as: password settings, firmware upgrade, NAT, firewall, etc. Logout: Exists the utility and returns to the login page. 3.2 Setting the Time Zone The first step is to setup the time zone. For management purposes, a correct time zone setting will let you have accurate time stamps on the system log. h h h Time Zone: Select your time zone from the drop-down list. Daylight Saving: Select the Enable radio button if you are in the daylight saving time zone. Click on the Next button to continue. 3.3 Connection Type The next step is to setup the connection type. The following connections are supported by this router, and each one is described in this section: Cable Modem Fixed IP xDSL, XDSL PPPoE, xDSL PPTP, and BigPong Cable. 12 Wireless 11g Broadband Router Version 1.0 3.3.1 Cable Modem If your broadband access is through a cable modem or your ISP uses DHCP, select this option. h h h Hostname: Enter a hostname if it was provided by the ISP (optional). MAC Address: Enter a MAC address if it was provided by ISP (optional). Click on the Next button to continue. 13 Wireless 11g Broadband Router Version 1.0 3.3.2 xDSL PPPoE If your broadband access is through a xDSL modem and uses a fixed IP address, select this option. h h h h h IP: Enter the IP address as provided by the ISP. Subnet Mask: Enter the subnet mask as provided by the ISP. Default Gateway: Enter the default gateway IP address as provided by the ISP. DNS: Enter the DNS IP address as provided by the ISP. Click on the Next button to continue. 14 Wireless 11g Broadband Router Version 1.0 3.3.3 xDSL PPPoE If your broadband access is through a xDSL modem and uses PPPoE (Point-toPoint Protocol over Ethernet), select this option. h h h h h User Name: Enter the username as provided by the ISP. Password: Enter the password as provided by the ISP. Confirm Password: Re-type the password for confirmation purposes. Service Name: Enter the name of the ISP (optional). Click on the Next button to continue. 15 Wireless 11g Broadband Router Version 1.0 3.3.4 xDSL PPTP If your broadband access is through a xDSL modem and uses PPTP (Point-toPoint Tunneling Protocol), select this option. h h h h h h h User Name: Enter the username as provided by the ISP. Password: Enter the password as provided by the ISP. Confirm Password: Re-type the password for confirmation purposes. Service IP Address: Enter the IP address of the remote PPTP tunnel. This IP address should be provided by your ISP. My IP address: Enter the IP address of the local PPTP tunnel. This IP address should be provided by your ISP. My Subnet Mask: Enter the subnet mask of the local PPTP tunnel. This IP address should be provided by your ISP. Click on the Next button to continue. 16 Wireless 11g Broadband Router Version 1.0 3.3.5 BigPond Cable If your broadband access service is through BigPond cable, select this option. (This service is available only in Australia). h h h h h h h h User Name: Enter the username as provided by the ISP. Password: Enter the password as provided by the ISP. Confirm Password: Re-type the password for confirmation purposes. Hostname: Enter a hostname if it was provided by the ISP (optional). Auth. Server: Select an authentication server from the drop-down list. This will automatically fill in the Server IP Address at the bottom. Manual Server: If your authentication server is not listed above, select Enable and then enter the server IP address below. Server IP Address: Enter this IP address if your authentication server is not listed above. Click on the Next button to continue. 17 Wireless 11g Broadband Router Version 1.0 3.4 Wireless Settings In this step you can configure the basic wireless settings: SSID and channel. h h h SSID: Enter the SSID (Service Set Identifier) which is the network name (by default: default). This is case-sensitive and cannot exceed 32 characters. All wireless devices on the network must use the same SSID. Channel: Select a channel number from the drop-down list. All wireless devises on the network must use the same channel. If you are experiencing interference, try a different channel. Click on the Next button to continue. 3.5 Summary In the last step of the typical configuration a summary page is displayed that lists the settings that were just configured. Click on the Finish button to complete the configuration. 18 Wireless 11g Broadband Router Version 1.0 4 Customized Configuration The Router can be configured in two different ways using the web-browser. This chapter describes the steps necessary to customize the settings of the router. This configuration type is called Customized Configuration. To create a typical configuration (setup wizard) refer to the pervious chapter. 4.1 Logging In To configure the Router through the web-browser, enter the IP address of the Router (default: 192.168.1.254) into the address bar of the web-browser, and press Enter. You will then see the login page. Enter admin as the password and then click on the Login button. After successfully logging in, you will see the following menu. Select Customized Configuration. h Typical Configuration: Provides a step-by-step setup wizard to guide you through the basic settings of the router. After completing the steps, the Router will be able to connect to the ISP. 19 Wireless 11g Broadband Router h h Version 1.0 Customized Configuration: Allows you to customize the network settings of the router for specific purposes such as: password settings, firmware upgrade, NAT, firewall, etc. Logout: Exists the utility and returns to the login page. 4.2 System Settings Click on the System button on the top navigation bar to view the options available for the system settings. The System menu includes the following options and each one is described in this section: Time Zone, Password Setting, Remote Management, Firmware Upgrade, Restart, Factory Default, System Status, Statistics, Event Log, Diagnostic, Use as Access Point, and Backup Settings. 4.2.1 Time Zone For management purposes, a correct time zone setting will let you have accurate time stamps on the system log. h h h Time Zone: Select your time zone from the drop-down list. Daylight Saving: Select the Enable radio button if you are in the daylight saving time zone. Click on the Apply button to continue. 20 Wireless 11g Broadband Router Version 1.0 4.2.2 Password Setting This router is shipped with the default password set as admin. This option allows you to use a personal password to replace the default password. h h h h h h Old Password: Enter the old password, default is admin. New Password: Enter the new password that you would like to use. Confirm New Password: Re-type the new password for confirmation purposes. Expire Status: This option allows you to change the login idle time, which is the amount of time that elapses before the router automatically logs off the user. Select Enable to turn on this function. Expire Time: Enter the idle time (in minutes) after which the user will be automatically logged off. Click on the Apply button to continue. 21 Wireless 11g Broadband Router Version 1.0 4.2.3 Remote Management The remote management option allows you to log into the router from a WAN connection (Internet). h h h Remote Management: Choose to Enable or Disable remote management. Remote Management WAN Port: Enter the port number that you would like to use for remote management. By default, this value is set to 8080. Click on the Apply button to continue. 4.2.4 Firmware Upgrade This page allows you to upload the latest firmware into the router. h h Firmware Upgrade: Click on the Choose File button to select the firmware, and then click on the Upgrade button. You will then need to confirm the decision. Click on the OK button on the dialog 22 Wireless 11g Broadband Router Version 1.0 box. After the firmware upgrade is complete, the router will restart. Note: Do not power off the device while the firmware is being upgraded. 4.2.5 Restart This page allows you to manually restart the router without unplugging the power. By doing this you will not loose your current configuration. Click on the Restart button to do so. 4.2.6 Factory Default This page allows you to reset the router back to its default settings. This can also be done by holding down the reset button on the rear panel of the router for more than 5 seconds. Click on the Restore button and then the OK button to confirm your decision. Note: By resetting the device to its factory defaults, you will loose your current configuration. 23 Wireless 11g Broadband Router Version 1.0 4.2.7 System Status This page displays the router’s configuration. This includes General, Internet, LAN, and WAN settings. Click on the Refresh button view the most updated status. 4.2.8 Statistics This page displays all the necessary statistics of the router. This information is necessary for monitoring the router’s performance. Click on the Refresh button view the most updated statistics. 24 Wireless 11g Broadband Router Version 1.0 4.2.9 Event Log This page displays the last 128 events recorded by the router. This data is useful for monitoring and troubleshooting the network. 25 Wireless 11g Broadband Router 4.2.10 Version 1.0 Diagnostic This page allows you to test your connection in two ways: Ping and & Internet connection. h h IP Address: Enter the IP address that you would like to Ping, and then click on the Ping button. Connect to the Internet: Click on the Test Connection button to test the Internet connection. 4.2.11 Use as Access Point This page allows you to configure the router into Access Point mode, only acting as a bridge between the computers attached to all Ethernet ports (LAN) and the clients on the wireless LAN (WLAN). To operate in AP mode, the router must share the same subnet mask as the other LAN and WLAN devices. 26 Wireless 11g Broadband Router h h h h Version 1.0 Enable AP Mode: Place a check in this box to enable AP mode. IP Address: Enter the IP address of the AP. Subnet Mask: Enter the subnet mask of the AP. Click on the Apply button to continue. Please wait while the router resets. In AP mode the internal NAT firewall and DHCP server will be disabled, and the four LAN ports and one WAN port will be bridged together. You will then notice that the menu bar is different, and consists of System and Wireless only. 4.2.12 Backup Setting This page allows you to save the current profile on your computer or load an existing profile. h h Save Settings: Click on the Save button to save the current profile. Restore Settings: Click on the Choose File button to select the existing profile, and then click on the Restore button. You will then need to confirm you decision, click on the OK button. Please wait while the router resets. 27 Wireless 11g Broadband Router Version 1.0 4.3 Internet Settings Click on the Internet button on the top navigation bar to view the options available for the Internet settings. The Internet menu includes the following options and each one is described in this section: Connection Type, MAC Clone, DNS, and Dynamic DNS. 4.3.1 Connection Type This page displays a list of connections that are supported by this Router. Steps to configure each of the connection types are described in this section. 4.3.1.1 DHCP Client Select this option if you connect to the Internet using a cable modem, and then enter the Host Name (name of ISP). 28 Wireless 11g Broadband Router 4.3.1.2 Version 1.0 PPPoE Select this option if your broadband service uses PPPoE (Point-to-Point Protocol over Ethernet) h h h h h PPPoE Type: Select Dynamic or Static. User Name: Enter the username as provided by the ISP. Password: Enter the password as provided by the ISP. Confirm Password: Re-type the password for confirmation purposes. MTU: This is the Maximum Transmission Unit (MTU) that can be transmitted over the network. Do not change this value unless required by 29 Wireless 11g Broadband Router h h h h h h h Version 1.0 ISP. Authentication Type: Select an authentication type from the drop-down list. Options available are: Auto, PAP, CHAP, or MSCHAP v1. The default setting is AUTO. Service Name: Enter the name of the ISP (optional). Primary DNS: Enter the primary DNS IP address (optional). Secondary DNS: Enter the secondary DNS IP address (optional). Connect on Demand: Select Disable to auto-connect. Disconnect Option: Enter a number (minutes) after which an idle connection will disconnect. Setting this value to 0 will never disconnect. Click on the Apply button to continue. 4.3.1.3 Fixed IP Select this option if your broadband service uses a fixed IP address, and you have received one from you ISP. h h h h h h IP Address: Enter the IP address as provided by the ISP. Subnet Mask: Enter the subnet mask as provided by the ISP. ISP Gateway: Enter the gateway IP address as provided by the ISP. Primary DNS: Enter the primary DNS IP address. Secondary DNS: Enter the secondary DNS IP address (optional). Click on the Apply button to continue. 30 Wireless 11g Broadband Router 4.3.1.4 Version 1.0 PPTP Select this option if your broadband service uses a PPTP (Point-to-Point Tunneling Protocol), and you have received an IP address from you ISP. h h h h h h h h h User Name: Enter the username as provided by the ISP. Password: Enter the password as provided by the ISP. Confirm Password: Re-type the password for confirmation purposes. Service IP Address: Enter the IP address of the remote PPTP tunnel. This IP address should be provided by your ISP. My IP address: Enter the IP address of the local PPTP tunnel. This IP address should be provided by your ISP. My Subnet Mask: Enter the subnet mask of the local PPTP tunnel. This IP address should be provided by your ISP. Connect on Demand: Select Disable to auto-connect. Disconnect Option: Enter a number (minutes) after which an idle connection will disconnect. Setting this value to 0 will never disconnect. Click on the Apply button to continue. 31 Wireless 11g Broadband Router 4.3.1.5 Version 1.0 BigPond Select this option if your broadband access service is through BigPond cable (this service is available only in Australia). h h h h h h h h User Name: Enter the username as provided by the ISP. Password: Enter the password as provided by the ISP. Confirm Password: Re-type the password for confirmation purposes. Hostname: Enter a hostname if it was provided by the ISP (optional). Auth. Server: Select an authentication server from the drop-down list. This will automatically fill in the Server IP Address at the bottom. Manual Server: If your authentication server is not listed above, select Enable and then enter the server IP address below. Server IP Address: Enter this IP address if your authentication server is not listed above. Click on the Apply button to continue. 32 Wireless 11g Broadband Router Version 1.0 4.3.2 MAC Clone This page allows you to clone the MAC address of the WAN interface. A MAC address is a 12-digit code assigned to a piece of hardware for identification purposes. The MAC address on this page refers to the MAC address of this router. If you need to provide your ISP with a MAC address for registration, provide the MAC address listed. You can then change the MAC address to match the one recorded by the ISP. By cloning the MAC address, this router will appear to the ISP as a single PC. Click on the Clone MAC Automatically button, and then click on the Apply button. 4.3.3 DNS This page allows you to setup DNS (Domain Name System) on the router. DNS is able to translate internet domain names into IP addresses. This page can be used to add mappings between a private static IP address and a domain name. Such a feature can be helpful when setting up a FTP or Web server. Enter the Domain Name and corresponding IP address, and then click on the Add button. 33 Wireless 11g Broadband Router Version 1.0 4.3.4 Dynamic DNS This page allows you to setup Dynamic DNS (Domain Name System) on the router. DDNS allows you to assign a fixed host and domain name to a dynamic Internet IP address. Each time the router boots up, it will re-register its domainname-to-IP-address mapping with the DDNS service provider. This is the reason that Internet users can access the router through a domain name instead of its IP address. 34 Wireless 11g Broadband Router Version 1.0 Note: Make sure that you have registered with a DDNS service provider before enabling this feature. h h h h h h h h h Dynamic DNS: Select Enable or Disable. Dynamic DNS Provider: Select a DDNS service provider from the dropdown list. Host Name: Enter the hostname as registered with the DDNS service provider. User Name: Enter the user name required to log into the DDNS account. Password: Enter the password required to log into the DDN S account. My IP Address: Enter the IP address of this router. Update Manually: Click on this button if would like to remove the original settings. Status: Displays the status of the DDNS connection as received from the DDNS server. Click on the Apply button to continue. 4.4 LAN Settings Click on the LAN button on the top navigation bar to view the options available for the LAN settings. The LAN menu includes the following options and each one is described in this section: IP Setting, DHCP Server, DHCP-IP-MAC mapping, DHCP Client List, MAC Filter, UPnP Setting 4.4.1 IP Setting This page allows you to change the IP address and subnet mask of this router. 35 Wireless 11g Broadband Router h h h Version 1.0 IP Address: Enter the IP address for this router. Subnet Mask: Enter the subnet mask for this router. Click on the Apply button to continue. 4.4.2 DHCP Server This page allows you to configure the DHCP server, which assigns IP addresses to all the clients on the network. h h h h h DHCP Server: Select Enable or Disable. IP Pool Starting Address: Enter the first address that should be assigned by the DHCP server. IP Pool Ending Address: Enter the last address that should be assigned by the DHCP server. Lease Time: Enter the number of hours that a client can use the assigned IP address. Click on the Apply button to continue. 36 Wireless 11g Broadband Router Version 1.0 4.4.3 DHCP-IP-MAC mapping This page allows you to configure the DHCP server to assign a specific IP address to a specified MAC address. h h h h IP Address: Enter the IP address that you would like to reserve for a specified MAC address. MAC Address: Enter the MAC address that was specified for the reserved IP address. Click on the Add button to add this entry into the table (current settings). Current Settings: This table lists the entry of DHCP-IP-MAC mappings. Click on the Delete button to remove an entry. 37 Wireless 11g Broadband Router Version 1.0 4.4.4 DHCP Client List This page lists the IP addresses that have been assigned by this router’s DHCP server. h h h h Release All: Click on this button to release all the assigned IP addresses. Release: Click on this button to release a specific IP address. Static: This indicates that the IP address is static and cannot be released. Refresh: Click on this button to refresh the table. 4.4.5 MAC Filter This page allows you to control access to the router by filtering MAC addresses. 38 Wireless 11g Broadband Router Version 1.0 h LAN MAC Filter Control: Select Disable, Allow, or Deny. Disable: This option will disable the MAC filter control. Allow: This option will allow the specified MAC addresses to access the router. All other MAC addresses will be denied access. o Deny: This will deny the specified MAC addresses access to the router. But all other MAC addresses will be allowed access. h Click on the Apply button to make the selection. h MAC Address: Enter the MAC address into this field and click on the Add button. o o 4.4.6 UPnP Setting This page allows you to control to the UPnP (Universal Plug-and-Play) settings. UPnP is a technology that offers seamless operation of voice messaging, video messaging, games, and other applications that are UPnP compliant. Those applications usually require the router’s firewall to be configured in specific way. With UPnP support, those applications have the ability to communicate with the router, basically “telling” the router which why it needs the firewall configured. h h h UPnP Services: Choose to Enable or Disable this service. UPnP Internet Gateway Device Status: Choose to Enable or Disable. By enabling this, the PC will keep polling the router’s status and display packet information. This will increase the network’s load affect the performance and compromise security. UPnP Internet Gateway Device Control: Choose to Enable or Disable. By enabling this, the UPnP application will be allowed to configure the 39 Wireless 11g Broadband Router h 4.5 Version 1.0 settings of the router. Click on the Apply button to make the selection. Wireless Settings Click on the Wireless button on the top navigation bar to view the options available for the wireless settings. The Wireless menu includes the following options and each one is described in this section: SSID & Channel, Radio Setting, Authentication & Encryption, Wireless Bridge, Associated Client List, and Association Control. 4.5.1 SSID & Channel This page allows you to set the SSID and operating channel of the router. h h h h SSID: Enter the SSID (Service Set Identifier) which is the network name (by default: default). This is case-sensitive and cannot exceed 32 characters. All wireless devices on the network must use the same SSID. Channel: Select a channel number from the drop-down list. All wireless devises on the network must use the same channel. If you are experiencing interference, try a different channel. Accept Broadcast SSID: Place a check in this box if you would like to broadcast the SSID of the router. This will allow all devices on the network to detect the router. Click on the Apply button to make the selection. 40 Wireless 11g Broadband Router Version 1.0 4.5.2 Radio Setting This page allows you to configure the radio’s advanced features. If you don’t know how to configure these settings, it’s recommended to leave these parameters at their default settings. Modifying these settings can affect the performance of the router. h h h h Beacon Period: The default value is 100 milliseconds. This value refers to the frequency interval that the router broadcasts a beacon to synchronize the wireless network. As broadcasting beacon do require additional bandwidth, lowering this value too much may adversely affect the wireless performance. RTS Threshold: The default value is 2347 bytes. This value refers to the packet size at which the router issues an RTS (Request-to-Send) frame to a receiving station. Any frames larger than the specified threshold must be transmitted following the RTS/CTS handshake exchange mechanism. After receiving and RTS, the wireless stations responds with a CTS (Clear-toSend) frame to acknowledge the right to begin data transmission. This RTS/CTS mechanism is used to minimize collisions among wireless stations. Fragment Threshold: The default value is 2346 bytes. This value refers to the size at which a packet is divided into smaller pieces that are transmitted separately to the receiving wireless stations. If there is a high packet error rate, you may need to adjust this value to find the best performance. DTIM Period: The default value is 1 beacon period. This value refers to 41 Wireless 11g Broadband Router h h h h h Version 1.0 the time interval at which the router broadcasts a DTIM (Delivery Traffic Indication Message) to inform clients in power saving mode to wake up for listening to broadcast and multicast messages. Mode: The default value is auto. If you have both 11b and 11g clients on your network, use the auto mode. You can also select 802.11g only from the drop-down list if you want to prevent 11b clients from accessing the network. You may also select 802.11b only if you want to allow only 11b clients. Basic Rate: The default rate is default. The Basic Rate is not the same as the Transmission Rate, but a series of rates that the router broadcasts to clients to make the aware of what rate they can transmit at. With the default setting the router will automatically transmit at the best rate. You may select the other option (1, 2, 5.5, 11, 6, 12, 24 Mbps) from the dropdown list. Transmit Rate: The default rate is auto. Using the default setting, the router will enable auto-fallback and will automatically select the best possible data rate for transmission. You may select another transmission rate from the drop-down list. Prism Nitro™: The default value is disable. Enabling this mode should improve the network performance, either 3 times faster data rates in mixed mode environment where both 11b and 11g clients exist, or 50% more data throughput in 11g-only environment. Click on the Apply button to make the selection. 4.5.3 Authentication & Encryption This page allows you to configure and manage the security of the router through different authentication and encryption methods. Each method is described is this section. Authentication Open or Shared Key Shared Key WPA 802.1x Encryption None WEP 64-bits WEP 128-bits WEP 64-bits WEP 128-bits TKIP None WEP 64-bits WEP 128-bits WEP Key 1 ~ 4 Not Required 10 HEX 26 HEX 10 HEX 26 HEX Not Required Not Required 10 HEX 26 HEX 42 Wireless 11g Broadband Router 4.5.3.1 h h h Version 1.0 Open & Shared Key Authentication without Encryption Network Authentication: Select Both from the drop-down list. Using this setting the router will switch between Opened and Shared authentication types, based on the client’s request. Open: This allows any wireless station to access the router without asking a shared secret key. But the wireless station can communicate only if its WEP key matches with the routers. Shared Key: This works only if the WEP key option is turned ON. It requires a wireless station providing a shared key to be authenticated by the router. If the shared key is correct, the wireless station will be able to access the router. Encryption Type: Select None from the drop-down list. This setting disables encryption. Click on the Apply button to make the selection. 43 Wireless 11g Broadband Router 4.5.3.2 h h h Version 1.0 Open & Shared Key Authentication with WEP Encryption Network Authentication: Select Both from the drop-down list. Using this setting the router will switch between Opened and Shared authentication types, based on the client’s request. Open: This allows any wireless station to access the router without asking a shared secret key. But the wireless station can communicate only if its WEP key matches with the routers. Shared Key: This works only if the WEP key option is turned ON. It requires a wireless station providing a shared key to be authenticated by the router. If the shared key is correct, the wireless station will be able to access the router. Encryption Type: Select WEP from the drop-down list. This setting allows you to select one of two encryption levels. For each encryption type it is possible to enter up to 4 WEP keys. 64-bit WEP Key: This option allows you to manually enter 5 digits of alphanumeric characters. 128-bit WEP Key: This option allows you to manually enter 13 digits of alphanumeric characters. Click on the Apply button to make the selection. 44 Wireless 11g Broadband Router 4.5.3.3 h h h Version 1.0 Shared Key Authentication with WEP Encryption Network Authentication: Select Shared Key from the drop-down list. This works only if the WEP key option is turned ON. It requires a wireless station providing a shared key to be authenticated by the router. If the shared key is correct, the wireless station will be able to access the router. Encryption Type: Select WEP from the drop-down list. This setting allows you to select one of two encryption levels. For each encryption type it is possible to enter up to 4 WEP keys. 64-bit WEP Key: This option allows you to manually enter 5 digits of alphanumeric characters. 128-bit WEP Key: This option allows you to manually enter 13 digits of alphanumeric characters. Click on the Apply button to make the selection. 45 Wireless 11g Broadband Router 4.5.3.4 h h h h h h h Version 1.0 802.1X Authentication without Encryption Network Authentication: Select 802.1X from the drop-down list if there is a RADIUS server on your network. RADIUS Server IP: Enter the IP address of the RADIUS server. RADIUS Server Port: Enter the port number of the RADIUS server. The default is 1812. RADIUS Server Key: Enter the Shared Secret Key of the RADIUS server. Reconfirm RADIUS Server Key: Re-type the Shared Secret Key of the RADIUS server. Encryption Type: Select None from the drop-down list to disable encryption. Click on the Apply button to make the selection. 46 Wireless 11g Broadband Router 4.5.3.5 h h h h h h h Version 1.0 802.1X Authentication with WEP Encryption Network Authentication: Select 802.1X from the drop-down list if there is a RADIUS server on your network. RADIUS Server IP: Enter the IP address of the RADIUS server. RADIUS Server Port: Enter the port number of the RADIUS server. The default is 1812. RADIUS Server Key: Enter the Shared Secret Key of the RADIUS server. Reconfirm RADIUS Server Key: Re-type the Shared Secret Key of the RADIUS server. Encryption Type: Select WEP from the drop-down list. This setting allows you to select one of two encryption levels. For each encryption type it is possible to enter up to 4 WEP keys. 64-bit WEP Key: This option allows you to manually enter 5 digits of alphanumeric characters. 128-bit WEP Key: This option allows you to manually enter 13 digits of alphanumeric characters. Click on the Apply button to make the selection. 47 Wireless 11g Broadband Router 4.5.3.6 h h h h h h h h Version 1.0 WPA Authentication with TKIP Encryption Network Authentication: Select WPA from the drop-down list if there is a RADIUS server on your network. WPA (Wi-Fi Protected Access) is used in a Pre Shared Key mode that does not require an authentication server. Access to the Internet and the rest of the wireless network services is allowed only if the pre-shared key of the computer matches that of the Access Point. This approach offers the simplicity of the WEP key, but uses stronger TKIP encryption. RADIUS Server IP: Enter the IP address of the RADIUS server. RADIUS Server Port: Enter the port number of the RADIUS server. The default is 1812. RADIUS Server Key: Enter the Shared Secret Key of the RADIUS server. Reconfirm RADIUS Server Key: Re-type the Shared Secret Key of the RADIUS server. WPA Group Rekey Interval: The default value is 3600 seconds. This value is the time after which the router changes to a new work group key. Encryption Type: TKIP is the only option available. Click on the Apply button to make the selection. 48 Wireless 11g Broadband Router 4.5.3.7 h h h h h h Version 1.0 WPA-PSK Authentication with TKIP Encryption Network Authentication: Select WPA-PSK from the drop-down list if there is a RADIUS server on your network. WPA (Wi-Fi Protected Access) is used in a Pre Shared Key mode that does not require an authentication server. Access to the Internet and the rest of the wireless network services is allowed only if the pre-shared key of the computer matches that of the Access Point. This approach offers the simplicity of the WEP key, but uses stronger TKIP encryption. WPA Pre-Shared Key: Enter the WPA Pre-Shared key and then select Passphrase or HEX from the drop down list. Confirm WPA Pre-Shared Key: Re-type the WPA Pre-Shared key and then select Passphrase or HEX from the drop down list. WPA Group Rekey Interval: The default value is 3600 seconds. This value is the time after which the router changes to a new work group key. Encryption Type: TKIP is the only option available. Click on the Apply button to make the selection. 49 Wireless 11g Broadband Router Version 1.0 4.5.4 Wireless Bridge (WDS) This page allows you to configure the router as a Wireless Bridge or WDS (Wireless Distribution System). This option allows you to extend the range of your network infrastructure by connected other Wireless Bridges with each other wirelessly. Note: All Wireless Bridges must operate on the same channel and can maintain up to 4 other Wireless Bridges. The following are examples of two topologies: Star & Chain Star Topology using WDS 50 Wireless 11g Broadband Router Version 1.0 Chain Topology using WDS 51 Wireless 11g Broadband Router h h h h Version 1.0 Encryption Type: Select Enable if you would like to use the router as a wireless bridge (WDS). WDS Only: Place a check in this box if you would like the router to work as a WDS only. This mode will not allow any clients to associate with the router. Click on the Apply button to make the selection. WDS MAC Address: Enter the MAC address of the other WDS routers, and then click on the Add button. 4.5.5 Associated Client List This page displays the MAC addresses of the associated clients. 52 Wireless 11g Broadband Router Version 1.0 4.5.6 Association Control This page allows you to control access to the router by filtering MAC addresses. h Wireless Access Control: Select Disable, Allow, or Deny. o Disable: This option will disable the wireless accessr control. o Allow: This option will allow the specified MAC addresses to access the router. All other MAC addresses will be denied access. o Deny: This will deny the specified MAC addresses access to the router. But all other MAC addresses will be allowed access. h Click on the Apply button to make the selection. h MAC Address: Enter the MAC address into this field and click on the Add button. 53 Wireless 11g Broadband Router 4.6 Version 1.0 NAT Settings Click on the NAT button on the top navigation bar to view the options available for the NAT settings. The NAT (Network Address Translation) menu includes the following options and each one is described in this section: Static NAT setting, Virtual Server, Special Applications. 4.6.1 Static NAT Setting This page allows you to configure the router’s virtual server setting based on IP forwarding. Using the IP forwarding setting, all Internet requests for specified public IP addresses will be forwarded to a certain PC with the corresponding private IP address. h h Private IP: Enter the private IP address. Public IP: Enter the corresponding pubic IP address, and then click on the Add button. 54 Wireless 11g Broadband Router Version 1.0 4.6.2 Virtual Server This page allows you to configure the router’s virtual server setting based on Port forwarding. This feature helps you set up a server on your private network that can be accessed by Internet users. Using port forwarding, all Internet requests for a specified public IP, based on their ports, will be forwarded to a certain PC with the correspondent private port. h h h h h h h h Popular Servers: You may select a server from the drop-down list (HTTP, FTP, POP3, etc). This will automatically fill in the fields, except for the private IP, which needs to be filled in manually. Service Name: Manually specify a name for the service. Private IP: Enter the private IP address. Start Private Port: Enter the port number where the requests will arrive. Type: Select a protocol form the drop-down list. TCP, UDP, or both. Start Public Port: Enter the port number from where requests will be forwarded. Number of Ports: Enter the number of ports Click on the Add button. 55 Wireless 11g Broadband Router Version 1.0 4.6.3 Special Applications This page allows you to configure the router for special applications such as Instant Messaging or some Internet games whose outgoing ports must differ from incoming ports. When you run a PC application to access the Internet, it typically initiates communication with another computer on the Internet. In some special applications, the computer on the Internet also initiates communication with your PC. If you use such applications on your PC behind your router, then you need to configure the router to support Port Triggering to perform those applications in a proper manner. h h h h h h Popular Applications: You may select a popular application from the dropdown list (StarCraft, WarCraft, AIM). This will automatically fill in the fields. Trigger Port: Manually specify the range of port numbers used by the application for outbound data. Refer to the application’s user manual for its port numbers. Trigger Type: Select a protocol form the drop-down list. TCP, UDP, or both. Public Port: Manually specify the range of port numbers used by the application for inbound data. Refer to the application’s user manual for its port numbers. Public Type: Select a protocol form the drop-down list. TCP, UDP, or both. Click on the Add button. 56 Wireless 11g Broadband Router 4.7 Version 1.0 Firewall Settings Click on the Firewall button on the top navigation bar to view the options available for the firewall settings. The router features powerful and flexible firewall protection to keep your network secure. You can configure the strength of the firewall protection at a high or low level. If you are an advanced user, you can configure firewall policies depending on your needs. The Firewall menu includes the following options and each one is described in this section: Basic Setting, Service Filters, Policies, Notification, and Virtual DMZ. 4.7.1 Basic Setting This page allows you to configure the basic settings of the firewall. Please be aware that a higher level of firewall protection will increase the network security but may decrease the wireless performance of the router. h h Firewall Protection: Select High, Low, or Disable. Select High if your bandwidth is greater than 2 Mbps. This protects your network in high-level security, but causes heavy network loads on the router. Select Low if your bandwidth is less then 2 Mbps. This protects your network in lowlevel security and causes only small network loads on the router. Select Disable to turn OFF the firewall feature. Inbound Traffic: Choose to allow or deny all inbound traffic. 57 Wireless 11g Broadband Router h h h h Version 1.0 Outbound Traffic: Choose to allow or deny all outbound traffic. ICMP Error Message: Choose to allow or deny all ICMP error messages. WAN ICMP blocking: Choose to allow or deny ICMP packets received from the Internet. Click on the Apply button to make the selection. 4.7.2 Service Filters This page allows you to add custom service filters (up to 32 entries) which are not listed in the Well-Known Services list. h h h h Name: Enter a name for the custom service filter. TCP / UDP Port: Enter the port number for TCP or UDP. Description: Enter a description for the custom service filter. Click on the Add button. 58 Wireless 11g Broadband Router Version 1.0 4.7.3 Policies This page allows you to add polices to your router. You may define and schedule rules for example, for inbound and outbound traffic. Please be careful with these configurations. Any incorrect setting might cause the firewall to block all traffic or leave your network too vulnerable for hacker attacks. h h h h h h h h Direction: Select WAN to LAN (inbound) or LAN to WAN (outbound) from the drop-down list. Policy Name: Enter a name for the policy. Services: Select the services you would like to use from the list and then click on the > button. Click on the < button to remove a service from the list. Policy Action: Choose to allow or deny all data for the assigned services. Source IP: Select Any, Single, or Range, and then enter the IP address. Destination IP: Select Any, Single, or Range, and then enter the IP address. Take Effect: Select Always, Schedule or Disable. If you select Schedule, select the date and time to use this service. Click on the Add button. 59 Wireless 11g Broadband Router Version 1.0 4.7.4 Notification This page allows you to configure email notifications for the security log of the router. You can configure a schedule to enable the router to send an email message to a specified user. This feature is useful if you want to acquire the security log remotely. h h h h h h h h h Email Notification Status: Choose to Enable or Disable email notification status. Send Notification: Select from the drop-down list when the router should send out the notification. Options available are Daily, Weekly, Monthly, or when log is full. Mail Server: Enter the SMTP IP address of the mail server. Port: Enter the port number, the default is 25. Subject: Enter a description that will be shown in the subject line of the email message. Sender Email: Enter en email address that the recipient can reply to. Recipient’s Email: Enter the email address that will receive this notification. Server Authentication: Place a check in this box if the mail server required authentication. Then enter the user name and password in the fields below. Click on the Send Test Mail to send out a test message using the configuration provided. 60 Wireless 11g Broadband Router Version 1.0 4.7.5 Virtual DMZ This page allows you to configure the Virtual DMZ feature on the router. This feature enables the PC/Server on the LAN to be exposed to all users on the Internet, allowing unrestricted 2-way communication between the PC/Server and other Internet PC services. The PC/Server in the DMZ (De-Militarized Zone) will receive all connections and requests without any restrictions. h h h h Virtual DMZ Stats: Choose to Enable or Disable Virtual DMZ. Public IP Address; This is automatically displayed. Private IP Address: Enter the IP address of the PC/Server that you would like to expose to the Internet. Click on the Apply button to make the selection. 61 Wireless 11g Broadband Router Version 1.0 Appendix A – Specifications General Data Rates * 1,2,5.5,6,9,11,12,18,24,36,48,54 Mbps Standards IEEE802.11b/g, IEEE802.1x, IEEE802.3, IEEE802.3u Compatibility IEEE 802.11g/ IEEE 802.11b compliant Power Requirements USA: 12W/120Vin, 1A/12Vout Europe: 12W/230Vin, 1A/12Vout Physical Interface One 10/100Mbps RJ-45 for DSL/Cable modem Four 10/100Mbps RJ-45 Switch Port Reset Button Status LEDs 4*LAN : Link/Activity 1*WAN : Link/Activity WLAN : Link/Activity Power : On/Off Regulatory/ Safety FCC Part 15, Class B R&TTE Directive 1999/5/EC EN 300 328 EN 301 489 EN 60950 RF Information Frequency Band 2.400~2.484 GHz Media Access Protocol Carrier sense multiple access with collision avoidance (CSMA/CA) Modulation Technology Orthogonal Frequency Division Multiplexing (OFDM) DBPSK @ 1Mbps DQPSK @2Mbps CCK @ 5.5 & 11Mbps BPSK @ 6 and 9 Mbps QPSK @ 12 and 18 Mbps 16-QAM @ 24 and 36 Mbps 64-QAM @ 48 and 54 Mbps Operating Channels 11 for North America, 14 for Japan, 13 for Europe, 2 for Spain, 4 for France Receive Sensitivity (Typical) -89dBm @ 1Mbps -88dBm @ 6Mbps -79dBm @ 24Mbps -86dBm @ 2Mbps -87dBm @ 9Mbps -75dBm @ 36Mbps -85dBm @ 5.5Mbps -84dBm @ 12Mbps -70dBm @ 48Mbps 62 Wireless 11g Broadband Router Version 1.0 -82dBm @ 11Mbps -82dBm @ 18Mbps -67dBm @ 54Mbps Available transmit power (Depend on Different Countries’ Regulation) 11b Mode : EIRP ≤ 19 dBm Output Power = 17 ± 1 dBm @11MHz 11g Mode : EIRP ≤ 15.5 dBm Output Power = 13 ± 1 dBm @54MHz Antenna Gain Peak Gain = 2 dBi Average Gain = 1.08 dBi (@ 2.45GHz, H-Plan) Networking Information Topology Infrastructure Operation Mode AP/ Router/ WDS Bridge LAN DHCP Server Static IP MAC Filter UPNP WAN Static IP DHCP Client PPPoE PPTP Clone MAC NAT Virtual server mapping IP address mapping ALG(Application Layer Gateway) support Firewall Blocking Ping ICMP Bolcking Access control list (MAC filtering from LAN & WLAN) TCP/IP/UDP/Port filtering DoS protection SPI (Stateful Packet Inspection) DMZ (Demilitarized Zone) Host VPN Support VPN pass-through (PPTP, L2TP) Security 64/128 bit WEP Encryption WPA -- Wi-Fi Protected Access PSK (Pre share key) EAP-MD5/TLS/ TTLS authenticator support (RADUIS Client) TKIP MAC address filtering (WLAN) Hide SSID in beacons 63 Wireless 11g Broadband Router Version 1.0 Management Configuration Web-based configuration (HTTP) Firmware Upgrade Upgrade firmware via web-browser Administrator Setting Administrator password change Idle time out Reset Setting Restore this Device Restore to Factory Default System monitoring Status and Statistics, Time Zone & NTP Client, Event Log, Email Alarm Environment Temperature Range 0 to 50° C (32 °F to 122 °F) - Operating -40 to 70 ° C(-40 °F to158 °F) - Storage Humidity (non-condensing) 15%~95% typical Physical Dimensions 128(L)mm x 180(W)mm x 32(H)mm Weight 295g * Theoretical wireless signal rate based on IEEE standard 802.11a, b, g of chipset used. Actual throughput will vary. Network conditions and environmental factors lower actual throughput rate. ** All specifications are subject to change without notice. 64 Wireless 11g Broadband Router Version 1.0 Appendix B – FCC Interference Statement This equipment has been tested and found to comply with the limits for a Class B digital device, pursuant to Part 15 of the FCC Rules. These limits are designed to provide reasonable protection against harmful interference in a residential installation. This equipment generates, uses and can radiate radio frequency energy and, if not installed and used in accordance with the instructions, may cause harmful interference to radio communications. However, there is no guarantee that interference will not occur in a particular installation. If this equipment does cause harmful interference to radio or television reception, which can be determined by turning the equipment off and on, the user is encouraged to try to correct the interference by one of the following measures: • • • • • Reorient or relocate the receiving antenna. Increase the separation between the equipment and receiver. Connect the equipment into an outlet on a circuit different from that to which the receiver is connected. Consult the dealer or an experienced radio/TV technician for help. FCC Caution: Any changes or modifications not expressly approved by the party responsible for compliance could void the user's authority to operate this equipment. For operation within 5.15 ~ 5.25GHz frequency range, it is restricted to indoor environment, and the antenna of this device must be integral. This device complies with Part 15 of the FCC Rules. Operation is subject to the following two conditions: (1) This device may not cause harmful interference, and (2) this device must accept any interference received, including interference that may cause undesired operation. IMPORTANT NOTE: FCC Radiation Exposure Statement: This equipment complies with FCC radiation exposure limits set forth for an uncontrolled environment. This device complies with FCC RF Exposure limits set forth for an uncontrolled environment, under 47 CFR 2.1093 paragraph (d)(2). This transmitter must not be co-located or operating in conjunction with any other antenna or transmitter. 65