1
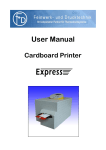
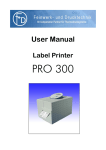
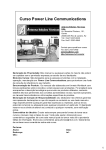
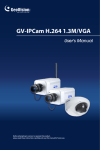
INSTALLATION MANUAL
Powerwifi USB Router in combination with the Powerwifi USB outdoor antenna
INTRODUCTION
The Powerwifi USB Router can be used together with the Powerwifi USB outdoor antenna.
This creates the possibility to use several appliances over the same wireless connection, and there is no need
to install drivers or software on your laptop, tablet or Smartphone.
The USB Router has many settings, but we will only address the settings that are directly associated with the
use of the Powerwifi USB outdoor antenna.
You can use the USB Router to connect the USB outdoor antenna with the Wi-Fi network of your choice.
You only need to go through the configuration once, the network settings are then saved..
If you want to connect to another network, you will need to go through the configuration steps again.
INSTALLATION
Attach the small black antenna to the USB Router and connect the USB cable from the outdoor antenna to
the 3G USB Port on the router (NOTE: Make sure the top of the outdoor antenna is mounted as shown).
Then connect the power supply to the DC Power Socket and plug the adapter into the wall socket.
The USB Router will now start and the Power LED (PWR) lights up instantly.
If you have connected a computer to the RJ45 LAN port, the LAN LED will light up shortly thereafter.
After about 30-60 seconds, the WLAN LED will light up and you can start the configuration.
USB outdoor antenna
USB Router
1
CONFIGURATION
Once booted, the USB Router can be configured both wireless and wired (via the RJ-45 LAN Port).
This manual contains some screenshots of wireless network connections in Windows 7.
These are displayed differently on a Macintosh, tablet or Smartphone, or not at all.
If necessary, consult the manual of your device how to make a wireless connection.
Important: Select, modify or fill only those buttons or fields which are marked red in this manual.
WIRELESS CONFIGURATION
The USB Router will be displayed under the name
11N 3G Router_AP in your list of wireless networks.
Connect to this network.
When using Windows you may be asked what type of network this
regards; specify preferably that this is a public network. (see
example)
After selecting, it might take a few seconds for your computer to
obtain an IP address and connect to the network.
Continue with the General Configuration.
WIRED CONFIGURATION
Connect your computer with an Ethernet network cable to the RJ-45 LAN Port on the USB Router.
Make sure that your network card is set to automatically obtains an IP address (this is the case by default).
Continue with the General Configuration.
GENERAL CONFIGURATION
Open your browser and type the address http://92.168.2.1 in the
address bar followed by Enter. Then you can login with username
admin and password admin.
(this is the default username / password combination).
Confirm your entry with OK.
This takes you to the statusscreen of the USB Router.
2
To configure a connection, choose Easy Setup.
Then select USB Wireless Adapter.
Now choose Site Survey to scan and display the available networks in your area.
3
You will now see a list of available networks, as shown below.
Select in the left column the desired network by clicking on the ball.
You need to choose the network of the campsite or marina and not your 11N 3G Router_AP.
In case you’ve received a username and password for Hotspot access, the 7th and 8th column of the
selected network should be stated as “None”. In such a situation you don’t fill a password during
configuration of the router in the next step but you will continue with Next immediately.
After you’ve properly configured the USB router you should automatically be redirected to the
Hotspot login page of the campsite/marina when launching a browser. (see page 7)
There might be multiple rows containing the same network name, choose the one with the strongest signal.
If the desired network is not listed, click Rescan to scan for available networks again.
In case your selected network has “None” stated in the 7th and 8th column you don’t fill a password in the next
step.
The network in this example has WPA-Personal / TKIP so we do need to fill a password in the next step.
After choosing your network click Select.
4
The data from the selected network will now automatically be filled in, as shown in the green box.
Enter the password (Passphrase) if required of the selected network.
Note that this is case sensitive and other fields should not be modified.
In case of WEP encryption you need to fill the WEP Key in the marked field (WEP Key 1).
If the network is unprotected, the password fields don’t exist at all.
Then click Next to save these settings.
The Powerwifi outdoor USB antenna is now configured.
Now the last step, set up your wireless private network.
By factory default, the USB Router is accessible under the name 11N 3G Router_AP .
However, there may be more routers in the vicinity with the same name.
You should change this name (SSID Choice) so your network is easier to recognize and does not
conflict with other networks.
Also, choose and set your own password to prevent others from accessing your network.
Change the default SSID name (SSID Choice). We have named it WIFI_1234.
At Security Mode select WPA2-PSK.
At WPA Algorithms choose AUTO (TKIP / AES) by ticking the ball.
Choose your own password of at least 8 characters and fill this in the Pass Phrase field.
5
Note: this password is also case sensitive.
Then click Done to save the settings.
The USB Router is now configured and will restart with the selected settings.
Since the router is now secured, your computer/tablet is not able to reconnect automatically.
Ignore the “Saving… Please wait a moment…” en close your browser.
Wait for about 60 seconds until the router has finished rebooting.
If you have an eye on the LED’s you will notice the WLAN LED will be OFF for a few seconds.
During reboot it will come ON again, after a few more seconds the USB LED should also be ON.
Configuration is now completed.
6
INTERNET CONNECTION
If you have changed the SSID (network name), then this custom
name will now show in the available wireless networks. If not, you
can connect to 11N 3G Router_AP.
In our case, our network is now called WIFI_1234.
Connect to your wireless private network and enter your previously
chosen password in Security key.
Note: this password is case sensitive.
Confirm with OK.
If all is correct, you are now connected to the USB Router.
When using Windows, you might again see a screen where you must specify what type of network it is. Choose
again for Public network. It might take a few seconds for your computer to obtain an IP address and connect to
the network.
Now open a browser to verify that you have an Internet Connection.
In case you are connected to a Hotspot you will be automatically redirected to a Hotspot login page
when launching a browser. At this page you need to login using the given credentials.
Depending on the Hotspot settings you might need an extra password for every additional device
(computer/tablet/smaprtphone).
In case you have no Internet connection, please make sure the USB LED at the router is ON and verify whether
you’re still connected the USB router.
If so, have a look at the status screen of the router bij opening http://192.168.2.1 in your browser.
Check the steps as written at “Connected but no Internet connection” in the chapter “Problems and Solutions”.
7
PROBLEMS AND SOLUTIONS
RESTORING FACTORY DEFAULTS
On the bottom of the USB Router there is a reset button (see picture).
If you press this button for 5 seconds or longer while the USB Router is powered
on, the factory settings are restored.
Note: All chosen settings will be lost.
After the USB Router restarts, you can go back to the configuration. Use this
option only if you can no longer access the USB Router.
SITE SURVEY DISPLAYS NO NETWORKS
This can depend on your browser. We have seen this on a Samsung Smartphone, but it can also occur on other
devices. In this case install a different browser like Firefox (free to install from Google Play store) and restart
the configuration. You can also use a different device to configure the USB Router, such as a tablet or a laptop.
USB LED WON’T LIGHT UP AFTER CONFIGURATION
In such situation the router was unable to establish a connection to de desired accesspoint. In some cases it
helps to cycle power for 5 seconds and wait until the router reboots with it’s current settings. Often the root
cause is a misspelled password for the chosen accesspoint; repeat the “Easy Setup” procedure and make sure
to re-type the correct password.
CONFIGURATION OF A HOTSPOT CONNECTION WITH USERNAME AND PASSWORD
Usually Hotspots are open-networks where no password is used in order to connect to the accesspoint. During
configuration you should not enter a password, a username and password should be provided afterwards at a
special Hotspot login page where you should be automatically redirected when launching a browser.
Depending on the Hotspot settings you might need an extra password for every additional device.
CONNECTED BUT NO INTERNET CONNECTION
By factory default, the local IP address (LAN IP) of the USB Router is 192.168.2.1
If you are using the Powerwifi Outdoor USB antenna connected to a wireless network and you receive a
WAN IP address from the same 192.168.2.x range, you cannot connect to the Internet.
This address must not be in the same range. You can recognize this by the following example.
8
This can be solved by changing the IP address settings of the LAN network.
Choose the LAN option from the Advanced menu.
9
Then change the IP Address from 192.168.2.1 to 192.168.3.1 in the LAN Setup as shown below.
Then click Apply to save the settings.
De USB Router will now reboot.
Since the router is rebooting it might be the case that your computer/tablet automatically connects to another
available Wi-Fi network. If you don’t see a “Wizzard Success” message at the end, please make sure to
(re)connected to the Powerwifi router. Now you will see the message whih you can confirm with Ok.
Your browser will now show the renewed statusscreen.
The LAN IP address (192.168.3.x) is, as it should be, different than the obtained WAN IP address (192.168.2.x).
Under the heading USB Wireless Adapter Information you can see to which network you are connected.
From now on, if you want to configure the USB Router, enter the changed IP address into your browser.
In this example, it is now http://192.168.3.1
10