1
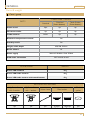
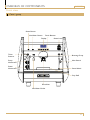
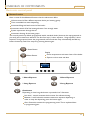
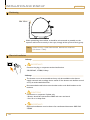
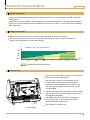
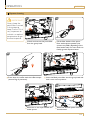
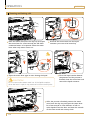
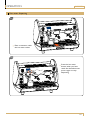
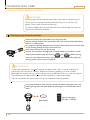
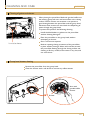
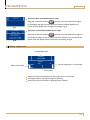
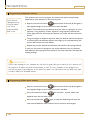
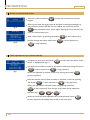
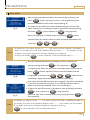
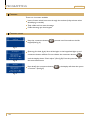
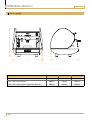
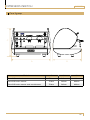
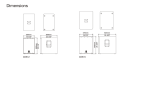
CARAT
USER MANUAL
UM_EN
Part No.: 1764015_02
CONTENT
CARAT
CONTENT......................................................................................................................................................... 2
GENERAL............................................................................................................................................................ 4
Introduction...............................................................................................................................................................4
Warnings.....................................................................................................................................................................4
Precautions.................................................................................................................................................................4
Intended use...............................................................................................................................................................4
Facts & weight ..........................................................................................................................................................5
Carat 1 group............................................................................................................................................................5
Carat 2 groups...........................................................................................................................................................6
OVERVIEW OF COMPONENTS......................................................................................................... 7
Front view...................................................................................................................................................................7
Carat 1 group............................................................................................................................................................7
Carat 2 groups...........................................................................................................................................................8
Electronic control panel..........................................................................................................................................9
Buttons function........................................................................................................................................................9
INSTALLATION AND START-UP...................................................................................................... 10
Positioning............................................................................................................................................................... 10
Electrical installation.............................................................................................................................................. 10
Water connection.................................................................................................................................................. 11
Filling up the boiler................................................................................................................................................ 11
First start up............................................................................................................................................................ 11
The porta-filter set................................................................................................................................................ 12
How to lock the porta-filter in the group head............................................................................................. 12
OPERATION.................................................................................................................................................. 13
Espresso brewing................................................................................................................................................... 13
Steaming and frothing milk................................................................................................................................... 14
Hot water dispensing............................................................................................................................................ 15
CLEANING AND CARE......................................................................................................................... 16
Cleaning of the espresso machine..................................................................................................................... 16
Cleaning of group head and porta-filter........................................................................................................... 16
Cleaning of gasket and shower........................................................................................................................... 17
Group head shower cleaning.............................................................................................................................. 17
PROGRAMMING........................................................................................................................................ 18
Espresso machine status....................................................................................................................................... 18
Programming capabilities with buttons............................................................................................................. 18
Display explanations.............................................................................................................................................. 19
2
CONTENT
CARAT
Programming of espresso volume...................................................................................................................... 20
Programming of hot water volume.................................................................................................................... 20
Programming temperature for the turbo steamer......................................................................................... 21
Maximum security time........................................................................................................................................ 21
Access to second level menus............................................................................................................................ 22
Clock adjustment, hour, minutes and day......................................................................................................... 22
Auto on/off.............................................................................................................................................................. 23
Counters.................................................................................................................................................................. 24
Counters access..................................................................................................................................................... 24
POSSIBLE SOLUTIONS........................................................................................................................... 25
Possible faults.......................................................................................................................................................... 25
Recommendations................................................................................................................................................. 25
Cautions................................................................................................................................................................... 25
DIMENSION SKETCH.............................................................................................................................. 26
Carat 1 group......................................................................................................................................................... 26
Carat 2 groups........................................................................................................................................................ 27
Some important information may appear in textboxes seen below
IMPORTANT!
INFO.
CAUTION!
More INFO.
Note
INFO.
INFO.
3
GENERAL
CARAT
Introduction
Thank you for choosing a Carat espresso machine.
We hope you enjoy it !
Read the user guide before using the machine.
This guide contains important instructions for
proper and safe use of the vending machine.
Always keep this guide close at hand for future
reference.
Warnings
Never immerse the machine, plug or mains
cable in water because there is a danger of
electric shock.
The appliance is not intended for use by
persons (including children) with reduced
physical, sensory or mental capabilities, or
lack of experience and knowledge, unless they
have been given supervision or instruction
concerning the use of the appliance by a person
responsible for their safety.
Children should be supervised to ensure they
do not play with the appliance.
Do not use the machine if the mains cable, plug
is damaged or the machine has fallen down.
If the mains cable is damaged it must be
replaced by the manufacturer, service agent or
similarly qualified persons in order to avoid a
hazard.
Only plug the machine into a properly installed
earthed safety socket whose line voltage
matches the technical data for the machine.
Precautions
Do not use the machine outdoors so it can be
exposed to weather (rain, snow, frost). It will
cause material damage to the machine.
Do not try to open the machine or repair it in
any way. To avoid danger only have the machine
repaired in a technical workshop, Service
Centre or by a qualified person.
Remove the mains cable from the socket when
the machine is not in use for longer periods. To
do this, pull the plug not the cable.
This appliance must be placed in a horizontal
position which is resistant to any water that
may leak.
Place the machine out of the reach of children.
Position the mains cable so that people cannot
trip over it. Keep it away from sharp edges and
heat sources.
The new hose-sets supplied with this appliance
are to be used, old hose-sets must not be reused.
This appliance is not suitable for installation in
an area where a pressure washer may be used.
This appliance must not be cleaned with a
pressure washer.
Intended use
This appliance is intended to be used in
household and similar applications such as:
- Staff kitchen areas in shops.
- Offices and other commercial working
environments.
- On agricultural estates.
- By clients in hotels, motels and other
residential type environments.
- Bed and breakfast type environments.
4
For the optimal performance of the machine
these parameters shall not be exceeded:
- Maximum permissible inlet water pressure :
800KPa (8Bar)
- Minimum permissible inlet water pressure:
200KPa (2Bar)
- Maximum working temperature: 40°ºC
- Minimum working temperature: 10°ºC
GENERAL
CARAT
Facts & weight
Carat 1 group
CARAT MINI 1 GROUP
FACTS
Standard
Standard
(Turbo Steamer)
Touch Button
(Turbo Steamer)
Steam wand
2pcs
1pc
1pc
Hot water outlet
1pc
1pc
1pc
None
1pc
1pc
Turbo steamer
Electronic temperature control
Yes
Stand by mode
Yes
Height, width, depth
620, 586, 563mm
Boiler volume
6L
Power supply
230V AC 50/60Hz 1F+N 2750W
Cold water connection
3/8” Internal thread
MODEL/NAME
WEIGHT
Carat 1GR standard
45kg
Carat 1GR turbo steamer
45kg
Carat 1GR turbo steamer with touch buttons
45kg
INCLUDED ACCESSORIES
14g Porta-filter
with 2 outlets
7g Porta-filter
with 1 outlets
Water hose
1pc
1pc
1pc
Filter basket
7g x1pc
14g x1pc
Blind
gasket
1pc
5
GENERAL
CARAT
Facts & weight
Carat 2 groups
CARAT 2 GROUPS
FACTS
Standard
Standard
(Turbo Steamer)
Touch Button
(Turbo Steamer)
Steam wand
2pcs
1pc
1pc
Hot water outlet
1pc
1pc
1pc
None
1pc
1pc
Turbo steamer
Electronic temperature control
Yes
Stand by mode
Yes
Height, width, depth
620, 774, 563mm
Boiler volume
11.5L
Power supply
Single phase 230V AC 50/60Hz 1F+N 3250W
Multi phase 380V AC 50/60Hz 3F+N 4750W
Cold water connection
3/8” Internal thread
MODEL/NAME
WEIGHT
Carat 2GR standard
63kg
Carat 2GR turbo steamer
63kg
Carat 2GR turbo steamer with touch buttons
63kg
INCLUDED ACCESSORIES
14g Porta-filter
with 2 outlets
7g Porta-filter
with 1 outlets
Water hose
1pc
1pc
1pc
6
Filter basket
7g x1pc
14g x1pc
Blind
gasket
1pc
OVERVIEW OF COMPONENTS
CARAT
Front view
Carat 1 group
Steam Button
Hot Water Button
Drink Buttons
Display
Turbo
Steamer
Steam Lever
Brewing Group
Pump
Manometer
Main Switch
Steam
Manometer
Steam Wand
Cup Shelf
Porta-filter
Hot Water Outlet
7
OVERVIEW OF COMPONENTS
CARAT
Front view
Carat 2 groups
Steam Button
Display
Steam Lever
Hot Water Button
Drink Buttons
Brewing Group
Steam Lever
Steam
Wand
Pump
Manometer
Steam
Manometer
Porta-filter
Main Switch
Hot Water Outlet
Cup Shelf
Turbo Steamer
8
Steam Wand
OVERVIEW OF COMPONENTS
CARAT
Electronic control panel
Buttons function
Here is some of the additional functions that the electronics offers:
Volume control of four different espresso drinks per brewing group.
Time-controlled hot water dispensing.
Automatic filling and level control of the boiler.
Automatic switch off of the heating element if not enough water.
System supervision through alarms.
Automatic cleaning of the brew groups
The control panel is by default programmed with 4 standard drinks (these can be reprogrammed as
you wish) and a continuous selection. The first four keys (1 short espresso, 1 long espresso, 2 short
espresso, 2 long espresso) brew the programmed volume and then stop automatically, the fifth key
brews continously untill user stops it by pressing button again.
Steam Button
Display
Shows temperature and water lever of the boiler.
Option to show time and date.
Water Button
Publicity
EXPOBAR
Max
hh:mm
day
C
o
Min
1 Short Espresso
2 Short Espresso
1 Long Espresso
2 Long Espresso
Continuous
Depending on how long this button is pressed it has 3 functions:
Less than 1 second, activates the hot water for infusions dosing.
Between 1 and 8 seconds, activates continuous espresso dispensing, in
order to stop the dispensing, press the button again.
Over 8 seconds, activates the programming menu. This is explained later
in programming part.
9
INSTALLATION AND START-UP
CARAT
Positioning
Min. 10cm
When positioning the machine, it should be as horizontal as possible, so the
espresso will come out evenly in the cups, through all the spouts of each group.
Note Make sure air is able to circulate behind the machine
(minimum 10cm).
Electrical installation
1 Group
IMPORTANT!
Connect the plug to a separate earthed wall socket.
220-230VAC, 2750W,16 Amp.
2 Group
The brewer is not reconnectable and may only be installed to the electric
supply network with a voltage that is stated on the brewer and shall be carried
out by an authorized electrician.
Recommended: install a line circuit breaker and a earth fault breaker to the
machine.
CAUTION!
Connection to a separate 3 phase only
- B
rewer should be connected to 380V with zero and earth.
- Use 10 or 16 Amp fuses.
IMPORTANT!
Electrical installations must be done of an certificated electrician: 380V 2N/
2750W
10
INSTALLATION AND START-UP
CARAT
Water connection
Using the flexible hose provided with the machine, connect it to a connection hose 3/8” male, with
closing valve.
Placement of a water softener filter between the valve and the machine is mandatory (among all the
spare parts you should have another flexible hose of 50 cm in order to connect both water softener
filter and valve).
Filling up the boiler
When the machine is turned on, it will automatically fill up the boiler with water.
The manometer shows the pressure inside the boiler. There is a direct relation between the
pressure and temperature in the boiler. (see fig.)
C
o
Relation Pressure-Temperature
125
120
115
MPa
110
0.7
0.8
0.9
1
1.1
1.2
Standard pressure-temperature
First start up
Open the external supply of water to the machine.
Turn on the main power switch.
Press the brew switch or one selection at the
control panel on each group, wait until water
comes out continuously from each of them. This
way the heat exchangers in the machine will be
correctly filled.
Turn on the steam lever until steam comes out. This
way we will evacuate the remaining air that could
be trapped in the boiler.
The display will show that boiler is heating-up.
Once it turns off, it means the machine has
reached the ideal temperature.
The machine is ready to use.
power switch
11
INSTALLATION AND START-UP
CARAT
The porta-filter set
Lock-in spring (filter basket)
Filter basket
Placing porta-filter spring
Porta-filter and filter basket
for single espresso (7g)
Porta-filter & filter basket
for double espresso (14g)
How to lock the porta-filter in the group head
The porta-filter has two
guides at each side, they
must be aligned with
the screw slots in the
group.
Turn the porta-filter counter-clock wise till
the handle is perpendicular to the espresso
machine.
guide
Correct position of the porta-filter in the group head:
Not inserted
enough
12
Correct
The group joint
is worn out
OPERATION
CARAT
Espresso brewing
IMPORTANT!
01
02
Always keep the
porta-filter inserted
in the group to
keep it warm. This is
very important to
maintain an optimal
temperature to get
the best espresso.
Unlock and remove the porta-filter
from the group head.
03
Fill the filter basket of the portafilter with espresso powder (the
amount may differ depending of the
filter basket size). For best result use
freshly ground espresso beans.
04
Press down the coffee with the coffee tamper
(around 5kg of preassure).
Insert the filled porta-filter into the group head and
lock it into correct position.
05
Place one or two cups beneath the
outlet spouts.
06
Select the desired option from the
drink buttons.
13
OPERATION
CARAT
Steaming and frothing milk
01
02
Steaming
Frothing
Place the steam wand over the drip tray and open
the steam lever for a few seconds, this will allow
condensed water to be ejected. Close the steam
lever when only steam comes out.
Immerse the steam wand into the liquid
container you want to be heated up.
03
04
Open the steam lever again to start heating the liquid.
CAUTION!
Do not remove the steam wand out of the liquid container
when the lever is open, it may cause serious burns and injuries.
Once the liquid reaches desired
temperature and the process is
finished, close the steam lever and
remove the liquid container.
05
After the process is finished, position the steam
wand over the drip tray and open the steam lever
for a few seconds to clean leftovers of milk or
other liquids. Close the lever and clean the outside
of the steam wand with a damp cloth.
14
OPERATION
CARAT
Hot water dispensing
01
Place a container under
the hot water outlet.
02
Press the hot water
button, when you have
reach the desired amount
press it again to stop
dispensing.
15
CLEANING AND CARE
CARAT
Cleaning of the espresso machine
REMEMBER!
To always get the best performance from the machine, descaling and
cleaning must be performed continuously. Always turn off the main
power switch prior to external cleaning.
All external body parts can be cleaned with a damp cloth. Do not use
abrasive or dissolvent products.
Cleaning of group head and porta-filter
Unlock and remove the porta-filter from the group head.
Replace the filter basket of the porta-filter with one of the provided blind filters
baskets or rubber gasket.
Pour espresso cleaning detergent into the porta-filter, follow the instruction label
on the cleaning detergent to get correct amount.
Lock the porta-filter into the group head.
Activate the automatic cleaning cycle as follows. When the machine is in idle
mode, press simultaneously the buttons
and
. When cleaning
starts you may release the buttons and machine will automatically repeat the
cleaning cycles 5 times until it completed.
IMPORTANT!
Once cleaning process is finished, remove the porta-filter and run water through the
group again to rinse out all remains. Repeat the cleaning process this time without
detergent for removal of any remains of the cleaning product. Finally re-install the original
filter basket on the porta-filter, store the blind basket in a convenient place.
Do not manipulate the porta-filter during the automatic cleaning process.
It is recommended to clean the filter membrane without detergent every day.
Cleaning the groups with blind basket and detergent is recommended once a
week.
Blind Gasket
16
Espreso detergent
Part No. : 1104162
CLEANING AND CARE
CARAT
Cleaning of gasket and shower
When placing the porta-filter filled with grinded coffee into
the brewing group, left overs will accumulate in the closing
surface. If these remains are excessive it can prevent a
good closing between the porta-filter and the group head.
Moreover, these remains can even block the dispensing of
water through the group head.
To prevent this perform the following cleaning:
Install the blind basket or gasket into the porta-filter
without cleaning detergent.
Place the porta-filter in the group head, without
attempting to close it.
Start a continuous espresso.
It must be loose
Make an opening-closing movement of the porta-filter
in place without closing it. Water will now flow around
the porta-filter, flowing through the closing surface and
cleaning it. Be very careful, as this water is very hot, and
can cause burns.
Group head shower cleaning
Remove the porta-filter from the group head.
Clean the shower with a soft brush to remove any coffee remains
Area with
grinded coffee
remains
Shower
17
PROGRAMMING
CARAT
Espresso machine status
The espresso machine has 3 possible status:
Publicity
EXPOBAR
Max
hh:mm
day
On status
The machine is active and ready for brewing espresso. Generally when
switching on the main switch, the machine will enter this status. (See fig.A)
C
o
Min
fig.A
Stand by status
The main switch is on, espresso machine is OFF status and this is shown in
the display (See fig.B). To get to this status, begin with the machine in ON
OFF
hh:mm
day
status. Press the continuous button
(2 short espresso). The machine will show
press the button
fig.B
without releasing it,
“OFF” on the display. To get out from this status press the button
(2 short espresso), the machine will come back to ON status.
Off status
The espresso machine is totally disconnected.
Programming capabilities with buttons
C
+
A
A
-
B
OK
D
Group boiler ON/OFF
When machine is in ON status, press Continuous + 1 long espresso button
simultaneously to turn the group boiler to ON/OFF mode. (multi-boiler
machines)
B
Standby mode
Press and hold Continuous button then tap 2 short espresso button, this will
activate the standby mode (only left keypad)
C
Automatic cleaning
When machine is in ON status, press Continuous + 1 short espresso button
simultaneously to activate automatic cleaning function.
D
Activate programming menus
There are 2 levels of programming menus that can be reached while machine is
in ON status, At the first level it is possible to adjust drink volumes. The second
level access menus for adjusting clock/date and view counter etc…
18
PROGRAMMING
Doses Programming
Select 30s
CARAT
To access first level follow these steps:
pressed over 8 seconds, all the lights Keep the continuous button
fig.A
in the keypad will light up and continuous button will flash. Release the
button and the display have changed according to fig.A.
To access second level follow these steps:
Clock Adjust
HH:MM Day
1 short espresso ↑ +
1 long espresso ↓ 2 short espresso OK
Continuous to confirm
fig.B
pressed over 8 seconds, all the lights in
Keep the continuous button
the keypad will light up and continuous button will flash. Do not release the
button until the display shows Clock adjust according to fig.B.
Display explanations
Customizable lines
Publicity
EXPOBAR
Boiler water level
Max
hh:mm
day
C
o
Actual temperature of the boiler
Min
Hour & day
Digital control and visualization of the temperature in the boiler.
On-display help for reprogramming and adjusting.
Visual alarm about the need of replacing water softener.
19
PROGRAMMING
CARAT
Programming of espresso volume
Each volume
reprogramming
must be done
with fresh
ground coffee
each time.
This section covers how to program the volume that will be automatically
dispensed by each selection on the control panel.
Keep the continuous button
pressed over 8 seconds, all the lights in
the keypad will light up and continuous button will flash.
Within 30 seconds press any selection that you want to reprogram (1 short
espresso, 1 long espresso, 2 short espresso, 2 long espresso). Notice that
all the lights will turn off except the selection you made and the continuous
button.
The group begins to dispense espresso, when the desired volume of espresso
is reached, press the selection button that is light up to stop dispensing, this
volume will now be stored as default.
Repeat this process with all the selections that needs to be reprogrammed.
In case you only want to reprogram one of the selections, acts as previously
described and only reprogram one selection. The other selections will keep the
existing settings.
IMPORTANT!
When you reprogram any selection on the left key pad (facing the machine), this volume will
be stored in all other key pads automatically as well. This only happens if you program on
the left key pad. If you program at any other key pad it will not overwrite any other key pads
and only affect the selected button.
Programming of hot water volume
Keep the continuous button
pressed over 8 seconds, all the lights in
the keypad will light up and continuous button will flash.
Press the continuous button
for less than 1 second. Water will
dispense from the hot water wand.
Press the same button
again to stop the dispensing and store the
new volume. Different water volumes can be stored in each keypad.
20
PROGRAMMING
CARAT
Programming temperature for the turbo steamer
Keep the continuous button
pressed over 8 seconds, all the lights in
the keypad will light up and continuous button will flash.
Immerse the steam wand in the liquid to be heated up.
Press the steam button
.
When the liquid reaches the desired temperature, press steam button
again to stop. The new temperature is now stored.
When programming this button it will only affect the temperature of the liquid,
not the time steaming. Once the electronic steam wand with temperature probe
reaches the programmed temperature it will automatically turn off. Different
volumes of liquid will not affect the temperature.
Maximum security time
Every selection has a maximum allowed time for brewing of 5 minutes.
21
PROGRAMMING
CARAT
Access to second level menus
Doses Programming
Select 30s
Keep the continuous button
keypad.
(Entering first level, See fig. A). Now all the lights in the keypad will light up
and continuous button will flash. Do not release the continuous button
fig.A
Clock Adjust
1 short espresso ↑ +
1 long espresso ↓ 2 short espresso OK
Continuous to confirm
fig.B
pressed over 8 seconds on the left
until the display shows “Clock adjust”(See fig. B). From this point we
are in the second level menu.
Enter “Clock adjust” by pressing the button
(2 short espresso) or
browse through the system with button
(1 short espresso) or
(1 long espresso).
Clock adjustment, hour, minutes and day
To adjust the clock press the button
adjust” is displayed.(See fig. C)
Clock Adjust
HH:MM Day
1 short espresso ↑ +
1 long espresso ↓ 2 short espresso OK
Continuous to confirm
fig.C
(2 short espresso) while “Clock
The hour starts to flash, increase or decrease its value by pressing the button
(1 short espresso) or
(1 long espresso).
When the rightvalue is reached, accept it by pressing the button
(2 short espresso).
Now the minutes starts to flash, increase or decrease its value by pressing
the button
(1 short espresso) or
(1 long espresso).
When the right value is reached, accept it by pressing the button
(2 short espresso). Then the day of the week can be adjusted in
the same way (
,
&
).
When all values have been adjusted and is confirmed with button
(2 short espresso) the display will proceed to the next menu.
22
PROGRAMMING
CARAT
Auto on/off
Auto On/Off
On: Hh:mm
1 short espresso ↑ +
1 long espresso ↓ 2 short espresso OK
Continuous to confirm
After accepting the adjusting made in the time and day by pressing the
(2 short espresso), we enter in the programming of the
button
automatic ON/OFF function of the machine.(See fig. A)
To modify the time which the machine automatically gets into the “ON”
status, while the hour is flashing, increase or decrease its value by pressing
Fig. A
the button
(1 short espresso) or
(1 long espresso).
When the right value is reached, accept it by pressing
(2 short
espresso). Then the minutes will start to flash and will be adjustable in the
Note
same way (
,
&
).
By default, this first value will be: On: - - : - - this means that the function is disabled. As
soon as we modify the value, and it become different from - - : - - the function will be
enabled. If we prefer to leave this function disabled, just accept by
pressing the button
(2 short espresso) while the adjusted value is - - : - - .
Now the automatically OFF time is flashing, increase or decrease its
value by pressing the button
Auto On/Off
Off: Hh:mm
1 short espresso ↑ +
1 long espresso ↓ 2 short espresso OK
Continuous to confirm
(1 long espresso). When the right value is reached, accept it by pressing the
button
(2 short espresso). Then the minutes will blink, and will
be adjustable in the same way(
Fig. B
(1 short espresso) or
,
&
). With this final
confirmation, display will proceed to the next menu.(See fig. B)
If automatic ON and OFF times have been assigned, a day off can be enabled
in which the machine will not switch on at all. The day off menu will not
appear if the automatic ON/OFF times is not set.(See fig. C)
Closed on
Day
1 short espresso ↑ +
1 long espresso ↓ 2 short espresso OK
Continuous to confirm
Fig. C
Note
To adjust the day OFF, increase or decrease its value by pressing the button
(1 short espresso) or
(1 long espresso ).
When the right value is reached, accept it by pressing the button
short espresso).
(2
By default, this setting will be: - - : - - this means that the function is disabled. As soon as
we modify the value, and it become different from - - : - - the function will be enabled.
If we prefer to leave this function disabled, just accept by pressing
(2 short espresso) while the adjusted value is - - : - 23
PROGRAMMING
CARAT
Counters
There are 4 counters available:
Litres of water which have come through the machine (help to know when
decalcifying is needed)
Total coffee and hot water brewings
Coffee brewings per dose keypad
Counters access
Doses Programming
Select 30s
Keep the continuous button
keypad.(See fig. A)
pressed over 8 seconds on the left
Fig. A
Clock Adjust
1 short espresso ↑ +
1 long espresso ↓ 2 short espresso OK
Continuous to confirm
Fig. B
(Entering first level, fig.A.). Now all the lights in the keypad will light up and
continuous button will flash. Do not release the continuous button
until the display shows “Clock adjust” (See fig. B). From this point we are in
the second level menu.
Counters
1 short espresso ↑ +
1 long espresso ↓ 2 short espresso OK
Continuous to confirm
Fig. C
24
Press briefly the continuous button
“Counters”. (See fig.C)
, the display will show the option
POSSIBLE SOLUTIONS
CARAT
Possible faults
Failures produced by lime
The coffee does not come out at a appropriate
temperature:
The outlet tubes of heat exchangers are clogged by
lime
Water does not come out from the groups:
Lime blocks the water getting through
Ninety percent of failures are caused by lime build-up in the machine when none water
treatment operation is done. Is very easy to avoid this kind of failure by performing the regular
maintenance of the water softener.
Problems due to grind setting
Coffee comes out very fast:
Adjust the grinder setting, the grind is too coarse
Coffee comes out very slow:
Adjust the grinder setting, the grind is too fine
If you observe any malfunctioning in the coffee machine contact the technical service.
Recommendations
You should clean the group head without soap every day, only use the blind filter basket and water.
You should clean the group head with espresso detergent (as described in this manual), at least
once a month.
You should regularly replace the water softener, according to the time interval described on the
water softener label.
Use freshly ground espresso beans to get the best properties, aroma and flavor when dispensing a
drink.
In order to obtain a good espresso drink, remember that both the group head and the porta-filter
must be hot and at a constant temperature, keep the porta-filter placed in the group head when
not in use.
Cautions
While dispensing espresso do not attempt to take out the porta-filter. Hot water at high pressure
could be projected and cause serious burns or injuries.
Never try to access the inside of the machine, this must be done only by authorized technicians.
Do not insert any kind of object through the openings and ventilation holes of the machine.
Frequently check the drip tray and make sure all water is drained properly.
25
DIMENSION SKETCH
CARAT
Carat 1 group
C
A
Model
B
A
B
C
Carat 1GR standard
586mm
563mm
620mm
Carat 1GR turbo steamer
586mm
563mm
620mm
Carat 1GR turbo steamer with touch buttons
586mm
563mm
620mm
26
DIMENSION SKETCH
CARAT
Carat 2 groups
C
A
Model
B
A
B
C
Carat 2GR standard
774mm
563mm
620mm
Carat 2GR turbo steamer
774mm
563mm
620mm
Carat 2GR turbo steamer with touch buttons
774mm
563mm
620mm
27
For the warranty to be valid the conditions for maintenance must have been
followed according to our instructions, proper precaution has been made and
warranty claim been issued without delay.
The affected equipment may not be used during awaiting service if there is any risk
that the damage or defect would worsen.
The warranty will not cover consumption supplies such as glassware, normal
maintenance such as cleaning of filters, contaminations in water, lime, incorrect
voltages, pressure or adjustment of water amounts.
The warranty will not cover damages of defects caused by incorrect handling and
operation of the appliance.
FOR SERVICE
Please contact your dealer
Your Dealer
www.creminternational.com