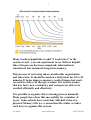
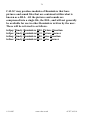
1
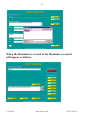
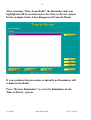
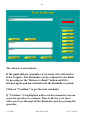
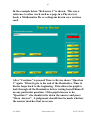
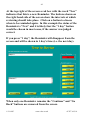
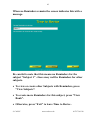
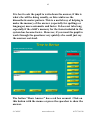
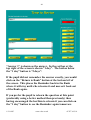
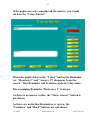
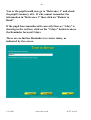
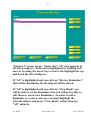
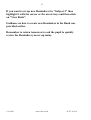
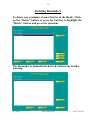
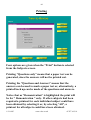
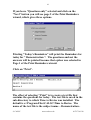
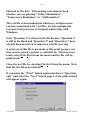
Time to Revise User's Manual
Jane E. Mitchell
CALSC - Communication and Learning Skills Centre
First published 2000 by:
Communication and Learning Skills Centre
PO Box 621
Sutton
Surrey
SM1 2ZS
020 8642 4663
www.calsc.co.uk
© Copyright, Jane E. Mitchell 2000 - 2010
The moral rights of the author have been asserted
ISBN 1 899126 08 2
This book is sold subject to the condition that it shall not, by way of trade or otherwise, be lent,
re-sold, hired out, or otherwise circulated without the publisher’s prior consent in any form of
binding or cover other than that in which it is published and without a similar condition
including this condition being imposed on the subsequent purchaser.
All rights reserved, including translation. No part of this publication may be reproduced or
transmitted in any form or by any means, electronic or mechanical, recording or duplication in
any information storage and retrieval system, without the permission in writing from the
copyright holder even within the terms of any licence granted by the Copyright Licensing
Agency Ltd.
Contents
Improving Long-term Memory and Recall ............................. 4
The rationale underlying Time to Revise................................. 4
When and where to use Time to Revise ................................. 10
Who needs Time to Revise ?.................................................... 11
How Time to Revise works...................................................... 13
Installing the program............................................................. 21
Adding a User........................................................................... 21
Adding a Subject ...................................................................... 24
Adding a Reminder.................................................................. 27
French and other symbols ....................................................... 33
Including pictures and sounds in a Reminder....................... 34
Moving Reminders................................................................... 37
Reviewing the Reminders – Day 1 .......................................... 39
Reviewing the Reminders – Day 2 .......................................... 44
Adding further Subjects .......................................................... 50
Editing Subjects ....................................................................... 53
Editing Reminders ................................................................... 57
Deleting Reminders.................................................................. 59
Printing ..................................................................................... 60
Analysis of Reminders ............................................................. 67
Importing Reminders from a text file .................................... 68
Exporting Reminders to a text file.......................................... 79
Backing up Reminders ............................................................ 82
4
Improving Long-term Memory and Recall
Time to Revise is a computer program that is designed to
help pupils review facts and information that have been
learned so that they are not forgotten. Like any learning that
is worthwhile it requires time and effort but it rewards
pupils with improved knowledge and better recall of their
chosen subject. This is necessary for pupils who learn
something and yet can’t remember it the next week, or who
know a fact but do not have it at their finger tips and cannot
recall it fast enough to use it automatically.
Time to Revise ensures that whatever has been taught is
securely fixed in the mind of the user. It organizes revision,
ensures facts are fixed in long-term memory, and can be
used for any subject or information. Facts learned in this
way are easy to recall.
The pupil/child/student or teacher/therapist/parent has
complete flexibility to enter anything: text, pictures, or the
spoken word. Some people find it easier to use the preprepared files of specific subject content.
The rationale underlying Time to Revise
The automaticity of the original learning is one factor which
will directly influence the likelihood that generalization will
occur, this is true for factual information, vocabulary or
skills. If a fact is not securely held in the automatic longterm memory of the pupil, then it may not be recalled in
stressful situations or when there is an increased load on the
processing capacity. The fact may not literally be forgotten,
© CALSC
www.calsc.co.uk
01797 361318
5
but it may be forgotten in the sense that it cannot be recalled
at a particular time.
The way to achieve this level of automaticity of recall
involves good teaching in the first instance but also, once the
information is known, it involves the use of reviewing
(Buzan 1996) to ensure that the information is recalled with
ease. Once information has been transferred to long-term
memory it is technically never lost; however, the information
may not be able to be recalled on demand. Reviewing
information at certain intervals ensures that recall is more
likely and much easier. This is not the same as ‘over
learning’, although both aim to ensure that information can
be recalled from the long -term memory.
Over learning often requires a child to practise a word, rule
or spelling every day or every lesson to ensure that it is
transferred to long-term memory. Then, after a period, the
teacher/therapist will move onto the next item. Many
children get bored with this kind of repetition and do not
fully process and integrate it although the material is
presented every session.
The reviewing process is more complex and relies on the
principle that it is better to review or go over a piece of
information or skill, while it is still easily recalled, rather
than allowing it to be forgotten. Once forgotten, it requires
considerable effort to relearn the information and may be
demoralizing for all parties concerned.
A review can be a self-test, a test by another person, a
prompt by another person which should elicit the required
skill/fact/information or simply looking over the work again.
© CALSC
www.calsc.co.uk
01797 361318
6
The review can be oral or written depending on what is
more appropriate and the time available. If reviewing
languages or spellings, writing the answer may be useful to
reinforce or develop the correct kinaesthetic pattern of the
word.
In the reviewing process information should be reviewed 5
minutes after it was properly learned. This test after 5
minutes accomplishes two things. Firstly, it checks whether
the skill or information was really learned or whether the
teaching method needs to be altered. Secondly, it increases
the chance of remembering the information for about a day.
The intervals at which subsequent reviews should be
performed are:
• the next day
• 2 days later
• 1 week later
• 1 month later
• 3 months later
• 6 months later
• 1 year later
© CALSC
www.calsc.co.uk
01797 361318
7
Many teachers/pupils like to add “2 weeks later” to the
system as well - you can experiment to see if this is helpful.
Once this process has been completed, information is
transferred into automatic long-term memory.
This process of reviewing takes considerable organization
and takes time. It should be used on a daily basis for 10 to 25
minutes. It helps improve memory recall of important work
covered in class or in therapy sessions. It is used to ensure
that key facts, new vocabulary and concepts are able to be
recalled efficiently and effectively.
It is possible to organize this reviewing process manually.
Many people have done this successfully for a number of
years. Some schools have used Jane Mitchell’s idea of a
physical Memory File (i.e. a concertina file, folder or index
card box) to organize this system.
© CALSC
www.calsc.co.uk
01797 361318
8
Brigid Clifton, Head Speech and Language Therapist at St.
Catherine’s says
“ Many of the children and young people with language
impairment that we work with at St Catherine’s School
have significant problems in retaining and recalling
information, vocabulary, spellings etc. Memory and
organization skills are often severely affected in our
pupils. So, as a staff group, we are always looking for
ways to help them to develop strategies that are useful and
simple.
Mindmaps, associative recall and visualisation have all
been used successfully with individual pupils. A very
effective strategy was introduced into the school some
years ago, following on from one of Jane Mitchell’s
courses. We found out that moving information physically
also helps to transfer it from short-term to long-term
memory.
G, a pupil with very poor auditory and visual memory, but
stronger kinaesthetic skills, took to Jane’s concertina file
system for reviewing and recalling with gusto. The
discipline of reviewing and then physically moving
spelling lists through the file helped him to learn and
retain spellings. Since then the system has also been used
to help other pupils in learning subject-specific
vocabulary. A new computerised version of the system has
been developed recently and we look forward to adding
this to our armoury of useful strategies.”
The reviewing system is also used at Gap House School,
Kent, Maggie Johnson, Chief Speech and Language
Therapist says
© CALSC
www.calsc.co.uk
01797 361318
9
“ It's considered essential in the main school and timetabled into every school day in every class, as long
experience has shown us that nothing else works! We use
it routinely for topic vocabulary and concept work (e.g.
language of maths, time-concepts) and on a more ad hoc
basis for any factual information which the children need
to have at their fingertips. In the pre-school unit it's used
mostly for early concept vocabulary. This is true
teamwork! We rope in anyone to make sure the children
get their daily practice.”
As this process of reviewing takes considerable organization
CALSC has produced this computer program to organize
what needs to be reviewed each day.
This program is available in two versions: Time to Revise is
for KS1- KS3 and Timely Reminders is for KS4 and adults.
The functioning of the programs is, however, identical.
Following research about preferences the screen colour for
Time to Revise is blue and for Timely Reminders it is grey.
The manuals are written for the appropriate groups. The
names of the programs are preferred by the age groups for
which they are intended: adults feel that the word “Revise”
is inappropriate or unwelcome but feel happy to talk about
doing “Reminders”.
When the program is started Time to Revise or Timely
Reminders will remind the learner of the work which needs
attention on that day. It allows anyone whether a pupil,
student, parent or teacher to enter an unlimited number of
facts, statements, questions and answers of any type. The old
adage of “a little and often” is supported by all the research
© CALSC
www.calsc.co.uk
01797 361318
10
on learning and is especially true for the revision of large
quantities of information that is difficult to remember.
The program can be used in conjunction with a person's
preferred learning style, e.g. notes, keyword cards or Mind
Maps®. The creative use of it rests with the teacher or
pupil. It is useful for a very wide range of National
Curriculum subjects including language learning, early
literacy, maths definitions, science formulae, dates, places,
vocabulary building, and spellings.
When and where to use Time to Revise
Ideally, reviewing should happen in every lesson and
therefore is organized by the teacher. Time to Revise can
help a teacher who wants to do this efficiently. As an
alternative means of using the reviewing system, teachers
can use the program to print out a conventional paper test.
This test can be done either with an individual or a large
group, either in a lesson or, for example, as homework.
Time to Revise is an ideal program to follow-up work
covered in class or therapy if there is not time for reviewing
to be part of the lesson or session. It can be used by pupils in
their independent study time and can take 5-30 minutes
daily. Many parents guide their children in the use of the
program at home.
Teachers/therapists who work with pupils with Special
Needs or Speech and Language Disorders should use the
program within their lessons/session to ensure that key facts,
new vocabulary and concepts are able to be recalled.
© CALSC
www.calsc.co.uk
01797 361318
11
Who needs Time to Revise ?
Nearly everyone could benefit from Time to Revise.
However, there are several groups of people for whom it is
especially useful.
Pupils/Students
• Pupils who want to do well in their studies, exams or work
find it a useful aid to their current learning systems.
• Many pupils who find it difficult to retain and recall
information, facts or concepts find the system invaluable.
Adults (who often prefer to use the program Timely
Reminders because of the name and screen colour)
• People of all ages who have a large amount of work to
learn and would rather approach it in bite-size chunks.
• Individual specialists who are keen to learn all the details
about an area of study or a hobby.
• Adults who feel that due to overload of information or
increasing age they are forgetting things which they were
previously able to recall, such as names of people or facts
that are important to them.
• Adults who want to learn basic skills in literacy and
numeracy, some of whom may have learned facts many
times but not in the way to help them remember and use
them.
© CALSC
www.calsc.co.uk
01797 361318
12
Parents/Teachers/Therapists
• Parents who want to help their children learn important
school work (especially, at a junior level, times tables,
early spelling patterns, sight-words and number bonds)
but need help in organising the process.
• Special needs teachers, LSAs, dyslexia teachers, speech
and language therapists, who see children on a regular
basis and want to ensure that vocabulary, concepts,
literacy or numeracy work done in class is really learned
in a way that means it will be recalled and transferred and
generalized to other situations.
Only when recall of information is virtually automatic do
some children use strategies or information taught in other
situations.
If a child is not using the skills learned in teaching/therapy
outside the environment in which s/he was taught them, then
reviewing is essential, and, in the long-term, time saving. In
my view, time spent on reviewing facts that are considered
important is well spent. It boosts confidence and is essential,
if transfer of the information is what is required.
If a child learns facts or skills and cannot recall them later
especially under stress or timed conditions then reviewing
could be useful for him or her.
If the forgetting curve is understood and integrated into the
teaching plan then the expectations of both the teacher and
pupil can be realistic. This can ensure that children do not
feel ‘unable to learn’ or ‘stupid’ and consequently they are
less likely to become disaffected with the whole learning
process.
© CALSC
www.calsc.co.uk
01797 361318
13
Reviewing would be useful for children who are taught
sound/symbol relationships, spelling words or rules and then
the next year need to be re-taught exactly the same
information because they have forgotten it. It is also useful
for children who can remember a spelling or word if their
special needs teacher/speech and language therapist is
present but cannot transfer the knowledge to the classroom
context and use the same items in their other work.
How Time to Revise works
(Overview)
The basic principles needed to use Time to Revise can
usually be learned in a few minutes. The program can help
anyone to organize learning and revision more efficiently. It
ensures information is not only properly learned but can be
recalled.
There are four main screens in Time to Revise (see over).
1. The Users screen
2. The Subjects screen
3. The Bank of Reminders
4. The Review Reminders screen.
© CALSC
www.calsc.co.uk
01797 361318
14
Overview of Time to Revise screens
Indicates possible flow
from one screen to another
Start
Users
screen
Subjects
screen
Bank of
Reminders
Review
Reminders
screen
There are 4 main buttons to move around the program.
These buttons are labelled:
• View Users (takes the user to the Users screen)
• View Subjects (takes the user to the Subjects screen)
• View Bank (takes the user to the Bank of Reminders)
• Review Reminders (takes the user to the Review
Reminders screen)
© CALSC
www.calsc.co.uk
01797 361318
15
These four buttons are used to move between the four main
screens. Each screen shows the buttons that are needed to
take the user to one of the other screens.
If a teacher or parent is entering the questions and answers
for a child then the child will only need to look at the Review
Reminders screen if this is felt to be more appropriate.
Other buttons are also important to be able to use the
program.
• Add - allows a new Reminder, Subject or User to be
added.
• Modify - is used to edit an existing Reminder, Subject or
User.
• Delete - removes a Reminder, Subject or User from the
program.
• Move from Bank - transfers Reminders, which are
initially stored in the Bank of Reminders, into the Time to
Revise system where they can be seen in the Review
Reminders screen.
• Return to Bank - transfers Reminders from the Review
Reminders screen back to the Bank of Reminders.
• View Users – returns to the Users screen to add new users.
By moving the cursor over a button for a second or so,
additional help on that button is provided in a pop-up box.
As well as writing your own questions and answers it is
possible to import pre-written questions and answers using
the “Import” button. These may have been written by
someone else.
© CALSC
www.calsc.co.uk
01797 361318
16
A teacher can write questions and answers on any
curriculum subject within Time to Revise and export these
for use by other people with copies of Time to Revise such as
pupils/parents/other teachers. This is done using the
“Export” button.
There are several options for printing. For example, a text
copy can be printed out of the Reminders for conventional
follow-up work.
The first screen allows one to set up the users. An unlimited
number of users can be entered but only one pupil can use
the program at a time. If one has a multi-user version the
licence will determine the number of people who can use the
program concurrently.
© CALSC
www.calsc.co.uk
01797 361318
17
The second screen is the Subjects screen which is used by the
user to add or modify subjects. It is important to
classify/organise the information stored in the Time to
Revise system into separate subject/topic areas to aid
efficient use of the program. The Subjects screen also
contains the advanced buttons that allow import, export and
printing of Reminders.
The third screen is the Bank of Reminders. New questions
and answers are stored in the Bank of Reminders until they
have been learned and transferred into the Time to Revise
reviewing system. The writing of questions and answers can
be done by a teacher/therapist/parent/pupil on a daily or
weekly basis.
© CALSC
www.calsc.co.uk
01797 361318
18
Several questions and answers can be entered and stored in
the Bank on one particular day. Gradually they can be
transferred to the Time to Revise reviewing system over a
period of several days.
The Bank of Reminders shows all the questions in a list. The
pupil or teacher can browse down the list of questions shown
in the Bank of Reminders and choose which to learn.
Having learned the answer, it can be added to the reviewing
system by clicking on the “Move from Bank” button.
The fourth screen is the Review Reminders screen. This is
the most important screen.
© CALSC
www.calsc.co.uk
01797 361318
19
The Review Reminders screen shows each Reminder in turn
and allows the pupil to test themselves on the work or the
teacher/therapist to include the topic/question in the lesson.
If at any time the answer to a question is not known the
Reminder (which comprises a question and answer) can be
returned to the Bank for additional learning by pressing the
“Return to Bank” button.
If the pupil can answer the question correctly then it can be
moved through the reviewing system. Firstly the “1 day”
button should be clicked whereupon the reminder will
disappear from the screen and will be shown again in one
day's time, i.e. the following day.
As the program is used on subsequent occasions the
appropriate reminders will be displayed and they can be
moved through the reviewing system outlined earlier: 5mins,
1 day, 2 days, 1 week, 1 month, 3 months, 6 months, 1 year.
The top box on the right shows the status of the current
Reminder and allows the pupil to move the Reminder to the
next required time for reviewing. However to allow
flexibility the program does not move the Reminders on
automatically. It can be personalized by each student and
allows self-assessment and ownership of the process by a
user. The pupil or teacher can decide that the fact is not well
enough known and needs to be reviewed again the next day.
Some pupils find it helpful to review certain tricky facts
everyday for the first week before moving them to a day
later, 2 days later and then on through the system. Because
the computer does not move Reminders on automatically
each individual user can judge each question and decide
when it should be reviewed again. If a pupil/teacher does not
© CALSC
www.calsc.co.uk
01797 361318
20
look at the program on the required day then the Reminders
will be saved up until the next day they use the program.
© CALSC
www.calsc.co.uk
01797 361318
21
Installing the program
Put the CD-ROM into the drive. The CD should run
automatically the first time. Follow the questions on screen
regarding the licence. If for any reason the automatic set-up
does not run, select “Run” from the “Start” menu and use
the “Browse” button to find and run the “Setup.exe” file on
the CD. To run Time to Revise click the icon on your
desktop or select Programs: CALSC: Time to Revise.
The first time that you run the program you will be
prompted to enter your user name and serial number.
These are unique to you and are supplied when you
purchase the program. They are case sensitive and must be
entered exactly as given. If you ever remove the program
from one computer and reinstall it on another machine you
will need to re-enter the same user name and serial number.
Serial numbers allowing an upgrade from single-user licence
to network are obtainable from CALSC. The CD-ROM
must be in the drive for editing to take place with a singleuser licence.
Adding a User
The first screen shown in Time to Revise is the Users screen.
When you go into the program for the very first time the
Users screen will be blank. Click on the “Add” button to
add the name of the pupil(s) who will use the program.
© CALSC
www.calsc.co.uk
01797 361318
22
Type in the pupil’s name and, if you wish, a password. The
password is not compulsory but will protect a pupil’s files
from access by other users.
The new user’s name appears within the screen and can be
selected by clicking on it with the mouse. Other buttons also
appear that allow you to modify or delete a user’s name. If
you delete a user’s name this will delete everything to do
© CALSC
www.calsc.co.uk
01797 361318
23
with that user (i.e. all the Reminders created and analysis of
results) so be careful before you do this.
At the top right of the page is a button that allows you to
view Subjects for the user that is highlighted. Click on the
“View Subjects” button in order to add new subjects or view
the available Subjects for the user.
The user needs to enter her/his password (if applicable)
before the Subjects screen is shown. (This will always be the
Subjects screen for that particular user.)
© CALSC
www.calsc.co.uk
01797 361318
24
Adding a Subject
When you go into the Subjects screen for the very first time
the screen will be blank.
In order to set up a new Subject press the “Add” button.
It is assumed that a teacher/therapist/parent works with a
child to set-up the system initially. Hence “you” refers to the
adult supervising the process and “pupil” refers to the child
or your son/daughter.
© CALSC
www.calsc.co.uk
01797 361318
25
Time to Revise will then present a blank box into which you
can type the name of the Subject that you want to set up as
shown below.
This example has been called “Subject 1” but it could have
been Times Tables, Physics, General Knowledge or any topic
desired.
Having entered the Subject name, press the “OK” button.
© CALSC
www.calsc.co.uk
01797 361318
26
The subject that has just been set up “Subject 1” in this
example - is now shown on the Subjects Screen.
The “Modify” and “Delete” buttons are available on the
screen but only when one or more Subjects are present.
N.B. It is necessary to highlight the Subject you want in the
Subjects Screen before you go on to add Reminders for it. A
Subject is highlighted when its background is blue (the
Microsoft default colour for highlighting).
© CALSC
www.calsc.co.uk
01797 361318
27
Adding a Reminder
Reminders for a subject are always created in the Bank.
The Bank is where the Reminders are stored before being
learned, and before being added to the Reviewing System.
The Bank is like a filing box.
To create Reminders choose the subject into which they will
be filed. To add a Reminder highlight the chosen Subject,
“Subject 1” in this example, and press “View Bank” to add
Reminders for this Subject.
The Bank of Reminders screen is shown below. The selected
subject, “Subject 1” in this example, is shown in the top box.
© CALSC
www.calsc.co.uk
01797 361318
28
In the bottom box is the space where the Reminders are
shown. As yet none has been entered.
To add a Reminder press “Add”.
The screen on the following page will be shown.
© CALSC
www.calsc.co.uk
01797 361318
29
Type your question and answer into the Question and
Answer boxes. The computer does not check the answer, this
is deliberate and needs to be done by the user, as human
judgement is more flexible than that of the computer.
You can move from the Question box to the Answer box by
pressing the Tab key on the Key board or by clicking into the
Answer box with the mouse.
To move back to the Question box, press Shift-Tab or click on
it with the mouse.
If a question or answer requires an accent or other symbol
click on the required item (see French and other symbols).
© CALSC
www.calsc.co.uk
01797 361318
30
After adding the question and answer click on “OK”.
The Bank of Reminders will appear. The first line of the
question is shown in the large box below the subject.
Questions are shown in the order in which they were
entered. This is called the “Input Order”. There is an
option to alter the order in which the Reminders are shown
by clicking on the button marked “Alphabetical”. To return
to the original sequence click on “Input Order”.
To continue adding further Reminders to the same subject
press “Add” and follow the preceding sequence.
© CALSC
www.calsc.co.uk
01797 361318
31
When appropriate it is possible to add a Reference rather
than a Question and Answer.
When you have finished, press “OK”.
Examples of references might be:
• Page 36 of Physics text book
• Page 22 of third file on Mathematics.
• The diagram of the heart on card 23 of revision cards.
When you see this reference in the future you will simply go
to the appropriate information source and review the
information shown there.
© CALSC
www.calsc.co.uk
01797 361318
32
Teachers/therapists can use this facility to incorporate
reviews into their lesson plans.
© CALSC
www.calsc.co.uk
01797 361318
33
French and other symbols
To use accents or other symbols, click on the box at the
bottom left of the screen and use the slide bar to locate the
symbol required.
By clicking on the symbol it will be placed automatically into
the text wherever the cursor is located. The rest of the text
can then be entered.
© CALSC
www.calsc.co.uk
01797 361318
34
Including pictures and sounds in a Reminder
It is possible to show pictures and play sounds with either or
both the question and answer. The pictures and sounds
must be produced first using a program other than Time to
Revise. For example, a picture might be scanned using a
scanner and a sound might be recorded into your computer.
Alternatively, you might be able to use pictures from a
clipart or photo library.
Look back a couple of pages to the last screenshot showing
the creation of a Reminder. The third button down on the
right hand side is labelled “Advanced”. Click on this button
and the screen will change in the following way.
For the question and the answer it is now possible to browse
the pictures and sounds that you have on the computer and
select them for inclusion in the Reminder. In the example
given a picture of a rabbit has been stored in a folder called
© CALSC
www.calsc.co.uk
01797 361318
35
“Media” within the time to Revise folder. The “Browse”
button has been used to select the picture of the rabbit to be
shown in both the question and the answer. At other times
you might want to use different pictures for the question and
the answer.
The following screenshot shows what the Reminder looks
like when it is viewed in the Reminders screen.
In the next screenshot you can see that a spelling Reminder
is being added. The question (hidden behind the select audio
file box) instructs the user to click on the ear that can be
seen and spell the word. The word “football” has been
recorded as a “.wav” file and has been saved in the Media
folder within the Time to Revise folder. When the “Open”
button is pressed the reference to the “football.wav” is saved
in Time to Revise.
© CALSC
www.calsc.co.uk
01797 361318
36
When the Reminder is viewed in the Reminders screen it
will appear as follows.
© CALSC
www.calsc.co.uk
01797 361318
37
Moving Reminders
Once Reminders have been added to the Bank of Reminders
they will stay here until they are transferred to the
Reviewing system. In other words, whilst they are in the
Bank you will not be reminded of them.
The Bank can be used to write and store any number of
Reminders. Once a particular Reminder has been learned,
by what ever method is appropriate or necessary, then it
should be added to the Time to Revise reviewing system.
To move a Reminder into the Time to Revise system:
1. Highlight it;
Press “Move from Bank”.
© CALSC
www.calsc.co.uk
01797 361318
38
After pressing “Move from Bank” the Reminder that was
highlighted will be transferred to the Time to Revise system.
In the example below it has disappeared from the Bank.
If you continue this procedure eventually no Reminders will
remain in the Bank.
Press “Review Reminders” to view the Reminders in the
Time to Revise system.
© CALSC
www.calsc.co.uk
01797 361318
39
Reviewing the Reminders – Day 1
The Reminders screen is shown with “Subject 1” as the main
Subject.
“Question 1” is shown but the answer is hidden. This is
when the pupil should try and remember the answer. If s/he
can recall the answer this will strengthen her/his memory of
it.
When the pupil has recalled the answer (or not as the case
may be), press “Show Answer”.
© CALSC
www.calsc.co.uk
01797 361318
40
The answer is now shown.
If the pupil did not remember it correctly s/he will need to
learn it again. The Reminder can be returned to the Bank
by pressing on the “Return to Bank” button until it is
learned again and moved back into the Reminders system.
Click on “Continue” to get the next reminder.
If “Continue” is highlighted with a red box around it you can
press the spacebar to continue. Time to Revise is set up to
allow you to go through all the Reminders just by pressing the
spacebar.
© CALSC
www.calsc.co.uk
01797 361318
41
In the example below “Reference 1” is shown. This was a
reference to other work such as a page in a Physics text
book, a Mathematics file or a diagram drawn on a revision
card.
After “Continue” is pressed Time to Revise shows “Question
1” again. When it gets to the end of the Reminders, Time to
Revise loops back to the beginning. This allows the pupil to
look through all the Reminders before testing herself/himself
on any particular question. If the pupil chooses to do
“Question 1” s/he should write down the answer and press
“Show Answer”. A judgement should then be made whether
the answer matches that on screen.
© CALSC
www.calsc.co.uk
01797 361318
42
At the top right of the screen a red box with the word “New”
indicates that this is a new Reminder. The buttons shown on
the right hand side of the screen show the intervals at which
reviewing should take place. Click on a button to choose
when to be reminded again. In this example the status of the
Reminder is “New” and it is likely that the “1 day” button
would be chosen in most cases, if the answer was judged
correct.
If you press “1 day”, the Reminder will disappear from the
screen and will be shown in 1 day's time (i.e. the next day).
When only one Reminder remains the “Continue” and “Go
Back” buttons are removed from the screen.
© CALSC
www.calsc.co.uk
01797 361318
43
When no Reminders remain the screen indicates this with a
message.
Be careful to note that this means no Reminders for the
subject “Subject 1” - there may well be Reminders for other
subjects.
• To view or create other Subjects with Reminders, press
“View Subjects”.
• To create more Reminders for this subject, press “View
Bank”.
• Otherwise, press “Exit” to leave Time to Revise .
© CALSC
www.calsc.co.uk
01797 361318
44
Reviewing the Reminders – Day 2
If yesterday you set up a new subject - “Subject 1” - added
two questions and moved them on 1 day, when you load
Time to Revise today the screen will look like this.
Notice that the “Review Reminders” button is underlined.
This means that there are Reminders to review.
Click on the “Review Reminders” button.
At the top of the screen is written “Subject 1”. “Question 1”
is shown as the question. Encourage the pupil to try to
remember the answer.
© CALSC
www.calsc.co.uk
01797 361318
45
It is best to ask the pupil to write down the answer, if this is
what s/he will be doing usually, as this reinforces the
kinaesthetic-motor pattern. This is a useful way of helping to
make the memory of the answer (especially for spellings or
languages) more automatic and faster. It does not take long
especially if the child’s memory for the items included in the
system has become faster. However, if you want the pupil to
work through the questions very quickly s/he could just say
the answers out-loud.
The button “Show Answer” has a red box around. Click on
this button with the mouse or press the spacebar to show the
answer.
© CALSC
www.calsc.co.uk
01797 361318
46
“Answer 1” is shown as the answer. In the red box at the
top right of the screen is shown “1 day”. The button below
the “1 day” button is “2 days”.
If the pupil did not remember the answer exactly, you would
click on the “Return to Bank” button at the bottom left of
the screen. This places the Reminder back in the Bank
where it will stay until s/he relearns it and moves it back out
of the Bank again.
If you prefer the pupil to relearn the question at this point
(preferably using a better method than previously) then
having encouraged the her/him to relearn it you can click on
the “1 day” button to see the Reminder again tomorrow.
© CALSC
www.calsc.co.uk
01797 361318
47
If the pupil correctly remembered the answer, you would
click on the “2 days button”.
When the pupil clicks on the “2 days” button the Reminder
(i.e. “Question 1” and “Answer 1”) disappear from the
screen. That Reminder will be shown again in 2 days time.
The remaining Reminder “Reference 1” is shown.
As there is no answer to this, the “Show Answer” button is
not shown.
As there are no further Reminders to review, the
“Continue” and “Back” buttons are not shown.
© CALSC
www.calsc.co.uk
01797 361318
48
You or the pupil would now go to “Reference 1” and check
the pupil’s memory of it. If s/he cannot remember the
information in “Reference 1” then click on “Return to
Bank”.
If the pupil has remembered it correctly then, as “1 day” is
showing in the red box, click on the “2 days” button to move
the Reminder forward 2 days.
There are no further Reminders to review today, as
indicated by the screen.
© CALSC
www.calsc.co.uk
01797 361318
49
However, so far the pupil has only reviewed Reminders for
today. You still need to enter new Reminders about things
that s/he has learned today, so click on the “View Subjects”
button.
It is advisable to enter only a few Reminders each day to
introduce the pupil gradually to the program and to prove
that it helps her/him. Similarly, only do a few important or
difficult subjects to start with, not the whole curriculum. As
the pupil becomes more confident the quantity entered can
increase. However, the number of Reminders entered each
day for each subject should not exceed her/his memory span.
© CALSC
www.calsc.co.uk
01797 361318
50
Adding further Subjects
The main Subjects screen is shown, with “Subject 1” as the
only subject heading so far entered.
You may want to set up further subjects which could be any
topic such as Vocabulary, French, Science, Spellings, but we
will refer to it as “Subject 2”.
Click on the “Add” button to do this.
Type in “Subject 2” and then press the “OK” button.
© CALSC
www.calsc.co.uk
01797 361318
51
“Subject 2” is now set up. Notice that “All” now appears in
the list of subjects. This can be highlighted by clicking on it
once or by using the arrow keys to move the highlight bar up
and down the list of subjects.
If “All” is highlighted and you click on “Review Reminders”
then all the Reminders for all subjects will be shown.
If “All” is highlighted and you click on “View Bank” you
will be able to see the Reminders but you will not be able to
edit them or create new Reminders. In order to edit a
Reminder or create a new one you must highlight the
relevant subject and press “View Bank” rather than use
“All” subjects.
© CALSC
www.calsc.co.uk
01797 361318
52
If you want to set up new Reminders for “Subject 2” then
highlight it with the cursor or the arrow keys and then click
on “View Bank”.
Guidance on how to create new Reminders in the Bank was
provided earlier.
Remember to return tomorrow to ask the pupil to quickly
review the Reminders you set up today.
© CALSC
www.calsc.co.uk
01797 361318
53
Editing Subjects
When “All” is highlighted it is not possible to modify or
delete subjects. The “Modify” and “Delete” buttons only
show when a subject is highlighted.
Highlight “Subject 2” with the mouse or arrow keys and
click on “Modify”.
© CALSC
www.calsc.co.uk
01797 361318
54
“Subject 2” is shown and can be edited. Make any changes
or modifications you wish and press the “OK” button.
Any Subject can be deleted.
It is very important to appreciate that if you delete a subject
then all the Reminders that go with it will also be deleted.
To delete a subject, highlight it and click the “Delete”
button.
Before the subject is deleted a message is shown asking you
to confirm that you really want to delete the subject and all
its Reminders.
© CALSC
www.calsc.co.uk
01797 361318
55
Notice that the message indicates that a backup of the
subject can be made using the “Export” button. How to do
this is covered in a later chapter.
A text export can also be made using the “Print” button.
This is also covered in a later chapter.
Click on the “Yes” button to confirm deletion of the subject.
© CALSC
www.calsc.co.uk
01797 361318
56
“Subject 2” has been deleted.
There is no way to get it back unless you have backed it up
using the “Export” or “Print” buttons.
“All” has also disappeared from the list of subjects since
only one subject remains, i.e. “Subject 1”.
© CALSC
www.calsc.co.uk
01797 361318
57
Editing Reminders
This sequence shows what to do if there is a spelling mistake
that you want to edit.
Editing can be done at any time after the Reminder has been
created. The editing can be done by the pupil/teacher or by
any other person who knows the password.
To modify the question or answer for any Reminder, click
on the “Modify” button.
© CALSC
www.calsc.co.uk
01797 361318
58
The spelling mistakes can be corrected and any other
necessary modifications made.
Note that when the “Modify” button is pressed, the text
“How do I spel 40?” is all highlighted. If you start typing
whilst the text is all highlighted it will all be replaced by the
new text you type. To avoid this, click on the highlighted
text with the mouse to remove the highlighting and place the
cursor wherever you want to make the modifications.
Click on the “OK” button to finish making modifications.
The answer can be modified to be correct in the same way.
© CALSC
www.calsc.co.uk
01797 361318
59
Deleting Reminders
To delete any reminder, it must first be in the Bank. Click
on the “Delete” button or press the Tab key to highlight the
“Delete” button and press the spacebar.
The Reminder is immediately deleted without any further
warning.
© CALSC
www.calsc.co.uk
01797 361318
60
Printing
Four options are given when the “Print” button is selected
from the Subjects screen.
Printing “Questions only” means that a paper test can be
generated, since the answers will not be printed out.
Printing the “Questions and Answers” means that the
answers can be used to mark a paper test or, alternatively, a
printed back up can be made of the questions and answers.
Notice that as “Demonstration” is highlighted the print will
be for “ Demonstration “ only. If other subjects had been
required a printout for each individual subject could have
been obtained by selecting it or, by selecting “All”, a
printout for all subjects could have been obtained.
© CALSC
www.calsc.co.uk
01797 361318
61
If you leave “Questions only” selected and click on the
“Next” button you will see page 2 of the Print Reminders
wizard, which gives three options.
Printing “Today's Reminders” will print the Reminders for
today for “ Demonstration “. The questions and not the
answers will be printed because that option was selected in
Page 1 of the Print Reminders wizard.
Click on “Print”.
The effect of selecting “Print” is to create a text file that
contains the questions for today. The text file is saved in the
sub-directory to which Time to Revise was installed. The
default is c:\Program Files\CALSC\Time to Revise. The
name of the text file is the subject name – Demonstration © CALSC
www.calsc.co.uk
01797 361318
62
followed by the date. This naming convention is used
whether you are printing “Today's Reminders”,
“Tomorrow's Reminders” or “All Reminders”.
The text file is then loaded into whichever wordprocessor
you have associated with *.txt files. In this example, the
relevant word processor is Notepad, which ships with
Windows.
Only “Question 3” is shown in the file because “Question 4”
is still in the Bank and “Question 2” and “Question 1” have
already been moved on to tomorrow and the next day.
A print out of this file is not made at this point because you
may need to attach a printer or switch it on. When you are
ready, select File-Print from the menu and the file will be
printed out.
Close the text file by selecting File-Exit from the menu. Note
that the text file is not deleted.
If you select the “Print” button again and choose “Questions
only” and select the “Next” button page 2 of the print wizard
will appear again.
© CALSC
www.calsc.co.uk
01797 361318
63
If you select “Tomorrow's Reminders” and click on the
“Print” button the screen will look like this.
This time “Question 2”, which was moved on 1 day and is
due to be shown tomorrow, is included in the print-out.
“Question 3” is included because this reminder has not yet
been reviewed today and either returned to the Bank or
moved on 1 day. If it had been moved on one day (which is
what we recommend for “New” questions), in fact it would
still appear tomorrow.
The purpose of providing a “Print Tomorrow's Reminders”
option is to enable teachers/therapists who wish to prepare a
day in advance of a lesson/session to print out the questions
(or questions and answers) at the time when they do their
preparation.
If you click on the “Print” button and select “Questions
only” and “All Reminders” you will produce a text file like
the one shown below.
© CALSC
www.calsc.co.uk
01797 361318
64
It can be seen that “Question 1” (which was moved on 2 days
and is therefore not due to be shown today or tomorrow) is
printed out. In fact all questions, regardless of how many
days they have been moved on, are printed out under this
option.
The one exception to this is that questions that are in the
Bank are not printed out. This highlights the fact that the
Bank is used as a store for questions that have not yet been
learned. It would not therefore be appropriate to include
them in a paper test.
Selecting “Print”, “Questions and Answers” gives similar
results to those described for “Questions only”.
© CALSC
www.calsc.co.uk
01797 361318
65
Above is shown the result of printing “All” questions and
answers for the “Demonstration” subject.
If there is more than one subject, it is possible to print
“Questions” or “Questions and Answers” for all the subjects
by selecting “All” from the subjects menu. The questions
and answers are then printed in Subject order (alphabetical)
and, within each subject, in order of when they are next due
to appear.
By clicking on the “Print” button and then “Subject
headings only” a print out of all the subject headings
without the questions and answers can be obtained.
© CALSC
www.calsc.co.uk
01797 361318
66
The screen shown above has the code “trs:” in the line above
the subject heading “Demonstration”.
The purpose of this option will become more apparent in the
chapter on importing and exporting questions and answers.
Briefly, “trs:” is code which tells Time to Revise that what
appears on the following line is a subject heading when
questions and answers are imported from a pre-prepared
text file.
© CALSC
www.calsc.co.uk
01797 361318
67
Analysis of Reminders
It may be of interest to see how many Reminders there are
in the system, and how they fall into the different categories
of Bank, New, 1 day, 2 days etc.
By clicking on “Print” and selecting “Analysis of
Reminders” a printout can be obtained, as shown overleaf.
In order to show the results in a properly aligned table, an
internet format is adopted.
Notice that the name of the file is composed as follows:
The name of the subject (Demonstration): The word
“Analysis”: The date.
© CALSC
www.calsc.co.uk
01797 361318
68
Importing Reminders from a text file
In some cases it is easier to write the questions and answers
to a text file and then import them into Time to Revise. For
example, one person might want to write a series of
questions and answers on a particular subject and share
them with a friend who writes questions and answers on a
different subject.
It is possible to do this using the “Import” button.
Using your wordprocessor, write a text file as shown
overleaf (this was created in Notepad which ships with
Windows but any wordprocessor will save text files).
© CALSC
www.calsc.co.uk
01797 361318
69
Note that the extension of this file is “.txt”. Only a text file
with this extension will be recognized. Save the text file
somewhere where you can locate it again.
Each line has a code to distinguish the subject, question and
answer. These are explained on page 67. The layout needs
to be as illustrated, with a blank line between each item, a
colon after the code and the reminder on the line below.
For the purposes of this example, we have saved the file to a
floppy disc since we are assuming that these questions and
answers have been written so that they can be shared by
several people. (If you wish to follow this example as a
tutorial you should also create a French.txt file on a floppy
disk that contains the same text as shown above.)
In the Subjects screen, click on the “Import” button.
© CALSC
www.calsc.co.uk
01797 361318
70
After clicking on “Import” an “Open” dialogue box is shown
from which you need to select the text file to open.
First click on the down arrow on the “Look in:” box and
select the “a: drive”.
© CALSC
www.calsc.co.uk
01797 361318
71
Then click on the down arrow next to “Files of type:” and
select “Text Files (*.txt)”.
Click on the filename e.g. “French.txt” and then click on the
“Open” button.
© CALSC
www.calsc.co.uk
01797 361318
72
The text file is quite quickly imported into Time to Revise.
The subject “French” is created and the two questions are
put into the Bank.
To view the two questions, highlight the subject “French”
and click on the “View Bank” button.
If more than two questions and answers had been written
these would all have been imported into the Bank.
© CALSC
www.calsc.co.uk
01797 361318
73
The Bank shows the two questions. These can now be moved
from the Bank and dealt with in the normal way. Four
fairly simple bits of “code” were required in the text file that
enabled Time to Revise to deal with the import.
tri: everything that follows “tri:” will be ignored by Time to
Revise. This enables you to write some introductory text at
the beginning of the text file or even to insert additional
explanations at a later point in the file. tri stands for Time
to Revise Ignore.
trs: what follows on the line below “trs:” will be taken to be
a subject heading. Everything after the first line below
“trs:” will be ignored. “trs:” stands for Time to Revise
Subject.
© CALSC
www.calsc.co.uk
01797 361318
74
trq: everything on the line below “trq:” will be taken to be a
question. “trq:” stands for Time to Revise Question.
tra: everything on the line below “tra:” will be taken to be
an answer to the previous question. “tra:” stands for Time
to Revise Answer.
Further codes are used to refer to pictures and sounds, as
seen in the following example.
trpq: everything on the line below “trpq:” will be taken to be
the pathname of a picture to be shown as part of the
question. “trpq:” stands for Time to Revise Picture
Question.
© CALSC
www.calsc.co.uk
01797 361318
75
trpa: everything on the line below “trpa:” will be taken to be
the pathname of a picture to be shown as part of the answer.
“trpa:” stands for Time to Revise Picture Answer.
trnq: everything on the line below “trnq:” will be taken to be
the pathname of a sound file (“n” stands for noise!) to be
played as part of the question. “trnq:” stands for Time to
Revise Noise Question.
trna: everything on the line below “trna:” will be taken to be
the pathname of a sound file to be played as part of the
answer. “trna:” stands for Time to Revise Noise Answer.
It is important to note that the pathname for a picture or
sound file will be interpreted exactly. If the picture or sound
is not where it is stated to be it will not be shown or played.
It is therefore recommended that all the picture and sound
files are placed in one location so that there is less chance of
an error occurring when writing questions in a text file. At
installation, a folder called Media is included as follows:
c:\Program Files\CALSC\Timely Reminders\Media\ and
sound and picture files may be placed in this folder.
If a picture or sound file cannot be located an error message
is displayed when the Reminder is first shown in the
Reminders screen and not when the import process takes
place in the subjects screen or the Reminder is first created
in the Bank of Reminders. An example of an error message
is shown overleaf.
© CALSC
www.calsc.co.uk
01797 361318
76
The location may be manually edited or the “Browse”
button may be used to locate the file. If the “Browse” button
is used a window similar to the following will be shown.
Suppose that in this particular example the “dna.jpg”
picture file is actually located in the Media folder. Double
clicking on the Media folder in the “file open” dialogue box
shown above and then clicking on the “dna.jpg” picture file
will enable the correct folder to be used to find the picture
file in future, as shown overleaf.
© CALSC
www.calsc.co.uk
01797 361318
77
N.B. The “Files of type” box in the dialogue box shown
above is searching for image files. If you are browsing for a
missing sound file click on the down arrow in the “Files of
type” box and select “Sound Files”.
If the location of the picture file is incorrect then, in many
cases, it will also be incorrect for other Reminders in that
subject. For this reason, after browsing for a missing file
(picture or sound) the following dialogue box is shown.
Clicking “Yes” will mean that all picture or sound files for
the relevant subject will be searched for in the folder that
contained the missing file, in this case the “Media” folder. If
your sound and picture files are located in several different
folders do not click on the “Yes” button otherwise you will
have to search for all the files that are not located in the
Media folder all over again.
© CALSC
www.calsc.co.uk
01797 361318
78
CALSC may produce modules of Reminders that have
pictures and sound files that are contained within what is
known as a DLL. All the pictures and sounds are
compressed into a single file, the DLL, and will not generally
be available for use in other Reminders written by the user.
These will be referred to as follows.
trdpq: Timely Reminders DLL Picture Question
trdpa: Timely Reminders DLL Picture Answer
trdnq: Timely Reminders DLL Noise Question
trdna: Timely Reminders DLL Noise Answer
© CALSC
www.calsc.co.uk
01797 361318
79
Exporting Reminders to a text file
Questions and answers can also be exported to a text file.
Return to the Subjects screen and highlight “All”. Then
click on the “Export” button. Click on the down arrow next
to “Save as type” and select the “Text Files” option. Then
click on “Save” to save the file as “Lisa Smith All.txt” on the
“a: drive”. Lisa Smith is the pupil’s name in this example.
Use your wordprocessor to open the “Lisa Smith All.txt” file
and it should open up as shown overleaf.
© CALSC
www.calsc.co.uk
01797 361318
80
The “Lisa Smith All.txt” file contains all the questions and
answers for both the “French” and “Science” subjects.
Just after each “trq:” is written the status of the question in
terms of whether it is in the Bank or has been moved on 1
day, 2 days etc.
The status of a question will be respected on import as well.
In other words, if “2 days” appears after a question then it
will automatically be moved on 2 days at the time of import.
If you are importing questions produced by someone else
you should delete all the occurrences of “1 day”, “2 days”
etc. so that the questions are imported into the Bank ready
for use.
© CALSC
www.calsc.co.uk
01797 361318
81
In some cases, several people may be using the Time to
Revise on the same computer, for example, at home.
Alternatively, in education, several pupils may be using the
same computer and learning the same questions. In this
case, rather than typing out the same questions and answers
several times, the text file can be used to import the
questions and answers into different pupil’s sections.
Note that if further questions are to be added and imported
then questions that have already been imported should be
deleted from the text file. If they are not deleted then
duplicate questions will be produced.
© CALSC
www.calsc.co.uk
01797 361318
82
Backing up Reminders
It is possible to back up your file of Reminders and we
recommend that you do so.
Exporting all the Reminders to a text file, as described in
Chapter 5, is one form of backup since at least all the
Reminders can be imported back into Time to Revise.
However, this is not a perfect solution. Suppose that a
Reminder has been moved on 1 week. After 3 days have
passed we can say that the Reminder will be shown again
four days after that, making the complete week.
Suppose now that the Reminder is exported - showing a
status of 1 week - and then imported again. Time to Revise
will then show the Reminder 1 week after the date on which
the import took place and not four days later. So, whilst the
text export can be used to print out all the Reminders in the
system - and to show their status on the day when the
printout is made - it cannot be used to properly back up the
system.
The “Export” and “Import” buttons can be used to create a
backup and import it without losing the dates on which
Reminders are to be shown again.
Using the “Export” button provides an option called “*.trd”;
“trd:” stands for Time to Revise Data file. It is this data file
that is used to make the backup. It cannot ordinarily be
read using a wordprocessor and it contains additional
information to that created when the Reminders are
exported to a text file.
© CALSC
www.calsc.co.uk
01797 361318
83
To see this facility working, create a subject called
“Definitions”. Next create a single question and answer
called “Definition Question” and “Definition Answer” and
move these from the bank to the Reminders system. Then
return to the Subject screen.
The Subjects screen should like this. A new subject called
“Definitions” has been created. The “Review Reminders”
button is underlined which indicates that the Reminder
made up of “Definition Question” and “Definition Answer”
is available to be reviewed.
Click on the “Export” button.
© CALSC
www.calsc.co.uk
01797 361318
84
Save the “Definitions.trd” file to a disc on the “a: drive”
(though it could be to any other location) as indicated by this
dialogue box.
Then delete the “Definitions” subject (which will also delete
the reminder that goes with it).
After deleting the “Definitions” subject the Subjects screen
looks like this.
© CALSC
www.calsc.co.uk
01797 361318
85
Now import the “Definitions.trd” file from the “a: drive”
using the “Import” button.
The “Definitions” subject is now restored and the “Review
Reminders” button is underlined to show that “Definition
Question” and “Definition Answer” are available to be
reviewed.
© CALSC
www.calsc.co.uk
01797 361318