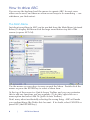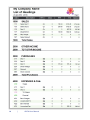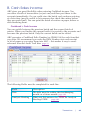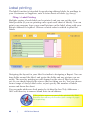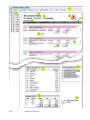
1
USER
MANUAL
ABC6 ACCOUNTS

|
i
Intentionally left almost blank
ii
|
ABC6 Manual
Foreword
When I started writing computer manuals (using a typewriter)
we were required to supply three books with a software
package -- a Training Manual, a technical Reference Manual,
and the User Manual. These were seriously thick objects as
they had to explain what a computer was, and give step-bystep instructions to people who were still waiting for the hard
disk to be invented. I remember several pages devoted to
showing typists the difference between their old Remington
and the keyboard of their new computer. This was 1979.
A lot of trees are relieved to find that a quarter of a century
later most software comes with minimal documentation.
Microsoft’s highly complex program development languages
are supplied with no paper manuals at all (creating a huge
market for 3rd party books). I think this is a step too far. I am
disappointed when I buy a box of software and find it contain
just a CD -- all features and options of the program only being
visible after I install the software.
So with ABC we have provided this User Manual on paper. It
contains notes to get you started, and reminders for day to day
operation. We have also supplied a vast amount of other stuff
-- Reference Manual, Technical Notes, Training Guide, etc that
installs onto your computer and is available on screen from
within ABC. I hope this gives you the best of both worlds.
Chris Hicks
[email protected]

|
iii
Copyright
© 2007
© 2010
ABC Direct Sales retains sole copyright and title
to these programs and documentation. All rights
are reserved.
You are granted a non-exclusive and nontransferable licence to operate this software on a
single computer for your own use.
No distributor dealer or agent is authorised to
change these terms.
Warning: Limited
Liability
It is impossible for anyone to guarantee that
a complex computer program is free of small
faults (bugs). In addition the results produced
by a program depend on the information entered
at the keyboard; and the correct operation of the
computer system.
ABC Direct Sales and their agents and
distributors can accept no liability for the
use of this program or any direct or indirect
consequential damages arising from the use of
this program.
It is the responsibility of the user of the program
to check that this program is suitable for their
requirements; that it is installed correctly; and
that any results of its use are correct.
Credits
Design supervisor: Chris Hicks.
Production details
The ABC programs are mostly written in
Microsoft Visual Basic. This Manual was
prepared using Adobe InDesign; and ClipMate.
Manual v1.04 Printed in England. April 2010
FEEDBACK and
Contact Details
We are keen to hear your comments, bug reports,
complaints, and ideas for improvements
(preferably by email).
ABC Direct Sales
PO Box 203, Sale, Cheshire M33 4XG,
Tel: 0161-282 1270
email: [email protected]
website: www.abc6.co.uk
iv
|
ABC6 Manual
UK
Contents
1 Introduction
What ABC can do. .. .. .. .. .. .. .. .. .. .. .. .. .. .. .. 1
After-Sales Support . .. .. .. .. .. .. .. .. .. .. .. .. .. .. .. 2
How to use This Manual. .. .. .. .. .. .. .. .. .. .. .. .. .. 2
How to drive ABC, The Main Menu. .. .. .. .. .. .. .. .. .. . 6
On screen HELP. .. .. .. .. .. .. .. .. .. .. .. .. .. .. .. .. 7
Log-On, Log-Off, Starting up ABC. .. .. .. .. .. .. .. .. .. .. 8
Registration Key, Passwords. .. .. .. .. .. .. .. .. .. .. .. .. 8
Get started with Bookkeeping. .. .. .. .. .. .. .. .. .. .. ..10
A typical months bookkeeping. .. .. .. .. .. .. .. .. .. .. 11
2 Getting started
Setting up the Accounts. .. .. .. .. .. .. .. .. .. .. .. .. ..13
Set up some Analysis Headings. .. .. .. .. .. .. .. .. .. .. 15
Analysis Heading Groups . .. .. .. .. .. .. .. .. .. .. .. .. 16
Analysis Heading Numbers . .. .. .. .. .. .. .. .. .. .. .. ..17
Clear the Accounts Files, Set accounts Year and Folio nbrs . ..18
Set-up Customers and Suppliers . .. .. .. .. .. .. .. .. .. .. 19
Check the VAT rates. .. .. .. .. .. .. .. .. .. .. .. .. .. .. 21
VAT General notes . .. .. .. .. .. .. .. .. .. .. .. .. .. .. 22
Notes for the VAT Inspector. .. .. .. .. .. .. .. .. .. .. .. ..23
Import from ABC5 . .. .. .. .. .. .. .. .. .. .. .. .. .. .. ..24
3 Record cards
Customer and Supplier Records . ..
Details of each Field . .. .. .. ..
Analysis Heading Records. .. .. ..
Details of each Field . .. .. .. ..
Stock Record Cards. .. .. .. .. ..
Details of each Field . .. .. .. ..
..
..
..
..
..
..
..
..
..
..
..
..
..
..
..
..
..
..
..
..
..
..
..
..
..
..
..
..
..
..
..
..
..
..
..
..
..
..
..
..
..
..
..
..
..
..
..
..
..
..
..
..
..
.. 26
27
30
31
33
34
Contents
|
v
4 Transactions
Different types of transaction . .. .. .. .. .. .. .. .. .. .. .. 37
a) Money Received for an invoice (Sales Ledger) . .. .. .. .. 39.
b).Money Received for a Cash Sale. .. .. .. .. .. .. .. .. ..44
a) Money Paid for a Purchase Ledger Invoice . .. .. .. .. .. 45
c).Money Paid for a Cash Purchase (petty cash) . .. .. .. .. 49
Internal adjustments/movements. .. .. .. .. .. .. .. .. .. ..51
Bankings . .. .. .. .. .. .. .. .. .. .. .. .. .. .. .. .. .. .. 51
Bank Reconciliation. .. .. .. .. .. .. .. .. .. .. .. .. .. .. 52
Opening Balance to Customer or Supplier . .. .. .. .. .. .. 52
Opening Balance to Nominal Ledger. .. .. .. .. .. .. .. .. 52
Nominal Ledger Transfers (Journal entries). .. .. .. .. .. .. ..53
Stock (Inventory) transactions. .. .. .. .. .. .. .. .. .. .. ..55
Unpaid bills (purchase invoices) . .. .. .. .. .. .. .. .. .. .. 56
Sales Invoices . .. .. .. .. .. .. .. .. .. .. .. .. .. .. .. .. 58
Link to the Stock File. .. .. .. .. .. .. .. .. .. .. .. .. .. .. 61
Credit Notes. .. .. .. .. .. .. .. .. .. .. .. .. .. .. .. .. ..61
Delivery Advice Note. .. .. .. .. .. .. .. .. .. .. .. .. .. ..62
Corrections and Adjustments. .. .. .. .. .. .. .. .. .. .. .. 62
5 Printing reports
Sales Ledger (Customer) reports. .. .. .. .. .. .. .. .. .. .. 64
Purchase Ledger (Supplier) reports . .. .. .. .. .. .. .. .. .. 65
Stock (Inventory) reports. .. .. .. .. .. .. .. .. .. .. .. .. ..67
Nominal Ledger reports . .. .. .. .. .. .. .. .. .. .. .. .. ..68
VAT reports (VAT Return, and Audit). .. .. .. .. .. .. .. .. ..69
CashBook reports. .. .. .. .. .. .. .. .. .. .. .. .. .. .. .. 70
Design your own reports. .. .. .. .. .. .. .. .. .. .. .. .. ..70
Print a label, envelope, letter or statement. .. .. .. .. .. .. 70
6 Month & Year End
Run the Month End . .. .. .. .. .. .. .. .. .. .. .. .. .. .. 71
End of Year . .. .. .. .. .. .. .. .. .. .. .. .. .. .. .. .. .. 73
Letter to the Accountant. .. .. .. .. .. .. .. .. .. .. .. .. 74
vi
|
ABC6 Manual
7 Customise ABC
Company name and address. .. .. .. .. .. .. .. .. .. .. ..75
Logo (picture) for top of reports . .. .. .. .. .. .. .. .. .. .. 75
Passwords. .. .. .. .. .. .. .. .. .. .. .. .. .. .. .. .. .. ..76
Accounting Year. .. .. .. .. .. .. .. .. .. .. .. .. .. .. .. 76
Folio & Invoice Numbers. .. .. .. .. .. .. .. .. .. .. .. .. ..76
Settlement Discount . .. .. .. .. .. .. .. .. .. .. .. .. .. .. 76
Other Companies . .. .. .. .. .. .. .. .. .. .. .. .. .. .. ..78
8 FILING
Open a File . .. .. .. .. .. .. .. .. .. .. .. .. .. .. .. .. .. 79
Customise a File . .. .. .. .. .. .. .. .. .. .. .. .. .. .. .. 80
Import or Export data. .. .. .. .. .. .. .. .. .. .. .. .. .. ..83
Global Changes . .. .. .. .. .. .. .. .. .. .. .. .. .. .. .. 83
Design your own Reports . .. .. .. .. .. .. .. .. .. .. .. .. 84
Label printing. .. .. .. .. .. .. .. .. .. .. .. .. .. .. .. .. 87
9 TYPING
Edit text . .. .. .. .. .. .. .. .. .. .. .. .. .. .. .. .. .. .. 89
Mail-merge . .. .. .. .. .. .. .. .. .. .. .. .. .. .. .. .. .. 91
10 Spread Sheet
Formula . .. .. .. .. .. .. .. .. .. .. .. .. .. .. .. .. .. .. 94
Link to Nominal Ledger (Headings) . .. .. .. .. .. .. .. .. .. 95
Import/Export. .. .. .. .. .. .. .. .. .. .. .. .. .. .. .. .. 96
11 Useful extras
Noticeboard. .. .. .. .. .. .. .. .. .. .. .. .. .. .. .. .. ..97
Calculator. .. .. .. .. .. .. .. .. .. .. .. .. .. .. .. .. .. 97
Print Envelope. .. .. .. .. .. .. .. .. .. .. .. .. .. .. .. .. 98
Yellow Notes. .. .. .. .. .. .. .. .. .. .. .. .. .. .. .. .. ..98
Contents
|
vii
12 Snapshot & Backup
Make safe copies of your data. ..
..
..
..
..
..
..
..
..
..
99
Install ABC onto your computer . .. .. .. .. .. .. .. .. .. ..
Program updates . .. .. .. .. .. .. .. .. .. .. .. .. .. ..
Version number. .. .. .. .. .. .. .. .. .. .. .. .. .. .. ..
Registration Key, User Forum. .. .. .. .. .. .. .. .. .. .. ..
101
101
101
102
13 Installation and Update
14 Reference
Enter a Date, or a Heading Code . .. .. .. .. .. .. .. .. ..
Enter a Payment Method . .. .. .. .. .. .. .. .. .. .. .. ..
Enter a VAT Code, or an amount of VAT . .. .. .. .. .. .. ..
Find a Record . .. .. .. .. .. .. .. .. .. .. .. .. .. .. .. ..
Apply a Filter to pick out Records you want, SQL. .. .. .. ..
Edit a Record Card . .. .. .. .. .. .. .. .. .. .. .. .. .. ..
A Grid (ie. Table) of data. .. .. .. .. .. .. .. .. .. .. .. ..
Features of ABC reports . .. .. .. .. .. .. .. .. .. .. .. ..
The Report viewer Toolbar, Report Options. .. .. .. .. .. ..
103
104
104
105
106
106
108
111
112
15 Glossary
Technical words explained. .. .. .. .. .. .. .. .. .. .. .. 118
16 Trouble-shooting
Solutions to common problems . ..
17 INDEX
viii
|
ABC6 Manual
..
..
..
..
..
..
..
..
.. 115
1
Introduction
An overview of ABC
and how to use this manual
What ABC can do
ABC is a computer program designed to help take care of the bookkeeping
and paperwork in a small business. Guessing you are not an accountant, we
have made ABC very easy to use.
In technical terms ABC is an accounts package that can also print labels,
letters and lists. All the usual facilities are provided, including Sales
Invoicing, Statements, Stock Control, VAT Returns, Cashbook, Profit & Loss
Report, and Audit Trail. A Payroll module is an optional extra.
Computer Expert? or Beginner?
You may be new to computers and worried about which button to press.
We have made the ABC program quite foolproof (though we know someone
may invent a better fool). Everybody makes mistakes: it is easy to correct
these later. ABC contains lots of features that you may think you do not
need; ignore those to start with.
After a while you will become a computer expert and want to go faster. ABC
contains many hidden short cuts for you.
Boxes like this contain hints,
shortcuts, efficiency tips and
suggestions.
Introduction
|
1
After-Sales Support
A Newsletter is sent out at irregular intervals, containing ideas and
suggestions collected from other users of this package.
Free technical advice is available by letter or email. Program updates are
available from our website or by post. page 101
An ABC User Forum (via our website -- page 102) allows you to discuss and
comment on ABC with other users, and ask for help.
Independent consultants or ABC experts in various areas of the country
provide after-sales support, training, telephone help lines, etc for a small
annual fee.
If you have paid for After-Sales Support, write the telephone number and
address of your support company in this box for quick reference:
Your computer
ABC should be happy to run on any computer that has Windows XP, Vista
or Windows7 installed, and a few hundred megabytes of free disk space.
Ideally your processor speed should be over 2GHz, and you will have at
least 2GB of RAM. We strongly recommend you have some removable
device for making backups (eg a USB stick).
It should be possible to use any printer with ABC. If you need to use
multi‑part ncr sets ABC has an option to print invoices and statements on
dot‑matrix printers.
2
|
ABC6 User Manual
How to use This Manual
This book is mainly a How to Guide briefly explaining day-to-day tasks, for
example -- how to produce a Sales Invoice.
General operation of the ABC program is hidden away towards the back
of the book; and you’ll find pointers to suitable page numbers if you need
more explanation ..... eg. page 123
It is assumed that you have a working knowledge of the Windows Operating
System (if not, go and spend 10 minutes learning how to double-click
a mouse, start and close a program, and drag the border of a window to
change its size).
You may have a fear of boring technical manuals but Please, PLEASE,
glance through the first couple of Chapters of this book to get an overview
of ABC and see important step-by-step instructions for getting started with
Bookkeeping.
Find your way around
Use the Contents List (at the front) or Index (at the end) to lookup the
subject you are interested in; this should point you to the page.
Technical words are explained in a Glossary
page 113
Using mouse and keyboard
If you have used Windows for more than a few minutes you probably
already know these basic principles -- in which case you can look smug as
you skim through this section.
The mouse moves the mouse cursor on the screen. When the mouse cursor
is over the item you want to activate, click the left mouse button (ie. press
and release it).
To select some text, hold down the left mouse button as you move the
mouse across the test -- this will highlight that section of text. Whatever
text operation you choose now will be applied to the highlighted text only.
Click the mouse anywhere else to cancel the selection.
You can usually change the size of windows, boxes and pictures on the
screen by dragging their corners or sides. To do this, position the mouse
Introduction
|
3
cursor over a corner or side of a box (the cursor will change shape to
indicate the box is ready to be dragged). Then hold down the left mouse
button and move the mouse to change the shape.
The right mouse button normally produces a small popup menu of
functions relevant to the item under the mouse cursor.
If your mouse has a wheel, this can be used for scrolling up and down.
While editing text, a text cursor will show your position in the text. The
cursor keys can be used to move this around (or you can point to a new
position with the mouse cursor and then left click the mouse to move the
text cursor to that position).
press ESC
means press the ESC key on the keyboard
click OK
means use the mouse and click the left
mouse button on the OK Button on the
screen
Enter FORMAT
means type the word format, then press
the ENTER key
Double Click
press the left mouse button twice
(quickly)
Hot Keys
Not everyone likes using the mouse all the time and it is possible to operate
ABC most of the time using only the keyboard. This is faster and easier
when entering items into bookkeeping but there are times when the mouse
is useful.
To indicate to Windows that you are typing a special command, and not just
another bit of text, you must press one of the command keys at the same
time; usually the CTRL key or the ALT key. Possibly the most widely used
keyboard shortcut is CTRL+C to Copy. (hold down the CTRL Key, and then
also press the c Key)
Most buttons and menus can be operated by pressing the ALT key together
with a letter of the alphabet. Look at the Menu or button: if one of the
letters is underlined, that is the one that will activate it. For example, the
File Menu can be activated by pressing ALT+F.
4
|
ABC6 User Manual
Here are some useful keyboard shortcuts (hot keys)
CTRL+C
Copy the selected item to the clipboard
(eg. the highlighted section of text)
CTRL+V
Paste the item from the clipboard at the
cursor position
F1
Press the F1 key for HELP
ESC
Press the ESC key to cancel or exit the
operation.
F5
old ABC users are used to pressing F5 to
Save (or Finish) the operation, so this still
works in ABC6.
Close a window (exit)
The standard way to close a window (ie. finish with this operation) is to
click the “X” at the top right hand corner. However, sometimes ABC will
not let you exit in this way. You might have begun entering an invoice. If
you click the “X”, ABC does not know if you want to cancel (discard) this
work, or save it part finished.
Before you can exit, you need to click Save or Cancel.
This Manual is a rough guide
The user interface of ABC may change as we continue to work on the
programs. And you can customise the appearance of many parts of ABC
and Windows. This means that your screen might look different to the
pictures in this Manual.
For this reason we have not shown many screenshots and have generally
just pointed you in the right direction rather than giving exact step-by-step
instructions. Hopefully this keeps the Manual thin, and prevents it from
going rapidly out of date.
Introduction
|
5
How to drive ABC
You can use the keyboard and the mouse to operate ABC. In most cases
either can be used, and there are often several ways to do something -- use
whichever you find easiest.
The Main Menu
Just about everything in ABC can be reached from the Main Menu (pictured
below).To display the Menu click the large round button top left of the
screen (or press ALT+M).
Use the mouse or cursor keys to move around the Menu. Double-click the
mouse or press the ENTER key to select a Menu item.
At the top of the screen is a Quick Access Toolbar, and you can customise
this to add any functions you use regularly. (To do this, right-click on a
menu option and select Add To Quick Access Toolbar.)
Don’t worry about accidentally selecting the wrong thing. ABC will make
you confirm things like Delete this Account. If in doubt, select CANCEL or
press ESC (the ESCAPE key).
6
|
ABC6 User Manual
On screen HELP
ABC includes an on-screen Manual that you can view at any time: press
the F1 key, or click a Help button, or select Help from a menu.
The on-screen Manual contains several Sections, including an Introduction,
Reference Section, Guided Tour of ABC (for beginners) and Operator Notes.
Each Section contains several Chapters. An example Page (explaining the
ABC Message Box) is shown below. While viewing any Help Page you can
call up the full Contents of the on-screen Manual in a separate Window -click the Contents tab (or press ALT+C). See below.
Help Pages contain links to other Help Pages: click on the underlined words
to follow the link (and then click BACK if you want to get back to the
previous page).
You can search the on-screen Manual by choosing Index or use Find to see
all Pages containing the word(s) you are interested in.
While you are using ABC, if you request Help (press F1 or click Help) the
program will usually be able to open the on-screen Manual at a relevant
page (this is known as context sensitive Help).
The Help System remembers Pages you looked at recently, and you can use
the < and > keys to step backwards or forwards through these Pages.
Introduction
|
7
Starting up ABC
From Windows desktop click on the ABC shortcut
If the Password system is turned off, the Main Menu will appear. Otherwise
you need to Log-On by entering your Password.
Log On to ABC
Enter your own password.
To set up or edit Passwords (page 76) ABC may ask for your
Registration Key (page 102)
The Noticeboard may appear; you can Continue, or Edit the
messages, Print on paper. The NOTICEBOARD is a useful
place to leave notes for the next person to use ABC. You can
turn it off (page 97)
Log Off from ABC
Whenever you have finished using the program, you should always close
down properly to ensure files are closed and all information is written
safely back to disk. Never switch off the computer without first closing
down ABC.
If you are just leaving the computer for a few minutes, or couple of hours,
then you should Log-Off.
Change to different Company
If you have more than one set of accounts set up in ABC, go back to the
Main Menu and Log-Off, then Log-On to a different Company.
8
|
ABC6 User Manual
Customise your ABC
Many parts of ABC can be changed to suit your own preferences, including
screen colours, screen layout, passwords, report content and quick access
Menus. The OPTIONS MENU (top right of the screen) has many of these
functions. Buttons at the bottom right of the screen will change the screen
layout from multiple windows side-by-side, to having them one above
another.
To add a function to the Quick Access toolbar (top left of screen) right click
on a menu item and select ADD TO QUICK ACCESS TOOLBAR.
Set your company details
You need to set your company name and other details before starting to use
ABC for your real accounts. Page 75
Bottom left of the screen always shows the current bookkeeping month and
accounts year start. If you use ABC for more than one company’s books the
current company name is displayed near the top of the screen.
Other functions of ABC
ABC is unusual amongst Accounts packages because it also lets you write
letters, produce labels, design your own reports, produce spreadsheets, etc.
Later chapters describe these options. Don’t bother learning about things
that you do not need. However, if you find you are spending time every day
over some repetitive task (eg. producing address labels for parcels), look to
see if ABC can help.
If you cannot see how to get ABC to save you time on some task, contact
your After-Sales Support company, or ABC Direct, with details of what you
need to do. Usually we can help
The TOOLS MENU (top right of the screen) contains functions like Update
ABC, Visit the ABC website or User Forum, and display Version number,
and enter your Registration Key.
Introduction
|
9
Get started with Bookkeeping
ABC is designed to save you time and effort in looking after the mass of
paperwork that is the bookkeeping in every small business.
At its simplest you can just enter details of everything you buy or sell,
money received or paid. At the end of each month ABC can automatically
produce neatly typed double-entry account books exactly like a perfect
hand-written system (but without the effort).
Take these books to your accountant at the end of year, and they will sort
out depreciation, prepayments and accruals, assets, etc.
Notes for Accountants: The emphasis in ABC is low level bookkeeping, and
on screen we have hidden the complexities of accountancy. However, ABC
is a full double-entry accounting package and could produce final accounts.
(page 74).
Don’t trust computers!
Beginners (and some experts!) often think that anything printed out by a
computer must be correct. This is not true! The computer is only a large
calculator; if somebody enters a wrong number, the answer will be wrong.
If your neighbour operates an arc-welding unit, a surge through the power
supply can make your computer turn out nonsense.
The thing to bear in mind with any computerised accounts system is,
computers and computer operators CAN make mistakes. So you must check
everything.
You can easily print out on paper and then glance through to see if totals
look reasonable. This allows you to check what is happening all the time,
and you have your account books not only in the computer, but on paper in
black and white.
Don’t keep separate handwritten books!
Everyone will advise you to run a new computer accounts system in
parallel with your normal bookkeeping for a few weeks or months, to make
sure it is working correctly. This advice is correct in general, BUT with
ABC you can do this without having to do all that handwritten paperwork
yourself. Here’s the secret:
Enter into ABC details of everything you buy and sell. Print the reports on
paper. Now treat those pieces of paper as your handwritten account books,
and check them carefully.
10
|
ABC6 User Manual
In the absolute worst case (eg. your computer goes wrong) you are still
better off! A Sales Daybook is a list of invoices with a total at the end no
matter whether it was produced laboriously by hand, or printed out in
seconds by a computer.
Another factor is that if you do keep a separate set of books, it is often
difficult to get exact agreement with the computer. You can end up wasting
hours to find why the computer total is a penny different (often due to a
mistake in your manual adding up). It’s much better to spend a fraction of
that time on double checking the paperwork produced by the computer.
You’ll achieve the same result.
If you are in doubt about this advice talk it over with your accountant. We
are happy to speak to accountants about the best way to use ABC.
After the first few weeks
Once you have got used to working as described above, please continue to
do this. Just because things appear to be OK for a few weeks, don’t assume
everything will work perfectly for ever.
A typical month’s bookkeeping
During each month you would produce sales invoices on the computer
using the Sales Ledger and enter details of unpaid bills into the Purchase
Ledger. Collect together all petty cash receipts and other miscellaneous bits
of paper (eg. till rolls) and enter these into the CashBook. You can do this
each day, or every few days, whenever it is convenient.
When you receive a cheque (or cash) in payment of a sales invoice, enter
this into the Sales Ledger (so you can mark the invoice paid) and not into
the CashBook. When you pay a supplier’s invoice, start by telling ABC you
have paid that invoice (in the Purchase Ledger) and the computer will then
show you how much to write on the cheque and can print a Remittance
Advice to send with it.
It is best to have entries approximately at real dates
(ie do not get too far behind in your entries). It is a
good idea to run the ABC Month End function within
a few days of the real end of Month even if it means a
some late items get entered into next month instead.
Introduction
|
11
At the end of the month you can start producing sales invoices with next
month’s date, while still entering unpaid bills from suppliers. Most people
run the Month End routine about a week into the next month. Before doing
this, have a final check that you have entered everything into the computer
from this month. Go through your bank statement and enter any bank
charges or standing orders.
Then select the MONTH END function. This can be customised to
automatically print out a lists, in the form of double-entry account book
pages, of everything you entered during the month. (though these days
many people save paper by not printing anything out unless it is required)
That is the minimum you need to do!
ABC has taken care of all the calculations, adding-up columns and
separating out the VAT.
If you wish you can do much more, for example print out useful Trading
Reports at any time showing an analysis of your profit and loss.
More than one way
There often are several ways in which you could enter something into
ABC Accounts. For example, if you cash a cheque at the bank and put the
money in your petty cash tin, this could be entered into ABC in one of three
ways:
xx 1. Cashbook PAYMENT (cheque paid from the bank)
xx 2. Cashbook RECEIPT (cash received by petty cash tin)
xx 3. Nominal Transfer (amount transferred from bank to petty cash)
Any of these will work OK. (Method 1. is preferred because it allows you to
enter the cheque number into the correct place)
12
|
ABC6 User Manual
2
Getting started
Setting up the Accounts
General Notes about VAT
Introduction
It is important that you set up ABC correctly to suit your business before
you start using it to do your bookkeeping. For example, check that the VAT
rates are set correctly, invoice numbers are set to the required start number,
your Company Name and Address details are entered, and that any dummy
information has been cleared from the files. Use the checklist below:
If you create an extra company at any time, you must
follow this procedure to set up that Company, before
starting to use it.
If you are upgrading from an earlier version of ABC,
the IMPORT function will take care of most of this
automatically (page 24)
RR 1. Set up Analysis Headings (Nominal Ledger Accounts) page 15
RR 2. Clearout any dummy information from the files
and set your Accounting Year and the current Accounting Month.
Set Folio Numbers. Also specify if you are VAT Registered. page 18
RR 3. Enter your Customer and Supplier names and addresses.
If you have been trading for a while there will probably be invoices
already outstanding with these companies so you can choose to
enter the amounts as Opening Balances.
page 19.
Getting started
|
13
14
|
ABC6 User Manual
Set up some Analysis Headings
The Analysis Headings (our word for Nominal Ledger accounts) are the
centre of the Accounts system, and hold details of vague things like assets,
profit, VAT, bank accounts. Americans call it the General Ledger, whereas
in the UK it is the Nominal Ledger.
Think of the Nominal Ledger as a book with nine chapters. Chapter one is
for Sales, Chapter four is for expenses, Chapter eight is for Current Assets,
etc. Each Chapter is split into sections for example Chapter four (expenses)
might contain sections for Gas, Electricity, Postage, Insurance, Bank
charges.
With a handwritten ledger the usual way to show these sections is with
columns; one column for Gas, one for Electricity, etc. The title or name
of each column being written as a heading for the column. Splitting your
expenses up in this way allows you to analyse your business see at a
glance what you are spending on each item. In ABC we call these sections
(ie. columns) Analysis Headings. (Accountants think of them as Nominal
accounts).
The advantage of the computer is that you can create as
many Headings as you need and analyse your business
just how you choose
.
Each Heading is given a unique number; those in Chapter one have
numbers between 1000 and 1999, those in Chapter four between 4000 and
4999. Some sample Headings (Nominal accounts) could be: 4223--Gas
expenses, 4325--Telephone charges.
Before you start using ABC, you need to set-up the Headings to suit
your own type of business. You don’t have to get this perfect first time,
because you can alter things later; but it is sensible to get the Headings
approximately correct before you start making entries.
We suggest you print the existing list of Headings (page 68), and work just
on paper until you are satisfied you have a suitable list of Headings (an
accountant might call this a Chart of Accounts).page 14.
Nominal Ledger > Print List of Headings
It is a good idea to talk to your accountant about this, and you do not need
to use the computer at all; just pen and paper. A copy of last years accounts
would provide a good starting point.
Getting started
|
15
It is easy to add more Headings later, if you find you need greater analysis
of certain parts of your business. But it is difficult to delete Headings after
you have used them (it upsets the audit trail). As a general rule, therefore,
you should start off with very few Headings, and only add more when you
really need them. Do not create a separate Heading for each Stock Item -that analysis is better done using the Stock System.
Analysis Heading Groups
The Analysis Headings are divided into 9 Groups (chapters)
Group
Category of Headings (N/L Accts)
Db or Cr
1
SALES or INCOME.
Credit
2
OTHER INCOME
Credit
3
PURCHASES and COST of SALES
Debit
4
EXPENSES & OVERHEADS
Debit
5
CAPITAL EMPLOYED
Credit
6
LONG TERM LIABILITIES
Credit
7
FIXED ASSETS
Debit
8
CURRENT ASSETS
Debit
9
CURRENT LIABILITIES
Credit
ABC takes the totals of these groups and uses them as follows: (You can
rename the groups, though that won’t change their function).
Gross Profit
=
Group 1 - Group 3
Net Profit
=
(Groups 1 + 2) - (Groups 3 + 4)
Turnover
=
Group 1
Liabilities
=
Groups (5 + 9 + 6)
Assets
=
Groups (7 + 8)
Working Capital
=
Groups (8 9)
Note for Accountants:
An Analysis Heading is what ABC calls a Nominal
Ledger Account.
16
|
ABC6 User Manual
Analysis Heading Numbers
Each Heading is numbered (think of it as the Account Number) and this
number determines the properties of this Heading.
Analysis Numbers can range from 1000 to 9999
Headings in Group 1 have numbers beginning with 1.
Headings in Group 2 have numbers beginning with 2, etc.
To make your Trading and Balance Sheet printouts look
prettier (and to create sub-divisions within Groups) you
can use some Headings as Group Titles, Sub-titles, and
Totals. These sub-title and total Headings cannot be
used for entering money; they are purely cosmetic.
Numbers ending in 000 are main group titles.
Numbers ending in 00 are sub-titles.
Numbers ending in 0 are titles of sub-divisions.
Numbers ending in 999 are main group totals.
Numbers ending in 99 are sub-totals.
Numbers ending in 9 are totals for sub-divisions.
For example, Number 1000 is Main Title for Group 1
All other Numbers are normal Headings, and can have amounts of money
entered against them.
For example, 8411 is Bank Account 1
The Subtitles and Subtotals allow you to divide your
business up into departments if required. You could
ignore these for now and add some later if you need to.
.
Examine a List of Headings (page 14) you will see how the titles and totals
Headings appear, determined by their number.
If you add a new Heading to your list, give it an appropriate number. It is a
good idea to leave a few gaps between numbers in case you decide later to
add some further Headings in this area.
Getting started
|
17
Clear the Accounts Files
The installation disk may contain some dummy information to let you
experiment with the Accounts system. When you are ready to start using
ABC for your business, you must clear out all the Accounts Files.
Accounts Utilities > Rarely used > Clear the Files
There are several stages to this process and you can complete them in any
order.
xx Choose ALL DATA (clear out Customer names/addresses also)
or CLEAR FIGURES ONLY (just set the amounts to zero).
The Headings (Nominal) descriptions are not cleared
but the Heading balances are all set to zero.
If you want to delete any Headings, this is the time to
do it (while they hove no transactions).
.
xx Select a set of Analysis Headings (Nominal Ledger Accounts) for your
business. You can retain the existing set, or choose one of the presets
included with ABC. You will be able to modify these later, so do not
worry too much about it at this stage.
xx Set the starting Sales Invoice number, Purchase Folio number, etc. If
you already have a bookkeeping system, you might choose to carry on
with the same number sequence, or you could start from 1 (or from
1000). page 21
xx Enter the Year & Month of the start of your accounting year.
xx Enter the Year & Month in which you wish to begin using ABC. This
must be within your Accounting Year.
xx Are you registered for VAT?
If you are, then also enter your VAT Registration number.
18
|
ABC6 User Manual
Set-up Customers and Suppliers
CAUTION regarding VAT: If you need to enter details from your old
handwritten bookkeeping system into ABC, think carefully about the VAT
involved in the old invoices. Either handle it outside of ABC (manually)
or enter it into ABC and let ABC take care of it completely. Do not do
both! (There is only one thing worse than paying VAT; and that is paying it
twice!!) See item 3. below. Discuss this with your accountant if in doubt
It is not essential that you enter all your Customer and Supplier names and
addresses into the computer before you start using ABC because you can
add new records at the time you enter invoices. You might choose to ignore
this section completely. However, if you want to enter your Customers and
Suppliers first, here is what to do:
1. Prepare a list on paper of existing customers and suppliers. This does
not need to be in alphabetic order.
2. Add the new Customer and Supplier Records (page 26)
You can add these records in any order. You can enter
them all or just do some now and the rest later; or add
new customers at the time you invoice them.
3. Choose from 4A, 4B, or 4C for how to enter old invoices. Method 4C is
best (but involves most work). Most people probably use method 4B.
If you are just starting a new business, then 4A is your choice.
4A. Do Nothing! You are starting with blank files. (If you do have any
invoices from before you started using ABC, you must continue to
handle them by your old manual bookkeeping system -- they are
nothing to do with ABC. Remind your accountant to combine those
old invoices with the ABC books to produce your final Accounts at
year end).
4B. Enter an Opening Balance. Instead of entering all the details of what
a customer owes you, just enter the total amount (and this figure is
put as the Opening Balance on their Account). One complication is
that you must separately take care of any VAT relating to those old
invoices. (If you are using the Cash VAT Accounting method, sorting
out the VAT may be complicated -- you might find it simpler to use
4C instead!!).
Getting started
|
19
By just entering Opening Balances to Customer/Supplier records you
are ignoring the VAT (this was accounted for at the time the original
invoices were raised). You have two choices for handling the old
VAT:
1. Do it outside of ABC (eg by hand).
2. Work out the amount of VAT and enter this as an Opening
Balance to Heading 9211 -- VAT Control Account in the
Nominal Ledger (page 53)
Decide on a starting date, usually the 1st of that Month you entered
as the starting month. (page ) Calculate the balance for each customer
and supplier AT THAT DATE. This will be their Opening Balance;
enter it into ABC.
4C. Enter all the old invoices into ABC. ie. go back in time a few
months, and enter all the individual original invoices; ie. duplicate
the manual system. You do not have to print these invoices when
entering them but it might be useful. (page 61) If you do not have too
many old invoices, this method is the best one to use.
ABC is very flexible. You may choose method 4C for some of your
customers, but 4B for others. Just remember that once you have
entered something onto the computer, you must account for it. If you
enter invoices with VAT, you must at some stage also enter details of
payment of that VAT to the government.
5. You can print on paper to make it easier to check what you have
entered. Look at the reports to see the figures you have entered. This
is a very good way of learning how a bookkeeping system works.
For example, examine the List of Customers report and Aged Debtor
report (page 64)
To correct mistakes in the Customer name/address
details edit the Customer Record. (page 26) You
cannot directly edit the account balance so if you need
to adjust the figure enter an Opening Balance (as a
positive or negative amount).
20
|
ABC6 User Manual
Company name and address
Fill in your own Company name and address details. These will be printed
on reports (including invoices and statements) so take care to get everything
correct (though you can edit them at any time).
Accounts Utilities > Edit Company Parameters
You can view or edit the next Folio/Invoice Number (page 75), and the Logo
(small picture) that prints at the top of reports. (page 75)
FOLIO NUMBERS
ABC automatically generates a unique Folio Number
for each transaction you enter. These folio numbers
then appear on all reports, audit trails, etc, making it
easier to track the transactions. There are 5 sets of folio
numbers:
SL - Sales Ledger Invoices
PF - ProForma Invoices
PL - Purchase Ledger Invoices (Unpaid Bills)
CB - CashBook entries
JN - Nominal Ledger Journal entries.
Normally you should not alter these during the year.
Check the VAT rates
Accounts Utilities > Rarely used > Edit VAT Rates
Whenever you enter a transaction into ABC you must specify which VAT
rate applies by selecting one of the following VAT Codes. Do not edit the
percentage rate unless the Government has changed the VAT rates.
Code
Rate
Notes
0
Zero rated goods
books, food; also exports
1
Standard rate (eg. 17.5%) most sales and purchases
2
Alternative rate 2
3
Alternative rate 3
4
EC zero rate
5
EC Standard rate
6
EC Alternative rate
E
Exempt from VAT
N
Not applicable
most EC sales and purchases
internal transfers, wages
Getting started
|
21
VAT General notes
There will be occasions when ABC queries the VAT Amount you entered
because it does not exactly agree with the expected amount.
a) If you have made a mistake, then change your entry.
b) If you had a valid reason for entering this VAT Amount (see next
paragraph), then you can select Continue.
Mistakes involving VAT
If you spot an error on the piece of paper you are entering into ABC:
(1) If you created this piece of paper (for example, a Cash Sale Receipt),
and no copies have been given to anyone else; then you can tear up
the paper and create a corrected version.
(2) If you have already sent someone else a copy of this piece of paper,
or if you are entering an invoice or receipt from a supplier; then you
must enter the incorrect figures into the computer exactly as they
appear on the paper.
Sales Invoices - cosmetic adjustment
VAT can be worked out line-by-line or calculated on the invoice total.
ABC uses the line-by-line method (as this allows you to mix VAT rates on
the same invoice), but humans usually use the invoice total method. Both
methods are acceptable, but could give slightly different results (eg.a few
pence difference). This may worry your customers if they check the invoice
using the other method.
ABC tries to be smart! If all lines on the invoice have the same VAT rate,
then the program will try to adjust the VAT total so that the line-by-line
method gives the same result as the invoice total method. The small
adjustment is made to the first line of the invoice. It should be stressed
that this is being done purely for cosmetic reasons; the VAT Inspector will
accept either method.
Cash VAT Accounting
ABC automatically allows for Cash-VAT-Accounting (the system where you
do not have to pay VAT to the government until your customer pays you).
There is nothing you need to do differently in ABC whether you use CashVAT or normal Accounting.
22
|
ABC6 User Manual
Print the VAT Return
You can choose a standard VAT Return, or the Cash-VAT Accounting
Return (which includes some additional pages showing how ABC arrived
at the results). In either case, you should check the figures carefully before
entering them onto your actual VAT 100 Form and signing it. page 68
A full VAT Audit Report can be printed, listing all the transactions
containing VAT within the date range you specify. VAT Returns can be
reprinted for past periods.
Notes for the VAT Inspector
ABC can produce an audit trail of everything that has been entered during
any specified period; and this can be printed on paper for easier inspection
or record keeping.
Every report has a separate column for VAT, with a summary at the end.
The ABC VAT Return lists VAT transactions during the period, followed by
details of any calculations or adjustments to those figures. Finally, the last
page shows the entries required on the VAT 100 form.
Please contact ABC Direct Sales if you have any queries or wish to discuss
ABC (page iv)
Getting started
|
23
Import from ABC5
ABC includes a function to import all the Accounts data from your old
version of ABC5. This process does not affect the ABC5 files at all, and you
could continue to use the old ABC5 for a while. This function can be used
at any time, and you can use it more than once if you wish.
If you have more than one Company in ABC5 then
first you must create a corresponding new Company in
ABC6 and then ensure you are in that Company before
using Import. You need to do the Import separately for
each Company.
Accounts Utilities > Rarely Used > IMPORT FROM ABC5
Select which of your old ABC5 Companies to import from (if you have more
than one). The Import process may take a few minutes if you have a lot of
history. While importing the data, ABC6 will check the records and will
skip any damaged or deleted records. Check the text in the progress box on
screen for a report on what has been imported.
24
|
ABC6 User Manual
3
Record cards
Add new Account Record Cards
Edit existing Accounts
Customers Stock Items Headings
ABC keeps a Record Card for each Customer Account, to store their name,
address, balance, history, notes, etc. The Record is split into several tab
pages (see example above). Similarly there is a Record Card for every
Supplier, Stock Item, and Nominal Account (Analysis Heading).
This chapter explains how you can view or edit existing records, add new
records, or print a record. Full details are given of the information that is
stored in each Record Card.
Record cards
|
25
Customer and Supplier Records
Supplier and Customer Record Cards are identical, so this section applies
to both. Select Sales Ledger for Customer Records, or Purchase Ledger for
Suppliers:
Sales Ledger > Customer Records
We talk about the Customer Record Card but an
accountant will probably call it the Customer Account.
(and a programmer might think of it as one Row in the
Customer Table.)
The list panel to the left of the Card allow you to find a particular customer
and then view or edit their Record Card.
(page 105)
Create New Customer Record
Select ADD from the ribbonbar. A blank Record Card is displayed. Fill in
the name and address details as explained below.
Edit or View Customer Record
Find the Customer Record that you require. Select EDIT from the ribbonbar
if you want to change anything (page 106).
Some Fields are updated automatically by ABC and you cannot change
them (eg. the Account Balance).
Details of each Field
The Customer (or Supplier) Record Card has Fields for the name, address,
credit limit, balance and other details. Each Record Card has several tab
pages containing groups of Fields (described below). Many of the Fields can
be left blank -- you can edit them later if required.
Field Name
26
Description and Notes
Account
Number
This is generated by ABC to ensure each customer has
a unique account number. You cannot change this.
Key
This is just a shortcut or nickname for the Customer
that you can use to quickly locate their Record.
Enter any code or abbreviation; or leave it blank and
ABC will fill in the first few letters of the name as a
suggestion.
|
ABC6 User Manual
Field Name
Description and Notes
Company
Enter the business name and address of the Customer
Name Address (Supplier). ABC will use this when printing
and Postcode statements, invoices or letters, so check it carefully.
The EC Field is a 2 character European Country code.
Telephone and ABC will use this when printing a list of Customers
Contact Name (or Suppliers) and Aged Debtor Lists.
Mobile
phone and
fax numbers.
Email address
Can all be left blank if not required.
Current
Balance
The total amount owing on this account at this
moment. You cannot directly edit this Field. When
you enter a bookkeeping transaction (for example
an Invoice or Money Received) ABC will update the
Balance.
Year to Date
The total amount of trading for the current
bookkeeping year, up to today’s date. ABC updates
this automatically.
Credit Limit
ABC will warn you during invoicing if the account
balance is approaching this Credit Limit (you might
then choose to ignore the warning..... that’s up to
you!). If you leave it blank (or set at 0) then ABC will
not check the Customers credit limit.
Previous Year
total
You can leave this blank. Or you can fill in an
approximate total of how much business you did with
this Customer (Supplier) last year (excluding VAT).
ABC will automatically update this Field during the
Year End.
Last Invoice
Month
ABC automatically updates this field with the
bookkeeping month number (eg 201103 for March
2011) of the last time you sent/received an invoice.
Last
Transaction
Leave this blank. ABC will keep this field updated
with the date of the most recent transaction for this
Customer (or Supplier)
Unallocated
and
Overdue
(indicators)
If this Customer (Supplier) has a money or credit note
item over 30 days old and not paid, the indicator will
glow red. Even if the Balance is zero because you have
entered their payment, the indicator will glow to show
that items are not yet allocated (marked paid).
Record cards
|
27
Field Name
28
Description and Notes
History or
Outstanding
The grid (table) will display the transactions for this
Customer (Supplier). You can choose OUTSTANDING
to see only the unpaid items; or HISTORY to see
everything. Right-Click an invoice to Zoom or reprint.
Note 1
A single line of text for your own use.
Note 2
A single line of text for your own use.
Note 3
A single line of text for your own use.
Memo
This can store a large amount of text (many hundreds
of lines).
Customer Ref
If the Customer refers to you by a code or account
number; you can enter it in this Field. This can be
printed on sales invoices.
VAT
Registration
The Customers VAT Registration number; as required
for reclaiming EC VAT. Can be left blank.
Delivery
Address
The Customer might have different addresses for
deliveries and for invoicing. ABC allows you to store
several different delivery addresses for each Customer.
Leave this Field blank -- ABC will automatically fill
in the code of the last Delivery Address used for this
Customer. (You can edit the Delivery Addresses while
producing a Sales Invoice).
Agent
For your use (or used by Sales Order Processing)
Type of
accounting
You can specify Open Item or Balance Forward
accounting for the Customer. The default is OPEN
ITEM (which is what most people prefer).
Settlement
Discount
Tick this box if you wish the Customer to be offered
your standard Settlement Discount on sales invoices.
See page for more details.
Cash with
Order basis
Tick this box if you do not want to allow this
Customer any credit (ie. they must pay cash for any
goods or services)
VAT Inclusive
prices
If you tick this box ABC will assume that all prices
entered when invoicing this Customer are VAT
Inclusive: ABC will then deduct the VAT to show the
Goods and VAT separately. This is useful if your goods
are marked with retail prices.
|
ABC6 User Manual
Field Name
Description and Notes
Price Group
The Stock System can store 3 different prices for
each item. When invoicing this customer Price1 will
normally be used. If you tick the Price Group 2 box,
or Group 3 box, then Price 2 or 3 will be used when
invoicing this customer.
Trade
discount
If this Customer nearly always has a trade discount
then you can enter the discount percentage here,
eg 10%. ABC will use this as the default when you
invoice this Customer.
Terms
For your use. eg. Strictly Nett. Payment within 30
days. These terms can be printed on Sales Invoices.
View or Print
While looking at a Customer (or Supplier) Record; you can view or print
a Statement (list of all unpaid items) or History (list of every transaction
-- you can specify a date range). Other options on the View/Print Menu are
address label, mail-merge letter, envelope.
If you want to print details of ALL (or several) Customers; then select a
Report from the Sales/Purchase Ledger Menu -- eg. to print Statements for
all Customers with outstanding items (page )
Reprint (or view) old Invoice
Right-click on an invoice in the History/Outstanding Grid, and select Zoom
to view or reprint.
Delete a Record
Edit the Customer (or Supplier) Record Card, and tick the box “Marked for
Delete” on their Options Page. The Record will not be removed immediately
-- ABC will wait until it is safe (from an accounting point of view) and that
may take a year or so. Customers that still have any outstanding item will
never be deleted.
To undelete a Customer Record edit the Record Card
and untick the MARKED FOR DELETE box on the
Options tab page.
Record cards
|
29
Analysis Heading Records (Nominal Ledger Accounts)
The Nominal Ledger is for details of vague things like assets, profit, VAT,
bank accounts. Also known as the General Ledger. (page 15)
ABC keeps a separate Record Card for each Nominal Account (Analysis
Heading), as shown below.
Create a new Nominal Account (Heading)
Select ADD from the ribbonbar. A blank Record is displayed. Fill in the
details (see next section).
It is very easy to add new Headings at any time, but not so easy to delete
them (without upsetting the Audit Trail). Our advice is to only add a new
Heading if you really need it.
Edit a Heading Record Card
Find the Record Card you require (page 105) and select EDIT.
You may find it useful to print a List of Headings on paper (page 68).
For hints and tips on editing Fields, page 106.
30
|
ABC6 User Manual
Details of each Field
Field Name
Description and Notes
Heading
Number
Also known as the Nominal Account Number, or Heading
Code. Each Heading Record must have a unique number.
Short
Description
A brief title for this Heading. This will be used where there
is not space for the full description (below). eg MTB Ladies
Full
Description
The full title for this Heading (Nominal Account) eg. Sales
of Mountain Bikes (Ladies Size)
Current
Balance
The total amount that is in the Account at this moment.
Only ABC can change this Field.
Month to Date
The total of all transaction entered into this Heading during
the current bookkeeping month. Only ABC can change this
Field.
Start of Year
Opening
Balance
The figure that was in this Heading at the start of this
bookkeeping year. This should be zero for all Trading
accounts (eg Sales, Purchase Expenses)
Budget
For your own use. For example; you can print a report
comparing actual balances with budget figures. Can be left
blank.
Debit or Credit Depending on the type of Heading this is; ABC displays
whether it is a Credit or Debit account. (only an accountant
could be interested in this)
Type of
Account
The Headings (Nominal Accounts) are divided into 9
categories or types. (page 16). ABC fills in this field
automatically.
Last Year
For the Trading accounts (eg. Sales) ABC keeps a note here
of the total entered into this Heading last year.
This Month
or All
Transactions
The grid (table) displays the transaction history for this
Heading. You can switch between viewing this months
transactions
Headings with Analysis CODES above 5000 are Balance
Sheet Headings and the Last Year figure becomes
the Opening Balance figure for this year; you are not
allowed to alter this.
Headings with CODES below 5000 are Trading
Headings and you can enter a Last Year total for
comparison or use it as a budget figure. You can edit
this.
Record cards
|
31
Delete a Heading Record
Select Delete from the ribbonbar. Some Heading Records cannot be deleted
because:
a) some Headings are used by ABC for automatic postings. These include:
1971 Sales Discounts
8395 Contra Payments
3971 Purchase Discounts
8411 Bank account 1
3981 Stock adjustments
8471 Petty cash tin
5111 Trading Profit C/F
8481 Money on Premises
5281 Opening Balance
9111 Purchase Control
8111 Sales Control
9211 VAT Control
8121 Stock Value
9221 PAYE Control
b) Headings that have an amount in the Balance Field, or which have
been used recently, cannot be deleted.
Also, the Group Title and Group Total for a Group, ie. Headings 1000,
1999, 2000, 2999, etc, cannot be deleted.
Although you cannot delete these Headings, you can
change the descriptions to better match your own
business.
32
|
ABC6 User Manual
Stock Record Cards
Introduction
Some people use the word Inventory instead of Stock.
Each stock item is given a Record Card in the Stock File to store details like
description, quantity in stock, and price.
Some businesses may not need a stock control system but you can also use
the Stock Records for keeping “text-only” Records to store commonly used
phrases or notes. These can then easily be used on Sales Invoices when
required.
For a proper Stock System to be useful, you must keep it up to date and
enter everything that goes in or out of stock.
The ABC Stock System has some more advanced features (generally hidden
away on the Options Tab Page). For example you can specify the Cost Price
and Markup percentage, and ABC will calculate the Selling Price (with and
without VAT). And you can ask ABC to warn you when invoicing if the
stock level of this item is getting low.
Stock System > Stock Records
Record cards
|
33
Add new Stock record
From the ribbonbar select ADD.
A blank Record Card is displayed, and you can fill in details of a new stock
item (see below). Give each stock item a unique Code.
The Stock Code can be used when creating a Sales
Invoice to call up a stock item into the invoice so
choose Codes that are meaningful and relevant to that
item.
Edit Stock record
Find the stock item you require (page 105) and select EDIT from the
ribbonbar.
Hints and tips on editing Fields, page 106.
The Stock Record Card has Fields for the description, cost price, selling
price, etc. These are spread across several tab pages, and described in the
following table.
When you SAVE the Stock Record, ABC can recalculate the Selling Prices
or Markup if you wish. You can set your preference on the Options tab.
Details of each Field
Field
34
Description
Stock Code
Any code or number. It must be unique. You will use this to
quickly call up the stock record; so we suggest you choose
codes that are short, meaningful and easy to remember. Up to
16 characters.
Description 1
and
Description 2
A description of the Stock Item. This can appear on printouts
and Invoices. The Description 2 Field allows you to have
an alternative description, perhaps for Price Lists or trade
customers.
Qty in Stock
The number of units you have in stock. ABC will
automatically update this Field; you cannot edit it directly.
|
ABC6 User Manual
Field
Description
Quantity on
Order
You can enter the quantity of units that you have already
ordered. This is to stop the computer constantly telling you to
re-order an item that is already on order.
Allocated
The quantity of units you have sold but do not have in stock
ie. on order and reserved for someone.
Location
It may be useful to specify a shelf or warehouse location.
Case
Quantity
How many units in one case or outer. You can leave it blank if
you don’t need this feature (or enter 1 )
Selling Prices
(Excluding
VAT)
The Selling Price excluding VAT. If you leave this blank, ABC
will calculate it from the Unit Cost price and the markup
percentage. You can have three different prices for each stock
item. (On the Customer Record you can specify which Price
Group should be used for that Customer: 1, 2 or 3.) page 29
Selling Prices
(Including
VAT)
The Selling Price including VAT. If you leave this blank the
computer will calculate it as above, adding on VAT at the
current rate dependent on the VAT CODE Field.
Case
Discount
Enter either a fixed amount or a percentage (eg. enter 5% )
Sales
Heading
Number
The default Sales Heading this item will be analysed under
when invoicing. (but you can change it)
VAT Code
Specify the VAT Code that normally applies to this stock item.
If you leave it blank, it defaults to Standard Rate.(Vat Code 1)
Sales Dept.
The default Sales Department Code this item will be analysed
under when invoicing.
History Page
This Page displays a table showing all transactions involving
this Stock Item. You can view just this month, or the full
history. You can also choose whether to only look at Invoiced
items, entries made using Stock IN or Stock OUT, or both.
Unit Cost
The unit cost excluding VAT. This is used for automatic
calculations and valuation reports. All quantities in the rest of
the Record Card relate to units.
Case Cost
If the units arrive packed in outers of 20 for example, then you
can use this feature. If you purchase units individually, leave
this blank (or enter the cost of 1 unit)
Supplier 1
and 2
You can note your main Supplier and a second source here.
This information is just a note for you. The computer does not
use it for anything; except to show on reports.
Purchase
Heading
Code
The default Purchase Heading Code this item will be analysed
under when entering purchases.
Record cards
|
35
Field
Description
Purch. Dept.
The default Sales Department Code this item will be analysed
under when invoicing.
Re-order
Quantity
When you need to re-order this item, how many units do you
normally order? This will be shown on the RE-ORDER LIST
Last-In Cost
For comparison when next you re-order.
Type of Stock
Item
A Stock Record can contain a NORMAL item (eg. some goods
or service; with a price); or just some text -- TEXT ONLY. The
difference is that ABC automatically adjusts the Qty In Stock
Field as you buy and sell Normal Items but does not do this
for Text Only Items.
Low Stock
Warning
When producing a Sales Invoice; ABC can warn you if the
Stock Item you enter is out of stock. This warning can be
turned ON or OFF for each Stock Record. If a Stock Record
is Text Only (see above) then the Low Stock Warning is
automatically turned OFF.
Minimum
Quantity
The lowest quantity of units that you require normally to have
in stock. The NEED RE-ORDER LIST will show you all Stock
Items where the Quantity in Stock is below this Minimum
Quantity.
Method
For your own use
Recalculate
Prices or
Markup.
You can specify whether you wish ABC to automatically
recalculate the Selling Price (from Cost Price X Markup) or the
Markup % (from Selling Price/Cost Price).
Month to
Date Sales
(MTD)
The number of units that have been sold this month, at each
Price Group. Normally you would leave this blank, and ABC
will fill-in the figures as you produce invoices.
% Markup
You can specify how much profit you wish to make on this
stock item and ABC will use this figure to calculate the selling
price (if you leave that Field blank). Alternatively, leave the
Markup % blank and ABC can calculate the percentage from
the Selling Price and Cost Price
Delete Stock record
From the buttons under the Record Card select DELETE.
If you have used (eg. bought or sold) this item recently, then it may be
better to wait for a while before deleting it (otherwise the Stock History will
have a gap).
36
|
ABC6 User Manual
4
Transactions
Enter details of payments,
receipts, banking, stock,
or create invoices
There are many types of transaction in your business, for example writing
out a cheque; paying money into the bank, buying something with petty
cash, or producing a Sales Invoice. To make it easy to enter the different
types of transaction, ABC has an appropriate entry routine to suit each type.
In general terms, if the amount of the transaction is more than a few pounds
you should have a piece of paper to prove that the transaction is genuine.
Figures on a computer screen are very neat, but the VAT Inspector and
Accountant prefer traditional bits of paper like bank statements, chequestubs, invoices, petty cash receipts. If you do not have a bit of paper, then
create one; write the details of the transaction onto a blank sheet, and put
that into your ring-binder. Every transaction entered into ABC is given a
folio number; (page 21) you should write this number onto the bit of paper.
We recommend you get into the habit of always doing this in some
distinctive way; eg. get a rubber stamp, or use a purple pen, and always put
the number in the bottom right hand corner of the document. This makes it
easy to check, and if you find a document with this number on it you know
it has already been entered into ABC.
When it comes to entering transactions into ABC, you can save time by
collecting together similar items and entering them as a batch.
Transactions
|
37
First thing to do is decide which type of transaction you are entering. Here
are the most common
Money Received - page 39
Invoice payments (for credit items, relating to a Sales Invoice)
Cash sales (miscellaneous non-credit items, eg till receipts) VAT Refund
from Government
Money Paid - page 45
Pay a bill (purchase invoice)
Cash payments (petty cash) (for misc. non-credit items) Including: Wages
to employees; NI, PAYE to government; Proprietor drawings; VAT
Return to Government
Internal Adjustments - page 51
Bankings (take Money on Premises to the Bank); Write a cheque for petty
cash tin; Opening Balances for Customers or Suppliers (Sales Ledger,
Purchase Ledger);
Opening Balances (Nominal Ledger);
Transfers (Nominal Ledger Journal)
Stock (Inventory) - page 55
Stock Value (enter results of Stock Take);
Goods In or Out.
Unpaid Bills (from Suppliers) (Purchase Invoices) - page 56
Sales Invoices - page 58
Create new invoice, or enter details of a handwritten invoice.
Also Credit Note, proforma Invoice, or Delivery Note.
Corrections (adjustments) - page 62
Everybody makes mistakes from time to time. When you spot something
wrong, simply enter a correction.
The following pages describe each type of transaction, and explain how to
enter it into ABC.
38
|
ABC6 User Manual
Money Received
Decide if this is
A. a payment for a Sales Invoice,
or B. a small miscellaneous sale (eg. via the shop till)
A. Payment received for an invoice
Sales Ledger > Customer Records
> Select the Customer > Receive Money
If you do not know the Customer name but have the
Invoice Number the FIND function has an option to get
the matching Customer record.
The normal procedure is to first enter the amount of money received (and
the date, payment method, etc). Then you can allocate this against one or
more invoices, to mark the items as paid.
However, you could just enter the money. Later you can mark items paid -by allocating Credit Notes, Opening Balances, etc against invoices. You can
part-pay any invoice.
Sometimes you may allow the Customer a Discount. And occasionally the
Customer will pay the wrong amount (eg. send a cheque for £34.12 instead
of £34.21). ABC makes it easy to handle these entries.
You can even make ABC automatically allocate any
receipts against invoices at month end and this brought
forward option can be set for just some customers. See
Page.
Enter money details
The entry screen for you to enter details of the money transaction is shown
on the next page.
ABC gives every transaction a computer Folio Number (eg. CB010027) as
you enter it, and you may want to make a note of this (eg. write it onto the
Bank Paying-In slip).
Transactions
|
39
Details of Fields for entering money received
Field
40
Description
Amount received
The amount of money received from the
Customer.
Method of
Payment
In what form was the money? page 104
Date of this
transaction
Today’s date is provided as the default; but you
can change to a different date. ABC expects
the date to be within the current bookkeeping
month; but you can put a future month if
necessary. You cannot use a previous month
date. page 103
Paid Into
Specify the Analysis Heading where this money
will be placed. Normally it should be the
MONEY ON PREMISES (for cash/cheques); but
could be a BANK (if Direct Debit etc). Page 103
Our Reference
A reference number or name (eg. the initials of
the person making this entry; or the number
from your bank paying-in book page)
Note
A description of this transaction. Can be left
blank.
|
ABC6 User Manual
Discount
If you tick the ALLOW DISCOUNT box, additional Fields appear to allow
you to enter and calculate a Settlement Discount for this payment.
The Customers account balance will be reduced by the Amount of money
they have paid, plus the discount.
Field
Description
Amount Received
The actual amount of money received from the
Customer.
Discount percentage
ABC displays this automatically (in brackets).
Discount
You can enter an amount here; or enter a
percentage (eg 3%)
Total
ABC calculates this figure automatically. This
is the amount by which the Customer account
balance will be reduced. You can play about
with the above Fields to get the Total to what
you require, and then tick the FREEZE box (to
keep the total fixed). Now you can adjust the
other Fields as required.
Allocate (mark invoices paid)
Select the Allocate tab page. This shows all unallocated items for the
Customer (Invoices, Credit Notes, Discounts, Opening Balances, Brought
Forward amounts, and Money Received).
These all need to be Allocated where possible -- for example, to mark an
Invoice as paid by allocating Money or Credit Note against it. This can be
done at any time. If you are using Cash VAT Accounting it is important to
Allocate as many items as possible before printing a VAT Return.
In the left column you can enter:
Y -- YES, PAID in full (Allocate this item)
P -- to Part-allocate (then you enter the amount to part-pay)
N -- NOT PAID (ie. cancel either of the above)
Transactions
|
41
It is this process that alters the Amount Outstanding
Field in the history/statements. When the outstanding
amount is zero; an item is considered paid. You can
also part-pay an item. If this Customer Record has
the Option set as Brought Forward the computer will
automatically allocate any money against the oldest
invoices during the next Month End.
As you Allocate each item the Allocated TOTAL will change. We
recommend you begin by allocating any money, credit notes and discounts
these all will decrease the Allocated Total. Now start allocating invoices and
any Balances Forward this will increase the Total. Stop when the Total gets
back to zero (ie. an exact match between money and invoices).
If you select SAVE when the Allocated Total is not zero, ABC will query
this, and offer you several alternatives to get rid of the discrepancy:
STORE AS BALANCE create a new Brought Forward item.
WRITE-OFF (as a Discount) useful for small amounts, eg. if a Customer’s
cheque is wrong by 2 pence.
ALLOCATE go back and try again.
EDIT MONEY go back to previous section and edit details of the
payment received.
Refund to a Customer
Treat this the same as Money Received from a Customer (see above) but
enter the amount as negative.
Contra Payments
If you owe a Supplier for an invoice, and they also owe you some money,
you can cancel one against the other to save you both having to write out
cheques (obviously they must also agree to this). This is known as paying
by contra.
You should enter both the Sales and Purchase sides of this transaction
at the same time, and the amount must be the same in both cases. (If the
invoice on either side is of a greater value, then just mark it part paid by the
smaller amount).
Use the special Heading 8395 for all Contra Payments.
42
|
ABC6 User Manual
B. Cash Sales income
ABC gives you great flexibility when entering CashBook income. You
can enter a batch of transactions (or just one) and then post these to the
accounts immediately. Or you could store the batch, and continue entering
at a later time (may be useful to let someone else check the entries before
they are made final). You can print the batch of entries on paper, before or
after finalising them.
Cashbook > Cash Income
You can switch between the previous batch and the current batch of
entries. When you finalise the current batch it is posted to the accounts and
becomes the previous batch. Only the current batch can be edited.
ABC generates a CashBook Folio Number (eg CB001234) for each item that
you enter. We recommend you write the Folio Number onto each receipt
or bit of paper as you enter them into ABC -- this makes it easy to crossreference from the Audit Trail later. page 21
The following Fields must be completed for each line.
Field
Description
Date
The date must be within this bookkeeping
month; or a future month. page 103
Analysis Heading
What was this amount for? Enter an Analysis
Heading CODE.
page 103
Transactions
|
43
Note
Imagine you are looking at a list in six months
time; and trying to remember what this entry
was for. The note will appear on the list; try to
type something meaningful.
Reference
For your own use. For example; the Bank PayingIn Book page number. Or your initials.
Amount
Enter the total amount (including VAT).
VAT Code
The VAT Code for this transaction. page 104
VAT Amount
Enter the Amount of VAT.
VAT Calculation: With the cursor in the
VAT Amount field; you can press F8 and the
computer will calculate the VAT amount for you
(at whatever rate you specified with the VAT
CODE).
Method
In what form was this money? Cash? Cheque?
Direct Debit? page 104.
Bank Heading
Where did you put this money? To your
Petty Cash Tin? or to Money on Premises
(recommended) for Banking later page 104
As you complete each line, the amounts are added to the Batch Total at the
bottom of the screen. You can Cursor up or down to move back and correct
any entries you have just made.
You can save your work and resume tomorrow, or finalise the batch
immediately.
The Summary Tab Page shows an analysis of the Headings you have used,
and the VAT split. You can print a Batch Report at the end. Some people
find it useful to print this list of what they have just entered, and store it in
a ring-binder with any associated pieces of paper (eg. till rolls).
VAT refund from the Government
Enter this as a Cash receipt, with VAT Code N (Not Applicable). The
Analysis Heading is 9211, and the Cash/Bank Heading is wherever you put
the money, eg 8481-Money On Premises or 8411-Bank.
44
|
ABC6 User Manual
Money Paid
Decide if this is a
A. Payment for an Unpaid Bill (Purchase Ledger Invoice), or
B. Small cash (ie. not “credit”) purchase.(eg. wages, VAT or tax payment,
petty cash for stamps or petrol)
A. Purchase Ledger Invoice payments
Normally it is convenient to first “tick” the unpaid bill(s) that you wish to
pay, and ABC will show the total amount of money. ABC does allow partpayment of invoices, and paying of several invoices at one time. You can
instead make an arbitrary payment to a Supplier.
A Remittance Advice Note and/or Cheque can be printed.
Purchase Ledger > Supplier Records
> Select Supplier Record > Money Pay
If you know the Invoice Number but can’t remember
the Supplier Name, you can locate the Supplier from
the invoice number.
.
The Allocate Tab Page shows a list of all unallocated items for the Supplier
(these can include Invoices, Credit Notes, Discounts, Opening Balances,
Brought Forward amounts, and Money Paid).
These all need to be Allocated where possible -- for example, to mark an
Invoice as paid by allocating a Money Paid against it. This can be done
at any time. (If you are using Cash VAT Accounting, it is important to
Allocate as many items as possible before printing a VAT Return.
In the left column enter:
Y -- YES, PAID in full (Allocate this item)
P -- to Part-allocate (then you enter the amount to part-pay)
N -- NOT PAID (ie. cancel either of the above)
Transactions
|
45
It is this process that alters the Amount Outstanding
Field in the history/statements. When the outstanding
amount is zero; an item is considered paid. You can
also part-pay an item. If this Supplier Record has
the Option set as Brought Forward the computer will
automatically allocate any money against the oldest
invoices during the next Month End.
As you Allocate each item, the Allocated TOTAL will change. We
recommend you begin by allocating any money, credit notes and discounts.
These all will decrease the Allocated Total. Now start allocating invoices
and any Balances Forward this will increase the Total. Stop when the Total
gets back to zero (ie. an exact match between money and invoices).
If you select SAVE when the Allocated Total is not zero, ABC will query
this, and offer you several alternatives to get rid of the discrepancy:
STORE B/F -- create a new Brought Forward item.
WRITE-OFF -- (as a Discount) useful for small amounts, eg. if you paid
three pence too much by mistake, this allows you to get rid of it
ALLOCATE -- go back and try again.
EDIT -- go back and change the money amount.
Arbitrary payment
If you wish to make an arbitrary payment to a Supplier, just enter this on
the Money Details tab page and then SAVE. You can Allocate it at another
time.
Print Remittance Advice or Cheque
You can print either of these at this stage. You cannot come back later and
print them.
If the printout does not match your stationery, it can be
customised to suit.
46
|
ABC6 User Manual
Details of the payment
The following fields must be completed:
Field
Description
Amount Paid
The amount of money paid to the supplier.
Method of Payment
In what form was the money? page 104
Date of this transaction
We suggest the date is within the current
bookkeeping month. page 103
Paid from Heading
Specify the Analysis Heading from where
this money will be paid. It must be one of
your Bank Headings. page 103
Our Reference
This might be your cheque number
Note
A brief comment about this transaction. Can
be left blank.
Discount
If you tick the ALLOW DISCOUNT box, additional Fields appear to allow
you to enter and calculate a Settlement Discount for this payment.
The Suppliers account balance will be reduced by the Amount of money
you are paying, plus the discount.
Transactions
|
47
Field
Description
Amount Paid
The actual amount of money that you pay to
the Supplier.
Discount percentage
ABC displays this automatically.
Discount
You can enter an amount here; or enter a
percentage (eg 3%)
Total
ABC calculates this figure automatically. This
is the amount by which the Supplier account
balance will be reduced. You can choose to
fix this total (play about with the above two
Fields to get the total to what you require and
then tick the FREEZE box) and then adjust the
Amount Paid and Discount.
Refund from a Supplier
If you need to enter a Refund from a Supplier, enter it as a payment but as a
negative amount, eg. -18.73
You cancel (stop) a cheque to a Supplier
Enter it as an arbitrary payment as described above but enter the amount of
the cheque as negative, eg. -35.12
Contra payments
If you owe money to a Supplier, and they also owe you some money, you
can avoid both having to raise cheques by simply cancelling your invoice
against theirs (obviously they must also agree to this). This is known as
paying by contra.
You should enter both the Sales and Purchase sides of this transaction
at the same time, and the amount must be the same in both cases. (If the
invoice on either side is of a greater value, then just mark it part paid by the
smaller amount).
Use the special Heading 8395 for all Contra Payments.
48
|
ABC6 User Manual
B. Cash Payments (ie. not “credit”)
These are small miscellaneous purchases (by cash, credit card, cheques,
etc) for example buying petrol, stamps, stationery at the local shop, paying
the window cleaner. You would also use this CashBook for entering details
of paying your VAT Return, proprietor drawings, cashing a cheque to put
money in the Petty Cash Tin, and paying Wages to employees (and Tax/NI to
the Inland Revenue).
You can enter a batch of transactions (or just one) and then post these to the
accounts immediately. Or you could store the batch, and continue entering
at a later time (may be useful to let someone else check the entries before
they are made final). You can print the batch of entries on paper, before or
after finalising them; and you can recall the previous batch of entries to
view or print.
Cashbook > Cash Payments
You can switch between the previous batch and the current batch of entries.
When you finalise the current batch it is posted the accounts and becomes
the previous batch. Only the current batch can be edited.
ABC generates a CashBook Folio Number (eg CB001234) for each item that
you enter. We recommend you write the Folio Number onto each receipt
or bit of paper as you enter them into ABC -- this makes it easy to crossreference from the Audit Trail later.
The following Fields must be completed for each line.
Field
Description
Date
The date must be within this bookkeeping
month or a future month. page 104
Analysis Heading
What was this amount for? Enter an Analysis
Heading CODE. page 103
Note
Imagine you are looking at a list in six months
time and trying to remember what this entry
was for. The note will appear on the list; try to
type something useful (example... Employee
name, description of item, reference number,
etc).
Reference
For your own use. Some useful reference. For
example; the Cheque number. Or your initials.
Amount
Enter the total amount (including VAT).
VAT Code
The VAT Code for this transaction.
page 104
Transactions
|
49
VAT Amount
Enter the Amount of VAT.
VAT Calculation: With the cursor in the
VAT Amount field; you can press F8 and the
computer will calculate the VAT amount for you
as specified by the VAT CODE.
Bank Heading
Where did the money come from? Petty Cash
Tin? Cheque from Bank? Credit card? page 103
As you complete each line, the amounts are added to the Batch Total at the
bottom of the screen. You can edit any entries you have just made.
You can save your work and resume tomorrow, or finalise the batch
immediately.
The Summary Tab Page shows an analysis of the Headings you have used,
and the VAT split. You can print a Batch Report at the end. Many people
find it useful to print this list of what they have just entered, and store it in
a ring-binder with the bits of paper (receipts) to form your Petty Cash Book.
Wages payments to staff; VAT or tax to Inland Revenue
Payments that you make to staff (paying wages), and payments to the
government (paying tax and NI, and VAT Returns) should be entered as
CashBook > Cash Payments. These are all VAT Code “N”.
Direct Debits/Bank Charges
Enter these and tick them off on your bank statement (to ensure you don’t
enter them twice). Use CashBook > Cash Payments for these items.
Accountants only seem to believe bank statements, so most prefer you
to enter these items only after you see them in black and white on the
statement. This may cause you to be a month behind in entering these
items. Check with your accountant -- we think they will still prefer this.
Standing Orders
You can store a list of regular transactions. Typically each month you call
up the list and tick those items you wish to process (post to the accounts).
ABC will stop you accidentally posting the same item twice in a month.
CashBook > Standing Orders
50
|
ABC6 User Manual
Internal adjustments/movements
These transactions take place within your business, ie. they are internal.
For example, getting money from your bank to put in your petty cash tin, or
making a correction for analysing an expense against the wrong Heading. In
all these cases the VAT Code is N (Not Applicable).
Transfers (Nominal Journal entries) should be the last resort -- use only if
you cannot find a better way of entering a transaction.
Bankings
Most of the money you receive (entered using Money Received in Sales
Ledger) is normally posted to the MONEY ON PREMISES Heading. It
remains there until you use BANKINGS to transfer it to the bank. You
should use the figures from your bank paying-in book to enter BANKINGS;
and put the bank paying-in book reference as the Note.
When you select BANKINGS, the screen will contain the following items on
each line. Generally you only enter a single figure for each type of money
(eg. total of cheques, total of cash).
The reason for this procedure is to make the computer Bank Report agree
exactly with your real bank statement, for easy reconciliation.
Cashbook > Banking
Start by selecting which Bank Account you have taken money to. Then
enter one or more banking transactions. For each line you need to fill in the
following columns:
Field
Description
Date
Must be in current Bookkeeping Month. page 103
Note
Any note or comment
Amount
The total amount of this batch of items; ie. the
amount shown on your bank paying-in slip.
BankBook
The reference number from the page of your bank
paying-in book.
Method
Type of items in this batch. eg Cheques? page 104
ABC generates a Journal Folio Number (eg JN001234) for each line. You
should write this on the Bank Paying-in book counterfoil, or on the bank
statement -- it helps cross-reference from the Audit trail.
Transactions
|
51
Bank Reconciliation
This allows you to compare your real bank statement with the ABC List of
bank transaction. Ideally they would agree exactly, but sometimes you will
find differences -- eg. a direct debit or standing order you have not entered
into ABC, or a cheque that didn’t get paid into the bank. These differences
need to be “reconciled”.
CashBook > Reconcile Bank
Typically you should tick off on the bank statement and computer screen
each item that appears on both. And then investigate any item on either list
that is not ticked.
Start by selecting a bank account. When you have finished, it may be useful
to print a list of unreconciled items on paper.
Writing a cheque for the petty cash tin
If you get money for the Petty Cash Tin by cashing a cheque at the bank,
enter it here:
Cashbook > Enter Payment
Opening Balance to Customer/Supplier
This function is normally used only when you set up a new Customer
Record. Note that the Opening Balance is simply a total amount of money
-- any VAT must be handled separately (page 19) For Suppliers, use the
Purchase Ledger instead.
Sales ledger > Customer Records
> Select customer > Opening Balance
Opening Balances (Nominal Ledger)
You can edit the Nominal Ledger Opening Balances for the current
accounting year.
Nominal Ledger > Direct Entries > Opening Balances
After editing the Opening Balances, ABC allows the option to write these
figures into the Headings (N/L Accounts) Records.
The Opening Balance Edit screen shows for each account (Heading)
whether it is a Credit or a Debit account, but you do not need to think
about this when setting the opening balance figure; just set each account
(Heading) to the opening balance figure it should be, for example set Bank
Account 8411 to eg. £3456.12 (unless it is overdrawn in which case you
would put a negative figure eg -£456.78)
You cannot exit from the Opening Balances Edit until the books are
52
|
ABC6 User Manual
balanced, ie. total Db = Total Cr.
When you run the Year End function (page 73) the Closing Balances for this
year can be used as the Opening Balances for next year.
These opening balances are stored in a separate file and you can edit them
without affecting your accounts. ABC will not let you exit until they are
balanced (ie. Total Db = Total Cr). You can choose to write these figures to
the accounts (to the Opening Balance fields of the N/L accounts. The N/L
current Balances are made up of the Opening Balance (at start of year) plus
transactions for this year to date.
Transfers (Nominal Journal)
Most Bookkeeping entries will be made through the Sales/Purchase
Ledgers or CashBook. The Nominal Ledger Journal should only be used for
those few adjustments or corrections that need to be made directly to the
Headings (N/L Accounts). We suggest you do not use Transfers unless you
cannot find any other way.
Examples of Transfers
Make adjustment required by Special VAT Scheme
Transfer money from current account to deposit account
Adjust Prepayments, Accruals, Depreciation
Correction of mistakes.
Nominal Ledger > Direct Entries > Journal (Transfers)
Each line is one complete balanced entry; the transfer of an amount from
one Heading (N/L account) to another. You need to fill in the following
columns.
Field
Description
Date
Must be in current Bookkeeping Month.
page 103
1st Heading
The Heading you are adjusting.
page 103
Adjustment
The amount of this adjustment. You can put a
positive or a negative amount. A positive amount
will increase the Heading’s balance. Do not worry
about “Debit” or “Credit” -- ABC takes care of all
that.
Note
Any comment or description of this entry.
2nd Heading
The balancing Heading. You are Transferring an
amount from one Heading to another -- this is
the other. ABC takes care of Debit and Credit and
ensures everything stays balanced. page 103
Transactions
|
53
The Summary Tab Page shows the effect of this batch of entries.
VAT normally is not involved in Transfers, because all you are doing is
making internal adjustments within your business.
The expressions Increase or Decrease the Analysis
Heading are translated by the computer to
automatically Debit a Debit Heading (for increase) or
Credit a Credit Heading (increase). Entering a negative
amount to Adjust a Heading will Credit a Debit
Heading, or Debit a Credit Heading.
Wages Summary
The calculations for wages must be done as a completely separate task,
either using the Inland Revenue Tax Tables and cards (or CD calculator), or
on a computer Payroll System (eg. the ABC Payroll). The summary can then
be posted to ABC Accounts here:
Nominal Ledger > Direct Entries > Wages Summary
This posts the total liability to the Balance Sheet (Heading 9221) after you
enter details of the wages, tax and NI totals.The totals are what you owe (to
the government and to employees.
When you come to actually pay these people (eg. write the cheques), use
the normal CashBook > Cash Payments for the individual payments (the
Analysis Heading for those should be 9221). (page 103)
An easier solution is to get our Payroll Module. Not
only does it do the calculations and produce all the
paperwork, but it can automatically make the postings
to the ABC Accounts system
Stock Value
ABC will display the computer’s value of your stock and you can enter a
New Value. Usually this should be based on a Stock Valuation report. This
figure can affect your Profit & Loss and Balance Sheet (and your accountant
may adjust the value for various reasons).
Nominal Ledger > Direct Entries > Stock Value
This entry will write the new Stock Value to Heading 8121 (Current Assets)
and the stock movement to Heading 3981 (Cost of Sales).
54
|
ABC6 User Manual
Stock (Inventory) transactions
Enter Goods In
Stock items received from suppliers.
Select Stock Record > Stock In
Enter Goods Out
Items you are taking out of stock for some reason (if you use Stock Codes
on Sales Invoices, those items are automatically taken out of stock by the
invoicing system).
Select Stock Record > Stock Out
Enter Stock Adjustments
After completing a Stock Take, you might find the actual number of some
items in stock is different to the computer figure. Use this function to
correct the computer by entering adjustments.
Select Stock Record > click on ADJUST tab Page
This function might also be used to enter Stock Opening Balances.
Transactions
|
55
Unpaid bills (purchase invoices)
Select the Supplier Record > Unpaid Bill
If you do not already have a Supplier Record for this Supplier, you can Add
one at the same time (page 26)
Enter the following details from the Supplier invoice:
Field
Description
Invoice Number.
The invoice number from the unpaid bill.
Date on the Unpaid Bill
The date as shown on the unpaid bill. It
does not matter if this date is not in your
current bookkeeping month; but ABC will
store the transaction in this months books.
Our Description
A few words to describe this purchase.
Invoice Total
The total amount as shown on the unpaid
bill. (including any VAT).
Amount of VAT
If this unpaid bill includes any VAT; you
must enter the exact figure that is shown
on the bill (even if the Supplier got their
calculations wrong; you must still enter
their figures).
Their Account number
If the unpaid bill shows an Account
number that the Supplier uses for our
company; then you can enter this here (it
will then be shown on any Statement or
Remittance advice).
Now analyse the invoice total against one or more Headings, on the
Analysis Tab Page. The following columns must be completed:
Field
Description
Analysis
Heading Code
Normally will be a Cost of Sales (3000 )
or Expense Heading (4000)
page 103
Description
A few words to describe this line.
VAT Code
Amount excluding VAT The amount (excluding
VAT) for this line Shortcut: If you leave the
Amount blank ABC will fill in the remaining
amount.
Often you may just analyse the item against one Heading, but up to 99
Headings could be used.
56
|
ABC6 User Manual
Before you can finish, the Goods Total shown at the bottom of the window
must agree with the figures you entered on the Invoice Summary tab page.
ABC generates a Folio number for the Unpaid Bill; you should write this
number on the invoice. It is a good idea to use a special colour pen for this
to allow you to see immediately if an invoice has already been entered.
Debit Notes
(a Credit Note received from a Supplier) Treat exactly as an unpaid bill, but
enter the Amounts as negative.
VAT-only Invoice
Sometimes you may have to enter an Unpaid Bill that contains only VAT. In
this case the Invoice Total will be the same figure as the VAT amount. You
still need to analyse this against a purchase Heading, but it doesn’t really
matter which one since the goods amount is zero. Put VAT Code 1.
To indicate to ABC that this is a special VAT-Only Invoice, tick the box on
the ribbonbar.
Update Stock
You can update your stock quantities while entering the unpaid bill. Tick
the box on the ribbonbar to cause the additional stock columns to appear.
(or untick the box if you do not wish to use this facility.
Transactions
|
57
Sales Invoices
ABC includes a full invoicing module (linked to the Stock System).
Invoices can have your choice of logo (small picture) printed at the top, and
if you want to print a Message (eg. Special Offers this week) at the bottom
of the invoice, a choice of attention grabbing borders can be used.
You can produce one or more proforma invoices for a Customer, and these
can later be edited, printed, turned into a real invoice or deleted. Delivery
Notes can be printed (from the Options tab of the Invoice).
Once an invoice has been “Finalised”, it is written to the accounts files and
cannot be changed any more -- but you can reprint it at any time (page 29).
Sales Ledger > Customer Records > select Customer > Invoice
If you currently have some part-finished or proforma Invoices for this
Customer you can select one of those, or create a new invoice
The Invoice Top contains these Fields
58
Field
Description
Account number
Invoice number
The computer fills these items into the
invoice and you cannot alter them here.
Invoice Date
This is the tax point for VAT. It must be
in the current (or a future) bookkeeping
month.
Supply Date
Useful as a note, for example the date
when the goods were supplied. Can be left
blank.
Your Ref.
Any note (eg. the Order Number or a
name). Can be left blank. This will be
printed on the Daybook. If you entered
anything in the NOTE Field on this
customer Record; it will appear here by
default.
Our Ref
Any note or reference (eg. Delivery Note
nbr.) or can be left blank. This will be
printed on Daybook.
Trans. Type
Any note describing this transaction. Can
be blank.
Sold By
Initials of salesperson; or any note. Can be
blank.
|
ABC6 User Manual
Delivery Ref.
Any note, for example the method of
delivery, or our Delivery Note Number.
Can be left blank.
Delivery Address
Defaults to as invoice address. You can
enter any different address here, or leave
it blank. Or click the button to select or
edit a stored Delivery Addresses for this
Customer.
Special Instructions
Can be left blank, or you can enter any
notes or instructions as required. If you do
enter a message here, you can enhance it
by printing an attention grabbing border
-- see the Message Border tab.
Notes
Any further notes or instructions.
Special Invoice types
You can modify the behaviour of an invoice in several ways, for example:
Cash-with-Order Invoice (if the invoice is being paid immediately). This
is just a short-cut to save you having to separately go and mark the
invoice paid later.
VAT-inclusive Prices. Instead of entering net price, and letting ABC add
on the VAT, the VAT-Inclusive Invoice takes the prices you enter as
already containing VAT; ABC will then automatically separate the
VAT and show it on the invoice.
VAT-only Invoice. Not a common requirement for most businesses, but
some companies need these (eg.import/export agent). This is an
invoice with zero value of goods, but an amount of VAT.
Invoice at Zero VAT rate. For certain categories of customers only.
1. The VAT-only option will override any other special
invoice selections.
2. Only the first line can be used, and the Amount is
taken to be the VAT (and put against VAT rate 1)
To specify one of these special types, see the OPTIONS tab page.
Transactions
|
59
Delivery Address
ABC allows you to store multiple delivery addresses for any customer. Click
the Delivery Address button on the Invoice Top/Bottom to view/edit/add
addresses.
Customer Reference
Several Fields from the Customer Record will be filled into the Invoice Top.
You can also use the last stored Invoice Top for this Customer as the basis of
the new Invoice -- see Options tab page.
Body of the Invoice
The body of the invoice can contain up to 99 lines.
Some lines may contain just descriptive text, and you can leave blank lines
between items if you wish (to make invoice prettier).
To make the invoice lines deeper, drag the line down
at the left hand edge of the Invoice. This lets you have
long item descriptions.
Use the mouse or cursor keys to move to the line you wish to change then,
to edit the line, double click, or press ENTER, or click EDIT.
Each line contains the following Fields.
Field
60
Description
Quantity
The number of these items you have sold.
Stock Ref.
A Stock Code. Enter ? to select from Stock File.
Leave blank if you don’t want an item from Stock.
Description
Enter a description of this item. If you have used a
Stock Code; ABC can fill in the Stock Description
here.
Unit Price
Enter the unit price of this item (excluding VAT
unless you are working with VAT-inclusive prices).
Discount
You can enter a trade discount that applies to this
line only. Either enter a figure; or a percentage (eg
3%). This discount can be positive or negative (ie. a
surcharge).
|
ABC6 User Manual
Amount
The net amount for this line (ie. excluding VAT
unless you are working with VAT-inclusive prices).
ABC can calculate this from the Quantity, Unit Price
and Discount.
VAT Code
Enter the CODE to specify which rate of VAT applies
to this entry line. page 104
Heading code
Enter an Analysis Heading Code. page 103
ABC will check each line and alert you to any problems. You cannot Finish
the line until you correct any errors.
While entering the lines you can right-click the mouse for editing functions
including Copy, Insert, Cut, Clear, or Paste lines.
When you have finished editing the invoice you have the options to print
a ProForma Invoice, Hold the Invoice (store on disk as a part-finished
Invoice), or Finalise the Invoice). The invoice can be edited or deleted at
any time until you Finalise it -- thereafter it cannot be changed. (It only gets
posted to the accounts when it is finalised).
Print the Invoice
A Part-finished Invoice can be printed as a Proforma Invoice. The proper
invoice can only be printed after it has been finalised. It is possible to
reprint old invoices at any time (page 29).
If you are entering details of hand-written invoices you may choose not to
print anything.
Delivery Advice Note/Estimate/Quotation
You can print any of these items by selecting from the Options tab page.
These are copies of the invoice but you can choose the words printed at the
top, and whether or not to show prices.
Credit Notes
Create an invoice as normal but arrange that the final total is negative. This
can be done either:
a) by entering a negative price and no stock code. This will not affect the
Stock File
b) by entering a stock code and putting the quantity negative. This will
put the items back into the Stock File (eg. if the Credit Note is for
goods returned to you).
Transactions
|
61
When this negative invoice is printed, the words CREDIT NOTE will appear
instead of INVOICE.
Settlement Discount
If you have ticked the Settlement Discount box (Customer Record -- Options
tab page) then your standard settlement discount terms will be printed on
the invoice. For example, 2% discount for payment within 7 days.
Link to the Stock File
You can call a description and price from the Stock File. This saves you
typing the information, and of course ensures the price is right. You will
find this useful even if you don’t need Stock Control at all, as you can store
lines of text that you often use on invoices -- see Page .
Enter a Stock Code on the Invoice (or select from the drop down list) and
ABC will fill in the description, price, VAT Code and Analysis Heading
from the Stock Record.
If you have entered a Quantity, then it will be deducted from the Quantity
in Stock Field on the Stock Record Card.
Picture (company logo) on Invoice
To make your invoices look more professional and businesslike, you can
print your company logo (or any small picture) at the top. Select the picture
or turn off this function on the Options tab page.
Message with border
You can print an attention-grabbing border around your message at the foot
of the invoice. The Message Border tab has several choices, including No
Border. If you do not enter any text in the Special Instructions box on the
Invoice Top/Bottom, then no border will be printed anyway.
Corrections and Adjustments
In general, you should always make any corrections or adjustments by
creating a new transaction, complete with a piece of paper. From experience
we have found this is the best way to keep Accountants and Tax Inspectors
happy, and to make it clear what you have done.
For example, if you invoice the wrong company or for the wrong amount
you can correct the situation most neatly by creating a Credit Note to cancel
the incorrect invoice. In the Reference Field of the Credit Note put the
Invoice Number of the original invoice.
62
|
ABC6 User Manual
5
Printing reports
Viewing lists, labels, summaries
on screen, paper, or to disk file
When you select any Report in ABC, it is first displayed on screen in
the Preview Window (page 112). This allows you to check the contents;
zooming in or out, and moving from page to page. Select PRINT if you need
to send the report to paper, and you can select a printer and maybe a range
of pages.
It is also possible to export Reports to a disk file, for example in PDF, CSV or
HTML format for use in other applications, websites or email.
Select File > Export > PDF, CSV, etc, from the Preview Window.
Reports can be viewed or printed at any time, and as often as you wish.
Plain paper is used for all printouts.
Many reports can be customised by setting options (page 112) to choose
a range of dates, sorted order, and other criteria. ABC can be set to
automatically print your choice of reports each Month and Year End.
In addition to the built-in bookkeeping reports, you can design your own
reports and labels to print information from the Accounts files or your own
files.
This chapter lists all the built-in bookkeeping reports, with a few notes
pointing out any unusual features or options
Printing reports
|
63
Sales (Customer) reports
You can select the following reports from the Sales Ledger Menu.
List Customers A list of Customers showing their company name
address telephone number etc
Customer
Statements
Normally you print Statements to send Customers
a reminder of unpaid items; but it may be useful
to also show items they have paid recently. ABC
gives you a range of options so you can choose
what to show on the Statement; and who to send
Statements to. Typically you would produce
Statements at the end of each month. Also note:
While looking at a Customer Record Card you could
produce a quick Statement for them from the View/
Print Menu.
Customer
History
Lists all transactions and you can choose a range
of dates and whether to expand invoices to show
full details or just show invoice totals. Also note:
While looking at a Customer Record Card you could
produce a quick History for them from the View/
Print Menu.
Aged Debtors
List of everything currently owing to you divided
into several age ranges. Telephone numbers are
printed making this a convenient list for chasing
overdue debts. Also shows “future” items (not yet
due).
Money
Received
A list of all money received in payment of sales
invoices. (Reminder that CashBook income -- eg
sundry cash sales-- are not included in this report
but can be found in CashBook Receipts page 70).
Sales Daybook List all invoices and credit notes. You can specify
a range of dates. This is one of the basic reports
required by your accountant and VAT Inspector.
Sales Audit
Trail
Unpaid
Invoices
64
|
Like an expanded version of the Sales Daybook but
the Audit Trail also shows every line from each
sales invoice (you can select the range of dates). It is
mainly useful for tracking errors or auditing.
A list of invoices not yet marked as paid (as of
today’s date). To mark an invoice as paid you
Allocate money (or Credit Notes) against the
invoice. (page 41)
ABC6 User Manual
Re-print (or view) old Sales Invoice (Zoom)
At the Customer’s Record Card go to the Balance Tab page and see a list of
their old invoices (use Outstanding or History option). Right click on the
old invoice and select ZOOM (or reprint)
Letter, Label, or Envelope for one Customer
At the Customer’s Record Card choose the item you require from the View/
Print Menu. ABC can then automatically fill-in their address on the label,
envelope or letter. You can edit these items and customise them with your
own logo or picture
Letter or Label for all Customers
Use TYPING > MAIL-MERGE (page 91) to print letters.
Use FILING > LABELS (page 85) to print sheets of labels.
Purchase (Supplier) Reports
You can select the following reports from the Purchase Ledger Menu.
List of
Suppliers
A list of your Supplier’s company name address
telephone number etc.
Supplier
Statements
List all outstanding items for each Supplier. Also
note: While looking at a Supplier Record Card you
could produce a quick Statement from the View/Print
Menu.
Supplier
History
The Supplier History Report lists all transactions and
you can choose several options. Also note: While
looking at a Supplier Record Card you could produce
a quick History from the View/Print Menu.
Aged
Creditors
List of everything you currently owe divided into
several age ranges. Future items (not yet due for
payment) are also shown.
Money Paid
Purchase
Daybook
A list of all money paid against Purchase Invoices
(Unpaid Bills). You can specify a range of dates. (This
report does not include any petty cash payments
made through the CashBook. These are shown in
CashBook Payments report (page )
A list of all Unpaid Bills (Purchase Invoices) and
Debit Notes entered during the range of dates you
specify. This is one of the basic reports required by
your accountant and VAT Inspector.
Printing reports
|
65
Purchase
Audit Trail
Unpaid
Invoices
Like an expanded version of the Daybook, but the
Audit Trail also shows every line from each Purchase
Invoice -- you can specify a range of dates. Mainly
useful for tracking errors or auditing.
List of items not yet marked as paid (as of today’s
date).
Zoom (view or print) an old Unpaid Bill
At the Supplier’s Record Card right-click on an old invoice and select
ZOOM (to view or reprint)
Letter, Label, or Envelope for one Supplier
At the Supplier’s Record Card choose the item you require from the View/
Print Menu. ABC can then automatically fill-in their address on the label,
envelope or letter. You can edit these items and customise them with your
own logo or picture.
Letter or Label for all Suppliers
Use TYPING (MAIL-MERGE) (page 91)
Use FILING (LABELS) (page 85)
66
|
ABC6 User Manual
Stock Reports
You can select the following reports from the Stock System Menu.
You can use the stock File to store bits of useful text
which can be called up when invoicing to save you
time and typing effort. These text-only Stock Records
will not appear in the following reports. (page 33)
Stock List
List of all your stock items showing their
location quantity in stock on order and
allocated and price.
Stock Valuation
List all stock items showing the quantity in
stock and the cost price. These figures are
multiplied together to get the value of that
stock item and at the end of the report the
total value is shown. It is a good idea to print
this report at the end of each month and then
enter the stock value into the Accounts.
Blank Stock List
List of all stock items showing the quantity
that the computer thinks you have in stock
with a blank space for you to enter the
actual figure. Print this list whenever you
need to check your stock figures (stocktaking or inventory). By using this list you
will ensure that you do not overlook any
stock items. When you have completed the
stock-take, compare the computer stock
quantities with the actual figure and enter
any ADJUSTMENTS into the computer.
Stock Sales
Shows how many of each Stock item have
been sold this month this year and the
average per month. This is a useful guide to
help estimate what minimum stock levels
and re-order quantities should be, and see
which items are selling well.
Price List
List of all Stock item descriptions and selling
prices. Prices are shown with and without
VAT, and the price list can be printed for
Price Group 1, 2, or 3.
Printing reports
|
67
Stock Audit Trail
Full Audit Trail of all stock movements in or
out for the range of dates you specify.
Needing Re-Order
Shows items where the Quantity in Stock
is below the Minimum Stock. Re-order
Quantity is calculated using:
Reorder Qty = Reorder Qty
+ Allocated Qty – Qty on Order.
Nominal Ledger reports
You can select the following reports from the Nominal Ledger Menu.
List of
Headings
Also called the Chart of Accounts. A list of all
your Analysis Headings showing the Analysis
Code and the type of each Heading (ie Debit or
Credit). It also shows the overall structure of
the way you are analysing your business. Your
accountant will find it useful to keep this handy
when checking other Bookkeeping reports.
Trading (P&L)
Also called the Profit & Loss Report. This shows
all Sales Purchases and Expenses during this
period and then a calculation of your Gross Profit
and Net Profit. Can give you an overall picture
of the business and an idea as to which parts are
making money and where you are spending most
money. You can alter the layout of this report by
changing the sub-title and sub-total Headings.
Trial Balance
Lists all Nominal Accounts. The total of debit
accounts should be the same as the credit account
total if your books are in balance.
Balance Sheet
This produces a working Balance Sheet. If you are
an expert at accounting and have entered prepayments, accruals, depreciation, etc into ABC
then this report could form the basis of the Final
Balance Sheet for a small business.
Audit Trail
(Heading
History)
List of all transactions in the order in which they
were entered into the system. This is mainly
useful for error checking.
Bank
Reconciliation
68
|
Can be printed from the Bank Reconciliation
function (page 52).
ABC6 User Manual
VAT 100 Report (VAT Return)
You can print a VAT Return for any range of previous months, and choose
normal or cash VAT Accounting. You should print this report after doing
the Month End for the last month in your VAT quarter.
Nominal Ledger > VAT Reporting System > VAT Return
The options Tab Page allows you to
specify the range of months, and also
to choose whether to include a VAT
Audit and lists of unpaid Sales and
Purchase invoices (the VAT on these is
not included in the Cash VAT Accounting
system so it is a good idea to check for
mistakes).
You must check that these figures appear
correct (you should have a rough idea of
the total sales, total purchases, etc month
by month) and then fill in these figures
on the VAT Return form. Keep the printed
report in your ring binder.
You must sign the VAT100 Return form to say that these figures are correct,
and it is no defence to blame the computer if they are drastically wrong. If
in doubt, consult your accountant.
If the end of a VAT period does not coincide with the
end of your accounting year we recommend you ask
your local VAT office to adjust your VAT period so it
does match your bookkeeping periods. Check with
your accountant of course, but it makes life easier for
everyone and avoids extra calculations at year end.
VAT Audit
This report lists all transactions involving VAT.
Nominal Ledger > VAT Reporting System > Full VAT Audit Trail
Special VAT Schemes
Some VAT Schemes require an adjustment to your accounts at the end of
the VAT quarter. You must enter this adjustment (using Nominal Ledger
Transfers), and ensure that you only enter it once.
Printing reports
|
69
CashBook Reports
You can select the following reports from the CashBook Menu.
List of Receipts
You can specify a range of dates and this report
will list all CashBook Receipts (eg. sundry sales)
entered during this period.
List of Payments This could form your Petty Cash DayBook.
Specify a range of dates and this report will list all
CashBook Payments made during this time.
List of Bankings A list of all Bankings entered during the range of
dates you specify. Each bank account is shown
separately. This report should contain the same
items as the bank Statement you receive from your
bank -- making it easy to compare the two looking
for errors and omissions.
Bank Statement
Similar to your real bank statement this report
shows a list of all Receipts and Payments to a
bank.
Design your own
Print a Report or sheets of Labels
You can use FILING to design your own reports or labels to print data from
the Accounts files. This is a safe function to use, and can not affect your
accounts data. page 86.
Print a single label, envelope, letter or statement
While looking at a Customer (or Supplier) Record Card you can quickly
print an envelope, letter, label or statement from the View/Print buttons on
the ribbonbar.
70
|
ABC6 User Manual
6
Month & Year End
Closing each Month
Closing the accounts Year
General Notes
At the end of each month you must use the Month End function to close
your accounts for this month and set the current bookkeeping month to the
next month.
Run the Month End
Accounts Utilities > Month End
Once you have got used to the system you might find it helpful to draw up
your own Month End Check List and tick off each item as you do it. Here is
an example:
Month End Check List
RR Enter all petty cash purchases
RR Enter all bankings
RR Enter Standing Orders, direct debits, from the bank statement.
RR Look through bank paying-in book to ensure all cheques have been
entered and invoices marked paid
RR Print Customer statements
Month & Year End
|
71
Hints & Tips
ABC will encourage you to make a Snapshot or Backup at Month End.
Before doing the Month End you normally should check that you have
entered all the petty cash purchases, bankings, standing orders, etc. If you
have any online transactions or PayPal purchases, remember to enter these
as well.
Many people wait a few days after the end of a calendar month before
doing the ABC Month End, to allow for late arriving Purchase invoices to
be entered. This is OK, but we suggest you do not wait too long -- 7 days
should be ample. Anything that arrives after that can be posted into the
following month accounts.
If you print Customer Statements just before you do the Month End, you
will get different results to if you print them just after Month End (ie. when
all transactions are then shown as being another month old). Decide which
suits you best.
You can set ABC to automatically print a selection of reports on paper
as part of the Month End process. (These days many people do not print
anything at all on paper at Month End. ABC allows you to print reports
later, as required. The exceptions are Balance Sheet, Profit & Loss, and
Aged Debtors/Creditors -- these cannot easily be reprinted later, so do print
them at Month End if required).
If this is the last month of your financial year, then you should run a
Year End immediately after doing the Month End (ie. do enter any more
transactions before you do the Year End).
72
|
ABC6 User Manual
End of Year
At the end of your accounting year, immediately after running the Month
End, you must run the YEAR END function.
Accounts Utilities > Year End
This moves This Year figures into the Last Year boxes, and sets This Year
totals to zero. In the Analysis Headings, the Trading Accounts are set to
zero, and the Profit/Loss for the year is carried into the Balance Sheet (you
might adjust this later when your accountant gives you his figures).
As part of the Year End process, you should print certain reports on paper
that cannot be printed at any other time. These include:
Trial Balance
Profit & Loss (Trading) report
Balance Sheet
Aged Debtors/Credits reports
Hints and Tips
Take a copy of the Letter to the Accountant (page 74) with your books when
you take them to your accountant.
Your accountant does not need to go near the computer in order to audit
your books, or prepare your Balance Sheet and end of year results.
However, we have often supplied accountants with a copy of ABC so they
can receive your books on a USB stick or flash drive.
Month & Year End
|
73
Letter to the Accountant
Dear Accountant,
The ABC Accounts software is mainly a bookkeeping system intended
to make life easy for a small-business owner who does not understand
accounting.
Throughout the package we have tried to use non-accounting words. For
example, instead of Nominal Account we have used the term analysis
heading. Similarly, the operator does not need to know anything about debit
and credit; the computer takes care of this side of things, and always keeps
the books balanced.
We even suggest that if the operator has no idea about accounting they
can virtually ignore the balance sheet and just take care of the trading side
of the business; ie. invoicing, paying bills, sending statements, entering
receipts and payments. The more complicated balance sheet side can be left
to you, the accountant.
A likely scenario is that the user will have entered everything into ABC
during the year, but that the opening Balance figures have probably not
been set -- the result being that the computer Balance Sheet and Trial
Balance totals will need adjustment. (ABC is a full double-entry accounts
system, and in the hands of a knowledgeable person it could produce final
accounts).
ABC can print a wide range of Daybooks, Audit Trails, Money Paid/
Received, and other reports. Most of these can be produced for a range of
dates (eg. the whole accounting year, or a particular few days), and a range
of Headings (ie. nominal expense codes). ABC generally retains accounts
data for several years, so you can ask the user to print out (for example),
all telephone expenses for last year, or proprietor drawings during JanuaryMarch two year’s ago.
Tell the user what you need. If they need assistance to find it, they will ask
us. If you request something that ABC cannot produce -- we will work to
very quickly enhance the software so that it WILL do it.
It is likely you will need to work out depreciation, prepayments, stock
adjustments, etc. You may give these adjustments to the user to enter into
their ABC Accounts, to bring the computer into line with your real world
figures.
If you’d like to discuss this further, or suggest any improvements for this
Accounts Package, please contact us
(see page iv at front of this book)
74
|
ABC6 User Manual
7
Customise ABC
Edit company parameters,
Extra Companies, Passwords
This Chapter describes how to set your own Passwords, create or delete
additional sets of accounts (you can run more than one business with this
copy of ABC), edit your Company Address details, and specify the next
Invoice Number or other Folio numbers.
Edit Company Parameters
Accounts Utilities > Edit Company Parameters
Choose the appropriate tab to view or edit any of the following:
Company name and address
Fill in your company address details. These will be printed on invoices,
reports, envelopes, etc, so check carefully.
Logo (picture) for top of reports
You can choose to print a picture at the top of reports (usually your
company logo). This feature can be turned off.
If you don’t have a suitable small picture file contact us
for advice. The file should one of the following formats:
.JPG .BMP .GIF .WMF .ICO. Maximum filesize is 50K.
We suggest creating the picture about 7cm wide by
3.5cm high and about 72dpi. Store the picture in the
ABC company data folder. eg. for Company A it is \
ABC6\A_DATA.
Customise ABC
|
75
A similar picture or logo can be printed at the top of Invoices and
Statements. You can use the same picture for all, or choose different
pictures. To set the Invoice or Statement logo, see the Options tab when
printing an Invoice or Statement.
Folio & Invoice Numbers
Do not change the Invoice or Folio numbers without good reason.
Accountants are suspicious of daybooks or audit trails that have gaps in the
numeric sequence.
There are several sets of Folio Numbers. page 21
Settlement Discount
If you are foolish enough to offer customers a Settlement Discount, you can
enter the details here. (We generally advise against settlement discounts
because they work out so expensive to you). On the Customer Record
Options tab you can set the default to always allowing them a settlement
discount, but can still change this for individual invoices.
Accounting Year
Set the start month and end month of your accounting year. Normally you
would have 12 months in your accounting year, but this is not compulsory.
It is a bad idea to change the current accounting month once you have
started using ABC. If you feel you need to do this, please contact ABC
support to discuss it -- we usually can suggest alternatives.
Passwords
You may not want everyone who walks past your computer to be able to
view your accounts or delete records. ABC can restrict access to people who
know the correct password.
Accounts Utilities > Edit Passwords
The Passwords tab page has a box you can tick to turn the Password System
On or Off. A table shows all your Passwords.
For each line you can enter:
76
Password
Up to 6 characters
Note
Any note about this password (can be left blank)
Level
1 to 9. (9 is the highest some numbers not used).
|
ABC6 User Manual
You can have up to 20 different passwords, and each can be set to a level
between 1 and 9. The different levels of password allow access to various
parts of the package as follows:
Level
Access permitted by this level
1
Cannot clear or delete files or records. Cannot access
Bookkeeping; Payroll; or secured files.
2
Cannot delete files. Can make entries into Bookkeeping;
but not view Profit/Loss or Bank. Cannot run Month
end. Cannot access secured files. Cannot run Payroll.
3
Can delete files. Cannot run Month end. Cannot run
Payroll. Can view secured files.
4
Can do most things including Month End and Payroll.
Cannot change passwords or zero accounts; or use
Filing to edit accounts.
9
Full access to everything; no restrictions
If you want to set the same level for all areas, just set the last column -- the
rest of the columns will then be set to that level.
At least one Password must be the highest level for the Utilities area (since
this is necessary for editing the Passwords).
You can turn OFF the Password security system in ABC, and then you will
never need to Log-On (also, anybody could view or edit your accounts
files). Or you can set up a complicated set of different Passwords, each
allowing access to just some areas of ABC; for example the ability to view
(but not change) Sales Invoices, and full access to CashBook.
If you are the only person using the computer, it still might be a good idea
to give yourself a top level password (that allows access to everything).
Then a visitor or friend could not casually view your accounts by mistake.
Take care that if you allow someone to access FILING, this could allow
them to also view the Accounts files.
Each Company you set up in ABC will have its own set of Passwords.
Customise ABC
|
77
Other Companies
ABC allows you to do the bookkeeping for up to 26 different Companies,
and we have been imaginative and called them Company A, Company
B, etc. Each will have its own folder on the hard disk, and there is no
interaction between the different sets of accounts.
Accounts Utilities > Other Companies
The top of the screen always shows the Company Name of the set of
accounts you are working on. If you change any account options, or use
Snapshot, Month End, etc, you are only affecting this one Company.
You can quickly switch to a different company (but first close down
whatever function you are using). Just Log-Off and then when you Log-On
you can choose which company you require.
Create new Company
You can create new companies here. The first thing you should normally do
after creating a new company is to follow the procedure for setting up the
accounts. page 13.
Delete a Company
An unwanted company can be deleted. Everything associated with that
company will be erased also, including any Snapshots, text files, your own
data files, report formats, etc. Do not proceed unless you are sure. If in
doubt, make a Backup first. (Not a Snapshot).
You cannot delete Company A.
Other functions
Some other functions are provided, for example to copy accounts files from
one company into another.
You can view a quick summary of each company.
78
|
ABC6 User Manual
8
FILING
Create your own Files
Design and Print Reports and labels
The Filing option on the Main Menu is a simple database and report
generator that allows you to store and edit your own information, and print
lists, reports, and labels to your own design.
Filing can also be used (password permitting) on any of the ABC account
files.
ABC stores its data in MS Access type databases. This
does mean FILING can be used to view data in .MDB
databases created by other programs. Also note: We
refer to “files” but in MS Access they are called “tables”
Open a File
Filing > Open a File
Select which database you require -- Accounts Files, Filing (your own Files).
or any other MS Access type .MDB database. A list of Files (Tables) in that
database is then displayed for you to select from.
You can view the Records in two different ways. Either as a Record Card
(one Record at a time, as in older versions of ABC) or a Grid (Table), (each
Record occupies one line). Switch between these views at any time.
In the Record Card view you can use the Select Record functions (page 105)
and you can click Edit, Add or Delete on the ribbonbar. Before being
allowed to edit an Accounts File you need to enter a special password
(obtainable from ABC Direct Sales). After editing, choose Save or Cancel.
While using Grid View, scroll up and down, click on column headers to
sort into order, select groups, or rearrange columns (page 108). The Grid is
FILING
|
79
similar to a Spreadsheet, and you can simply click in a cell and edit it. Add
a new Record by typing into the blank line at the top of the Grid.
Customise a File
You can change various properties of the Record Card to make it better suit
your requirements. This includes adding or deleting Fields, changing the
size or type of Fields, renaming Fields, and specifying which Fields to use
for printing address labels. You can set a Field to be “auto-number” (eg.
useful for serial numbers) or “auto-date” (fills in today’s date whenever you
edit the Record).
Open the File, and then from the ribbonbar select EDIT PROPERTIES.
Take care before using this powerful function. For example if you delete a
Field you will destroy all information contained in that Field throughout
the File.
The properties are displayed in a Grid, and you can edit any of the details.
Right-Click to Add or Delete a Field.
It might be useful to print these properties before and after changing
anything. Click the Print Record Properties (or see next section).
It is a good idea to set the FieldNames and FieldTypes BEFORE you start
creating Reports and MailMerge Letters that use this File (Otherwise when
you change a Field’s Name you need to also change every Report or Letter
that contains this Field).
80
|
ABC6 User Manual
For each Field you can set these properties:
Notes
Field Name
Must be unique within this File. We also suggest
you keep it unique within your database -- the
easiest way to ensure this is to prefix each Name
with an abbreviation of the File Name. eg. if the
FIle is called Dog Club Members we’d suggest
Field Names like dgmBREED dgmOWNER
dgmTELEPHONE. Names must not include
spaces or other punctuation. But the underline is
allowed.
Field Types
The default type is Text but you can set various
other types such as Date or number (long Integer
is a number with no decimal places). You can
also (see table below) specify a Field to be “autonumber” (eg to increment Membership Numbers)
or “auto-Date” (today’s date is filled into a Record
whenever you edit it.
Field Length
Text Fields default to 50 characters long but you
can set a maximum length of 255. Be generous
with the Length for Text; it is better to set it a few
characters bigger than too small. Numbers and
dates are stored in compacted form so ABC may
set the Length to the correct required value.
Format style
The default is “None” but you can specify that
ABC formats a Field to Uppercase (capitals) or
other style.
Order of Edit
This sets the order in which Fields are displayed
on screen in the Record Card View. The top field
Order of Edit is 1 then 2, 3, etc.
FILING
|
81
Other properties that can be set
(ABC will have set these to a default value, but you can change them at any
time).
Description
Unique Field
If a Field will have a unique value for each Record
in the File specify the FieldName as the Unique
Field (ABC then uses it as an Index). For example
the Customer File has the Account Number as the
Unique Field.
Find Field1
Find Field 2
Find Field 3
Specify three Fields (enter FieldNames) you want
to use to locate Records when you are in the
Record Card View.
Label Line 1
Label Line 2, 3
etc
Specify the FieldName you want to print on line 1,
line 2, line 3, etc of an address label or envelope.
From now on you can simply click Print Envelope
(or Label) and ABC will know which Fields to use.
Auto Number
If you want to set a Field as “auto-number” enter
the FieldName. When you then ADD a new
Record ABC will lookup the last number entered
in this Field, increment it by 1, and fill it into this
Field for you.
Auto Date
If you want to set a Field as “auto-date” enter the
FieldName. When you then EDIT any Record ABC
will fill today’s date into this Field.
Print Record Properties
This will produce a printout of the Record Card layout showing the Fields
(names, size, type) etc. Useful to document your Files.
Open a File, and then from the ribbonbar select:
Print > Record Properties
Design your own File
You can create new Files as needed, to your own design. The way to do
this is to choose an existing File to copy as the basis for the new File (the
existing File is not affected at all). ABC does have some sample Files to get
you started. You can then customise this new File by adding or removing
Fields, renaming Fields, etc.
82
|
ABC6 User Manual
Copy a File
Open the File, and then from the ribbonbar select
Tools > Copy this File
Give a name for this new FIle. It will be created in the same database as the
original File.
Import or Export data
A common method of storing data in disk files is in standard ASCII
(pronounced Ass Key) text files. Most software products can read and write
to this type of file, so it has become a universal method of transferring
information.
The most common format is the comma delimited ASCII file. (usually with
a .CSV file extension).
ABC allows you to read (import) or write (export) ASCII files in a variety of
different formats.
Open the File, and then from the ribbonbar select
Tools > Export
(or Import )
Import an old ABC5 File
Filing > Create New File > Import from ABC5
This function will read an old ABC5 file and create an equivalent new File
in ABC6 in the Filing Database. All the records are automatically copied
into the new File. This does not affect the old File at all.
Because ABC5 cannot provide a name for each Field, ABC6 calls them
Field1, Field2, Field3, etc. One of the first things we recommend you do is
to Customise the new File (page 80) and set the Field Names to something
meaningful (eg. CompanyName, Telephone, Postcode). It is a good idea to
do this before you start designing reports or mailmerge letters because these
require you to specify the Field Names.
Global Change
This most powerful function allows you to specify a change to a Field of the
current File. The same change can then be performed to all (or a selected
group of) Records in the File.
Open the File, and from the ribbonbar select Global Change
Specify which Field you want to change and enter details of the new
contents for the Field -- this can be a calculation. Also decide which
Records in the File should be affected. A SQL Wizard can help you enter
FILING
|
83
quite complicated selection criteria.
ABC will allows you to test the change (and see how many records will be
affected) before you finally start the Global Change in operation.
Global Change has a box you can tick if instead of changing records, you
wish to Delete the selected records.
Clear a File
All Records are removed to leave you with an empty File. The data is
permanently deleted, so ABC makes sure you wish to proceed.
Open the File, and from the ribbonbar select Clear File
Delete a File
The File will be completely erased from the database, and its contents
permanently erased -- so ABC makes sure you wish to proceed..
Open the File, and from the ribbonbar select Delete File
Designing a report by dragging fields into position
84
|
ABC6 User Manual
Design your own Reports
The ABC Report Designer allows you to choose a data File, select some of
the Fields and position them on the report layout, and specify Grouping of
Records and Sorting Order. You can enhance the Report with a picture (eg.
company logo), Heading and Footer, and specify various types of calculation
to produce totals.
Experts can edit SQL statements to select Records from
joined Tables. ABC has a SQL Wizard to help.
You can use the Accounts Files in your reports, giving you the ability to
create your own accounting reports to meet your requirements. You can
Save Reports and simply Load one when you want to print it. Reports can
be previewed on screen, printed on paper, or sent to a PDF, HTML or Text
File on disk.
Filing > Report Printing
From the File Menu at the top, choose OPEN (an existing report) or NEW
(create your own). Beginners can simply Open and Print a report that may
have been created by a more experienced person.
The bottom half of the screen is the body of the report, where you can drag
Fields and Labels around as required. But first you need to tell ABC which
File(s) you want to use, and which records from those Files. It is best to
work logically through the following steps in order.
Step-by-Step report Design
As you complete one step, it sets up parameters (eg. a list of Fields) that you
can use in a later step.
1. Choose a database. The options are Accounts (contains all the
bookkeeping files) or Filing (contains all your own files you may have
created or imported).
2. Specify which Files (Tables) to use. For the simplest report, just click
on one of the displayed File names. If you are more experienced you
can enter a SQL expression (the SELECT clause) to link (join) more
than one Table together.
3. Filter the Records. If you do not enter any filter conditions, then all
records will be used. Filters are created by using a SQL expression,
and ABC includes a Wizard to make this a little easier. You can set
FILING
|
85
the report to ask the user to enter a parameter at the time the report is
run. By editing the SQL expression you can also perform calculations
on fields, combine fields together, etc. (simple books on SQL are
available, or you can ask your support company or ABC Direct Sales
to assist).
4. Add some fields to your report layout. You can also add text labels
to explain a field. (after adding a label, right click on it and Edit the
Label Text to change the wording). Drag fields and labels to move or
resize them.
5. Formatting. The text size, font, colour, alignment, etc of each field and
label used in your report can be set. Right click on a field and choose
from the popup menu. Holding the SHIFT key down and clicking
fields causes a RED background. Fields with RED backgrounds are
the ones affected by the menu alignment options. Right click to
popup the Formatting Menu.
6. Sort the records into order. You can pick any field (or several fields)
to use as the basis for sorting the records, and you can specify an
Ascending or Descending sort.
7. Totals and Groups. You can get the report to produce subtotals and
grand totals for up to four different fields. Several types of totalling
operations can be carried out Count, Average, Sum. The field used
for such totals must be a numeric type field. (but there is a way
around this if you need to total a text field that contains numbers for
example). Before you can use Totals, you must set up a Group choose
a field to use for grouping on.
8. Options. Choose whether to print separator lines between records,
show page numbers, enter a Report Title (prints at top of the report),
set page to be portrait or landscape, etc. If you have used Groups/
Totals then you can choose whether to print all the detail lines for
each Group, or just a summary.
9. Remember to SAVE your report (the report designs are stored in
ReportLayouts.mdb)
You do not need to use any SQL in order to use ABC, but if you do want to
get more advanced, or have any special requirements, your local computer
expert (or ABC Direct Sales) could guide you through the process of
creating a suitable SQL expression. (page 106)
86
|
ABC6 User Manual
Save the Report
From the File Menu at the top, select Save or Save As New. (Save will
overwrite the existing version of this report -- even if you’ve changed its
title -- but SAVE AS NEW will create a new copy of the report that you can
edit to change some features).
Report designs are stored in a file called ReportLayouts.mdb located in the \
ABC6\GENDATA folder. Even if you have several Companies set up in ABC,
these reports will work with whichever company you are currently using.
Preview or Print the Report
From the File Menu at the top, select Print Preview. This displays the
finished report, and the menu at the top provides functions for printing to
paper, or exporting to PDF or HTML file.
One-off labels or envelopes
While viewing customer or supplier records in the accounts, you can print
an address label for the current record. Select Address Label or Envelope
from the ribbonbar. This is intended mainly for use with a separate dotmatrix type printer that can also be attached to your computer.
When using one of your own files in FILING, this feature can also be used
providing you have defined the Address Fields (page 82).
FILING
|
87
Label printing
The label function is intended for producing address labels for mailings to
your Customers or Suppliers, onto A4 size sheets of labels (eg Avery). .
Filing > Label Printing
Multiple copies of each label can be printed, and you can set the start
label position (if you are printing onto a part used sheet of labels). You can
print your company logo or any small picture on the label, along with your
Return Address if required. Choose a sorted order in which to print the
labels.
Designing the layout for your label is similar to designing a Report. You can
drag fields around the label, and resize the fields and any picture you are
using. The area for printing on will depend on the size of label you have
set, so you should specify the size as the first thing you do. You can choose
from a range of Avery Label codes, or just specify the number of labels
across and down the sheet.
You can make addresses look neater by ticking the box Tidy Addresses -ABC will then try to remove blank lines in an address.
If the printer messes up part of the printout the Print
Preview does allow you to select just a range of pages
for reprinting.
88
|
ABC6 User Manual
9
TYPING
Edit Text, Print Letters,
Mail Merge
You can select TYPING from the Main Menu and use it as a normal
wordprocessor (with MailMerge capability). And in various other parts
of ABC you can select Print A Letter and this same “Typing” function will
appear -- for example, while looking at a Customer Record you can produce
a letter to this Customer.
Edit text
Change text size, colour or font.
Highlight a section of text and then choose a function from the toolbar at
the top of the window.
If no text is highlighted, any changes you make will apply to all new text
that you enter from now on.
To select ALL text, press CTRL+A
Ruler, Margins, Tab stops
The ruler across the top of the text shows left and right margins, indent,
and any tab stops. These can all be set differently for each paragraph.
Click on a paragraph to make it into the current paragraph, and then drag
the little triangular markers along the ruler to change the margins. The
marker on the top of the ruler sets an indent (or outdent) for the first line of
the paragraph.
Alternatively, right click the mouse on the ruler and a form will appear that
allows you to set margins and tabs for the paragraph.
If you want to change several paragraphs at the same time, highlight them
first. (CTRL+A will select All Text)
TYPING
|
89
Graphics (pictures)
You can insert pictures into the text. Position the cursor at the bottom left of
where you require the picture, and from the Options Menu select INSERT
GRAPHIC. Choose any picture file (eg. .BMP) and it will appear on screen.
You can click the picture and then resize it by dragging the corners or
sides. You can also move it to a different position, but note that the picture
is treated like a big word -- it must be inserted into the text (it does not
overlap any text). As you drag a picture, a small line cursor shows where it
will be inserted when you release the mouse button.
Word Count
From the Options Menu select Word Count, and ABC will display the
number of words in this document.
Find and Replace
Select FIND from the Edit Menu. (Keyboard:
Spell Check
From the Options Menu you can choose AUTO SPELL and ABC will then
check your spelling as you type and underline any suspect words with a red
wavy line.
If you right click on a suspect word, you can select from several spell check
options:
Ignore All -- tell the Spell Checker that this word is OK.
Add -- tell the Spell Checker to add this word to the Dictionary.
90
|
ABC6 User Manual
Spelling -- ABC will display suggestions for the correct spelling of
this word. Sometimes these will be sensible....
To check through all the words in the document, select Spell Check from
the Options Menu. ABC will display each suspect word in turn, with
suggestions for its replacement.
Headers, Footers
A Header (or Footer) is a separate text file that ABC can automatically insert
at the top (or bottom) of every page. This can include pictures or calculated
fields such as today’s date or page number. ABC allows you to specify
which pages the Header should appear on (for example, even pages only).
You should first create Header(s) and Footer(s) as separate documents. Then
these can be loaded into any other document while editing it. From the
Options Menu select Header & Footers.
The background colour of Headers and Footers can be set, along with their
width, height and other properties.
Mail-merge
When printing letters or notes on paper, you can get ABC to automatically
fill names and addresses or other information into the text. This is known
as mail-merge.
The data being inserted can come from Fields of any Record Card.
The MailMerge function can be turned On or Off. From the Options Menu
select Allow MailMerge -- a new area with several tabs will then appear at
the top of the typing window.
First select which File to use, from the File tab The other tabs allow you to
specify which records to use, and which Fields to use in your letter..
Specify a MailMerge Field in your letter
The easiest method is to click on a Field Name in the drop down list on
the Fields tab, then click at the position in the letter you want to insert this
Field, and type CTRL +V. This will paste the Field into your letter.
Preview while editing
Click the Preview tab and ABC will merge data from the first Record into
your letter. You can use the Previous < and Next > buttons to try different
Records and ensure everything is working as expected. Close this Preview
before you can resume editing the letter.
TYPING
|
91
Choose a group of Records
You can specify criteria to choose a group of Records. This can stay simple
or you can get as complicated as you wish (by entering a SQL statement -page ).
The MailMerge section in Preview mode has a box labelled “Match” where
you can enter some text to match. ABC tries to match this with the first
FieldName it finds in your letter (ie. the one nearest the top of the letter).
For more control you can use the Records tab and then enter selection
criteria. Here are some examples (using the Customer File)
Use all Records -- ALL
Use Records where Account Number is between 50 and 100
-- WHERE custACCT > 49 AND custACCT < 101
Use Records where the address (line 4) is in London.
-- WHERE custADDR4 = ‘London’
(note that the text LONDON must be in single quotes)
Also see page 106.
92
|
ABC6 User Manual
10
Spread Sheet
The ABC SpreadSheet is relatively simple, but it has the useful feature of
Formulae to call data out of ABC Account Files, for example for CashFlow
Forecasts. You can enhance your SpreadSheets by using different sizes
and colours of text, and inserting pictures into cells. Approximately 500
columns by 500 rows can be used.
Spreadsheets can be imported and exported in various formats including
MS Excel, HTML, and text files.
Use the CURSOR Keys (or mouse) to move around.
Edit Numbers or Text cells
Click on a cell, and just start typing. Enter a number or some text. The
Options Menu allows you to choose what happens when you first select a
cell -- whether to highlight all existing text or not. Set as you prefer.
Simply move out of the cell when you’ve finished Editing. Press the TAB
key to move to the next cell, or ENTER to move down a cell.
Caution. It is easy to confuse yourself if you press
ENTER while editing a cell which allows multi lines. In
this case ENTER will simply move you to the next line
within the cell (and probably scroll the first line out of
sight so you are left wondering what has happened).
Insert or Delete a Column or Row
Position the cursor first, and then from the Edit Menu at the top, select the
required operation.
Any formulae involved will be automatically adjusted.
Spread Sheet
|
93
Types of cell
Each cell can contain text, numbers, a formula, or a picture. Right click on
a cell and choose the type of cell you require from the pop down list. The
default cell type is Any Text.
Type of cell
Description
Any Text
Whatever you enter here is treated as text.
Currency
This is a number that is formatted to two
decimal places with a currency symbol.
Number
Any number.
Percent
Displays percentages to two decimal places
and followed by a % sign.
Formula
This is not a separate cell type. It just provides
a reminder that you must first set the cell Type
to Currency, Number, or Percentage -- these
are the only cell Types in which you can enter
a Formula.
Formula
You can enter a Formula into any numeric type cell (so you may need to
first set the type of cell as Currency, Number, or Percent).
Position the cursor on a cell and press “=”. You can then enter a Formula
for that cell, or edit the existing Formula.
Each Formula can can include
positions (eg. A21, G4 )
numbers (eg. 1.15, 32)
operators (eg. + / * ^ )
Where * means multiply, and / means divide by
^ means to the power of
You can also use brackets: eg A2 * (A1 + 57.5)
Examples:
A3 + B17 This will add the number at position A3 and the number at
position B17.
C5 + (C6 + B4) * 1.15 Add number in cell C5 to 1.15 times the sum of
the numbers at C6 and B4.
Keywords (functions) can be used in Formula. For example, words like
AVERAGE, SUM, TAN, DATE, TODAY, MIN, MAX.
94
|
ABC6 User Manual
Examples:
sum(A3:A17) add up the Range of cells between A3 and A17
max(B4:F4) use the maximum value in the range B4 to F4
average(A3:A99) use the average value of the range A3 to A99
In most of these Formulae, blank (unused) cells are ignored (ie. not
included in average, etc)
Link to Nominal Ledger (Headings)
Information from any Heading (Nominal account) can be used within a
Formula. The current information from the Headings File is inserted into
the Sheet.
Use the special formula hdg to indicate you wish to use figures from the
Headings File, and follow this with a word to specify whether you want
the Current Balance, Last Year (opening balance), Month to Date, or Budget
figure; and give the Heading number that you require.
Examples:
hdgBUDGET(3351) -- The Budget figure for Heading 3351
hdgCURR(8411)
-- The current balance of Heading 8411
hdgMTD(1111) -- The Month to Date figure for Heading 1111
hdgOBAL(4211) -- The opening Balance figure for Heading 4211
Other Formulae
A vast range of other functions (keywords) and operators can be used in
Formulae. For help with Formula, press F1 while using the SpreadSheet.
We can add custom Formulae to the ABC SpreadSheet, so contact us if you
need anything specific to your trade or business.
Copy or Move or Clear a cell or block of cells
You can use the mouse to highlight a cell or block of cells, and then
position the mouse at the edge of the highlight (so the cursor shape
changes) and drag the highlighted area somewhere else. This will MOVE
the original cells. If you press SHIFT while dragging, you make a COPY
of the original. While the cells are highlighted, the Edit Menu gives other
options -- eg, Clear the selected cells.
This drag and drop operation can be turned On or Off on the Edit Menu.
Spread Sheet
|
95
Adjust Column width and Row height
You can change the size of the cells by dragging the cell bottom edge, and/or
right hand edge, at the grey row or column title area.
Pictures in cells
Position the cursor on a cell, and then select INSERT PICTURE from the
Edit Menu at the top. You can then browse to select a picture to insert into
the cell. The picture will be resized to fit the size of the cell, but the full
sized picture will be stored internally. We recommend you only use small
picture files (eg. file size less than 20K) for inserting into the SpreadSheet.
Larger pictures should first be resized using a paint package.
Change the size of the picture by dragging the cell width and height (see
above).
Freeze/Release titles
It is sometimes useful to keep the Column and Row titles fixed while the
rest of the sheet scrolls. From the Options Menu at the top of the Sheet,
select the choice you require.
Print on Paper
The entire Sheet will be printed out on your printer. Because the Sheet
can be larger than the paper, it will be printed in sections. (you can set the
printer to landscape format if you wish). Use the Print Preview and you can
set up Header and Footer, page size, etc.
Import/Export
You can import your old spreadsheets from ABC5. You can import data
in various other formats, including text files and Excel sheets. There is
a function to import your customers, suppliers, or stock records to the
spreadsheet. (editing the spreadsheet will not affect the original accounts
files).
It is also possible to export data in several ways including Excel, text file,
HTML and XML.
From the File Menu at the top, select Export or Import, and then choose the
required function.
Expect to do some fine tuning on imported data as other software may have
slightly different features compared to ABC6.
96
|
ABC6 User Manual
11
Useful extras
Calculator, Notes,
Envelope Printer
This chapter describes the very useful functions that you can use at almost
any time, no matter what you are doing. They can be accessed from the
Quick Access Toolbar at the top of the screen, and you’ll also find them in
various places throughout ABC.
This type of accessory was very useful in
early versions of ABC running under DOS
but these days Windows provides much
of this functionality already. However
accessories that link directly to parts of
ABC are retained because they provide
unique and useful function.
Noticeboard
When you startup ABC, the Noticeboard can be shown on the screen (or
it can be turned off). The Noticeboard is a useful place to leave a message
for yourself or the next person to use the computer. When you go to Close
Down at the end of the day, you can Edit the Noticeboard.
Calculator
This function allows you to use your expensive computer as a cheap
calculator. Some useful functions are included for quick calculations or
adding up a stack of petrol receipts. For example, to add or remove VAT
from the figure you enter.
You can type on the keyboard or use the mouse to click the buttons on
screen.
Useful extras
|
97
Print Envelope
The first tab page allows you to select envelope size, and choose whether to
have your return address printed top left, and an optional small picture or
company logo.
It is usually best to allow ABC to TIDY THE ADDRESS -- this means that
any blank lines in the middle of the address will be removed and the
remaining lines moved up. It makes the address look neater.
If you have called Envelope Print while looking at a Customer or Supplier
Record Card, then that company’s address should automatically have been
filled into the name and address boxes on the Text tab page. You can edit
these details or type a new address.
You may need to experiment with your particular printer to see which way
round to insert envelopes.
Yellow Notes
Most screens in ABC have a yellow button marked NOTES. This is for your
own use. View or edit a note about that ABC function. An experienced user
could leave hints for the newcomer.
The Noticeboard is just another of these
Notes.
98
|
ABC6 User Manual
12
Snapshots
Backups and Snapshots
Both Backup and Snapshot functions are on the same page (select the
Snapshot function from various Menus) but have different purposes:
Backups
Every hard disk will stop working sometime; maybe in 5 years, maybe
tomorrow. To protect yourself against this, you must make copies of your
information onto removable storage; these are your backup copies. Possibly
the best method is to backup onto RAM drives (USB sticks) that simply plug
into your computer. Second best method is CD or DVD. Other methods are
available.
To protect against your premises catching fire, or theft, you should keep
these backups in a separate building. To protect against faults that may
be undetected for a few weeks, you need several different backup sets.
Remember that backups contain all your business information, so keep
them in a secure place.
Snapshots or Archive
Snapshots allow you to quickly make a copy of your Accounts information
onto another folder on your hard disk (Archive). The archive can store up
to ten different Snapshots, and you can also set ABC to automatically make
Snapshots (eg. at month end).
One of the most common problems is a power failure or surge, which
upsets your account files. If you set ABC to automatically make a Snapshot
every morning, it is very easy to retrieve that start of Day set of accounts
from the Archive if you have a problem during the day.
Because the Archive is held on your hard disk, it is very fast and
convenient to use. But it does not protect you against hard disk failure or
fire/theft -- so you also need regular separate Backups.
Snapshots
|
99
Create a Snapshot (into Archive)
ABC will display all existing Snapshots in the archive. Select one of the ten
Snapshots Positions to be used. You can write to a blank (empty) position
or overwrite an existing Snapshot.
Snapshots are automatically labelled with the date and time that they were
created, and you should also enter a note to describe this Snapshot.
Restore a Snapshot
This function will copy the archived accounts files back into your real
accounts -- this overwrites the existing current accounts.
ABC will display all the existing Snapshots in the archive. Select one of the
available Snapshots to use. Do not proceed unless you are sure you want to
clear the existing accounts and replace with the archived snapshot copy.
Automatic Snapshots
You can specify that ABC automatically makes Snapshots at certain times,
for example just before each Month End.
ABC will not overwrite an existing Snapshot without asking you.
A function is also provided to allow you to delete unwanted old Snapshots.
Other companies
The Snapshot and Backup functions operate on the current company you
are working on. If you have set up several companies in ABC, you must
Backup each separately.
Create a Backup
Plug the removeable device (eg USB stick) into the computer (or ensure
there is a blank CD in the drive) before you select the Snapshot & Backup
function, because ABC starts by scanning all drives attached to the
computer and only lists those it can write to.
Select which drive to Backup onto (this could be a network drive). Any
existing backup on that drive will be overwritten.
Restore a Backup
ABC checks all drives attached to the computer and displays any suitable
ABC Backups that are found. You can select one of these to restore. This
restore process will place the backup into a Snapshot -- you can then
restore the Snapshot to put the backup into your accounts files.
100
|
ABC6 User Manual
13
Installation
How to install ABC onto your computer.
How to update your programs.
ABC will run on any computer which is PC compatible and has Windows
NT, XP, Vista or Windows 7.
(NETWORK version? See separate Installation Instructions)
Installation
Place the CD into your CD drive. Open MyComputer on your Windows
Desktop, and “browse” to the CD drive (often this will be drive D). This
should display the contents of the CD.
Double click on the installation program. Typically this will be called
Setup.exe or ABC6 Install.
Follow the instructions on the screen.
Program updates
An UPDATE contains the latest version of the programs and you should
update your ABC every few weeks. We are tirelessly working to fix bugs
and enhance the features of ABC. Updates can be downloaded free from our
website, or for a small charge we will send you an Update CD. ABC6 can
also be set to automatically update itself from our website (See Tools Menu,
top right of screen).
Version number
To see the Version Number and date of your ABC programs, select the Tools
Menu (top right of the screen) and then VERSION. If you are ringing up for
help, it is one of the things we will ask you for.
Installation
|
101
If your programs are over 3 months old, we strongly recommend you obtain
an Update, either from our website www.ABC6.co.uk or contact us for a
disk. The latest programs will have many enhancements and improvements
(suggested by users of ABC); and of course any reported bugs will have
been fixed.
Registration Key
Although you can begin using ABC immediately after purchasing it, you
need to Register the package within a few weeks. Do this by entering your
Registration Key and Serial Number.
Tools Menu (top right of screen) > Registration.
The Registration Key is normally supplied with the package, but can be
obtained from ABC Direct Sales (page iv) if you can’t find it. If you have the
ABC package on 30 day Sale or Return, or a Trial version from the website,
we do not supply the Registration Key until you have paid for the package.
ABC will work happily without this key for a couple of months, so there is
no urgency.
There is an option to print out your Company Name and address on paper.
We recommend you send these details to ABC Direct Sales so we can add
you to our mailing list (these details will not be released to anyone else).
With an accounts package it is particularly important that we can notify you
if accounting or VAT rules change, or bugs are found and important updates
are available.
User Forum
There is a free User Forum on our website where you can read comments
and questions/answers from other ABC users. Only registered users of ABC
are able to write messages on the Forum, but any casual visitor can read
them. You can get to the Forum using the Tools Menu (top right of screen).
102
|
ABC6 User Manual
14
Reference
How to operate ABC: the common functions
Select a Date
Enter a date in the format DD MMM YYYY (eg. 23 Jun 2007)
are acceptable, eg. 3 apr 06, 14 7 05
Shortcuts
To produce a popup Calendar either click
on the button or press F8. You can then
select a date by clicking on the Calendar.
The buttons at the top move to previous or
next month.
ABC will sometimes restrict the range of
dates you can enter -- for example you can’t
add new transactions to a previous month’s
accounts. Typically the date entry will turn
red to show the date is not acceptable -- try a
different date.
Select a Heading
You can enter a valid Heading Code (eg 1121)
if you know it, or leave it blank (or press the
little button) to see a popup list of Headings
to choose from.
You can cursor up/down, use PageUp/Down, or use the mouse to scroll up
or down. Click on the column titles of this list to sort the list.
Select a Heading by clicking on it, or press ENTER.
ABC may restrict the Headings on the list to only show those that are
suitable for the current task. eg if you are selecting a bank account, only the
Bank Headings will be displayed.
Reference
|
103
Select a Payment Method
Enter a code for the payment method (eg. CQ for Cheque) or leave blank (or
click the little button) to see a list to choose from.
ABC may only display methods applicable to the current task.
The Payment Method and Payment Heading
Code may affect each other. For example, if
you are making a payment in cash, methods
like Direct Debit or Credit Card will not be
displayed.
Select a VAT Code
Enter a code for the VAT rate
applicable to this transaction (eg.
1 = standard rate). Leave blank (or
click the button) for a list of VAT
Codes to choose from.
Enter amount of VAT
In many places ABC can calculate the amount of VAT for you. For example
in the CashBook, after you have entered the total amount and the VAT code,
you can press F8 (or click the down arrow) and ABC will calculate and fillin the VAT Amount for you. You can edit this if you wish.
104
|
ABC6 User Manual
Find a Record
There will be many occasions when you need to find a Record Card, for
example select a Customer Record in order to invoice them.
The Find panel appears at the left of the Record Card, and shows a list of
records. Click a record to select it.
Click a column header to
sort the list in that order
(click again to reverse
order the sort). And you
can apply a filter to select
just a group of matching
records by entering some
text in the box under the
list. The list will then
only show matching
records. Click the ALL
button to cancel the
filter and display all the
records again.
Instead of the old ABC
NEXT and PREV buttons,
there are vcr type buttons
under the list, allowing
you to jump to the Next,
Previous, First or Last
records -- These relate
to the current sequence
determined by Sorting
and filtering (ie. there are
no fixed record numbers).
When looking at Customer or Supplier Records, the Find Panel also has
a box where you can type an Invoice number and ABC will locate the
Customer or Supplier it belongs to..
Reference
|
105
Apply a Filter to pick out Records you want
At various times you will want to filter the Records from a File, to just view
or print the ones you want. To make life easy for beginners, in most places
ABC will provide some preset filter you can use by clicking a button. But
for more advanced filtering you can enter some conditions.
SQL -- a brief introduction
ABC uses SQL for selecting Records. SQL is a programming language that
databases understand. It can be easier than you think to make simple
selection requests (queries). For example, to request customer records where
the account number is greater than 50 and less than 300, and the 3rd line of
the address is the word “London”, the SQL expression would be:
WHERE custACCT > 50 AND custACCT < 300 AND custADDR3 = ‘London’
If you have a particular requirement for filtering records, you can ask your
Support Company (or ABC Direct Sales) to tell you what to type in. Experts
will probably be familiar with simple SQL queries, and many books are
available.
ABC has a SQL Wizard that can assist in creating SQL expressions. These
result can be edited for further fine tuning.
Edit a Record Card
Whenever there is a Record Card on the screen, there will usually be
buttons on the ribbonBar which include the options.
EDIT allows you to change (alter, change) the information in that Record
Card.
ADD will create a new (blank) Record Card for you to edit.
When you select EDIT (or ADD), the screen will appear with the cursor
flashing in one of the Fields. You can now edit that Field.
Editing a Field is similar to editing text. You can type over any information
in the Field; or use CURSOR LEFT or CURSOR RIGHT to move left or
right. To Delete one character, use the BACKSPACE or DEL key. To switch
between insert and overtype mode, press the INS key.
If you change your mind, press ESC to UNDO any changes.
106
|
ABC6 User Manual
Move to another Field
When you have finished editing a Field, press ENTER. Or use CURSOR UP/
DOWN to move to another Field. (of course you can also use the TAB key
to move between Fields, or simply click in a Field with the mouse).
Finish editing the Record
If everything is correct, click SAVE. If you want
cancel the changes, click CANCEL.
You can click a button with the mouse, but it may be
faster to press ALT-S to Save, ALT-C to Cancel (old
ABC users can use F5 to SAVE, and ESC to cancel).
Reference
|
107
A Grid (ie. Table) of data
The versatile grid is used throughout ABC for viewing and editing data, like
the example below.
If you view your Customer Records in a grid, each row is one Record, and
each column displays a Field. You can customise most grids by swapping
columns around and changing their widths, sorting into different order,
creating groups of records, as described below:
Click the mouse to select a row (it then becomes highlighted), or use the
cursor keys to move the highlight up or down. The highlighted row is called
the Current Row.
Move or Size columns
Use the mouse to drag a column title to a new position and drop it there
-- the column will then move to that position. If you drag the dividing line
between column titles, you can stretch a column bigger or smaller.
Print part of the Grid
If you highlight a few lines in the grid, you usually will find a menu choice
to print those lines on paper (eg. File Menu > Print Selected). To select ALL
the rows in the grid, press CTRL +A.
108
|
ABC6 User Manual
Edit the Grid
Some grids can be treated like a spreadsheet -- you can click anywhere
and simply edit what you like. Others may only let you edit one line at a
time -- normally you can double-click on a line (or press ENTER when it is
highlighted) to begin editing.
Group records
You can group the records (rows) in the Grid together to make it easier to
find things or spot trends. Simply drag a column title into the area above
the grid, and the records will be grouped based on that column. If you want
a sub-group, you can then also drag another column title into the area.
To cancel grouping of records, drag the column title out of the area above
the grid and drop it back on the grid.
This temporary grouping function is just for viewing records on screen. It
does not affect the actual order of records in the file.
Sort the Grid
Usually you can simply click on a column title to cause the Grid to resort
itself in that order -- click on it again to sort in reverse order.
Some grids can not be changed in this
way. Some grids will remember the
changes you make and stay like this
until you change them again.
Reference
|
109
110
|
ABC6 User Manual
Features of ABC reports
Page 110 illustrates many features of the ABC bookkeeping reports.
1 -- The Report window Toolbar -- see next page for details.
2 -- The cursor. If you hold down the left mouse button and drag the
cursor, the report also moves. This is a quick way to scroll up, down,
left or right. Or you can use the cursor keys.
3 -- Your Company Name at the top of every report (page 75)
4 -- Your company logo (or any small picture you provide).
Or no picture at all.
(page 75).
5 -- The report title describes this report and includes a note of any range
of values used; also shows if this is a Month End final report.
6 -- The current Date and Time are printed at the top of each report. This
shows when the report was printed; it does not refer to the contents
of the report.
7 -- The page number.
8 -- The body of the report.
9 -- The end of the report usually shows a summary of Nominal Ledger
movements (Heading Analysis)
10 -- A summary of the VAT may be shown at the end of a report.
11 -- To explain abbreviations used in a report, a key is printed at the end
of some reports.
12 -- While printing some bookkeeping reports, ABC can cross-check
the integrity of the data. This is shown at the end of the report in the
DATA CHECK.
for OK, or
if a problem was detected
(with brief note of the error).
r
t
13 -- Some reports include an optional Table of Contents. If you click
on an entry in this Table, the report jumps straight to the page
containing that entry -- very useful if there are many pages. You can
hide or show the Table of Contents.
Reference
|
111
The Report window Toolbar
This appears at the top of the report Preview, and provides functions to
change page, zoom in or out, hide or display the Table of Contents, and
send the report to a printer or fax modem. You can click the buttons, or use
the keyboard (eg. ALT-P to select Print, the Plus/Minus keys to zoom, PgUp/
PgDn keys to change page).
Table of Contents -- the first (left) button allows you to hide or display the
Contents. (Not all reports have a Table of Contents).
Export will create a disk file in your choice of HTML, PDF, or CSV TEXT
format.
Email allows you to send this report by email.
Print -- Allows you to select a printer, and range of pages to print.
Zoom size slider -- Change the display size on screen.
Buttons allow you to jump to First or Last, Next or Previous page.
Report pages -- Shows the current page, and total pages (eg. 1/3 indicates
you are on page 1 of a 3 page report).
Options some reports allow you to change configuration of the report (eg
Sort in a different order, or display summary only).
Help -- Displays the on-screen User Manual section showing how to use the
report viewer, with general hints and tips.
Close -- Close the report window (exit from the report). You can also close a
report by pressing the ESC key.
112
|
ABC6 User Manual
15
Glossary
Technical words explained
ACCOUNT
A card containing a Customers Name, Address and other
details is called a Customer Record Card by computer
people; but a bookkeeper will call it the Customer Account.
You can choose which you prefer.
ALLOCATE
In ABC you mark an Invoice as “paid” by allocating a
money payment (or a Credit Note) against it.
BALANCE
The current total of an account (record card). eg. The
amount a customer owes you is called their balance.
CASH
not Credit. Can include cheques, Direct Debits, coins, bank
transfers, etc. But no invoice or deferred payment.
COLUMN
See FILE. In a Table, Columns are the Fields of Records.
CREDIT
An item is not paid for immediately, but is obtained on
credit. ie. not cash
DATA
Any information (such as a name and address, or a letter)
can be made to sound more important by calling it data.
DATABASE
(.MDB)
ABC stores data on disk in MDB files, using the MS JET
engine (like Access). We define a Database in this context
as a huge diskfile that contains all of the various ABC
accounts information. Inside the Database we can think of
the data as being stored in separate Files or Tables. ABC
also has several other databases, for example one stores all
the Files you create with FILING.
DEFAULT
The suggested normal option. To make life easier for you
the computer will often display a default entry (eg. today’s
date) which you can accept or change.
DIRECTORY
See SUB-DIRECTORY (Also called a Folder).
Glossary
|
113
FILE RECORD
and FIELD and
TABLE)
The Customer File contains a Record Card for each
customer. Each card stores details of their Name Address
Telephone etc -- and these boxes are called fields; eg. the
Postcode Field. (more recently people have started calling
Files Tables -- eg. the Customer Table, and the Fields are
Columns in the Table). You enter information into Fields
on the screen (or Columns in a Table/Grid)
FOLDER
Another word for a subdirectory or an area of the disk.
PATH
A file Path is the full disk address leading to that file ie.
starting from the main (or root) directory, down through
all the sub-directories to reach that file. (see also SUBDIRECTORY)
POST
Entering a transaction is sometimes called “posting” the
transaction.
PROFORMA
A quotation in the form of an invoice, showing the price,
details, delivery, of the order. Not part of the accounts.
PROPERTY
In computer terms the parameters (or option settings) of an
item are sometimes called its “properties”.
RECORD
See FILE. (in a Table you can think of a Record as one line
or Row in the Table).
RIBBONBAR
The multifunction toolbar across the top of the ABC
window, which displays buttons and functions relevant to
the task you have selected.
SNAPSHOT
A copy of the Account Files, frozen at the moment the
Snapshot was made. Similar to Backup. See ARCHIVE.
SQL
This stands for Structured Query Language and is the
modern programming language for getting information in or
out of a database. ABC uses SQL internally.
SUB-DIRECTORY
Generally called a “Folder” these days. A small section of
your hard disk. Instead of storing all files in one area, it
makes life much easier if each program uses its own subdirectory.
TABLE
For many years we have used the word “File” to describe a
collection of Records. However; in the database system that
ABC now uses this collection of Records is called a “Table”.
TRANSACTION
When you buy something or sell something you are
performing a transaction. Other transactions include paying
wages to someone or taking money to the bank.
UPDATE
To bring something more up to date. For example to install a
newer version of a program.
114
|
ABC6 User Manual
16
Trouble-shooting
Common Problems
Check the following before calling in the engineer.
Problem
Possible Cause and Remedy
You have plugged in the
computer system and
switched on but nothing
appears on the screen.
Check equipment switches are all
ON. Check fuses in mains plug(s). If a
fuse blows more than once don’t use
equipment but call service engineer.
Various strange symptoms
Mysterious computer glitch; eg. power
surge or loose connection. Switch off
and check all connections, plugs and
sockets are secure. Wait 1 minute before
switching on again.
Pressing a cursor key prints
a number on screen, or
unexpected capital letters.
You might have number lock or capitals
lock selected. Press the NUM LOCK key
or CAPS LOCK key to turn it off.
Screen display appears
normal with flashing cursor
but nothing happens when
you press a key, or move the
mouse.
Are you pressing an allowed key? Try
pressing ESC.
Keyboard may have become unplugged.
Mouse may have become unplugged.
After switching on the
computer it reports Invalid
Boot disk or similar. Or
computer freezes during
startup.
Remove any disk from the floppy drive
or CD drive. Switch everything OFF for 1
minute and then try again.
Customer or Supplier Record
remains Locked (eg. after a
crash or power cut)
Edit the Record and untick the “Locked”
box
Trouble-shooting
|
115
Problem
Possible Cause and Remedy
Reports or letters are OK in
the on-screen Preview but
nothing appears on paper
when PRINT is selected.
Check the following: Printer (paper;
ink; on-line); cables and connections;
Open the Printer in Windows and check
settings). If you are on a network; check
the server and the PC with the printer
connected.
ABC won’t run, or you get an
error message like “Cannot
create server” or “Automation
Error”, and the program stops.
If you are on a network ABC cannot run
on Workstations unless it can access the
data located on the server. Check the
server and network.
Update the software from our website:
this usually fixes this type of error
(caused by windows registry or file
version confusion).
Program errors
We are confident you will not find anything serious wrong with the
programs but it is likely there are minor errors (bugs) remaining. It is
impossible to be certain that any complex computer program is free from
bugs.
If you do suspect a problem of this type please make a careful note of what
you were doing; what happened; what appeared on the screen; and then
email, phone, fax or write to us with those details.
UNLESS WE CAN REPRODUCE ANY FAULT YOU REPORT we cannot find
it or fix it! So please:
a) check that you can reproduce any problem (Intermittent troubles; or
symptoms that cannot be reproduced are usually due to the computer
equipment or power supply).
b) give us enough information so that we can follow the same path.
We do want to hear from you, and are very grateful for reports of any
problems. We try to fix any bugs within 24 hours.
Updates containing the latest version of the programs are always available
from the support people, on our website, or by post from us.
116
|
ABC6 User Manual
Index
A
ABC5
Import old file. . . . . . . . . Import accounts data . . . . . ABC, overview . . . . . . . . .
Account
Customer, Supplier, Nominal. Delete Nominal account . . .
Nominal, add new . . . . . .
Nominal Ledger. . . . . . . . Accountant, letter to. . . . . .
Accounting Year . . . . . . . .
Account Number
Customer. . . . . . . . . . .
Accounts, current month. . . . Accounts Files, clear . . . . . . Add record card. . . . . . . . . Address, edit company. . . . . Advice Note. . . . . . . . . . . After-Sales Support. . . . . . . .
All data, clear accounts. . . . . Allocate, mark paid. . . . . 41,
Analysis Headings
Groups. . . . . . . . . . . . . Setting up. . . . . . . . . . . Archive . . . . . . . . . . . . . B
Backup . . . . . . . . . . . . .
Balance Forward
Customer record . . . . . . .
Bank Charges . . . . . . . . . . Banking . . . . . . . . . . . . . Bank Reconciliation . . . . . .
Bookkeeping month. . . . . . . 83
24
74
25
32
30
15
74
76
26
71
18
25
21
62
2
18
45
16
15
99
99
28
50
51
52
71
C
Calculator. . . . . . . . . . . . 97
Calendar, select date. . . . . . 103
Case Quantity
Stock Record . . . . . . . . . 35
Cash Sales. . . . . . . . . . . . 43
Cash VAT Accounting . . . . . 22
Cash-with-Order Invoice. . . . 59
Chart of Accounts, print. . . . 15
Checklist to set up accounts . . 13
Cheque, print . . . . . . . . . . 45
Clear out accounts . . . . . . . 18
Close a window. . . . . . . . . . 5
Code
Heading (Nominal account) . 31
Stock. . . . . . . . . . . . . . 34
Code, VAT. . . . . . . . . . . . 21
Company, create other. . . . . 78
Company name and address. 21, 75
Contra payment. . . . . . . 42, 48
Copy. . . . . . . . . . . . . . . . 5
Correction. . . . . . . . . . . . 62
Correction, adjustment. . . . . 38
Credit, N/L account. . . . . . . 31
Credit Note, sales. . . . . . . . 61
CSV. . . . . . . . . . . . . . . 112
CSV, report output . . . . . . . 63
Customer
Account. . . . . . . . . . . . 25
Add new. . . . . . . . . . 19, 26
Delete . . . . . . . . . . . . . 29
Delivery Address . . . . . . . 28
Edit record . . . . . . . . . . 26
Mark invoice paid (allocate). 41
Opening Balance. . . . . . . 52
Price group . . . . . . . . . . 29
Record Card. . . . . . . . . . 25
Statement, label, envelope . . 29
D
Date, entry. . . . . . . . . . .
103
Debit, N/L Account . . . . . . . 31
Delete
a file in Filing. . . . . . . . . 84
Delivery addresses
Customer Record . . . . . . . 28
Delivery Address, invoice . . . 60
Discount, money received. . . 40
Discount, trade customer. . . . 29
dot‑matrix printers . . . . . . . . 2

|
117
E
Edit
Analysis Heading (Nominal) . 30
Company address. . . . . . . 21
Record card . . . . . . . . . . 25
Record Card. . . . . . . . . 106
Stock record. . . . . . . . . . 34
text using Typing . . . . . . . 89
using Filing . . . . . . . . . . 79
Envelope
Print 98
Print for customer. . . . . . . 29
Estimate. . . . . . . . . . . . . 62
Exit 5
F
Field
autonumber, autodate. . . . . 80
Customer record . . . . . . . 26
Nominal Ledger account . . . 30
Stock record. . . . . . . . . . 34
Figures only, clear accounts . . 18
Filter, select records. . . . . . 106
Find a record. . . . . . . . . . 105
Folio number. . . . . . . . 37, 76
Folio Number . . . . . . . . . . 49
Folio number, set . . . . . . . . 18
Formulae, spreadsheet. . . . . 95
Forum, user . . . . . . . . . . 102
G
Global Change, Filing. . . . . . 83
Goods In or Out, Stock . . . . . 55
Grid (table) of data. . . . . . . 108
Groups, Headings. . . . . . . . 16
H
Hardware required . . . . . . . .
2
Heading
Add new. . . . . . . . . . . . 30
Delete . . . . . . . . . . . . . 32
required by ABC . . . . . . . 32
Heading Code. . . . . . . . . . 15
Heading, debit or credit. . . . . 31
Heading entry. . . . . . . . . 103
Headings
Groups. . . . . . . . . . . . . 16
Help, After Sales. . . . . . . . . 2
118
|
ABC6 User Manual
Help, on screen. . . . . . . . . . 7
Hot Keys (shortcuts) . . . . . . 4, 5
HTM output. . . . . . . . . 63, 112
IImport
ABC5 data file. . . . . . . . . 83
Accounts from ABC5. . . . . 24
Installation. . . . . . . . . . . 101
Internal adjustments. . . . . . 38
Inventory (see stock) . . . . . . 33
Invoice
Cosmetic adjustment . . . . . 22
Enter old invoices. . . . . . . 20
Logo or Message. . . . . . . . 58
Mark paid. . . . . . . . . . . 41
ProForma . . . . . . . . . . . 61
Receive money . . . . . . . . 39
Reprint old . . . . . . . . . . 29
Invoice at Zero VAT. . . . . . . 59
Invoice number, set. . . . . . . 18
K
Keyboard shortcuts. . . . . . . .
5
Key, registration. . . . . . . . 102
LLabel
Print for customer. . . . . 29, 65
Print your own design . . . . 85
Letter to the Accountant. . . . 74
List of Headings, print. . . . . 15
Logo
for top of reports . . . . . . . 75
on invoice. . . . . . . . . . . 58
Log On, or Log Off . . . . . . . . 8
M
Mail-merge . . . . . . . . . . .
91
Print letter for customer . . . 29
Mail-Merge, customer. . . . . . 65
Main Menu . . . . . . . . . . . . 6
Margins, Typing. . . . . . . . . 89
Markup
Stock calculation . . . . . . . 33
MDB database. . . . . . . . . . 79
Method, select . . . . . . . . . 104
Q
Quick Access toolbar. . . . . . .
Mistakes. . . . . . . . . . . . . 10
Mistakes, correction . . . . . . 38
Month End . . . . . . . . . 12, 71
Month, set accounts month. . . 18
Mouse, using. . . . . . . . . . . 3
9
Quick Access Toolbar. . . . . . 97
Quotation . . . . . . . . . . . . 62
N
Network ABC. . . . . . . . . R
Receive Money. . . . . . . . .
101
New Customer, add. . . . . . . 26
Nominal
Account. . . . . . . . . . . . 25
Add new account. . . . . . . 30
Jounral entry (Transfer). . . . 53
link to spreadsheet . . . . . . 95
Transfers (direct entries) . . . 38
Nominal Ledger
Accounts . . . . . . . . . . . 15
Opening Balance. . . . . . . 52
Setting up. . . . . . . . . . . 15
Note, yellow. . . . . . . . . . . 98
Noticeboard. . . . . . . . . . 8, 97
O
Opening Balance
Customer or Supplier. . . 19, 52
Nominal Ledger. . . . . . 38, 52
Open Item
Customer Record . . . . . . . 28
Other Companies. . . . . . . . 78
Overview of ABC . . . . . . . . 74
P
Password . . . . . . . . . . . . .
8
Passwords. . . . . . . . . . . . 76
Paste. . . . . . . . . . . . . . . . 5
Pay money. . . . . . . . . . . . 38
PDF, output . . . . . . . . 63, 112
Petty Cash. . . . . . . . . . 45, 49
Price Group, customer. . . . . 29
Print
Cheque . . . . . . . . . . . . 46
Design your own labels. . . . 85
Design your own report. . . . 86
Envelope . . . . . . . . . . . 98
ProForma Invoice. . . . . . . . 61
Program update. . . . . . . . 101
38
Reconcille bank. . . . . . . . . 52
Record
change properties. . . . . . . 80
How to Find. . . . . . . . . 105
Stock (Inventory) . . . . . . . 33
Record Card. . . . . . . . . . . 25
Nominal ledger . . . . . . . . 30
Refund, from supplier . . . . . 48
Refund to customer. . . . . . . 42
Registration Key. . . . . . . 8, 102
Remittance Advice Note. . . . 45
Report
Cashbook, Bank. . . . . . . . 69
Design your own. . . . . . . 86
Features of ABC reports. . . 111
Logo for top of. . . . . . . . . 75
Nominal Ledger. . . . . . . . 68
Output as HTML, PDF, CSV . 63
Sales, Customers. . . . . . . 64
Stock. . . . . . . . . . . . . . 66
Supplier, Purchases. . . . . . 65
VAT return . . . . . . . . . . 68
S
Save or Cancel, Edit . . . . . .
107
Screen colours . . . . . . . . . . 9
Set folio numbers. . . . . . . . 18
Settlement Discount . . . . . . 76
option on Customer record. . 28
Snapshot . . . . . . . . . . . . 99
Sort grid in order . . . . . . . 109
Spell Check, Typing. . . . . . . 90
SQL
select record in Typing . . . . 92
SQL, select records . . . . . . 106
Standing Orders. . . . . . . . . 50
Start using ABC. . . . . . . . . 13
Stock
Delete record. . . . . . . . . 36
Goods IN or OUT . . . . . . . 55
Recalculate price. . . . . . . 36

|
119
Record card . . . . . . . . . . 33
Record Card. . . . . . . . . . 25
Text-only record. . . . . . . . 33
Value. . . . . . . . . . . . . . 55
Supplier
Account. . . . . . . . . . . . 25
add new. . . . . . . . . . . . 19
Opening Balance. . . . . . . 52
Payment to . . . . . . . . . . 45
Record Card. . . . . . . . . . 25
Unpaid bill . . . . . . . . . . 38
Support, After Sales . . . . . . . 2
Support, User Forum . . . . . 102
TTable (grid) of data. . . . . . .
108
Terms
Customer Record . . . . . . . 29
Text-only stock record . . . . . 33
Tidy the address, envelope. . . 98
Transactions. . . . . . . . . . . 37
Transfers, N/L. . . . . . . . 51, 53
U
Unit Cost, Stock. . . . . . . . . 35
Unpaid bill
mark paid . . . . . . . . . . . 45
Unpaid Bill . . . . . . . . . . . 38
Update, software. . . . . . . . 101
Update Stock, unpaid bill . . . 57
USB sticks. . . . . . . . . . . . 99
User Forum . . . . . . . . . 2, 102
V
Value, stock. . . . . . . . . . . 55
VAT
Cash Accounting. . . . . . . 22
codes . . . . . . . . . . . . . 21
Edit VAT rates. . . . . . . . . 21
Enter refund. . . . . . . . . . 44
General notes . . . . . . . . . 22
Inclusive prices. . . . . . . . 29
Invoice at zero VAT. . . . . . 59
Notes for VAT inspector . . . 23
previous accounts. . . . . . . 19
Print return . . . . . . . . . . 23
reports, Return . . . . . . . . 68
VAT Code, enter. . . . . . . . 104
120
|
ABC6 User Manual
VAT-inclusive Prices. . . . . . 59
VAT-only Invoice . . . . . . 57, 59
VAT Registration, set . . . . . . 18
Version Number. . . . . . . . 101
W
Wages . . . . . . . . . . . . 50, 54
Write-off as discount . . . . . . 42
X
Y
Year, accounting. . . . . . . . . 76
Year End. . . . . . . . . . . . . 73
Year, set accounts year. . . . . 18
Yellow Notes . . . . . . . . . . 98
Z
Zero, invoice at zero VAT. . . . 59