1
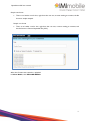
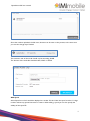
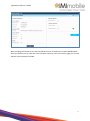
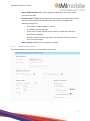
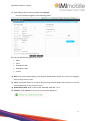
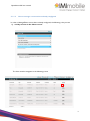
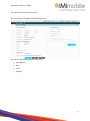
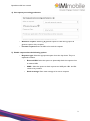
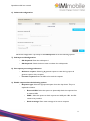
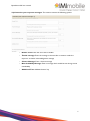
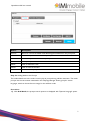
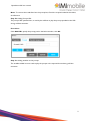
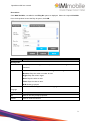
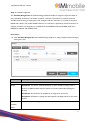
OPENHOUSE - UK - User Manual Author: IMImobile Version: 1.5 IMImobile Europe 5 St John’s Lane London EC1M 4BH Copyright © 2013 IMImobile Pvt. Ltd. All Rights Reserved Though every care has been taken to ensure the accuracy of this document, IMImobile cannot accept responsibility for any errors or omissions or for any loss occasioned to any person, whether legal or natural, from acting, or refraining from action, as a result of the information contained herein. Information in this document is subject to change at any time without obligation to notify any person of such changes. IMImobile may have patents or patent pending applications, trademarks copyrights or other intellectual property rights covering subject matter in this document. The furnishing of this document does not give the recipient or reader any license to these patents, trademarks, copyrights or other intellectual property rights. No part of this document may be communicated, distributed, reproduced or transmitted in any form or by any means, electronic, mechanical, or otherwise, for any purpose, without the prior written permission of IMImobile. OpenHouse-UK user manual Table of Contents 1. OPENHOUSE - Login....................................................................................................................................... 3 2. Broadcast Services............................................................................................................................................. 4 3. 2.1. SMS Broadcast........................................................................................................................................... 4 2.2. Voice Broadcast ...................................................................................................................................... 10 Voice Services................................................................................................................................................... 16 3.1. Configuring a SMS to call service ....................................................................................................... 16 3.2. Configuring a Click to call service ...................................................................................................... 23 3.2.1. 3.3. 4. 6. 7. 8. Voice response (IVR) service .............................................................................................................. 28 Feedback Services............................................................................................................................................ 31 4.1. 5. Launching the service ................................................................................................................... 25 Poll ............................................................................................................................................................. 31 Shortcode, Longcode and Keyword Services ........................................................................................... 34 5.1. Shortcodes ............................................................................................................................................... 34 5.2. Keywords ...................................................................................... Error! Bookmark not defined. 5.3. Long codes ............................................................................................................................................... 38 My Assets .......................................................................................................................................................... 42 6.1. Media ......................................................................................................................................................... 42 6.2. Call Flow Designer ................................................................................................................................. 44 6.3. Spoofs ........................................................................................................................................................ 58 6.4. Templates ................................................................................................................................................. 61 My Account ....................................................................................................................................................... 63 7.1. Managing Contacts and Groups .......................................................................................................... 63 7.2. Change Password ................................................................................................................................... 68 7.3. Invite User................................................................................................................................................ 69 7.4. Manage Team Roles ............................................................................................................................... 71 How to manage a service that is already configured ................... Error! Bookmark not defined. 2 OpenHouse-UK user manual 1. OPENHOUSE – Login/register Go to http://gcloudoh.openhouseplatform.com/. Register: Organizations that wish to register on OpenHouse can click on the sign-up button and download the registration form. This digital form has to be filled up and mailed to IMImobile as detailed in the On-Boarding process in the service definition. Login: Please login using your credentials to see the dashboard and other important links to start creating services. 3 OpenHouse-UK user manual 2. Broadcast Services 2.1. SMS Broadcast Click Services Tab, to interact with customers over SMS or Voice I want to interact with my customer’s window, click SMS A wizard for creating new SMS Broadcast opens Provide the information for creating SMS Broadcast Title: Provide a valid title for the SMS, providing valid title helps you to identify the service and also it’s easier to generate reports. Enter or Select Contacts: Contacts can be directly pasted into the contacts window, the count of contacts will be show just below the window. 4 OpenHouse-UK user manual Otherwise the contacts can either be uploaded from a FTP path. Through Upload File Upload the file containing the contacts in a specified format. Sample .txt format There is no header row for this, it starts reading as contacts, and the file format is .txt (can be generated from simple notepad). Sample .csv format There is no header row for this, it starts reading as contacts, the file format is Comma Separated File (CSV). Sample header .txt format There will be a header row for this, so the first row will be considered as a field row, the file format in simple text file. 5 OpenHouse-UK user manual There will be a header row for this, so the first row will be considered as a field row, the file format is Comma Separated File (CSV). Once the respective file is uploaded the headers can be displayed under Custom Parameters from uploaded file as shown in above image. 6 OpenHouse-UK user manual The message which needs to be sent to the target customers can be configured by using the custom parameters based on the business requirements as shown in the above figure. Message Provide the message for the SMS broadcast, the maximum character allowed in this field is 600, and you can view the live preview of character count, just below the message box. Add Template Predefined templates can be used for the messaging formats. These templates can be created in My Account. Select fields from below contact list From This is the sender ID, which can be either in number or Alpha numeric format. Add Spoof Add a Spoof from which would be displayed as a sender ID, this spoof can be a number or any name, while adding a spoof you can also specify the validity of the spoof ID. 7 OpenHouse-UK user manual Set batch Size If the total number of contacts uploaded is 1000, for smooth transition set the delivery of the messages in batches, example for 1000 contacts set in 5 batches. Set Interval Decide how many intervals the batches should be released for the broadcast. If you want to send the broadcast SMS at a future date, this can be supported by Send Later option. Live Choose when the SMS Broadcast should be live, just select the option Today, Tomorrow or provide specific date along with time. 8 OpenHouse-UK user manual After providing the content for the SMS broadcast service, click Submit to Create SMS Broadcast. Once you Submit, you can view the SMS broadcast summary and from this summary page you can also edit the SMS broadcast if needed. Once the SMS broadcast content is confirmed, click LAUNCH to launch the service, then the service will be live. 9 OpenHouse-UK user manual Once the service is launched successfully, a message will be displayed on the Summary page that the Service was launched successfully. View Reports Click View Reports to check your reports against a service Edit Users cannot edit the service when service is live, it has to be suspended to edit the service. Suspend You are able to suspend a service which is live, for example if the service is proven to be ineffective then the service can be suspended 2.2. Voice Broadcast On I want to interact with my customers window, click Voice A wizard for creating new VOICE Broadcast opens Provide the information for creating VOICE Broadcast 10 OpenHouse-UK user manual Title Provide a valid title for the VOICE, providing valid title helps you to identify the service and also it’s easier to generate reports. Enter or Select Contacts Contacts can be directly pasted into the contacts window, the count of contacts will be show just below the window. Upload File Upload the file containing the contacts in a specified format. 11 OpenHouse-UK user manual Sample .txt format There is no header row for this, right from the row one, it starts reading as contacts, the file format is simple notepad. Sample .csv format There is no header row for this, right from the row one, it starts reading as contacts, and the file format is Comma Separated File (CSV). After the Contacts are entered or uploaded In Select Media, click UPLOAD MEDIA 12 OpenHouse-UK user manual Once the media is uploaded, the file name, duration can be seen on the preview, at the same time you can also change clip if needed. The maximum size of the media should not be exceeding 20 MB. The formats of the audio file should be MP3, WAV or WMA. Add Spoof Add a Spoof from which would be displayed as a sender ID, this Video the spoof must be a 10 digit number without any special characters or letters. While adding a spoof you can also specify the validity of the spoof ID. 13 OpenHouse-UK user manual Live Choose when the SMS Broadcast should be live, just select the option Today, Tomorrow or provide specific date along with time. Once the scheduling is done, click appropriate button. After clicking SUBMIT button, the Service Details window appears. 14 OpenHouse-UK user manual After providing the content for the Voice broadcast service, click Submit to Create SMS Broadcast. Once you Submit, you can view the Voice broadcast summary, from this summary page you can also edit the Voice broadcast if needed. 15 OpenHouse-UK user manual 3. Voice Services 3.1. Configuring a SMS to call service 1) Service Details: – Service Name: Enter the service name. – Service Description: Describe the service 2) Schedule your service: Enter the start date and the end date of the service to be scheduled 3) Request >> SMS: – Service Number: Select The number to which the SMS is to be sent – Keyword: The key word which is to be sent as SMS – Notify URL: An URL which notifies the details of the SMS which includes MSISDN number and time of the SMS sent. – Email Notify: The email which receives the notifications related to the SMS. This contains the the details of the SMS which includes MSISDN number and time of the SMS sent. 4) Response >> Voice Call – Play Only Voice File: Select this option and select Choose file to choose an audio file saved in a system. This audio clip is played as a response to the SMS 16 OpenHouse-UK user manual – Select IVR Call Flow: Select a pre-configured IVR call flow. This is also used as response to the SMS. – Connect with 3rd party: An enterprise can have a help desk in place which would take care of the responses to the SMS. When this number is configured the following is the process • The customer sends an SMS to a number • A call lands up at the help desk • At the other end the call lands at the customer number from which the missed call is originated • Both the customer and the help desk of an enterprise answer the call and the conversation begins – 3.1.1.1. Auto response: Select an auto response to the SMS. How to create a service This sections explains the procedure to create and launch a service 17 OpenHouse-UK user manual 1) After filling in all the necessary details click Submit The User interface navigates to the following screen The user has the following options in this area EDIT View Estimated Traffic Estimated credits Launch 2) Edit: This option allows editing of the entered details while creation of a service and navigates back to the previous screen. 3) View: This option allows to only view the previously entered details while creation of a service and navigates back to the previous screen. 4) Estimated traffic: Enter a value of the estimated traffic EX: 1 or 2 5) Launch: Click Launch to launch the service which displays as 18 OpenHouse-UK user manual 3.1.1.2. How to manage a service that is already configured In order to Manage/Edit a service that is already configured, the following is the process 1) click My services in the Home screen The User interface navigates to the following screen 19 OpenHouse-UK user manual 1) Click the edit button in the screen The User interface navigates to the following screen The user has the following options in this area: View Reports Edit View Suspend 20 OpenHouse-UK user manual 1) View Reports: Click view reports to see the report against a service. The following is user interface Enter a start date and end date of the active service and click search to generate a report 2) Edit: To edit a service it has to be suspended and edited 21 OpenHouse-UK user manual 3) After making necessary changes click submit. The user can see the following screen 22 OpenHouse-UK user manual 4) Suspend: Click suspend to suspend a service. If its active the status is live and if its suspended the status shows as suspended 3.2. Configuring a Click to call service 1) Service Details: – Service Name: Enter the service name. – Service Description: Describe the service 2) Schedule your service: Enter the start date and the end date of the service to be scheduled 3) Widget Configuration: – Active hours: Enter the start time and end time during which the service needs to be active 23 OpenHouse-UK user manual – Available for: Select the during which the service needs to be active – Unavailable Message : Enter the message to be sent as response in case the service is unavailable 4) Request >> Click – Page title: This is the title of the HTML widget that this service generates – Notify URL: An URL which notifies the details which includes MSISDN number and time of the request. 5) Response>> Voice Call – Play Only Voice File: Select this option and select Choose file to choose an audio file saved in a system. This audio clip is played as a response to the request – Select IVR Call Flow: Select a pre-configured IVR call flow. This is also used as response to the customer’s request – Connect with 3rd party: An enterprise can have a help desk in place which would take care of the responses to the request. When this number is configured the following is the process 1. The customer clicks the widget 2. A call lands up at the help desk 3. At the other end the call lands at the customer number from which the request is originated 4. Both the customer and the help desk of an enterprise answer the call and the conversation begins – DND message: Enter the message to be sent in case the customer’s number is in ‘do not disturb’ list. 24 OpenHouse-UK user manual 3.2.1. Launching the service 1) After filling in all the necessary details click Submit The User interface navigates to the following screen The user has the following options in this area: SMS Sender ID Voice Sender ID Download EDIT View Estimated Traffic Estimated credits Launch 25 OpenHouse-UK user manual 1) SMS Sender ID: Choose the SMS sender ID from the available drop down 2) Voice Sender ID: Choose the Voice sender ID from the available drop down 3) Download: This option allows the user to download a widget. Unzip the widget and the user can view the following widget – Name: Enter your name – MobileNo: Enter your mobile no – Image: Enter the image – Callme: Click call me to call your number 26 OpenHouse-UK user manual 4) Edit: This option allows to edit the entered details while creation of a service and navigates back to the previous screen. 5) View: This option allows to only view the previously entered details while creation of a service and navigates back to the previous screen. 6) Estimated traffic: Enter a value of the estimated traffic EX: 1 or 2 7) Estimated credits: Enter a value of the estimated credits 8) Launch: Click Launch to launch the service which displays as 27 OpenHouse-UK user manual 3.3. Voice response (IVR) service 1) Service Details: – Service Name: Enter the service name. – Service Description: Describe the service 2) Schedule your service: Enter the start date and the end date of the service to be scheduled 3) Service number information – Service Number: Select the number to which the voice response is to connect to 4) Media details – Service Number: This option allows to select a voice clip from a list to be configured as response 28 OpenHouse-UK user manual – Select from Call flow: This option allows any existing voice call flow to be configured as response – Play/stop: Click this button to play or stop the audio clip – Select: Click this option to slect an audio clip as voice response – Search: Use the search box to search an audio clip by entering the name or a few alphabets 3.3.1.1. How to create a service This sections explains the procedure to create and launch a service 1) After filling in all the necessary details click Submit The User interface navigates to the following screen The user has the following options in this area: - EDIT - View - Estimated Traffic - Estimated credits - Launch 29 OpenHouse-UK user manual 2) Edit: This option allows to edit the entered details while creation of a service and navigates back to the previous screen. 3) View: This option allows to only view the previously entered details while creation of a service and navigates back to the previous screen. 4) Estimated traffic: Enter a value of the estimated traffic EX: 1 or 2 5) Estimated credits: Enter a value of the estimated credits 6) Launch: Click Launch to launch the service which displays as 30 OpenHouse-UK user manual 4. Feedback Services Feedback service is currently provided through Poll which is to obtain customer feedback and opinion through SMS 4.1. Poll 1) Service Details: – Service Name: Enter the service name. – Service Description: Describe the service 31 OpenHouse-UK user manual 2) Schedule your service: Enter the start date and the end date of the service to be scheduled 3) Service number information: Enter the start date and the end date of the service to be scheduled 4) Service Number information – Short code type: Select if the short code is a dedicated or shared short code. For dedicated short code the following is the process – • Short code: Select the short code from the drop down • Enter keyword: Enter the key word to be submitted by the customer Shared short code : If the short code is shared the following is the process • Short code: Select the short code from the drop down • Enter keyword: Select the key word to be submitted by the customer from the drop down – Shared short code : If the short code is shared the following is the process 5) Configure Poll Session: Configure Poll session allows an enterprise to configure and schedule number of poll sessions. The following is the procedure – Add new : Click add new to the following prompt 32 OpenHouse-UK user manual – Start date : Enter the start date and the end date of the service to be scheduled – No.of Options: Select the number of options from the drop down. These are the possible options which the user can enter while responding through a short code. – Options type: Select the type of option like a,b,c or 1 ,2,3 – Question Text: Enter the question. This is the question to which the customer will answer through opinion poll. – Footer message: Enter a Footer message – Character count: This displays the number of characters entered – Thanks message: Enter the message to be sent after a customer sends the poll opinion as thanks/ acknowledgement message – Create another: Click this option to create another poll session 33 OpenHouse-UK user manual 5. Shortcode, Longcode and Keyword Services 5.1. Shortcodes 1) Service Details: – Service Name: Enter the service name. – Service Description: Describe the service 2) Schedule your service: Enter the start date and the end date of the service to be scheduled 3) Service shortcode details – Select shortcode: Select the short code from the drop down – Keyword: Enter the key word which is to be sent as SMS – Keyword aliases: Check this box in case you want to use an alias to a keyword 34 OpenHouse-UK user manual 4) Set processing preferences – Response type: Select the appropriate option from the drop down. They are explained as follows • External URL: Select this option to dynamically fetch the response from an external URL • XML file: Select this option to fetch response from an XML file. An XML file has to be uploaded. • WAP: Select this option to fetch response via WAP push URL. An URL needs to be provided • – Static message: Enter static message to be sent as response Provide your application URL for forwarding customer requests: Enter the URL which would fetch the response dynamically and the same would be sent as a response. 35 OpenHouse-UK user manual 5) Advanced configuration Advanced configuration is primarily to add sub-keyword. It has the following options: 6) Sub-keyword Configuration – Sub-keyword: Enter the sub-keyword – Sub-keyword: Check the box to enter an alias for sub-keywords – Set request processing preferences – Response type: Select the appropriate option from the drop down. They are explained as follows • External URL: Select this option to dynamically fetch the response from an external URL • XML file: Select this option to fetch response from an XML file. An XML file has to be uploaded. This has an Auto-response preference which can be sent in a sequential or in a random fashion • WAP: Select this option to fetch response via WAP push URL. An URL needs to be provided • – Static message: Enter static message to be sent as response Provide your application URL for forwarding customer requests: Enter the URL which would fetch the response dynamically and the same would be sent as a response. 36 OpenHouse-UK user manual 7) Customize your response messages: This section contains the following options – Header Text: Enter text to be sent as header – Thanks message: Enter the message to be sent after a customer sends the response as thanks/ acknowledgement message – Closure Message: Enter a closure message – Non Availability Message: Enter a message which would be sent during service unavailability – Additional Text: Addtional text if any 37 OpenHouse-UK user manual 5.2. Long codes 1) Service Details: – Service Name: Enter the service name. – Service Description: Describe the service 2) Schedule your service: Enter the start date and the end date of the service to be scheduled 3) Service Longcode details : – Select long code: Select a long code from the drop down. – Keyword: Enter the keyword for the respective long code. – Keyword aliases: Select the check box to enter aliases for the long code 38 OpenHouse-UK user manual 4) Set request processing preference – Action on request : Select log & generate reports to view the log report & generate reports of the requests – Forward requests: Enter the URL to forward the requests. 5) Enable response has the following options – Response type: Select the appropriate option from the drop down. They are explained as follows • External URL: Select this option to dynamically fetch the response from an external URL • WAP: Select this option to fetch response via WAP push URL. An URL needs to be provided • Static message: Enter static message to be sent as response 39 OpenHouse-UK user manual 6) Advanced configuration Advanced configuration is primarily to add sub-keyword. It has the following options: 7) Sub-keyword Configuration – Sub keyword: Enter the sub-keyword – Sub-keyword: Check the box to enter an aliases for sub-keywords 8) Set request processing preferences – Action on request : Select log & generate reports to view the log report & generate reports of the requests – Forward requests: Enter the URL to forward the requests. 9) Enable response has the following options – Response type: Select the appropriate option from the drop down. They are explained as follows • External URL: Select this option to dynamically fetch the response from an external URL • WAP: Select this option to fetch response via WAP push URL. An URL needs to be provided • Static message: Enter static message to be sent as response 40 OpenHouse-UK user manual 10) Customize your response messages: This section contains the following options – Header Text: Enter text to be sent as header – Thanks message: Enter the message to be sent after a customer sends the response as thanks/ acknowledgement message – Closure Message: Enter a closure message – Non Availability Message: Enter a message which would be sent during service unavailability – Additional Text: Additional text if any 41 OpenHouse-UK user manual 6. My Assets This feature enables the user to view, update and manage the assets such as voice media files, recordings, call flows, spoofs, and templates that are used to create and render a service. These assets are developed with an inbuilt moderation and approval process. To do this, Click My Assets to display I want to manage my assets page with the following widgets: Media Call flow designer Spoofs Template 6.1. Media This feature enables the user to record a voice clip, or upload a recorded voice clip. To do this, Click Media in I want to manage my assets widget to display the Manage your media page. Here, the list of all the existing audio clips is displayed. The user can carry out the following activities: Directly record an audio clip from a handset Upload a recorded voice clip. Rename audio clip Delete an audio clip 42 OpenHouse-UK user manual 1) Click Record a Clip to display a popup window. Dial the given mobile number from the handset and enter the given PIN. Record the audio clip when prompted, and click OK. On completion of the recording, the recorded clip is displayed in the existing list of audio clips. To upload an audio clip, 2) Click Upload a Clip to display a popup window. Enter a name for the clip in the Voice clip name field. Browse and select the audio clip. Note: The audio clip MUST BE in mp3, wav, or wma format. Click Upload Clip to upload the selected clip. On successful upload, the following confirmation message is displayed: 43 OpenHouse-UK user manual Click on the icon to play the audio clip to check for clarity issues. To rename an audio clip, 3) Click on the Voice clip name to display a popup window where the audio clip size and clip length are provided. Modify the name as required, and click Rename to display the following confirmation message: To delete an audio clip, 4) Select the audio clip that needs to be deleted and click Delete to display a confirmation window. Click OK to confirm the deletion. On successful deletion, the following message is displayed. 6.2. Call Flow Designer DaVinci Call Flow Designer is an easy-to-use and rapid voice application development graphical tool that helps in designing and developing a variety of Call-Control based Inbound and Outbound voice applications. 44 OpenHouse-UK user manual A call flow is a road map, which includes a set of logical steps that describes the user interaction with the voice application through a series of nodes where each node is powered with a unique capability. The nodes in the flow are associated with the prompt(s), configured with the required properties to define the user interaction with the application. Each node represents a state/step in a call flow, which systematically guides the user through a series of steps based on the input provided by the user in the form of DTMF/speech. To build a voice application, the call flow steps are designed in the Call Flow Work Area with branching nodes. Each step/branch in the call flow specifies how the users interact with the application when they talk to it. After creating a call flow, the call flow script is generated to run the voice application on the DaVinci Voice platform. The Call Flow Designer feature in the platform enables the user to create, view, manage, and update the call flows. To do this, Click Call flow designer in I want to manage my assets widget to display the Call flow Designer page. Here, the user can create a new call flow, edit the existing call flow, test and publish a call flow. To create a call flow, Click New Call Flow in the Call Flow Designer page to display the New Call Flow popup window. 45 OpenHouse-UK user manual Enter the Name of the call flow, and select the Type of call flow from the dropdown list. Enter an overview of the call flow in the Description field. Select the Call Flow Template from the dropdown list. Click Create & Proceed to create the call flow and navigate to the Call Flow Designer window. The window includes the following components/elements that enable to create call flows: 46 OpenHouse-UK user manual Call Flow Work Area: Is the work area that displays node placeholders, which enables to create/design a call flow adding the required nodes. Placeholder: Is the default place reserved in the Call Flow Work Area, in which a start node can be created and that represents the first node of the call flow. This node enables to create the branching nodes to design the required call flow. Overview Window: Displays the following: – A list of call flow design errors with description. – A list of call flow system and user-defined variables. – Node library information that can be used to build call flows. Call Flow Navigator: Displays call flow design preview/overview, enables to select and edit the required nodes in the call flow design. Systematic Process to Build a Call Flow Pre-requisite: The Voice Assets (prompts) should be available for the supported languages to design a call flow. Step 1: Create Place holders and set node properties. The Call Flow Designer allows creating the call flows by creating nodes in the placeholders with the required properties: 5) Click the placeholder displayed in the Call Flow Work Area, the Place Holder window appears. 47 OpenHouse-UK user manual Field Description Node Dropdown includes the list of nodes supported by call flow designer to create call flows. type Each node listed here has a unique capability that can be used to perform an action in the call flow. Name Name of the node. Button Description Delete Click to delete the node. Cancel Click to close the window. Save Click to save the properties. Select the required Node Type from the dropdown list, enter the Node Name, and click Save. A node is created with the selected type and displayed in the call flow work area. For example, if Menu is selected, the Menu Window displays as show below, which allows to add the required no. of child nodes and assign prompts or the required actions. Click the node, Node Design window appears with Properties, Prompt, and Variable Assignment tabs. 48 OpenHouse-UK user manual Field Description Properties tab Barge-in If True is set, the prompt play can be stopped with interruption from dtmf/ASR inputs. If False is set, full prompt is played without interruption. No Input By default (if not checked), “no input” error handling is handled implicitly by the call flow. If checked, the default “no input” error flow action is overridden; and enables to specify the used defined error handling through the call flow nodes. Invalid Input By default (if not checked), “invalid input” error handling is handled implicitly by the call flow. If checked, the default “invalid input” error flow action is overridden; and allows to specify the user-defined error handling through the call flow nodes. To override the default input error flows, i) Check the No Input/Invalid options; a placeholder is displayed to create a node. ii) Select the required properties and assign variables for the node to handle the error in the required format. Enable Logs If this option is checked, the user response is tracked throughout the call flow. Response The no. of main menu options (user response options) that are required for a call flow can be specified here, and can be used to create the branches for a call flow. To add the user response options, click Add and enter the user response number (for example, 1, 2, 3, 4, and so on…) with description and click Save. The call flow menu is created with the specified no. of user responses (place holders). Each place holder can be used to create further branching nodes or assign a node with the required properties. 49 OpenHouse-UK user manual Button Description Delete Click to delete the node. Cancel Click to close the window. Save Click to save the properties. Click each node, select or enter the mandatory node properties in the fields that appear under the 'Properties' tab, and click Save. A node is created with the specified properties. Note: Refer the Call Flow Designer Nodes section for the mandatory property list for each node. Repeat the steps 2 through 4, to create node branches and build the required call flow. Step 2: Set Prompts Any call flow starts with a prompt and an action. The 'Prompt' tab of Node Design Window enables to select the required Media and Variables to play the prompt during the call flow execution. It facilitates to design the flows with 'Dynamic Language' property set, to play the prompts in the language selected by the user in the runtime. Procedure: Click 'Prompt' tab of Node Design Window to add media files and variables to the node. 50 OpenHouse-UK user manual Button Description Remove Allows to remove the added media files/assigned variables from the prompt list. Add Media Adds the required media files to the prompt. Add Variable Adds the required variables to the prompt. Add URL Adds a prompt URL. Delete Click to delete the node. Cancel Click to close the window. Save Click to save the properties. Step 2a: Adding Media to the Prompt The media added here to the node is used to play as prompt during call flow execution. The media prompts are the voice assets maintained in the Campaign Manager Assets group for various languages, which can be used here to assign for the call flow nodes. Procedure: 6) Click Add Media, the prompts search options are displayed with 'Dynamic Language' option. 51 OpenHouse-UK user manual Select the required Media files (prompts) from the list. Select the required 'Dynamic Language' variable, which plays prompt to the user on selected language dynamically during the call flow execution; click Ok, the selected media file is displayed under the 'Prompt' tab details. Repeat the steps 1 through 3 to add the required media files. Check the required media file checkbox, click or buttons to move up or down respectively to arrange the files in the required order; click Save, the media properties for the node are set. 52 OpenHouse-UK user manual Note: To remove the media files from the prompt list, Check the required media file checkbox, click Remove. Step 2b: Adding Prompt URL The prompt URL specified here, is used by the call flow to play the prompt specified in the URL during call flow execution. Procedure: Click Add URL, specify the prompt path in the below window, click Ok. Step 2c: Adding variables to the prompt The variables added here are used to play the prompt in the required format during call flow execution. 53 OpenHouse-UK user manual Procedure: Click Add Variable, a variable list with Play As options is displayed. Select the required Variable from the dropdown list and the Play As option, click OK. Field Description Prompt tab Select Variable The prompt variable assigned here is replaced with a value during call flow execution. Play As Plays the above variable value in the following formats during call flow execution: Number: Plays the value in number format. Digits: Plays the value in digits. Date: Plays the value as date. Time: Plays the value as time. N/A: Nothing is played. Select The variable value is played in the selected language. Language Button Description Ok Click to save the prompt properties. Cancel Click to close the window. 54 OpenHouse-UK user manual Step 3: Variable Assignment The Variable Assignment tab of Node Design Window enables to assign the required values to the pre-defined variables for the nodes created in a call flow. The nodes in a call flow use these variables while entering or leaving the node during the call flow execution. It consists of two parts; NAME and VALUE. The variable NAME reference in a call flow is replaced by VALUE at the time of call flow execution. For example, let Variable Name be MSISDN & Value be 07985213547; here, MSISDN is replaced with 07985213547. Procedure: 7) Click Variable Assignment tab of Node Design Window to assign variables while entering or leaving the node: Field Description Variable Assignment tab Assign Dropdown 1: Includes “OnEnter/OnLeave” events. Enables to assign static or dynamic variables/variable values to perform an action before/after playing the prompt. Dropdown 2: Includes list of variables to be assigned to the events. Dropdown 3: Enables to specify the static/dynamic (variable) values for the event actions. Type, Displays the above configured values in a list. Variable, Value 55 OpenHouse-UK user manual Delete Click to delete the node. Cancel Click to close the window. Save Click to save the properties. Select OnEnter/OnLeave option from the Assign dropdown list. Select the required variable from the first dropdown list to which the variable is to be assigned. To assign a static value for the variable, select the Static Value option from the second dropdown list, and enter the value; else select the required variable to assign a dynamic value to the variable, and click Add. Variable assignment is done and is displayed under the 'Variable Assignment' tab details. Repeat the steps to add variables. Check the required variable checkbox, click or buttons to move up or down respectively to arrange the variables in the required order; click Save, the variable assignment for the node is set. Note: To remove the variables from the variable list, Check the required variable checkbox, click Remove. Step 4: Handling Call Flow Errors Call flow errors are the Node Definition Errors, which occur due to improper design of call flow. To view the list of errors in a call flow design, 8) Click (Error List) in the Overview Window, Errors Window displays the list of node name(s) and node level with error description. For example, it lists all the blank nodes and blank mandatory properties in the error list. Select the required node from the error list/call flow navigator, edit the node errors and update the call flow. Note: User Input Errors: By default, the call flow handles the user input errors such as "Invalid input, No input" by calling the predefined scripts implicitly else is handled as designed in the call flow steps. 56 OpenHouse-UK user manual Step 5: Update call flow On successful creation of an error flow call flow, click Update to generate Menu Script for the call flow design. The call flow script is generated successfully if there are no errors in the design. The following confirmation message is displayed: Click on the (Publish) icon corresponding to the newly created call flow to publish the call flow. To edit call flow details 9) Click on the icon to the corresponding call flow name to display a confirmation window. Click OK to confirm to change the status to Editing. Click on the call flow name to navigate to the call flow designer page. Make the necessary changes and click Update. Click on the (Publish) icon to publish the call flow. A confirmation window is displayed: Click OK to publish the project. Note: Only Published call flow details can be modified. To test a published call flow, 10) Click on the icon to display the Test your call-flow popup window. 57 OpenHouse-UK user manual Enter the mobile number in the given field, and click Test. A call is placed to the given number thereby testing the call flow. To delete a call flow, 11) Click on the icon corresponding to the call flow that needs to be deleted. A confirmation window is displayed: Click OK to delete the project. Note: The call flow ONLY in draft state can be deleted. 6.3. Spoofs Spoofing is the term given to the activity of displaying a number on the recipient's Caller ID that is not that of the actual originating station. Just as e-mail spoofing can make it appear that a message came from any e-mail address the sender chooses. Caller ID spoofing can make a call appear to have come from any phone number the caller wishes. To create a Spoof, 12) Click Spoofs in I want to manage my assets widget to display the Manage Spoofs page. Click REQUEST A NEW SPOOF to display Request new Spoof window. 58 OpenHouse-UK user manual Select service type SMS or VOICE from Spoof Type dropdown list. Provide a name for the spoof, and click Submit. NOTE: For SMS it must be min 2 and max 11 characters in length containing numbers or letters without special character. For VOICE, it must contain a valid 11 digit numeric value. To view the spoof details, Click View corresponding to the Spoof name to display the Services Associated with Spoof window. 59 OpenHouse-UK user manual To delete the spoof, 13) Click on the icon corresponding spoof name to display a confirmation window. 60 OpenHouse-UK user manual Click OK to confirm the deletion, else click Cancel. 6.4. Templates The platform enables the user to create customized message templates that can be reused over a period of time. To do create a template, 14) Click Templates in I want to manage my assets widget to display the Manage message Template page. Click CREATE A TEMPLATE to display the Create a Template window. Enter the Name, Message, and select the Contacts from the given fields. Click Create to save the template details and display the confirmation message. 61 OpenHouse-UK user manual To edit the template, 15) Click on the Template name to display the Update a Template window. Make the required modifications, click Update to display a confirmation message. To delete template, 16) Select the template name, and click Delete to display a confirmation window. Click OK to confirm the deletion and display a confirmation message. 62 OpenHouse-UK user manual 7. My Account The platform provides a user friendly interface to view and manage the user’s account details related to rental plans, assets, contact details, inviting users, and changing password. To do this, Select the dropdown arrow adjacent to the user’s name to display a small menu. Select My Account from the menu to display the My account page. The following activities can be managed from this widget: Managing Contacts and Groups Changing Password Inviting Users Managing Team Roles 7.1. Managing Contacts and Groups All Contacts The contact list can be imported/deleted/modified here, and these contacts can be used while creating services. Click All Contacts to display the Manage my Contacts page. 63 OpenHouse-UK user manual To create a contact 1) Click CREATE to display the Create a Contact window. 2) Enter the details in the given fields (i.e.) First Name (Mandatory), Last Name (Mandatory), Email, and Mobile Number (Mandatory). 3) Select the group from the Add to Groups dropdown list. 4) Click Create to save the contact details and display a confirmation message. 64 OpenHouse-UK user manual To import a contact, 1) Click Import in the Manage my contacts page to display the Import Contacts window. 2) Browse and select a .csv file. 3) Select the group from the Upload to Group dropdown list to add the contact to the group. 4) In case the required group is not listed in the dropdown, then select Add a new group to display related fields. 5) Enter the New Group Name in the given field, and click Import. Note: While importing make sure that format and the order of contacts MUST be MSISDN, First Name, Last Name, email only. OPENHOUSE will not accept the CSV file if the contacts are not in prescribed format. 65 OpenHouse-UK user manual To edit the contact details, 1) Click on the Contact name to display the Update a Contact window. 2) Make the required modifications, can click Update to display a confirmation message. To delete contact, Select the contact name, and click Delete to display a confirmation message. Groups In groups, the user can organize the contacts into groups based on the requirement. For example, user can create a group of existing customers, lead customers, or the customer who made the highest purchase. To create a Group, Click Groups to display the Create a Group window. 66 OpenHouse-UK user manual Enter the Group Name and Group Description for the group, and click CREATE A GROUP to display a confirmation message. Once the group is successfully added, the group is displayed in the list, as shown below. 67 OpenHouse-UK user manual To edit the group details, 1) Click on the Group name to display the Update a Group window. 2) Make the required modifications, click Update to display a confirmation message. To delete a group, 1) Select the group name, and click Delete to display a confirmation window. 2) Click OK to confirm the deletion and display a confirmation message. 7.2. Change Password This feature enables the user to modify the account password, if required. To do this, 1) Click on Change Password in the Manage my profile widget. The Change Password page is displayed with the related fields. 68 OpenHouse-UK user manual The Name and E-mail ID of the user cannot be changed. 2) Enter the current password in the Old Password field. 3) Enter the New Password in the given field. The password must be a minimum 6 characters in length. 4) Re-enter the new password for confirmation in the Confirm Password field. 5) Click Submit to save the modifications. 7.3. Invite User Each node in the platform has a default user referred to as ‘Admin’. The admin can send invite to team members and assign roles to each registered user/team member. This feature enables the user to delegate platform UI access to users and assign roles with specific permissions (for example: Manage services, Manage financials, etc.). For this, the user can send out invite to team members and assign them roles such as Read-only, Manage services, or Full access to the platform. To do this, Click on Invite User in the Manage my profile widget. The Invite User page is displayed with the related fields. 69 OpenHouse-UK user manual Add a User 1) Click Add a New User to send an invite to a team member. 2) Enter team member details such as Name, and Email ID. 3) Select the User Role (Read-only/Manage services/Full access) that needs to be assigned to the team member. 4) Click Send Invite to send the notification to the given email id of the team member and display a confirmation message. Edit/Delete The team member details and permissions can be modified and deleted based on the requirement. To edit, Click on the Name of the team member to modify the details. To re-invite, The team member can be re-invited if required. To do this, 5) Click ReInvite corresponding to the team member name to display a confirmation window. 70 OpenHouse-UK user manual 6) Click OK to send the invite again, and display a confirmation message. To delete, 7) Click on the icon corresponding to the name to display a confirmation window. 8) Click OK to delete the user account of the team member. 7.4. Manage Team Roles This feature enables the team admin to set access permissions to team members or invited users. To do this, 71 OpenHouse-UK user manual 1) Click on Manage team roles to navigate to the Manage team roles page that displays the platform nodes (vertical) and the access permissions (horizontal). 72 OpenHouse-UK user manual 2) Enter a role name and click Add Role to create a new role. The new role is displayed with the functionalities (for example: Note: The role thus created can be edited ( ) icon) and deleted ( icon) as per the requirement. 3) Select the permissions that need to be assigned for a node. 4) Click Submit to save the new role and permissions. 73