1
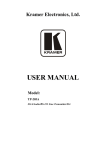
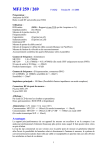
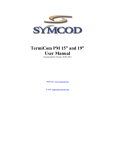
ViewXnet Ethernet to DVI/VGA adapter USER’S MANUAL FEDERAL COMMUNICATIONS COMMISSION This device complies with Part 15 of the FCC Rules Operation is subject to the following two conditions: this device may not cause harmful interference, and (2) this device must accept any interference received, including interference that may cause undesired operation. This equipment has been tested and found to comply with the limits for a Class B Digital Device, pursuant to part 15 of the FCC Rules. These limits are designed to provide reasonable protection against harmful interference in a residential installation. This equipment generates, uses and can radiated radio frequency energy and, if not installed and used in accordance with the instruction, may cause harmful interference to radio communication. However, there is no grantee that interference will not occur in a particular installation. If this equipment does cause harmful interference to radio or television reception, which can be determined by tuning the equipment off and on, the user is encouraged to try to correct the interference by one or more of the following measures: -Reorient or relocate the receiving antenna. -Increase the separation between the equipment and receiver. -Connect the equipment into an outlet on a circuit different from that to which the receiver is connected. -Consult the dealer or an experienced radio/TV technician for help. Notice: Changes or modifications not expressly approved by the party responsible for compliance could void the user’s authority to operate the equipment. CE DECLARATION This device complies with CE . These limits are designed to provide reasonable protection against harmful interface in a residential installation. Printed in TAIWAN R.O.C No. 05252010 All contents are subject to change without notice. All trademarks are the property of their respective owner. I Table of Contents II Chapter 1. Overview 1.1 Introduction The ViewXnet extends computer display across a standard Ethernet network to TV and any display devices with DVI/VGA input port, it allows to display a far-away computer screen in any display device(especial the big size TV), it provide real time stream video over a network on a far away display. ViewXnet makes you enjoy the big size TV to be a computer primary or extend monitor, no matter play computer video on TV or mirror computer display, it is best choice to swap your small size monitor to a far away big size TV. 1.2 Features Easy to switch computer display from local to a far away place through the Ethernet(more than 300feet). DVI/VGA output, compatible with LCD TV and monitor. Delivers smooth high-resolution up to 1600 x 900 Easily connect additional monitor with notebook/desktop computer via Ethernet. Compatible with all Notebook/Desktop computers. Mirror, Extend and Primary a computer display workspace. Support rotation (Normal/Left/Right/Upside-Down) function control. Supports left, right, up and down extend display. Works seamlessly with Windows 7, Windows Vista and Windows XP operating systems. 1.3 Specifications Video: - External display output supported DVI-I (Bundle DVI-VGA adapter for VGA out). - Supports resolution up to 1600 x 900. Network : - IEEE802.3: 10Base-T, 100Base-TX , Ethernet RJ-45. Power requirement : - DC5V. Dimensions : - 97 x 66 x 25 (mm) 1 Chapter 1. Overview 1.4 System Requirements 0B Windows XP X86 / Windows Vista X86/64 / Win7 X86/64 Equipped Ethernet Notebook/Desktop computer Network cable Display device (e.g. TV or LCD monitor) with DVI/VGA cable CD-ROM drive (For software installation) 1.5 Package Contents ViewXnet device x 1 DVI-I to VGA adapter x 1 DC5V power adapter x 1 Driver / Manual CD x 1 Quick Installation Guide x 1 2 Chapter 2. Outline Description 2. Outline Description 1. Power Button : Power ON (push) / OFF (release). 2. LAN : Connect to computer or router via network cable. 3. DC5V : Power in. 4. DVI/VGA : DVI/VGA out; Connect to TV or monitor with DVI/VGA input port. 3 Chapter 3. Installation ※ Do not connect ViewXnet to computer before driver installation. 3.1 Driver Installation 3.1.1 Please insert "Multimedia Installation Kit" CD-ROM into your CD-ROM drive; AutoRun will running. (if AutoRun didn’t run, please go to “My Computer”, click CD-ROM drive) 3.1.2 Please select “ViewXnet” product. 3.1.3 Please select “Device Driver” 3.1.4 Setup wizard is running. Click "Next" and “Install” driver. 3.1.5 License Agreement, if you are agreeing to be bound by the terms of this agreement, please click “I Accept”. 3.1.6 Setup wizard will be completed automatically, please click “Finish”. In the install process, if system asks restart computer, please ignore this request or select “NO” 3.1.7 After Driver install completed, Please restart computer. 3.1.8 After restart computer, You should now see the following icon on your desktop. 4 Chapter 3. Installation 3.2 Hardware Installation There are two connections between ViewXnet and computer. You can choose either one just depend on your application 1. Connect ViewXnet directly to computer (1) Properly connect TV/Monitor with DVI/VGA (ViewXnet) output port. (2) Connect network cable between ViewXnet “LAN” and computer’s “LAN” port (3) Connect power adapter to “DC5V” (ViewXnet) power port. (4) Power on ViewXnet device. (5) Double click the icon on desktop. Double click icon. Now you should check the Device Manager Network USB Server Device is showed on Universal Serial Bus controllers. ※ If your Network system does not support DHCP, You will see the Application window showed Net2DVI-I in different segment (See the Page 7 Note: Set IP address) 5 Chapter 3. Installation 2. Connect ViewXnet to computer via Router (1) Properly connect TV/Monitor with VGA (ViewXnet) output port. (2) Connect Network cable between ViewXnet “LAN” port and Router’s “LAN 1” port. (3) Connect Network cable between computer’s “LAN” port and Router’s “LAN 2” port. (4) Connect power adapter to “DC5V” (ViewXnet) power port. (5) Power on ViewXnet device. (6) Double click the icon on desktop. Double click icon. Now you should check the Device Manager Network USB Server Device is showed on Universal Serial Bus controllers. ※ If your Network system does not support DHCP, You will see the Application window showed Net2DVI-I in different segment (See the Page 7 Note: Set IP address) 6 Chapter 3. Installation Note:Set IP address - The Default IP address is 192.168.1.50 - Please go to My Network Places (right click) -> Properties -> Local Area Connection (right click) ->Properties -> General ->TCP/IP properties to set your IP address manually - The IP address first three values(192.168.1.X) should be same as Application window showed. - You can key the any number to be the 4th value. (Not same as Application window showed the 4th value…ex: 192.168.1.55) - Subnet mask must be 255.255.255.0 7 Chapter 4. Operation 4.1 Starting After double click the icon on desktop, you can see video window as below (1) Basic Setting: You can set the Basic Setting here. (2) Device: Show the Display devices is plugged in ViewXnet. (3) Status: Show the Display devices status. (4) Information: Show the Display devices information. (5) Search: Search the Display devices is plugged in ViewXnet. (6) Connect/Disconnect Device: Connect or Disconnect Device. 4.2 Display Connect Display Device and you can use Display function. (1) Click “Connect Device” button (2) When the device is connected successfully, it will show green check mark, and check the Device Manager After the device is installed correctly, you should now see the following icon on your notification area. 8 Chapter 4. Operation 4.2.1 Display Operation (Win XP / Vista) (1) Starting: To access the menu, right click the icon on your notification area. This utility allows you to quickly change the settings and resolution of your ViewXnet. (2) Updates: Check and download the latest driver here. (3) Screen Resolution: In Set as Main Monitor and Extended mode, you can change the display resolution. (4) Color Quality: You can set display Color Quality, There are Medium (16-bit) and Highest (32-bit) can select. 9 Chapter 4. Operation (5) Screen Rotation: You can use the Rotation function to change the display degree. (6) Extend To: In the Extend mode, you can extend screen to Right / Left / Above / Below. (7) Extend: This setting will extend your desktop from your main display onto the secondary. (8) Set as Main Monitor: Your main display (monitor) will automatically switch to being the secondary display and show the extended desktop. 10 Chapter 4. Operation (9) Notebook Monitor Off: Disable main screen. (10) Mirror: This setting will mirror the image from your main display onto the secondary display. Your main display and the extended display will show the same image. Note: In the Mirror mode, Screen Resolution and Color Quality functions will be disabled. Those two functions depend on the primary screen display settings, you can go to Advanced->Display to change. (11) Off: Disable screen extend function. (12) Optimize for Video (Only in Windows Vista): Optimize for the video you are showing. The function only can be used in Windows Vista. 11 Chapter 4. Operation (13) Advanced…: Go to Windows operating system Display Properties 4.2.2 Display Operation (Win 7) (1) Starting: To access the menu, click the icon on your notification area. This utility allows you to quickly change the settings of your ViewXnet. (2) Check for Updates…: Check and download the latest driver automatically here. (3) Optimize for Video: Optimize for the video you are showing. 12 Chapter 4. Operation (4) Advanced…: Change the appearance of your displays. (4)-1 Display: Display detected information. (4)-2 Resolution: You can change the display resolution. (4)-3 Orientation: You can use this function to change the display Orientation you are selected. Select a monitor Select the Orientation 13 Chapter 4. Operation Landscape Portrait Landscape (flipped) Portrait (flipped) (4)-4 Multiple displays - Duplicate these displays: This setting will duplicate the image from your main display onto the secondary display. Your main display and the extended display will show the same image. 14 Chapter 4. Operation - Extend these displays: This setting will extend your desktop from your main display onto the secondary. - Show desktop only on 1: Disable monitor 2 - Show desktop only on 2: Disable monitor 1 Note: After the setting please remember to click “Apply” and “OK” before you quit. 15 Chapter 5. Troubleshooting Q1: How come my video will not play on Media Player if I move it over to the extended desktop? A1: Check that you have moved the Media Player window completely over to the second screen. Q2: Why does my mouse not move to the right side of the screen as it should on the extended desktop? A2: Check the display settings and make sure that your display number ‘2’ is on the right side of display number ‘1’. You can rearrange how Windows treats each display in relation to each other in the Display Properties Settings. Q3: There are horizontal lines covering the displayed image. A3: This is due to a low refresh rate setting. You can change this in: Display Properties, Settings, Advanced, Monitor. Make sure that you have selected the USB 2.0 VGA device first, and do not exceed the refresh rate limitations of the monitor. Reset, or resynchronize the monitor may also help. For further details on how to reset or resynchronize your monitor, please refer to the documentation that was included with your monitor purchase. Q4: Why the images does not show on monitor which connect ViewXnet? A4: 1. Make sure the monitor power “ON”. 2. Make sure the setting menu on your notification area does not on “OFF” mode. 3. Please check the resolution both support those monitors. 16