1
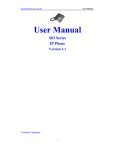
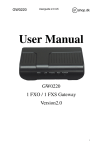
HybSys User Manual User Manual IP Phone HybSys 5000 Version 1.0 1- HybSys User Manual 1. Introduction ............................................................................................................... 3 2 3 1.1 Components .............................................................................................................. 3 1.2 Flexible Function .................................................................................................... 4 1.3 Key Function............................................................................................................. 5 Product Installation ............................................................................................... 6 2.1 Installation ................................................................................................................ 6 2.2 Typical Product network connecting Diagrams .................................................... 6 IP Phone Configuration ........................................................................................ 7 3.1 Memory key .............................................................................................................. 7 3.2 Screen display setting ............................................................................................... 8 3.3 Volume Setting .......................................................................................................... 9 3.4 Greeting Message Setting ........................................................................................ 9 3.5 Language Setting .................................................................................................... 10 3.6 SIP Setting ............................................................................................................... 10 3.7 Network Setting ....................................................................................................... 11 3.8 Ring Type Setting ................................................................................................... 12 3.9 Voice memo ............................................................................................................. 12 3.10 Reboot system ......................................................................................................... 12 4 Check the Callers Record .................................................................................... 13 5 Voice Record ......................................................................................................... 13 6 7 5.1 Voice Memo ............................................................................................................. 13 5.2 Voice record while calling ...................................................................................... 13 5.3 Listen the voice record ........................................................................................... 13 Making Call .......................................................................................................... 13 6.1 Multi-line calling out .............................................................................................. 14 6.2 Speed dial ................................................................................................................ 14 6.3 Transfer ................................................................................................................... 14 6.4 Three way conference ............................................................................................ 14 Web configuration ................................................................................................ 14 7.1 Wizard ..................................................................................................................... 14 7.2 Network Setting ...................................................................................................... 16 7.3 SIP Setting ............................................................................................................... 20 2- HybSys User Manual 1. Introduction Welcome to select our IP Phone and thanks for your trust and support to our company. We sincerely hope you can enjoy the convenience and capabilities brought forward by our products. IP Phone provides more value-added functions than normal phone. Our IP phone guarantees rich functions and crystal voice quality at mass-affordable price, which is fully compatible with SIP industry standard and able to interoperate with most SIP compliant devices and software on the market. This manual provides the information on basic operations and functions for IP Phone, which will assist users the fast access to learn basic functions and be familiar with operating the unit. ! CAUTION △ Although the adapter of IP Phone is compliant with UL standard, please do not attempt to use other different power adapter or cut off power supply during configuration or updating phone. Using unoriginal power adapter may damage IP phone and will invalidate the manufacturer warranty. 1.1 Components Unpacking the package of IP Phone and please make sure its contents included as below packing list .If you find any part missing or damaged, contact your local distributor. Components Packing List Components Quantity Main Unit 1 Unit Handset 1 PC Coil 1 PC AC Adapter 1 PC RJ45 data cable 1 PC User Manual 1 Volume IP Phone are designed to look like conventional phones, the following photo shows a broad overview of the IP Phone. 3- HybSys User Manual 1.2 Flexible Function Key button introduction 1.Callers 2.Redial 3. Hands free 4.Memory key 5.Volume+ 6.Volume- 7.Transfer 8.Mute 9.Hold 10.Phonenumber 11.Network 12.Esc 13. Earphone 14. Directory 15.Soft1 16.Soft2 17.Soft3 18.Left 19.Up 20.Right 21.Down 22.Menu 4- HybSys User Manual 1.3 Key Function There are 38 keys on the phone. Definitions of each is stated as below Key Button 0 -9 Mode Definitions In the dial-up mode Decimal digit number 0-9 In the keypad configure mode Swiftly press to display the digit number 0-9 first, then swiftly press to display the English character or others In the dial-up mode As one part of phone number when call out In the call hold mode Ready to call a third party’s number to make three-way (or conference) calling In the keypad configure mode Equal to the dots notation when input IP address Ex. 192.168.10.202 # In the dial-up mode Start making a call or send out the number dialed by pressing # MENU In the IDLE mode Enter into menu mode and display the tree menu systems Callers In the IDLE mode Check the Income/Outgoing/Missed calls record Three flexible Function Keys In the IDLE mode or In the keypad configure mode Select the relevant function on the LCD , pressing group function keys to make up/down/enter /edit//quit/save/record/next HOLD In the keypad configure mode Temporarily hold the active call Transfer In the keypad configure mode Transfer the active call to another party REDIAL In the dial-up mode Redial the number last dialed In the IDLE mode Enter into hands-free mode In the keypad configure mode Go back to previous item/ Go forward to sub-item In the IDLE mode Continuously thrice press to display WAN Port IP, gateway’s IP and the phone number registered on public server In the keypad configure mode Choose the item on the menu In the idle mode Show SIP Phone number Memory Key 1~5 In the IDLE mode Show the corresponding recorded phone number. Directory In the IDLE mode Access to phone book. Hand free In the IDLE mode Enable Hand free function Volume adjustment In the IDLE mode Adjust the dialing ring volume In the hand free mode Adjust the hand free volume * UP/Down Left/Right In the dial up mode Adjust the handset volume Network In the dial-up mode Show WAN port IP gateway IP Mute In the dial-up mode Mute an active call Earphone Use earphone to receive and make a call 5- HybSys User Manual 2 Product Installation 2.1 Installation a) Insert handset cord into the handset jack and the other end to the jack on the left side of the phone b) Insert the power adapter plug into the phone Power jack and the 2-prong plug end of which into grounded power outlet c) Connect one end of the network cable to the WAN port, which is indicated as on LCD, and the other end to the internet. d) If need to set up small LAN network, please connect the unit with your PC through the data able supplied, then you can find the indicator on LCD (PC is not required to set up for making a call) 2.2 Typical Product network connecting Diagrams Diagrams 1 IP PHONE Diagrams 2 6- HybSys User Manual 3 IP Phone Configuration Hereinabove the manual has defined the keypad function. It is easy to config IP phone thru the keypads. HybSys 5000 can be configured without PC, With keypad configuration, it is available to set Network parameter, SIP, Ring tone, and so on. There are ten function items in Menu. Including Memory Key , Screen Setting, Volume Control, Greeting Message , Language Setting , Sip Setting, Network Setting, Ringer Type, Voice Memo, Reboot System. By pressing Down to get the WAN Port IP, gateway’s IP in in the IDLE mode. Speed Dial Memory Key Setting 3.1 Memory key It is the first item in the menu config. There are five memory keys For installing insall common use phonenumber for speed dial 3.1.1 Set Speed Dial Memory Key ¾ press Menu ¾ LCD displays ¾ Select Choose a Memory Key Key in Idle mode: 01 Memory Key 7- HybSys User Manual ¾ Choose one from Memory 1 ~ Memory 5 ¾ Enter the phone number for speed dial. ¾ Select Save ¾ Finished. 3.1.2 Dial Speed Dial Memory Key ¾ Press Memory 1~5 key in idle mode ¾ Press Hand free or pick up the handset 3.2 Screen display setting Screen display setting is the second item in the menu, press Soft key2 to access set mode, including contrast adjustment by left and right button. Press softkey 1 to adjust the brightness by left and right button, there are three options for selecting as OFF, LOW, HIGH. 3.2.1 Login ¾ Pressing Menu ¾ Press the Down Key ¾ The LCD displays 02 Screen Setting Key in Idle mode . 3.2.2 Letter contrast setting ¾ Select Enter. The LCD displays 01 Contrast ¾ Adjust the letter contrast by pressing Left Key ¾ Select Save ¾ Finished. or Right Key 3.2.3 Brightness setting ¾ Select Enter ¾ Press the Down Key ¾ Select ■ Off, ■ Low, ■ High of the brightness by pressing Left Key . The LCD displays 02Brightness Key ¾ Select Save 8- or Right HybSys ¾ User Manual Finished. 3.3 Volume Setting Ring tone and microphone input/output volume can be adjusted in this menu. ¾ Pressing Menu ¾ Press the Down Key Key in Idle mode twice. The LCD displays 03 Volume Setting 3.3.1 Ringer Volume Setting ¾ Select Enter. The LCD displays 01 Ringer Volume ¾ Adjust the ringer volume by pressing Left Key ¾ Select Save ¾ Finished. or Right Key 3.3.2 Call Part Volume ¾ Select Enter. The LCD displays 01 Call Party Volume ¾ Adjust the call party volume by pressing Left Key ¾ Select Save ¾ Finished. or Right Key ¾ 3.4 Greeting Message Setting Setting message display on the LCD in idle state. The maximum capacity for greeting message storing is 10 letters. VOIP PHONE is the default display. Pressing Menu Key in Idle mode ¾ Press the Down Key ¾ Select Edit ¾ Enter the greeting message with the Number Key and Letter Key (The LCD will ¾ display the number pressed while pressing Number Key for three times . The LCD displays 04 Greeting Message 0 ~ 9 once and displays the Lowcase letter / Capital letter while pressing twice. * works as the full stop or comma. # works as space.) ¾ Select Save ¾ Finished 9- HybSys User Manual 3.5 Language Setting HybSys 5000 support Chinese and English. Users can select language what they like. ¾ Pressing Menu ¾ Press the Down Key Key in Idle mode for four times. The LCD displays 05 Language 3.6 SIP Setting ¾ Pressing Menu ¾ Press the Down Key Key in Idle mode for five times. The LCD displays 06 SIP Setting SIP server setting Synchronously, HybSys 5000 support two SIP service providers (SP) which are called SIP1 and SIP2. User can set his SIP account by keypad. NOTE: If the register port is not 5060 .You must set it in WEB. ¾ Select Enter. The LCD display 01 SIP 1 z z z z SIP 1 setting ¾ Select Enter. The LCD display 01 SIP 1 Server ¾ Select Edit. Enter the IP domain/ IP address. ¾ Select Save ¾ Finished. SIP Number Setting ¾ Return to 01 SIP 1 ¾ Press the Down Key ¾ Select Edit. Enter the SIP 1 Number ¾ Select Save ¾ Finished. once. The LCD displays 02 SIP 1 Number SIP Account Setting ¾ Return to 01 SIP 1 ¾ Press the Down Key ¾ Select Edit. Enter the SIP 1 Account ¾ Select Save ¾ Finished. twice. The LCD displays 03 SIP 1 Account SIP Password Setting ¾ Return to 01 SIP 1 ¾ Press the Down Key for three times. The LCD displays 04 SIP 1 Password 10 - HybSys z User Manual ¾ Select Edit with Flexible Function Key. Enter the SIP 1 Password ¾ Select Save ¾ Finished. Register Setting ¾ Return to 01 SIP ¾ Press the Down Key ¾ Press Left Key ¾ Select Save ¾ Finished. for four times. The LCD displays 04 SIP 1 Register or Right Key to select □ ON / □ OFF NOTE: SIP 2 Account Setting can be completed by methods as SIP 1 Account Setting. 3.7 Network Setting Network setting including WAN port network mode, static DHCP, PPPOE. Selecting static to modify the static IP, DNS, gateway IP. When selecting DHCP, WAN port will get IP from DHCP server automatically. When selecting PPPOE, HybSys 5000 can connect with ADSL modem. ¾ Pressing Menu ¾ Press the Down Key z z Key in Idle mode for six times. The LCD displays 07 Network Setting Net Mode Setting ¾ Select Enter. The LCD displays 01 Net Mode ¾ Press Left Key ¾ Select Save ¾ Finished. or Right Key to select □ Static / □ DHCP /□PPPoE Static Setting ¾ Return to 07 Network Setting. ¾ Select Enter and go into WAN port network setting. ¾ Press the Down Key and go into the Static Setting. The LCD displays 02 Static Setting ¾ Select Enter the LCD displays 01 Static IP ¾ Select Edit . Enter the Static IP. ¾ Select Save ¾ Finished. Return to the Static IP Setting mode. The LCD displays 02 Static Setting ¾ Select Enter and press ¾ Select Enter. Press the Down Key ¾ Select Edit . Enter the gateway IP ¾ Select Save 11 - twice. The LCD displays 04 Static DNS HybSys User Manual ¾ Finished. z PPPoE Setting ¾ Return to 07 Network Setting. ¾ Select Enter and go into WAN port network setting. ¾ Press the Down Key ¾ Select Enter. The LCD displays 01 Account ¾ Select Edit . Enter the PPPoE account. Please refer to 3.4 ¾ Select Save ¾ Finished. twice. The LCD displays 03 PPPoE Setting Return to 03 PPPoE Setting ¾ Select Enter. Press the Down Key ¾ Select Edit. Enter the PPPoE password. ¾ Select Save ¾ Finished. . The LCD displays 02 Password 3.8 Ring Type Setting HybSys 5000 has 12 types of incoming ring tones for user selecting. Include 4 types of MP3 ring. Using LEFT and RIGHT key to choose the ring tone you like ¾ Press Menu ¾ Press the Up Key ¾ Press Left Key Key in Idle mode . The LCD displays 08 Ring Type. or Right Key to select the ring type.(There are 8 default ring types). ¾ Select Save ¾ Finished. 3.9 Voice memo It is the greeting voice when incoming a call, which last 80 seconds. And HybSys 5000 supports user-define. About how to set, please refer to chapter 4.1. 3.10 Reboot system After rebooting the unit, it will return to the last store. 12 - HybSys User Manual 4 Check the Callers Record You can check the incoming calls, outgoing calls and missed calls by pressing Callers 5 Voice Record HybSys 5000 phone makes amelioration on voice record. 5.1 Voice Memo In idle state, SOFT KEY 3 is for recording. Pick up the handset and press soft key 3 (record) to select voice memo, then record your defined voice to change the voice memo to user–defined, save and quit. Remember to save. User-defined voice memo lasts 80 seconds. 5.2 Voice record while calling ¾ Press Rec. ¾ Press Stop to stop the record. Check the voice record ¾ Press Rec. The LCD displays Receive Record ¾ Select Enter 5.3 Listen the voice record In idle state, press SOFT KEY 3 to record page. Follow what show on LCD to use the soft function key. Process: In leaving message page, you can find new, old voice record. 6 Making Call The chapter will introduce multi-line using, speed dial, transfer, three way conference There are three dialing modes: 13 - HybSys User Manual 6.1 Multi-line calling out HybSys 5000 phone support the maximum 5 line calling out. That is to say the phone can register to 5 different SIP VoIP system synchronously. User can set the memory key from 1 to 5 according to the SIP account for calling out. So user can select the VoIP SP for calling out. NOTE: HybSys 5000 supports default call-out via SIP1 service 6.2 Speed dial In IDLE mode, user can place a call without picking up the handset or using SPEAKER by ending the number dialed with SOFT 2 KEY. If ending with soft 3 key, the number dialed will be saved. 6.3 Transfer While in conversation, press SOFT 2 KEY, then dial the number that you want to reach. Note: in conversation, SOFT 2 KEY works as the transfer button. While In dial-up state, It is map function. So, in dial-up state, press SOFT 2 KEY to send out the call by domain format. 6.4 Three way conference ¾ Press TRANSFER to hold Party B ¾ Dial Party C’s number ¾ Press SOFT 3 KEY after Party C answer Note: If HybSys 5000 is the 3-way conference starter, recording function is not available at this moment. 7 Web configuration 7.1 Wizard There is wizard item in the left navigation column. Click Wizard .then the page will show as the below picture (Picture: Wizard 01) 14 - HybSys User Manual Picture: Wizard 01 Network Mode Select have three mode for choosing. Take DHCP as example. Stick DHCP mode check box , then click NEXT. It will enter into another config windows that it is for SIP setting Picture: Wizard 02 Set display name Set SIP register server IP address set SIP singal register port. Default is 5060 15 - HybSys User Manual Set SIP register server account username(Usually it is the same with the config port number) Set password of SIP register server account Set assigned phone number Enable /disable register function. That is to say to use or do not use SIP 1 service After finishing setting SIP1 account, then click NEXT to go into the following picture. Picture: Wizard 03 In the STEP 4, we must click <Finish> button to end our setting , it will save the config and reboot the phone. 7.2 Network Setting 7.2.1 WAN Click Networksetting, and wan config, the page will show as the below picture (Picture: Wizard 04) 16 - HybSys User Manual Picture: Wizard 04 Three models (Static /DHCP/PPPoE) are paratactic. Users can set the right model according to actual requirements. Static : user need to set IP, NETMSK, Gateway IP by manually DHCP: WAN Port will get IP from DHCP server (like your router ) PPPOE: It is for ADSL internet mode. User need to fill username and password that user get it from SP. If it display <valid MAC > on the right of Mac Authentic Code in the pic, it means the phone had been certificated. If it display display <invalid MAC>, it means the phone need a Mac Authenticating Code.(get it from your provider ) 17 - HybSys IP Address Netmask Gateway DNS Domain Primary DNS Alter DNS User Manual WAN IP address Network mask Default gateway IP address Option configuration IP address for primary Domain Name Server Option configuration Server If ISP no special requirements, remains default setting User Provided by ADSL ISP Password Provided by ADSL ISP Click “Apply” button after finished above setting, IP Phone will auto-config the WAN parameter with immediate effect. The setting of WAN is effective and enables IP Phone to connect to internet. 18 - HybSys User Manual 7.2.2 LAN configuration Click LAN Config, it will enter into Picture: Wizard 05 Picture: Wizard 05 z Config LAN: generally config one private IP address IP Netmask LAN IP address Network Mask z Start LAN DHCP Service and NAT or do not: default setting is start Start Bridge Mode or do not(transparent mode): Once start Bridge Mode, some parts of LAN config will be disabled, and the phone will no longer set IP address for LAN physical port,LAN and WAN will join in the same network; 19 - HybSys User Manual 7.3 SIP Setting Click SIP Setting, then the page will show as the below picture (Picture: Wizard 06) Picture: Wizard 06 Regist status SIP register state;if register successfully, show “Registered”(marked red in the pic) in the square bracket,otherwise show Unregistered Display name the called display the name Register Server Set SIP register server IP address address Proxy Server addr Set proxy server IP address(usually SIP will provide the same configuration of proxy server and register server, if different(such as different IP addresses), then each server's configuration should be modified separately) Register Server Port Set SIP register server signal port Proxy Server Port Set SIP proxy server signal port Set SIP register server account username(Usually it Register Username is the same with the config port number) Proxy Username Set the SIP proxy server account username 20 - HybSys Register Password Proxy Password Domain Realm User Manual Phone Number Set password of SIP register server account Set password of SIP register account Set the sip domain if you have it, otherwise HybSys 5000 will use the proxy server address as sip domain. (Usually it is same with registered server and proxy server IP address). Set assigned phone number Enable Register Configure enable/disable register SIP advance configuration Click Advanced Setting, then the page will show as the below picture (Picture: Wizard 07) Picture: Wizard 07 set expire time of SIP server register, default is 60 seconds If the register time that server request is not equal to the phone expire time . HybSys 5000 will automatically adjust the time according to the server request. Set the server detect interval time .If phone enable the SIP detect server function .phone will send request to server by the interval time to detect the server answer or not. 21 - HybSys User Manual User agent , example .Net2phone register.user agent fill in the phone wan port MAC address Fill singnal encrypt key It is some voip softswitch that had compatible with our phone encryption function. Set DTMF sending mode. According to the SP ,Select one is right to the server . Set phone sip protocol version.To ensure that the phone can communicate with CISCO5300 version.You must select that use SIP1.0 RFC2543. Default config is RFC3261 Enable /disable phone support SIP prack function. Enable /disable to send register into with authentication Select this function, HybSys 5000 will not send authentication request to server each time. Server receive authentication register info ,it will send register acknowledgement to the HybSys 5000 Co-work with Server Auto Swap and Detect Interval Time. Select this function, HybSys 5000 will periodically detect whether the public SIP server is available, if the server is unavailable, the HybSys 5000 will switch to the back-up SIP sever, and continue detecting the public sip server. HybSys 5000 will switch back to the primary SIP server if the server is available again. Enable /disable to support/not support rfc4028; Enable /disable signal encryption function Enable /disable voice encryption function Enable /disable STUN function. Show stun nat judgement,true means that STUN penetrate through firewall.,false means that STUN can not penetrate through firewall. Set STUN server address 22 - HybSys User Manual Set SIP STUN server port STUN detect NAT type and interval time Set SIP phone local port 23 -