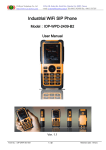
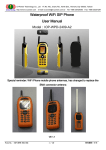
1
Wifi Phone E30 User Guide
Table of Content
For your safety---------------------------------------------------------------------------------------------2
Start----------------------------------------------------------------------------------------------------------3
Package Contents-----------------------------------------------------------------------------------3
Phone Specification--------------------------------------------------------------------------------3
Handset Description--------------------------------------------------------------------------------4
Key Pad Define and Text Entry-------------------------------------------------------------------5
Write Text--------------------------------------------------------------------------------------------5
Charge Battery-------------------------------------------------------------------------------------- 6
Power On /Off---------------------------------------------------------------------------------------6
Keypad Lock-----------------------------------------------------------------------------------------6
Flashlight---------------------------------------------------------------------------------------------6
WLAN and VOIP Setting--------------------------------------------------------------------------6
Dial/Answer Call----------------------------------------------------------------------------------- 9
SOS Alarm-------------------------------------------------------------------------------------------10
P2P----------------------------------------------------------------------------------------------------11
Menu Function----------------------------------------------------------------------------------------------11
Call----------------------------------------------------------------------------------------------------11
Message---------------------------------------------------------------------------------------------- 12
PTT--------------------------------------------------------------------------------------------------- 12
Utilities----------------------------------------------------------------------------------------------- 14
Setting------------------------------------------------------------------------------------------------ 15
Status Summary------------------------------------------------------------------------------------- 16
Basic Trouble Shooting------------------------------------------------------------------------------------ 17
-1-
For your safety
Read these simple guidelines. Not following them may be dangerous or illegal. Read the
complete user guide for further information.
SWITCH ON SAFELY
Do not switch the phone on when wireless phone use is prohibited or when it may cause
interference or danger.
ROAD SAFETY COMES FIRST
Obey all local laws. Always keep your hands free to operate the vehicle while driving. Your
first consideration while driving should be road safety.
INTERFERENCE
All wireless phones may be susceptible to interference, which could affect performance.
SWITCH OFF IN RESTRICTED REGIONS
Follow any restrictions. Switch the phone off in restricted regions.
USE SENSIBLY
Use only in the normal position as explained in the product documentation. Do not touch the
antenna unnecessarily.
QUALIFIED SERVICE
Only qualified personnel may install or repair this product.
ENHANCEMENTS AND BATTERIES
Do not replace components.
Use only approved enhancements and batteries. Do not connect incompatible products.
Replacing batteries must be done in a safe place with the same type batteries.
Do not disassemble, recharge or replace the battery in hazardous locations.
Charging must be conducted in a safe place with the charger provided by manufacturer.
Do not use or recharge the battery in heat, fire or direct sunlight locations.
THE PERFORMANCE OF THREE-PROOF
Your phone has a waterproof, explosion-proof, dust-proof and anti-drop performance, but
uses it with care.
BACK-UP COPIES
Remember to make back-up copies or keep a written record of all important information
stored in your phone.
CONNECTING TO OTHER DEVICES
When connecting to any other device, read its user guide for detailed safety instructions. Do
not connect incompatible products.
-2-
Start
Please read the manual before installing and using this product.
Package Contents
Wifi phone
x1
Battery
x1
Charger
x1
USB cable
x1
Quick guide
x1
Certificate of approval
x1
Phone Specification
Dimension
121.8* 57.8* 28.7 mm
Weight
168g (including battery)
Battery
Rechargeable Lithium Manganese battery,
PL123450, 3.7V, 1500mAh; (removable)
Adapter
Input AC 100-240V / output DC 5V 1A
Protocol
SIP v2,RFC3261/STUN、RTP
LCD
Color LCD 1.8”, 128*160
NOTE
z The standby time depends on the network conditions, phone usage and surrounding area. The
phone consumes more battery power under the following conditions:
1. In areas with weak signals, with high or low temperatures, or when used outside the service
coverage area.
2. When the phone frequently searches for network signal due to location changes.
3. When users talk on the phone for long periods of time (+ - 3hrs).
4. When users send and receive messages frequently.
5. The Alarm, Backlight or Vibration function is active.
6. Ring or listening volume is set to maximum.
7. When flashlight is used frequently.
8. Sometimes the matching between the phones and AP can influence the standby time.
-3-
Handset Description
Key
Function
Left soft key
Select/done
Right soft key
Back/clear/exit
Answer key
Answer/dial
End key
Reject/end/back/power on/power off
Up
Up/increase
Down
Down/decrease
Left
Before/decrease
Right
Next/increase
OK
Same to the left soft key
Number key 1
Number 1 and symbols in common use “ .” “-” “ ?” “@” “1”
Number key 2
Number 2 and characters ABC
Number key 3
Number 3 and characters DEF
Number key 4
Number 4 and characters GHI
Number key 5
Number 5 and characters JKL
Number key 6
Number 6 and characters MNO
Number key 7
Number 7 and characters PQRS
Number key 8
Number 8 and characters TUV
Number key 9
Number 9 and characters WXYZ
Number key 0
Number 0/+-*% and for blank
Symbol *
Symbol * / symbols
Symbol #
Symbol # /shift input
PTT key
PTT call
-4-
SOS key (top key)
One key alarm
Flashlight key
Flashlight On/Off
Key Pad Define and Text Entry
Write Text
The number keys are not labeled all the letters that they can input. Letters that can be input refer
to the language you select. This phone support English and Simple Chinese input.
English:
z Press the number keys 1 to 9 continuously until the right character appear.
z Press the key that character is labeled, once for the first character, twice for the second, so on
and so forth.
z If the letter you want is at the same key with the before letter, you can press the left or right
key, then enter the new letter.
z Press the key of number 1; you can input some interpunctions you frequently use.
z Select “clear” to delete the character before the cursor.
z Select “#” to switch the input method.
-5-
Charge Battery
1. E10 has a built-in non-removable lithium cobalt battery or a built-in non-removable lithium
manganese battery. Please check if there is spare capacity in the battery the first time you use the
phone. If you can not boot the phone or the phone display low power consumption after booting,
please recharge it before using.
2. Connecting the charge base to the power supply, open the charging column protection cover at
the bottom of the phone, then insert the charge column to the charge base to start charging.
3. After that, the battery indication will start to roll while charging; when the phone finish charge,
the indication will stop rolling, please pull out the adapter to use.
Power On /Off
Power On
Press the End key for 2 seconds, the phone start to respond and power on. You need to setup the
phone first, if you have finished setting, the phone will search for the set WLAN automatically.
Power Off
Press the End key for 2 seconds, the phone will start to respond and power off.
Keypad Lock
Active: at standby mode, press * key first, and then # key
Unlock: press the * key first, and then # key
Flashlight
The flashlight key is on the right side of the WIFI phone. Press the key, flashlight is turned on;
Release the key, flashlight is turned off.
WLAN and VOIP Setting
This product support IEEE802.11b/g and SIP protocol, the default setting is without SIP
information, you should get the SIP name, password and domain from operator first.
For example, the information of the WLAN you’re going to use is:
SSID: WIFIAP
Security type: WEP-open
Password/Text: WIFI (or Hex key: 1016A386E)
-6-
The information of the SIP server you’re going to use is:
SIP server(domain): 51.108.26.31 (or maybe in the form of: sip.wifi.cn)
User name (SIP phone number):123456
SIP phone number: 123456(phone number could be the same to user name
or not, that due to the setting of SIP server.)
Password: 1234
The detailed settings are as follows:
A: Search Available WLAN
1. At standby mode, press the left soft key or OK key to enter the main menu. (The default initial
password: 000000)
2. Select Settings> WLAN setup, select one from the default 1-8 AP in WLAN setup, these eight
factory default configurations are empty, the default display is "Default + list No.".
3. After entering the "Options" menu, first select "WLAN Search". After searching, there will
be a list to show you the available AP, with security type and signal strength. Select the one
with highest strength (if this AP is permitted to use), press left soft key or OK key to setting.
Note: The security type of the selected AP was shown at the searched AP list. We take the type of
WEP-OPEN for example here; you can set other types by following the indication.
B: Connect WLAN
1. Set the SSID name WIFIAP first (the default name is the one you have just selected, the name
is consistent to AP currently), press left soft key or OK key to enter change menu.
Enter SSID
WIFIAP
2. Select Security Type> WEP-OPEN〉 WEP Key index〉 WEP Key 1, press left soft key or
OK key and enter the WEP-OPEN menu again. If the security type is “Open”, go to Step 3
directly.
Select Key / Pass〉Passphrase/ Hex Key, press left soft key or OK key enter the Enter key
(Hex)mode, key of the SSID is the one of the AP you have just selected., then press the left
soft key or OK key enter change menu again.
Enter passphrase
WIFIAP
Enter hex key
or
WIFIAP
3. Select IP setting> use DHCP (If the WLAN you selected support DHCP server), press left soft
key or OK key to enter change menu again.
You can also select static IP, follow the indications, and enter the IP address, net mask, gateway,
-7-
DNS address in turn. And back to change menu after setting.
4. The functions of configuration item "Options" menu are as follows:
Use - use the configuration item
Change - set the configuration item
Rename - rename the configuration item
Search - search an AP for the configuration item
WPS - connect the configuration item in WPS
Reconnect - reconnect the AP under the configuration item
C: SIP Server Register
1. WiFi phone number setting
You should get SIP phone number (SIP user name), password and SIP server domain from
operator first.
Select VOIP Settings, select one from the default 1-8 AP in WLAN setup, then enter the
"Options" menu, select "Change" menu to set configuration item.
Select VOIP identify> Phone number; input SIP phone number 123456, then press left
soft key or OK key to enter the VOIP identify menu again.
Enter phone no.
123456
2. SIP domain setting
Select VOIP setting> change> VOIP identify> SIP domain, press left soft key or OK
key, input SIP server address, press left soft key or OK key and enter the VOIP change menu
again.
Enter domain
Enter domain
or
51.108.26.31
Sip.wifi.cn
3. SIP server authentification
Select VOIP authentification> SIP user name/ password, then press left soft key or OK
key and enter the VOIP change menu.
Enter user name
Enter password
and
123456
1234
4. SIP Server Setting
Select VOIP server> SIP server address/SIP proxy address, press left soft key or OK
key and enter the VOIP change menu.
Enter SIP server address
Enter SIP server address
or
51.108.26.31
Sip.wifi.cn
5. After VOIP Information is set up, return to VOIP Setup menu, press the left soft key or OK key
to enter the configuration item, select "Use", then the configuration item will be taken effect.
-8-
6. The functions of configuration item "Options" menu are as follows:
Use - use the configuration item
Change - set the configuration item
Rename - rename the configuration item
Note: 1. STUN protocol is set in SIP server currently; you needn’t to set in your handset again. If
the SIP you registered doesn’t support STUN, you can search for it on internet and set in
your handset.
2. The port number of VOIP protocol is default; you needn’t to set in your handset again
except your operator provides you another one. To set it, enter the symbol “:” after the
SIP sever address, and then input the port number.
Enter SIP server address
51.108.26.31: 5060
3. This edition doesn’t support voice mail now.
Dial/Answer Call
1. Enter the integrity number, or you can search the number from the phonebook; or simply click
dial key to recall the recent phone number.
2. Press the Answer key to call the number; you can press the up/down key or left/right key to set
the volume of the speaker and microphone.
3. Press Answer key to answer a call, to reject a call press the End key.
Call Hold:
Call Hold is that users on a call can temporarily interrupt the original call (after call hold the
phone is in silent mode). To restore the original call, the user just needs to release the call hold
function,
Hold: Call status > left soft key > Call Options >1 Hold
Unhold: right soft key can release hold directly (or click the left soft key) > 1 Unhold
Call Mute:
Call Mute is that the user which selects Call Mute can only receive but not call.
Mute: Call status > left soft key > Call Options > 2 Mute
Unmute: right soft key can release mute directly (or click the left soft key) > 2 Unmute
Call Transfer:
Call Transfer is that the users on a call can transfer the current call to the online users on
third-party server platform, the transfer user withdraws the current call, and the remaining one
establishes a new call with the third party.
For example: 8001 and 8002 in the call state, 8002 transfer the current call to the user number
8003. At this time 8001 and 8003 establish a new call, and then 8002 withdraw the current call.
-9-
Call Transfer: call state > left soft key > Call Options > 3 Transfer > 3 Dial Call
(Or call from the phone book)
New Call:
New Call is that the users on a call can make a third-party call; the initial call will be
automatically held when the new call begins (the original call is in silent model). When the new
call hangs up, after the caller release hold, the original call can be restored.
New Call: call state > left soft key > Call Options > 4 New Call (or call from the phone book)
Restore the original call > right soft key directly release hold (or click the left soft key) > 1
Unhold
For example: 8001 and 8002 in the call, 8002 launch a new call to a third-party user 8003. At this
time 8002 and 8003 establish a new call, the call between 8001 and 8002 is on hold, either 8002 or
8003 can hang up the new call, after 8002 release hold, 8001 still can talk with 8002.
Note: Hold, Mute, Transfer, New Call function don’t distinguish the calling party and the
called, all parties can achieve above functions.
Shortcut key for speaker
During the call, you can turn on and turn off the speaker by the navigation OK key directly.
SOS Alarm
1. This function must cooperate with the server. Users can alarm to the server, then the server will
locate the user and take emergency measures.
2. Once press "SOS" key on the top of the phone in any interface, the phone starts to alarm, during
this period users can continue to operate other functions, the SOS alarm status can be displayed in
standby interface.
3. Please press the "SOS" key again to cancel alarm.
SOS number configuration
Settings> Phone Settings> 8 SOS settings
SOS server settings
SOS number settings
Note: Before using SOS function, please make sure the server your phone is registered in can
support the SOS function. Please contact the server operator for detailed information.
- 10 -
P2P
On standby interface, press combination keys " *0000 " into P2P dial interface:
* Enter P2P numbers, finished with clicking "OK"
* Enter P2P IP address, finished with clicking "OK"
Comes to the "start P2P dial" prompt, click "OK", then a P2P call begins
Note:
1. For P2P calls, all Wifi phones need to register on an AP, or an AP under the same subnet, and
automatically or manually obtain the IP address.
2. To make P2P calls, the VOIP numbers and SIP server address of the caller and the called can
not be empty, but can random fill in the information.
3. During P2P calls, you can not answer the VOIP calls.
4. When you choose Static IP, please set the gateway address.
Menu Function
You can press left soft key to enter the main menu at standby mode, and then choose the
function you want. Press right key “back” you will back to the higher level menu. Press the End
key you will back to the standby mode.
(Not all menu functions or option items are described here)
Call
Phonebook
Select Menu>Call>Phonebook, You can save names and phone numbers in the phone memory.
The internal contact list can store up to 200 names.
You can also use the following options in the Phonebook menu:
Phone numbers----- classify the number and store
Special ring----- select the special ring for the entry
Edit name----- edit name for the entry
Delete entry----- delete entry from phonebook
Find name and number from phonebook
1. Scroll down in the standby mode, select Menu>Call>Phonebook>Find/Add name.
2. Enter the first letters of the name. Scroll to the name that you want.
You can press # to switch the input method.
Dial
Select Menu>Call >Dial, you can enter the number you want and call it then.
- 11 -
Recent Calls
Select Menu>Call>Recent calls, The phone logs 10 phone numbers each of missed, received, and
dialed calls; the approximate duration of all calls.
The phone logs missed and received calls if it is switched on, within the network service area,
and the network supports these functions.
Speed Dial
Select Menu>Call >Speed Dial, you can dial the number key once for a call number.
Message
Create
Select Menu>Message>Create, then edit a new message here and sent it out.
Inbox
Select Menu>Message>Inbox, you can look over the messages you have received here. This box
can only store 20 messages at most, when it’s full, please delete some old once in time.
Outbox
Select Menu>Message>Outbox, you can look over the messages you have sent here. This box
can only store 20 messages at most, when it’s full, please delete some old once in time.
Drafts
Select Menu>Message>Drafts, you can look over the messages you have store here. This box
can only store 20 messages at most, when it’s full, please delete some old once in time.
Group list
Select Menu>SMS>Group list, you can add and edit the group list, or view and change the
contacts in this list. You also can send group SMS to the group list users.
Group list > 1 View list > 2 Add list > 3 Send message > 4 Rename list > 5 Delete list
1. Can store up to seven group lists, and each group list can store 20 users
2. Can add group list user from the phone book directly.
Note: Before you send messages, be sure the SIP server you’ve used support this function. Please
contact the operator for detailed information.
PTT
Login
Enter the PTT function from main menu, press the left function key to select "Options", enter
the following menu list:
Login
List update
PTT contact
PTT group
PTT setup
- 12 -
Select "PTT setup", enter the following menu list:
User setup
Server setup
Speaker setup
Auto login
Enter user ID and password in the "User setup" menu, enter the server address and port number
(default port is 5058) in the "Server Setup", complete the setup and exit "PTT setup" menu and
return to the "Options" menu, select "login" to register, the screen will be prompted:
"Registering 。。。". Once the phone is registered successfully, the PTT icon will appear on the
screen, then you can make the PTT call.
Use
Return to the "PTT contact" interface. Contacts are listed alphabetically according to contact
name; distinguish the offline users and online users through icon color, online users are orange
icon, offline users are gray icon; when there are two or more members in one group, the group is
online.
When the cursor stays on a certain contact or a group, press the left function key to select
"Options" menu, enter the following menu list:
Logout
List Update
PTT Contact
PTT Group
PTT Setup
"Logout" operation will quit PTT server, and the PTT icon disappears;
"List Update" operation will update the current group contact list;
"PTT Contact" will enter the following menu (when the cursor stays on a certain contact in a
contact list, the following menu will be available):
Edit Contact
View more info.
Add Contact
Delete Contact
"PTT group" will enter the following menu (when the cursor stays on a certain group in the PTT
contact, the following menu will be available):
Edit Group
View more info.
Add Group
Delete Group
- 13 -
View Member
Add Member
Delete Member
Call
After PTT server registration is completed, at the standby interface or "PTT contact" interface,
press and holds the side PTT key to initiate PTT call; after the ring stops, you can send the voice
message through microphone; when call is over, release the PTT key to end the call; "up" and
"down" key can adjust the volume of the PTT call.
On the standby interface, press the PTT key, the phone will initiate PTT call to default group;
On the "PTT contact" interface, when the cursor stays on the pre-built group or personal contacts,
press the PTT key to initiate the PTT call to this object;
After PTT call for pre-built group is over, any member of this pre-built group can initiate PTT
callback in the effective time.
Notes:
1. Sharing group is the fixed group set by the server; the end user can not change it. The sharing
group is top listed in the group list by default.
2. Pre-built group need to be defined in the members of sharing group by wifi phone terminal.
3. The "Options" menu of "sharing group" only has the following menus:
View group member
View more info.
Add group
4. During the answering period, it can not receive PTT calls.
PTT functionality requires server support; please contact the server operator for detailed
information.
Utilities
Stop watch
Select Menu>Utilities>Stop Watch, press left soft key to active the stop watch and start to time.
Calculator
Select Menu>Utilities>Calculator, Press keys 0 to 9 to insert digits and # to insert a decimal
point. Press * to select algorithm, and left soft key to get result.
Note: This calculator has limited accuracy and is designed for simple calculations.
Calendar
Select Menu>Utilities> Calendar, press up/down/right/left key to look over.
- 14 -
Setting
In this feature, you can change the phone's various settings. In order to prevent other people
changing the user's settings, please input your password to enter the settings menu. The initial
password is 000000, you can change this password in the "Password Settings" menu.
Phone Setup
Volume Setting
Select Menu>Setting>Phone Setup>Volume Setting, you can set the volume of receiver,
speaker, ring, keypad.
Prompt Mode
Select Menu>Setting>Phone Setup>Prompt Mode, you can select special ring, or set the
phone to vibrate mode or ring + vibrate mode when you receive a call
Screen/Keys
Select Menu>Setting>Phone Setup>Screen/Keys, you can set contrast, backlight, key
repeat, key click volume here.
Speakerphone
Select Menu>Setting>Phone Setup>Speakerphone, you can set it on or off.
Language
Select Menu>Setting>Phone Setup>Language, to select the menu language you want
(including English and Chinese).
Edit Greeting
Select Menu>Setting>Phone Setup>Edit Greeting, you can edit greeting for your phone.
WLAN Setup and VOIP Setup
See page 6 for details.
WLAN Setup>Security Type
Select Setting>WLAN Setup>WLAN/IP Setup>Change>Security Type, this product
support security type of Open, WEP, WPA2, WPA-PSK, WPS etc., you can choose the different
type for different WLAN. The operation is the same to the WEP-Open type; you can set it
following the indication.
VOIP Setup> VOIP methods > Keep Alive
You can choose to keep Alive or not to change the interactive frequency between the Wifi
Phone and the server. When you keep alive the phone, the interactive frequency becomes larger;
when you don’t keep alive, the frequency becomes smaller; Wifi Phone doesn’t keep alive by
default, normally this will not affect your use of the phone..
PING Test
Select Menu> Settings> PING test, PING test is for testing network delay and for users to
view the current network status. Under this function interface, you can manually input any IP
address for testing, or can choose the complete gateway, DNS, SIP server, SIP proxy and STUN
server for testing.
- 15 -
Time/Date
Select Menu>Setting>Time/date, you can set the time and date of your phone here. You can
also select a mode of the time/date format.
Upgrade Server Address
Select Menu> Setting> Upgrade Server Address, enter the upgrade server address in
window; when you start to upgrade, the system will connect to it automatically.
Firmware Upgrade
Select Menu>Setting> Firmware Upgrade, the system will check for the new files and
upgrade automatically.
Erase All
Select Menu>Setting> Erase All, this function will erase all of the user settings to reset all
settings to their default values.
Password Setup
Select Menu>Setting> Password Setup, users can change the password here, according to
the operation tips.
Status Summary
Wifi Phone provides user shortcut to look over the settings, there will be a detail list after
you setup your phone.
VOIP Status
WLAN Status
AP Channel
Signal Strength
Storage Status
Battery Display
Phone Number
MAC Address
Firmware Version
Server Information
Note: You can only look over the information here, if you want to change your settings, go back to
the setting menu.
- 16 -
Basic Trouble Shooting
QUESTION
RECOMMENDED
ACTION
Why can’t I switch on?
1. Check if the battery is inserted correctly.
2. Check if the battery is running out of power.
Connect the handset to PC or voltage.
Why is there no signal?
1. Check if there is any available AP.
2. Check if AP is setting correctly.
Check if AP settings (SSID, WEP key) of
WLAN are correctly.
Why is nothing displayed on the LCD
screen?
1. Check if battery is running out of power.
Why can’t I make a call?
1. Make sure you have registered the SIP server
correctly.
2. Make sure you have setup the WLAN
correctly.
3. Make sure the number you dialed is
available.
Why isn’t my firmware upgrading?
1. If the version of your handset is the latest, it
won’t update again.
2. Check if the upgrading address is correct.
Why can’t I roam?
1. Your handset can roam only between the APs
with same SSID name and password, if not,
you have to set it up again.
- 17 -