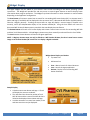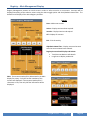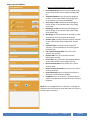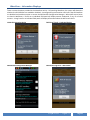
1
Active Credentials ™
User Guide & Reference
Version 1 – Revision 01.13.A
* DISCLAIMER *
NO WARRANTY – SOFTWARE AND DOCUMENTATION PROVIDED "AS IS"
THIS PROGRAM AND RELATED MATERIALS ARE DISTRIBUTED IN THE HOPE THAT THEY WILL BE USEFUL, BUT
WITHOUT ANY WARRANTY. THE ENTIRE RISK AS TO THE QUALITY AND PERFORMANCE OF THE PROGRAM IS
WITH YOU. SHOULD THE PROGRAM OR ANY MATERIALS PROVE DEFECTIVE, YOU ASSUME THE COST OF ALL
NECESSARY REPAIRS, SERVICING, AND CORRECTION.
This software is provided "AS IS" and any expressed or implied warranties, including, but not limited to, the
implied warranties of merchantability and fitness for a particular purpose are disclaimed. In no event, unless
required by applicable law, shall the software author or contributors be liable for any direct, indirect, incidental,
special, exemplary, or consequential damages including, but not limited to, procurement of substitute goods or
services; loss of use, data, or profits, or data being rendered inaccurate; or business interruption however caused
and on any theory of liability, whether in contract, strict liability, or tort (including negligence or otherwise) arising
in any way out of the use, inability to use, non-functionality, inaccuracies of this software and associated services,
or losses sustained by you or third parties, or a failure of the program to operate with any other programs or
systems even if the author or contributors have been advised of the possibility of such damage.
LIMITATION OF DIGITAL CREDENTIALS – Not all merchants or situations accept digital credentials and an original
document may be required in certain circumstances. While Agent provides storage and presentation of digital
credentials, there is no guarantee as to the accuracy or acceptance by any party of a digital credential originated
by Agent, nor the explicit or implicit assurance that a digital credential will be recognized and accepted as a
substitute for original credential materials. It is the user’s sole responsibility to ensure that a digital credential will
satisfy all credential acceptance requirements before using such items.
PHONE STATE ACCESS – For security reasons, it is required that Agent has access to the phone state in order to
create an encryption algorithm that mates the local Agent database with certain device characteristics. This
matching of database and device helps to prevent the unauthorized use of stored information on a rogue device.
BARCODE FORMATS – There are dozens of barcode formats in use ranging from one-dimensional (1D) linear types
to two dimension (2D) geometric styles. Agent scans many of the formats in general use (e.g., Code 39, Code 128,
QR Code, UPC A, EAN 8, EAN 13, ISBN-13, ISMN, LOGMARS), but there a number of unsupported types.
APPLICATION REQUIREMENTS
① The Android Operating System with a minimum installed Android OS version of 2.3.3 API 10.
② Barcode image accuracy is dependent on the installation device’s camera and screen resolution.
Agent Central Website
Copyright © 2011 - 2012 PayBurst Stbi. All Worldwide Rights Reserved.
Trademark claims are listed in the Terms of Use at www.PayBurst.com or About. All other marks, names and
logos are the property of their respective owners and mentioned as fair-use reference only. This application is not
endorsed by or affiliated with any company. Use of this software application and documentation constitutes
acceptance of the Privacy and Terms of Use policies listed at www.PayBurst.com.
PayBurst™ – Agent™
Page 2
Table of Contents
Operational Overview ............................................................................................................................................ 5
Credential Operations ............................................................................................................................................ 7
Home Screen Display .............................................................................................................................................. 9
Widget Display...................................................................................................................................................... 10
Access Menu Bar Options..................................................................................................................................... 11
Profile Overview ................................................................................................................................................... 12
Profile Fields Display ....................................................................................................................................... 13
Reminders Overview and Display ......................................................................................................................... 15
Registry Overview................................................................................................................................................. 16
Registry – Main Management Display ............................................................................................................ 18
Registry – Credential Display........................................................................................................................... 19
Registry – Credential Options.......................................................................................................................... 20
Registry Fields Display – Addition ................................................................................................................... 21
Registry Fields Display – Modification & Pre-Configured Issuer ..................................................................... 23
Registry – Photo Display.................................................................................................................................. 24
Registry – Accessory Displays .......................................................................................................................... 25
Agent ID Code Overview....................................................................................................................................... 26
Agent ID Code Display ..................................................................................................................................... 27
Agent ID Scan Overview and Display .................................................................................................................... 28
Agent ID Scan – Alternate Displays ................................................................................................................. 29
WaveScan Overview and Display ......................................................................................................................... 30
WaveScan – Information Displays ................................................................................................................... 31
DealQuest Overview / UNDER CONSTRUCTION (See System -> R&D)................................................................. 32
DealQuest Display ........................................................................................................................................... 33
DealQuest – Information Displays................................................................................................................... 34
PayBurst™ – Agent™
Page 3
System Settings Overview .................................................................................................................................... 35
System Settings Display................................................................................................................................... 37
Program Password Reminder .......................................................................................................................... 39
System Coordination Activities............................................................................................................................. 40
Appendix............................................................................................................................................................... 42
Agent ID™ Code – Property Field Tag & Data Specification ................................................................................. 43
User Profile Information ................................................................................................................................. 43
Agent ID™ Scan – Property Field Tag & Data Specification .................................................................................. 44
Registry Account Information ......................................................................................................................... 44
Gestures Index ...................................................................................................................................................... 46
PayBurst™ – Agent™
Page 4
Operational Overview
If you can scan, photo, or load a card or document image, then you can use it with Agent.
Agent™ from PayBurst™ is a digital credential application for the Android operating system. This type of
application is generally referred to as a mobile wallet, but Agent is capable of far more than simply being a digital
replacement for a leather wallet filled with credit cards.
CREDENTIAL FEATURES
Agent is able to store almost everything in your current physical wallet as you would expect, plus some items that
you currently cannot fit in your wallet. The following list highlights some of the items you can manage with Agent.
ü Loyalty cards
ü Credit/Debit Cards
ü Identification Cards
ü Boarding Passes
ü Admission Tickets
ü Licenses
ü Coupons
ü Health Insurance Cards
ü Motor Vehicle Records
ü Business Cards
ü Appointment Cards
ü Book ISBN Reminders
Some mobile wallet applications are limited in terms of the barcode formats they support. But with Agent, you
may either scan, photo, or load for use any plain text or image credential, including graphics such as:
QR Codes
Barcodes
PDF417 Codes
Agent can also create 2D barcodes of personal information using Agent ID™ Code to present to a participating
merchant for account applications, such as a loyalty rewards card. This feature allows the selection of personal
data from your Profile that you want to provide in an account application and then create a QR Code that the
merchant may scan. Upon approval, the merchant may then display a reply QR Code with the new account
information ready to be entered as an account using Agent ID™ Scan. With a simple scan of the merchant’s code,
the new membership details will be quickly and accurately entered into the Account Registry.
SECURITY FEATURES
Security is a key component of Agent since it was designed with the goal of keeping your personal information
safe. Agent uses a “local” approach to keep your data in safe hands (namely, your hands) and that means your
personal data is not stored on an Internet database.
All data is stored in the phone's local storage media using the internal system memory and the SD Card if
available. The local database that contains all user data, along with temporary files used by the application, is
encrypted with the AES-256 encryption algorithm which is considered to provide strong protection. The database
encryption keys created with this algorithm are unique to your device. With this arrangement, instead of cracking
one Internet computer database server to get the information for a million accounts, a cyber-thief would have to
crack a million devices to get one database file from each for the same results.
The Agent application also provides a program protection option which the user may configure that requests the
entry of a password to start the program. Of course, while there is a program password option available for the
user to employ, no application security system is infallible and program password protection is only part of a total
security management practice.
PayBurst™ – Agent™
Page 5
EXTERNAL CONNECTIONS
To improve security, Agent minimizes its access to the Internet. Features that require Internet connections are as
follows. The Reverse Geo-Location service queries a Google database upon request to provide address location
information. The System Update option will download data upon request for adjustments to the local database,
such as Account Type and other program configuration data. Licensing Validation will authenticate the
application as disclosed in the Terms of Use and consented to during the application installation. DealQuest
[Under Construction – See System -> R&D] queries a remote database upon request to search for deals with usersupplied search criteria.
No personal or account data is transmitted unless the user provides consent or makes a request.
Connections initiated by Agent program code attempt to conduct transmissions using HTTPS secure connections
to help safeguard the data when it is transmitted, yet connections are subject to the policies and practices of
connection servers. Such servers may use various connection standards and these servers are not under the
control of Agent operations. External connections via the Internet are limited to accessing a Google application
program interface for geo-location (address) information, and data servers for system updates. No security
system is infallible, yet limiting connections and using HTTPS when possible for those connections provides
industry standard secure transmissions.
ACTIVE CREDENTIALS
A key feature of Agent is the Active Credential™ operation. Each account entered into the Account Registry may
be linked with a WiFi Access Point (AP) Station ID Name maintained by a merchant or location. Depending on the
selected program configuration settings, the linked account could automatically display a custom credential image
stored with the account, or a barcode with the Account Number/ID.
For example, if your local music store had a WiFi AP broadcasting the Station ID Name “The Music Store” and you
linked your music store rewards card to that Station ID Name, then by setting the program configuration to AutoDisplay the next time you entered that store the rewards card would automatically be displayed on your device
screen (also requires use of System -> Settings -> Location Sync Interval). Any account could be linked to the
Station ID Name ranging from a rewards card to a coupon and it would be displayed for you to use the next time
you are at that location. The WiFi AP does not have to provide Internet access for this feature to function since all
that is required is for the WiFi AP to broadcast a Station ID Name.
SEARCH FOR SPECIFIC REWARD DEALS
Having Agent display a loyalty card to get a discount is convenient, but before you need that loyalty card you may
want to search for an item that is offering the reward you want, such as cash back or airline miles. DealQuest™ is
a feature being expanded to provide the user with options that allow custom searches filtered by the specific
accounts that you want to use, or the particular incentives that you want to receive.
DEALQUEST IS UNDER CONSTRUCTION – SEE SYSTEM -> R&D
PayBurst™ – Agent™
Page 6
Credential Operations
Credential Display
If a Registry Account has either custom images or an Account Number/ID listed, then the images or ID can be
displayed for review or scanning during a transaction. The Agent Credential Display activities can be accessed by
various methods.
·
·
·
User -> Registry – Main Account List - A list of established accounts will be displayed after
launching the Registry activity. A Long Press on an account panel will display a credential image.
A Touch on an account panel will launch the modification operation for the Registry Account.
Widget - Scan Button - If the Auto-Display Account option is active in System Settings, then
using the Scan button on the Agent Widget will automatically display any linked account
credentials that match a discovered WiFi Station ID Name.
Widget – Account Logo or Name - If the Auto-Display Account option is not active and an
account matches a discovered WiFi Station ID Name, then pressing the displayed Account Logo
or Name will manually display the account credentials.
Auto-Display Credentials
In addition to the credential options presented in the Widget, there are System Settings which allow for a timed
search of the surrounding area to discover linked accounts and automatically display credential images. The
Location Sync Interval option [System Settings] allows for the discovery of WiFi Station ID Names either manually
using the Widget or automatically on a selected interval (e.g., a scan every 5 minutes).
The WiFi Station ID Name detection process is based on a radio transmission power algorithm which uses the
most powerful WiFi AP signal (which usually is the closest in terms of physical proximity) to search for linked
accounts. Changing locations may cause a change in detected power ratings and thus cause the detected WiFi
Station ID Name to change resulting in another linked account credential being displayed on screen.
If an account credential is displayed on screen and Auto-Display Account is activated, then in the event that a new
WiFi Station ID Name is detected with a linked account there will not be a change of display. Rendering the newly
discovered account credential would interrupt the current on-screen display which may be in use during a
transaction. The current display would need to be dismissed before a new credential display could be rendered.
The Auto-Display Account action will display a credential image and after it has been dismissed, the detected WiFi
Station ID Name must change before the same credential image will be automatically displayed again. This
prevents the credential image from becoming a nuisance display once you have dismissed it from view since after
using it the first time, or not using it, and dismissing the credential image you will not likely need it again. The
same credential image may be manually displayed again if needed using the Widget options.
Enabling the Auto-Display Account option also allows activating another display setting. A Display On Lock Screen
option in System Settings allows the user to enable Agent to activate the phone from standby/sleep mode and to
display account information in front of a phone's screen lock (Keyguard) window. A Program Password cannot be
active for this action to operate; otherwise, an account credential will not be automatically displayed.
WARNING: A user must exercise caution in using the Display On Lock Screen setting since the
display of account information may reveal personal information. A user is solely responsible for
enabling the display of an account credential in front of a lock screen and for exercising
protective diligence in restricting whoever may have access to view such a credential image.
Screen Orientation Lock
Whenever the credential display image is in the Locked mode (i.e., the screen orientation is set to a fixed position
of either portrait or landscape mode), the phone is also placed in a "Do Not Sleep" mode and will stay awake
displaying an illuminated credential image.
PayBurst™ – Agent™
Page 7
When the image is in the Unlocked mode (i.e., a change in screen orientation will re-draw the display), the phone
will return to its regular dynamic screen display operations and resume the user’s configured sleep operation for
battery conservation.
Locked mode is convenient to keep the credential image on screen without having to touch the screen to keep the
device awake while waiting in a checkout line.
NOTE: The use of the Auto-Display Account and Do Not Sleep modes may have an impact on battery longevity.
With both the Auto-Display Account option active and the Display On Lock Screen option active the device may
display a credential image while in a pocket or purse – which is intended for quick and easy take-out-and-use
convenience. While Auto-Display Account and Do Not Sleep modes are convenient so that manually selecting
account credentials is not necessary, the device will use power when images are displayed for an extended period
of time. The user is responsible for monitoring the screen display if these options are employed.
Barcode Display
The Account Number/ID will be rendered in a barcode image during a credential display. A QR Code of the
Account Number/ID will be generated in addition to Code 128 and EAN-13 barcode formats and both are available
in the Cycle display operation.
While the Account Number/ID field can accommodate a relatively large amount of text, the Code 128 and EAN-13
format display is limited to rendering a maximum of 30 characters and 13 characters respectively. A QR Code has
a clarity resolution limit more than a maximum character limit and the particular limit is dependent on the device
screen resolution which affects absolute data density (i.e., how many dots per inch can be clearly recognized by a
scanner).
The QR Code format is widely recognized by merchants. A Code 128 and EAN-13 barcode display is used for
general purposes such as ID, inventory, shipping, and distribution.
PayBurst™ – Agent™
Page 8
Home Screen Display
The Agent Home Screen provides access to all of its features. Several of the more often used features are located
on the Action Bar for quick access. The Access Menu Bar provides complete menus for all the features. The
Access Menu Bar may be hidden and displayed by using the Menu Bar option located in the Application Menu.
Action Bar
· Exit Application
· Registry – Account Management
· WaveScan™ – Search for local WiFi APs
· DealQuest™ – Search for deals
[DEALQUEST IS UNDER CONSTRUCTION – SEE
SYSTEM -> R&D]
· Overflow – Displays Actions Menu
Access Menu Bar
· User – Personal options and Registry
· Actions – Program activity features
· System – Configuration and information activities
Application Menu
Touch the device Menu button to reveal an
Application Menu for access to several items.
· Settings – System configuration
· Menu Bar – Toggles hide/display mode for
the Access Menu Bar
· Reference – Displays User Reference Guide
PayBurst™ – Agent™
Page 9
Widget Display
The Agent Widget may be added to your device’s home screen according to the device operating system
instructions. The Widget will provide fast and easy access to several Agent features as well as display status
information about program operations. The Widget may show information in either automatic or manual modes
depending on the application configuration.
The Scan Button will initiate a manual scan to search for surrounding WiFi Access Points (AP). An Account Issuer’s
Name and Logo (if available) will be displayed in the top status line if a discovered WiFi Station ID (SSID) Name is
linked to a Registry Account. Touching the Issuer Name or Logo will display a custom image (if entered in the
account), and a QR Code/Barcode display of the Account Number/ID. Using the Scan button will reset the
discovered WiFi Station ID Name memory used with the Auto-Display Account feature.
The Review Button will launch a full screen display and initiate a manual scan to search for surrounding WiFi APs
and then list all discovered APs. A linked Registry Account may then manually be selected from this list of SSIDs.
The Icon between the two buttons will launch the Agent application.
NOTE: A Registry Account must not only be linked to a WiFi Station ID Name, but also it must have a custom
image or an Account Number/ID in order for it to display a digital credential.
Widget Status Display and Actions
· Top status line
·
Mid status line
·
·
·
Scan – Manual search for Linked Accounts
Icon – Launch the Agent application
Review – Display list of surrounding WiFi
Station ID Names
Sample Display
· Linked account Issuer Name and Logo. A Touch
will display the account credential.
· The mid status line shows the number of local
WiFi AP sites and the name of the WiFi AP that is
linked to the displayed Issuer Name and Logo.
· In either automatic or manual scan modes, a Last
and Next scan time may be displayed.
PayBurst™ – Agent™
Page 10
Access Menu Bar Options
The Agent Home Screen provides the Access Menu Bar for selecting features from the main activity groups.
User Menu
Actions Menu
System Menu
NOTE: DEALQUEST IS UNDER CONSTRUCTION
See System -> R&D
PayBurst™ – Agent™
Page 11
Profile Overview
Personal information may be stored in the Profile section of the application which can be used by several Agent
features.
Information Use
The information in this section may be used to create a personal QR Code with the Agent ID Code feature and
allow the user to display the barcode in various situations. Digital barcodes may be a convenient method to apply
for a new merchant loyalty card account without the bother of manually entering information on a paper form.
The Agent ID Code feature also allows a choice between creating a text QR Code for general use, as well as a
vCard format code which could be used with an address book application. When creating the barcode, a user
must manually select the information to be included each time a barcode is generated for reasons of privacy and
security.
Program Password Security
A Program Password feature provides the user with the ability to restrict launching the Agent application until a
password is entered.
Dual activation options are required for the password protection setup. For security and to ensure the intentional
use of the password protection feature, the password option must be activated by the user by means of the
Program Password option in the System Settings. In addition, if the System Settings Program Password option is
activated, then the user should set a password in their Profile settings (Program Password field).
NOTE: This dual activation is necessary since if a user forgets their password there is no password recovery
option due to the security and encryption routines in use. The only option for a forgotten password is to clear
the program data files using the system commands (Phone Settings - Applications - Manage Applications) or to
uninstall and then reinstall the Agent application.
While there is a program password option available for the user to employ, no security system is infallible and
program protection is only part of a total security management practice. Several options are available to protect
your data. There is the first physical layer of security, which is that a user maintains physical possession of their
property. A second level of security is provided by the phone with a device password. A third level of protection
is this application's password protection option to safeguard access to the user's data. For added protection,
Agent uses encryption routines to make it very difficult (not impossible) for the database with your information to
be used on another device.
If the System Settings Program Password option is activated and the Profile Program Password field is left empty,
then when the password prompt appears on screen after launching Agent a tap on the Submit button will gain
access to the Agent application. For password protection to be effective both a Profile Program Password must
be entered and the System Settings Program Password option must be activated.
NOTE: Your database file cannot be moved to another device because of the encryption techniques used to
protect your data. The goal is to prevent the possibility of your database file being copied and then opened on
a rogue device by someone other than the true owner. Also be aware that there is no “master password” and
that the application has no commonplace means for regenerating or reverse-engineering a personal Program
Password. If you should set a Program Password and then forget it, you would need to delete the Agent data
files, which would eliminate all your Agent data, and then create a new database file and re-enter your data.
PayBurst™ – Agent™
Page 12
Profile Fields Display
Buttons
Save – The user must select to save any entries or
changes. No information will be automatically
saved if the user exits the screen without first saving
their data.
If a Program Password is entered,
then after each use of the Save
button a confirmation display will
indicate the password as a reminder
and to allow for changes before
Exiting the Profile Activity.
Reset – All entry fields will be returned to their initial
values.
Exit – Exit the activity.
Profile Field Specifications
·
Program Password: Text of a maximum 20
characters.
The Program Password is CASE SENSITIVE
·
·
Display All Deal Options: A listing of all
available incentive options – for review only.
First Deal / Second Deal / Third Deal:
Auto-Complete entry that finds Deal Options
for selection using the characters you enter.
Only listed incentives may be selected. First
Deal defaults to Max Rewards on installation.
Remove a Deal Name with a single space in
the Auto-Complete field.
·
·
·
First / Middle / Last Name:
First – Text of a maximum 64 characters.
Middle – Text of a maximum 12 characters.
Last – Text of a maximum 64 characters.
Gender: Selection option.
Birth Date: Touch for calendar display.
Defaults to installation date.
PayBurst™ – Agent™
Page 13
Profile Fields (continued)
·
·
·
·
·
·
·
·
·
·
Address Line 1 / Line 2: Text of a maximum
40 characters each.
City: Text of a maximum 30 characters.
State: Selection list from which to choose
the state name.
Zip/Postal Code: Numeric of a maximum 20
characters. Only numbers and hyphen are
allowed.
E-mail Address: Text of a maximum 128
characters. Valid Internet format.
Mobile Number: Numeric of a maximum 20
characters. Only numbers and hyphen are
allowed. Defaults to device number on
installation.
Receive Alerts Status: Selection option.
Indicates if the user requests notifications
regarding Issuer notices and Deal provisions.
May be used during account applications.
Defaults to No on installation.
Deal Keywords: Text of a maximum 128
characters. Specific items of interest. May
be used during account applications.
Personal Activities: Text of a maximum 128
characters. Specific items of interest. May
be used during account applications.
Comments – Text of a maximum 256
characters. Personal notes.
PayBurst™ – Agent™
Page 14
Reminders Overview and Display
The Home Screen will display a Reminders window if there are any Registry Accounts that have been tagged with
their Show A Reminder status set as “Yes”, or if the Account Expiration Date is within approximately the number
of days set in the System Settings Reminder Advance Days option.
Reminders
Touching a Reminders information panel will display the specific account in the Registry Management activity.
Touching the Title Bar will dismiss the Reminders display window. A Long Press of any Reminders panel also will
dismiss the Reminders display window.
The Reminders window may be displayed regardless of any reminders being available by accessing the User
Reminders menu option. The Reminders window may also be toggled by using the Application Menu and the
available Menu Bar option.
Reminders Display and Actions
· Top Title Bar: Touch to dismiss the Reminders
display window.
· Account Information Panel: Touch the
comment field to display the account causing
the reminder notice in the Registry
Management activity.
A Long Press on any Reminders information panel will
dismiss the Reminders display window.
The Reminders display window may be activated by
using the User Reminders option.
PayBurst™ – Agent™
Page 15
Registry Overview
The Account Registry is the centerpiece of the Agent application and provides the information for credential
displays. Many Agent activities are based on the accounts available for use and their particular characteristics.
Additions / Modifications
There are two types of Registry Accounts: 1) User-Created Issuer Accounts, and 2) Pre-Configured Issuer Accounts.
A User-Created Account allows for the entry of account information and the ability to change all fields. A PreConfigured Issuer Account will not allow changes to certain fields since some Issuer information is required to be
consistent.
·
If an account is created by selecting one of the Issuers in the Pre-Configured Issuer List, then the Issuer
Name and Merchant ID fields cannot be changed and are considered locked field entries.
The difference between a User-Created Issuer Account and a Pre-Configured Issuer Account is whether or not an
Issuer was selected from the Pre-Configured Issuer List. If an account is created by selecting a Pre-Configured
Issuer and any of the locked field entries require adjustment, then the user would need to delete the PreConfigured Issuer account and enter a new User-Created Account without selecting one of the Pre-Configured
Issuers.
Clear display fields: If a single space character is entered in the Issuer Name field, then all appropriate data fields
will be cleared.
Credential Image and Account Number/ID
An account's custom image and Number/ID can be display as a credential image. A custom image will display as
the image itself, while the Account Number/ID will be displayed using text (i.e., Account Name and Number/ID)
along with renderings of a QR Code and Code 128 and EAN-13 barcodes. Many merchants have adopted QR
Codes and the code should be readily scanned. Although the Code 128 and EAN-13 format is in use in many
business operations, it may not be readable by all point of sale (POS) scanning systems.
When the barcode is displayed, the Account Number/ID also is displayed on screen in text so that a cashier may
manually enter the number in a POS system if a scanner is not available. Account credential images will be
displayed, depending if the image is available, in the order: Back Image; Front Image; then the Account
Number/ID as a QR Code followed by a Code 128 and then EAN-13 barcode. If an account entry is missing, such as
no Front Image, then that image display sequence would be skipped. If there are no custom images and the
Account Number/ID was not entered, then a message will be displayed indicating that there are no credentials
able to be displayed for the account.
The Back Image, if available, is displayed first when both Front and Back Images are available since most loyalty
cards and other items have a scan code on the reverse side and use the obverse side for displaying a business
logo. If only one image is entered in the account, then that will be the first item displayed and the Account
Number/ID (if available) would be the second item displayed. Regardless of order, there is a Cycle option to
advance through all available images and renderings.
Image Loading
If a user loads either an Issuer Logo or a Brand Logo from locally stored images, then that image file will be copied
to the Agent’s default logo storage folder in the application’s /logos subfolder (typically located on the external
media in the Android/data/com.payburst.agent/files folder). This is performed for convenient reuse of the image
file by the application.
If a user loads a custom image (e.g., the Front or Back Image of a loyalty card) from a locally stored image, the
image will NOT be copied to the default logo storage folder and the image will only be stored in the encrypted
database. The user is solely responsible for the management of this image file.
PayBurst™ – Agent™
Page 16
Photo loading does not use any locally stored images and photo loading does not create a temporary image file in
the local storage media. A photo image is captured in active random access memory (RAM) until saved in the
encrypted database, or until the user selects to use the Clear option to remove the image from RAM memory.
This RAM memory also is erased when the device is turned off. This use of RAM for photo images helps to
prevent the misuse of information by not storing data where it may be discovered.
IMPORTANT: Images may contain sensitive personal information and credential data (e.g.,
license, airline boarding pass). The user is solely responsible for managing and/or deleting as
appropriate any locally stored image file used in the loading process.
Photo Loading
A card, coupon, or credential image (e.g., airline boarding pass barcode) may be entered with a Registry Account.
Selecting the Photo option will present the camera interface. When the camera preview window is displayed, the
System Activity Menu allows adjustments to the Focus, Resolution, Flash, Filter, White Balance, and on-screen
information display (HUD Head-Up Display).
It is recommended to take a photo of a card image with the camera display in a portrait mode and the card's
bottom edge turned to the left edge of the preview screen (i.e., rotate the card 90 degrees clockwise from normal
viewing). This will present the image in the Account Registry display with a normal orientation.
The Camera Preview mode has four options available: Snap, Focus, Reset, and Exit.
·
·
·
·
Snap will take a picture of the image displayed in the preview screen.
Focus is recommended to be used just prior to taking a picture to trigger the Macro focus adjustment
process for a sharp close-up image.
Reset will initialize the preview mode to the original camera settings.
Exit will terminate the camera activity.
NOTE: The Focus adjustment may not function immediately after Touching the Focus button on some devices.
Should this occur, use the Reset option to re-initialize the camera operation.
After pressing the Snap button and capturing an image, there are four editing options: Spin, Clear, Save, and Exit.
·
·
·
·
Spin rotates the image 90 degrees clockwise with each Touch of the button.
Clear will erase the captured image and return to the Camera Preview mode ready to Snap another
picture.
Save will store the image, exit the camera activity, and return to the account management activity in
order to display the image in the appropriate field (i.e., Front, Back).
Exit will terminate the camera activity and the image will not be saved.
The Save option must be used to retain and transfer the image for use in the Registry Account.
The photo image may be viewed in detail with standard touchscreen adjustment gestures. Tapping on the photo
image will zoom-in on the point touched by 10% with each tap. A Long Press on the screen for more than onehalf second will zoom-in to 100% of the actual image size. A Long Press on the screen for more than one-half
second after zooming to 100% of the actual image size will zoom-out to display the complete image in the viewing
window. The image may be moved around by Dragging the image. Pinch Open and Pinch Close gestures also will
adjust image size.
Expiration Date
A new account default expiration date is set to 30 days from the current date. If an account expiration date is
more than 25 years in the future, it will be displayed as No Expiration. The “No Expiration” actual date will be
properly recorded in the database while only the display is amended for readability.
PayBurst™ – Agent™
Page 17
Registry – Main Management Display
Registry Management presents an initial screen in order to select an action or an account. Accounts will be
displayed according to the selection criteria using the Active toggle option and the Alphabetic Name Filter. The
default list will display all the Active Registry Accounts.
Buttons
New – Add a new account.
Active – Displays active and non-expired.
Inactive – Displays inactive and expired.
All – Displays all accounts.
Exit – Exit the activity.
Alphabetic Name Filter – Display accounts that start
with the Account Name letter selected.
Registry Account Panel Display and Actions
·
·
Touch Account Name to edit details.
Long Press to display credentials.
Note: The Account Number/ID is abbreviated in the Main
display for privacy. Only the last four numbers of the
account are displayed. If the Account Number/ID is 5
characters or less, then only half the information will be
displayed.
PayBurst™ – Agent™
Page 18
Registry – Credential Display
A Long Press on an Account Name in the Main Management Account Panel list will display the associated
credentials and allow the user to Cycle through the various images. QR Code, Barcode 128, and Barcode EAN-13
formats will be displayed for the Account Number/ID. The Barcode type will be displayed in the button menu
section. An EAN-13 code will be displayed only if the Account Number/ID is exactly 13 characters. A custom
image or Account Number/ID must be loaded for a display to be rendered.
Front Image
Back Image
QR Code
Barcode
PayBurst™ – Agent™
Page 19
Registry – Credential Options
Account credentials may be displayed and manipulated in several ways. The buttons provide options to manage
and rearrange the image.
Spin will rotate the image 90 degrees clockwise with each Touch of the button. The Spin button is not available
when a QR Code or Barcode is displayed since the code typically does not require rotation for viewing.
Unlock / Lock Toggle permits the user to keep the image in a fixed orientation, either portrait or landscape mode.
This is helpful when positioning the device for viewing by another so that the image will not be repositioned and
redrawn between orientation changes as the device is moved.
Cycle will display the various credential images starting with the Back Image. The Back Image, if available, is
displayed first when both Front and Back Images are available since most loyalty cards and other items have a
scan code on the reverse side and use the obverse side for displaying a business logo. If only one custom image is
loaded, it will not matter whether it is loaded as the Front or Back Image since it is the first and only one that will
be displayed.
A custom image also may be adjusted using the Pinch Open, Pinch Close, Drag, Long Press, and Quick Touch
gestures. These actions are presented in the Gestures Index of this guide with the exception of the Quick Touch.
The Pinch Open will zoom in; the Pinch Close will zoom out; the Drag will reposition the image; a Long Press will
jump zoom to the area under the finger press or return the image back to screen size; the Quick Touch is a short
tap that will zoom in on the image by 10% with each tap. The Long Press on an image area is helpful when a
barcode may need to be quickly enlarged for scanning.
Exit will end the activity.
The device will be set to a “Do Not Sleep” mode whenever a credential image is being displayed so that the
credential image will be ready for scanning without the need for the user to frequently touch the screen to keep
the device “awake” and illuminated.
PayBurst™ – Agent™
Page 20
Registry Fields Display – Addition
Registry Account Addition
Buttons
Save – The user must select to save any entries. No
information will be automatically saved if the user Exits
the screen without first saving the data.
New – Add a new account.
Exit – Exit the activity.
Account Field Specifications
·
·
·
·
·
·
·
·
·
·
·
·
·
·
·
Pre-Configured Issuer List: A listing of PreConfigured Issuers available for selection.
Issuer Name: Entry of an Issuer name, or autoentered with a Pre-Config Issuer name.
Credential Image / Front / Back:
Display of a custom image.
Image Selection / Front / Back: Select a
credential image for action.
View: Display selected credential image.
Clear: Clear selected credential image.
Photo: Launches photo activity to load a custom
image for selected credential image.
Load: Launches the File Manager to load a
custom image for selected credential image.
Account Number/ID: Entry of account
identification.
Scan: Launches barcode scanning activity to enter
an Account Number/ID.
WiFi Access Point: Entry of a WiFi Station ID
Name, or auto-entered with a Pre-Config Issuer
WiFi Station ID Name.
Link: Launches the WaveScan feature for
selection of a local WiFi Station ID Name.
Active Account: Select status of account.
Defaults to Active.
Expiration Date: Expiry of the account. Defaults
to one month from entry date.
NoEXP: No expiration date for the account.
PayBurst™ – Agent™
Page 21
Registry Account Addition
Account Field Specifications (continued)
·
·
·
·
·
·
·
·
·
·
·
·
·
·
Issuer Merchant ID: Entry of an Issuer Merchant ID,
or auto-entered with a Pre-Config Issuer Merchant
ID.
Telephone Number: Entry of an Issuer telephone
number, or auto-entered with a Pre-Config Issuer
name. Numeric entry only (0123456789).
Issuer Logo / Load: Launches the File Manager to
load an image, or auto-entered with a Pre-Config
Issuer Logo.
Brand Logo / Load: Launches the File Manager to
load an image, or auto-entered with a Pre-Config
Issuer Brand Logo.
Brand Type: A listing of brands for selection, or autoentered with a Pre-Config Issuer Brand Type.
Account Type: A listing of account types for selection,
or auto-entered with a Pre-Config Issuer Account
Type.
Incentive Type: A listing of incentive types for
selection, or auto-entered with a Pre-Config Issuer
Incentive Type.
CVC Card Verification Code: Entry of the card
security code number.
Account PIN: Entry of the account personal
identification number.
Issuer URL: Entry of the Issuer URL website address,
or auto-entered with a Pre-Config Issuer URL.
Online Account Name: Entry of the user’s online
account name.
Online Account Password: Entry of the user’s online
account password.
Show A Reminder: Select to display the account in
the Home Screen Reminders window.
Comments: Entry of comments. Comments will be
shown in the Reminders window when this account is
displayed.
NOTE: If a Pre-Configured Issuer is selected, no changes are
allowed to the Issuer Name or Issuer Merchant ID in order to
maintain data consistency.
PayBurst™ – Agent™
Page 22
Registry Fields Display – Modification & Pre-Configured Issuer
The following displays the auto-entered information for a Pre-Configured Issuer. The custom image was loaded
from a locally stored PNG image file. The Account Number/ID was scanned using the barcode scanning feature.
Account Modification
Buttons
Save – The user must select to save any entries. No
information will be automatically saved if the user exits the
screen without first saving the data.
Reset – Information is restored to the last saved event.
Delete – The account will display a confirm alert, and if
confirmed then the account will be deleted.
Exit – Exit the activity.
NOTE: If a Pre-Configured Issuer is selected, no
changes are allowed to the Issuer Name or Issuer
Merchant ID (blackout fields) in order to maintain
data consistency.
PayBurst™ – Agent™
Page 23
Registry – Photo Display
A Registry Account may be loaded with a custom image by using the Photo feature. Camera settings will be
automatically configured.
If there is a need to change the camera resolution it should be reset before adjusting other settings since a
resolution change will reset the camera options of Focus (Auto), White Balance (Auto), and Flash (Off) to their
default state (in parenthesis).
No resolution greater than 1600 x 1200 is allowed.
The Focus setting should be set to Macro (default) for close-up photos.
It is recommended to take a photo of a card with the card’s bottom edge rotated to be on the left side of the
camera preview screen for it to appear normally positioned in the Account Registry Credential Image display.
Image Capture Buttons
Snap – Acquires the picture displayed in the preview panel.
Focus – Touch before taking a photo to adjust clarity.
Reset – Clears preview and resets camera settings.
Exit – Exit the activity.
Screen HUD Display – A Head-Up Display of settings which
may be toggled using the System Activity Menu options.
System Activity Menu - Touch the device Menu button to
reveal camera setting options.
Review Acquired Image
Buttons
After a Snap, buttons will change for review.
Spin – Rotate the image 90 degrees clockwise
with each Touch of the button.
Clear – Clears the acquired image preview.
Save – The user must select to save any entries.
No information will be automatically saved if the
user exits the screen without first saving the
data.
Exit – Exit the activity.
PayBurst™ – Agent™
Page 24
Registry – Accessory Displays
Several of the Registry Account fields provide accessory displays to assist with data entry.
File Manager
WaveScan WiFi Station ID Name Selector
Field Item Selectors
PayBurst™ – Agent™
Page 25
Agent ID Code Overview
The personal information stored in the Profile may be used to create a QR Code for display in various situations.
Digital barcodes may be a convenient method to apply for a new merchant loyalty card account without the
bother of manually entering information on a paper form. The Agent ID Code feature also allows a choice
between creating a text QR Code for general use, as well as a vCard format code which could be used with an
address book application. When creating the barcode, a user must manually select the information to be included
each time a barcode is generated to ensure privacy and security.
Creating a Profile Barcode Image
The Text format option will allow all Profile information, including non-standard Property Field Tag information
fields, such as the First Deal, to be parsed for use by a receiver scanning application conforming to the Property
Field Tag conventions listed in this guide (See Appendix).
The vCard format will not permit the transfer of all Profile information for use by some applications (e.g., an
address book) due to established vCard standards. For example, the First Deal Property Field Tag is not
recognized in the vCard specification since it is a non-standard field tag.
After selecting the information to display and Touching either the Text or vCard button, a 2D barcode image will
be generated and displayed.
When a QR Code is generated and displayed on screen, the phone orientation (i.e., portrait, landscape) will be
Locked (i.e., a fixed orientation display) so that the phone may be moved without redrawing the QR Code. Using
the Clear button will remove the QR Code image, redisplay the Profile fields, and also resume the dynamic phone
orientation mode (i.e., able to switch between portrait and landscape orientations).
PayBurst™ – Agent™
Page 26
Agent ID Code Display
Agent may be used to generate personal 2D barcodes, such as QR Codes, that may be scanned for use by other
applications. Such uses may be to display information for a security system, or presenting a library card account.
No Profile information is automatically selected in the Agent ID Code activity as a matter of security. Profile
information requires the user to intentionally select personal data to be included in the 2D barcode display.
Buttons
Clear – All checked items will be cleared of their
selection status.
Text – Selected information will be used to generate
a 2D code image according to the Agent ID Code
convention listed in the Appendix Section Agent ID™
Code – Property Field Tag & Data Specification.
vCard – Selected information will be used to
generate a 2D code image according to the vCard
Format Specification.
Exit – Exit the activity.
After selecting the information to display and using either
the Text or vCard button, a 2D barcode image will be
generated and displayed.
Sample Display
QR Code image displayed using a Text format and ready
for scanning.
PayBurst™ – Agent™
Page 27
Agent ID Scan Overview and Display
Agent not only is able to produce a 2D barcode (e.g., QR Code) using Agent ID Code, but also it may be used to
scan barcodes presented to it. Agent ID Scan allows for the convenient entry of a Registry Account using a
barcode created with the data tag conventions listed in the Appendix Section Agent ID™ Scan – Property Field Tag
& Data Specification. As an example, a merchant would create a 2D barcode with the details of a new loyalty
account and then the user would scan the QR Code to enter the account details directly into the Account Registry.
Buttons
Scan – Activates the camera scanning feature.
Save – This button is disabled until after a scan of a
2D barcode is performed. There must be some
scanned data recognized according to the Property
Field Tag conventions for this button to become
enabled for use.
Clear – The screen will be cleared of any displayed
information and then reset to perform a scanning
activity.
Exit – Exit the activity.
After Scanning – The scanned 2D barcode will be parsed
for information according to the Property Field Tag
conventions.
Appropriately tagged information will be displayed on the
top line of the individual field panel along with the
corresponding Property Field Tag description listed
below.
Buttons
Save – This button is enabled after a scan if there is any
appropriately tagged information.
If the information does not include an Issuer Name and
the data is saved, then a default Issuer Name of "A New
Account – 11:37 AM” will be entered in the Registry.
Time is the current time when saved.
PayBurst™ – Agent™
Page 28
Agent ID Scan – Alternate Displays
Not all scanned 2D barcodes will contain appropriately tagged information and such non-identified data fields will
be displayed in light Red panel shading. Light Green panel shading indicates a field that used a field tag according
to the Property Field Tag & Data Specification.
A Long Press on an individual field panel will display the actual Property Field Tag.
Unidentified Data Fields – The light Red field panels
indicate that the information displayed has no
corresponding Agent Property Field Tag.
Long Press – A Long Press on an individual field panel
will display the actual Property Field Tag.
PayBurst™ – Agent™
Page 29
WaveScan Overview and Display
WiFi AP hot spots are an integral part of Agent operations. The WaveScan activity displays the surrounding WiFi
Access Points, and also a Geo-Location address if the GPS device is enabled. A Registry Account may be linked to a
WiFi Station ID Name to allow for the automatic display of account credentials.
WaveScan may be accessed:
1) by launching the feature directly from the Home Screen menu Actions WaveScan; or,
2) using the Registry Management WiFi Access Point Name Link option, in which case a Touch of a Station ID
Name will enter the ID Name in the Registry Account.
Buttons
Reload – Scans the surrounding area for WiFi Access
Points and updates the display list.
GPS On/Off – This button is a toggle to allow quick
access to the GPS Satellite Configuration Manager to
either enable or disable the GPS satellites for the
optional Geo-Location service.
Exit – Exit the activity.
If the GPS Satellites are not enabled, then the
message “GPS Not Activated” will be displayed and
the GPS button will display “GPS On” indicating the
option to turn on the GPS device.
The WiFi Access Point field panel displays the Station ID
Name and the relative power percentage. The WiFi list is
sorted in descending order by the power percentage.
If the GPS Satellites are enabled, then the Geo-Location
service will display “Searching…” when identifying the
address of the current location. The GPS button will
display “GPS Off” indicating the option to turn off the GPS
device.
PayBurst™ – Agent™
Page 30
WaveScan – Information Displays
There are several options provided in the WaveScan activity. On launching WaveScan, the system will determine
whether the GPS Satellites are enabled or disabled. A message will be presented on initial use if the GPS Satellites
are disabled and provide an option to access the GPS Satellite Configuration Manager. When WiFi Access Points
are listed in WaveScan, a Touch on an individual field panel will display account credentials, if any, for a linked
account. A Long Press on an individual field panel will display information about the WiFi Access Point.
Initial GPS Activation Notice
Field Panel Touch – Credential Display
GPS Satellite Configuration Manager
Field Panel Long Press – WiFi Details
PayBurst™ – Agent™
Page 31
DealQuest Overview / UNDER CONSTRUCTION (See System -> R&D)
Searching for deals is not new, but searching for deals based on an account to use (e.g., credit card, loyalty card),
a location, and a preferred incentive does provide some new filter options that help to customize your deal
results. Maximizing your savings by discovering the best deals is the goal of DealQuest and the development
effort is working to provide this service which is currently in alpha testing. The DealQuest feature will be part of
the regular application updates when released. Presently, it is in DEMO mode.
Searching for Deals
The user may select to search for deals and refine their deal search by specifying the merchant name (or partial
name), WiFi AP Station ID Name, keywords, a particular account to use, and an incentive type.
Possible search parameters include: a merchant name, selected (if the merchant is a Registered Issuer) or entered
using an exact or partial name; a specific WiFi AP Station ID Name or the embedded Issuer Merchant ID code
assigned to a Registered Issuer; keywords may be used (e.g., tires, tablet computer); particular accounts to use
(e.g., Visa); and preferred incentives (e.g., Airline Miles - Southwest).
If keywords are entered, the deal search process scans the Deal Item database fields of: Deal Title, Deal
Description, and Deal Keywords.
The user may select the number of results to display (5, 10, or 20), also depending on how many matching deals in
total are discovered.
If a search is performed trying to identify specific brand accounts (e.g., Visa), then deals requiring a Visa account
along with all deals that are not restricted for use with another account (e.g., a deal that can only be redeemed
using a MasterCard) will be displayed. In other words, the search will find all deals that match the brand account
search key, or will find deals that are not restricted to certain brand account types.
Specifying a specific incentive will limit results to only those deals that match the Incentive key.
For a deal to be displayed, it must be declared by the Issuer as PUBLIC, listed as currently active, and timely which
means neither expired nor starting at a future time.
Deals that are found will be listed alphabetically by their title.
The deal details will provide full information about the deal offer as well as provide the user an opportunity to
share the deal via e-mail with a friend or save the deal to the Account Registry.
If a deal is saved to the Registry, then the contents of the Deal Barcode field is entered as the Account Number/ID.
Display Details
WiFi Site Links will display both WiFi Access Point Station ID Names from the immediate surrounding area
(refreshed by Touching the Sites button). Surrounding Station ID Names will display using Red text. Station ID
Names used by a Registry Account (linked accounts) will be displayed following the list of surrounding Station ID
Names and use Blue text.
Touching the Reset button will reset all fields to their initial default condition as well as update the WiFi Site Link
list. If the user updates the WiFi Site Link list and a previously selected site is no longer within range, then that
site will not be displayed on the site listing and the WiFi Station ID Name will be replaced in the selection options
with the default entry.
A reorientation of the phone (e.g., moving it from portrait to landscape mode) will update the WiFi Site Link list
and may alter a selected WiFi Station ID Name if the site is no longer in range.
Updating the WiFi Site Link list may take several seconds in order to identify and classify each site’s rating.
PayBurst™ – Agent™
Page 32
DealQuest Display
The DealQuest feature will be part of the regular application updates when released. Presently, it is in DEMO
mode. Refer to System -> R&D.
Buttons
Search – Query the deal database using the selected
parameters.
Sites – Reload the WiFi Access Points listed in the
“With A Specific Site Link” selector. Surrounding
WiFi Access Point Station ID Names are displayed at
the top in Red text, while Station ID Names that are
part of existing Registry Accounts are displayed at
the bottom of the list in Blue text. This allows
searching for local deals as well as searching for
deals using existing accounts.
Reset – All entry fields will be returned to their
default values. The WiFi Site Link list will be updated.
Exit – Exit the activity.
Find Deals At: Auto-Complete entry that will filter
registered Issuer Names, or allow for the free-text
entry of a merchant name or partial name.
With A Specific Site Link: Allows selection of a WiFi
AP Station ID Name. Only surrounding WiFi Station
ID Names and Station ID Names from Registry
Accounts are displayed in the list.
When Getting: Entry of keywords to search for.
Using: Allows selection of a brand type that will be
accepted by the deal conditions.
Offering: Allows selection of an incentive type (e.g.,
cash back) that is provided by the deal.
Maximum Number of Results: The number of results
best matching the search parameters that will be
displayed.
PayBurst™ – Agent™
Page 33
DealQuest – Information Displays
DealQuest results that match the search parameters will be displayed in an alphabetic list. A Touch of a Deal Title
panel will display the complete details. A Long Press will display a summary of the deal information.
Save will transfer the deal details into a new Registry Account. Share will launch an e-mail application and load
the deal details as a message so it may be sent to a contact. Exit will dismiss the display
Search Results
Deal Title Panel – Touch – Details
Deal Title Panel – Long Press – Summary
Share Button – Launches e-Mail Activity
PayBurst™ – Agent™
Page 34
System Settings Overview
The Settings activity for Agent provides various options to configure and customize the operation of the
application. All changes take effect immediately.
Important: Agent may be configured to request a Program Password to access the application.
Using this option also requires the entry of a Program Password in the Profile section.
Activating the System Program Password option and NOT entering a Program Password in the
Profile section will display a Password Required panel on launch, but an empty password will
allow access. Similarly, entering a Profile Program Password and NOT activating the System
Program Password option will not display a Password Required panel on launch. Three
attempts to enter the correct password are provided. After three failed attempts, the
application will cause a return to the device’s home screen and Agent may be launched again
for another three attempts, and again. If the user loses their password, there is no method
available for recovering a lost password due to the security algorithm used to safeguard the
information. In the case of a lost password, the Agent data file would need to be deleted and
the information reconstructed.
Location Sync Interval
Selecting a Location Sync Interval (other than Manual Update) will activate the WiFi device if necessary to scan the
surrounding area for WiFi Access Points. If the scan finds a WiFi Station ID Name that matches a linked account,
then the Auto-Display setting will guide whether a credential image is displayed as a full screen image or only as a
logo on the Agent Widget.
If Auto-Display is active, then Agent will check the Display On Lock Screen setting and either display a credential
image in front of a lock screen or withhold such a credential display until the user manually unlocks the device.
WiFi Services does not need to be checked for scanning purposes since the Location Update Interval will
temporarily activate the WiFi device if necessary. If the user prefers not to have the WiFi device activated at any
time, then this option should be set to Manual Update and WiFi AP scanning can be performed using the Widget.
Interaction of Location Sync Interval with the WiFi Device
If the user selects to update their location by choosing a Location Sync Interval time period, then Agent will
activate the WiFi device as needed but always return it to its original setting. For example, if the user selects to
update their location every 5 minutes but normally keeps their WiFi device turned off, then Agent will activate the
WiFi device every 5 minutes to perform a scan and once the scan is completed the WiFi device will be turned off.
If, when the search begins, Agent determines that the user has the WiFi device active, then Agent will complete
the location scan and leave the WiFi device in an active state.
GPS Satellites
For the Geo-Location service to function and provide a local address, the GPS device must be activated. For
privacy reasons, no program has the ability to activate the GPS system and as such the user is responsible for its
management. There is a System Settings option to access the GPS Satellite Configuration Manager and configure
the GPS device.
There may be occasions when the Geo-Location service may not provide an address. GPS satellite signals cannot
be received if the GPS device is within a building or otherwise obstructed from getting a clear satellite signal.
Being in an open space or near a window can help GPS signal reception.
The GPS device will only be used by the Agent application for as long as necessary to determine a position, and
then it will be turned off to preserve battery power. The System Settings of the Location Sync Interval will
determine how often the GPS device will be used, and thus have a bearing on power consumption. The more
often the GPS device is used, the more power will be used. The user should find a satisfactory balance between
location updates and battery power consumption by adjusting the Location Sync Interval period.
PayBurst™ – Agent™
Page 35
Auto-Display Account
If the Auto-Display option is selected, then the first time a new WiFi Access Point ID Name is discovered any linked
accounts with that Station ID Name will be displayed.
The Auto-Display feature will only show accounts on the first discovery of the Station ID Name. Further discovery
of the same Station ID Name will not display the account credential again until a change of highest rated WiFi AP
has occurred. The linked Station ID Name must change for a different linked account to be displayed. Once the
linked Station ID Name has changed, then Auto-Display can show a new account credential.
The Auto-Display Station ID Name memory can be cleared and triggered to display current location accounts by
pressing the Scan button on the Agent Widget.
If a WiFi Station ID Name is discovered, and the user has linked a Registry Account with that Station ID Name, and
Auto-Display is active, then the account credential will be displayed as a full screen image. If Auto-Display is not
active, the user may manually select the Account Logo or Name on the Agent Widget to display a linked account
credential.
Accounts that are linked to a WiFi Station ID Name, or refer to a WiFi Station ID Name containing an embedded
Issuer Merchant ID code that matches a Merchant ID code in an account, will be able to display account
credentials. IF there are multiple accounts that match a WiFi Station ID Name or Merchant ID code, then a list of
all linked accounts will be displayed for the manual selection of an account credential to be displayed.
PayBurst™ – Agent™
Page 36
System Settings Display
Program Password – Agent may be configured to
request a Program Password to access the application.
If Auto-Display Account is activated, or the user requests
a manual credential display using the Agent Widget,
then the Profile Program Password entry will be
required before any credential will be displayed. The
Program Password will only be requested on the first
launch of the Agent application and Agent access will be
granted until the device is reset or turned off and on.
Deactivating the System Settings Program Password
option will remove a Profile Program Password entry
after which activating this option again will require the
entry of a Profile Program Password. See further page in
this section for an Important Password Protection note.
Auto-Display Account – This option is used in
conjunction with Location Sync Interval. If Auto-Display
is activated and a Location Sync Interval is set, then if a
WiFi Station ID Name is discovered that matches a linked
Registry Account the available credential images will be
automatically displayed.
Display On Lock Screen – This option requires AutoDisplay. When this option is active, if a linked Registry
Account is found, the credential images will be displayed
even if the device is “sleeping” and has a device
password lock screen active and displayed.
Location Sync Interval Selection Display
Location Sync Interval – Specifies the scan frequency of
searching for surrounding WiFi Access Points and
updating the geographic location. A Location Sync
Interval scan will temporarily activate the WiFi device if
necessary should the WiFi device not already be
enabled.
Data Sync Interval – Specifies the data update
frequency. A Carrier data connection or WiFi data
connection is required. For use by Registered
Subscribers Only. Regular program updates will be
available to all users from the original application
download site (e.g., Google Play Store).
Reminder Advance Days – Specifies the timeframe to
search for expiring accounts. For example: Selecting 7
Days will display a Reminders notice for accounts that
will expire within the next seven days.
PayBurst™ – Agent™
Page 37
WiFi Services – Enables the WiFi device. The use of WiFi is
necessary to scan for Station ID Names that match linked
Registry Accounts. The WiFi device may be activated
temporarily for a manual scan using the Agent Widget, of if
the Location Sync Interval is set to other than Manual Update.
Configure GPS Settings – Displays the GPS Satellite
Configuration Manager.
Status on Start – This option displays status information on
the first launch. The state of Carrier Connection, WiFi
Connection, GPS Satellites, and Bluetooth will be displayed.
Confirm on Exit – Confirms a user’s exit of the Agent
application. Agent services continue to operate even when
the Agent application is not displayed on screen.
Activity Information – General information (e.g., latitude,
longitude) will be displayed in the system notification panel if
this option is activated. Critical information will always be
displayed regardless of this setting.
Access Menu – Select to display or hide the Home Screen
Access Menu Bar. The Access Menu Bar also may be toggled
using the Application Menu.
Application Language – Selection of display language.
Requires exit and re-entry of the Agent application after
selecting a different language setting.
PayBurst™ – Agent™
Page 38
Program Password Reminder
After activating the System Settings Program Password option, a notification display will indicate the status of the
Program Password entry in the Profile information settings. This is intended to remind the user that a password
needs to be set before the program is protected against unauthorized use.
Buttons
Profile – Access to the Profile activity. A Program
Password should be entered at this time, or the use
of the System Settings Program Password option
should be reconsidered.
Continue – Bypass the password verification option
and continue to use a blank password. This will not
provide protection against unauthorized use of the
program.
Pressing the Android Back Button
will have the same effect as using
the above Continue button.
Settings – Access to the System Settings options.
This display notice will occur as long as the System
Settings Program Password option is active and there
is an empty/blank password field in the Profile
settings, or until the above Continue button is used
to deactivate the current session password
verification routine.
*** IMPORTANT NOTICE ***
Agent may be configured to request a Program Password to access the application. Using this
option also requires the entry of a Program Password in the Profile section. Activating the
System Program Password option and NOT entering a Program Password in the Profile section
will display a Password Required panel on launch, but AN EMPTY/BLANK PASSWORD ENTRY
WILL ALLOW ACCESS TO THE PROGRAM.
Similarly, entering a Profile Program Password and NOT activating the System Program
Password option will not display a Password Required panel on launch.
Three attempts to enter the correct password are provided. After three failed attempts, the
application will cause a return to the device’s home screen and Agent may be launched again
for another three attempts, and again.
IF THE USER LOSES THEIR PASSWORD, THERE IS NO METHOD AVAILABLE FOR RECOVERING A
LOST PASSWORD DUE TO THE SECURITY PROCESS USED TO SAFEGUARD THE DATABASE
INFORMATION. IN THE CASE OF A LOST PASSWORD, THE AGENT DATA FILE WOULD NEED TO
BE DELETED AND THE INFORMATION RECONSTRUCTED.
PayBurst™ – Agent™
Page 39
System Coordination Activities
Several activities provide options that update the local database, access the online manual for review, access legal
text, and provide a means to contact support.
Update
Downloads deal and configuration updates to the
local database. No user data is involved in this
update activity.
Available to Subscription Accounts Only.
Regular program updates are available to all
licensed users when released and will be provided
from the original application download site (e.g.,
Google Play Store) using the normal update
process.
Button
Exit – Exit the activity.
Reference
Online user guide presented in an abbreviated format.
Documentation is provided as topic sections of related
features.
The complete User Reference Guide in PDF format also is
available.
Buttons
|< - Move to first section.
< - Move back one section.
> - Move forward one section.
>| - Move to last section.
PDF – Display the complete User Reference Guide in PDF
format. Requires a PDF viewer application.
Exit – Exit the activity.
PayBurst™ – Agent™
Page 40
There are several features provided in the About activity, including an option to contact support.
About
Displays general information related to Agent
operations. Licenses, attributions, and notifications
are included in this display.
Buttons
Website – Link to the main website.
Terms of Use – Link to the main website for terms
and conditions by which operation of the Agent
application is licensed.
Support – Launch an e-mail application and load the
Support Address and Agent version information as
the subject line in preparation for a message to be
sent to Support.
Exit – Exit the activity.
Research & Development
·
·
Connects to the Agent Central Website.
The User Manual in PDF format is available for
download at the Agent Central Website.
Further information regarding DealQuest is available at
Agent Central Website
PayBurst™ – Agent™
Page 41
Appendix
Specifications are provided in the following sections detailing various features and conventions of the Agent
application.
A listing of screen gestures with pictograms provides an illustration of various screen control methods.
PayBurst™ – Agent™
Page 42
Agent ID™ Code – Property Field Tag & Data Specification
User Profile Information
The user’s Profile information, displayed as a QR Code in the Agent ID Code activity, is assembled according to the
following Property Field Tags. The QR Code may be generated either as a text QR Code, which allows for
additional information, or as a vCard, which uses the vCard Format Specification Version 4.0 for Field Tags. Profile
information follows after the colon symbol and is terminated with a Chr(10) newline code.
Description
Property Field Tag
Data Type, Display, Maximum Length
First Name
N:
VARCHAR(64)
Middle Initial/Name
N:
VARCHAR(10)
Last/Family Name
N:
VARCHAR(64)
Gender
X-GENDER:
Male / Female
Birth Date
BDAY:
YYYY-MM-DD
Address Line1
ADR:
VARCHAR(40)
Address Line2
ADR:
VARCHAR(40)
City
ADR:
VARCHAR(30)
State
ADR:
Two character U.S. Postal abbreviation
Zip/Postal Code
ADR:
VARCHAR(20)
E-mail Address
EMAIL:
VARCHAR(128)
Mobile Number
TEL;type=CELL:
VARCHAR(20)
Receive Alerts - Status
X-AGENT-ALERTS:
Y/N
First Deal
X-AGENT-DEAL-CLASS1:
VARCHAR(30) – Refer to Encoding Notes
Second Deal
X-AGENT-DEAL-CLASS2:
VARCHAR(30) – Refer to Encoding Notes
Third Deal
X-AGENT-DEAL-CLASS3:
VARCHAR(30) – Refer to Encoding Notes
Deal Keywords
X-AGENT-DEAL-KEYWORDS:
VARCHAR(256)
Personal Activities
X-AGENT-DEAL-ACTIVITIES:
VARCHAR(128)
Referral ID
X-AGENT-REFERRALID:
VARCHAR(20)
Locale/Language
X-AGENT-LOCALE:
Refer to Encoding Notes
Time Zone Offset (UTC)
TZ;utcOffset:
Offset measured in hours from UTC
Encoding Notes:
ü The First, Second, and Third Deals are literal names (e.g., Airline Miles – Southwest).
ü Locale format: 2 character language code, underscore, 2 character country code (e.g., en_US).
ü A Field Tag of “CATEGORIES:” is embedded with the data of “Agent” to identify the origin source.
X-AGENT Property Field Tags are Copyright © PayBurst Stbi. All rights reserved.
PayBurst™ – Agent™
Page 43
Agent ID™ Scan – Property Field Tag & Data Specification
Registry Account Information
An Issuer may provide account information as a QR Code for use and entry by the Agent ID Scan activity. Data
should be assembled according to the following Property Field Tags. Account information should follow after the
colon symbol and is to be terminated with a Chr(10) newline code. Property Field Tags are not case sensitive.
Description
Property Field Tag
Data Type and Maximum Length
Issuer Key
X-AGENT-IssuerKeyXDB:
VARCHAR(10) NOT NULL DEFAULT ''
Issuer Merchant ID
X-AGENT-IssuerMerchantID:
VARCHAR(30) NOT NULL DEFAULT ''
Issuer Name
X-AGENT-IssuerName:
VARCHAR(30) NOT NULL DEFAULT ''
Issuer Name (alternate tag)
FN:
Refer to: Issuer Name
Issuer Logo
X-AGENT-IssuerLogoFileURL:
VARCHAR(50) NOT NULL DEFAULT ''
Issuer URL
X-AGENT-IssuerURL:
VARCHAR(50) NOT NULL DEFAULT ''
Account Type
X-AGENT-AcctTypeKeyXDB:
VARCHAR(10) NOT NULL DEFAULT ''
Brand Type
X-AGENT-BrandKeyXDB:
VARCHAR(10) NOT NULL DEFAULT ''
Brand Logo
X-AGENT-BrandLogoFileURL:
VARCHAR(50) NOT NULL DEFAULT ''
Incentive Type
X-AGENT-IncentiveKeyXDB:
VARCHAR(10) NOT NULL DEFAULT ''
Account Active
X-AGENT-AccountActive:
CHAR(1) NOT NULL DEFAULT 'Y' (Y/N)
Account Number/ID
X-AGENT-AccountNumID:
TEXT DEFAULT ''
CVC Code
X-AGENT-AccountCVC:
VARCHAR(10) NOT NULL DEFAULT ''
Account PIN
X-AGENT-AccountPIN:
VARCHAR(10) NOT NULL DEFAULT ''
Expiration Date
X-AGENT-DateOfExpiration:
LONG - Refer to Encoding Notes
Online Account Name
X-AGENT-OnlineAcctName:
VARCHAR(20) NOT NULL DEFAULT ''
Online Account Password
X-AGENT-OnlinePassword:
VARCHAR(20) NOT NULL DEFAULT ''
Show A Reminder
X-AGENT-Reminders:
CHAR(1) NOT NULL DEFAULT 'N' (Y/N)
Comments
X-AGENT-Comments:
TEXT DEFAULT ''
Registered Issuer
X-AGENT-RegisteredIssuer:
CHAR(1) NOT NULL DEFAULT 'N' (Y/N)
Last Transaction Date
X-AGENT-DateOfLastTrans:
LONG - Refer to Encoding Notes
Telephone Number
X-AGENT-IssuerTelNo:
VARCHAR(20) NOT NULL DEFAULT ''
Refer to Encoding Notes
Telephone Number (alternate
tag)
TEL:
Telephone Number – General
Refer to: Telephone Number
Telephone Number (alternate
tag)
TEL;type=CELL:
Telephone Number – Mobile
Refer to: Telephone Number
WiFi Access Point Name
X-AGENT-WiFiAP:
VARCHAR(50) NOT NULL DEFAULT ''
WiFi Access Point Name
(lowercase)
X-AGENT-WiFiAPLC:
Refer to: WiFi Access Point Name
Refer to Encoding Notes
Issuer Latitude
X-AGENT-IssuerLatitude:
DOUBLE DEFAULT 0.0
PayBurst™ – Agent™
Page 44
Description
Property Field Tag
Data Type and Maximum Length
Issuer Longitude
X-AGENT-IssuerLongitude:
DOUBLE DEFAULT 0.0
Item Image Front
X-AGENT-CardImageF:
URL to download digital image
Item Image Back
X-AGENT-CardImageB:
URL to download digital image
Operating Notes:
Issuer Key is for use by Registered Issuers and such registrants should enter Y for the Registered Issuer (Y/N) field.
Non-Registered Issuers should enter N for the Registered Issuer field.
WiFi Access Point Name is the Station ID Name broadcast by the Issuer’s WiFi device. The Issuer should include
their Issuer Merchant ID in the WiFi Station ID Name bracketed with the $ (dollar sign) identification tag symbol.
For example, an Issuer with assigned Merchant ID code ABC123 should broadcast their WiFi Station ID Name as:
The Music Store $ABC123$ for Agent to recognize the Merchant ID during a WaveScan operation.
Encoding Notes:
ü Expiration and Last Transaction Date Format: Date and time values are stored as ticks. Ticks are the
number of milliseconds since January 1, 1970.
ü Only one Telephone Number will be stored with the account.
ü WiFi Access Point Name (lowercase) will default to entering the lowercase value of WiFi Access Point
Name (X-AGENT-WiFiAP:) if an entry for X-AGENT-WiFiAPLC: is not provided.
X-AGENT Property Field Tags are Copyright © PayBurst Stbi. All rights reserved.
PayBurst™ – Agent™
Page 45
Gestures Index
Gestures allow operations to be employed that affect the screen objects used in the application. The following
table shows the core gesture set that is supported in Android.
Touch
Triggers the default functionality
for a given item.
Action – Press, lift
Pinch Open
Zooms into content.
Action – 2-finger press, move
outwards, lift
Double Touch
Zooms into content. Also used as a
secondary
gesture
for
text
selection.
Action – Two touches in quick
succession
Long Press
Enters data selection mode. Allows
selection of one or more items in a
view and act upon the data using a
contextual action bar.
Action – Press, wait, lift
Pinch Close
Zooms out of content.
Action – 2-finger press, move
inwards, lift
Drag
Rearranges data within a view, or
moves data into a container (e.g.
folders on Home Screen).
Action – Long press, move, lift
Swipe
Scrolls overflowing content, or
navigates between views in the
same hierarchy.
Action – Press, move, lift
Peace
Index and middle fingers raised
and parted, other fingers are
clenched with palm outward.
Action – Extend, raise, help
PayBurst™ – Agent™
Page 46