1
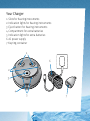
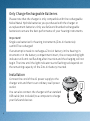
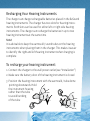
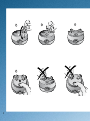
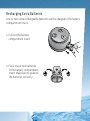
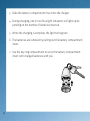
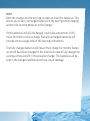
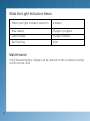
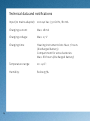
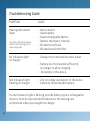
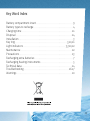
User Guide ReSound Azure Charger AZ60 Congratulations on the purchase of your new ReSound Azure charger for your hearing instruments. This user manual will help you make the most of your charger. We hope you enjoy it! Contents Page Your charger . . . . . . . . . . . . . . . . . . . . . . . . . . . . . . . . . . . . . . . . . . . . . . . . . . . . . . . . 3 Only charge rechargeable batteries . . . . . . . . . . . . . . . . . . . . . . . . . . . . . . . . 4 Installation . . . . . . . . . . . . . . . . . . . . . . . . . . . . . . . . . . . . . . . . . . . . . . . . . . . . . . . . . . 4 Recharging your hearing instruments . . . . . . . . . . . . . . . . . . . . . . . . . . . . . 5 Recharging extra batteries . . . . . . . . . . . . . . . . . . . . . . . . . . . . . . . . . . . . . . . . . 9 What the light indicators mean . . . . . . . . . . . . . . . . . . . . . . . . . . . . . . . . . . 12 Maintenance . . . . . . . . . . . . . . . . . . . . . . . . . . . . . . . . . . . . . . . . . . . . . . . . . . . . . . 12 Precautions and Warnings . . . . . . . . . . . . . . . . . . . . . . . . . . . . . . . . . . . . . . . 13 Technical Data & Notifications . . . . . . . . . . . . . . . . . . . . . . . . . . . . . . . . . . . 14 Troubleshooting Guide . . . . . . . . . . . . . . . . . . . . . . . . . . . . . . . . . . . . . . . . 16-17 Key Word Index . . . . . . . . . . . . . . . . . . . . . . . . . . . . . . . . . . . . . . . . . . . . . . . . . . . 19 Your Charger 1. Slots for hearing instruments 2. Indication lights for hearing instruments 3. Eject button for hearing instruments 4. Compartment for extra batteries 5. Indication lights for extra batteries 6. AC power supply 7. Keyring container 1 6 2 3 4 5 7 Only Charge Rechargeable Batteries Please note that the charger is only compatible with the rechargeable Nickel Metal Hydride batteries you purchased with the charger or as replacement batteries. Only use ReSound branded rechargeable batteries to ensure the best performance of your hearing instruments. Important! Single-use batteries for hearing instruments (Zinc Air batteries) can NOT be recharged! If an attempt is made to recharge a Zinc Air battery in the hearing instrument or in the battery compartment insert, the corresponding light indicator will emit red flashing after insertion and the charging will not begin. The time until the light indicator starts flashing red depends on the remaining capacity of the Zinc Air battery inserted. Installation Connect the cord of the AC power supply to the charger unit and then to an ordinary wall power outlet. You can also connect the charger with a standard USB cable (not included) to a computer to charge your ReSound devices Recharging Your Hearing Instruments The charger can charge rechargeable batteries placed in the ReSound hearing instruments. The charger has two slots for hearing instruments. Both slots can be used for either left or right side hearing instruments. The charger can recharge the batteries in up to two hearing instruments at the same time. Note! It is advisable to keep the earmould / sound tubes on the hearing instruments when placing them in the charger. This makes it easier to identify the right and left hearing instrument when charging is complete. To recharge your hearing instrument: 1.Connect the charger to the wall power outlet (see “Installation”) 2.Make sure the battery door of the hearing instrument is closed 3.Position the hearing instrument with the earmould / tube dome pointing downwards. Hold the instrument housing rather than the tube to avoid bending of the tube 1 4 2 3 4. The hearing instrument is inserted in the charger with the battery door first in a downward arc (see illustration 1 on page 6). While inserting the hearing instrument, use firm and constant pressure until you feel some resistance. You will now hear a click (see illustration 2 on page 6). This indicates that the battery door is open and your instrument is ready to be recharged. 5. If step 4 is unsuccessful, remove the hearing instrument, close the battery door, and repeat step 4. 6. A blue lamp (light emitting diode) will light up during charging. To ensure that both hearing instruments are charging correctly, there is a light indicator for each side (see illustration 3 on page 6). 7. When the charging is complete the light turns green (see illustration 3 on page 6). 8. The hearing instrument is removed from the charger by pushing the eject button (see illustration 4 on page 6). 9. The battery door on the hearing instrument is now open. Snap the battery door into the ON-position before you put on your hearing instrument. You can conveniently charge the hearing instruments overnight, as a full charge will take a maximum of 7 hours. If desired, the hearing instruments can be left in the charger indefinitely without risk of damage, and will be ready for use when taken out. With frequent use the rechargeable batteries will have a life time of approximately one year. Important! Make sure the charger light is blue. If there is no light, the hearing instruments might not have been inserted correctly. Recharging Extra Batteries One or two extra rechargeable batteries can be charged in the battery compartment insert. 1.Pull out the battery compartment insert. 2.Place one or two batteries in the battery compartment insert. Make sure to polarize the batteries correctly. 3. Slide the battery compartment insert into the charger. 4. During charging, one or two blue light indicators will light up depending on the number of batteries inserted. 5. When the charging is complete, the light turns green. 6. The batteries are removed by pulling out the battery compartment insert. 7. Use the key ring compartment to carry the battery compartment insert with charged batteries with you. 10 Note! Both the charger and the key ring contain an insert for batteries. This allows you to carry recharged batteries in the keyring while charging another set of extra batteries in the charger. If the batteries are fully discharged, it will take a maximum of 8½ hours for them to fully recharge. Partially recharged batteries will provide shorter usage time of the hearing instruments. The fully charged batteries will retain their charge for months. Batteries which have been charged in the insert will remain fully charged for as long as they are left in the powered charger. The batteries can be kept in the charger indefinitely without risk of damage. 11 What the Light Indicators Mean When your light indicator does this Blue steady Green steady Red flashing It means Charge in progress Charge complete Error Maintenance Your ReSound battery charger can be cleaned on the outside by wiping it with a moist cloth. 12 Precautions and Warnings Only use the charger indoors in a dry environment 1.The battery charger is designed for use in dry surroundings indoors. Do not use the charger in bathrooms, etc. 2.The battery charger will charge batteries when it is placed in an environment temperature between 0 °C and 40 °C (32 °F and 104 °F). Do not place the charger in direct sunlight, as the temperature can rise above 40 °C (104 °F). At temperatures below 0 °C (32 °F) or above 40° C (104 °F) the charger will not recharge hearing instrument batteries and hence the blue lamps will not be lit. When the temperature returns to the operating range, the charger automatically begins to charge the connected batteries. Use the proper mains adapter (power supply) 1.The battery charger must only be powered by the adapter (AC power supply) included in the delivery. To operate the battery charger in countries where your adapter plug doesn’t fit the power outlets, it will normally be enough to use a plug adapter. The adapter can operate from a wide range of mains voltages, 100 – 240 Vac. Check the voltage before connecting! 2.You can also connect the charger with a standard USB cable (not included in delivery) to any PC and charge your ReSound Azure instruments. 13 Technical data and notifications Input (to mains adapter): 100-240 Vac / 50-60 Hz / 80 mA 14 Charging current: Max. 18 mA Charging voltage: Max. 1.7 V Charging time: Hearing instrument slots: Max. 7 hours (discharged battery) Compartment for extra batteries: Max. 8½ hours (discharged battery) Temperature range: 10 - 40 C°. Humidity: Below 95%. 15 Troubleshooting Guide SYMPTOM CAUSE Hearing Instrument dead For more information please refer to your hearing instrument user guide • Not turned on • Dead battery • Dead rechargeable battery • Battery improperly inserted • Blocked sound tube • Blocked sound inlet filter No indication light • Charger not connected to power outlet on charger • Battery door not opened sufficiently by charger to allow charging • No battery in the device Red indication light flashing on charger • Zinc Air (single-use) battery in the device • Defective recharcheable battery If a red indication light is flashing, and the battery type is rechargeable, the error must be reported to GN ReSound or the hearing care professional where you bought the charger. 16 POSSIBLE REMEDY • Turn on • Replace battery • Recharge battery • Insert battery properly • Clean sound tube blockage • Consult your hearing care professional • Connect the charger with the adapter to power outlet • Eject the device out of the charger, close the battery door if open and reinsert • Insert rechargeable battery • Replace it with a rechargeable battery, • Replace with new rechargeable battery If there are any other problems not mentioned in this guide, please contact your hearing care professional. 17 Any issues relating to the EU Medical Device Directive 93/42/EEC should be directed to GN ReSound A/S. EU directives: EMC 2004/108/EU; Low Voltage 73/23/EEC 18 Key Word Index Battery compartment insert . . . . . . . . . . . . . . . . . . . . . . . . . . . . . . . . . . . . . . . 9 Battery types to recharge . . . . . . . . . . . . . . . . . . . . . . . . . . . . . . . . . . . . . . . . . . 4 Charging time . . . . . . . . . . . . . . . . . . . . . . . . . . . . . . . . . . . . . . . . . . . . . . . . . . . . . 11 Disposal . . . . . . . . . . . . . . . . . . . . . . . . . . . . . . . . . . . . . . . . . . . . . . . . . . . . . . . . . . . 14 Installation . . . . . . . . . . . . . . . . . . . . . . . . . . . . . . . . . . . . . . . . . . . . . . . . . . . . . . . . . . 3 Key ring . . . . . . . . . . . . . . . . . . . . . . . . . . . . . . . . . . . . . . . . . . . . . . . . . . . . . . 3,10,11 Light indicators . . . . . . . . . . . . . . . . . . . . . . . . . . . . . . . . . . . . . . . . . . . . . 3,7,10,12 Maintenance . . . . . . . . . . . . . . . . . . . . . . . . . . . . . . . . . . . . . . . . . . . . . . . . . . . . . . 12 Precautions . . . . . . . . . . . . . . . . . . . . . . . . . . . . . . . . . . . . . . . . . . . . . . . . . . . . . . . 13 Recharging extra batteries . . . . . . . . . . . . . . . . . . . . . . . . . . . . . . . . . . . . . . . . . 7 Recharging hearing instruments . . . . . . . . . . . . . . . . . . . . . . . . . . . . . . . . . . . 5 Technical data . . . . . . . . . . . . . . . . . . . . . . . . . . . . . . . . . . . . . . . . . . . . . . . . . . . . 14 Troubleshooting . . . . . . . . . . . . . . . . . . . . . . . . . . . . . . . . . . . . . . . . . . . . . . . 16-17 Warnings . . . . . . . . . . . . . . . . . . . . . . . . . . . . . . . . . . . . . . . . . . . . . . . . . . . . . . . . . . 10 19 United Kingdom GN ReSound Ltd. 1 Landscape Close Weston Business Park Weston-on-the-Green Oxon OX25 3SX Tel.: 0 1869 343 500 Fax: 0 1869 343 466 www.gnresound.co.uk Australia GN ReSound Pty. Ltd. Unit R1 Regent Park Estate 391 Park Road Regent Park NXW 2143 Tel.: 02 9743 9707 Fax: 02 9743 7472 www.gnresound.com.au New Zealand GN ReSound (NZ) Ltd. 12 Parkway Drive Mairangi Bay Auckland Tel.: (free) 0800 900 126 Fax: (free) 0800 007 695 www.gnresound.co.nz 16115100-GB-07.07 Rev B Worldwide Headquarters GN ReSound A/S Lautrupbjerg 9 DK-2750 Ballerup, Denmark Tel.: +45 45 75 11 11 Fax: +45 45 75 11 19 www.gnresound-group.com