1
User’s manual
SCENARIO MANAGEMENT
Doc-3366-2
DOC-3366-2, Current Version
Title:
ID-no.:
Revision:
Date:
APOLLO SCENARIO MANAGEMENT – User’s Manual
DOC-3366-2
03
October 06
main issue
update
chapter 1
chapter 2
chapter 3
chapter 4
chapter 5
chapter 6
chapter 7
new:
corr.:
add.:
The corresponding chapters are new or completely revised.
Passages of the corresponding chapter were corrected; see modification bars.
Passages of the corresponding chapter were added; see modification bars.
This manual refers to following software versions
Apollo Scenario Management
Release 1.1
Apollo
Release 1.9
Document History
Modifications, which result in a new version, are indicated by a vertical bar.
Trademarks
Brand and product names mentioned in this manual may be trademarks, registered trademarks or copyrights of
their respective holders. All brand and product names mentioned in this manual serve as comments or examples
and are not to be understood as advertising for the products or their manufacturers.
Copyright © 2006 by BARCO
Die Weitergabe sowie die Vervielfältigung aller Unterlagen, die von uns überlassen werden, deren Verwertung
und Mitteilung ihres Inhaltes an Dritte ist nicht gestattet, soweit dies nicht ausdrücklich zugestanden ist.
Urheberrechte, insbesondere auch solche an Software, werden nur insoweit übertragen, als es für die Erreichung
des speziellen Vertragszwecks erforderlich ist. Zuwiderhandlungen können zu Schadensersatz verpflichten. Alle
Rechte aus der Erteilung eines Patents oder der Eintragung eines Gebrauchsmusters verbleiben bei uns.
Copyright © 2006 by BARCO
All rights reserved. No part of this document may be copied, reproduced or translated. It shall not otherwise be
recorded, transmitted or stored in a retrieval system without the prior written consent of BARCO.
Guarantee and Compensation
BARCO provides a guarantee relating to perfect manufacturing as part of the legally stipulated terms of
guarantee. On receipt, the purchaser must immediately inspect all delivered goods for damage incurred during
transport, as well as for material and manufacturing faults. BARCO must be informed immediately in writing of
any complaints.
The period of guarantee begins on the date of transfer of risks, in the case of special systems and software on
the date of commissioning, at the latest 30 days after the transfer of risks. In the event of justified notice of
complaint, BARCO can repair the fault or provide a replacement at its own discretion within an appropriate
period. If this measure proves to be impossible or unsuccessful, the purchaser can demand a reduction in the
purchase price or cancellation of the contract (redhibition). All other claims, in particular those relating to
compensation for direct or indirect damage, and also damage attributed to the operation of software as well as
to other services provided by BARCO, being a component of the system or independent services, will be deemed
invalid provided the damage is not proven to be attributed to the absence of properties guaranteed in writing or
due to the intent or gross negligence on the part of BARCO.
If the purchaser or a third party carries out modifications or repairs on good delivered by BARCO, or if the goods
are handled incorrectly, in particular if the systems are commissioned or operated incorrectly or if, after the
transfer of risks, the goods are subject to influences not agreed upon in the contract, all guarantee claims of the
purchaser will be rendered invalid. Not included in the guarantee coverage are system failures which are
attributed to programs or special electronic circuitry provided by the purchaser, e. g. interfaces. Normal wear as
well as normal maintenance are not subject to the guarantee provided by BARCO either.
The environmental conditions as well as the servicing and maintenance regulations specified in this manual must
be complied with by the customer.
Revision sheet
To:
•
BARCO Control Rooms GmbH
An der Rossweid 5, D-76229 Karlsruhe
Phone: +49-721-6201-0, Fax: +49-721-6201-298
E-mail: [email protected], Web: www.barcocontrolrooms.com
From:
Date:
Please correct the following points in this documentation (DOC-3366-2):
page
wrong
correct
Contents
1 Introduction........................................................................................................................................ 1-1
1.1 How this manual is organized ....................................................................................................................1-2
1.2 Styles and symbols......................................................................................................................................1-2
2 Summary ............................................................................................................................................ 2-1
2.1 General.........................................................................................................................................................2-2
2.2 Terminology.................................................................................................................................................2-3
2.3 Samples of applications ..............................................................................................................................2-4
2.3.1 Startup problems (relative time) .......................................................................................................2-4
2.3.2 Begin and end of a shift (absolute time) ..........................................................................................2-4
2.4 Realization ...................................................................................................................................................2-4
3 Installation ......................................................................................................................................... 3-1
3.1 System requirements ..................................................................................................................................3-2
3.2 Requirements ..............................................................................................................................................3-2
3.3 Used ports ....................................................................................................................................................3-3
3.4 Installation of the Scenario Management software ..................................................................................3-4
3.4.1 Common settings................................................................................................................................3-4
3.4.2 Server side installation (Scenario Executor) ......................................................................................3-8
3.4.3 Client side installation (Scenario Configurator) .............................................................................. 3-16
4 The Scenario Configurator.................................................................................................................. 4-1
4.1 Launching the Scenario Configurator..........................................................................................................4-2
5 The Scenario Editor ............................................................................................................................ 5-1
5.1 Creating a new scenario..............................................................................................................................5-2
5.2 Editing a scenario ........................................................................................................................................5-2
5.2.1 Actions.................................................................................................................................................5-5
5.2.2 Trigger .............................................................................................................................................. 5-24
5.2.3 Timeline ........................................................................................................................................... 5-31
6 Use cases ............................................................................................................................................ 6-1
6.1 Overview......................................................................................................................................................6-2
6.2 Use case: Operation mode of a display wall..............................................................................................6-4
6.2.1 Day shift ..............................................................................................................................................6-5
6.2.2 Night shift ...........................................................................................................................................6-6
6.2.3 Switch Projector lamp off...................................................................................................................6-7
6.3 Use case: change active lamp.....................................................................................................................6-8
6.3.1 Upper lamp switching ........................................................................................................................6-8
6.3.2 Lower Lamp Switching .......................................................................................................................6-9
6.4 Use case: scan viewer .............................................................................................................................. 6-10
6.5 Use case: automated alarm response ..................................................................................................... 6-11
7 Troubleshooting ................................................................................................................................. 7-1
7.1 How to check for the ScenarioApiServer ....................................................................................................7-2
7.2 How to remove a Java Web Start Application............................................................................................7-2
7.3 Tomcat service setting: Allow service to interact with the desktop.........................................................7-4
7.4 Log files........................................................................................................................................................7-4
7.5 Hot Line........................................................................................................................................................7-5
1. Introduction
1 Introduction
This chapter explains the structure of the manual itself and the used typographic styles and symbols.
Barco – Apollo Scenario Manager – DOC-3366-2 – user's manual – Revision 03 – October-2006
____________________________________________________________
1-1
1. Introduction
1.1 How this manual is organized
This section explains the structure of the manual itself and the used typographic styles and symbols. Safety
information is provided concerning the operation of computer systems from BARCO.
•
Introduction
gives an overview about the used styles and symbols.
•
Summary
gives an overview about the functionality of the Scenario Management software
•
Installation
shows system requirements and explains the necessary steps and components of the installation
•
Scenario Configurator
introduces the Scenario Configurator and explains its user interface
•
Scenario Editor
explains the user interface of the Scenario Editor and the shows how to edit scenarios
•
Use cases
gives same samples of scenarios
•
Hotline
informs where to get support in case problems occur.
Chapters, pages, figures and tables are numbered separately. Chapters are indicated by a »point syntax«, e. g.
4.2.3, pages by a »dash syntax«, e. g. 2-1, as figures and tables are, e. g. figure 5-4.
1.2 Styles and symbols
The typographic styles and the symbols used in this document have the following meaning:
Bold
Labels, menus and buttons are printed in Bold font.
Condensed
Links to both other chapters of this manual and to sites in the Internet are printed
condensed. In the on-line version of this manual all hyperlinks appear teal.
Courier
Names of files and parts from programs are printed in the Courier font.
Courier bold
Inputs you are supposed to do from the keyboard are printed in Courier bold font.
The sheet icon indicates additional notes.
Next to this icon you find further information.
This arrow marks tips.
Next to this icon you find important notes.
Barco – Apollo Scenario Manager – DOC-3366-2 – user's manual – Revision 03 – October-2006
____________________________________________________________
1-2
2. Summary
2 Summary
This chapter gives an overview about the functionality of the Scenario Management software.
Barco – Apollo Scenario Manager – DOC-3366-2 – user's manual – Revision 03 – October-2006
____________________________________________________________
2-1
2. Summary
2.1 General
The Scenario Management software is based on the Apollo API. It is a mechanism to define and execute
sequences of Apollo functions, thus providing a simple, end-user accessible way of programming the Apollo
system.
These sequences of commands are called scenario.
Scenarios are defined by the user. The execution of the scenarios is triggered by events coming from various
sources and received via the API (e.g. user actions, time of day, etc.).
To define scenarios, the Scenario Management software provides a configuration user interface.
The configuration user interfaces also allows to start/stop scenarios and to monitor the execution of the
scenarios.
The user interface as front end (client side) of the Scenario Management software is called Scenario
Configurator.
The back end (server side) is called Scenario Executor.
Barco – Apollo Scenario Manager – DOC-3366-2 – user's manual – Revision 03 – October-2006
____________________________________________________________
2-2
2. Summary
2.2 Terminology
A scenario is consists of a list of actions, a list of triggers, and a schedule. The schedule is called Timeline. The
scenario is an XML file saved on the ScenarioApiServer.
A scenario can be addressed by the scenario executor only if the scenario is loaded.
When a scenario is loaded, it can be edited: actions as well as triggers can be added or modified or removed,
or the timeline can be modified.
A scenario can be user controlled (timeline set to manual) or time-controlled (time line different from
manual).
In case of a user controlled scenario, starting the scenario is requires clicking on the Start button in the Scenario
Editor, cf. The Scenario Editor. The scenario then runs as soon as it is triggered.
In case of a time-controlled scenario, starting the scenario happens at is startup time defined in the timeline.
The scenario then runs as soon as it is triggered. (Manual intervention by clicking the Start button has no effect
until the startup time defined in the timeline is the current time (but then of course it starts if the Start button
has been clicked or not)
A scenario stops as soon as all commands of the list are executed (provided there is no loop which makes them
start again).
It also stops in case its duration time has passed.
The user can stop it manually by clicking on the Stop button in the Scenario Editor, cf. The Scenario Editor. To make
it running again, the Start button has to be clicked. However it is mandatory that re-start happens during its
Duration time, otherwise it won't have any effects.
The Duration time is the time where a scenario is sensitive for triggers. Duration time is an absolute time and
prevents conflicts causing from e.g. system failures. If the server shuts down and is restarted, the scenario
executor will resume the scenario only when it is still due to be active (duration time not over).
The execution of a scenario pauses when the current action in the list of actions is a Pause or Wait action, but
the triggers will still remain active.
In case of Pause, execution of the actions is resumed as soon as a trigger fires.
In case of Wait, execution of the action is resumed as soon as the wait time defined has passed.
User controlled scenario
Time controlled scenario
Loading
Operator (via user interface or via
commandline)
Starting
Start button
Schedule
Running
When started, and a trigger fires
When started, and a trigger fires
Duration time
Duration of one cycle
Defined in the timeline
Shut down time
When the once cycle is over
Defined in the timeline
Stopping
When one cycle is over, or when the stop
button has been clicked (manual
intervention).
Only when the duration time is over (if
the active state of a scenario is still
pending, it cannot be stopped manually)
Barco – Apollo Scenario Manager – DOC-3366-2 – user's manual – Revision 03 – October-2006
____________________________________________________________
2-3
2. Summary
2.3 Samples of applications
2.3.1 Startup problems (relative time)
Some applications require some time to initialize before the next action can start.
This problem can be solved by creating a scenario which allows the next action to take place only after some
time the application has been launched.
2.3.2 Begin and end of a shift (absolute time)
The requirements during night may be different from the requirements during day with respect to active size of
the wall and/or applications running on the wall.
These requirements can be met by a scenario which runs at a fixed time of the day (e.g. 6 PM) and which
switches off parts of the wall, unloads the "day layout" and loads the "night layout". – In the morning, another
scenario resets the control room into day operating status again.
2.4 Realization
The Scenario Management software is a kind of client to the Apollo API and is implemented in Java to be
independent from the operating platform. Therefore it is mandatory that Apollo and Apollo API are installed on
the server workstation of the Scenario Management back end, i.e. on the workstation of the Scenario Executor.
The user interface for defining scenario is a web start application delivered from the Apache Tomcat Server which
hosts the Scenario API.
It can run on every machine where the Java runtime environment is installed.
Barco – Apollo Scenario Manager – DOC-3366-2 – user's manual – Revision 03 – October-2006
____________________________________________________________
2-4
3. Installation
3 Installation
Barco – Apollo Scenario Manager – DOC-3366-2 – user's manual – Revision 03 – October-2006
____________________________________________________________
3-1
3. Installation
3.1 System requirements
Since the Scenario Management software requires Apollo and Apollo API, the system
requirements are the system requirements for Apollo.
3.2 Requirements
•
Windows 2000 Service Pack 4 or later
•
Internet Explorer 6.0 SP2 or later
•
Windows Scripting Host 5 or later
•
Hot Fixes and Customizations (according to Barco TASK-2k-09a for TransForm A controller)
•
Windows XP Professional Service Pack 2 or later
•
Internet Explorer 6.0 SP2 or later
•
Windows Scripting Host 5 or later
•
Hot Fixes and Customizations (according to Barco TASK-XP-09a for TransForm A controller or RTASK-XPDP-09
for TransForm A DualXeon)
•
Barco Snmp RcAgent 1.6SR1 (for device control)
•
Barco Windows driver suite 4.2 (for TransForm A controller)
•
Funk Software Inc. Proxy Host 5.1 (for Cottus viewer), Gateway 5.1
•
VNC 4.1.2 (for VNC viewer)
•
TightVnc 1.2.9 (for VNC viewer)
•
Microsoft Visio2000 or higher (for Apollo Configurator)
•
Microsoft Visual Studio 6.0 SP4 (for software development)
•
Windows Media Player 9
•
Barco OCM 1.2 for OverView D projection modules
When running the viewers, please keep in mind that each instance of a viewer requires
about 20MB to 30MB RAM. Upgrade your TransForm A controller accordingly!
You need administrative privileges to install the Apollo software. If the computer reboots during installation,
users have to log in with administrative privileges after the reboot as well.
When installing, please stick to the following installation sequence: OS level first
(Windows2000 WindowsXP), then system level (Windows Driver Suite, Barco RC Agent),
finally application level (Apollo, RemotePointer, Screen Host)
Barco – Apollo Scenario Manager – DOC-3366-2 – user's manual – Revision 03 – October-2006
____________________________________________________________
3-2
3. Installation
3.3 Used ports
Apollo will use the following ports:
Application
ports
Control Room Bus
TCP/IP ports: 4570 and 4571
CottusViewer / Proxy Host
UDP port: 1505
CottusViewer /Gateway
UDP port: 2303
VncViewer / VncServer / TightVncServer
TCP/IP port: 5900
ProServer / ProViewer / RemotePointer
TCP/IP port: 4580
TCP/IP Command interface
TCP/IP port 4585
SnmpMngr
TCP/IP port 4701
RcAgent
TCP/IP port 4700
OCM
TCP/IP port 6063 and 4702
With Windows XP SP2, the firewall is automatically activated and all ports are closed! Make
sure to open the above mentioned ports! Without being able to communicate, Apollo will
not work!
Please check also if an external firewall is installed. No matter what type of firewall:
Apollo can only operate when the ports listed above are open.
Consult the user documentation about your firewall how to open the ports.
Barco – Apollo Scenario Manager – DOC-3366-2 – user's manual – Revision 03 – October-2006
____________________________________________________________
3-3
3. Installation
3.4 Installation of the Scenario Management software
In case there is already a version of this software installed on the system, first de-install
the old version: Select Start|Control Panel|Add or Remove Programs|Barco Scenario
Management
3.4.1 Common settings
The following steps have to be performed on the server workstation as well as on the client workstation.
•
Host configuration
•
Modification of the power management settings
3.4.1.1 Host configuration
To adapt the host file, it is mandatory that you know the IP addresses of the ApolloApiServer and of the
ScenareioApiServer.
In case you know the names of the workstation but not the IP addresses, you can find them out using the PING
command:
•
Select Start|Run and enter CMD.
•
In the command prompt, enter the following command: PING NameOfWorkstation
•
The ping commands return the IP address of the workstation:
By means of the PING command, not only the IP address is returned, but you are also
informed that the workstation is running and connected to the network.
Barco – Apollo Scenario Manager – DOC-3366-2 – user's manual – Revision 03 – October-2006
____________________________________________________________
3-4
3. Installation
To perform the host configuration
•
navigate the folder C:\Windows\System32\drivers\etc.
•
Use Notepad to edit the file hosts, and add the following lines:
IP Address apolloapiserver
IP Address scenarioapiserver
Barco – Apollo Scenario Manager – DOC-3366-2 – user's manual – Revision 03 – October-2006
____________________________________________________________
3-5
3. Installation
3.4.1.2 Power management settings
Select Start|Control Panel|Power Options.
•
Set the power scheme of hard disk and system as Never, and close the dialog.
Now the network adapter has to be configured:
•
Select Start|Control Panel|System.
•
Activate the tab Hardware, and click on the button Device Manager.
•
Navigate and then right click on Network adapters.
•
From the context menu, select Properties.
•
Activate the tab Power Management
•
Uncheck the option "Allow the computer to turn off the device to save power"
Barco – Apollo Scenario Manager – DOC-3366-2 – user's manual – Revision 03 – October-2006
____________________________________________________________
3-6
3. Installation
After the host file has been modified and the power management options have been set, the system has to be
restarted!
Restart the system to apply the modifications!
Barco – Apollo Scenario Manager – DOC-3366-2 – user's manual – Revision 03 – October-2006
____________________________________________________________
3-7
3. Installation
3.4.2 Server side installation (Scenario Executor)
For the log files, addititional 100MB of free space are required, cf. Log files!
Make sure that Apollo has been installed, either the Apollo operator workstation or the
Apollo desktop server.
Also the Apollo API has to be installed. (Mandatory: the Internet Information Service is
installed and configured, and the local users IWAM and IUSR have been assigned the
respective rights.
To learn more about the installation of Apollo and the Apollo API, cf. Apollo user's manual,
doc -3197-2.
To check the correct installation of Apollo and the Apollo API, use the tool VerifyAPI.exe provided on the Apollo
CD-ROM:
•
Navigate to the folder Apollo (CRS-3045)\Apollo 1.9\API
•
Double click on VerifyAPI.exe
The verification tool launches and checks the configuration. If everything is ok, after several instances it shows
the build of the Apollo Software.
In a second step you can click on the button "List Desktops". The tool will look for all desktop servers of the
related Apollo project and lists them. The entries of the list can be viewed opening the list box:
Provided Apollo and Apollo API have been installed and configured according the installation instructions as
described in the Apollo user's manual, the installation of the Scenario Executor requires the following steps:
•
Installation of the Java Runtime Environment 5.0 (version 1.5.0_07)
•
Installation of Apache Tomcat Server version 5.5.17
•
Unpacking of Systinet4Tomcat.zip
•
Installation of Scenario Manager
Barco – Apollo Scenario Manager – DOC-3366-2 – user's manual – Revision 03 – October-2006
____________________________________________________________
3-8
3. Installation
3.4.2.1 Installation of the Java Runtime Environment 5.0 (verson 1.5.0_07)
The software is located on the Apollo CD-ROM in the subdirectory
3rd Party\Java Runtime Environment
•
Navigate to this folder.
•
To install the Java Runtime Environment, double click on jre-1_5_0_07-windows-i586-p.exe.
Follow the instructions on the screen.
3.4.2.2 Installation of Apache Tomcat Server version 5.5.17
In case a former version of Scenario Management has already been installed on the
system, you might want to keep the customized files (log-files, xmls-files).
Check the environment variable CATALINA_HOME. If she refers to a folder Tomcat 5.5 you
have to copy the folders CATALINA_HOME/logs and CATALINA_HOME/xmls to a temporary
folder. Then delete the following files and folders
%CATALINA_HOME%\webapps\ConfiguratorLauncher.war
%CATALINA_HOME%\webapps\ConfiguratorLauncher\
%CATALINA_HOME%\webapps\Systinet\app\ScenarioAPIPackage.jar
"%CATALINA_HOME%\webapps\Systinet\work\ScenarioAPIPackage.jar\
If the environment variable refers to Tomcat 5.0, the folders mentioned above will not be
affected by a new installation and you can later copy your files directly to the new target
folder.
In case you want to de-install an old Tomcat version, in order to keep the customized files,
select No in the dialog shown below, and de-install it without removing the files!
You can delete them later when the customized files of the Scenario Manager have been
copied to the new destination.
The software is located on the Apollo CD-ROM in the subdirectory
3rd Party\Apache
•
Navigate to this folder.
•
Double click on apache-tomcat-5.5.17.exe.
Follow the instructions on the screen. If you accept the default installation path, the software will be installed to
the folder
C:\Program Files\Apache Software Foundation\Tomcat 5.5
When asked about the password for the Tomcat Server Admin: this password can be freely selected. It has
nothing to do with your network password etc. Just make sure that you later remember the password … or let it
empty….
Barco – Apollo Scenario Manager – DOC-3366-2 – user's manual – Revision 03 – October-2006
____________________________________________________________
3-9
3. Installation
When the installation is complete, check if the Port 8080 is opened!
The installation continues. On the last dialog, deselect the options "Run Apache Tomcat" and "Show Readme"
If the option "Run Apache Tomcat" is checked, the service will be started, and you first
have to stop it before being able to configure it!
Barco – Apollo Scenario Manager – DOC-3366-2 – user's manual – Revision 03 – October-2006
__________________________________________________________
3-10
3. Installation
3.4.2.3 Environment variable to Apache Tomcat and configuration of the Tomcat Server
When the installation is finished, an environment variable to the installation path has to be set and the Tomcat
server has to be configured.
Make sure that Apache Tomcat Server is not running.
•
Set the environment variable on system level:
Select Start|My Computer| Properties|Advanced|Environment Variable
Barco – Apollo Scenario Manager – DOC-3366-2 – user's manual – Revision 03 – October-2006
__________________________________________________________
3-11
3. Installation
CATALINA_HOME = C:\Program Files\Apache Software Foundation\Tomcat 5.5 (in case the default
installation path is used, otherwise indicate the custom installation path!)
After the environment variable has been set, it is highly recommended to close all open
instances of the Windows Explorer! Otherwise you risk that the environment variable is not
fully introduced to the system and the setup of the Scenario Controller will not see it and
therefore abort.
To configure Tomcat, proceed as follows:
•
Select Start|All Programs|Apache Tomcat 5.5|Configure Tomcat
•
On the JAVA tab, assign “Initial Memory Pool” : 256 MB & “Maximum Memory Pool” : 512 MB.
Barco – Apollo Scenario Manager – DOC-3366-2 – user's manual – Revision 03 – October-2006
__________________________________________________________
3-12
3. Installation
As default, the Apache Tomcat Server starts manually. In case you want to have it started automatically
when starting up the system, navigate to the General Tab and select Startup type as “Automatic”.
The Scenario Executer is running as soon as the Apache Tomacat Server has been started.
The Scenario Executer has no dedicated "start" command. Therefore it is recommended to
have the Apache Tomacat Server started automatically when booting the system to ensure
that the Scenario Executer is running. This is done by selecting the Startup type as
“Automatic”.
Barco – Apollo Scenario Manager – DOC-3366-2 – user's manual – Revision 03 – October-2006
__________________________________________________________
3-13
3. Installation
Subsequently navigate to the tab Log On and apply the settings as shown below:
Do not check "Allow service to interact with the desktop". For further information, please
refer to Tomcat service setting: Allow service to interact with the desktop
3.4.2.4 Unzip Systinet4Tomcat.zip
The Zip-File is located on the CD-ROM in the folder
…\Apollo (CRS-3045)\Apollo 1.9\ScenarioManagement
If the default installation path is used, extract these files into the folder C:\Program Files\Apache Software
Foundation\Tomcat 5.5 (= CATALINA_HOME).
Make sure that the files are extracted into the folder CATALINA_HOME!
The following folders will be created at CATALINA_HOME:
•
Common
•
Conf
•
Webapps
Barco – Apollo Scenario Manager – DOC-3366-2 – user's manual – Revision 03 – October-2006
__________________________________________________________
3-14
3. Installation
Check if these folders have been created. You can also verify the successful Systinet extraction by starting the
Systinet Server for Java:
•
In case the Tomcat Server is stopped, start it!
•
Launch the Internet Explorer
•
On the menu bar, select Tools|Internet Options
•
Navigate to the tab Connections
•
Click the button LAN settings
•
In case a proxy server is used for your LAN: Check the option Bypass proxy server for local addresses.
•
Enter the following address: http://ScenarioApiServer:8080/Systinet/server/admin/console
If everything is correct, the following page will be opened:
3.4.2.5 Installation of Scenario Management
•
If the Tomcat Server is running, stop it: right click on the icon in the system tray and select "Stop"!
•
On the CD-ROM, navigate to …\Apollo (CRS-3045)\Apollo 1.9\ScenarioManagement\ and double click
on setup.exe. The setup will copy and deploy the required files (ConfiguratorLauncher.war,
ScenarioApiPackage.jar, ScenarioApiPackage.jar)
•
Start Tomcat Server. This step will deploy the binaries automatically.
•
Open Tomcat log file from “CATALINA_HOME/logs/ and verify that Scenario API Server is online (there is an
entry Systinet in this folder with a current time stamp) or wait until it gets online.
In case you already had a previous installation of Scenario Management, copy the folders
logs and xmls of the previous valid CATALINA_HOME directory to the current directory
CATALINA_HOME.
Barco – Apollo Scenario Manager – DOC-3366-2 – user's manual – Revision 03 – October-2006
__________________________________________________________
3-15
3. Installation
3.4.3 Client side installation (Scenario Configurator)
The Scenario Configurator simply requires the installation of the Java Runtime Environment(JRE) 5.0
(version 1.5.0_07)
In case you already run Scenario Configurator Version 1.0 from this computer, no
intervention is required: A Java Web Start application always looks for a new verion on the
server and downloads it. In case this does not work, cf. Troubleshooting
3.4.3.1 Installation of the JRE 5.0
The software is located on the Apollo CD-ROM in the subdirectory
3rd Party\Java Runtime Environment
•
Navigate to this folder.
•
To install the JRE 5.0, double click on jre-1_5_0_07-windows-i586-p.exe.
Follow the instructions on the screen.
3.4.3.2 Configuration and launching of Apollo Scenario Configurator
The Scenario Configurator is a web start application delivered from the Apache Tomcat Server which hosts the
Scenario API.
It can run on every machine where the Java runtime environment is installed.
To configure the Java web start application,
•
Launch the Internet Explorer
•
In the address bar, enter the following address:
http://scenarioapiserver:8080/ConfiguratorLauncher/Launcher.jnlp
The URL is case sensitive. Please mind the upper and lower case characters.
This will start the Scenario Configurator as Java Web Start application which is updated whenever a modified
version is detected on the server.
A shortcut to Scenario Configurator is created on the desktop and in the Start menu.
In case the shortcut creation fails, you can create them via the Java Application Cache Viewer:
Browse to the Java Runtime installation folder (in case you used the default path:
C:\Program Files\Java\JRE1.5.0_07) and open the subfolder bin.
In this subfolder there is an application javaws.exe (java web start).
Double click on this exe-file. The Java Application Cache Viewer pops up and shows the web start application
clients of this system. Select Application|Install Shortcuts to install a shortcut on the desktop and in the
Windows Start menu.
Barco – Apollo Scenario Manager – DOC-3366-2 – user's manual – Revision 03 – October-2006
__________________________________________________________
3-16
3. Installation
Barco – Apollo Scenario Manager – DOC-3366-2 – user's manual – Revision 03 – October-2006
__________________________________________________________
3-17
4. The Scenario Configurator
4 The Scenario Configurator
Barco – Apollo Scenario Manager – DOC-3366-2 – user's manual – Revision 03 – October-2006
____________________________________________________________
4-1
4. The Scenario Configurator
4.1 Launching the Scenario Configurator
To launch the Java web start application, double click on the shortcut on the desktop or select
tart|Programms|-Apollo - Scenario Configurator|Apollo - Scenario Configuator.
After the Java web start application is started it shows the following dialog (the entries might look different and
depend on the sample files copied during installation of the Scenario Executer and/or scenarios already defined
for the same API server):
A scenario is an XML file stored in the XML store of the ScenarioApiServer
(%CATALINA_HOME%\XMLS)
The following list explains the columns of the dialog:
Name
Name of the scenario as defined by the user. The name is assigned when a scenario has
been created by clicking on the New… button
Status
If a scenario is loaded, there is an icon the status column; and, selecting this layout, the
Load button is disabled.
Next to the status icon, an indicator shows if the scenario is running (
(
).
), or paused
If there is no icon in the status column, the scenario has not been loaded yet. Click on the
Load button to load it!
Locked
If a scenario is being edited by a user, it is locked to make sure that not a second user
modifies it at the same time. The "locked" status and the current owner (editor) as well as
a time stamp is indicated in the Locked column (
)
Description
This is a free text entered when creating a new scenario.
Barco – Apollo Scenario Manager – DOC-3366-2 – user's manual – Revision 03 – October-2006
____________________________________________________________
4-2
4. The Scenario Configurator
To pause or stop a scenario manually, click on the Open button. This command opens the
editor to modify the scenario and/or to manipulate its execution.
A scenario is an xml file which is saved in the directory %CATALINA_HOME%\XMLS.
As soon as the Scenario Configurator is launched, the list of scenarios is populated with all xml files located in
this directory.
All new created scenarios will be saved in this directory, and the entries in the Scenario Configurator will be
adapted accordingly.
Command button New
Clicking on the button will open a dialog to define name and description for a new scenario
Command button Open
Clicking on this button will open the editor to add or modify actions and triggers for a selected scenario.
Command button Delete
Clicking on this button will delete the selected scenario file from the xml store, the directory
%CATALINA_HOME%\XMLS. The deleted scenario is irretrievably lost.
Command button Load
Clicking on this button will load the selected scenario, i.e. making the scenario addressable. It can be edited, and
is waiting for a trigger to be started. Loading a scenario does not mean starting a sequence of actions, but means
loading of an action sequence, trigger list and timeline for a scenario and making the scenario ready to be
started by a trigger.
All triggers defined in the scenario are "live" as soon as the scenario is started. If e.g. a trigger is defined to fire
after 2 Minutes, this time will be counted down immediately when the scenario is started.
In case the scenario is already loaded, the Load button is disabled for this scenario.
Command button unload
Clicking on this button will unload the selected scenario from the server. The Unload command has to be
confirmed in an additional dialog which pops up. If accepted, the scenario is unloaded from the server, which
means that the Scenario Executor no longer "sees" this scenario definition. The icon in the Status column
disappears.
In case the selected scenario has not been loaded yet, the Unload button is disabled for this scenario.
The behavior described only applies for scenarios which are not locked by another user. For
locked scenarios, the command buttons are disabled.
Barco – Apollo Scenario Manager – DOC-3366-2 – user's manual – Revision 03 – October-2006
____________________________________________________________
4-3
5. The Scenario Editor
5 The Scenario Editor
The dialog which pops up when clicking on the New or Open button of the Scenario Controller is called Scenario
Editor.
Barco – Apollo Scenario Manager – DOC-3366-2 – user's manual – Revision 03 – October-2006
____________________________________________________________
5-1
5. The Scenario Editor
5.1 Creating a new scenario
To create a new scenario, click on the New… button. A dialog opens where the name and the description of the
scenario has to be entered:
Please mind that the name has to be unique, and that characters which are forbidden in a
filename or which have a special meaning in XML (\ / : * ? " < > |) must not be included in
the name.
Name and description can be modified afterwards when opening the scenario.
After the name and the description of the new scenario have been entered and the dialog has been quit with
OK, the new scenario shows up as an entry in the list.
To define the scenario, navigate to the respective entry and click on Open.
5.2 Editing a scenario
To define and/or edit a scenario, click on the Open button. This command opens the Scenario Editor where you
can modify name and description, define and re-organize the action, define and modify time line and trigger of
the action as well s to manually start/pause/stop the scenario.
The caption of the Scenario Editor indicates the name of the scenario being edited.
If you re-name the scenario, i.e. if you modify the name, the caption will be adapted at
once.
Barco – Apollo Scenario Manager – DOC-3366-2 – user's manual – Revision 03 – October-2006
____________________________________________________________
5-2
5. The Scenario Editor
Name
This entry shows the name which has been given when creating the new scenario. If you want to change it, you
can do it. In the list of scenarios, the new name shows up after the modified scenario has been saved. Please
mind the characters forbidden in XML.
Assigning a different name will only rename the scenario. It is not possible to copy a
scenario in the Scenario Configurator. If required, open the XML store and copy the desired
scenario using the Windows Explorer.
Description
This entry shows the description which has been entered when creating the new scenario. If desired, modify it!
In the list of scenarios, the new description shows up after the modified scenario has been saved.
Timeline
This entry shows when the scenario will be started time-controlled, i.e. activated to be ready for execution (it
waits for the trigger which will start the execution). To set or modify the TimeLine, click on the Schedule…
button!
Barco – Apollo Scenario Manager – DOC-3366-2 – user's manual – Revision 03 – October-2006
____________________________________________________________
5-3
5. The Scenario Editor
Action Sequence
In this list box the actions of the scenario are listed. The icon indicates whether the command is an internal
action ( ), or an external action ( ), or an Apollo action ( , supported by the Apollo API). Next to the icon
the name of the action is listed and a unique ID number to identify the action in the sequence.
Next to the list box the command buttons allow to manage the actions.
Icon
description
Add, to add a new command/action to the scenario
Modify, to modify the selected command
Delete, to delete the selected action
Move up, the selected action is moved upwards in the sequence, i.e. executed earlier
Move down, the selected action is moved downwards in the sequence, i.e. executed later
Trigger List
The list box comprises all triggers assigned to this scenario. The icon indicates whether it is an internal trigger
( ), an external trigger ( ) or an Apollo trigger ( , event raised in Apollo)
New triggers can be added to the list; already existing triggers can be edited or deleted using the command
buttons at the right of the trigger list field:
Icon
description
Add, to add a new trigger for scenario
Modify, to modify the selected trigger
Delete, to delete the selected trigger
Command button Start
This button is for manually starting scenarios which have its run frequency in the timeline set to manually. The
scenario then is sensitive for triggers and will start running as soon as a trigger fires.
Clicking on the Start button has not effect on time-controlled scenarios except the scenario has been manually
stopped by clicking the Stop button. Then clicking the Start button will resume execution of the scenario provided
the duration time is not over yet.
The Start button will schedule the next Stop Time of the scenario, in case of time-controlled scenarios.
Command button Pause
Use this button to pause the execution of the scenario. Execution will be resumed if the Start button will be
clicked within the duration time of the scenario.
Command button Stop
Use this button to interfere with the scenario execution. The scenario will be stopped and only resumed if the
Start button will be clicked within its duration time.
The Stop button will schedule the next Start Time of the scenario, in case of time-controlled scenarios.
Command button Save
Use this button to save any modifications made during editing the scenario.
Barco – Apollo Scenario Manager – DOC-3366-2 – user's manual – Revision 03 – October-2006
____________________________________________________________
5-4
5. The Scenario Editor
Command button Close
Use this button to close the Scenario Editor. In case modifications have not been saved yet, you are asked to save
them or not.
5.2.1 Actions
5.2.1.1 Add actions ( )
Clicking on this button displays a dialog where the desired action can be chosen and defined:
The list of actions comprises:
Action
description
Action Sequence
To control the execution of the scenario
Trigger
To enable, disable or fire a trigger
Wait
To define a "sleeping time"
Activate Layout
To load a layout
Deactivate Layout
To unload a layout
Command Line
Used for command line executions from the Server-side
Connect Source
To connect a source to a viewer
Disconnect Source
To disconnect a source to a viewer
Switch Projector Lamp
To switch the projector from standby into operation and vice versa
Set Video Channel
To set a video channel in the FRG Viewer
Barco – Apollo Scenario Manager – DOC-3366-2 – user's manual – Revision 03 – October-2006
____________________________________________________________
5-5
5. The Scenario Editor
Action
description
Set Streaming Source
To set a streaming source in the FRG Viewer
Set Streaming Video Channel
To set the streaming video channel in the FRG Viewer
Activate Projector Lamp
To select the active lamp (dual lamp projector)
Start Shortcut
To start a shortcut
In the following the actions will be described. Description is based on the assumption that the Scenario
Configurator is Online and connected to the respective Desktop Server. Then the list boxes of the dialog will be
populated with the information derived from the project via the ApiServer.
However, the Scenario Configurator can be operated while the Apollo API Server is offline – then of course all
entries have to be made manually, and knowledge about the project and the layout database for the project is
mandatory to match all the names and settings to ensure that the scenarios will run as expected.
Action Sequence
This action controls the flow of executing the scenario. It pauses (Pause) the execution or stops (Stop) it, it may
restart the execution of the scenario, thus initiating the first action defined in the scenario, or it initiates a jump
to an action in the scenario out of the ordinary sequence of steps (GoTo). If Goto is selected, the jump has to be
defined. It is selected from the list box which is populated with all actions defined in this scenario.
Barco – Apollo Scenario Manager – DOC-3366-2 – user's manual – Revision 03 – October-2006
____________________________________________________________
5-6
5. The Scenario Editor
If the Enabled check box is cleared, the action is disabled, and shows up grayed out in the list of actions.
Whenever the action sequence is Pause, the execution of the scenario will be on hold until
a trigger fires. Then the execution will be resumed with the action following the Pause
action.
The Stop option will stop the execution of the scenario. If a trigger fires the scenario to be
executed again, execution will start with the first action of the scenario.
Barco – Apollo Scenario Manager – DOC-3366-2 – user's manual – Revision 03 – October-2006
____________________________________________________________
5-7
5. The Scenario Editor
Trigger
To add a trigger action, it is mandatory that triggers had already been defined for this scenario. Then the list box
of the triggers will be populated with the defined triggers.
When defining a trigger action it is possible to initiate or to prevent a trigger from firing, thus controlling the flow
of execution of the scenario.
Select Disable to deactivate the trigger dynamically. Select Fire to have the trigger fired when the execution of
the scenario is at this point.
If a trigger is dynamically disabled, it might be recommended to Enable it again in a following action.
If the checkbox Enabled is cleared, the action is deactivated and grayed out in the list of actions.
Barco – Apollo Scenario Manager – DOC-3366-2 – user's manual – Revision 03 – October-2006
____________________________________________________________
5-8
5. The Scenario Editor
Wait
This action allows to interrupt the execution of the actions of the scenario for a certain time. The period can be
either entered in hours, minutes and seconds, or a date can be defined up to which the execution is interrupted.
Enter the duration in hours, minutes, and seconds; or select the date when it should restart by using the calendar
control.
Use the spin buttons to increase or decrease the selected value by one.
Barco – Apollo Scenario Manager – DOC-3366-2 – user's manual – Revision 03 – October-2006
____________________________________________________________
5-9
5. The Scenario Editor
If the checkbox Enabled is cleared, the action is deactivated and grayed out in the list of actions.
Barco – Apollo Scenario Manager – DOC-3366-2 – user's manual – Revision 03 – October-2006
__________________________________________________________
5-10
5. The Scenario Editor
Activate Layout
To load a layout on the display wall, use the action Activate Layout. Since a layout is defined in a layout
database which is assigned to the Desktop Server, at first the Desktop Server has to be selected from the list of
available Desktop Servers of the ScenarioApiServer.
As soon as the Desktop Server is selected, the regions defined in the layout database for this Desktop Server
populate the Region list. In case there are no regions defined, the region list comprises the single entry
<default>.
After the region has been selected, the list of layouts available for this region is populated. Select the desired
layout.
If the checkbox Enabled is cleared, the action is deactivated and grayed out in the list of actions.
Barco – Apollo Scenario Manager – DOC-3366-2 – user's manual – Revision 03 – October-2006
__________________________________________________________
5-11
5. The Scenario Editor
Deactivate Layout
This action unloads a layout from the display wall. Since a layout is defined in a layout database which is
assigned to the Desktop Server, at first the Desktop Server has to be selected from the list of available
Desktop Servers of the ScenarioApiServer.
As soon as the Desktop Server is selected, the regions defined in the layout database for this Desktop Server
populate the Region list. In case there are no regions defined, the region list comprises the single entry
<default>.
After the region has been selected, the list of layouts available for this region is populated. Select the desired
layout to be unloaded.
In case all layouts of this region of the selected Desktop Server shall be unloaded, check All.
If the checkbox Enabled is cleared, the action is deactivated and grayed out in the list of actions.
Barco – Apollo Scenario Manager – DOC-3366-2 – user's manual – Revision 03 – October-2006
__________________________________________________________
5-12
5. The Scenario Editor
Command Line
This action is used to execute commands from the command prompt of the Scenario Executor Server.
This functionality is based on the java command ScenarioCmd.jar.
The command uses the syntax
Java.exe –jar ScenarioCmd.jar –Command [Value] –Scenario [Value] –Trigger[Value]
These are the values of the parameters:
Parameter
Short form
Value
Refers to
-Command
-C
All commands available in the Scenario Configurator
Type 1: Load, Unload, Start, Stop, Pause
Scenario
Type 2:
Trigger
Enable, Disable, Fire
-Scenario
-S
Name of Scenario
Scenario
-Trigger
-T
Name of Trigger in case of command Type 2
Trigger
Since the trigger is part of the scenario definition, you have always to specify the scenario
which "hosts" the trigger. Therefore the –Scenario is the required parameter for all
commands.
-Trigger is an optional parameter and has only to be specified if the command affects a
trigger.
Barco – Apollo Scenario Manager – DOC-3366-2 – user's manual – Revision 03 – October-2006
__________________________________________________________
5-13
5. The Scenario Editor
Examples
What to do
Command line (long/short form)
Start scenario
"Activate Layout"
Java.exe –jar ScenarioCmd.jar –Command Start –Scenario "Activate Layout"
Fire Trigger1 of the
scenario "Activate
Layout"
Java.exe –jar ScenarioCmd.jar –Command Fire –Scenario "Activate Layout" –Trigger Trigger1
Java.exe –jar ScenarioCmd.jar –C Start –S "Activate Layout"
Java.exe –jar ScenarioCmd.jar –C Fire –S "Activate Layout" –Trigger Trigger1
If the name of the scenario or the trigger includes blanks, the name has to be enclosed by
double quotes.
Please replace "Java.exe" and "ScenararioCmd.jar" with the full path names (or the
respective environment variables) of the applications!
It is possible to specify a working directory. This is the directory the command line is intended to be executed
from. If the working directory has been specified in the respective field, and if the ScenarioCmd.jar is located in
the working directory, then no path information for ScenarioCmd.jar has to be included in the command line.
To reduce errors and to make it more convenient, the command line commands can be defined as standalone
command files.
Example:
Definition of the command Start_Scenario.cmd:
%JAVA_HOME%\jre\bin\java.exe -jar ScenarioCmd.jar -C START -S %1
Definition of the command Fire_Trigger.cmd:
%JAVA_HOME%\jre\bin\java.exe -jar ScenarioCmd.jar -C FIRE -S %1 -T %2
Using these predefined command lines, the entry in the command line field would look like this:
Barco – Apollo Scenario Manager – DOC-3366-2 – user's manual – Revision 03 – October-2006
__________________________________________________________
5-14
5. The Scenario Editor
cmd /c starts a new instance of the Windows command interpreter with the option "Carries out the command
specified by string and then terminates". The string consists of the command and the parameter of the
command.
(In case of Fire_Trigger.cmd of course two parameters have to be handed over, therefore the entry would read
cmd /c Fire_Trigger.cmd "Sample 1" Trigger1. Please note that double quotes are required since the name of
the scenario includes a blank).
It is recommended to save the predefined command files in the working directory!
Entering the environment settings is optional. Clicking on the Add button ( ) displays a dialog to enter name
and path of the new environment variable. In case environment variables are already defined, they can be
modified ( ) or deleted ( ).
All environment variables defined for this commandline are listed in the respective field.
If the Enabled checkbox is cleared, the action is deactivated and shows up grayed out in the action sequence list.
Barco – Apollo Scenario Manager – DOC-3366-2 – user's manual – Revision 03 – October-2006
__________________________________________________________
5-15
5. The Scenario Editor
Connect Source
Connect source is an action which refers to a viewer. Therefore when this action is selected, the Viewer list box
is populated with all the viewers defined in the project.
Select the desired viewer.
Subsequently the sources defined for this viewer in the viewersources.ini are listed in the Source list box.
Select the desired source from the list.
In case the viewer is connected to a different source, it will disconnect and connect to the selected source. If the
viewer already is connected to this source, nothing will happen.
The viewer can only connect to a pre-defined source.
If the Enabled checkbox is cleared, the action is deactivated and shows up grayed out in the action sequence list.
Barco – Apollo Scenario Manager – DOC-3366-2 – user's manual – Revision 03 – October-2006
__________________________________________________________
5-16
5. The Scenario Editor
Disconnect Source
Disconnect source is an action which refers to a viewer. Therefore when this action is selected, the Viewer list
box is populated with all the viewers defined in the project and which are currently connected to a source.
Select the desired viewer.
As soon as the OK button is pressed, the Viewer will be disconnected from the source.
If the Enabled checkbox is cleared, the action is deactivated and shows up grayed out in the action sequence list.
Barco – Apollo Scenario Manager – DOC-3366-2 – user's manual – Revision 03 – October-2006
__________________________________________________________
5-17
5. The Scenario Editor
Switch Projector Lamp
This action allows to switch a projector on < (from standby to operation) or off (from operation to standby).
Selecting this action will populate the Projector list box with all projectors of the project. When a projector is
selected, the current status of operation is indicated: If the lamp is on (projector in operation status), it can only
be switched off (On is selected). If the lamp is off (projector in standby), it can only be switched on (Off is
selected.
Select the desired option.
If the Enabled checkbox is cleared, the action is deactivated and shows up grayed out in the action sequence list.
Barco – Apollo Scenario Manager – DOC-3366-2 – user's manual – Revision 03 – October-2006
__________________________________________________________
5-18
5. The Scenario Editor
Set Video Channel
If this action is selected, the Viewer list box is populated with all FRG viewer of the project running on the
ApiServer.
Select the desired viewer.
Source, Channel Code and Port Number as defined in the viewer language compiler file and/or in the
viewersource.ini file have to be defined for this viewer. Enter the values into the respective fields.
If the Enabled checkbox is cleared, the action is deactivated and shows up grayed out in the action sequence list.
Barco – Apollo Scenario Manager – DOC-3366-2 – user's manual – Revision 03 – October-2006
__________________________________________________________
5-19
5. The Scenario Editor
Set Streaming Video Channel
This action refers to the FRG Viewer allocated to a StreamingVideo Card and allows to select a source not defined
yet in the respective ini-files.
These are the *.ini-files related to the streaming video: viewersource.ini,
DigitalStreamSource.ini,. EncoderTypes.ini
Selecting this option will populate the Viewer List with all FRG Viewers defined in this project which are
connected to a StreamingVideo card.
Enter the required values into the respective fields.
Parameter
description
Source
Name of the associated viewer source
Channel
The name of the channel of the Streaming Video Card as defined in the
SwitcherLanguageCompiler
IP Address
IP address, if multicast is selected
IP Port
The port of the streaming source
Network Protocol ID
information about the used protocol, 0: UDP (default), 1: TCP
Stream Protocol ID
0: auto (standard), 1: elementary, 2: program, 3: transport
Stream Program ID
information about the Program ID (0: auto)
Encoder Command-Address
IP address of the encoder
Barco – Apollo Scenario Manager – DOC-3366-2 – user's manual – Revision 03 – October-2006
__________________________________________________________
5-20
5. The Scenario Editor
Parameter
description
Encoder Command Port
Network port of the encoder, this information is read from the
EncoderTypes.ini file
EncoderNet ProtocolID
protocol id (0:UDP default, 1:TCP)*
EncoderStartCommand
start command to send
EncoderSkipAtStart:
bytes to skip at start of IPPacket*
EncoderSkipAtEnd:
bytes to skip at end of IPPacket*
If the Enabled checkbox is cleared, the action is deactivated and shows up grayed out in the action sequence list.
Set Streaming Source
This action refers to the FRG Viewer allocated to a StreamingVideo Card and allows selecting a source already
defined yet in the respective ini-files.
These are the *.ini-files related to
DigitalStreamSource.ini,. EncoderTypes.ini
the
streaming
video:
viewersource.ini,
Selecting this option will populate the Viewer List with all FRG Viewers defined in this project which are
connected to a StreamingVideo card.
Select the desired FRG Viewer. Subsequently the Sources list box will show all defined sources for this Viewer.
Select the desired source.
If the Enabled checkbox is cleared, the action is deactivated and shows up grayed out in the action sequence list.
Barco – Apollo Scenario Manager – DOC-3366-2 – user's manual – Revision 03 – October-2006
__________________________________________________________
5-21
5. The Scenario Editor
Activate Projector Lamp
This action refers to all dual lamp projectors as included in the project.
The Projector list box will show the name of all the respective projectors as assigned by the Control Room
Configurator.
Select the desired projector.
Subsequently the dialog will show the currently active lamp: if the upper lamp is active, the radio button Upper
is selected, in case the bottom lamp is active, the radio button Lower is selected.
Change the active lamp by selecting the other radio button, or just quit the dialog by clicking OK to confirm the
current status.
If the Enabled checkbox is cleared, the action is deactivated and shows up grayed out in the action sequence list.
Barco – Apollo Scenario Manager – DOC-3366-2 – user's manual – Revision 03 – October-2006
__________________________________________________________
5-22
5. The Scenario Editor
Start Shortcut
This action is related to the shortcut defined in the layout database of the project.
Selecting this action will populate the Desktop list box with all Desktop Servers of the project.
When the Desktop Server is selected, the Shortcut list box shows all available shortcuts. Select the desired
shortcut from the list.
If the Enabled checkbox is cleared, the action is deactivated and shows up grayed out in the action sequence list.
5.2.1.2 Modify actions ( )
Select an action sequence and click on the modify button to change it according your needs. The modify
command gives access to the same dialogs and functionalities as the add command. To learn about the entries
and controls of the dialogs, please see the description of the respective dialog in the chapter Add actions,
5.2.1.3 Delete actions (
)
Select the action to be deleted and click on the red cross. A dialog pops up asking for confirmation. If accepted,
the action will be deleted.
In case you "temporarily" want to delete an action, it is sufficent to disable it: Select the
action, click on the modify button, and clear the Enable checkbox at bottom of the action
sequence dialog.
Barco – Apollo Scenario Manager – DOC-3366-2 – user's manual – Revision 03 – October-2006
__________________________________________________________
5-23
5. The Scenario Editor
5.2.1.4 Move an action up (
) or down (
) in the sequence
To change the sequence the actions are executed, select the action, and move it using the up button or the
down button, respectively.
5.2.2 Trigger
As already mentioned, loading a scenario does not necessarily means starting it. It can be started (and
paused/stopped) manually in the Scenario Editor, but this manual intervention is meant e.g. for test purposes
and not for standard operation.
Loading a scenario loads all the actions and activates all the triggers. As soon as a trigger fires, the scenario is
started.
Therefore the definition of the scenario comprises not only the definition of actions, but also the definition of
triggers.
Barco – Apollo Scenario Manager – DOC-3366-2 – user's manual – Revision 03 – October-2006
__________________________________________________________
5-24
5. The Scenario Editor
5.2.2.1 Add triggers ( )
Clicking on the add buttons opens a dialog to enter name and description of the trigger. As with the name of
scenarios, also the name of the trigger must not include characters with a special meaning in XML (e.g. / < >).
Besides this restriction wrt characters, name and description can be freely set.
Please note that the name of the trigger has to be unique in a scenario.
Besides name and description, the Event Type and Action Type have to be specified.
These are the Event Types of a trigger:
Event type
description
Elapsed
The trigger fires when the time defined is over. Count down of the time starts when
loading the scenario. The elapsed time can be zero (trigger starts instantly) or defined in
hours, minutes and seconds.
Scheduled
The trigger fires when the date specified in the schedule is the current date. The date
comprises time (hh:mm:ss) and day. To modify it, select the required value and increase
it in steps by one using the spin button. Or highlight the entry, delete it, and enter a
new one (mind the format!). To change the day, it is also possible to open the calendar
control and select the desired day.
Layout Alarm
The trigger fires when a defined layout is loaded on the display wall or unloaded from
the display wall. As with all layouts, the desktop server, the region and the name of the
layout to fire this trigger have to be specified.
Barco – Apollo Scenario Manager – DOC-3366-2 – user's manual – Revision 03 – October-2006
__________________________________________________________
5-25
5. The Scenario Editor
These are the Action Types of a trigger:
Event type
description
Action Sequence
The trigger controls the execution of the action sequences.
Trigger
The trigger fires another trigger.
5.2.2.2 –Event type
Elapsed
Define the time when the trigger fires after the scenario has been loaded.
The counter starts when the scenario is loaded!
To fire it instantly, let hours, minutes and seconds as zero. To fire it after a certain period, enter the desired
values. Use the spin buttons to increase the values in steps by one, or directly edit the field.
If the Enabled checkbox is cleared, the trigger is deactivated and shows up grayed out in the trigger sequence
list.
Barco – Apollo Scenario Manager – DOC-3366-2 – user's manual – Revision 03 – October-2006
__________________________________________________________
5-26
5. The Scenario Editor
Scheduled
Define the date to fire the trigger.
The date will fire the trigger only if the trigger is active, i.e. the scenario has been loaded.
The time-stamp includes a well defined time (hours, minutes, and seconds) as well as day, month and year. To
define the latter, also the calendar control next to the spin button can be used.
Highlight the item to be changed, and use the spin button to increase or decrease the selected value by one.
Or just enter the desired time or date directly in the field. Mind the format!
If the Enabled checkbox is cleared, the trigger is deactivated and shows up grayed out in the trigger sequence
list.
Barco – Apollo Scenario Manager – DOC-3366-2 – user's manual – Revision 03 – October-2006
__________________________________________________________
5-27
5. The Scenario Editor
Layout Alarm
A trigger can also be fired when a layout is activated or deactivated. This mechanism is called layout alarm.
If the Scenario Configurator is online, all Desktop Servers connected show up in the list. Select the desired
Desktop Server.
After the Desktop Server is selected, the region list box is populated with all regions defined for this desktop
server. Select the desired region. Subsequently the layouts defined for this region can be selected from the
Layout list.
Specify if the trigger fires when the selected layout is loaded (Activation) or unloaded (Deactivation).
If the Enabled checkbox is cleared, the Trigger is deactivated and shows up grayed out in the Trigger sequence
list.
Barco – Apollo Scenario Manager – DOC-3366-2 – user's manual – Revision 03 – October-2006
__________________________________________________________
5-28
5. The Scenario Editor
5.2.2.3 Action Type
Every trigger can fire an action or another trigger. This is selected in the Action Type list box.
Action Sequence
If the target for the trigger is an Action Sequence, it can be defined what will happen with it:
Start
This will resume executing the action list where it has been stopped
Pause
This will pause executing of the action list
Stop
This will stop executing the action list
Restart
This will restart the execution of the action sequence (start the first action)
Go To
Define the action which should be started by the trigger from the list (the entries of the list box
show all actions defined in the scenario).
The effects of Start, Pause, Stop depend on the execution of the scenario itself, e.g. if the
scenario action waits for 2 hours, and a trigger fires "Pause", then nothing will happen.
Barco – Apollo Scenario Manager – DOC-3366-2 – user's manual – Revision 03 – October-2006
__________________________________________________________
5-29
5. The Scenario Editor
Trigger
If Trigger is selected, the respective list box is populated with all triggers defined in the scenario.
Select the desired trigger, and assign one of the following actions to it:
Enable
In case the selected trigger is disabled, it will be enabled. In case it is already enabled, nothing
will happen.
Disable
In case the selected trigger is enabled, it will be disabled. In case it is already disabled, nothing
will happen.
As with the event type, it dependes on the actual status of the selected trigger what will
really happen.
Barco – Apollo Scenario Manager – DOC-3366-2 – user's manual – Revision 03 – October-2006
__________________________________________________________
5-30
5. The Scenario Editor
5.2.3 Timeline
Use Timeline to define when the scenario is loaded. Please note: loading a scenario does not necessarily start it!
Loading a scenario loads all action sequences and make all triggers "live". As soon as a
trigger fires, the actions will start.
To start a scenario immediately when being loaded, the trigger event type can be set to
elapsed with zero hours/minutes/seconds.
Timeline offers multiple options to manipulate loading a scenario. Run Frequency can be set to Manually, Once,
Hourly, Daily, Weekly, Monthly. Depending on the selection, the frequency has to be further specified.
Depending on the Run Frequency, the Start Up time has to be entered (time when the scenario is loaded), the
Shut Down time (time when the scenario is unloaded, default: never), and the duration of one occurance. If a
contradiction occurs, the entry is not accepted. Instead a warning pops up informing about the contradiction, e.g.
Shut Ddown time is earlier than Start Up time…
Barco – Apollo Scenario Manager – DOC-3366-2 – user's manual – Revision 03 – October-2006
__________________________________________________________
5-31
5. The Scenario Editor
5.2.3.1 Manual
In Manual mode, the scenario is started by clicking on the Start button in the Scenario Configurator. It's obvious
that no Start Up time has to be defined. The scenario will stop after the actions are executed once, so neither
Shut down time has to be specified nor the Duration of One Occurrence.
Barco – Apollo Scenario Manager – DOC-3366-2 – user's manual – Revision 03 – October-2006
__________________________________________________________
5-32
5. The Scenario Editor
5.2.3.2 Once
If Once is selected, the scenario is loaded at the Start up time. Define the Start Up time using the spin buttons,
calendar control or directly edit the fields. Since its run frequency is only once, no duration of one occurrence has
to be specified, and of course the number of occurrences cannot be entered either.
In case you want the scenario being unloaded, unselect Never in the Shut Down frame, and enter time and day
for the scenario to stop by using the spin buttons, the calendar control or by directly editing the respective fields.
Please note that the spin button always affect the selected item. If the entire field is selected, the selection will
be reduced to the first item (e.g. month, or hour).
Barco – Apollo Scenario Manager – DOC-3366-2 – user's manual – Revision 03 – October-2006
__________________________________________________________
5-33
5. The Scenario Editor
5.2.3.3 Hourly
If Hourly is selected, the scenario does not necessarily have to be loaded every hour. Hourly simply means that
the timely distance between two occurrences is less then a day.
Define the timely distance between two occurrences by using the spin button of the Hours field. In case you
want to limit the occurrences to a certain quantity, tick the For checkbox and enter the quantity in the
Times/Day field.
Example: if reoccurrence is every two hours, the scenario could be loaded 12 times a day. To reduce this
frequency, you may e.g. enter 3 Times/Day.
Define the Start up time (time and date) when the scenario will be loaded for the first time. In case you want
the scenario being unloaded, unselect Never in the Shut Down frame, and define the Shut down time, as well
as the duration of one occurrence. This duration will be evaluated – it is not possible to have duration of e.g. 16
hours and to load a scenario 3 times a day. An error message would pop up.
Please note that the spin button always affect the selected item. If the entire field is selected, the selection will
be reduced to the first item (e.g. month, or hour).
If Daily is selected, the scenario does not necessarily have to be loaded every day. Daily simply means that the
timely distance between two occurrences is less then a week.
Barco – Apollo Scenario Manager – DOC-3366-2 – user's manual – Revision 03 – October-2006
__________________________________________________________
5-34
5. The Scenario Editor
5.2.3.4 Daily
Define the timely distance between two occurrences by using the spin button of the Days field. Or select Every
Weekday: then the scenario will be reloaded for the second time 7 days after it has been loaded (defined as
Start Up time).
Example: the Startup time is January 5, 2005. This has been a Wednesday. So if Every Weekday is checked, the
scenario will be run always on Wednesday.
Define the Start up time (time and date) when the scenario will be loaded for the first time. In case you want
the scenario being unloaded, unselect Never in the Shut Down frame, and define the Shut down time, as well
as the duration of one occurrence. This duration will be evaluated – it is not possible to have duration of e.g. 30
hours and to load a scenario daily. An error message would pop up.
Please note that the spin button always affect the selected item. If the entire field is selected, the selection will
be reduced to the first item (e.g. month, or hour).
Barco – Apollo Scenario Manager – DOC-3366-2 – user's manual – Revision 03 – October-2006
__________________________________________________________
5-35
5. The Scenario Editor
5.2.3.5 Weekly
If Weekly is selected, the scenario does not necessarily have to be loaded every week. Daily simply means that
the timely distance between two occurrences is less then a month.
Define the timely distance between two occurrences by using the spin button of the Weeks field. In addition you
can specify on which day(s) of the week the scenario will be run. If this checkbox is ticked, the list of week days
is shown. Check the desired days.
Define the Start up time (time and date) when the scenario will be loaded for the first time. In case you want
the scenario being unloaded, unselect Never in the Shut Down frame, and define the Shut down time, as well
as the duration of one occurrence. This duration will be evaluated – it is not possible to have duration of e.g. 30
hours and to load a scenario daily. An error message would pop up.
Please note that the spin button always affect the selected item. If the entire field is selected, the selection will
be reduced to the first item (e.g. month, or hour).
Barco – Apollo Scenario Manager – DOC-3366-2 – user's manual – Revision 03 – October-2006
__________________________________________________________
5-36
5. The Scenario Editor
5.2.3.6 Monthly
If Monthly is selected, the scenario does not necessarily have to be loaded every month. Monthly simply means
that the timely distance between two occurrences is less then a year.
th
Define the detailed schedule. The schedule can be set defining e.g. the 10th day of every third month, or the 20
day of every March. You may even set the day as first weekday or third Sunday of a month or as fourth Thursday
every February.
Define the Start up time (time and date) when the scenario will be loaded for the first time. In case you want
the scenario being unloaded, unselect Never in the Shut Down frame, and define the Shut down time, as well
as the duration of one occurrence.
Please note that the spin button always affect the selected item. If the entire field is selected, the selection will
be reduced to the first item (e.g. month, or hour).
Barco – Apollo Scenario Manager – DOC-3366-2 – user's manual – Revision 03 – October-2006
__________________________________________________________
5-37
6. Use cases
6 Use cases
The following chapter explains the sample scenarios.
Barco – Apollo Scenario Manager – DOC-3366-2 – user's manual – Revision 03 – October-2006
____________________________________________________________
6-1
6. Use cases
6.1 Overview
Before explaining some use cases of a scenario, the sequence in the process flow of a scenario are to be familiar
with. Look at the flow chart to get a better knowledge of the scenario specific terms.
Barco – Apollo Scenario Manager – DOC-3366-2 – user's manual – Revision 03 – October-2006
____________________________________________________________
6-2
6. Use cases
time controlled scenario user controlled scenario
Scenario on the
Scenario Api Server,
“dead”
“Load” command
(Load button,
command line)
Scenario “live”,
can be edited,
but is “sleeping”
Yes
No
Run frequency
<> manual?
“Start” command
(by Startup time
defined in schedule)
“Start” command
(Start button)
Scenario “active”,
sensitive for triggers
waiting for trigger
to start running
Trigger fires
Scenario “running”,
execution of actions
more triggers
Yes
No
All actions of action
list executed,
no more triggers
No
Yes
No
No
Yes
Unload button,
command
Time of
following
occurance
reached
Run frequency
<> manual
or once
No
Yes
Shutdown time
reached
No
Unload button,
command
Yes
Yes
Yes
Duration time over
No
Barco – Apollo Scenario Manager – DOC-3366-2 – user's manual – Revision 03 – October-2006
____________________________________________________________
6-3
6. Use cases
6.2 Use case: Operation mode of a display wall
Let's assume:
A display wall is setup of 2 rows and 3 columns. At day, the entire display is used. During night, only the first
column is used.
The display wall is not run in 24/7 operation, but shutdown during weekend: The projectors will be switched off
after Friday night (= Saturday morning at 9AM), and switched on again on Monday morning at 6 AM (a time
which is during the night operation mode, so only the first column will be switched on)
This results in the scenarios depicted in the following four sub chapters.
Barco – Apollo Scenario Manager – DOC-3366-2 – user's manual – Revision 03 – October-2006
____________________________________________________________
6-4
6. Use cases
6.2.1 Day shift
Timeline of the Scenario
every week on Monday, Tuesday, Wednesday, Thursday, Friday.
Startup time of the day scenario
9AM
Operation time of day
9 AM - 6PM.
Duration of the day scenario
9 hours (until 6PM, when the night shift occurs)
Explanation:
To make sure that all projection modules of this display wall are switched on, the scenario starts with sending
the "switch on" command to every projector. In case the projector had been switched off due to power loss or
service works, it is switched on. In case it is already/still running, nothing happens.
Subsequently the command to unload all layouts is sent. This command ensures that the display wall is in a
known ("empty") state. Even if the projectors had not been running when the scenario started and had only
switched on by the scenario, it might be that the controller (and thus a layout setting) was still running.
Therefore it is wise to first unload all layouts to bring the display wall in a defined state.
Subsequently the desired layout is loaded into the respective regions.
Barco – Apollo Scenario Manager – DOC-3366-2 – user's manual – Revision 03 – October-2006
____________________________________________________________
6-5
6. Use cases
6.2.2 Night shift
Timeline of the Scenario
every week on Monday, Tuesday, Wednesday, Thursday, Friday.
Startup time of the day scenario
6PM
Operation time of day
6PM - 9AM.
Duration of the day scenario
15 hours (until 9 AM, when the day shift occurs)
Explanation:
During night shift, not the enire display wall but only row should be switched on. Therefore the scenario starts
with sending the "switch off" command to the projectors of the first row and to the last projector of the second
row. To make sure that two of the projectors are running, they are explicitely switched on.. In case the projectors
had been switched off due to power loss or service works, this command ensures that they are running as soon
as they are powered on. In case they are already/still running, nothing happens.
Subsequently the command to unload all layouts is sent. This command ensures that the display wall is in a
known ("empty") state. Even if the projectors had not been running when the scenario started and had only
switched on by the scenario, it might be that the controller (and thus a layout setting) was still running.
Therefore it is wise to first unload all layouts to bring the display wall in a defined state.
Subsequently the desired layout is loaded into the desired region.
Barco – Apollo Scenario Manager – DOC-3366-2 – user's manual – Revision 03 – October-2006
____________________________________________________________
6-6
6. Use cases
6.2.3 Switch Projector lamp off
Timeline of the Scenario
every week on Saturday Morning
Startup time of the day scenario
9AM (after the duration of the night scenario started on Friday evening)
Duration of the day scenario
45 hours (until the projectors are to be switched on again on Monday
morning, 6AM)
Explanation:
The entire display wall is switched off during weekend. The weekend starts when the Friday night shift is over.
During the night shift, only two projectors are running (2x1, 2x2).
It might happen that although the other projectors should be off they are running (due to manual intervention).
To make sure that the display wall is really switched off, the "switch off" command is also sent to these
projectors..
The scenario also ensures that if a projector is switched on during weekend (duration time of scenario) it is
switched off again.
Barco – Apollo Scenario Manager – DOC-3366-2 – user's manual – Revision 03 – October-2006
____________________________________________________________
6-7
6. Use cases
6.3 Use case: change active lamp
In case the dual lamp projectors are to change their active lamp in regular intervals (to ensure that both lamps
have about the same runtime and show the same aging effects), the active lamp might be switched every week.
This is realized by two scenarios: one activates the upper lamp, one the lower lamp. Since the switch should take
every week, every scenario has a run frequency of every second week and a duration time of one week.
6.3.1 Upper lamp switching
It has to be ensured that all the projectors of the display wall are in operation mode and not in standby.
Therefore the projectors are switched on first. Then the display wall is in a well-defined and known status (all
on), and the upper lamps can be activated.
In case the projectors are on when receiving the command "switch on", nothing happens.
Barco – Apollo Scenario Manager – DOC-3366-2 – user's manual – Revision 03 – October-2006
____________________________________________________________
6-8
6. Use cases
6.3.2 Lower Lamp Switching
It has to be ensured that all the projectors of the display wall are in operation mode and not in standby.
Therefore the projectors are switched on first. Then the display wall is in a well-defined and known status (all
on), and the lower lamps can be activated.
In case the projectors are on when receiving the command "switch on", nothing happens.
Barco – Apollo Scenario Manager – DOC-3366-2 – user's manual – Revision 03 – October-2006
____________________________________________________________
6-9
6. Use cases
6.4 Use case: scan viewer
A layout might comprise many viewer windows. However when the layout is started, the viewer is connected to
the source defined as default source in the viewersources.ini file of Apollo. The viewer then can be connected to
a different source "statically", or it can be connected in turn to all sources defined in the viewersources.ini-file.
Thus the list of action will include the Connect action.
In the screen shot you can see how to scan five different sources defined for th ProViewer. Since the sources are
changed every 10 seconds, this scenario serves for checking if the sources are available and can be connected.
Barco – Apollo Scenario Manager – DOC-3366-2 – user's manual – Revision 03 – October-2006
__________________________________________________________
6-10
6. Use cases
6.5 Use case: automated alarm response
The Automated Alarm Response first switches on all projection modules of the first row. In case a projector has
been switched off (by accident or during night shift), it is switched on again. In case it is on, nothing happens.
Subsequently a layout is loaded and viewers connected to the respective sources.
Barco – Apollo Scenario Manager – DOC-3366-2 – user's manual – Revision 03 – October-2006
__________________________________________________________
6-11
7. Troubleshooting
7 Troubleshooting
Check this chapter for help.
Barco – Apollo Scenario Manager – DOC-3366-2 – user's manual – Revision 03 – October-2006
____________________________________________________________
7-1
7. Troubleshooting
7.1 How to check for the ScenarioApiServer
The Apollo – Scenario Configurator connects to the ScenarioApiServer. In case the server is not available, the
application cannot be launched.
To check if the server is online,
•
Open the command prompt
•
Subsequently enter the commands:
Ping ScenarioApiServer
Ping ApolloApiServer
If the server answer, they are running and connected.
If there is no response, navigate to…Windows\System32\drivers\etc.
Edit the file Hosts and check the IP addresses for the ApolloApiServer and the ScenarioApiServer.
Verify the addresses. If required, adjust them. If they are correct: call the IT Administrator to look for the
TransForm A where the ApolloApiServer and the ScenarioApiServer are installed.
7.2 How to remove a Java Web Start Application
In case of a previous installation of Apollo Scenario Configurator 1.0, and in case the title bar of the Configurator
Window does not show version 1.1, the automatic update of the Java Web Start application failed.
It then is recommended to remove the previous version of Apollo – Sceario Configurator manually to force the
system to look for a new version.
Every Java web start application maintains a cache on the client computer. When upgrading from Scenario
Management 1.0 to Scenario Management 1.1, Scenario Management 1.0 has to be deleted from the cache:
Browse to the Java Runtime installation folder (in case you used the default path: C:\Program
Files\Java\JRE1.5.0_xx) and open the subfolder bin.
In this subfolder there is an application javaws.exe (java web start).
Double click on this exe-file. The Java Application Cache Viewer pops up and shows the web start application
clients of this system.
Barco – Apollo Scenario Manager – DOC-3366-2 – user's manual – Revision 03 – October-2006
____________________________________________________________
7-2
7. Troubleshooting
Select Apollo – Scenario Configurator.
Before removing this application, it is recommended to remove the shortcut associated with it.
Select Application|Uninstall Shortcuts. This will remove the respective shortcut from the desktop and the Start
menu.
Subsequently click on Remove Selected Application.
Clicking on Remove Selected Application will remove the application from the system. The respective entry in
the Java Application Cache Viewer is removed.
Barco – Apollo Scenario Manager – DOC-3366-2 – user's manual – Revision 03 – October-2006
____________________________________________________________
7-3
7. Troubleshooting
To install the new version of the Scenario Configurator,
•
Launch the Internet Explorer
•
In the address bar, enter the URL:
http://ScenarioApiServer:8080/ConfiguratorLauncher/Launcher.jnlp
This will install the Apollo - Scenario Configurator as Web Start Application and install the respective shortcuts.
You can check the installatio using the Java Application Cache Viewer, see above. A new entry of Scenario
Configurator is added.
7.3 Tomcat service setting: Allow service to interact with the desktop
When configuring Tomcat, on the Log On tab there is a checkbox "Allow service to interact with the desktop".
If this checkbox is checked, starting Tomcat will show the Tomcat console in a command prompt window. If this
window is closed by accident, the service will stop.
To avoid an unintentional shut down of the Tomcat Server, we recommend NOT to allow
the service to interact with the desktop.
However, if you create scenarios which wants to trigger a "Notepad" window, you have to allow the service to
interact with the desktop. Otherwise the Notepad process will be created and started, but there won't be a
Notepad window since the service is not allowed to interact with the desktop.
Therefore whenever you need desktop integration, you have to allow the service to
interact with the desktop. But please keep in mind NOT to close the command prompt
window of the service!!!
7.4 Log files
In case the default installation path has been used, the Tomcat log files can be found on
C:\Program Files\Apache Ssoftware Foundation\Tomcat 5.5\logs\systinet.log
The default logging configuration creates log files of at max. 10MB and (at max.) 10 backup files. A new log file
is created as soon as the size of 10MB is exceeded.
The logging configuration can be modified by editing the file
C:\Program Files\Apache Ssoftware Foundation\Tomcat 5.5\webapps\systinet\conf\log4j.config.
For the entries and their setting, cf. also this file.
Barco – Apollo Scenario Manager – DOC-3366-2 – user's manual – Revision 03 – October-2006
____________________________________________________________
7-4
7. Troubleshooting
7.5 Hot Line
Feel free to contact us if you have any further questions!
•
BARCO N.V. Projection Systems - Europe
Noordlaan 5, B-8520 Kuurne
Phone: + 32-56-36 82 82, Fax: +32-56-368-251
E-mail: [email protected], Web: www.barcocontrolrooms.com
Barco – Apollo Scenario Manager – DOC-3366-2 – user's manual – Revision 03 – October-2006
____________________________________________________________
7-5
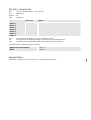


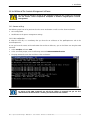
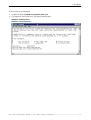
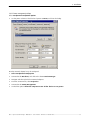
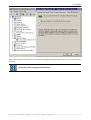
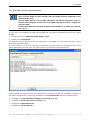
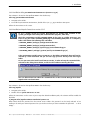
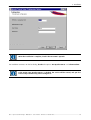
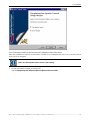
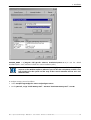
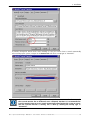
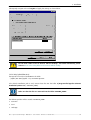
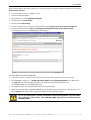
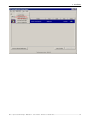

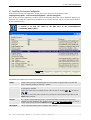


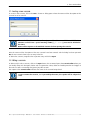
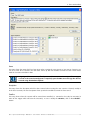
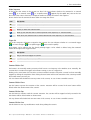

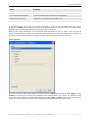
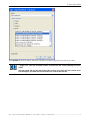

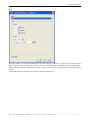
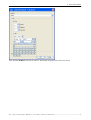
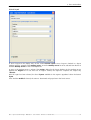
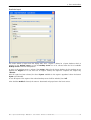
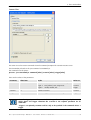

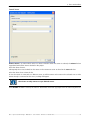
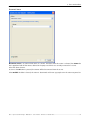

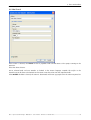
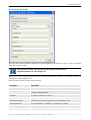
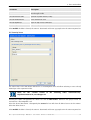
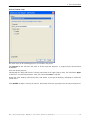
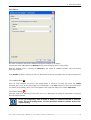
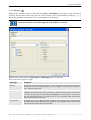
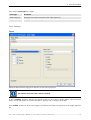
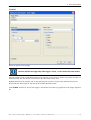
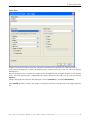
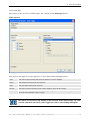
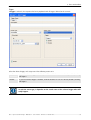
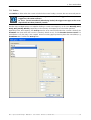
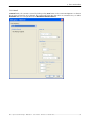
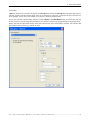
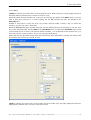
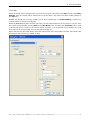
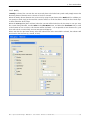


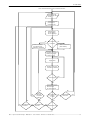
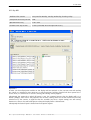
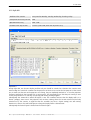

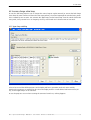
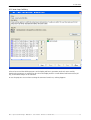
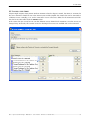
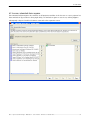

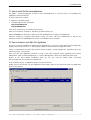
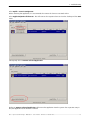


![OverView Control Manager user`s manual - operator [v04]](http://vs1.manualzilla.com/store/data/005659468_1-4c522981c7089838b286d7fbb1120c24-150x150.png)
![[1 ] Oracle® Fusion Middleware](http://vs1.manualzilla.com/store/data/005864196_1-9da2f2f6c7b4ef8d293b35b0c50291d0-150x150.png)