1
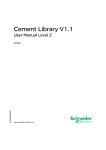
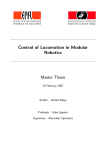
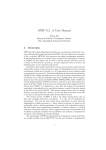
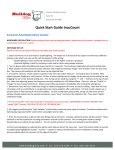
IMOROD User Guide
S´ebastien GAY
Department of Computer Science
Institute of applied sciences (INSA) Lyon
A Program under
GNU GPL License
2007
Contents
1 Introduction
1
1.1
What’s IMOROD ? . . . . . . . . . . . . . . . . . . . . . . . . . . . . . . . .
1
1.2
General structure of the program . . . . . . . . . . . . . . . . . . . . . . . .
2
2 Designing a Furniture
2.1
2.2
2.3
2.4
3
Some visualization options . . . . . . . . . . . . . . . . . . . . . . . . . . . .
3
2.1.1
Displaying the application in full screen . . . . . . . . . . . . . . . .
3
2.1.2
Displaying only the outline of the modules . . . . . . . . . . . . . . .
3
Manipulating the scene
. . . . . . . . . . . . . . . . . . . . . . . . . . . . .
5
2.2.1
Translating the scene . . . . . . . . . . . . . . . . . . . . . . . . . . .
5
2.2.2
Rotating the scene . . . . . . . . . . . . . . . . . . . . . . . . . . . .
5
2.2.3
Zooming the scene . . . . . . . . . . . . . . . . . . . . . . . . . . . .
6
2.2.4
Resetting the view . . . . . . . . . . . . . . . . . . . . . . . . . . . .
6
Manipulating the modules . . . . . . . . . . . . . . . . . . . . . . . . . . . .
6
2.3.1
Adding/Removing a module . . . . . . . . . . . . . . . . . . . . . . .
6
2.3.2
Selecting/Unselecting a module . . . . . . . . . . . . . . . . . . . . .
6
2.3.3
Moving a module in the scene . . . . . . . . . . . . . . . . . . . . . .
6
2.3.3.1
Translating a module . . . . . . . . . . . . . . . . . . . . .
6
2.3.3.2
Rotating a module . . . . . . . . . . . . . . . . . . . . . . .
8
2.3.4
Rotating the servo of a module . . . . . . . . . . . . . . . . . . . . .
8
2.3.5
Connecting/Disconnecting two modules . . . . . . . . . . . . . . . .
8
Playing with configuration . . . . . . . . . . . . . . . . . . . . . . . . . . . .
9
2.4.1
saving the current configuration . . . . . . . . . . . . . . . . . . . . .
9
2.4.2
Creating a new configuration . . . . . . . . . . . . . . . . . . . . . .
9
i
CONTENTS
2.4.3
Loading a configuration . . . . . . . . . . . . . . . . . . . . . . . . .
10
2.4.4
Deleting a configuration . . . . . . . . . . . . . . . . . . . . . . . . .
10
2.4.5
Closing the Window . . . . . . . . . . . . . . . . . . . . . . . . . . .
10
3 Arrange a room
13
4 Visualize reconfiguration
14
ii
Chapter
1
Introduction
1.1
I
What’s IMOROD ?
MOROD stands for Interface for MOdular RObots Design. IMOROD is a 3D interface meant to very easily assemble robotic modules to build complex modular
structures. It has been designed originally in the framework of the project Roombots
to intuitively create furniture made with Roombots robot modules, but can be extended to
the design of any modular robotic structure. Everyone can use IMOROD with at most 3
minutes training (the time needed to read that user guide ^).
¨
1
1.2 General structure of the program
1.2
General structure of the program
IMROD is split into three modules, or if you prefer three packs of functionalities.
The three modules are called :
• Furniture Design
• Room Arrangement Design
• Reconfiguration Visualization
This implies three different windows. The Furniture Design window contains every tools
necessary for the user to manipulate and connect modules in a scene, in order to compose a
more complex structure. The Room Arrangement window is dedicated to the positioning of
previously created furniture in a virtual room. The Reconfiguration Visualization is useful
for visualizing the robot reconfiguring, transforming from one shape to another according
to a previously computed sequence.
The relevant window can be chosen by the user at application startup on the Module
Selection window.
Figure 1.1: The Module Selection window
This document gives step by step the actions that can be done in each of these three
windows using IMOROD.
2
Chapter
2
Designing a Furniture
T
HIS chapter explains how to easily create a modular configuration using IMOROD.
The main window contains two regions (view Figure 2.1): The left one is the scene. It’s
here that the robot is actually created, the modules moved and assembled. The right one
is a tool palette. It contains all controls needed to interact with the scene.
Figure 2.1: The main window of the Furniture Design pack
3
2.1 Some visualization options
2.1
2.1.1
Some visualization options
Displaying the application in full screen
To switch between full screen and window mode, check or uncheck the Full screen check
box (see Figure 2.2).
Figure 2.2: The main window of the Furniture Design pack
2.1.2
Displaying only the outline of the modules
To display only the outline of the modules, check the Wireframe check box (see Figure 2.2).
This can be useful to see hidden parts of the scene.
2.2
Manipulating the scene
The manipulation of the scene can be done either with the mouse or, for those not very
familiar with it, with a set of buttons on the tools palette (see Figure 2.3). The manipulation
of the scene with the mouse is only available when no module is selected (otherwise the
manipulation of the selected module will be enabled).
4
2.2 Manipulating the scene
Figure 2.3: The movement panel : a set of buttons for manipulating the scene
2.2.1
Translating the scene
To translate the scene, right click + drag it. You can also use the arrow buttons on the
Tools palette (see Figure 2.3).
2.2.2
Rotating the scene
To rotate the scene, left click + drag it. If you wish to rotate the scene only around a
specified axis, use the following :
• CTRL + mouse wheel : rotate around the X axis.
• ALT + mouse wheel : rotate around the Y axis.
• SHIFT + mouse wheel : rotate around the Z axis.
You can also use the CW (clock wise) and CCW (counter clock wise) buttons on the Tools
palette (see Figure 2.3).
2.2.3
Zooming the scene
To zoom the scene in or out, simply use the mouse wheel. If you don’t have a mouse wheel
or if you want a more precise zoom you can click on the middle button and drag the mouse
5
2.3 Manipulating the modules
up or down. You can also use the + (zoom in) and -(zoom out) buttons on the Tools palette
(see Figure 2.3).
2.2.4
Resetting the view
To reset the scene to the default view, press the Reset view button of the tools palette (see
Figure 2.3).
2.3
2.3.1
Manipulating the modules
Adding/Removing a module
You can visualize the current module in the top part of the tool palette (see Figure 2.4).
You can rotate this preview using the mouse. To add a module, click on the < −− Add
module button. This adds a module at the center of the scene. If you want to delete a
previously added module, select it (refer to section 2.3.2 for more details) and either press
the Delete module button or press the Del key of your keyboard.
Figure 2.4: The valid moves of the simplified modules. Left : rolling around one module ;
right : moving on a surface.
6
2.3 Manipulating the modules
2.3.2
Selecting/Unselecting a module
To select a module that has been added to the scene, simply click on it. The selected
module then appears with a red selection box around it (see Figure 2.5). To unselect a
selected module, click on it again. If you click on a non selected module while another
module is selected, the selected module is deselected and the new module is selected. Only
one module can be selected at a time.
Figure 2.5: A selected module is surrounded by a red selection box
2.3.3
2.3.3.1
Moving a module in the scene
Translating a module
To translate a module, select it and right button mouse drag it.
2.3.3.2
Rotating a module
To translate a module, select it and right button mouse drag it. When a module is connected
to another one, you can only rotate it on the axis of the connector. You can set a “step” for
the angle of rotation by using the slider on the tool palette (see Figure 2.6. For instance, if
you select 45, the modules can only be connected by an angle which is a multiple of 45˚(ie
-45, 0, 45, 90, 135 ...).
2.3.4
Rotating the servo of a module
To rotate the servo of a module, select it and use CTRL + left button click and drag the
mouse up or down. NB : When a set of modules is connected to the selected module and
7
2.4 Playing with configuration
Figure 2.6: The slider to set the step of connection angle
you rotate it’s servo, all the connected subset will also rotate.
2.3.5
Connecting/Disconnecting two modules
To connect modules to each other, you have to be in snap connectors mode. To enable this
mode, check the corresponding check box on the tools palette. (see Figure 2.7)
When the snapping of connectors is enabled, to connect two modules, move one of the
modules in contact to the other one. They will automatically snap and connect by their
nearest connectors.
To disconnect two modules, select one of them and move it quickly away from the
other one. If you move it too slowly they will just stay connected. This is meant to avoid
unwanted disconnections.
2.4
2.4.1
Playing with configuration
saving the current configuration
To save the current configuration, you have to first chose a name for it. Type this name in
the text field just above the Save configuration button (see Figure 2.8). Once you have done
8
2.4 Playing with configuration
Figure 2.7: The check box to enable the snap connectors mode
that, you can click on the Save configuration button. The configuration is added to the
configuration list, and saved as an XML file exportable to the reconfiguration computation
software and convertible in a WebotsTM file.
Figure 2.8: The Save configuration button and text field for the name of the configuration
9
2.4 Playing with configuration
2.4.2
Creating a new configuration
Once you have saved your current configuration, or when you want to discard the work
currently done, you can click the New configuration button (see Figure 2.9). This empties
the scene and resets the name of the current configuration to “untitled”. You can start
over the building of a new configuration.
2.4.3
Loading a configuration
If you want to load a previously saved configuration, for visualizing or modifying it, click
the Load configuration (see Figure 2.9). This will display a new window with the list of
saved configurations (see Figure 2.10). Select the desired configuration and click the OK
button.
Figure 2.9: The New configuration and Load configuration buttons
2.4.4
Deleting a configuration
When you click the Load configuration button and display the list of the saved configurations
(Figure 2.10), you can see a Delete configuration button. By clicking this button, you delete
the selected configuration. It will be deleted from the list, and from the hard disk (XML
file) so it will never be loadable again.
10
2.4 Playing with configuration
Figure 2.10: The dialog for loading and deleting configurations
2.4.5
Closing the Window
To close the window and go back to the module selection window, press the Quit button
(see Figure 2.11).
Figure 2.11: The dialog for loading and deleting configurations
11
Chapter
3
Arrange a room
U
NDER development.
12
Chapter
4
Visualize reconfiguration
U
NDER development.
13