1
User Guide
Version 3.0
Canon®, the Canon logo, iR®, MEAP® and the MEAP logo are trademarks of Canon Inc.
Adobe® and Acrobat® are trademarks of Adobe Systems Inc which may be registered in some jurisdictions.
Microsoft® , Microsoft® Windows®, Windows NT®, Office ®, PowerPoint® and Excel® are registered
trademarks of Microsoft Corporation in the United States and other countries.
ABBYY® FineReader® Engine 8.1 © ABBYY Software Ltd. 2006. ABBYY, FINEREADER and ABBYY
FineReader are registered trademarks of ABBYY Software Ltd.
Other brand, company or product names used herein may be the trademarks or registered trademarks of
their respective holders.
© 2007 - 2009 by Canon Europa N.V. All rights reserved.
No part of this publication may be reproduced, stored in a retrieval system, transmitted or communicated in
any form, mechanical or electronic, including photocopying and recording, without the prior written
permission of Canon Europa N.V.
Canon Europa N.V. shall not be liable for any direct, incidental or consequential damages of any nature, or
losses or expenses resulting from the use of this material.
Canon Europa N.V. shall not be liable for any loss of data on customer USB devices arising from the
use of USB Print & Scan.
Canon Europa N.V.
Bovenkerkerweg 59-61
1185 XB
Amstelveen
The Netherlands
How This Manual is Organised
Chapter 1
Introduction
Chapter 2
Using USB Print & Scan
Appendix A
Glossary
iii
Contents
How This Manual is Organised ..................................................................................... iii
Contents........................................................................................................................... iv
Preface ............................................................................................................................. vi
How to Use This Manual........................................................................................................... vi
Conventions Used in This Manual ......................................................................................... vi
Displays Used in This Manual ................................................................................................ vi
Chapter 1: Introduction ................................................................................................... 1
USB Print & Scan Overview ...................................................................................................... 2
Storage Devices ....................................................................................................................... 2
File Systems ............................................................................................................................. 2
File Formats ............................................................................................................................. 3
Document Cache Mailbox ....................................................................................................... 7
Languages................................................................................................................................ 8
Application Platform .................................................................................................................. 8
Device Support......................................................................................................................... 8
Supported Mass Storage Environment Devices .................................................................... 9
Chapter 2: Using USB Print & Scan............................................................................ 11
USB Print & Scan Initial Panel ................................................................................................ 13
File Browser Panel ................................................................................................................... 13
Device List .............................................................................................................................. 13
File List ................................................................................................................................... 16
Eject Mass Storage Device Button (imageRUNNER ADVANCE) ...................................... 19
Current Location..................................................................................................................... 21
Page Up / Down Buttons and Page Indicator Bar ................................................................ 21
File Browser Sorting............................................................................................................... 22
Hide Extensions ..................................................................................................................... 23
Show Hidden Files ................................................................................................................. 23
Additional Supported Extensions .......................................................................................... 23
Scan Button ............................................................................................................................ 23
Preview Button ....................................................................................................................... 23
Print Button ............................................................................................................................. 24
Progress Bar .......................................................................................................................... 24
Create New Folder ................................................................................................................. 25
Delete ..................................................................................................................................... 27
Rename .................................................................................................................................. 28
Scanning Panel ......................................................................................................................... 29
Information Label ................................................................................................................... 29
Preview Window .................................................................................................................... 30
Navigation Buttons ................................................................................................................. 30
iv
Page Selection Field .............................................................................................................. 31
Delete Page Button ................................................................................................................ 31
Colour Scan Setting Radio Buttons....................................................................................... 31
Two Sided Scan Setting Radio Buttons ................................................................................ 31
Brightness Selector ................................................................................................................ 32
Save Button ............................................................................................................................ 32
Cancel Button ......................................................................................................................... 32
Saving Panel.............................................................................................................................. 32
Preview Window .................................................................................................................... 33
Navigation Buttons ................................................................................................................. 33
Page Selection Field .............................................................................................................. 33
File Name Field ...................................................................................................................... 33
File Format Radio Buttons ..................................................................................................... 33
PDF Format Radio Buttons ................................................................................................... 34
Back Button ............................................................................................................................ 34
Save Button ............................................................................................................................ 34
Cancel Button ......................................................................................................................... 34
Preview Panel............................................................................................................................ 34
Preview Window .................................................................................................................... 35
Navigation Buttons ................................................................................................................. 35
Page Selection Field .............................................................................................................. 35
Zoom In / Out Buttons ............................................................................................................ 35
Scroll Buttons ......................................................................................................................... 35
Details Panel .......................................................................................................................... 36
Print Button ............................................................................................................................. 36
Done Button ........................................................................................................................... 36
Print Settings Panel.................................................................................................................. 36
Copies Control ....................................................................................................................... 37
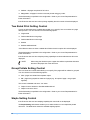
Paper Source Control ............................................................................................................ 38
Colour Printing Control........................................................................................................... 39
Two Sided Print Setting Control ............................................................................................ 40
Group/Collate Setting Control................................................................................................ 40
Staple Setting Control ............................................................................................................ 40
Hole Punch Setting Control ................................................................................................... 41
Advanced / Basic Settings Button ......................................................................................... 41
Print Button ............................................................................................................................. 42
Cancel Button ......................................................................................................................... 42
PDF version not supported dialog ......................................................................................... 42
Message Label ....................................................................................................................... 46
Continue Button ..................................................................................................................... 46
Convert Button ....................................................................................................................... 46
Cancel Button ......................................................................................................................... 47
Appendix A: Glossary ................................................................................................... 48
Glossary of Terms .................................................................................................................... 49
v
Preface
This manual is designed for use by day-to-day users of USB Print & Scan to help them upload
documents to, and print documents from, their USB sticks and USB Hard Disk Drives (HDD).
Please read this manual thoroughly before operating the product in order to familiarise yourself
with its capabilities.
How to Use This Manual
This manual assumes that the reader has knowledge of printers and Windows operations.
Conventions Used in This Manual
The following conventions are used throughout the manual:
Important
Indicates important items or precautions that should always be observed.
These should always be read to avoid damage to the application due to
improper operation.
NOTE
Indicates items for reference or supplementary information. Reading these
notes is highly recommended.
Field Names
Field names are highlighted in bold and italic text.
Buttons
Buttons are highlighted in bold text.
[Screen Names]
The names of screens, windows and dialogs are within square brackets
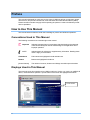
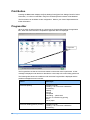
Displays Used in This Manual
The screen shots in this manual are from USB Print & Scan, Version 3.0, running on a MEAP iR
device, unless otherwise specified. Specific areas of the screen are highlighted as follows:
Preview Window
vi
Chapter 1: Introduction
This chapter provides a brief overview of the USB Print & Scan application and outlines the
system environment required to install and run the application.
Chapter 1: Introduction ................................................................................................... 1
USB Print & Scan Overview ...................................................................................................... 2
Storage Devices ....................................................................................................................... 2
File Systems ............................................................................................................................. 2
File Formats ............................................................................................................................. 3
Document Cache Mailbox ....................................................................................................... 7
Languages................................................................................................................................ 8
Application Platform .................................................................................................................. 8
Device Support......................................................................................................................... 8
Supported Mass Storage Environment Devices .................................................................... 9
Introduction
1
USB Print & Scan Overview
The USB Print & Scan application is a MEAP application that allows customers to
print data from, scan data to, or preview data stored on a USB mass storage
device.
Version 3.0 can also work in conjunction with the optional USB Print & Scan v3.0 Server to
enhance its functionality. The server solution includes two plug-ins:
USB Print and Scan V3.0 Server Plug-in – to support Microsoft Office Systems 2003 or
2007.
USB Print and Scan V3.0 Server Plug-in – to support Portable Document Format (“PDF”)
conversion.
The first plug-in gives users the power to print Microsoft Word, Excel and PowerPoint files
directly from USB Devices to MFP devices and to scan directly from MFP devices onto USB
devices in editable .RTF format.
The second plug-in down levels later versions of PDF (1.7, 1.6, 1.5 or 1.4) to version 1.3 if the
device is unable to support the higher specification of the PDF file to be printed.
Storage Devices
The following storage devices are supported:
USB Memory Stick
USB Hard Disk
USB Card Reader
File Systems
The application supports USB memory devices formatted with FAT12, FAT16 and FAT32 file
systems. NTFS file systems are not supported.
NOTE
The imageRUNNER ADVANCE can work in two modes. The native mode
(default) uses the native/system mass storage driver to access the memory
device. When run in this mode the supported file system formats are as
specified by the native driver (i.e. the same as the native USB storage
applications). However the imageRUNNER ADVANCE can be run in “MEAP”
mode where the MEAP mass storage driver is used. In this mode the
supported file systems are as described in this section. Please contact your
Canon Representative if there are issues with USB memory devices which are
formatted with one of the supported file systems.
File Names
Under FAT file systems file names are limited to 255 characters and can be any combination of
letters, digits or characters with code point values greater than 127. The special characters
shown below are also permitted:
$ % ‘ - _ @ ~ ` ! ( ) { } ^ # & + , ; = [ ] . SPACE
The total length of a file path must not exceed 259 characters.
2
Introduction
The following rules apply:
Embedded spaces are permitted but leading and trailing spaces are ignored.
Leading and embedded periods are allowed but trailing periods are ignored.
Both upper case and lower case characters are permitted.
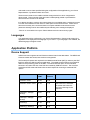
File Formats
Printing and Previewing Formats
USB Print & Scan prints or previews files stored on the mass storage device in any of the
formats shown in the table below:
File Type
Format / Version
Supported Devices
Adobe PDF
Fully supported up to PDF Version 1.3
(Acrobat 4.x)
Refer to PDF Support
table below.1+4
Support for higher versions (up to PDF
Version 1.7 (Acrobat 8.0)) subject to printing
restrictions.
Printing restrictions vary according to device
(see table below).
PS Print Kit or Direct Print Kit required for all
versions.
TIFF
CCITT Group 4
All devices
JPEG
Any format
All devices
TXT
Plain text
All devices3
RTF
Rich text format
All devices2+4
DOC
MS Office Word
All devices2+4
PPT
MS Office PowerPoint
All devices2+4
XLS
MS Office Excel
All devices2+4
DOCX
MS Office Word
All devices2+4
PPTX
MS Office PowerPoint
All devices2+4
XLSX
MS Office Excel
All devices2+4
NOTE1
The Secure PDF format is not supported. Although Secure PDF files appear on
the User Interface as PDF files, they cannot be printed and a PDL PDF Data
Decode Error is displayed when attempting to print.
NOTE2
Support for RTF, MS Office Word, PowerPoint and Excel files is provided via
the standalone server option, i.e. the USB Print & Scan V3.0 Server MS Office
Support plug-in product.
Introduction
3
NOTE3
Requires PCL5e. Either of the following are required for PCL5e:
1. PCL standard model. For instance, iRxxxxN, iRCxxxxi.
Or
2. UFR II/PCL Printer Kit (for non PCL standard model)
NOTE4
Requires PS Print Kit or Direct Print Kit (if Direct Print kit available for that
device). Please check memory option requirements for these kits.
PDF Support Table
USB Print & Scan fully supports up to PDF v1.3 files for the list of Canon devices, which support
USB Print & Scan except for the 30xx range. PDF files conforming to higher specifications may
not print properly, dependent on the file and the device. If configured, a warning message will
be displayed which will warn the user of potential printing or previewing errors for a PDF file
conforming to a higher specification than the device supports. A PDF Support plug-in exists,
however, the USB Print & Scan V3.0 Server PDF Support plug-in product. This runs on a
server and down levels later versions of PDF to version 1.3 to allow them to print/preview, if the
device is unable to support the higher specification of the PDF file to be printed/previewed.
The table below shows the versions of PDF officially supported on each device and any printing
restrictions associated with a particular version.
It may be possible to print from a higher version of PDF than that specified when the new
features of the higher version are not being used by a particular document.
Supported
Devices
PDF /
Acrobat
Version
Restriction
iR3025/N
1.2 or lower
(Acrobat 3.0)
Prints according to the spec for PDF Ver1.2 or lower.
1.3 (Acrobat
4.0)
Prints according to the spec for PDF Ver1.3.
3035/N
3045/N
However, the following items are not supported:
-File Specifications
-ICC Based Color Space
-Interactive Forms
-Electric signature
-Linearized PDF
1.4 or higher
(Acrobat 5.0)
Data using the functions added in PDF Ver1.4 or
higher versions cannot be output (print).
However, files encrypted with RC4-128bit (PDF
Ver1.4) can be printed.
iRC5185i
4
Introduction
1.4 or lower
(Acrobat 5.0)
Prints according to the spec for PDF Ver1.4 or lower.
Supported
Devices
PDF /
Acrobat
Version
Restriction
PDF Version
1.6 or below
Prints according to the spec for PDF Ver1.6 or below.
iRC4580i
iRC4080i
iRC2380i
iRC3080/i
iRC3580/i
iRC2880/i
iRC3380/i
iR6880C/i
iR5880C/i
iR3180C/i
iR5055/N
iR5065/N
iR5075/N
iR3225/N
iR3235/N
However, the following items are not supported:
(Acrobat 7.0)
iR3245/N
- JBIG2 decoder
- JPX(JPEG2000) decoder
- File Specification (Reference to external files not
supported)
- Only Public Key Security
- Handler (PDF Standard security handler supported)
- PS XObject
- Transfer Functions
- Halftones
- Transparency Groups
- Free Text Annotations (XHTML, XML, CSS:Noncorrespondence)
- Field Dictionaries (Rich Text Strings: Non-
Introduction
5
Supported
Devices
PDF /
Acrobat
Version
Restriction
correspondence)
- Digital Signatures (Its validity is not verified, however
it is printed. If the icon that indicates the presence of a
signature in a PDF file or the one indicating the
possibility of falsification exists, print is executed in a
state that the validity is unclear.)
- File Identifiers (Reference to external files not
supported)
- Output Intents
- Open Prepress Interface (OPI)
- 3D Artwork (3D model is not displayed, and any
alternate image is output.)
imageRUNNE
R ADVANCE
C5051(i) /
C5045(i) /
C5035(i) /
C5030(i)
PDF Version
1.7 or below
(Acrobat 8.0)
imageRUNNE
R ADVANCE
C7055i /
C7065i
PDF Version
1.7 or below
(Acrobat 8.0)
Prints according to the spec for PDF Ver1.7 or below.
However, the following items are not supported:
- Watermarks
Prints according to the spec for PDF Ver1.7 or below.
However, the following items are not supported:
- Watermarks
Scanning Formats
USB Print & Scan can create files on connected storage devices in the formats shown in the
table below:
6
File Type
Pages per file
Supported Devices
Default PDF
Multiple
All devices
Highly compressed PDF
Multiple
Optional on all
devices1
Searchable PDF
Multiple
Optional on all
devices1
Outline PDF
Multiple
Optional on all
devices1
Outline Searchable PDF
Multiple
Optional on all
devices1
Black and White TIFF
1
All devices
Introduction
File Type
Pages per file
Supported Devices
Colour JPEG
1
Colour devices only
RTF
Multiple
All devices2
NOTE1
NOTE2
Requires Universal Send Kit and PDF Advanced Feature Set.
Support for scanning to the editable .RTF format is provided via the standalone
server option, i.e. RTF files can only be created when the application is used in
conjunction with the USB Print & Scan V3.0 Server MS Office Support plug-in.
The RTF file produced and saved to the connected storage device can be
viewed and edited if required in MS Word or any other appropriate word
processor application, which may be available to the end user.
The scanning functionality included in the USB Print & Scan V3.0 Server
product relies on OCR (Optical Character Recognition) functionality to
distinguish characters on a page and convert them to editable characters that
can be manipulated electronically.
As with other OCR products, the RTF output from USB Print & Scan is not a
perfect representation of a printed document. Particular areas where the OCR
technology may not reproduce a document accurately are the following:
•
Tables of data – table layout may not be retained.
•
Logos and pictures – logos may not retain their original font and format.
Pictures may not retain their original quality.
•
Newspapers – where text bleeds through the page (as may be the
case with newspapers) the quality of character recognition may be
reduced.
•
Bound books and documents - where it is not possible to place an
entire document completely flat on the scanner screen, the OCR
software will not be able to accurately interpret the characters
contained in the document. This will result in editable output which
does not completely reflect the source document.
NOTE
When a file format only supports one page per file, a file is created for each
page. A number is appended to the end of the file name (but before the file
extension) which indicates the page number.
NOTE
The Secure PDF format is not supported. No option is available to scan to
Secure PDF format.
NOTE
A memory upgrade is required for 600 x 600 dpi colour scanning on the iR32xx
range of devices.
Document Cache Mailbox
When a document is loaded from the memory stick to be previewed, it is stored in a pin code
secured mailbox (see Preview Button for further information). Both the mailbox and the pin
Introduction
7
code used to secure it are specified during the configuration of the application by your Canon
Representative. By default mailbox 99 is used.
The document remains in the mailbox until the storage device from which it originated is
disconnected. This means that if the document is subsequently printed or previewed the
document does not have to be reloaded.
If an attempt is made to cache a document and there is no available space a random document
is chosen to be deleted from the cache to make space for the new document. If there are no
documents currently in the cache and there is no space available to store the document
(because it is being used in other mailboxes) the following error message is displayed:
‘There is no more mailbox box space. Please delete some documents and try again.’
Languages
Your application will be configured by your Canon Representative. Please contact them if the
application is not displayed in the language of your choice. If your language is not available, the
default language of English is used.
Application Platform
Device Support
USB Print & Scan supports various iR devices that are listed in the table below. The MEAP and
Firmware version are shown; later versions are supported.
The Postscript iR options are required for the Multifunctional Printer (MFP) in order to print PDF
files from within the USB Print & Scan application. The speed at which PDFs are processed is
reliant on the processing power of the MFP. The Advanced PDF option is recommended,
because it can reduce the size of the PDF files created by USB Print & Scan. The Universal
Send Kit and PDF Advanced Feature Set are both required for scanning to advanced PDF
options.
8
Model
MEAP
CONT
System
Software
iRC2880i / 3380i
88.02
91.02
iRC4080i / 4580i / 5185i
91.02
91.02
iR3025(N) / 3035(N) /
3045(N)
25.01
30.02
iR5055(N) / 5065(N) /
5075(N)
50.01
52.01
iR3180C(i)
61.02
68.92
iR5880C(i) / 6880C(i)
61.02
67.92
Introduction
Notes
PS Printer Kit is standard,
so neither PS Printer Kit
nor Direct Printing Kit are
required.
Model
MEAP
CONT
System
Software
iRC2380i
88.02
90.03
iRC3080i / 3580i
88.02
90.03
iR3225i / 35 / 45(N)
35.02
35.06
imageRUNNER
ADVANCE C5051(i) /
C5045(i) / C5035(i) /
C5030(i)
20.25
21.37
2 USB sockets on MFP.
imageRUNNER
ADVANCE C7055i /
C7065i
25.24
24.07
2 USB sockets on MFP.
NOTE
Notes
imageRUNNER ADVANCE C9060 PRO / C9070 PRO are not supported
because of EFI server 100% attachment ratio and USB Print & Scan does not
support the EFI server.
Supported Mass Storage Environment Devices
USB Print & Scan will theoretically work with any USB Mass Storage device with a supported
file system (i.e. FAT12, FAT16 and FAT32 file systems). NTFS is not supported.
It is not possible to guarantee compatibility with all the USB Storage Devices on the market.
The devices shown in the table below have been tested on the supported iR devices and found
to function correctly:
Device Model
Manufacturer
Type
FCR-HS215/1
Kingston
USB 15 in 1 card reader
SDDR-89-E115
Sandisk
USB 12 in 1 card reader
DataTraveller II
Kingston
1Gb USB flash drive
USM4GREX
Sony
4Gb high speed USB flash drive
27036
Freecom
80Gb USB mobile HDD
Some mobile HDDs will not work effectively when powered solely via USB. A separate power
adapter is often supplied with the mobile HDD.
The devices shown in the table below have known conflicts with USB Print & Scan:
Device Model
Manufacturer
Type
Note
523CGS0-1G
Novatech
1Gb USB flash drive
Not recognised
ST980801U2-RK
Seagate
80Gb USB mobile HDD
Not enough power can be
supplied to HDD through
Introduction
9
the single USB socket
10 Introduction
Chapter 2: Using USB Print & Scan
This chapter describes how to use the USB Print & Scan application.
Chapter 2: Using USB Print & Scan............................................................................ 11
USB Print & Scan Initial Panel ................................................................................................ 13
File Browser Panel ................................................................................................................... 13
Device List .............................................................................................................................. 13
File List ................................................................................................................................... 16
Eject Mass Storage Device Button (imageRUNNER ADVANCE) ...................................... 19
Current Location..................................................................................................................... 21
Page Up / Down Buttons and Page Indicator Bar ................................................................ 21
File Browser Sorting............................................................................................................... 22
Hide Extensions ..................................................................................................................... 23
Show Hidden Files ................................................................................................................. 23
Additional Supported Extensions .......................................................................................... 23
Scan Button ............................................................................................................................ 23
Preview Button ....................................................................................................................... 23
Print Button ............................................................................................................................. 24
Progress Bar .......................................................................................................................... 24
Create New Folder ................................................................................................................. 25
Delete ..................................................................................................................................... 27
Rename .................................................................................................................................. 28
Scanning Panel ......................................................................................................................... 29
Information Label ................................................................................................................... 29
Preview Window .................................................................................................................... 30
Navigation Buttons ................................................................................................................. 30
Page Selection Field .............................................................................................................. 31
Delete Page Button ................................................................................................................ 31
Colour Scan Setting Radio Buttons....................................................................................... 31
Two Sided Scan Setting Radio Buttons ................................................................................ 31
Brightness Selector ................................................................................................................ 32
Save Button ............................................................................................................................ 32
Cancel Button ......................................................................................................................... 32
Saving Panel.............................................................................................................................. 32
Preview Window .................................................................................................................... 33
Navigation Buttons ................................................................................................................. 33
Page Selection Field .............................................................................................................. 33
File Name Field ...................................................................................................................... 33
File Format Radio Buttons ..................................................................................................... 33
PDF Format Radio Buttons ................................................................................................... 34
Back Button ............................................................................................................................ 34
Save Button ............................................................................................................................ 34
Cancel Button ......................................................................................................................... 34
Preview Panel............................................................................................................................ 34
Preview Window .................................................................................................................... 35
Navigation Buttons ................................................................................................................. 35
Page Selection Field .............................................................................................................. 35
Using USB Print & Scan 11
Zoom In / Out Buttons ............................................................................................................ 35
Scroll Buttons ......................................................................................................................... 35
Details Panel .......................................................................................................................... 36
Print Button ............................................................................................................................. 36
Done Button ........................................................................................................................... 36
Print Settings Panel.................................................................................................................. 36
Copies Control ....................................................................................................................... 37
Paper Source Control ............................................................................................................ 38
Colour Printing Control........................................................................................................... 39
Two Sided Print Setting Control ............................................................................................ 40
Group/Collate Setting Control................................................................................................ 40
Staple Setting Control ............................................................................................................ 40
Hole Punch Setting Control ................................................................................................... 41
Advanced / Basic Settings Button ......................................................................................... 41
Print Button ............................................................................................................................. 42
Cancel Button ......................................................................................................................... 42
PDF version not supported dialog ......................................................................................... 42
Message Label ....................................................................................................................... 46
Continue Button ..................................................................................................................... 46
Convert Button ....................................................................................................................... 46
Cancel Button ......................................................................................................................... 47
12 Using USB Print & Scan
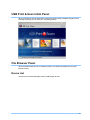
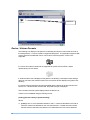
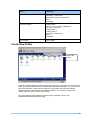
USB Print & Scan Initial Panel
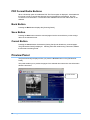
When the USB Print & Scan application is started the [Initial Panel] is displayed together with a
message requesting you to insert your USB storage device.
File Browser Panel
When the USB storage device is inserted the [Device List Window] is displayed in the [File
Browser Panel].
Device List
The [Device List Window] displays a list of USB storage devices.
Using USB Print & Scan 13
Device List
Device / Volume Formats
The following icon displays in the [Device List Window] and depicts a volume that is found on
the storage device. A volume contains a supported file system. The application supports USB
memory devices formatted with FAT12, FAT16 and FAT32 file systems. NTFS is not
supported.
If a volume is found that contains an unsupported file system such as NTFS, it will be
represented by the icon below:
If, while the Device List is displayed in the [Device List Window], a subsequent mass storage
device is connected, the volumes found on the new device will also display in the [Device List
Window].
If a device is disconnected the volumes associated with the device will be removed from the
Device List. If all devices are disconnected, the [Initial Panel] is re-displayed.
The root folder of the file system displays above the Device List.
Volume icons are labelled using the following format:
[Letter]: {[Volume Label] on [Product Name]}
Where:
[Letter] is one or more characters between A and Z. Letters are allocated in the order in
which the volumes are detected on the connected devices. If a letter becomes unused
because a device has been removed then it is reallocated to the next volume detected
14 Using USB Print & Scan
when a new USB device is connected. If all letters between A and Z are allocated,
allocation continues from AA. There is no limit on the number of letters that can be
allocated.
[Volume Label] is the label allocated to the volume when it was formatted. If no volume
has been specified, the volume label and the ‘on’ part of the label are not displayed.
[Product Name] is the product name of the USB device on which the volume is found. A
USB device can contain a number of volumes.
Opening Volumes
A volume can be opened by touching the icon on the screen.
NOTE
Touching a volume icon that contains an unsupported file system will do
nothing.
Using USB Print & Scan 15
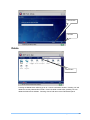
File List
When a volume is selected, the [File List Window] is displayed. The File List displays a list of
files and directories that are found on the USB storage device.
A folder
A file
Folder / File Formats
A suitable icon is used to represent files of a recognised format. File formats are recognised by
their file extension only.
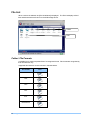
Supported files and their icons are shown in the table below:
File format
PDF
JPG
TIFF
TXT
RTF
DOC/DOCX
16 Using USB Print & Scan
Icon
File format
Icon
PPT/PPTX
XLS/XLSX
Unsupported file
The following icon is used to represent a folder. The name of the folder displays under the icon.
Opening Volumes/Folders / Files
Volumes can be opened and browsed by touching the icon on the screen.
Folders can be opened and browsed by touching the icon on the screen twice, once to select it
and once to open it.
Selected folder
A file can be selected by touching the appropriate icon on the screen.
When a file is selected, the background of the icon changes colour as shown in the table below:
File format
Icon
PDF
Using USB Print & Scan 17
File format
Icon
JPG
TIFF
TXT
RTF
DOC/DOCX
PPT/PPTX
XLS/XLSX
NOTE
18 Using USB Print & Scan
Unsupported files are selectable, renameable and deleteable.
Eject Mass Storage Device Button (imageRUNNER
ADVANCE)
If the green icon below is visible at the bottom right hand corner of the screen and you wish to
remove the mass storage device you should press on this green icon. If this green icon is not
present and you wish to remove the mass storage device, then just remove it. The following
figure shows the icon concerned:
After pressing the above button, you will be presented with the following dialog to confirm the
mass storage device you wish to remove:
If you removed the mass storage device without pressing the eject mass storage device button,
the following warning message will be displayed, just press “ok” to continue:
Using USB Print & Scan 19
20 Using USB Print & Scan
Current Location
The path of the current folder is displayed above the File List. This consists of the volume letter
followed by a colon, followed by the path of the current folder.
If the path is too long to fit into the space allocated then the first part of the path, between the
drive letter and the path, is replaced by three full stop characters. The remaining part of the
path shows as much of the path as will fit in the space allocated.
Use the Folder Up button to move up and down folders.
Folder Up Button
Page Up / Down Buttons and Page Indicator Bar
If there are more items in the list than can be displayed at any one time in the [Device List
Window] or the [File List Window] the Up and Down buttons can be used to change the current
page of items displayed in the list.
Using USB Print & Scan 21
Page Up / Down
Buttons
Pressing the Up button displays the previous page. When the first page of the list is displayed,
this button is disabled.
Pressing the Down button displays the next page in the list. When the last page in the list is
displayed, this button is disabled.
A bar displays above the page Up and Down buttons to give a visual indication of the number of
pages in the list and also the current page being shown. The bar’s size is in proportion to the
number of pages. For example, if there are two pages the bar is half the size of the allocated
space, if there are three pages the bar occupies a third of the allocated space.
The bar is positioned within the allocated space according to the page being displayed. If there
are two pages and the first page is being displayed, the bar is located in the top half of the
allocated space. When the second page is being displayed the bar is located in the bottom half
of the allocated space.
When there is only one page, no bar is displayed.
File Browser Sorting
The file browser can be sorted on different fields:
Type
Name
Creation Date
Size
Extension
The above are listed in the default sort order used by the application.
You can also specify ascending or descending sorting. This allows the sorting to be reversed.
The default is ascending.
22 Using USB Print & Scan
Please contact your Canon Representative if you wish to change the settings used for file
browser sorting.
Hide Extensions
Files with certain file extensions can be hidden on the file browser panel.
Please contact your Canon Representative if you wish to hide files with certain file extensions.
Show Hidden Files
Files with their “hidden” attribute set can be shown on the file browser panel. The default is they
are shown.
Please contact your Canon Representative if you wish to change the setting used.
Additional Supported Extensions
If a file with a certain extension can be treated in the same way as one of the already supported
extensions in USB Print & Scan, this file extension can be mapped to the already supported
extension.
Please contact your Canon Representative if you wish this to be configured.
Scan Button
Pressing the Scan button displays the [Scanning Panel] (see Scanning Panel for further
information).
Scanned files are saved into the current folder displayed in the File List. When the list of
volumes is shown in the File List this button is disabled.
The Scan button can be hidden via the configuration. Refer to your Canon Representative for
further information.
Preview Button
Pressing the Preview button starts to load the selected document from the storage device into
the Document Cache Mailbox. If an unsupported document is selected this button will be
disabled.
While the document is being loaded a progress bar is displayed which shows the current
progress of the process.
If the document has already been cached this process is skipped.
When the document has been loaded to the Document Cache Mailbox the [Preview Panel] is
displayed (see Preview Panel for further information).
The Preview button can be hidden via the configuration. Refer to your Canon Representative for
further information.
Using USB Print & Scan 23
Print Button
Pressing the Print button displays the [Print Settings Panel] (see Print Settings Panel for further
information). If a file is not selected in the [File List Window] then this button will be disabled.
The Print button can be hidden via the configuration. Refer to your Canon Representative for
further information.
Progress Bar
When an action is being performed on a document the Progress Bar replaces the application
title. When the action has been completed the application title is re-displayed.
Progress Bar
The Progress Bar consists of a bar that increases in size as the action is performed. A brief
message is displayed under the bar to describe the current step of the action being performed.
The following table shows the conditions under which the Progress Bar is displayed and the
possible messages that can be shown:
Action
Messages
Document printing
Initialising Printer
Loading… do not remove USB device
Processing…
Waiting…
printing
completed
Cancelling… please wait
An error occurred during printing
Error
Out of paper
Document loading (before preview)
Initialising Printer
Loading… do not remove USB device
Processing…
24 Using USB Print & Scan
Action
Messages
Waiting…
cancelling… please wait
Document could not be previewed
Error
completed
Document saving
Creating PDF
Saving… do not remove USB device
not enough file space
creating page 1
creating page 2
cancelling… please wait
Error
completed
Out of Paper
Out of Paper
Create New Folder
New Folder
button
Pressing the New Folder button will bring up a field in which you can enter the name of the new
folder. If you press within this field, the software keyboard will be displayed. You can use this to
type in the characters. When you have typed in the new folder name using the software
keyboard, press the “Ok” button on the software keyboard. This will take you back to the
“Please enter the name of the new folder” panel.
This is a screenshot of the software keyboard used by USB Print & Scan on the
imageRUNNER ADVANCE device range:
Using USB Print & Scan 25
This is a screenshot of the software keyboard used by USB Print & Scan on the other supported
devices:
If a hardware keyboard is connected to the device, this it to be used instead. On the
imageRUNNER ADVANCE device range, in order to use the USB hardware keyboard for text
entry, the firmware software keyboard must be opened. You will then be able to use the USB
hardware keyboard for text entry, but the text will show in the firmware software keyboard text
window. This will not work on the imageRUNNER ADVANCE device range if the USB Input
Device setting is set to the MEAP driver on the device instead of the system (native) driver
(please contact your Canon Representative if there are issues with the hardware keyboard and
you need to use this for text entry).
Now you can press the “Ok” button if you wish to create the folder. Press “Cancel” if you want
to cancel the operation. Both actions will return you to the File Browser panel.
26 Using USB Print & Scan
Cancel button
Ok button
Delete
Delete button
Pressing the Delete button will bring up an ok / cancel confirmation window. Pressing “Ok” will
delete the currently selected file or folder. Even if the folder contains files, pressing “Ok” will
delete the folder and its children. Pressing “Cancel” will return to the File Browser panel.
Using USB Print & Scan 27
Cancel button
Ok button
Rename
Rename
button
Pressing the Rename button will bring up a field in which you can type in the new name you
wish to give this file or folder you have selected for renaming. If you press inside the field the
software keyboard will be displayed unless a hardware keyboard is connected. Press “Ok”
once you have typed in the new name. If you wish to cancel the operation and be returned to
the File Browser panel, press the “Cancel” button.
28 Using USB Print & Scan
Cancel button
Ok button
Scanning Panel
The [Scanning Panel] is displayed when you press the Scan button on the [File Browser Panel].
This panel enables you to set up scanning options before scanning a selected document.
Information Label
Information Label
The Information Label either prompts you for an action or updates you on the progress of an
operation.
The possible text data that can display in the label and the condition under which it is displayed
Using USB Print & Scan 29
is shown in the table below:
Text
Condition
‘Place your document into the feeder or on to the
plattern and press the Green button to scan.’
Default condition
‘Scanning in progress… please wait.’
During the scanning operation
‘Scan more pages or press Save to continue.’
After the scanning is complete
NOTE
While the scanning is in progress, the centre of the green Scan button
changes to orange.
Preview Window
The [Preview Window] shows a preview image of the selected page. When there are no pages
(e.g. when the panel is first opened) the window is empty.
Preview Window
If the preview image cannot be generated, the following error message is displayed:
‘Document could not be previewed.’
Navigation Buttons
Subsequent pages of the scanned document can be accessed via the four navigation buttons
below the preview window. These buttons are disabled appropriately when the extent of the
document has been reached.
Previous Page
Next Page
30 Using USB Print & Scan
First Page
Last Page
Page Selection Field
To the right of the navigation buttons, a label indicates the page number currently being
previewed and the total number of pages.
Delete Page Button
Pressing the Delete button deletes the page currently displayed in the [Preview Window].
Colour Scan Setting Radio Buttons
A group of radio buttons are available that enable you to specify the colour settings to be used
when scanning a document. These buttons are located at the top of the allocated area.
You can choose one of the following options:
Auto1 – the device decides the most appropriate scan setting to be used on a page by
page basis.
Colour – all pages in the document are scanned in full colour.
Grey scale2 – all pages in the document are scanned using grey scale.
Black and white – all pages in the document are scanned in black and white.
The default setting is specified in the configuration. If you want to change the default setting see
your Canon Representative for further information.
If your iR device does not have colour scanning capability then these radio buttons will not be
displayed.
NOTE1
In IMI mode, excluding the iR32xx and imageRUNNER ADVANCE device
ranges, Auto cannot be selected.
NOTE2
Grey scale can be selected on the following devices in CPCA mode:
iR3025(N) / 3035(N) / 3045(N)
iR5055(N) / 5065(N) / 5075(N)
iR3180C(i)
Two Sided Scan Setting Radio Buttons
A group of radio buttons are available that enable you to specify if you want one or two sides of
each page in a document to be scanned. These buttons are displayed under the colour
scanning control. If the colour scanning control is not visible then the buttons will be displayed
at the top of the allocated area.
You can choose one of the following options:
Using USB Print & Scan 31
Single sided – scans one side of each page in the document.
Double sided – scans both sides of each page in the document.
The default setting is specified in the configuration. If you want to change the default setting see
your Canon Representative for further information.
If your iR device does not have a two sided scanning capability then these buttons will not be
displayed.
Brightness Selector
The Brightness Selector enables you to specify the scanning density of the scanned image.
The available range is 0% to 100% in steps of 10%. 100% gives the lightest, least dense
scanned image, whilst 0% gives the darkest, most dense scanned image.
Pressing a number (or the adjacent rectangle) selects the scan brightness. The selected scan
brightness is indicated by a filled in rectangle.
The default setting is specified in the configuration. If you want to change the default setting see
your Canon Representative for further information.
NOTE
If the “Restrict Options” is switched on for devices running in CPCA mode, then
scanning will fail if the brightness setting is anything other than 50%. The
“Restrict Options” setting on the device is navigable via “Settings / Registration”
-> “Function Settings” -> “Common Settings” -> “Document Scan Lock
Operation Settings” -> “Restrict Options”.
Save Button
Pressing the Save button dismisses the [Scanning Panel] and the [Saving Panel] is displayed.
Cancel Button
Pressing the Cancel button dismisses the [Scanning Panel] and discards any scanned pages.
The [File Browser Panel] is displayed.
Saving Panel
The [Saving Panel] is displayed when you press the Save button on the [Scanning Panel].
This panel enables you to set up various options before the file is saved.
32 Using USB Print & Scan
Preview Window
Preview Window
The [Preview Window] shows a preview image of the current page. This window works in the
same way as the Preview Window on the [Scanning Panel].
Navigation Buttons
The navigation buttons are for navigating through the pages in the document. They work in the
same way as the Navigation Buttons on the [Scanning Panel].
Page Selection Field
This is a label which indicates the page number currently being previewed and the total number
of pages. This is the same as the Page Selection Field on the [Scanning Panel].
File Name Field
Touching the File Name field opens the software keyboard panel, which enables you to specify
the name of the new file. This must conform to the requirements of the file system to which the
file is being written. See File Names for more information on the permitted file names. The
default file name is the date and time, for example 20070215_175903.pdf. If a hardware
keyboard is connected then this is used to specify the name of the new file.
When a file format is selected (see File Format Radio Buttons) the current file extension, if there
is one, is removed and replaced with the appropriate extension for the selected file format.
File Format Radio Buttons
This radio button list specifies the file format that the document will be saved in. See File
Formats for more information on the permitted file formats.
Using USB Print & Scan 33
PDF Format Radio Buttons
When a Postscript option is installed the PDF File Format option is displayed. Associated with
this format is a set of controls that allow the format of the PDF file to be altered. See File
Formats for more information. These buttons are disabled when the PDF radio button is not
selected.
Back Button
Pressing the Back button displays the [Scanning Panel].
Save Button
Pressing the Save button saves the scanned pages into the current directory on the storage
device in the selected format.
Cancel Button
Pressing the Cancel button dismisses the [Saving Panel] and discards any scanned pages.
The [File Browser Panel] is displayed. Pressing this button whilst saving a document, deletes
the files that were being saved.
Preview Panel
The [Preview Panel] is displayed when you press the Preview button on the [File Browser
Panel].
This panel enables you to preview the pages of the selected document and to view information
about the document.
Preview Window
34 Using USB Print & Scan
Preview Window
The [Preview Window] shows a preview image of the current page. This window works in the
same way as the Preview Window on the [Scanning Panel].
Navigation Buttons
The navigation buttons are for navigating through the pages in the document. They work in the
same way as the Navigation Buttons on the [Scanning Panel].
Page Selection Field
This is a label which indicates the page number currently being previewed and the total number
of pages. This is the same as the Page Selection Field on the [Scanning Panel].
Zoom In / Out Buttons
These buttons control the magnification factor of the [Preview Window].
Zoom In
Zoom Out
The zoom in button allows the preview image to be enlarged. The button can be pressed
repeatedly until maximum zoom has been reached. The maximum amount of zoom
depends on the device and the physical dimensions of the page. When maximum zoom is
reached the zoom in button is disabled.
The zoom out button reduces the size of the preview image. The button can be pressed
repeatedly until minimum zoom has been reached. When minimum zoom is reached the
zoom in button is disabled
You can also zoom in and out by tapping on the preview window.
Scroll Buttons
These buttons control the portion of the image displayed in the [Preview Window].
Left
Up
Right
Down
Pressing the Left arrow button scrolls the image to the left. When the left edge of the image is
visible this button is disabled.
Pressing the Up arrow button scrolls the image upwards. When the top edge of the image is
visible this button is disabled.
Using USB Print & Scan 35
Pressing the Right arrow button scrolls the image to the right. When the right edge of the
image is visible this button is disabled.
Pressing the Down arrow button scrolls the image to the downward. When the bottom edge of
the image is visible this button is disabled.
You can also drag and drop the document within the preview window if the image does not fit
into the preview window to see portions of the image which are hidden.
Details Panel
The [Details Panel] displays additional information (as detailed in the table below) about the
document. This information is static text and cannot be edited.
Document Name
The name of the document on the memory stick
File Type
PDF, TIFF, TXT, JPEG, DOC, XLS, PPT, DOCX, XLSX,
PPTX, RTF
File Creation Date
The date the document was created
File Size
The file size of the document
Number of Pages
The number of pages in the document
Print Button
Pressing the Print button dismisses the [Preview Panel]. The [Print Settings Panel] is
displayed.
Done Button
Pressing the Done button dismisses the [Preview Panel]. The [File Browser Panel] is
displayed.
Print Settings Panel
The [Print Settings Panel] is displayed when you press the Print button on the [File Browser
Panel].
This panel enables you to specify the settings used to print the selected document.
The panel has both a basic and an advanced mode. This mode is activated using the
Advanced / Basic Settings button.
In basic mode the following controls are available:
Copies Control
Paper Source Control
Colour Printing Control
Advanced / Basic Settings Button
Print Button
36 Using USB Print & Scan
Cancel Button
In advanced mode the following additional controls are available:
Two Sided Print Setting Control
Group/Collate Setting Control
Staple Setting Control
Hole Punch Setting Control
Copies Control
The Copies field enables you to specify the number of copies you require of the selected
document. The maximum number of copies is 9999.
Using USB Print & Scan 37
Pressing the C key on the control panel reverts to the default value. The default setting is 1
copy. Values can be entered into the field using the numeric keypad on the control panel.
The number of copies can also be changed by using the Left and Right arrow buttons either
side of the field. Pressing the Right arrow button increases the number of copies by 1.
Pressing the Left arrow button decreases the number of copies by 1. When the minimum
number of copies is displayed the left arrow is disabled.
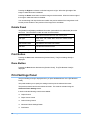
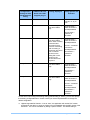
Paper Source Control
This is a group of radio buttons that list all paper sources contained in the device.
The first item in the list will be ‘Auto’. Selecting this option will mean that the iR device will
choose the most appropriate paper source.
The remaining paper sources will consist of the paper source name, an image to reflect the
amount of media remaining in the paper source and a label indicating the media size.
The table below shows the possible paper source names:
Name
Description
Auto
The device automatically determines the most appropriate source
Manual
The device attempts to take paper from the manual feed
Deck N*
The device attempts to take paper from Deck N*
Cassette N*
The device attempts to take paper from cassette N*
* N is a number between 1 and 4
NOTE
If the selected source does not contain the correct paper size for the
selected document the device will prompt you to insert the appropriate
paper into the selected source.
NOTE
If the paper in any of the paper sources are empty, then the associated
radio button will be greyed out.
NOTE
Printing a PDF or non native document from different paper sources:
•
iR5075 and iR6880 allow you to print a PDF from any paper source
except manual feed. If the document is previewed first then it is
possible to print from manual feed.
•
imageRUNNER ADVANCE devices allow you to print a PDF from
any paper source, including manual feed.
•
All other supported devices ignore paper source setting when
printing PDF. However, if the document is previewed first then the
selected paper source is honoured.
When the paper source can not be set due to device limitations ‘Auto’ is
selected and the option is disabled.
The table below shows the icons that reflect how much paper remains:
38 Using USB Print & Scan
Icon
Remaining Paper
The paper source is empty
The paper source is up to one third of its capacity
The paper source is between one third and two thirds of its capacity
The paper source is between two thirds and full capacity
The table below shows the supported paper sizes. If the paper size detected in a paper source
is unknown then ‘Unknown’ will be displayed.
Paper Size Label
A3
A4
A5
11x17
Legal NA
Letter NA
Statement
Executive
B5 (JIS)
B4 (JIS)
Envelope Monarch
Envelope COM10
Envelope C5
Envelope B5
SRA3
12x18
Colour Printing Control
A group of radio buttons are available that enable you to specify the colour settings that will be
used when the document is printed. You can choose one of the following options:
Auto – the storage device decides the most appropriate setting to be used on a page by
page basis.
Using USB Print & Scan 39
Colour – all pages are printed in full colour.
Grey scale – all pages in the document are printed using grey scale.
The default setting is specified in the configuration. Refer to your Canon Representative for
further information.
If the iR device does not have colour printing capability then this control will not be displayed.
Two Sided Print Setting Control
A group of radio buttons are available that enable you to specify if one or two sides of a page
will be printed. You can choose one of the following options:
Single sided
Double sided bind on long edge
Double sided bind on short edge
Booklet
Booklet saddle stitched*
*If the iR device does not have a saddle stitch finisher then this option will not be displayed.
The default setting is specified in the configuration. Refer to your Canon Representative for
further information.
If the iR device does not have a duplex printing capability then these radio buttons will not be
displayed.
NOTE
When using the ‘Booklet’ option a paper size will be required that is double
the size of the paper size of the document.
Group/Collate Setting Control
This is a combo box control that enables you to specify if the pages will be collated or grouped.
You can choose one of the following options:
Yes – pages are collated into separate copies.
No – pages are grouped into batches of pages (e.g. all copies of page 1 are grouped
together).
This control is disabled and set to ‘Yes’ when:
Duplex is set to ‘Booklet’ or ‘Booklet saddle stitched’.
Staple is not set to ‘None’.
The default setting is specified in the configuration. Refer to your Canon Representative for
further information.
Staple Setting Control
If the iR device does not have stapling capability this control will not be displayed.
The Staple Setting radio button enables you to select whether or not to staple the printed
document. The table below shows the available stapling options:
40 Using USB Print & Scan
Staple Position
Number of Staples
None
0
Upper Left
1
Lower Left
1
Upper Right
1
Lower Right
1
Left
2
Right
2
This control is disabled and set to ‘None’ when:
Duplex control is set to ‘Booklet’ or ‘Booklet Saddle Stitched’.
Group/Collate is set to ‘Group’.
The default setting is specified in the configuration. Refer to your Canon Representative for
further information.
Hole Punch Setting Control
If the iR device does not have hole punching capability this control will not be displayed.
The Hole Punch radio button enables you to select whether or not the printed document will be
hole punched.
You can choose one of the following options:
Yes – the document will be hole punched.
No – the document will not be hole punched.
When ‘Yes’ is selected the printed document is hole punched with two holes. The location of
the holes is on the trailing edge of the paper.
This control is disabled and set to ‘Off’ when:
Duplex is set to ‘Booklet’ or ‘Booklet saddle stitched’.
The default setting is specified in the configuration. Refer to your Canon Representative for
further information.
Advanced / Basic Settings Button
Pressing the Advanced / Basic button changes the mode of the [Print Settings Panel].
In basic mode only the following controls are shown:
Copies Control
Paper Source Control
Using USB Print & Scan 41
Colour Print Control
In advanced mode all controls are shown.
Print Button
Pressing the Print button dismisses the [Print Settings Panel] and starts to print the selected
document with the selected settings. The [File Browser Panel] is displayed.
If the document has not already been cached in the Document Cache Mailbox (see Document
Cache Mailbox for further information) the document data is loaded from the USB memory
device. As it is loaded it is submitted directly to the printer. It is not stored in the Document
Cache Mailbox before printing begins.
If the document is already in the Document Cache it does not need to be loaded and is printed
directly from the Mailbox with the selected settings.
As printing occurs, a progress bar is displayed. See Progress Bar for further information.
Cancel Button
Pressing the Cancel button dismisses the [Print Settings Panel] and the [File Browser Panel] is
displayed. Any settings made in the [Print Settings Panel] are discarded.
PDF version not supported dialog
When a PDF file is being printed/previewed the application checks the PDF version of the
document being printed. If the version of PDF is not natively printed by the device then this
dialog may be displayed. The conditions under which the dialog is displayed are shown in the
following table:
Configuration
setting for PDF
Not Supported
dialog
USB Print & Scan
Server V3.0 PDF
Support plug-in
Dialog displayed
Hide
No
No
Hide
Yes
No
Dialog Options and
Outcome
Document is
printed/previewed
natively regardless
of the PDF version
Document with native
PDF version are
printed/previewed
natively.
Documents with non
native PDF version
may be converted.
The behaviour of
non native PDF
versions can be
configured through
the configuration
servlet, where an
engineer can set the
42 Using USB Print & Scan
Configuration
setting for PDF
Not Supported
dialog
USB Print & Scan
Server V3.0 PDF
Support plug-in
Dialog displayed
Dialog Options and
Outcome
default behaviour to
“convert” or “try to
print”.
Show
No
Yes – when printing
non native PDFs
only
Continue button –
native document is
printed/previewed.
Cancel button –
operation is
cancelled.
Show
Always Show
Yes
No
Yes – when printing
non native PDFs
which have not been
previewed and
converted in that
process. Previewing
and converting a
document will cache
it as converted
cached, so the
dialog will not be
shown for the
cached document
anymore.
Yes – when printing
non native PDFs
only.
Continue button –
native document is
printed/previewed.
Convert – converted
document is
printed/previewed.
Cancel button –
operation is
cancelled.
Continue button –
native document is
printed/previewed.
Cancel button –
operation is
cancelled.
Always Show
Yes
Yes – when printing
non native PDFs
only.
Continue button –
native document is
printed/previewed.
Convert – converted
document is
printed/previewed.
Cancel button –
operation is
cancelled.
As well as the Pdf Not Supported dialog setting (default setting is “Show”), you can also specify
the following configurable items. Please contact your Canon Representative to change the
default configuration:
Highest supported Pdf Version – if set to “Auto”, the application will use the PDF version
supported on the device, to work out if there is an incompatibility with the PDF version of the
document. This can be overridden by setting a specific version. The default setting is
Using USB Print & Scan 43
“Auto”.
Default Pdf Conversion Action – if the dialog is not showing and there is a PDF version
incompatibility, you can set this configurable item, so the application always tries to print or
always converts. The default setting is “TryTo Print”.
The four different versions of the dialog are shown in the following screen shots and they
contain all of the following controls:
Message label
Continue button
Convert button
Cancel button
The following is the screenshot of the dialog when printing an unsupported version of PDF and
not connected to the USB Print & Scan Server V3.0 PDF Support plug-in:
Message Label
Cancel Button
Continue Button
The following is the screenshot of the dialog when printing an unsupported version of PDF and
connected to the USB Print & Scan Server V3.0 PDF Support plug-in:
44 Using USB Print & Scan
Message Label
Cancel Button
Convert Button
Continue Button
The following is the screenshot of the dialog when previewing an unsupported version of PDF
and not connected to the USB Print & Scan Server V3.0 PDF Support plug-in:
Message Label
Cancel Button
Continue Button
The following is the screenshot of the dialog when previewing an unsupported version of PDF
and connected to the USB Print & Scan Server V3.0 PDF Support plug-in:
Using USB Print & Scan 45
Message Label
Cancel Button
Convert Button
Continue Button
Message Label
The message label indicates to the user the document they have selected is not natively printed
by the device. When the USB Print & Scan Server V3.0 PDF Support plug-in is not connected,
the message contains the following text:
The PDF version you wish to print is not supported by
this device and may not print correctly.
Press Continue to try printing the unsupported version (fast).
If the USB Print & Scan Server V3.0 PDF Support plug-in is connected then the message
contains the following text:
The PDF version you wish to print is not supported by
this device and may not print correctly.
Press Continue to try printing the unsupported version (fast).
Press Convert to convert the document to a supported version (slow).
Continue Button
Pressing the Continue button prints/previews the native PDF document.
Convert Button
This button is only present when the USB Print & Scan Server V3.0 PDF Support plug-in is
connected and operational. When the button is pressed the document is sent to the server to be
converted to PDF version 1.3. The document is then returned to the device and
46 Using USB Print & Scan
printed/previewed.
Cancel Button
Pressing the Cancel button returns the user to the file browser panel.
Using USB Print & Scan 47
Appendix A: Glossary
This appendix provides a glossary of terms.
Appendix A: Glossary .........................................................Error! Bookmark not defined.
Glossary of Terms ........................................................................ Error! Bookmark not defined.
Glossary 48
Glossary of Terms
Term
Definition
HDD
Hard Disk Drive.
iR
Brand name for Canon MFPs.
MEAP
Multifunctional Embedded Application Platform. A
platform for running Java based application on a
Canon MFP.
MFP
Multifunctional Printer. A device that offers printing,
scanning and other document based services.
USB
Universal Serial Bus.
USB Mass Storage Device
A class of USB device that allows storage of large
amount of data.
FAT 12; FAT 16; FAT 32
The FAT (File Allocation Table) file system has
three FAT file system types differentiated by the
size in bits of the entries in the actual FAT structure
on the disk.
NTFS
Windows NT file system.
PDF
Portable Document Format.
TIFF
Tagged Image File Format
JPEG
A standard compressed file format used for digital
images.
TXT
A filename extension for files consisting of text.
RTF
Rich Text Format.
DOC
MS Office Word.
XLS
MS Office Excel.
PPT
MS Office PowerPoint.
DOCX
MS Office Word 2007.
XLSX
MS Office Excel 2007.
PPTX
MS Office PowerPoint 2007.
IMI
Integrated MEAP-Device Interface
Using USB Print & Scan 49
Term
Definition
PS
Postscript
50 Glossary