1
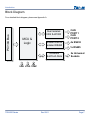
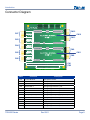
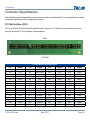
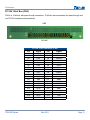
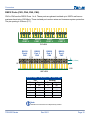
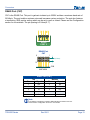
User Guide
TCB1000 Series
CANbus, Socket Modem & Serial Communication
Rev 09/11
Tri-M Technologies Inc.
101 – 1530 Kingsway Avenue
Port Coquitlam, BC V3C 6N6
Toll Free: 800.665.5600
Direct: 604.945.9565
Fax: 604.945.9566
Web: www.tri-m.com
Email: [email protected]
Preface
Important Notes
This manual is intended for integrators of embedded system applications. It contains detailed information on hardware
and software requirements to interconnect to other embedded devices. Carefully read this manual before you begin
installation.
About Tri-M Technologies Inc.
Tri-M Technologies Inc. specializes in embedded computing for rugged environments. Tri-M’s innovative solutions are
the premiere choice for off-highway vehicles, industrial controls, robotics, military equipment, aerospace technologies,
undersea and advanced security products. We offer a wide range of DC-to-DC converters, CPU boards, hardened
enclosures, I/O modules, wireless communication devices, and customized systems. With over 28 years of industry
experience, Tri-M is your embedded systems specialist.
Technical Support
Tri-M is pleased to provide technical support and services by phone, live chat, and email:
•
•
•
For User Guides, FAQ’s and RMA’s, please visit us at www.tri-m.com/support
For Email support, please contact our staff at [email protected]
To speak with a technical support representative, call us at 1.800.665.5600 or +1.604.945.9565
Tri-M Technologies Inc. (Limited Warranty)
Unless otherwise agreed to in writing, Tri-M Technologies Inc. (Tri-M) warrants to the original purchaser that its products
will be free from defects in material and workmanship for a period of (1) one year from the date of shipment. Tri-M’s
obligation under this warranty is limited to replacement or repair at its option and its designated site. Any such products
must be returned within the warranty period to Tri-M in Tri-M approved packaging with a Tri-M-assigned RMA (Return
Material Authorization) number referenced on the shipping documents.
All warranties are void if there is evidence of misuse, tampering, or attempted repair of parts. Any returns must be
accompanied by a return material authorization (RMA) number issued by Tri-M. Purchaser shall prepay transportation
to Tri-M’s designated site. If returned products are repaired or replaced under the terms of this warranty, Tri-M shall pay
return transportation charges.
In no case will Tri-M be held liable for consequential damages arising out of its obligations under this warranty or the
failure or incorrect use of any of its products. This warranty is in lieu of all warranties, either express or implied, including,
without limitation, any implied warranty of merchantability or fitness for any particular purpose, and of any other obligation
on the part of Tri-M.
Disclaimer
No part of this document may be reproduced, transmitted, transcribed, stored in a retrieval system, or translated into
any language or computer language, in any form or by any means, electronic, mechanical, magnetic, optical, chemical,
manual, or otherwise, without the express written permission of Tri-M Technologies Inc.
Tri-M Technologies Inc. (Tri-M) makes no representations or warranties with respect to the contents of this manual, and
specifically disclaims any implied warranties of merchantability or fitness for any particular purpose. Tri-M shall under
no circumstances be liable for incidental or consequential damages or related expenses resulting from the use of this
product, even if it has been notified of the possibility of such damages. Tri-M reserves the right to revise this publication
from time to time without obligation to notify any person of such revisions.
COPYRIGHT © 2011 TRI-M TECHNOLOGIES INC.
TCB1000 Series
Rev 09/11
Page 2
Preface
Table of Contents
Preface
Important Notes................................................................................................... 2
About Tri-M Technologies Inc. ........................................................................ 2
Technical Support............................................................................................ 2
Tri-M Technologies Inc. (Limited Warranty)..................................................... 2
Disclaimer....................................................................................................... 2
Introduction
Overview.............................................................................................................. 5
Key Features....................................................................................................... 5
Optional Items...................................................................................................... 5
Specifications....................................................................................................... 6
Electrical.......................................................................................................... 6
Mechanical...................................................................................................... 6
Environment.................................................................................................... 6
Communication............................................................................................... 6
Certifications................................................................................................... 6
Block Diagram..................................................................................................... 7
Dimensions.......................................................................................................... 8
Connector Layout................................................................................................ 9
Connectors
Connector Specifications..................................................................................... 10
PC/104 8bit Bus (CN1).................................................................................... 10
PC/104 16bit Bus (CN2).................................................................................. 11
RS232 Ports (CN3, CN4, CN5, CN6).............................................................. 12
RS485 Port (CN7)........................................................................................... 13
TCB1000 Series
Rev 09/11
Page 3
Preface
JTAG Port (CN8 Top)...................................................................................... 14
USB Port (CN8 Bottom).................................................................................. 14
LED Port (CN9)............................................................................................... 15
Universal MultiTech Sockets (CN10, CN11) ................................................... 16
CAN BUS (CN12, CN13)................................................................................ 17
Configuration
Configuration Overview....................................................................................... 18
Command-line Configuration Setup................................................................ 18
Mass-Storage Configuration Setup................................................................. 19
Command-line Configuration.......................................................................... 20
UART 1....................................................................................................... 20
UART 2....................................................................................................... 21
Serial Port Enable/Disable.......................................................................... 22
DSR............................................................................................................ 22
RS485......................................................................................................... 23
SOCKET RESET........................................................................................ 23
CAN MODE................................................................................................ 24
CAN 1......................................................................................................... 24
CAN 2......................................................................................................... 25
HEART BEAT............................................................................................. 25
TEMP.......................................................................................................... 25
ALARM MESSAGE.................................................................................... 26
CONFIG...................................................................................................... 26
Appendix A ........................................................................................................... 27
TCB1000 Series
Rev 09/11
Page 4
Introduction
Overview
Tri-M’s TCB1000 Series features dual SJA1000 CANbus controllers, isolated serial ports, and
two MultiTech Universal compatible sockets on a single PC/104 board design. This high density
communication board offers an all-in-one communication solution, optimizing Size, Weight, and
Performance (SWaP) requirements. This innovative product is an industry first, and takes full
advantage of the latest technologies in jumperless configuration, high voltage isolation and advanced
communication functionality.
The TCB1000 Series includes 2 galvanic isolated CANbus controllers with 2500V isolation protection
and advanced networking and configuration capabilities. The 4x RS232 Ports and 1x RS485 Port
features 2500V isolation protection and individual +5VDC isolated power supplies, thus providing less
noise and increased system protection.
With USB connectivity and jumperless setup, extended operating temperature, and versatile
options, Tri-M’s TCB1000 Series is your perfect choice for CANbus, serial, and wired or wireless
communication. To learn more and take advantage of this rugged and innovative design, please
contact us at 1-800-665-5600 or visit us at http://www.tri-m.com/products/trim/tcb1000.html.
Key Features
•
•
•
•
•
All-in-one PC/104 communication solution for CANbus, serial port, and wired and wireless communication (including optional GPS functionality)
High voltage (2500V) port isolation to reduce noise and increase system protection
Advanced CANbus functionality, such as socket network device operation, adding flexibility to your embedded system in order to reduce development time, cost, and installation setup
Jumperless configuration with secure lock, ensuring uniformity and maximizing system security
Extended operating temperature -40°C to +85°C (-40°F to 185°F), suited for outstanding performance and reliability in harsh environments
Optional Items
Tri-M offers the following options for the TCB1000 Series. For more information please visit us at
http://www.tri-m.com/products/trim/conformal.html or call 1.800.665.5600.
• Conformal Coating (Options - CS, CH, CH1, AND CU)
Ruggedized protection against the elements such as temperature (CS), fungal resistance
(CH), and humidity & chemical (CU)
TCB1000 Series
Rev 09/11
Page 5
Introduction
Specifications
Electrical
Supply Voltage
+5 VDC
Aux Port Output Current
200mA per Port
Aux Port Output Isolation
2500V maximum
Mechanical
Dimensions
PC/104 Compliant, 90mm x 96mm x 15mm
(3.55” x 3.775” x 0.6”)
Weight
52g (1.9oz)
Environment
Operating Temperature
-40°C to +85°C (-40°F to 185°F)
Communication
CANbus
2 x SJA1000 Controllers, 1Mbp/s maximum
RS232 4 x Isolated Ports, 921Kbp/s maximum
RS485
1 x Isolated Port, 921Kbp/s maximum
Universal MultiTech Sockets 2 x MultiTech Compatible Sockets, 921Kbp/s maximum
LED Indicators
5 x Isolated LED’s, built-in limiting resistors
USB/JTAG
1 x USB/JTAG port for easy installation setup
Certifications
Manufactured in
RoHS
compliant
ISO 9001:2008,
ISO 14001:2004 &
ANSI/ESD S20.20
Environments
TCB1000 Series
Rev 09/11
Page 6
Introduction
Block Diagram
PC/104 Bus
For a detailed block diagram, please see Appendix A.
Dual Isolated
CAN SJA1000
MCU &
Logic
Isolated RS232
Isolated RS485
Universal
MultiTech Slots
CAN
PORT 1
CAN
PORT 2
4x RS232
1x RS485
2x Universal
Sockets
USB JTAG TEMP
TCB1000 Series
Rev 09/11
Page 7
Introduction
Dimensions
Note
Dimensions are in mil (.001 inch) and millimeters (mm)
TCB1000 Series
Rev 09/11
Page 8
Introduction
Connector Diagram
CN12
CN7
CN10
CN13
CN3
CN4
CN9
CN5
CN11
CN8
CN6
CN1
CN2
Label
TCB1000 Series
Connector
Description
CN1
PC104 8-bit Bus
2x32 press-fit header
CN2
PC104 16-bit Bus
2x20 press-fit header
CN3
RS232 Port 1
2x5 right-angle shroud 0.1” pins
CN4
RS232 Port 2
2x5 right-angle shroud 0.1” pins
CN5
RS232 Port 3
2x5 right-angle shroud 0.1” pins
CN6
RS232 Port 4
2x5 right-angle shroud 0.1” pins
CN7
RS485 Port
2x5 right-angle shroud 0.1” pins
CN8
JTAG (TOP) / USB (BOTTOM)
2x5 right-angle 0.1” pins (2) (Top/Bottom)
CN9
5 Isolated LED’s
2x5 right-angle shroud 0.1” pins
CN10
SOCKET PORT 1
Supports Tri-M and Universal MultiTech Modules
CN11
SOCKET PORT 2
Supports Tri-M and Universal MultiTech Modules
CN12
CAN BUS 1
2x5 right-angle shroud 0.1” pins
CN13
CAN BUS 2
2x5 right-angle shroud 0.1” pins
Rev 09/11
Page 9
Connectors
Connector Specifications
The following sections describe the mechanical and pinout specifications. For configuration and setup
information, please see the Configuration section.
PC/104 8-bit Bus (CN1)
CN1 is a PC/104 ISA 8-bit bus with pass-through connectors. Tri-M also accommodates non-passthrough and non-PC/104 compliant customizations.
CN1
B1
B32
A32
TOP VIEW
PC/104 8-bit Connector (CN1)
Pin
Signal
Pin
Signal
Pin
Signal
Pin
Signal
A1
/IOCHCK
B1
GND
A17
SA14
B17
/DACK1
A2
SD7
B2
RESETDRV
A18
SA13
B18
DRQ1
A3
SD6
B3
+5V
A19
SA12
B19
/REFRESH
A4
SD5
B4
IRQ9
A20
SA11
B20
SYSCLK
A5
SD4
A6
SD3
B5
-5V
A21
SA10
B21
IRQ7
B6
DRQ2
A22
SA9
B22
N/A
A7
SD2
B7
-12V
A23
SA8
B23
IRQ5
A8
SD1
B8
/0WS
A24
SA7
B24
IRQ4
A9
SD0
B9
+12V
A25
SA6
B25
IRQ3
A10
IOCHRDY
B10
GND
A26
SA5
B26
/DACK2
A11
AEN
B11
/SMEMW
A27
SA4
B27
TC
A12
SA19
B12
/SMEMR
A28
SA3
B28
BALE
A13
SA18
B13
/IOW
A29
SA2
B29
+5V
A14
SA17
B14
/IOR
A30
SA1
B30
OSC
A15
SA16
B15
DACK3
A31
SA0
B31
GND
A16
SA15
B16
DRQ3
A32
GND
B32
GND
TCB1000 Series
Rev 09/11
Page 10
Connectors
PC/104 16-bit Bus (CN2)
CN2 is a 16-bit bus with pass-through connectors. Tri-M also accommodates non-pass-through and
non-PC/104 compliant customizations.
CN2
C0
DO
C19
D19
TOP SIDE
Pin
TCB1000 Series
PC/104 16-bit Connector (CN2)
Signal
Pin
Signal
C0
GND
D0
GND
C1
/SBHE
D1
/MEMCS16
C2
LA23
D2
/IOCS16
C3
LA22
D3
IRQ10
C4
LA21
D4
IRQ11
C5
LA20
D5
IRQ12
C6
LA19
D6
IRQ15
C7
LA18
D7
IRQ14
C8
LA17
D8
/DACK0
C9
/MEMR
D9
DRQ0
C10
/MEMW
D10
/DACK5
C11
SD8
D11
DRQ5
C12
SD9
D12
/DACK6
C13
SD10
D13
DRQ6
C14
SD11
D14
/DACK7
C15
SD12
D15
DRQ7
C16
SD13
D16
+5V
C17
SD14
D17
/MASTER
C18
SD15
D18
GND
C19
GND
D19
GND
Rev 09/11
Page 11
Connectors
RS232 Ports (CN3, CN4, CN5, CN6)
CN3 to CN6 are the RS232 Ports 1 to 4. These ports are galvanic isolated up to 2500V and have a
maximum baud rate of 921Kbp/s. These isolated ports reduce noise and increases system protection.
The pin spacing is 2.54mm (0.1”).
RS232
PORT 3
RS232
PORT 4
1
1
1
1
RS232
PORT 4
RS232
PORT 3
TOP VIEW
RS232
Port 4
CN6
1 9
RS232
Port 3
CN5
1
RS232
Port 2
CN4
1 9
RS232
Port 1
CN3
1
100mil (2.54mm)
10
2
PCB
SIDE VIEW
RS232 Ports 1 to 4 (CN3, CN4, CN5, CN6)
Top
Bottom
Pin
Signal
Pin
Signal
1
NC
2
NC
3
RX
4
RTS
5
TX
6
CTS
7
NC
8
NC
9
GNDISO
10
VCC5VISO
Note
GNDISO and VCC5VISO are independently isolated
TCB1000 Series
Rev 09/11
Page 12
Connectors
RS485 Port (CN7)
CN7 is the RS485 Port. This port is galvanic isolated up to 2500V and has a maximum baud rate of
921Kbp/s. The port isolation reduces noise and increases system protection. The port also features
a terminating 120Ω resistor setting which can be set to open or closed. Please see the Configuration
section for more details. The pin spacing is 2.54mm(0.1”).
1
RS485
PORT 5
RS485 Port
CN7
1
9
100mil (2.54mm)
10
2
PCB
SIDE VIEW
RS485 Port (CN7)
Top
Bottom
Pin
Signal
Pin
Signal
1
NC
2
NC
3
RX+
4
TX+
5
TX-
6
RX-
7
NC
8
Z120Ω Enable
9
GNDISO
10
VCC5VISO
Note
The software configuration command ‘RSZ’ will take precedence when set.
Please see the Configuration section for more details.
TCB1000 Series
Rev 09/11
Page 13
Connectors
JTAG Port (CN8 Top)
CN8 is the JTAG and USB Port comprised of two 1x5 headers. The top side of CN8 is the JTAG Port.
It provides programming and debugging capabilities for the CPLD. The pin spacing is 2.54mm(0.1”).
Note
This port is for
factory use only.
1
JTAG/
USB PORT
Top VIEW
JTAG/USB
Port CN8
5
1
JTAG
USB
JTAG Port (CN8)
Pin
Signal
100mil (2.54mm)
2
PCB
1
VCC3V3
3
TMS
5
TCK
7
TDI
9
TDO
SIDE VIEW
USB Port (CN8 Bottom)
The bottom side of CN8 is the USB Port, used to setup and configure the TCB1000. For configuration
details, please see the Configuration section. The pin spacing is 2.54mm(0.1”).
JTAG
USB
J TA G / U S B
Port CN8
1
USB Port (CN8)
Pin
Signal
100mil (2.54mm)
10
2
PCB
SIDE VIEW
TCB1000 Series
Rev 09/11
2
VCCUSB
4
D-
6
D+
8
GND
10
ISP
Page 14
Connectors
LED Port (CN9)
CN9 are the 5 LED Ports. These ports monitor the 4x RS232 and 1x RS485 signals. They are
independently isolated up to 2500V, and do not require any limiting resistors, allowing you to directly
connect an LED to the port. To configure the LED’s, please see the Configuration section. The pin
spacing is 2.54mm(0.1”).
1
LED
PORT
Top VIEW
LED Port
CN9
Note
+ is the Anode, and
- is the Cathode
9
10
-----
1
100mil (2.54mm)
+ + + + +2
PCB
SIDE VIEW
LED Port (CN9)
Top
Bottom
Pin
Signal
Pin
Signal
LED1
1
LED-
2
LED+
LED2
3
LED-
4
LED+
LED3
5
LED-
6
LED+
LED4
7
LED-
8
LED+
LED5
9
LED-
10
LED+
Note
LED- and LED+ are independently isolated
TCB1000 Series
Rev 09/11
Page 15
Connectors
Universal MultiTech Sockets (CN10, CN11)
There are two Universal MultiTech compatible sockets capable of serial and wireless or wired
communication. Tri-M developed its own GPS module and provides a variety of socket modules
including Ethernet, CDMA, GSM, GPRS, Wi-Fi and Bluetooth. For specific product information,
please visit http://www.tri-m.com/products/multitech/.
CN10
SOCKET 1
CN11
SOCKET 2
Top VIEW
(I/O)Tip
(I/O) Ring
Safety Void
(O) TX+
(O) TX(I) RX+
(I) RXSafety Void
(O) TCLK
(O) RCLK
(I) MIC+
(I) MIC(I) -RESET
(I) USB_VBUS
(I) GND
(I/O) USB_DP
(I/O) USB_DN
(O) LED DCD
(O) LED RX
(O) LED DTR
(O) LED TX
TCB1000 Series
1
2
3
4
5
6
7
8
9
10
11
12
13
14
15
16
17
18
19
20
21
22
23
24
25
26
27
28
29
30
31
32
MultiTech
Universal Socket
Rev 09/11
64
63
62
61
60
59
58
57
56
55
54
53
52
51
50
49
48
47
46
45
44
43
42
41
40
39
38
37
36
35
34
33
SPKR (O)
GND (I)
MICV (I)
VCC (I)
-LED SPD (O)
-LED COL (O)
-LED LINK (O)
-LEC ACT (O)
-LED FDX (O)
GPIO (I/O)
GPIO (I/O)
GPIO (I/O)
GPIO (I/O)
SPK+ (O)
SPK- (O)
GND (I)
-DTR (I)
-DCD (O)
-CTS (O)
-DSR (O)
-RI (O)
-TXD (I)
-RXD (O)
-RTS (I)
Page 16
Connectors
CAN BUS (CN12, CN13)
There are two NXP SJA1000 Controller Area Network (CAN) controllers providing up to 2500V
channel isolation and high input impedance for maximum protection in harsh environments. They are
configurable for BasicCAN and PeliCAN. The pin spacing is 2.54mm(0.1”).
The CAN transceiver has thermal shutdown protection, maximum speeds up to 1 Mb/s, and slope
control for EMI protection. It has a jumperless impedance setting, and unpowered nodes do not
disturb the bus resulting in secure and reliable network signaling. Another great feature is the
flexibility to access the CAN as a socket network device. To configure the CANbus, please see the
Configuration section.
1
1
CAN
PORT 1
CAN
PORT 2
TOP VIEW
CAN 2
CN13
9
1 9
CAN 1
CN12
1
100mil (2.54mm)
10
2
PCB
SIDE VIEW
CAN BUS (CN12, CN13)
Top
Bottom
Pin
Signal
Pin
Signal
1
N.C.
2
GND ISO
3
CAN-
4
CAN+
5
GND ISO
6
LOAD ON
7
LOAD T
8
+5VDC ISO
9
N.C.
10
N.C.
Note
To enable Z, connect LOAD T and LOAD ON
TCB1000 Series
Rev 09/11
Page 17
Configuration
Configuration Overview
The configuration setup uses a state of the art jumperless embedded design. This gives you quick
and easy remote and direct access to the board without having to dissemble and reassemble your
stack. The jumperless design is also a key element for ruggedization and protection for shock and
vibration. The TCB also features a configuration lock to secure your settings from undesirable
changes. There are two methods to configure the TCB1000: Command-line and Mass-Storage.
Command-line Configuration Setup
You can access the TCB’s Serial Port 8 remotely or directly by connecting a USB cable. Connecting
remotely involves identifying and accessing the COM port using a ‘terminal’ command-line
application. Connecting directly entails configuring the USB cable in CDC (communication device
class) mode, thus enabling a USB Virtual COM Port. You can then use a ‘terminal’ application to
configure the device.
TCB1000 directly accessed using a USB Cable as a Virtual COM Port
TCB1000
(Powered)
USB Cable
USB Virtual COM Port
Terminal Command-Line Application
TCB1000 remotely accessed via a Stack
TCB1000
(Powered
in a Stack)
Monitor connected to the Stack
Terminal Command-Line Application
Note
If you lock your configuration settings, they can only be unlocked using the USB Virtual COM in CDC mode
TCB1000 Series
Rev 09/11
Page 18
Configuration
Mass-Storage Configuration Setup
Once you have determined your configuration settings using the Command-line method, you can
lock your settings and export them into a ‘config.txt’ file. Using the USB cable in MSC (mass-storage
device class) mode, you can ‘drag and drop’ your configuration profile to and from the device.
Note that the TCB1000 does not need power in MSC mode, adding greater flexibility and ease in
configuring your device.
TCB1000 configured as a Mass-Storage device
TCB1000
(Powered or
Unpowered)
USB Cable
Configured as USB Mass Storage
Drag and Drop
Note
You do not need to power the board when connecting the USB cable for Mass-Storage
mode, and it may take up to 25 seconds to identify and mount the device (NXP LPC1342).
!
TCB1000 Series
CAUTION
Although the device is recognized as a Mass-Storage device, space in limited,
approximately 4kb. The intended use is strictly for storing the configuration file, config.
txt. The Mass-Storage memory should not be used for any other purposes as if there any
other files are present, they will be lost when the system power cycles.
Rev 09/11
Page 19
Configuration
Command-line Configuration
Once you have established connection with Serial Port 8, either directly or remotely (see the
Configuration Overview section), you can use a ‘terminal’ command-line application to read and write
values. The following sections describe the read and write commands.
UART 1
These commands allow you to configure UART1 which controls the RS232 Ports 1 to 4.
Note
Read Command
Description
SER?
Displays the addresses and IRQ’s used by UART1 and UART2
U1?
Displays the addresses and IRQ’s used by UART1
U1P?
Displays the addresses used by UART1
U1P1?
Displays the address used by UART1 Port 1 (RS232 Port 1)
U1P2?
Displays the address used by UART1 Port 2 (RS232 Port 2)
U1P3?
Displays the address used by UART1 Port 3 (RS232 Port 3)
U1P4?
Displays the address used by UART1 Port 4 (RS232 Port 4)
U1I?
Displays the IRQ used by UART1
U1I1?
Displays the IRQ used by UART1 Port 1 (RS232 Port 1)
U1I2?
Displays the IRQ used by UART1 Port 2 (RS232 Port 2)
U1I3?
Displays the IRQ used by UART1 Port 3 (RS232 Port 3)
U1I4?
Displays the IRQ used by UART1 Port 4 (RS232 Port 4)
To enter a Read
Command using a
terminal command-line
application, type exactly
what is in the column. For
instance, type SER?, then
press the Enter key to
return the value.
Write Command
Value
Default
Description
U1P=
ADDRESS
(in Hexadecimal)
0x100
Assign a base address to UART1. The value should represent the
real 10bits value as it will be masked with 0x3E0. The
ADDRESS RANGE is from 0x100 to 0x3E0 by steps of 0x20. For
instance, 0x100, 0x120...0x3E0, 0x3C0, 0x3E0.
U1I=
IRQ
5
Assign an IRQ (5,6,7,9,10,11,12,15)
Note
ADDRESS values are encoded and must be entered in hexadecimal. IRQ values are in decimal. All other values are
NUMERICAL, UPPER CASE.
TCB1000 Series
Rev 09/11
Page 20
Configuration
UART 2
These commands allow you to configure UART2 which controls the RS485 Port, Socket Modem 1,
Socket Modem 2, and CPU.
Note
Read Command
Description
SER?
Displays the addresses and IRQ’s used by UART1 and UART2
U2?
Displays the addresses and IRQ used by UART2
U2P?
Displays the addresses used by UART2
U2P1?
Displays the address used by UART2 Port 1 (RS485 port)
U2P2?
Displays the address used by UART2 Port 2 (Socket 1)
U2P3?
Displays the address used by UART2 Port 3 (Socket 2)
U2P4?
Displays the address used by UART1 Port 4 (CPU)
U2I?
Displays the IRQ used by UART2
U2I1?
Displays the IRQ used by UART2 Port 1 (RS485 port)
U2I2?
Displays the IRQ used by UART2 Port 2 (Socket 1)
U2I3?
Displays the IRQ used by UART2 Port 3 (Socket 2)
U2I4?
Displays the IRQ used by UART1 Port 4 (CPU)
Write Commands do not
immediately take effect
until you enter the UPD
(update) command or
reboot the device. The
configuration settings
are then saved to config.
txt located on the Mass
Storage device.
Write Command
Value
Default
Description
U2P=
ADDRESS
(in Hexadecimal)
0x200
Assign a base address to UART2. The value should represent the
real 10bits value as it will be masked with 0x3E0. The
ADDRESS RANGE is from 0x200 to 0x3E0 by steps of 0x20. For
instance, 0x100, 0x120...0x3E0, 0x3C0, 0x3E0.
U2I=
IRQ
5
Assign an IRQ (5,6,7,9,10,11,12,15)
Note
If you enter an invalid Value, an ‘unrecognized value’ message will appear and the default value will be used instead.
UART CLOCK DIVIDER
These commands allows you to assign a divider value for the UART Clock (f=14.7456MHz).
Read Command
UCD?
Description
Displays the value of the divider for the UART Clock
Write Command
Value
Default
Description
UCD=
1, 2, 4 or 8
1
Assigns a value to the divider for the UART Clock (f=14.7456MHz).
For instance, if UCD=1, then the UART Clock will be 14.7456MHz; if
UCD=2, then f=7.3728MHz; if UCD=4, then f=3.6864MHz; if UCD=8,
then f=1.8432MHz.
TCB1000 Series
Rev 09/11
Page 21
Configuration
Serial Port Enable/Disable
These commands allow you to enable or disable the 4 RS232 Ports and RS485 Port. You can also
assign Serial Port 8 to be connected to the CPU or GPIO pins on the Universal Socket 2. Note that
disabling the ports will also affect the power of the LED’s.
Read Command
Description
RS1?
Displays the Enable/Disable status of Serial Port 1 (RS232 Port 1)
RS2?
Displays the Enable/Disable status of Serial Port 2 (RS232 Port 2)
RS3?
Displays the Enable/Disable status of Serial Port 3 (RS232 Port 3)
RS4?
Displays the Enable/Disable status of Serial Port 4 (RS232 Port 4)
RS5?
Displays the Enable/Disable status of Serial Port 5 (RS485 Port)
RS8?
Displays whether the CPU or Socket 2 is connected to Serial Port 8 (UART 2 Port 4)
RSZ?
Displays the Terminated/Open status of Serial Port 5 (RS485 port)
Write Command
Value
Default
Description
RS1=
E or D
E
Enable or disable Serial Port 1 (RS232 Port 1)
RS2=
E or D
E
Enable or disable Serial Port 2 (RS232 Port 2)
RS3=
E or D
E
Enable or disable Serial Port 3 (RS232 Port 3)
RS4=
E or D
E
Enable or disable Serial Port 4 (RS232 Port 4)
RS5=
E or D
E
Enable or disable Serial Port 5 (RS485 Port)
RS8=
C or S
C
Assigns the CPU or Socket 2 to be connected to Serial Port 8
RSZ=
T or O
O
Connect (T) / disconnect (O) the Serial Port 5 termination (RS485 Port)
DSR
These commands allow you to configure the DSR signal to the DTR for the 4 RS232 Ports and the
RS485 Port.
Read Command
Description
DSR1?
Displays the Connect/Disconnect DSR signal of Serial Port 1 (RS232 Port 1) to DTR
DSR2?
Displays the Connect/Disconnect DSR signal of Serial Port 2 (RS232 Port 2) to DTR
DSR3?
Displays the Connect/Disconnect DSR signal of Serial Port 3 (RS232 Port 3) to DTR
DSR4?
Displays the Connect/Disconnect DSR signal of Serial Port 4 (RS232 Port 4) to DTR
DSR5?
Displays the Connect/Disconnect DSR signal of Serial Port 5 (RS485 Port) to DTR
Write Command
Value
Default
Description
DSR1=
C or D
D
Connect/Disconnect the DSR signal of Serial Port 1 (RS232 Port 1) to DTR
DSR2=
C or D
D
Connect/Disconnect the DSR signal of Serial Port 2 (RS232 Port 2) to DTR
DSR3=
C or D
D
Connect/Disconnect the DSR signal of Serial Port 3 (RS232 Port 3) to DTR
DSR4=
C or D
D
Connect/Disconnect the DSR signal of Serial Port 4 (RS232 Port 4) to DTR
DSR5=
C or D
D
Connect/Disconnect the DSR signal of Serial Port 5 (RS485 Port) to DTR
TCB1000 Series
Rev 09/11
Page 22
Configuration
RS485
These commands allow you to configure the RS485 Transmit & Receive lines.
Read Command
Description
TXI?
Displays the TXDI connection (RS485 Transmit line),TXD or GND
TXE?
Displays the TXDE connection (RS485 Transmit enable), RTS or GND
RXE?
Displays the RXDE connection (RS485 Receive enable) ALWAYS or when not transmitting (!TXDE)
CTS?
Displays the connection of Serial Port 5 (RS485), RTS or CONTROLLED (by the CPU)
DLY?
Displays the controlled delay assigned to the CTS of Serial Port 5 (RS485) in milliseconds
Write Command
Value
Default
Description
TXI=
T or G
T
Assigns the TXDI connection (RS485 Transmit line) to TXD or GND
TXE=
R or T
R
Assigns the TXDE connection (RS485 Transmit enable) to RTS or GND
RXE=
A or T
A
Assigns the RXDE connection (RS485 Receive enable) to ALWAYS or
when not transmitting (!TXDE)
CTS=
R or C
R
Assigns the connection of Serial Port 5 (RS485) to RTS or
CONTROLLED (by the CPU)
DLY=
Time(ms)
100
Assign the controlled delay assigned to CTS of Serial Port 5 (RS485).
The range is from 0-200ms. For instance, DLY=200, means that there will
be a delay for 200ms.
SOCKET RESET
These commands allow you to manually reset Socket 1 or Socket 2.
Read Command
Description
S1R?
Displays the Reset status of Socket 1, Yes or No
S2R?
Displays the Reset status of Socket 2, Yes or No
Write Command
Value
Default
S1R=
Y or N
N
Manually resets Socket 1
Description
S2R=
Y or N
N
Manually resets Socket 2
Note
If the socket is reset, S1R=Y, it will remain in reset mode until S1R=N is entered.
TCB1000 Series
Rev 09/11
Page 23
Configuration
CAN MODE
These commands allow you to configure the CANbus for BASIC or PeliCAN, PORTIO or MEMIO, and
assign the same IRQ for both CAN controllers.
Read Command
Description
CI?
Displays the IRQ for both CAN controllers
CD?
Displays the CAN address PORTIO or MEMIO decoding
CM?
Displays the CAN mode of BASIC or PeliCAN
Write Command
Value
Default
Description
CI=
IRQ
10
Assigns an IRQ (5,6,7,9,10,11,12,15) for both CAN controllers
CD=
P or M
P
Assigns the CAN address decoding to PORTIO or MEMIO
CM=
B or P
P
Assigns the CAN mode to BASIC or PeliCAN
Note
If the address is encoded on 20bits the IOMEM bit is set. If the address
is encoded on 16bits or less the IOMEM bit is cleared.
CAN 1
These commands allow you to configure the IRQ, addresses, and slew rate for CAN controller 1.
Read Command
Description
CAN?
Displays the address and IRQ for both CAN controllers
C1?
Displays the address and IRQ used by CAN controller 1
C1P?
Displays the address used by CAN controller 1
C1I?
Displays IRQ used by CAN controller 1
C1S?
Displays the Slew Rate for CAN controller 1, FAST or SLOW
Write Command
CP=
Value
Default
Description
ADDRESS 0x600(1) Assigns the base address for both CAN controllers.
C1I=
IRQ
10
Assigns an IRQ (5,6,7,9,10,11,12,15) to CAN controller 1
C1S=
F or S
F
Assigns the Slew Rate for CAN controller 1, FAST or SLOW
Note
If BASIC CAN: CAN2 address= CAN1 address + 0x20, if PeliCAN
CAN2 address= CAN1 address + 0x80
TCB1000 Series
Rev 09/11
Page 24
Configuration
CAN 2
These commands allow you to configure the IRQ, addresses, and slew rate for the CAN controller 2.
Read Command
CAN?
C2?
Description
Displays the address and IRQ used by both CAN controllers
Displays the address and IRQ used by CAN controller 2
C2P?
Displays the address used by the CAN controller 2
C2I?
Displays IRQ used by the CAN controller 2
C2S?
Displays the Slew Rate for CAN controller 2, FAST or SLOW
Write Command
CP=
Value
Default
Description
ADDRESS 0x600(2) Assigns the base address for both CAN controllers
C1I=
IRQ
5
Assigns an IRQ (5,6,7,9,10,11,12,15) to CAN controller 2
C1S=
F or S
F
Assigns the Slew Rate for CAN controller 2, FAST or SLOW
Note
If BASIC CAN: CAN2 address= CAN1 address + 0x20, if PeliCAN
CAN2 address= CAN1 address + 0x80
HEART BEAT
These commands allow you to assign a Heart Beat frequency (in deci-Hertz, 1/10Hz) and duty cycle.
Read Command
Description
HBF?
Displays the Heart Beat frequency in dHz
HBD?
Displays the Heart Beat duty cycle in %
Write Command
Value
Default
Description
HBF=
FREQUENCY
10
Assigns the Heart Beat frequency in dHz, 0-99
HBD=
DUTY CYCLE
50
Assigns assign the Heart Beat duty cycle in %, 0-99
TEMP
These commands allow you to configure the on-board low and high limits in Kelvin.
Read Command
Description
TRD?
Returns the current on-board temperature reading in Kelvin
TAL?
Returns the temperature low limit in Kelvin
TAH?
Returns the temperature high limit in Kelvin
Write Command
Value
Default
TAL=
TEMPERATURE
233
Assigns the low limit temperature in Kelvin, 0-999
TAH=
TEMPERATURE
358
Assigns the high limit temperature in Kelvin, 0-999
TCB1000 Series
Description
Rev 09/11
Page 25
Configuration
ALARM MESSAGE
These commands allow you to set the frequency of the alarm message in seconds(s).
Read Command
AMF?
Description
Displays the frequency of the Alarm Message in seconds(s)
Write Command
Value
Default
AMF=
TIME
60s
Description
Assigns the frequency of the Alarm Message in seconds(s), 0-60
CONFIG
These commands allow you to view the configuration settings. In addition, you can apply changes,
save/load the configuration profile (Config.txt) and lock any changes.
Read Command
Displays the entire configuration settings
VER?
Displays the firmware version, revision and build
HLP?
Displays a list of all the Read and Write Commands
Write Command
!
Description
CFG?
Description
UPD
Applies all the Write Commands entered while the system in running
STD
Saves the configuration profile, Config.txt, located on the device, when in the Mass-Storage mode
RLD
Loads the configuration profile, Config.txt, located on the device, when in the Mass-Storage mode
LCK
Locks and prevents any configuration changes to the device
CAUTION
Locked configuration settings can only be unlocked by accessing Serial Port 8 from a USB Virtual COM (USB in CDC mode).
TCB1000 Series
Rev 09/11
Page 26
Appendix A - Detailed Block Diagram
Control
Quad UART
16CSS4
Quad UART
16CSS4
RS232 Port 2
RS232
Isolated
RS232 Port 3
RS232
Isolated
RS232 Port 4
RS485/J1708
Isolated
RS485 Port
Multitech
Universal 1
IRQ
CS
PC/104 Bus
Data
RS232
Isolated
IRQ
Control
RS232 Port 1
Clock
CS
Data
RS232
Isolated
Multitech
Universal 2
Data
Socket 1
Socket 2
IRQ
Addresses
Addr/Data
Control
CPLD
Control
SJA1000
CAN CONTROLLER
ADM3053
ISOLATED
CAN CONTROLLER
CAN
PORT 1
SJA1000
CAN CONTROLLER
ADM3053
ISOLATED
CAN CONTROLLER
CAN
PORT 2
IRQ
IRQ
GPIO
JTAG
SPI
Control
MCU
LPC1342
ISOLATION
I2C
5xLEDs
JTAG PORT
USB
TEMP
14.7456 Mhz
OSCLTR
Note
For technical reference only
TCB1000 Series
Rev 09/11
Page 27