1
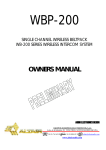
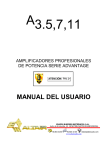
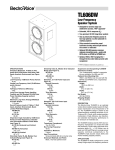
CC224
OPTIONAL CROSSOVER CARD FOR
PROFESSIONAL POWER AMPLIFIERS
ADVANTAGE SERIES
OWNERS MANUAL
EQUIPOS EUROPEOS ELECTRÓNICOS, S.A.L
Avda. de la Industria, 50. 28760 TRES CANTOS-MADRID (SPAIN).
34-91-804 32 65
34-91-804 43 58
www.altairaudio.com
[email protected]
OPTIONAL CROSSOVER CARD ADVANTAGE SERIES
2
CONTENTS
1. INTRODUCTION
2. OPERATION
3. CONFIGURATION AND INSTALLATION
PLACING A CROSSOVER CARD
RELEVANT FREQUENCY CONFIGURATION
CROSSOVER CARD OUTPUTS CONFIGURATION
EQUALIZER CARD
EQUALIZER CARD CONFIGURATION
GAIN CALCULATION
FILTER FREQUENCY CALCULATION
BANDWIDTH CALCULATION (Q)
BAND GAIN VARIATION
NON-STANDARD CONFIGURATION EXAMPLES
PLACING AN EQUALIZER CARD
4. BLOCK DIAGRAM
5. CONFIGURATION EXAMPLES
TWO MONO WAYS CONFIGURATION
TWO STEREO WAYS PLUS SUBWOOFER CONFIGURATION
TREE STEREO WAYS CONFIGURATION
6. WARRANTY
3
3
4
5
5
8
8
9
9
10
11
12
13
13
14
15
15
15
17
19
OPTIONAL CROSSOVER CARD ADVANTAGE SERIES
1.
3
INTRODUCTION
The optional crossover card, allow us to achieve a multiamp system with two or more ways, with an
equalization point (optional) per way. The crossover card has two filters, one high-pass and another low-pass
with a slope of 24 dB/octave LINKWITZ-RILEY type.
The relevant frequency is selectable between 50 and 750 Hz is steps of 50 Hz and between 750 Hz and
3750 Hz is steps of 250 Hz how will talk later on in special operations.
The crossover card provide two XLR-3-32 outputs with the two filters output (HIGH - high pass and LOW - low
pass), this allow us carry out the signal to others power amplifiers without install others crossover cards, or to
realise a system with more ways, inserting the output signal to other power amplifier with the crossover card
installing with other relevant frequency.
2. OPERATION
The outputs are unbalanced, the hot correspond to the pin 2 and the pin 1 and 3 are ground.
The next table show the output pins correspondence:
OUTPUT XLR-3-32
PIN 1
PIN2
PIN3
GROUND
HOT (+)
GROUND
The signal insert in the crossover card, always correspond to the channel 1, by this the input have to
insert by the CH1 XLR-3-31 connector, except for the full range configuration, where each channel get the signal
from his correspondent input.
The crossover card signal insert in each power amplifier channel, can be configured with the input select
switches, one per channel. The next table shows the configuration possibilities:
CONFIGURATION
CH1 -> LOW
CH2 -> LOW
CH1 -> LOW
CH2 -> HIGH
INPUT SELECT SWITCHS
OPTIONAL CROSSOVER CARD ADVANTAGE SERIES
CONFIGURATION
4
INPUT SELECT SWITCHS
CH1 -> HIGH
CH2 -> LOW
CH1 -> HIGH
CH2 -> HIGH
CH1 -> FULL RANGE
CH2 -> LOW
CH1 -> FULL RANGE
CH2 -> HIGH
CH1 -> LOW
CH2 -> FULL RANGE
CH1 -> HIGH
CH2 -> FULL RANGE
CH1 -> FULL RANGE
CH2 -> FULL RANGE
3. CONFIGURATION AND INSTALLATION
In order to install and/or setup the optional crossover card, the power amplifier advantage series must
be open, removing the nine screws of their top cover.
NOTE: This type of operations, takes place with the unit open, because of what should be carried out by
qualified technical personal.
WARNING: Before opening the unit, disconnect it of the mains. It is important mark that although the unit is
turned off (with the power switch at position 0), if it continues connected to the mains there is different parts of
the unit that are subjected to high tension.
CAUTION: Don't subject the crossover unit to rain or humidity, above all if it is open. If it comes to produce,
disconnect it of the mains and warns a qualified technical service.
The optional crossover card (ALTAIR -083) is placed at the left of rear panel (as you face the front panel),
OPTIONAL CROSSOVER CARD ADVANTAGE SERIES
5
PLACING A CROSSOVER CARD
With the power amplifier top cover removed, remove the blind plate screws placed at the left side of the
power amplifier rear panel (as you face the front panel),
Place the optional crossover card (ALTAIR -083) with its correspond plate instead of the blind plate, with
the components side top view and its two screws.
Disconnect the bus cable from the bus J3 connector (POTs + LEDs) of the driver board (DRIVER A5/A11
ALTAIR -081) and connect the bus cable associated with the J1 connector (TO DRIVER) of the crossover card
(ALTAIR -083) in the J3 connector (POTs + LEDs) of the driver board (DRIVER A5/A11 ALTAIR -081).
Connect the removed bus cable of the J3 connector (POTs + LEDs) of the driver board (DRIVER A5/A11
ALTIAR -081) to the J2 connector (TO POTs) of the crossover card (ALTAIR -083).
In this moment the optional crossover card is installed in the power amplifier.
RELEVANT FREQUENCY CONFIGURATION
The relevant frequency is selectable by 50Hz steps between 50 and 750 Hz and by 250Hz steps
between 750 Hz and 3750.
The crossover card (ALTAIR -083) frequency adjust takes place by means of the switches S1, S2, S3, S4
and S5
If the switches S2, S3, S4 and S5 are in the ON position (the switch towards the left, as you face the
front panel of the power amplifier), add its relative value S2 -> 50 Hz, S3 -> 100 Hz, S4 -> 200 Hz y S5 -> 400
Hz to the relevant frequency, on the other hand if its are in the OFF position don't add its relative value.
The switch S1 in its ON position do nothing, and in its OFF position multiply the relevant frequency (the
value of the sum of S2, S3, S4 and S5) by 5. This give rise to the next possible frequency table:
S1
S1 -> ON
S1 -> OFF
POSSIBLE FREQUENCIES
50, 100, 150, 200, 250, 300, 350, 400, 450, 500, 550, 600, 650, 700, 750 Hz
1K, 1K25, 1K5, 1K75, 2K, 2K25, 2K5, 2K75, 3K, 3K25, 3K5, 3K75 Hz
OPTIONAL CROSSOVER CARD ADVANTAGE SERIES
6
Below there are two examples:
Switch in its ON position.
Switch in its OFF position.
In the previous example, the crossover card relevant frequency is configured to 350 Hz, since the
sum of the switches S2 (+50), S3 (+100) and S4 (+200) that are placed in its ON position is 350, and S1 is in
it ON position ON (x1).
S2 → +50
S3 → + 100
S4 → + 200
+350 x (S1 → x1) = 350 Hz.
In the previous example, the crossover card relevant frequency is configured to 2000 Hz, since
only S5 (+400) is in the ON position, the total sum is 400 Hz and S1 is in it OFF position (x5) because of this,
multiply by 5 the relevant frequency: 400x5 = 2000 Hz.
S4 → + 400
+ 400 x (S1 → x5) = 2000 Hz.
If we want to configure the crossover card with a relevant frequency that we can't obtain with the
switch configuration, we can use the resistor array socket RX to configure exactly the crossover card
relevant frequency. The formula that gives us the relevant frequency is the next:
NOTE: The RX value must be include between the next values:
150KΩ (maximum) y 2KΩ (minimum).
RX ( KΩ) =
4.000
Fc
OPTIONAL CROSSOVER CARD ADVANTAGE SERIES
7
In order to insert a resistor array in the crossover card, you make coincide the dot that has the resistor
array in a lateral, with the dot placed in the frequency card components picture, and locating the pins of the
resistor array over the socket, push down.
THE DOTS
MUST BE FACED
RESISTOR
ARRAY
RESISTOR ARRAY
SOCKET
Sometimes it won't be possible to find a resistor array of a certain value. If this occurs, it is possible
substitute the resistor array by discrete resistors, all of the same value locating them according to show the
next picture:
DISCRETE
RESISTORS
RESISTOR ARRAY
SOCKET
In the resistor array configuration, the switches S1, S2, S3, S4 y S5 make the same addition (S2, S3, S4
and S5) and multiplication (S1) function that in the previous configurations without resistor array.
If the switches S2, S3, S4 and S5 are in the ON position (the switch towards the left, as you face the
front panel of the power amplifier), add its relative value S2 -> 50 Hz, S3 -> 100 Hz, S4 -> 200 Hz y S5 -> 400
Hz to the relevant frequency, on the other hand if its are in the OFF position don't add its relative value.
The switch S1 in its ON position do nothing, and in its OFF position multiply the relevant frequency (the
value of the sum of S2, S3, S4 and S5) by 5.
Below there are two examples:
In the previous example, the crossover card relevant frequency is configured to 372 Hz, since the
sum of the switches S2 (+50), S3 (+100) and S4 (+200) that are placed in its ON position is 350, plus the
resistor array RX of 180KΩ (22Hz) and S1 is in it ON position ON (x1).
OPTIONAL CROSSOVER CARD ADVANTAGE SERIES
8
S2 → +50
S3 → + 100
S4 → + 200
RX → + 22
→ RX = 4000/22 = 180 KΩ
+372 x (S1 → x1) = 372 Hz.
In the previous example, the crossover card relevant frequency is configured to 2550 Hz,
since only S5 (+400) is in the ON position, plus the resistor array RX of 36KΩ (110Hz) the total sum is 510
Hz and S1 is in it OFF position (x5) because of this, multiply by 5 the relevant frequency: 510x5 = 2550 Hz.
S4 → + 400
RX → + 110
→ RX = 4000/110 = 36 KΩ
+510 x (S1 → x5) = 2550 Hz.
CONFIGURACIÓN DE LAS SALIDAS DE LA TARJETA DE CROSSOVER
The male XLR-3-32 outputs HIGH (high pass) and LOW (low pass) of the crossover card, can be
configured pre or post equalizer card.
For the LOW output (low pass), is available two resistors R36 and R37. If we place a 100Ω resistor
into R36 and don't place R37, the equalization will not affect to the LOW output, and on the other hand,
we place a 100Ω resistor into R37 and don't place R36, the equalization will affect to the LOW output.
For the HIGH output (high pass), is available two resistors R38 and R39. If we place a 100Ω resistor
into R38 and don't place R39, the equalization will not affect to the HIGH output, and on the other hand,
we place a 100Ω resistor into R39 and don't place R38, the equalization will affect to the HIGH output.
EQUALIZER CARD
It is available an equalizer card as option, that has a point of parametric equalization, because of
it has the three parameters of an equalization point adjustable: gain, frequency and Q (bandwidth). Each
filter of the crossover card (High pass and Low pass) has a connector to place an optional equalizer card.
OPTIONAL CROSSOVER CARD ADVANTAGE SERIES
The LOW pass filter has the J4 connector, and the HIGH pass filter have the J3
connector to place the optional equalizer card.
If any of these connectors doesn't have an equalizer card, this filter should
have a jumper in the connector as you can see in the next picture, since of if this filter
doesn't have this jumper, the signal would remain off and therefore that way
wouldn't work. Keep in mind this circumstance whenever you change, update or
place for the first time an equalizer card. Of course in order to insert the equalizer
card, you should remove the connector jumper in which you want to place the
equalizer card.
As seen in the equalizer card component overlay, the jumper goes placed
beside an indication. It is important notice well where the jumper goes located,
because place it in other location could cause a short circuit in the power supply,
and cause the crossover card and/or the power amplifier break.
9
COMPONENTS
OVERLAY
INDICATION
JUMPER
EQUALIZER CARD CONFIGURATION:
The next picture shows the component overlay of an equalizer card. As seen in the picture, there
are 6 resistors called RG+, RG-, RQ, RQ,' RF and RF'. This resistors define the gain (RG+ or RG-), the
bandwidth (RQ and RQ') and the center frequency (RF and RF') of the equalization point:
Before adjusting a equalizer card, you should decide the gain, bandwidth and center frequency
that you want to implement, for this could use a parametric equalizer or a graphic equalizer and the
results will be verified with a spectrum analyzer. The use of a parametric equalizer is more advisable
since the adjustment parameters coincide with the equalizer card one. Keep in mind if you use a graphic
equalizer that could introduce only two points of equalization for way, because of that don't use a lot of
equalizer bands.
GAIN CALCULATION:
There are two resistors in the equalizer card, called RG+ and RG- that configure the equalization
point gain. For the gain you should only place a resistor, if you want positive gains should place it in
RG+, and if you want gains negatives should place it in RG-.
The maximum gain of the equalization point is of 15 dB, since this resistor could not be less than
2KΩ. If you want unitary gain don't place any resistance.
The next table shows the resistors that you should use for gains between 1 and 15 dB, in 1 dB
steps. If you want an intermediate gain you are able to calculate an intermediate value:
OPTIONAL CROSSOVER CARD ADVANTAGE SERIES
GAIN
1 dB
2 dB
3 dB
4 dB
5 dB
6 dB
7 dB
8 dB
9 dB
10 dB
11 dB
12 dB
13 dB
14 dB
15 dB
5% RESISTORS
82 KΩ
39 KΩ
24 KΩ
18 KΩ
13 KΩ
10 KΩ
8,2 KΩ
6,8 KΩ
5,6 KΩ
4,7 KΩ
3,9 KΩ
3,3 KΩ
3 KΩ
2,4 KΩ
2,2 KΩ
10
1% RESISTORS
82,5 KΩ
38,3 KΩ
24,3 KΩ
16,9 KΩ
13 KΩ
10 KΩ
8,06 KΩ
6,65 KΩ
5,62 KΩ
4,64 KΩ
3,92 KΩ
3,32 KΩ
2,87 KΩ
2,49 KΩ
2,21 KΩ
It is always advisable that use 1% resistors, since if use 5% resistors, the gain has more variation
with regard to the table.
You should be careful with the high gains adjustment (higher than 6 dB), since the crossover
dynamic decreases considerably.
FILTER FREQUENCY CALCULATION:
There are two resistors in the equalizer card called RF and RF,' that configure the center
frequency of the equalization point. These two resistors should be equal: RF= RF.'
The next table shows the resistors that should use for the thirty frequencies ISO standard. If you
want an intermediate frequency, are able to calculate an intermediate value:
FREQUENCY
25 Hz
31,5 Hz
40 Hz
50 Hz
63 Hz
80 Hz
100 Hz
125 Hz
160 Hz
200 Hz
250 Hz
315 Hz
400 Hz
500 Hz
5% RESISTORS
2 MΩ
1,5 MΩ
1,2 MΩ
910 KΩ
750 KΩ
620 KΩ
470 KΩ
390 KΩ
300 KΩ
240 KΩ
200 KΩ
150 KΩ
120 KΩ
91 KΩ
1% RESISTORS
1,91 MΩ
1,54 MΩ
1,21 MΩ
953 KΩ
768 KΩ
604 KΩ
487 KΩ
383 KΩ
301 KΩ
243 KΩ
191 KΩ
154 KΩ
121 KΩ
95,3 KΩ
OPTIONAL CROSSOVER CARD ADVANTAGE SERIES
FREQUENCY
630 Hz
800 Hz
1 KHz
1,25 KHz
1,6 KHz
2 KHz
2,5 KHz
3,1 KHz
4 KHz
5 KHz
6,3 KHz
8 KHz
10 KHz
12,5 KHz
16 KHz
20 KHz
5% RESISTORS
75 KΩ
62 KΩ
47 KΩ
39 KΩ
30 KΩ
24 KΩ
20 KΩ
16 KΩ
12 KΩ
10 KΩ
7,5 KΩ
6,2 KΩ
4,7 KΩ
3,9 KΩ
3 KΩ
2,4 KΩ
11
1% RESISTORS
76,8 KΩ
60,4 KΩ
48,7 KΩ
38,3 KΩ
30,1 KΩ
24,3 KΩ
19,1 KΩ
15,4 KΩ
12,1 KΩ
9,76 KΩ
7,68 KΩ
6,04 KΩ
4,87 KΩ
3,83 KΩ
3,01 KΩ
2,43 KΩ
If you don't find the resistances for low frequencies, since they are very big, you could change
the capacitors C2 and C3 to 33 nF, and divide the resistor value of the table by 10. This could only be
made between frequencies in the range of 25 Hz and 2 KHz, since the RF and RF' resistors could never
be less than 2 KΩ.
As in the gain calculation, it is always advisable that use 1% resistors, since if use 5%
resistors, the frequency has more variation with regard to the table.
BANDWIDTH CALCULATION (Q):
Fc
Fs − Fi
The Q is the filter bandwidth. So that the Q is the filter center frequency
divided by the difference of the higher and lower frequency, which the amplitude
response is three dB down from the filter center frequency: Q= (Fc/ (Fs-Fi)).
The next picture shows a filter with different Q at the same frequency and
gain. How you could see a high value of Q indicates a small bandwidth and a low value of Q a big
bandwidth.
Q=
F = 1 KHz. Q=0,5
Q=1,0 Q=2,5 Q=5
There are two resistors in the equalizer card called RQ and RQ,' that configure the bandwidth (Q)
of the equalization point. These two resistors should be equal RQ = RQ'.
OPTIONAL CROSSOVER CARD ADVANTAGE SERIES
12
The next table shows the resistor that you should use for bandwidths (Q) from 0.1 to 10. The
maximum value allowed for the RQ and RQ' resistors are of 150 KΩ. If you want an intermediate
bandwidth, you are able to calculate an intermediate value:
Q
RESISTENCIA 5%
RESISTENCIA 1%
Q
RESISTENCIA 5%
RESISTENCIA 1%
Q
RESISTENCIA 5%
RESISTENCIA 1%
Q
RESISTENCIA 5%
RESISTENCIA 1%
Q
RESISTENCIA 5%
RESISTENCIA 1%
Q
RESISTENCIA 5%
RESISTENCIA 1%
Q
RESISTENCIA 5%
RESISTENCIA 1%
Q
RESISTENCIA 5%
RESISTENCIA 1%
Q
RESISTENCIA 5%
RESISTENCIA 1%
Q
RESISTENCIA 5%
RESISTENCIA 1%
0,1
1K
1K
1,1
11K
11,0K
2,1
-21,0K
3,1
-30,9K
4,1
-41,2K
5,1
51K
51,1K
6,1
--7,1
-71,5K
8,1
-80,6K
9,1
91K
91,0K
0,2
2K
2K
1,2
12K
12,1K
2,2
22K
22,1K
3,2
-32,4K
4,2
-42,2K
5,2
-52,3K
6,2
62K
61,9K
7,2
--8,2
82K
-9,2
---
0,3
3K
3,01K
1,3
13K
13,0K
2,3
-23,2K
3,3
33K
33,2K
4,3
43K
43,2K
5,3
--6,3
-63,4K
7,3
-73,2K
8,3
-82,5K
9,3
-93,1K
0,4
3,9K
4,02K
1,4
-14,0K
2,4
24K
24,3K
3,4
-34,0K
4,4
-44,2K
5,4
-53,6K
6,4
--7,4
--8,4
--9,4
---
0,5
5,1K
4,99K
1,5
15K
15,0K
2,5
-24,9K
3,5
-34,8K
4,5
-45,3K
5,5
-54,9K
6,5
-64,9K
7,5
75K
75K
8,5
-84,5K
9,5
-95,3K
0,6
6,2K
6,04K
1,6
16K
16,2K
2,6
-26,1K
3,6
36K
35,7K
4,6
-46,4K
5,6
56K
56,2K
6,6
--7,6
--8,6
--9,6
---
0,7
6,8K
6,98K
1,7
-16,9K
2,7
27K
26,7K
3,7
-37,4K
4,7
47K
-5,7
--6,7
-66,5K
7,7
-76,8K
8,7
-86,6K
9,7
---
0,8
8,2K
8,06K
1,8
18K
18,2K
2,8
-28,0K
3,8
-38,3K
4,8
-47,5K
5,8
-57,6K
6,8
68K
68,1K
7,8
--8,8
--9,8
-97,6K
0,9
9,1K
9,09K
1,9
-19,1K
2,9
-28,7K
3,9
39K
39,2K
4,9
-48,7K
5,9
-59,0K
6,9
--7,9
-78,7K
8,9
-88,7K
9,9
---
1
10K
10K
2
20K
20,0K
3
30K
30,1K
4
-40,2K
5
-49,9K
6
-60,4K
7
-69,8K
8
--9
--10
100K
100K
One could see in the table, that there are Q values for which don't exist resistors. In that case you
should approach to the nearest Q.
As in the others cases, it is always advisable that use 1% resistors, since if use 5% resistors, the Q
has more variation with regard to the chart.
BAND GAIN VARIATION:
Apart from the gain, frequency and Q variations, you could vary the total band gain in which it is
insert the equalization point. This one could carry out varying the R1 resistor of the equalizer card.
The formula that gives us the gain is showed in the adjacent figure, the gain in dB and the resistor
in Ω. The factory value for R1 is 10 KΩ, that as you could check give a gain of 0
10000
dB. For example, for a gain of 6 dB, the resistor R1 would be of 5.1 KΩ 5% or of
R1 = G
4.99 KΩ 1%, and for a gain of - 6 dB, the resistor R1 would be of 20 KΩ 5% or
10 20
of 20 KΩ 1%. You should never put a less value of 2 KΩ for this resistor.
OPTIONAL CROSSOVER CARD ADVANTAGE SERIES
13
You should be careful in the adjustment of high gains (great of 6 dB), since the crossover
dynamic diminishes considerably.
The next table shows the value of R1 resistor for different gains:
GAIN
5%
R1
1%
+6 dBv
5,1 KΩ
4,99 KΩ
+4 dBv
6,2 KΩ
6,34 KΩ
+2 dBv
7,5 KΩ
7,87 KΩ
-2 dBv
12 KΩ
12,4 KΩ
-4 dBv
16 KΩ
15,8 KΩ
-6 dBv
20 KΩ
20 KΩ
NON-STANDARD CONFIGURATION EXAMPLES:
With the parametric equalization point, you also could simulate shelving and notch filters.
In order to carry out a shelving filter, you should select the frequency 35 Hz for low frequencies or
16 KHz for high frequencies and a very small Q of 0.4 for example. The next picture shows different
answers of the equalizer card simulating shelving filters for low and high frequencies, at different gains
and attenuations +5, +10, +15, -5, -10 & -15:
AMPL(dBr)
AUDIO PRECISION eq_shel
vs
FREQ(Hz)
14 MAY 96 13:33:37
AUDIO PRECISION notch
15.000
AMPL(dBr)
vs
FREQ(Hz)
14 MAY 96 15:50:54
2.0000
1.0000
0.0
10.000
- 1.000
- 2.000
- 3.000
5.0000
- 4.000
- 5.000
- 6.000
0.0
- 7.000
- 8.000
- 9.000
- 5.000
- 10.00
- 11.00
- 12.00
- 10.00
- 13.00
- 14.00
- 15.00
- 15.00
20
100
1k
10k
20k
20
100
1k
10k
20k
You could also make a filter type notch, selecting the high Q (15) that the equalizer card allows.
The next picture shows a filter type notch of 15 dB of attenuation at 1 KHz:
PLACING AN EQUALIZER CARD:
Before placing the equalizer card you should adjust it, for this it is recommended that read the
previous sections carefully, if you haven't done yet.
In order to place an equalizer card in the main board, follow the next steps:
Turn off the crossover and disconnect it of the mains.
Remove the connector jumper where you want to
insert the equalizer card (the connectors where you could
insert the equalizer card are indicated in the first
paragraph of the equalizer card manual).
Insert the equalizer card in the connector, guiding the printed circuit board toward the component
overlay indication of the card orientation in the main board. Take care to insert the connector carefully,
and don't move it forward, behind, left or right. All the main board male connector contacts should join
in the female equalizer card connector.
OPTIONAL CROSSOVER CARD ADVANTAGE SERIES
14
COMPONENTS OVERLAY
INDICATION OF THE EQUALIZER
CARD ORIENTATION
WARNING: Before carrying out any operation inside the power amplifier, disconnect it of the
mains. Upon being connected to the mains, the power amplifier contains elements with high tensions,
and if for negligence you touch one of those parts could cause a short circuit through your body with
the rising danger for your health.
CAUTION: Do not insert an equalizer card with the power amplifier turn on, this could cause
its break.
CAUTION: After placing the equalizer card in a insert connector, and before turning on the
power amplifier, make sure that the equalizer card is placed correctly in the crossover card connector,
and that any of the connector contacts is out of it. A wrong placement of the equalizer card, could
cause that the crossover card, the power amplifier and the equalizer card break.
4. BLOCK DIAGRAM
Like I could see in the block diagram, the optional crossover card is placed after the input unbalanced
circuit, and before the level potentiometer. The crossover filter always take the input signal of CH1, and the
mode switch configure the input signal that arrive to each channel of the power amplifier.
The signal output connectors (LOW and HIGH), can be configured before or after the equalizer card, as
we can see in the block diagram.
After the level potentiometer, find the BRIDGE switch (with its inverter), the limiter (with its ON/OFF switch)
and the output amplifier, to finish with the power output binding post.
I could see the EARTH-LINK switch placed between the input connectors, to isolate the power amplifier
electric ground, from the system mains earth.
OPTIONAL CROSSOVER CARD ADVANTAGE SERIES
15
5. CONFIGURATION EXAMPLES
In this section, we could see configuration examples, to illustrate in an easy way the use of the
crossover card.
TWO MONO WAYS CONFIGURATION
We suppose that the LOW way and the HIGH way have the same nominal power, to use only one
power amplifier. The relevant frequency of the monitor is 2 KHz. In this case, we use the next configuration:
+
HIGH
+
LOW
-
CROSSOVER CARD
CONFIGURED AT 2KHz.
HI GH
AUXILIARY X/OVER OUTPUTS
F:
LO W
Hz
INPUT SELECTION
CH2
CH1
1 G ND
2 H O T (+ )
3 GN D
(U N BA L )
LO W
C C2 2 4
2 X LR
H IGH
2 WAY C RO SSOVE R C AR D
PUSH
PUSH
MO DE
ST ER E O
BR IDG E
SIGN AL G RO UND
ON
O FF
CH2 INPUT SELECT SWITCH
CONFIGURED AS HIGH.
CH1 INPUT SELECT SWITCH
CONFIGURED AS LOW.
SIGNAL INPUT
We will configure the crossover card to 2KHz, like the next picture show:
TWO STEREO WAYS PLUS SUBWOOFER CONFIGURATION
We suppose that the low, high and subwoofer ways have different nominal power, therefore we use
three power amplifiers. The relevant frequencies are 3KHz for the two ways and 150 Hz for the subwoofer
way. The subwoofer way will be overlapped with the low way.
OPTIONAL CROSSOVER CARD ADVANTAGE SERIES
16
CH1 INPUT SELECT SWITCH
CONFIGURED AS HIGH.
CH2 INPUT SELECT SWITCH
CONFIGURED AS FULL RANGE.
SIGNAL INPUT (L).
CROSSOVER CARD
CONFIGURED AT 3KHz.
H IGH
AUXILIARY X/OVER OUTPUTS
F:
LO W
Hz
INPUT SELECTION
CH2
CH1
1 GND
2 HOT (+)
3 GND
(UNBAL)
LO W
2 X LR
C C224
H IG H
2 WA Y CR OSSO VE R C A RD
PUSH
PUSH
MO DE
+
LOW (L).
B R IDGE
SIG NA L GR O UND
ON
O FF
HIGH (R).
+
-
-
+
-
+
LOW (R).
HIGH (L).
ST E RE O
CROSSOVER CARD
CONFIGURED AT 3KHz.
CH2 INPUT SELECT SWITCH
CONFIGURED AS FULL RANGE.
CH1 INPUT SELECT SWITCH
CONFIGURED AS LOW.
H IGH
AUXILIARY X/OVER OUTPUTS
F:
LO W
Hz
INPUT SELECTION
CH2
CH1
LO W
C C224
2 X LR
H IG H
2 WA Y CR OSSO VE R C A RD
PUSH
PUSH
MO DE
ST E RE O
B R IDGE
SIG NA L GR O UND
ON
O FF
SIGNAL INPUT (R).
We will configure the crossover card to 3KHz, like the next picture show:
1 GND
2 HOT (+)
3 GND
(UNBAL)
-
SUBWOOFER.
OPTIONAL CROSSOVER CARD ADVANTAGE SERIES
+
17
DON'T CARE THE CH2 INPUT
SELECT SWITCH CONFIGURATION.
CH1 INPUT SELECT SWITCH
CONFIGURED AS LOW.
CROSSOVER CARD
CONFIGURED AT 150Hz.
F:
Hz
POWER AMPLIFIER CONFIGURED IN BRIDGE MODE.
SIGNAL INPUT (L).
We will configure the crossover card to 150Hz, like the next picture show:
TREE STEREO WAYS CONFIGURATION
In a three stereo ways configuration, we have two relevant frequencies, and how we suppose that the
nominal power of the ways is different, we need two power amplifiers per way. The relevant frequencies are
100Hz and 1500Hz. With this information, we use the next configuration (we show only the channel L, since
the channel R is exactly the same.
OPTIONAL CROSSOVER CARD ADVANTAGE SERIES
CH2 INPUT SELECT SWITCH
CONFIGURED AS LOW.
18
CH1 INPUT SELECT SWITCH
CONFIGURED AS HIGH.
CROSSOVER CARD
CONFIGURED AT 1500Hz.
+
-
LOW (L).
+
+
-
Hz
-
LOW (L).
+
HIGH (L).
MID (L).
F:
CROSSOVER CARD
CONFIGURED AT 100Hz.
-
CH2 INPUT SELECT SWITCH
CONFIGURED AS LOW.
CH1 INPUT SELECT SWITCH
CONFIGURED AS LOW.
F:
Hz
SIGNAL INPUT (L).
We will configure the crossover cards to 100Hz and 1500Hz, like the next picture show:
OPTIONAL CROSSOVER CARD ADVANTAGE SERIES
19
6. WARRANTY
This unit is warranted by Equipos Europeos Electrónicos to the original user against flaws in the
manufacturing and in the materials for a length of time of one year, starting from the date of sale.
Flaws due to misuse of the unit, internal modifications or accidents are not covered by this warranty.
There is no other warranty expressed or implicit.
Any faulty unit must be sent, to the dealer or the manufacturer. The serial number of the unit must be
included with any request for the service.
Equipos Europeos Electrónicos reserves the right to modify the prices or the technical specifications
without notice.
SERIAL NUMBER ...................................................
EQUIPOS EUROPEOS ELECTRÓNICOS, S.A.L
Avda. de la Industria, 50. 28760 TRES CANTOS-MADRID (SPAIN).
34-91-804 32 65
34-91-804 43 58
www.altairaudio.com
[email protected]
European Union
Waste Electronics Information
Unión Europea
Información sobre residuos electrónicos
Waste from Electrical and Electronic Equipment (WEEE) directive
The WEEE logo signifies specific recycling programs and procedures for
electronic products in countries of the European Union. We encourage the
recycling of our products. If you have further questions about recycling, contact
your local sales office.
Directiva sobre Residuos de Aparatos Eléctricos y Electrónicos (RAEE)
El logotipo de la Directiva RAEE se refiere a los programas y procedimientos
específicos de reciclaje para aparatos electrónicos de países de la Unión
Europea. Recomendamos el reciclaje de nuestros productos. Si tiene alguna
consulta, póngase en contacto con su Distribuidor.
Information based on European Union WEEE Directive 2002/96/EC
Información basada en la Directiva de la unión europea RAEE 2002/96/EC y el Real Decreto 208/2005
AUDIO ELECTRONICS DESIGN
EQUIPOS EUROPEOS ELECTRÓNICOS, S.A.L
Avda. de la Industria, 50. 28760 TRES CANTOS-MADRID (SPAIN).
34-91-761 65 80
34-91-804 43 58
www.altairaudio.com
[email protected]