1
DocAve® 6 File System Migrator
User Guide
Service Pack 5, Cumulative Update 1
Issued May 2015
DocAve 6: File System Migrator
1
Table of Contents
What’s New in this Guide ............................................................................................................................. 5
About File System Migrator .......................................................................................................................... 6
Complementary Products ......................................................................................................................... 6
Submitting Documentation Feedback to AvePoint ...................................................................................... 7
Before You Begin........................................................................................................................................... 8
AvePoint’s Testing Policy and Environment Support................................................................................ 8
Supported Hardware............................................................................................................................. 8
Supported Backup and Recovery .......................................................................................................... 8
Notable Environment Exceptions ......................................................................................................... 9
Configurations ........................................................................................................................................... 9
Agents ....................................................................................................................................................... 9
Required Permissions ............................................................................................................................... 9
Required Permissions for the Source.................................................................................................... 9
Required Permissions for the Destination: Migration to SharePoint On-Premises............................ 10
Required Permissions to the Destination: Migration to SharePoint Online ....................................... 10
Local System Permissions ................................................................................................................... 12
Forms Based Authentication Permissions .......................................................................................... 12
Migration Speed Considerations............................................................................................................. 13
Health Analyzer ....................................................................................................................................... 13
Getting Started............................................................................................................................................ 15
Launching DocAve File System Migration ............................................................................................... 15
Navigating DocAve .................................................................................................................................. 16
About Online Migrations............................................................................................................................. 17
Online Migration Overview ......................................................................................................................... 18
Pre-migration Configurations ..................................................................................................................... 19
Configuring Migration Databases ........................................................................................................... 19
Configuring File System Connections...................................................................................................... 20
Managing File System Connections .................................................................................................... 20
Creating and Editing File System Connections .................................................................................... 21
2
DocAve 6: File System Migrator
Configuring Filter Policies ....................................................................................................................... 21
Creating and Editing Filter Policies ..................................................................................................... 22
Configuring Mapping Settings................................................................................................................. 31
Domain Mapping................................................................................................................................. 31
User Mapping ...................................................................................................................................... 32
Group Mapping ................................................................................................................................... 32
Permission Mapping ........................................................................................................................... 33
Configuring Dynamic Rules ..................................................................................................................... 35
Managing Dynamic Rules .................................................................................................................... 36
Creating and Editing Dynamic Rules ................................................................................................... 36
Setting Up a File System Migration Profile ................................................................................................. 37
Migration Options ................................................................................................................................... 37
Mapping Options .................................................................................................................................... 38
Advanced Options ................................................................................................................................... 42
Dynamic Rule ...................................................................................................................................... 42
Character Length Settings ................................................................................................................... 42
Illegal Character Replacement Settings .............................................................................................. 42
Managing Sub-profiles ............................................................................................................................ 43
Editing an Existing Sub-profile ............................................................................................................ 43
Deleting an Existing Sub-profile .......................................................................................................... 43
Uploading a Previously Configured Sub-profile .................................................................................. 43
Downloading an Existing Sub-profile .................................................................................................. 44
Performing a File System Migration ........................................................................................................... 45
Selecting the Source and Destination Nodes .......................................................................................... 45
Creating Containers ............................................................................................................................ 47
Configuring the Run Now Interface ........................................................................................................ 48
Configuring the Save As New Plan Interface........................................................................................... 49
Customized Metadata File .................................................................................................................. 52
Existing Metadata File ......................................................................................................................... 53
Metadata Excel File ............................................................................................................................. 54
Configuring the Add Schedule Interface ............................................................................................. 57
Managing Plans ........................................................................................................................................... 59
DocAve 6: File System Migrator
3
File System Migrator Tools ......................................................................................................................... 60
Accessing File System Migration Using Hot Key Mode ............................................................................... 61
File System Migration ............................................................................................................................. 61
Home Page .......................................................................................................................................... 62
Plan Manager ...................................................................................................................................... 64
Appendix A: File System Migration Database Information......................................................................... 66
Job Detail................................................................................................................................................. 67
Job Notification ....................................................................................................................................... 70
Job Statistic ............................................................................................................................................. 71
Appendix B: Advanced Settings in File System Migrator Configuration Files ............................................. 75
Configuring the FileMigrationConfiguration.xml .................................................................................... 75
Appendix C: Conflict Resolution.................................................................................................................. 77
Container Level Conflict Resolution ........................................................................................................ 77
Content Level Conflict Resolution ........................................................................................................... 78
Notices and Copyright Information ............................................................................................................ 79
4
DocAve 6: File System Migrator
What’s New in this Guide
Added Required Permissions for the Source.
DocAve 6: File System Migrator
5
About File System Migrator
DocAve File System Migrator efficiently migrates documents from traditional Windows-based file
systems or networked file shares to Microsoft SharePoint 2013, SharePoint 2010, and SharePoint Online.
SharePoint administrators can easily automate the process of consolidating the full spectrum of
corporate-wide document sources onto SharePoint, therefore, maximizing the return on investment of
existing content residing in local and shared file systems.
To ensure a complete and successful migration, DocAve's Pre-Migration Scanner provides a detailed
analysis of the migration before it is performed. The DocAve Pre-Migration Scanner will detect and
notify you of any illegal characters, user permissions, user names, user domains, and other legacy
elements that must be mapped in order to migrate successfully into SharePoint.
File System Migrator allows organizations to:
Streamline the data transfer easily from File systems to SharePoint
Preserve and map all associated metadata and security settings of File System content
during the migration
Plan migration jobs according to business needs with granular or bulk content
migration and customizable job scheduling
Complementary Products
Many products and product suites on the DocAve 6 platform work in conjunction with one another. The
following products are recommended for use with DocAve File System Migrator:
6
DocAve Content Manager for SharePoint for restructuring or moving SharePoint
content.
DocAve Report Center for SharePoint to examine pain points in the SharePoint
infrastructure and report on SharePoint user behavior and changes.
DocAve Data Protection for setting backup and recovery points prior to adjusting
SharePoint governance policies in this product.
DocAve Replicator to perform live or event-driven, as well as scheduled or offline
replication. Synchronization and management of all content, configurations, and
securities is performed with full fidelity.
DocAve 6: File System Migrator
Submitting Documentation Feedback to AvePoint
AvePoint encourages customers to provide feedback regarding our product documentation. You can
Submit Your Feedback on our website.
DocAve 6: File System Migrator
7
Before You Begin
Refer to the sections below for system and farm requirements that must be in place prior to installing
and using DocAve File System Migrator.
AvePoint’s Testing Policy and Environment Support
Supported Hardware
AvePoint is committed to maintaining a hardware agnostic platform to ensure that DocAve operates on
common Windows file sharing and virtualization platforms. To ensure that DocAve is hardware agnostic,
AvePoint tests hardware that is intended to support SharePoint and DocAve infrastructure, storage
targets, and hardware-based backup and recovery solutions, as supported by AvePoint’s partnerships.
AvePoint directly integrates with the following platforms: any Net Share, IBM Storwize Family, FTP,
Amazon S3, AT&T Synaptic, Caringo Storage, Del DX Storage, EMC Centra, HDS Hitachi Content Platform,
Rackspace Cloud Files, TSM, and Windows Azure Storage.
All other hardware platforms that support UNC addressable storage devices are supported.
*Note: Most of the hardware partnerships referenced in this guide are intended to make use of
advanced functionality (such as snapshot mirroring, BLOB snapshots, indexing, long-term storage,
WORM storage, etc.), and are not indications that any changes to the product are required for basic
support. In most cases, hardware can be supported with no change to the product.
Supported Backup and Recovery
DocAve supports BLOB backup storage according to the list of hardware platforms above. BLOB
snapshot functionally, however, is currently only supported on OEM versions and NetApp hardware.
DocAve supports SQL content and Application database backups via the SharePoint Volume Shadow
Copy Service (VSS) on all Windows and SQL server platforms listed above. DocAve also supports
snapshot-based SharePoint VSS on all hardware listed above where the hardware partner has certified
support with Microsoft.
DocAve supports application and configuration server backups for all the supported software
environments listed above. DocAve 6 supports VM backup via Hyper-V/VMWare for the following
operating systems: Windows Server 2008 R2, Windows Server 2012, Windows Server 2012 R2, and
Microsoft Hyper–V Server 2012 R2.
8
DocAve 6: File System Migrator
Notable Environment Exceptions
The following are notable exceptions to the supported DocAve environments. The following represent
environment level support information, not feature level support. Feature level support, specific to each
feature, is described throughout this guide where applicable.
DocAve 6 does not support creating websites in an existing application pool using IIS7
Classic Managed Pipeline Mode when .NET 4.0 is also in use.
The DocAve 6 Report Service only supports Microsoft SQL Server as the Database Type
for Report Service databases.
Configurations
In order to use DocAve File System Migrator, the DocAve 6 platform must be installed and configured
properly on your farm. To review a list of migration source versions and systems supported by DocAve
Migrator, refer to Appendix C – Migration Source Environment in the DocAve 6 Installation Guide.
Agents
DocAve Agents are responsible for running DocAve jobs and interacting with the SharePoint object
model. DocAve Agents enable DocAve Manager to communicate with the respective servers, allowing
for DocAve File System Migrator commands to function properly.
*Note: The use of system resources on a server increases when the installed agent is performing
actions. This may affect server performance. However, if the agent installed on a server is not being
used, the use of system resources is very low and, therefore, the effect on server performance is
negligible.
For instructions on installing the DocAve Platform, DocAve Manager, and DocAve Agents, see the
DocAve 6 Installation Guide.
Required Permissions
To install and use DocAve File System Migrator properly, ensure that the following permissions are met.
Required Permissions for the Source
Before using File System Migration, ensure the DocAve Agent account in the source is a member of the
local Administrators group.
DocAve 6: File System Migrator
9
Required Permissions for the Destination: Migration to SharePoint OnPremises
Before using File System Migrator for SharePoint on-premises, ensure that the Agent account has the
following permissions:
Local System Permissions: The permissions are automatically configured by DocAve during
installation. Refer to Local System Permissions for a list of the permissions automatically
configured upon installation.
*Note: Operations of files on the file system require local administration permission. Therefore,
make sure that the source Agent account is in the local Administrators group.
SharePoint Permissions: These permissions must be manually configured prior to using DocAve
6 File System Migrator; they are not automatically configured.
User is a member of the Farm Administrators group. Since Administrator works across
farms and on all SharePoint settings and configurations, this account is needed in order
to provide the best and most complete quality of service.
Full Control to all zones of all Web applications via User Policy for Web applications.
Managed Metadata Service – Term Store Administrator
Other permissions required
Managed Metadata Service – Full Control
Managed Metadata Service – Administrator
SQL Permissions: These permissions must be manually configured prior to using DocAve 6 File
System Migrator; they are not automatically configured.
Member has a Database Role of db_owner for all of the databases related to
SharePoint, including Content Databases, SharePoint Configuration Database, and
Central Admin Database.
Member has a Database Role of db_owner for Migration Database.
Creator and Security Admin permission to SQL Server.
*Note: If a Web application enables the forms based authentication and uses database as the
method of forms based authentication, refer to Forms Based Authentication Permissions to
configure additional settings for the Web application.
Required Permissions to the Destination: Migration to SharePoint Online
Before using File System Migrator for SharePoint Online, ensure that the following permissions are met:
Local System Permissions for Agent Account
For the registered SharePoint Online site collections, the Agent account is on the Agent machine that
will run migration jobs. This machine must have network connection or have configured Agent Proxy
10
DocAve 6: File System Migrator
Settings. For more information about Agent Proxy Settings, refer to the DocAve 6 Control Panel
Reference Guide.
For the registered SharePoint on-premises site collections, the Agent account is on the Agent machine
that will run migration jobs. This machine must be the Central Administration server or one of the Web
front-end servers of the farm where the registered site collections reside, or the machine that can
communicate with the Central Administration server or one of the Web front-end servers.
The Agent account must have proper Local System permissions. These permissions are automatically
configured by DocAve during installation. Refer to Local System Permissions for a list of the permissions
automatically configured upon installation. If there are no strict limitations within your organization on
the permissions that can be applied, you can simply add the DocAve Agent Account to the local
Administrators group to apply all of the required permissions.
*Note: Operations of files on the file system require local administration permission. Therefore, make
sure that the source Agent account is in the local Administrators group.
Required Permissions for the User Used to Register SharePoint Online Site Collections
The user that is used to register SharePoint Online site collections in Control Panel > Registered
SharePoint Sites > Manual Input Mode must have the following permissions to each site collection:
Full Control permission to the site collection
Managed Metadata Service – Term Store Administrator
Other permissions required
Managed Metadata Service – Full Control
Managed Metadata Service – Administrator
*Note: If the site collections are registered in Scan Mode, make sure the user has the Global
Administrator role in Office 365.
Required Permissions for the User Used to Register SharePoint On-Premises Site
Collections
The user that is used to register SharePoint on-premises site collections in Control Panel > Registered
SharePoint Sites > Manual Input Mode must have the following permissions to each site collection:
User is a member of the Site Collection Administrator group.
Managed Metadata Service – Term Store Administrator
Other permissions required
Managed Metadata Service – Full Control
Managed Metadata Service – Administrator
DocAve 6: File System Migrator
11
*Note: If the site collections are registered in Scan Mode, make sure the user has the Full Control
permission to all zones of all Web applications via User Policy for Web Applications.
Local System Permissions
The following Local System Permissions are automatically configured during DocAve 6 installation:
User is a member of the following local groups:
IIS WPG (for IIS 6.0) or IIS IUSRS (for IIS 7.0)
Performance Monitor Users
DocAve Users (the group is created by DocAve automatically; it has the
following permissions):
Full Control to the Registry of
HKEY_LOCAL_MACHINE\SOFTWARE\AvePoint\DocAve6
Full Control to the Registry of
HKEY_LOCAL_MACHINE\System\CurrentControlSet\Services\eventlog
Full Control to the Communication Certificate
Permission of Log on as a batch job (it can be found within Control Panel
> Administrative Tools > Local Security Policy > Security Settings > Local
Policies > User Rights Assignment)
Full Control to DocAve Agent installation directory
Forms Based Authentication Permissions
If a Web application enables the forms based authentication and uses database as the method of forms
based authentication, ensure at least one of the following conditions is in place:
The Agent account has a Database Role of db_owner to this database.
Specify a user in the connectionString node in this Web application’s web.config profile
that has the access to this database. For details, refer to the instructions below.
i.
Navigate to Start > Administrative Tools > Server Manager > Roles > Web
Server (IIS) > Internet Information Services (IIS) Manager, find the desired Web
application in the Sites list.
ii. Right-click the desired Web application and select Explore.
iii. Find the web.config file in the pop-up window.
iv. Open the web.config file with Notepad.
v. Find the connectionString node and specify a user that has access to the
database that stores FBA security information.
12
DocAve 6: File System Migrator
Migration Speed Considerations
To estimate how long your migration plans will take, in order to better inform stakeholders, the
following key factors should be taken into consideration prior to running your migration plans.
Network bandwidth between the two SharePoint environments
SQL I/O and memory
Memory on Web front-end servers
Memory on the server hosting the DocAve Media service
Number of CPUs on Web front-end servers
Source environment deployment
Number of objects in source
Divide database and folder structures into small data sets before
running the migration. Consider a granular migration approach.
Size of objects in source
A single 1GB file will migrate far quicker than a million files which have a
sum of 1GB.
Complexity of folders, and sites
Divide database and folder structures into small data sets before
running the migration. Consider a granular migration approach.
Whether DocAve has to create site collections during migration
Use folders to break up large document libraries or data subsets to
manage library size; consider utilizing filtering to migrate a sub-set of
the data at a time.
Whether securities are included in the plan (including mappings)
Permissions can be configured to be migrated in the migration plans.
Whether metadata is included in the plan
Health Analyzer
AvePoint recommends using Health Analyzer to check the prerequisites you need to correctly use
DocAve File System Migration.
*Note: Only the users in the DocAve Administrators group can use Health Analyzer.
*Note: When creating Health Analyzer profiles, DocAve File System Migration recommends creating two
different profiles to scan the source Agent and the destination Agent separately.
DocAve 6: File System Migrator
13
After selecting File System as the module, all of the scan rules are selected by default, including the rules
for the source environment and the rules for the destination environment. When the Health Analyzer
job is finished, you can view the Health Analyzer results. If the scan rule is for the destination
environment, but it is applied on the source environment, ignore the error or warning, and vice versa.
For more information about Health Analyzer, refer to the DocAve 6 Installation Guide.
14
DocAve 6: File System Migrator
Getting Started
Refer to the sections below for important information on getting started with File System Migration.
Launching DocAve File System Migration
To launch File System Migration and access its functionality, follow the instructions below:
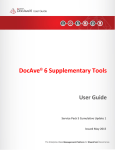
Log into DocAve. If you are already in the software, click the DocAve tab. The DocAve tab
displays all product suites on the left side of the window.
Click Migration to view all of the Migration modules.
Click File System Migration to launch that module.
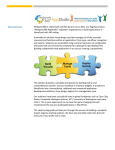
*Note: If desired, access the License Details information for Migrator products from the
Migration landing page.
Figure 1: DocAve module launch window.
DocAve 6: File System Migrator
15
Navigating DocAve
DocAve mimics the look and feel of many Windows products, making for an intuitive and familiar
working environment. While there are many windows, pop-up displays, and messages within DocAve
products, they share similar features and are navigated in the same ways. Below is a sample window in
DocAve. It features a familiar, dynamic ribbon, and a searchable, content list view.
Figure 2: Navigating DocAve.
Ribbon Tabs – Allows users to navigate to the DocAve Welcome page and within the active
module.
Ribbon Panes – Allows users to access the functionality of the active DocAve module.
Manage columns ( ) – Allows users to manage which columns are displayed in the list. Click the
manage columns ( ) button, and then select the checkbox next to the column name in the
drop-down list.
Hide the column ( ) – Allows users to hide the selected column.
Filter the column ( ) – Allows users to filter the information in the List View. Click the filter the
column ( ) button next to the column and then select the checkbox next to the column name.
Search – Allows users to search the List View pane for a keyword or phrase. You can select
Search all pages or Search current page to define the search scope.
*Note: The search function is not case sensitive.
Management Pane – Displays the actionable content of the DocAve module.
16
DocAve 6: File System Migrator
About Online Migrations
An Online Migration job migrates content, configurations, securities, and users from a source file system
to a destination SharePoint environment when a network between the source and destination is
available.
DocAve 6: File System Migrator
17
Online Migration Overview
To perform Online Migration jobs, the following steps must be performed in this order. Click the link to
jump to the corresponding section.
Pre-migration Configurations
Configuring Migration Databases (Optional)
Configuring File System Connections
Configuring Filter Policies (Optional)
Configuring Mapping Settings (Optional)
Configuring Dynamic Rules (Optional)
Setting Up a File System Migration Profile
Migration Options
Mapping Options
Advanced Options
Managing Sub-profiles
Performing a File System Migration
Selecting the Source and Destination Nodes
Creating Containers
Select either of the following methods to perform an online migration:
Configuring the Run Now Interface
Configuring the Save As New Plan Interface
18
DocAve 6: File System Migrator
Pre-migration Configurations
Configure the following settings before performing File System Migration. Click the link to jump to the
corresponding section.
Configuring Migration Databases (Optional)
Configuring File System Connections
Configuring Filter Policies (Optional)
Configuring Mapping Settings (Optional)
Configuring Dynamic Rules (Optional)
Configuring Migration Databases
Configuring a migration database is not mandatory for File System Migrators unless you want to store
detailed job information, such as: the status and type of the job, the user who runs the job, the start and
end time of the job, plan information, agent information, etc. For detailed information on the Migration
database schema, refer to Appendix A: File System Migration Database Information.
*Note: The version of SQL Server required to create a migration database must be SQL Server 2005 SP1
or higher.
On the Home tab, in the Settings group, click Migration Database. The Migration Database
page appears.
Click Configure in the Edit column to configure a migration database for the corresponding farm
or My Registered Sites. The Configure page appears.
Configure the following settings for the database that will store migration job data:
Configure Migration Database –Specify a migration database. Enter a new Database
Server and a Database Name in the corresponding fields.
Authentication – Select the authentication mode for the migration database.
Windows Authentication (recommended) – Select this mode to verify the user’s
identity by Windows.
By default, the Specify a Window account checkbox is deselected and
DocAve will create a new migration database or access the existing
migration database using the destination DocAve Agent account.
To access the database server with a specified Windows account, select
the Specify a Windows account checkbox and select a managed
account profile from the Managed Account Profile drop-down list, or
click New Managed Account Profile to create a new managed account
profile in Control Panel. Then, click Validation Test to validate the
DocAve 6: File System Migrator
19
account. For more information, refer to the DocAve 6 Control Panel
Reference Guide.
SQL Authentication – Select this mode to verify the user’s identity by SQL
Server. Enter the user’s account and password in the Account and Password
fields. You can also validate the SQL database account by clicking Validation
Test.
*Note: The specified account for creating or accessing the migration database
must have a server role of db_creator for the SQL server where you want to
create the migration database and have a database role of db_owner for the
newly created/existing migration database.
Failover Database Server (optional) – Specify a failover database server. In the event
that the specified migration database collapses, the data stored in the Migration
database can be transferred to this standby database.
Alternatively, you can specify a Migration Database in the Advanced settings by entering a
connection string instead of configuring the settings in Step 3. Click Advanced; the Connection
String section appears. Check the Edit Connection String directly checkbox to activate this
feature, and then enter the connection string according to the example listed in the left pane.
For more information about how to configure the connection string, refer to the
ConnectionString property in SQL Server Books Online or SQL Server Tutorials by navigating to
Start > Microsoft SQL Server (with the version you are using) > Documentation and Tutorials.
Click OK to finish and save the configuration, or click Cancel to return to the Migration Database
page without saving any configurations.
Configuring File System Connections
A file system connection connects a DocAve Agent to your file system server. In order to work properly,
the DocAve Agent must be able to connect to the file system server that contains the content you want
to migrate to SharePoint (see the *Note in the Pre-migration Configurations section). Created
connections are displayed on the source pane, showing the content for the file system migration job.
Managing File System Connections
The File System Connection interface displays any file system connections that you have previously
created.
In this interface, you can change the number of file system connections displayed per page and the
order in which they are displayed. To change the number of file system connections displayed per page,
select the desired number from the Show rows drop-down menu in the lower right-hand corner. To sort
the file system connections, click on a column heading such as Name, Agent and Last Modified Time.
Perform the following actions in the File System Connection interface:
20
DocAve 6: File System Migrator
Click Create on the ribbon to create a new file system connection. For details on
creating a new file system connection, see Creating and Editing File System Connections.
Click View Details on the ribbon and you will see the previously configured settings for
this file system connection. Here you can also click Edit on the ribbon to make changes
to the file system connection’s settings. You will be brought to the Edit File System
Connection page where you can change the settings of this file system connection.
Click Edit on the ribbon to change the configurations for this file system connection. For
details on editing configurations for a file system connection, see Creating and Editing
File System Connections.
Click Delete on the ribbon. A confirmation window appears. Click OK to delete the
selected file system connections, or click Cancel to return to the file system connection
interface without deleting the selected file system connections.
Creating and Editing File System Connections
To create a new file system connection, click Create on the ribbon. To modify a previously configured
file system connection, select the file system connection, and then click Edit on the ribbon.
In the Create File System Connection or Edit File System Connection interface, configure the following
settings:
File System Connection Name – Enter a Name for the file system connection. Then enter an
optional Description for this file system connection for future reference.
Connection – Configure the following settings to connect the file system server to the DocAve
Agent.
Agent – Select an Agent where you wish the file system server to connect from the
drop-down menu.
UNC path – Enter the UNC Path in the following format:
\\admin-PC\c$\data or \\admin-PC\shared folder
Managed Account Profile – Select a managed account profile in the drop-down list or
create a new managed account profile.
Click Validation Test to verify whether the connection is available.
Click OK to save the configurations and return to the File System Connection interface, or click
Cancel to return to the File System Connection interface without saving any changes.
Configuring Filter Policies
The Filter Policy allows you to set up filter rules so you can control what objects are migrated to the
SharePoint destination. By setting up and saving filter policies, you can apply the same filter policy to
different file system migration plans without having to recreate them each time.
DocAve 6: File System Migrator
21
To access the Filter Policy interface, click Profile Settings on the File System Migrator Home tab. On the
Profile Settings page, click Filter Policy on the ribbon.
The Filter Policy interface displays any filter policies that you have previously created in the main display
pane.
In this interface, you can change the number of filter policies displayed per page and the order in which
they are displayed. To change the number of filter policies displayed per page, select the desired
number from the Show rows drop-down menu in the lower right-hand corner. To sort the filter policies,
click on a column heading such as Filter Policy Name, and Description.
Perform the following actions in the Filter Policy interface:
Click Create on the ribbon to create a new filter policy. For detailed on creating a new
filter policy, see Creating and Editing Filter Policies.
Click Edit on the ribbon to change the configurations for the selected filter policy. For
details on editing configurations for filter policies, see Creating and Editing Filter
Policies.
Click View on the ribbon to view the configurations of the selected filter policy. To make
changes to this filter policy, click Edit on the ribbon of the View Details of Filter Policy
interface, and then you are brought to the Edit Filter Policy interface to edit the
configurations of this filter policy. For details on editing configurations for filter policy,
see Creating and Editing Filter Policies.
Click Delete on the ribbon. A confirmation window appears, confirming that you want to
proceed with the deletion. Click OK to delete the selected filter policies, or click Cancel
to return to the filter policy interface without deleting the selected filter policies.
Creating and Editing Filter Policies
To create a new filter policy, click Create on the ribbon. To modify a previously configured filter policy,
select the filter policy, and then click Edit on the ribbon.
In the Create Filter Policy or Edit Filter Policy interface, configure the following settings:
Name – Enter the name for the filter policy that you are creating, or rename the selected filter
policy that you are editing.
Description (optional) – Enter a description for this filter policy.
Filter Rule – A filter rule allows you to filter the files or folders that you want to migrate by
setting up a set of filter criteria. Follow the steps below to set up your own filter rules:
Select Folder or File from the Filter Level Group drop-down menu, and then click Add a
Filter Level Group to add a filter rule. A basic filter rule in the selected filter level group
is displayed in the configuration field. Name is the default rule, and Contains is the
default condition.
22
DocAve 6: File System Migrator
Click Name to change the rule from the drop-down menu, and then specify the
corresponding condition and value. For more detailed rule settings for each level you
can choose, refer to Examples of File System Migration Filter Policies.
Enter the Value according to the specific filter rule and filter condition.
Repeat steps a, b, and c to add more filter rules.
There are two logic settings: And and Or. By default, the logic is set to be And. It can be
changed to Or by clicking And.
And – The content that meets all the criteria will be filtered to be included.
Or – The content that meets any one of the criteria will be filtered to be
included.
Click OK to save the configurations and return to the Filter Policy interface, or click Cancel to
return to the Filter Policy interface without saving any changes.
For more information about Filter Policies, refer to Examples of File System Migration Filter Policies.
Examples of File System Migration Filter Policies
The following table provides detailed information on the components and usage of File System Migrator
filter policies.
*Note: All of the text boxes are not case sensitive, and do not support wildcards.
DocAve 6: File System Migrator
23
Filter
Level
Folder
Rule
Condition
Value
Example
Name
Contains
abc
Does Not Contain
abc
Equals
type
Does Not Equal
type
Before
2012-10-01
06:00 at
Central Time
(US & Canada)
After
2012-07-31
06:00 at
Central Time
(US & Canada)
The folder whose name
contains abc is included.
For example: abcdef,or
abc
The folder whose name
does not contain abc is
included.
For example: 123, or bc.
The folder whose name
is type is included.
The folder whose name
is not type is included.
The folder that was
created before 2012-1001 06:00 at Central Time
(US & Canada) is
included.
The folder that was
created after 2012-0731 06:00 at Central Time
(US & Canada) is
included.
The folder which was
created within 3 days is
included.
The folder whose
created time was older
than 3 days is included.
The folder that was last
modified before 201210-01 06:00 at Central
Time (US & Canada) is
included.
The folder that was last
modified after 2012-0731 06:00 at Central Time
(US & Canada) is
included.
The folder that was last
modified within 3 days is
included.
The folder whose last
modified time was older
than 3 days is included.
Created
Time
Within
Modified
Time
24
Day(s)/Week(s)/Month(s)
3 Days
Older Than
Day(s)/Week(s)/Month(s)
3 Days
Before
2012-10-01
06:00 at
Central Time
(US & Canada)
After
2012-07-31
06:00 at
Central Time
(US & Canada)
Within
3 Days
Older Than
3 Days
DocAve 6: File System Migrator
Last
Accessed
Time
File
Name
Type
Before
2012-10-01
06:00 at
Central Time
(US & Canada)
After
2012-07-31
06:00 at
Central Time
(US & Canada)
Within __ Day(s)/Week(s)/Month(s)
3 Days
Older Than __
Day(s)/Week(s)/Month(s)
3 Days
Contains (wildcards are
unsupported)
abc
Does Not Contain (wildcards are
unsupported)
abc
Equals
type
Does Not Equal
type
Contains
doc
Does Not Contain
docx
Equals
docx
Does Not Equal
docx
DocAve 6: File System Migrator
The folder that was last
accessed before 201210-01 06:00 at Central
Time (US & Canada) is
included.
The folder that was last
accessed after 2012-0731 06:00 at Central Time
(US & Canada) is
included.
The folder that was last
accessed within 3 days is
included.
The folder whose last
accessed time was older
than 3 days is included.
The file whose name
contains abc is included.
For example:
abcdef.docx, or abc.xlsx.
The file whose name
does not contain abc is
included. For example:
123.png, or bc.docx.
The file whose name is
type is included.
The file whose name is
not type is included.
The file whose extension
name contains the doc is
included.
For example: abc.doc, or
abcd.docx
The file whose extension
name does not contain
the doc is included.
For example: abc.gif, or
abcd.doc
The file whose extension
name is docx is included.
For example: abc.docx
The file whose extension
name is not docx is
included.
For example: abc.doc
25
Size
Metadata:
Text
Metadata:
Number
26
>= __ KB/MB/GB
10 KB
<= __ KB/MB/GB
10 KB
Manually enter
the Metadata
Name. Using
this condition if
you want to
filter the file
according to its
metadata
value.
This condition
supports all the
metadata types
except
Number,
Yes/No, Date
and Time
types.
Contains
apple
Does Not Contain
apple
Equals
apple
Does Not Equal
apple
Manually enter
the Metadata
Name.
This condition
only supports
the Number
metadata type.
>=
10
<=
10
=
10
The file whose size is not
smaller than 10 KB is
included.
For example: a file
whose size is 15KB.
The file whose size is not
larger than 10 KB is
included.
For example: a file
whose size is 5 KB.
The file that has this
specified metadata and
the specified metadata
value contains apple, is
included.
The file that has this
specified metadata and
the specified metadata
value does not contain
apple, is included.
The file that has this
specified metadata and
the specified metadata
value is apple, is
included.
The file that has this
specified metadata and
the specified metadata
value is not apple, is
included.
The file that has the
specified metadata, and
this specified metadata
value is larger than 10 or
equals to 10 is included.
The file that has the
specified metadata, and
this specified metadata
value is smaller than 10
or equals to 10 is
included.
The file that has the
specified metadata, and
this specified metadata
value equals to 10 is
included.
DocAve 6: File System Migrator
Metadata:
Yes/No
Metadata:
Date and
Time
Manually enter
the Metadata
Name.
This condition
only supports
the Yes/No
metadata type.
Manually enter
the Metadata
Name.
This condition
only supports
the Date and
Time metadata
type.
Is Exactly
Yes
The file that has the
specified metadata, and
this specified metadata
value is exactly Yes is
included.
Before
2012-08-06
09:00 at
Pacific Time
(US & Canada)
After
2012-08-06
09:00 at
Pacific Time
(US & Canada)
The file that has the
specific metadata, and
this specific metadata
value is before 2012-0806 09:00 at Pacific Time
(US & Canada) is
included.
The file that has the
specific metadata, and
this specific metadata
value is after 2012-08-06
09:00 at Pacific Time (US
& Canada) is included.
The file that has the
specific metadata, and
this specific metadata
value is within 3 Weeks
is included.
The file that has the
specific metadata, and
this specific metadata
value is older than 3
Weeks is included.
The file that was created
before 2012-10-01 06:00
at Central Time (US &
Canada) is included.
The file that was created
after 2012-07-31 06:00
at Central Time (US &
Canada) is included.
The file that was created
within 3 days is
included.
The file whose created
time was older than 3
days is included.
Within __
3 Weeks
Day(s)/Week(s)/M
onth(s)
Older Than __
3 Weeks
Day(s)/Week(s)/M
onth(s)/Year(s)
Created
Time
Before
Within
2012-10-01
06:00 at
Central Time
(US & Canada)
2012-07-31
06:00 at
Central Time
(US & Canada)
3 Days
Older Than
3 Days
After
DocAve 6: File System Migrator
27
Modified
Time
Last
Accessed
Time
PDF:
Application
28
Before
2012-10-01
06:00 at
Central Time
(US & Canada)
After
2012-07-31
06:00 at
Central Time
(US & Canada)
Within
3 Days
Older Than
3 Days
Before
2012-10-01
06:00 at
Central Time
(US & Canada)
After
2012-07-31
06:00 at
Central Time
(US & Canada)
Within
3 Days
Older Than
3 Days
Contains
abc
Does Not Contain
abc
Equals
abc
The file that was last
modified before 201210-01 06:00 at Central
Time (US & Canada) is
included.
The file that was last
modified after 2012-0731 06:00 at Central Time
(US & Canada) is
included.
The file that was last
modified within 3 days is
included.
The file whose last
modified time was older
than 3 days is included.
The file that was last
accessed before 201210-01 06:00 at Central
Time (US & Canada) is
included.
The file that was last
accessed after 2012-0731 06:00 at Central Time
(US & Canada) is
included.
The file that was last
accessed within 3 days is
included.
The file whose last
accessed time was older
than 3 days is included.
The PDF whose
Application property
value contains abc is
included.
The PDF whose
Application property
value does not contain
abc is included.
The PDF whose
Application property
value equals to be abc is
included.
DocAve 6: File System Migrator
PDF:
Author
PDF: Date
Created
PDF: Date
Modified
Does Not Equal
abc
Contains
AvePoint
Does Not Contain
AvePoint
Equals
AvePoint
Does Not Equal
AvePoint
Before
2012-10-01
06:00 at
Central Time
(US & Canada)
After
2012-07-31
06:00 at
Central Time
(US & Canada)
Within
3 Days
Older Than
3 Days
Before
2012-07-31
06:00 at
Central Time
(US & Canada)
After
2012-07-31
06:00 at
Central Time
(US & Canada)
DocAve 6: File System Migrator
The PDF whose
Application property
value does not equal abc
is included.
The PDF whose author
contains AvePoint is
included.
For example:
AvePoint.com
The PDF whose author
does not contain
AvePoint is included.
For example: DocAve
The PDF whose author
equals to be AvePoint is
included.
The PDF whose author
does not equal to
AvePoint is included.
The PDF that was
created before 2012-1001 06:00 at Central Time
(US & Canada) is
included.
The PDF that was
created after 2012-0731 06:00 at Central Time
(US & Canada) is
included.
The PDF that was
created within 3 days is
included.
The PDF whose created
time was older than 3
days is included.
The PDF that was last
modified before 201207-31 06:00 at Central
Time (US & Canada) is
included.
The PDF that was last
modified after 2012-0731 06:00 at Central Time
(US & Canada) is
included.
29
PDF:
Keywords
PDF: PDF
Producer
PDF: PDF
Version
30
Within
3 Days
Older Than
3 Days
Contains
AvePoint
Does Not Contain
AvePoint
Equals
AvePoint
Does Not Equal
AvePoint
Contains
Adobe
Does Not Contain
Adobe
Equals
Adobe
Does Not Equal
Adobe
>=
3.5
<=
3.5
The PDF that was last
modified within 3 days is
included.
The PDF whose last
modified time was older
than 3 days is included.
The PDF whose
keywords contain
AvePoint is included.
The PDF whose
keywords do not contain
AvePoint is included.
The PDF whose keyword
equals to be AvePoint is
included.
The PDF whose keyword
does not equal to be
AvePoint is included.
The PDF whose
producer contains
Adobe is included.
For example: the PDF
whose producer is
Adobe Library is filtered
to be included.
The PDF whose
producer does not
contain Adobe is
included.
For example: the PDF
whose producer is HT is
filtered to be included.
The PDF whose
producer equals to be
Adobe is included.
The PDF whose
producer does not equal
to be Adobe is included.
The PDF whose version
is larger than 3.5 or
equals to be 3.5 is
included.
The PDF whose version
is smaller than 3.5 or
equals to be 3.5 is
included.
DocAve 6: File System Migrator
=
3.5
PDF: PDF
Web View
Is Exactly (Yes/No)
Yes
PDF:
Subject
Contains
Migration
Does Not Contain
Migration
Equals
Migration
Does Not Equal
Migration
Contains
Migration
Does Not Contain
Migration
Equals
Migration
Does Not Equal
Migration
PDF: Title
The PDF whose version
equals to be 3.5 is
included.
The PDF whose web
view is exactly Yes is
included.
The PDF whose subject
contains Migration is
included.
The PDF whose subject
does not contain
Migration is included.
The PDF whose subject
equals to be Migration is
included.
The PDF whose subject
does not equal to be
Migration is included.
The PDF whose title
contains Migration is
included.
The PDF whose title
does not contain
Migration is included.
The PDF whose title
equals to be Migration is
included.
The PDF whose title
does not equal to be
Migration is included.
Configuring Mapping Settings
Before performing a file system migration job, you may want to define optional Domain Mapping, User
Mapping, Group Mapping, Permission Mapping, and Dynamic Mapping settings. Default mapping
settings are provided in the event that you do not want to customize the mappings.
Refer to the following sections to decide whether to configure the mapping settings, and learn how to
configure the mapping settings.
Domain Mapping
If there are users with the same name but with different domains in the source and destination
respectively, you can map a source domain name to a SharePoint domain name in the destination using
domain mapping. During a migration, File System Migrator will change the source domain name to your
specified destination domain name in the destination node. For example, the source user
DocAve 6: File System Migrator
31
summer\user1 can be mapped to SharePoint domain user may\user1 through domain mapping.
However, to guarantee successful mapping, the source Agent must be installed in the source domain
summer.
To set up a domain mapping, complete the following steps:
To access Domain Mapping, click Profile Settings on the ribbon of Home tab. The Profile
Settings tab appears.
Click Mappings on the ribbon, and then select Domain Mapping from the drop-down menu. The
Control Panel Mapping Manager interface appears.
Click Create on the ribbon to create a new domain mapping rule. For specific instructions on
setting up domain mapping, refer to the DocAve 6 Control Panel Reference Guide.
User Mapping
User mapping maps an existing source node user name to an existing SharePoint user name in the
destination. During a migration, File System Migrator will replace the source user name with the
specified destination user name in the destination node.
To access User Mapping, click Profile Settings on the ribbon of Home tab. The Profile Settings
tab appears.
Click Mappings on the ribbon, and then select User Mapping from the drop-down menu. The
Control Panel Mapping Manager interface appears.
Click Create on the ribbon to create a new user mapping rule. For specific instructions on setting
up user mapping, refer to the DocAve 6 Control Panel Reference Guide.
*Note: If you configure user mapping to map a Modified by user to a destination SharePoint user, make
sure that you enter the user’s display name in the Source Username column’s text box.
*Note: If SharePoint uses Active Directory Federation Services (ADFS) to authenticate users, you need to
configure User Mapping, even if the source node user and the SharePoint user are in the same domain.
Group Mapping
Use group mapping to map an existing source group name to a SharePoint group. During a migration,
File System Migrator will replace the source group name with your specified destination group name in
the destination node.
To access Group Mapping, click Profile Settings on the ribbon of Home tab. The Profile Settings
tab appears.
Click Mappings on the ribbon, and then select Group Mapping from the drop-down menu. The
Control Panel Mapping Manager interface appears.
Click Create on the ribbon to create a new group mapping rule. For specific instructions on
setting up group mapping, refer to the DocAve 6 Control Panel Reference Guide.
32
DocAve 6: File System Migrator
*Note: When the destination environment is SharePoint Online, the destination group name must be in
the format of O365AD:group name.
Permission Mapping
File System Migrator allows you to map permissions in the source to SharePoint permissions in the
destination. During the migration, File System Migrator will replace the source permission with
SharePoint permission levels in the Default Permission Mapping rule or your specified permission levels
in the destination node.
*Note: If you have configured both user mapping and permission mapping in the Mapping Options
profile with Merge as the Container level conflict resolution and New Version as the Content level
conflict resolution, the source user’s mapping permissions in SharePoint will be merged with the
mapped destination user’s permissions.
*Note: If you configure the permission mapping profile in the Details of permission entry mode and a
user in file system has multiple detailed file system permissions mapped to SharePoint, the user mapped
to SharePoint will only be granted the higher SharePoint permissions. For example, if a user has Read
Attributes and Write Attributes permissions in the file system (the Read Attributes permission in file
system is mapped to the Read permission in SharePoint; the Write Attributes permission in file system
is mapped to the Contribute permission in SharePoint), the user mapped to the SharePoint destination
will have the Contribute permission only.
To access Permission Mapping, click Profile Settings on the ribbon of Home tab. The Profile
Settings tab appears.
Click Mappings on the ribbon, and then select Permission Mapping from the drop-down menu.
The Permission Mapping interface appears.
Managing Permission Mappings
The Permission Mapping interface displays all previously configured permission mappings.
In this interface, you can change the number of permission mappings displayed per page and the order
in which they are displayed. To change the number of permission mappings displayed per page, select
the desired number from the Show rows drop-down menu in the lower right-hand corner. To sort the
permission mappings, click on a column heading such as Permission Mapping Name, and Description.
You may perform the following actions to a permission mapping:
Click Create on the ribbon to create a new permission mapping rule. For detailed on
creating a new permission mapping, see Creating and Editing Permission Mappings.
Click View Details on the ribbon and you will see the previously configured settings for
this permission mapping. Here you can also click Edit on the ribbon to make changes to
the permission mapping’s settings. You will be brought to the Edit Permission Mapping
page where you can change this permission mapping.
DocAve 6: File System Migrator
33
Click Edit on the ribbon to change the configuration of this permission mapping. For
details on editing permission mapping, see Creating and Editing Permission Mappings.
Click Delete on the ribbon. A confirmation window appears, confirming that you want to
proceed with the deletion. Click OK to delete the selected permission mappings, or click
Cancel to return to the Permission Mapping interface without deleting the selected
permission mappings.
Creating and Editing Permission Mappings
To create a new permission mapping, click Create on the ribbon. To edit a previously configured
permission mapping, select the permission mapping and then click Edit on the ribbon.
In the Create or Edit Permission Mapping interface, configure the following settings:
Permission Mapping Name – Enter a Permission Mapping Name for the permission mapping
that you are about to create or edit. Then enter an optional Description for this permission
mapping for future reference.
Permission Mapping – Allows you to set up the mapping of file system permissions to
SharePoint permissions. It provides you two modes of the permission mapping. The Permission
Entry Mode enables you to configure the mappings of five file system permission levels to
SharePoint Permission Levels. The Details of the Permission Entry Mode enables you to
configure the detailed permission mappings from file system to SharePoint Permission Levels.
To map the file system permission to SharePoint, you can choose the default SharePoint
Permission Levels, or previously created SharePoint Permission Levels, or you can directly
create a new SharePoint Permission Level by clicking New SharePoint Permission Level from
the drop-down menu.
For more information on creating a new SharePoint Permission Level, refer to Creating and
Editing SharePoint Permission Levels.
Click OK to save the configurations and return to the Permission Mapping interface, or click
Cancel to return to Permission Mapping interface without saving any changes.
SharePoint Permission Levels
You can create a new SharePoint permission level, view details, edit, or delete a previously configured
SharePoint permission level.
To access the Manage SharePoint Permission Level interface, click Profile Settings on the Home tab >
Mappings > Permission Mapping > Manage SharePoint Permission Level. The Manage SharePoint
Permission Level interface appears, where you will see a list of provided or previously configured
SharePoint permission levels.
In this interface, you can change the number of SharePoint Permission Levels displayed per page and the
order in which they are displayed. To change the number of SharePoint Permission Levels displayed per
page, select the desired number from the Show rows drop-down menu in the lower right-hand corner.
To sort the SharePoint Permission Levels, click on a column heading such as SharePoint Permission
Level Name, and Description.
34
DocAve 6: File System Migrator
Perform the following actions in the Manage SharePoint Permission Level page.
Click Create on the ribbon to create a new SharePoint Permission Level. For detailed
instructions on creating a new SharePoint Permission Level, see Creating and Editing
SharePoint Permission Levels.
Click View Details on the ribbon and you will see the previously configured settings for
this SharePoint Permission Level. Here you can also click Edit on the ribbon to make
changes to the SharePoint Permission Level’s settings. You will be brought to the Edit
SharePoint Permission Level page where you can change its settings.
Click Edit on the ribbon to change the configurations for this SharePoint Permission
Level. Note that the pre-defined SharePoint Permission levels including Contribute,
Design, Full Control, Read, and View Only, are not editable. For details on editing
configurations for a SharePoint Permission Level, see Creating and Editing SharePoint
Permission Levels.
Click Delete on the ribbon. A confirmation window appears, confirming that you want to
proceed with the deletion. Click OK to delete the selected SharePoint Permission Levels,
or click Cancel to return to the Manage SharePoint Permission Level interface without
deleting the selected SharePoint Permission Levels. Note that the pre-defined
SharePoint Permission levels including Contribute, Design, Full Control, Read, and View
Only cannot be deleted.
Creating and Editing SharePoint Permission Levels
To create a new SharePoint permission level, click Create on the ribbon. To modify a previously
configured customized SharePoint permission level, select the SharePoint Permission Level, and then
click Edit on the ribbon.
In the Create SharePoint Permission Level or Edit SharePoint Permission Level interface, configure the
following settings:
1.
Name and Description – Enter a Name for this permission level that you are about to create or
edit. Then enter an optional Description for future references.
2.
Permissions – Choose which permissions to include in this permission level. You can select
specified permissions of List Permissions, Site Permissions, and Personal Permissions by
selecting the checkbox before a specified permission. Check the Select All checkbox to select or
clear all permissions.
3.
Click OK to save the configurations and return to the Manage SharePoint Permission Level
interface, or click Cancel to return to the Manage SharePoint Permission Level interface
without saving any changes.
Configuring Dynamic Rules
Dynamic rules map file properties to SharePoint metadata using DLL files customized in C#. If you have
used a Dynamic Rule in a profile and the Property Mapping settings you configured are conflicting with
the specified Dynamic Rule, then the Dynamic Rule will take precedence and disable the corresponding
DocAve 6: File System Migrator
35
property mapping settings. If you selected the Configure the metadata file myself option or Use
existing metadata file option in plan settings, the dynamic rules you configured will not take effect.
*Note: You must configure dynamic rules to map the Date Created property, the Date Modified
property, the Last Saved by property, or the Owner property from the file system to SharePoint.
Managing Dynamic Rules
To access Dynamic Rule, click Profile Settings on the ribbon of Home tab. The Profile Settings tab
appears. Click Dynamic Rule on the ribbon. In the Dynamic Rule interface, you will see a list of
previously configured dynamic rules. In this interface, you can change the number of dynamic rules
displayed per page and the order in which they are displayed. To change the number of dynamic rules
displayed per page, select the desired number from the Show rows drop-down menu in the lower righthand corner. To sort the dynamic rules, click on a column heading such as Name, Description, DLL File
Name, and Last Modified Time.
You may perform the following actions to a Dynamic Rule:
Click Create on the ribbon to create a dynamic rule. For detailed information on creating
a new dynamic rule, see Creating and Editing Dynamic Rule.
Click View Details on the ribbon and you will see the previously configured settings for
this dynamic rule. Here you can also click Edit on the ribbon to make changes to the
dynamic rule’s settings. You will be brought to the Edit Dynamic Mapping page where
you can change this dynamic rule.
Click Edit on the ribbon to change the configuration of this dynamic rule. For details on
editing dynamic rule, see Creating and Editing Dynamic Rule.
Click Delete on the ribbon. A confirmation window appears, confirming that you want to
proceed with the deletion. Click OK to delete the selected dynamic rules, or click Cancel
to return to the dynamic rule without deleting the selected dynamic rules.
Creating and Editing Dynamic Rules
To create a new dynamic rule, click Create on the ribbon. To edit a previously configured dynamic rule,
select the dynamic rule and then click Edit on the ribbon. In the Create Dynamic Rule interface or Edit
Dynamic Rule interface, configure the following settings:
1. Name and Description – Enter a Dynamic Rule Name for the dynamic rule that you are about to
create or edit. Then enter an optional description for this dynamic rule for future reference.
2. Dynamic Rule – Browse a DLL file customized in C# from the local path.
3. Use the DLL file to configure your own mapping. Click Browse, select the specified DLL file, and
then click Open.
4. Click OK to save the configuration and return to the Dynamic Rule interface. Click Cancel to
return to the Dynamic Rule interface without saving any configuration or changes.
36
DocAve 6: File System Migrator
Setting Up a File System Migration Profile
The File System Migration profile is required to perform a migration job; it allows you to specify and
define numerous settings for the Migration jobs including Migration Options, Filter Options, Mapping
Options, and Advanced Options. File System Migrator provides you a default main profile with the basic
and recommended settings configured.
While it is theoretically possible to run an Online Migration job using the default migration profile
without configuring the settings described in the sections below, it is strongly recommended that you
configure these settings to ensure appropriate content management during migration.
Follow the instructions below to create an Online Migration Profile:
1. From the Home tab, in the Profile Manager group, click Profile Settings. The Profile Settings tab
appears.
2. From the Profile Settings tab, under the Profile/Sub-profile group, click New.
3. Enter a profile name in the pop-up window and click OK.
4. Select the Migration Options from the left-hand pane. Select a previously configured Migration
Options Sub-Profile from the drop-down menu. For details about this section, refer to Migration
Options.
5. Select the Filter Options from the left-hand pane and select a previously configured Filter Policy
from the drop-down menu. Or click New Filter Policy from the drop-down menu to create a new
filter policy. For details on creating a filter policy, refer to Creating and Editing Filter Policies.
6. Select the Mapping Options from the left-hand pane. Select a previously configured Mapping
Options Sub-Profile from the drop-down menu. For details about this section, refer to Mapping
Options.
7. Select the Advanced Options from the left-hand pane and configure the Character Length
Settings and the Illegal Character Replacement Settings. For details about this section, refer to
Advanced Options.
8. Click Save to save the profile. Alternatively, click Save as and enter a profile name to save it as
another profile. Select Save and replace existing profile to replace the original profile.
Otherwise, it is saved without removing the original profile.
Migration Options
Migration Options allow you to configure what securities can be migrated and to choose whether to
keep the source folder structure. Follow the instructions below to set up a Migration Options SubProfile:
1. From the Home tab, in the Profile Manager group, click Profile Settings. The Profile Settings tab
appears.
DocAve 6: File System Migrator
37
2. Click Migration Options on the left-hand pane, and from the Profile Settings tab, under the Subprofile group, click Edit Sub-profile to make the Migration Options field active.
3. From the Profile Settings tab, under the Profile/Sub-profile group, click New.
4. Enter a sub-profile name in the pop-up window and click OK.
5. Configure Folder Structure Management, which allows you to choose whether or not to
collapse folder structure of the migrated content.
Collapse all the folder structure – Migrates all the files within the source structured
folders to the same destination location by breaking the structures. Uncheck the Create
top level folder on destination checkbox as it is selected by default, and then check the
Collapse all the folder structure checkbox. You can choose whether or not to record the
source path of the folder or file by adding a column in the destination. Check the Add a
column to keep the source path checkbox, and use the default provided column name
DocAve Source Path or rename a new column name.
Note that if you migrate more than 2000 items at one time to a destination, SharePoint
performance might be affected.
Create top level folder on destination – Creates the top level folders of file system
source in SharePoint after migration. By default the Create top level folder on
destination checkbox is checked. Before you check the Create top level folder on
destination checkbox, you must uncheck the Collapse all the folder structure checkbox
at first. If you leave both of the two options unchecked, the source content will be
migrated to SharePoint without the top level folders, but preserving the source folder
structure under the top level folder.
6. Security Options – Choose whether to migrate the source users and groups to SharePoint.
When you select the Migrate users and groups checkbox, you can further choose whether to
migrate the security and inheritance of the folder and file from file system to SharePoint.
7. Click Save to save the sub-profile. Alternatively, click Save as and enter a sub-profile name to
save it as another profile. Select Save and replace existing sub-profile to replace the original
profile. Otherwise, it is saved without removing the original profile. Click Discard Changes to
clear all the modifications having been made to the current profile.
Mapping Options
Mapping Options allow you to set up the Property Mapping, the Content Type Mapping, and the
Security Mapping in a centralized interface. The Default Mapping sub-profile contains Property Mapping
and Permission Mapping default configurations. Follow the instructions below to set up a Mapping
Options Sub-Profile:
1. From the Home tab, in the Profile Manager group, click Profile Settings. The Profile Settings tab
appears.
2. Click Mapping Options on the left-hand pane, and from the Profile Settings tab, under the Subprofile group, click Edit Sub-profile to make the Mapping Options field active.
3. From the Profile Settings tab, under the Profile/Sub-profile group, click New.
38
DocAve 6: File System Migrator
4. Enter a sub-profile name in the pop-up window and click OK.
5. Configure the Property Mapping. This allows you to modify file system mapping properties to
SharePoint metadata. The default mappings are recommended.
*Note: If you want to configure the metadata file yourself and generate the Excel file, you must
make sure that the property mapping rules have been properly configured in the selected
profile, because the column in the generated Excel file will be migrated to SharePoint as
metadata. If there are no property mapping rules configured for the file system property, the
column cannot be created in the Excel file; however, if you use existing metadata file when you
run the migration job, the property mapping will run according to the existing Excel file,
regardless of property mapping settings.
To configure the property mapping rule, follow the steps below:
In the Property Mapping viewing pane, enter the keywords into the Search for File
System property text box to display the File System Properties that contain the
keywords you entered. Click to only display the property mapping rows which
contain the keywords you designate. Note that the search function is not case sensitive.
In the Property Mapping list, specify a property mapping row, and click the text box in
SharePoint Property column. Clear the text box, and then enter the name for the
SharePoint Property as you wish. Next, click in each row of Column Type to load the
drop-down menu, and specify the appropriate column type for the corresponding
property mapping. If the column type does not match, the value will fail to be mapped.
*Note: The Lookup column type requires you to configure the column settings. You are required
to enter the list/library name which you want to get information from, and then enter a name
for this Lookup column that you are creating. Thus, you will be able to get the information from
the list/library through this Lookup column. You can specify whether to allow multiple values,
and designate the separator. The Managed Metadata column type requires you to specify the
term set path, and choose whether to allow multiple values in this column. Follow the example
in the Term Set Path text box: System stands for the group name; semicolons (;) are the
separator; Keywords refers to the Term Set name.
6. Configure the Content Type Mapping, which allows you to match the content types of folders or
files in the source to SharePoint content types.
File Level –Designate a specific content type for the file. Refer to the instruction below:
i.
Click Add a Custom Metadata and then enter the wildcard character and
extension name (such as *.txt, doc.*, *.*; the character is not case sensitive) or
file name with extension name (for example, file1.docx) into the text box.
ii. Select a proper content type from the drop-down menu of Content Type
column, or enter a content type that has existed in SharePoint. The content
types you can select from the drop-down menu include Document, Form, Wiki
DocAve 6: File System Migrator
39
Page, Picture, Office Data Connection File, Universal Data Connection File, and
Report.
You are able to delete previously created metadata mappings through clicking
Delete the Selected Custom Metadata(s).
Folder Level –Designate a specific content type for the folder.
i.
Click Add a Custom Metadata and then enter the keywords of the folders’ name
into the text box (such as *tem, *, and tem*).
ii. Select a proper content type from the drop-down menu of Content Type
column, or enter a content type that has existed in SharePoint. The Content
Types you can select from the drop-down menu are Folder and Summary Task.
You are able to delete previously created metadata mappings through clicking
Delete the Selected Custom Metadata(s).
Make sure that in SharePoint Library Settings > Advanced Settings, the Allow Management of
Content Type value is set to be Yes, and that your specified SharePoint content type exists in the
library. Otherwise, the source content type will not map.
7. Configure the Security Mapping, which allows you to specify the User Mapping, Domain
Mapping, Group Mapping, and Permission Mapping of File System to SharePoint.
40
User Mapping (Optional) –Replaces existing user name in the file system with the
existing or default user name in SharePoint metadata fields. The migrated objects’
corresponding users are also mapped during the migration job. Select a previously
created user mapping rule from the drop-down menu, and click View to access the
detailed information about this selected user mapping. If you want to create a new user
mapping rule, click New User Mapping in the drop-down menu; this brings you to the
User Mapping Create page. For specific instructions on setting up user mapping, refer to
the DocAve 6 Control Panel Reference Guide.
Domain Mapping (Optional) –Replaces existing domain name in file system with
another domain name in SharePoint metadata fields. The domain information of
migrated objects’ corresponding users and groups is also replaced during the migration
job. Select a previously created domain mapping rule from the drop-down menu, and
click View to access the detailed information about this selected domain mapping. If you
want to create a new domain mapping rule, click New Domain Mapping in the dropdown menu; this brings you to the Domain Mapping Create page. For specific
instructions on setting up domain mapping, refer to the DocAve 6 Control Panel
Reference Guide.
Group Mapping (Optional) –Replaces groups in file system to the existing groups in
SharePoint metadata field. The group information of migrated objects is also replaced
during the migration job. Select a previously created group mapping rule from the dropdown menu, and click View to access the detailed information about this selected group
mapping. If you want to create a new group mapping rule, click New Group Mapping in
the drop-down menu; this brings you to the Group Mapping Create page. For specific
DocAve 6: File System Migrator
instructions on setting up group mapping, refer to the DocAve 6 Control Panel
Reference Guide.
*Note: When the destination environment is SharePoint Online, the destination group
name must be in the format of O365AD:group name.
*Note: When user mappings, domain mappings, and group mappings are configured in the
DocAve Migrator Tool rather than in the Mapping Options sub-profile, the mappings configured
in DocAve Migrator Tool will take effect once the following conditions are both met:
The mapping XML files are stored
in …\AvePoint\DocAve6\Agent\data\Migrator\FileMigrator.
The value of the attribute ExternalSecurity in FileSystemMigrationConfiguration.xml
file is True. The FileSystemMigrationConfiguration.xml file resides
in …\AvePoint\DocAve6\Agent\data\Migrator\FileMigrator.
*Note: When user mappings, domain mappings, and group mappings are configured in both the
DocAve Migrator Tool (the XML files are stored
in …\AvePoint\DocAve6\Agent\data\Migrator\FileMigrator and the value of the attribute
ExternalSecurity in FileSystemMigrationConfiguration.xml file is True) and the Mapping
Options sub-profile, the mapping configurations will be merged. If there is any conflict between
DocAve Migrator Tool mappings and Mapping Options mappings, the configuration in DocAve
Migrator Tool will take effect.
*Note: When user mappings, domain mappings, and group mappings are configured in the
DocAve Migrator Tool (the XML files are stored
in …\AvePoint\DocAve6\Agent\data\Migrator\FileMigrator and the value of the attribute
ExternalSecurity in FileSystemMigrationConfiguration.xml file is True) and mapping files are
imported in Control Panel > Mapping Manager, the mapping configurations will be merged. If
there is any conflict between DocAve Migrator Tool mappings and Mapping Manager mappings,
the configuration in DocAve Migrator Tool will take effect.
Permission Mapping (Required) –Maps the file system permissions to the SharePoint
permissions. A default permission mapping rule is provided with the name of Default
Permission Mapping. Select a previously created permission mapping rule from the
drop-down menu, and click View to access the detailed information about this selected
permission mapping. If you want to create a new permission mapping rule, click New
Permission Mapping in the drop-down menu; this brings you t to the Permission
Mapping Create page. For specific instructions on setting up permission mapping, refer
to Creating and Editing Permission Mappings.
8. Click Save to save the sub-profile. Alternatively, click Save as and enter a sub-profile name to
save it as another profile. Select Save and replace existing sub-profile to replace the original
profile. Otherwise, it is saved without removing the original profile. Click Discard Changes to
clear all the modifications which have been made to the current profile.
DocAve 6: File System Migrator
41
Advanced Options
Configure the Advanced Options to set the dynamic rule, character length settings and the illegal
character replacement settings. Follow the steps below to set up Advanced Options.
Dynamic Rule
Map the source file securities and properties to the destination SharePoint metadata. Select a previously
created dynamic rule from the drop-down list. Click View next to the drop-down list to view the detailed
information of the selected dynamic rule, or click New Dynamic Rule from the drop-down list to create a
new one. For more information on Dynamic Rule, refer to Configuring Dynamic Rules.
Character Length Settings
Configure character length limitations for SharePoint URL, filename, and folder name. In SharePoint, the
maximum length of SharePoint URL is 260 characters, and the maximum length of file name and folder
name is 128 characters.
Maximum Length of the folder name – The default value is 60, and you can define the
maximum from between 1 and 128.
Maximum Length of the file name – The default value is 80, and you can define the
maximum from between 1 and 128. If the character length of the file name consisting of
the file name, the period (.), and extension name (the character length of the file
123456.doc=6+1+3=10) exceeds the limitation you set, the extra characters at end of
the file name are pruned.
Maximum Length of the SharePoint URL – The default value is 255, and you can define
the maximum from between 1 and 260.The length of the SharePoint URL is calculated
from the first character of the managed path, that is “/”. When the folder or file’s URL
exceeds the limitation, the folder or file will move to upper level folders until the URL
character length does not exceed the limitation.
*Note: If you deselect the checkbox next to a setting, then that setting is considered not configured. In
that case, once a file name, folder name, or SharePoint URL exceeds the maximum length that
SharePoint supports, the file or folder will fail to migrate to the destination.
Illegal Character Replacement Settings
Modify or add illegal character mappings to map the illegal characters contained in the file and/or folder
names to the proper characters in SharePoint. By default, illegal characters including ~ " # % & * : < > ? \
/ { | }, are replaced with an underscore (_).These default replacement settings can be modified, but not
deleted.
42
To modify an illegal character mapping character, double-click the underscore in the
Replace with column and enter a new valid character.
DocAve 6: File System Migrator
To add an illegal character mapping, click Add an Illegal Character. Then enter the illegal
character in the Illegal characters in SharePoint column and the valid character in the
Replace with column.
To delete one or more illegal character mappings that you added, select the Illegal
characters in SharePoint check box, select the mappings, and then click Delete the
Selected Illegal Character(s). You can also remove the illegal character mapping by
clicking the delete ( ) button.
Managing Sub-profiles
File System Migrator provides the Migration Options sub-profile to manage the folder structure and the
securities for the migrated content, and the Mapping Options sub-profile to specify the Property
Mapping, Content Type Mapping, and Security Mapping (the Security Mapping contains the User
Mapping, Domain Mapping, Group Mapping, and Permission Mapping).Refer to the information below
to manage an existing sub-profile.
Editing an Existing Sub-profile
To edit an existing sub-profile, complete the following steps:
Select an existing sub-profile from the Sub-Profile drop-down list.
Click Edit Sub-profile in the Sub-profile group to edit the sub-profile settings.
Click Save in the Sub-profile group to save the sub-profile settings. Alternatively, click Save As
and enter a profile name to save it as another profile. Select Save and replace the existing subprofile to replace the original profile. Otherwise, it is saved without removing the original
profile.
Deleting an Existing Sub-profile
To delete an existing sub-profile, complete the following steps:
Select an existing sub-profile from the Sub-Profile drop-down list.
Click Delete in the Profile/Sub-profile group to delete the sub-profile, or directly click Delete
next to the sub-profile name in the drop-down list. Note that the default sub-profile and the
sub-profile used in the main profile cannot be deleted.
Uploading a Previously Configured Sub-profile
To upload a previously configured sub-profile, complete the following steps:
In the Profile Settings interface, click Migration Options or Mapping Options on the left panel.
Click Edit Sub-profile to make the Migration Options field active.
Click Upload in the Sub-profile group.
DocAve 6: File System Migrator
43
Select a previously created sub-profile and click Open to upload it. If a sub-profile having the
same name exists in DocAve, you have two options:
Upload as a new profile – Upload the sub-profile and name the uploaded sub-profile by
adding a suffix, for example, subprofile_1.
Overwrite current profile – Replace the existing sub-profile. The Default Mappings subprofile and the Default Migration Options sub-profile cannot be overwritten.
Downloading an Existing Sub-profile
To download an existing sub-profile, complete the following steps:
In the Profile Settings interface, click Migration Options or Mapping Options on the left-hand
panel.
Select an existing sub-profile and click Edit Sub-profile in the Sub-profile group.
Click Download in the Sub-profile group to save the sub-profile to the local disk.
44
DocAve 6: File System Migrator
Performing a File System Migration
A file system migration migrates content, configurations, and securities from a file system server to the
SharePoint environment. To start a File System Migration job, click Online Migration on the ribbon. This
brings you to the Create a New Plan interface.
*Note: Do not run more than seven jobs simultaneously. Otherwise, some jobs may fail.
To perform a File System Migration job, complete the following steps:
Selecting the Source and Destination Nodes
1. In the Source pane, click the file system server name to expand the data tree. Select the source
files to migrate:
Find the node whose data you wish to migrate. If working with a large environment,
enter the name of the node (for example, folder and file) into the Input Keyword text
box to search for the desired node. You can only search out the nodes whose name is
displayed in the currently expanded tree. The nodes that are not displayed in the
expanded tree cannot be searched.
Select the source node by selecting the corresponding checkbox. Within each folder
level, there is a node named Items. The prompt next to Items displays how many files
are contained in the Items node. You can click the Items node and the Item Browser
page interface appears. Select the files that you wish to migrate by selecting
corresponding checkboxes and click OK.
2. In the Destination pane, click the farm name to expand the data tree. Select the destination
node:
Find the node that you wish to migrate the source data to. If working with a large
environment, enter the keyword of the node into the Input Keyword text box to search
by the desired site URL, site title or library title. You can only search out the nodes
whose name is displayed in the currently expanded tree. The nodes that are not
displayed in the expanded tree cannot be searched.
To narrow down the search criteria and display fewer nodes on the tree, right-click the
specified node and select Advanced Search. In the Advanced Search interface, click Add
a Criterion and configure the following settings:
i.
Rule – Select the rule for this search. The following table displays the supported
rules for each node that is supported for Advanced Search.
DocAve 6: File System Migrator
45
Environment
SharePoint OnPremises
Node
Farm Level
Web Application Level
Rule
Web Application: URL
Site Collection: Name
Site Collection: URL
Site: Name
Site: URL
List/Library: Name
List/Library: URL
Folder: Name
Folder: URL
Site: Name
Site: URL
List/Library: Name
List/Library: URL
Folder: Name
Folder: URL
Sites
Lists
Folders
SharePoint Online
Sites
(My Registered Sites)
Lists
Folders
ii. Condition – Select the condition for the rule from the drop-down list.
iii. Value – Enter the value for the rule in the text box.
iv. To add more criteria, click Add a Criterion, and repeat steps above. You can
change the logical relationships between the criteria by clicking the And or Or.
By default, the logical relationship is set to And. And means that the child nodes
that meet all of the criteria will be included in the result. Or means that the
child nodes that meet any criterion will be included in the result. The Basic Filter
Condition area displays the logic relationships of filter criteria.
v. Click Search to start searching the child nodes.
Select the destination node by selecting corresponding checkbox. You can also create a
new container to be the destination node without leaving the current page.
For details on creating a container in SharePoint, refer to Creating Containers.
3. When the job has finished configuring, select one of the following options:
46
Click Run Now to perform a migration job immediately. For more information on the
Run Now interface, refer to Configuring the Run Now Interface.
Click Save As New Plan to configure more specific settings and then save them as a file
system migration plan, which then can be used to perform a file system migration job.
For more information on the Save As New Plan interface, refer to Configuring the Save
As New Plan Interface.
DocAve 6: File System Migrator
Creating Containers
Prior to migration, containers should be created in the destination to store the migrated content. The
destination container in File System Migration can be a library or folder.
DocAve allows you to create containers in SharePoint without leaving the DocAve interface, providing
you the ability to perform migration tasks without using SharePoint to create all of the necessary
containers in the destination.
To create a container:
Navigate to the Destination pane and enter the name of a new container in the available field.
Click Create Container. The Create Container interface appears.
*Note: If creating a folder, no settings need to be configured. Click Create Container at the
folder level to create a folder immediately.
If creating a library, configure the settings described below.
Object Type – The Library option is selected by default. Only a Library can be created at
the list/library level in File System Migrator.
Category – Select the category for the new library. The following library types are
supported for a File System Migrator destination: Document Library, Form Library, Wiki
Page Library, and Picture Library.
Document Template – For a newly created library, select a document template from the
drop-down list to specify the default template for all new files created in this document
library.
Navigation – Select Yes if you want to display the library on the Quick Launch.
Document Version History (for Document Library, Form Library) – Select Yes to create a
version each time you edit a file in this library.
Picture Version History (for Picture Library only) – Select Yes to create a version each
time you edit a file in this picture library.
Click OK to create the new list or library, or click Cancel to close the Create Container interface.
DocAve 6: File System Migrator
47
Configuring the Run Now Interface
In the Run Now interface, configure the following settings:
Conflict Resolution – A conflict occurs when an item name in file system is identical to an
existing item in SharePoint. At the Container level, the conflict resolutions provided are Merge
and Skip. Merge requires you to Check lower objects, and configure the content level conflict
resolution. Skip provides the configuration of the content level conflict resolution as optional.
Refer to the list below for a more detailed view about the Conflict Resolution.
Conflicting Levels
Container Level Conflict Resolution
Check lower object
Content Level Conflict Resolution
Resolutions
Merge (To check lower object is required)
Skip (To check lower object is optional)
Overwrite
Skip
Append
New version
Profile Selection – Configure the related migration options and mappings for the migration job.
Select a previously created migration profile from the drop-down menu. File System Migration
provides a default main profile named Default Profile.
Destination Agent Group – Select a destination agent group to execute the migration job. An
agent group can contain multiple agents for load balancing and better performance.
*Note: This section only appears when the destination node is in SharePoint on-premises.
High Performance Conversion – Select whether or not to use the High Performance Conversion
function.
*Note: This section only appears when the destination node is in SharePoint on-premises.
Use High Performance Conversion to speed up your migration – If you select this
option, File System Migration will move the source data stubs to SharePoint and move
the source data BLOB content to the specified logical device of the site or site collection
where the destination node resides.
*Note: Only the logical device with the storage type of Net Share is supported.
Migrate content only – If you select both Use High Performance Conversion to speed
up your migration and Migrate content only, the metadata/security information cannot
be migrated again because the source data has been moved.
*Note: DocAve recommends using the same physical device (or the same disk) as the source file
system and the physical device used by the destination node.
Migration Database – Choose whether to specify a migration database to store detailed job
information in SQL Server for each farm. For detailed information about configuring a Migration
Database, refer to Configuring Migration Databases.
48
DocAve 6: File System Migrator
Notification – Select the e-mail Notification profile for sending the notification report. For more
information on working with notification policies, refer to DocAve 6 Control Panel Reference
Guide.
Job Status Option – Specify whether to take the metadata and/or security exceptions into
consideration for the file system migration job status. If only the content metadata or security
fails to migrate and you select the Ignore metadata/security exceptions checkbox, the
migration job status will be marked as Finished. Otherwise, the job status will be marked as
Finished with Exception.
*Note: This section only appears when High Performance Conversion is disabled.
Configuring the Save As New Plan Interface
In the Save As New Plan interface, configure the following settings to build a migration plan:
Plan Name – Enter a name in the text box for the plan you are about to create. It is optional to
enter the description for the plan.
Profile Selection – Configure the related migration options and mappings for the migration job.
Select a previously created main profile from the drop-down menu. File system
Migration provides you a default main profile named Default Profile.
Click New Profile to create a new profile. The Profile Settings interface appears. For
detailed instructions on configuring the main profile, refer to Setting Up a File System
Migration Profile.
Destination Agent Group – Select a destination agent group to execute the migration job. An
agent group can contain multiple agents for load balancing and better performance.
*Note: This section only appears when the destination node is in SharePoint on-premises.
High Performance Conversion –Select whether or not to use the High Performance Conversion
function.
*Note: This section only appears when the destination node is in SharePoint on-premises.
Use High Performance Conversion to speed up your migration - If you select this
option, File System Migration will move the source data stubs to SharePoint and move
the source data BLOB content to the specified logical device of the site or site collection
where the destination node resides.
*Note: Only the logical device with the storage type of Net Share is supported.
Migrate content only - If you select both Use High Performance Conversion to speed
up your migration and Migrate content only, the metadata/security information cannot
be migrated again because the source data has been moved.
*Note: DocAve recommends using the same physical device (or the same disk) as the source file
system and the physical device used by the destination node.
DocAve 6: File System Migrator
49
Source File Management – Configure settings for file system content upon migration job
completion.
*Note: This section only appears when High Performance Conversion is disabled.
Copy to the destination –Copies the content from the source to the destination. After
the job is finished, the content can be accessed from both file system and SharePoint.
Move to the destination –Moves the content from the source to the destination. After
the job is finished, the content in the source has been deleted, and you can only access
the content from SharePoint.
Additionally, you can select the Leave a shortcut in the source for each file checkbox.
After a migration with the checkbox selected, a shortcut is left in the source. Users can
click the shortcut in the source to access the file and will be brought to SharePoint
interface.
Move to another location once the job is completed –Moves the content to another
location once the job is complete, and deletes the content from the source. You must
enter the UNC path, and select a managed account profile from the drop-down list to
connect to the specific location where you want to store the content once the job is
finished. To check the validation of your path, click Validation Test.
Additionally, you can select the Leave a shortcut in the source for each file checkbox.
After a migration with the checkbox selected, a shortcut is left in the source. Users can
click the shortcut in the source to access the file and will be brought to the new location.
*Note: You can also click New Managed Account Profile to create a new managed
account profile.
*Note: If a folder with the same name already exists in the specified location, the
content in the source folder will be merged to the destination folder of the same name.
If a file with the same name already exists in the specified location, the file will not be
moved to the specified location; it stays in the original source path.
Metadata Source – Specify the metadata that will be migrated with the content to the
destination. You may choose to use the file system metadata, configure your own metadata file
yourself, or use the existing metadata file.
50
Use the metadata of the file system –Uses the source file system metadata information
with no need to configure the metadata.
Configure the metadata file myself –Generates a metadata Excel file to customize your
own metadata. If you select the Configure metadata file myself checkbox, you are
required to generate Excel first before you run the migration job. Refer to Customized
Metadata File for more detailed instructions on configuring the metadata file.
Use the existing metadata file –Uses the former created metadata files that exist in the
source. If you select the Use the existing metadata file checkbox, make sure that the
metadata files exist in the source before you perform the file system migration job.
DocAve 6: File System Migrator
Refer to Existing Metadata File for more detailed instructions on using the existing
metadata file.
Schedule Selection – In the schedule configuration area, choose one of the following:
No Schedule – Select this option to apply the rules of this plan, and then you must run
the job manually.
Configure the schedule myself – Select this option to configure the specific time you
want to collect the data of this profile. The Schedule Settings area appears when you
select this option.
Click Add Schedule, and then the Add Schedule interface appears. For more information on the
Add Schedule interface, refer to Configuring the Add Schedule Interface.
Notification – Select the e-mail Notification profile for sending the notification report. For more
information on working with notification policies, refer to the DocAve 6 Control Panel Reference
Guide.
Associated Plan Group – Select an associated plan group or create a new plan group in the
Associated plan group(s) drop-down list in order to make the plan run according to the selected
plan group settings. For more information on plan groups, refer to the DocAve 6 Control Panel
Reference Guide.
Migration Database –Specify a migration database to store detailed job information in SQL
Server for each farm. For detailed information about the Migration Database, refer to the
Configuring Migration Databases.
When the plan has been configured , select one of the following options:
Click Save, then select Save to save the plan you have configured. The Plan Manager
interface appears. For more information, refer to Managing Plans.
Click Save, then select Save and Run Now to save the plan you have configured. The
Run Now interface appears. Configure the following settings:
Options – Select a type of migration for this migration job.
Full migration – Migrates with all content from the source to the
destination according to the settings of the profile.
Incremental migration – Migrates the newly created or updated
content in the source node since the last migration job.
*Note: If you select the Incremental migration option, the Remigrate
the objects whose metadata/securities failed to be migrated in the
last migration job option in the Conflict Resolution section will be
enabled. You are then required to decide whether or not to remigrate
the objects whose metadata/securities failed to be migrated in the last
migration job.
Conflict Resolution –Specify the conflict resolution action that occurs when the
item names in file system conflicts with an existing item in SharePoint. For the
DocAve 6: File System Migrator
51
Container level, the conflict resolutions provided are Merge and Skip. Merge
requires you to check the lower objects, and configure the content level conflict
resolution. Skip provides the configuration of the content level conflict
resolution as optional. For more detailed information of Conflict Resolution,
refer to Appendix C: Conflict Resolution.
Job Status Option – Specify whether or not to take the metadata/security
exceptions into consideration for the file system migration job status. If the
content metadata or security fails to migrate and you select Ignore
metadata/security exceptions checkbox, the migration job status will be
marked as Finished. Otherwise, the job status will be marked as Finished with
Exceptions.
*Note: This section only appears when High Performance Conversion is
disabled.
Click OK to run the file system migration job. Click Cancel to go back to the Plan
Manager interface.
Customized Metadata File
This section is only available when the Configure the metadata file myself checkbox is selected. When
this option is selected, after the configurations of this plan, you are required to generate an Excel file
before running the migration job. Refer to Metadata Excel File for more detailed information.
Generate only one metadata file –Generates only one metadata file in the source. This
metadata file is stored in the top level folder or the foremost selected folder in the
source tree.
Create a new version of the migrated file in the destination – The Version
Sequence and New File Name columns will be automatically added in the
metadata file. If you select the Collapse all the folder structure option or
Customize the folder structure of the migrated file in the destination option,
there may be files sharing the same name in the same path. Selecting this
option allows you to specify the different versions for these files under the new
file name.
*Note: This option offers a specific solution: if you want to migrate the files with
different names in file system as different versions of a specified file to
SharePoint destination, select this option, and then customize the values for
Version Sequence and New File Name in the generated Excel.
Customize the folder structure of the migrated file in the destination – The
Custom Folder column will be automatically added in the metadata file. Once
this column is created, the folder structure of the content in the source will be
collapsed. You can customize the file path in the Custom Folder column. The
folder structure in the destination will be migrated according to the Custom
Folder column.
52
DocAve 6: File System Migrator
*Note: If you do not check Generate only one metadata file checkbox, the
metadata files will be generated in each selected folder of the source, and the
customized columns will be added to each metadata file.
Rename the migrated content in the destination – Renames the content to be migrated
in the generated Excel. This option will automatically add the “New File Name” column
in the metadata files.
*Note: If you select Generate only one metadata file and Rename the migrated
content in the destination at the same time, you can generate only one metadata file in
the source with an added column named New File Name.
Add a new column to the metadata file – Automatically adds the customized column in
the metadata file. Through configuring the column value in the metadata file, you are
able to create your desired column for the source content in SharePoint. Click Add a
column, and then the configuration field appears. Enter a column name in the Column
name column, and select a content type from the drop-down menu of content type
column. Repeat the actions to add more columns. If you want to delete a previously
created column, select the checkbox ahead of the column name and then click Delete
the Selected Column(s).
Existing Metadata File
This section is only available only when the Use the existing metadata file checkbox is selected. You
must make sure that the Excel file has been placed in the source, and the columns you want to use have
been added in the Excel file. Refer to Metadata Excel File for a more detailed instruction.
Use only one metadata file –Uses only one existing metadata file for the migrated
content.
Create a new version of the migrated file in the destination – For this feature
to function properly, make sure Version Sequence and New File Name columns
have been added in the metadata file. You may have selected the Collapse all
the folder structure option, or you may have selected the Customize the folder
structure of the migrated file in the destination option with the Custom Folder
column created, which may lead to the fact that multiple files are using the
same name in the same path. If there are multiple files sharing the same name
in the same path, selecting this option will allow you to create different versions
for these files under the new file.
*Note: This option can realize a specific functionality: if you want to migrate the
files with different names in file system as the different versions of a specified
file to the SharePoint destination, select this option, and then customize the
values for File Version and New File Name in the existing metadata file.
Customize the folder structure of the migrated file in the destination – For this
feature to function properly, make sure the Custom Folder column has been
added in the existing metadata file. Once this column is created, the folder
DocAve 6: File System Migrator
53
structure of the content in the source will be collapsed. You can customize the
file path in the Custom Folder column. The folder structure in the destination
will be migrated according to the Custom Folder column. If there is no value in
this column for the corresponding file, the file will be migrated to the root folder
of the selected destination node in SharePoint.
Rename the migrated content in the destination – For this option to function properly,
make sure the “New File Name” column has been added to the existing metadata file.
Metadata Excel File
File System Migration allows you to migrate content with customized metadata by using an Excel file.
The metadata excel file will be used when you select the Configure the metadata file myself or Use the
existing metadata file option. For more information, refer to Configuring the Save As New Plan
Interface. The Excel file must be generated first or already be placed in the source file system before
running the migration job.
The columns will be migrated as the property of the items to the destination SharePoint. Read the table
and the introduction below for more usage information.
Type
Single line of text
Column_Name:= Type
Column_name:=Text
Multiple lines of text
Choice_Checkboxes (allow
multiple :)
Choice_Drop-Down Menu
Choice_Radio Buttons
Number
Date and Time_Date Only
Date and Time_Date &
Time
Yes/No
Person or Group
Managed Metadata
Column_name:=Note
Column_name:=CheckBoxChoice
Example of Content Format
Random Character String, less
than 255 characters
Random Character String
Random Character String
Column_name:=DropDownChoice
Column_name:=RadioChoice
Column_name:=Number
Column_name:=DateOnly
Column_name:=DateAndTime
Random Character String
Random Character String
10
12/30/2012
12/30/2012 5:34:27 AM
Column_name:=Boolean
Column_name:=User
Column_name:=Taxonomy(System;Ke
ywords;True;;)
Column_name:=Lookup(shared
document;title;False;;)
Column_name:= CurrencyNumber
Column_name:= URL
Yes
Domain\User
11;22;33
Lookup
Currency
Hyperlink or Picture
54
Refer to the note below
100
http://www.avepoint.com
Single line of text – Allows random character string less than 255 characters. If you do
not follow the corresponding column type format to customize the specific column, the
column values you have added in the metadata file will be migrated to SharePoint in the
single line of text.
Multiple lines of text – Allows random character string.
DocAve 6: File System Migrator
Choice_Checkboxes (allow multiple :) – Allows you to specify multiple values in the
column cell and these values will be migrated to destination SharePoint as Choices. The
format is aaa;#bbb;#ccc.
Choice_Drop-Down Menu/Choice_Radio Buttons –Migrates the specified values in the
column cells as Choices. The format is aaa.
Number – The column value can be any number.
Date and Time_Date Only/Date and Time_Date & Time – Make sure the value is in the
same format as that in SharePoint. The values in Date and Time_Data & Time column,
and Date and Time_Data Only column, will be automatically converted into the
corresponding time, according to the time zone that the SharePoint Server is using.
Yes/No – If you enter yes/true or any character as the column value into this column,
after the migration job, in the destination SharePoint the value in the file/folder’s
Yes/No column is Yes. If you enter no/false into the column or you do not enter any
character into the column, in the destination SharePoint the value in the file/folder’s
Yes/No column is No. Note that this column is not case-sensitive.
Person or Group – Allows you to assign SharePoint users, SharePoint groups, and
domain groups for the file/folder when migrated to SharePoint destination.
*Note: If you want to enter multiple values, please specify the column header in the
format: Column_name:=User(true). Then, enter multiple values into the column cell, for
example summer\user1;#summer\user2;#summer\user3.
*Note: When the destination environment is SharePoint Online, the value of the user
must be in the format of user [email protected] and the value of the
group must be in the format of group name or O365AD:group name.
Managed Metadata – The field type is taxonomy which represents fixed character
strings. You are allowed to specify four values, respectively the group name, term name,
whether to allow multiple values, and the separator you want to use. If there is already
a column with the same name but in a different type existing in the destination, the
assignment for this column will be invalid; and if there is no column with the same name
in the destination, a Managed Metadata column will be created. You can enter nested
terms in this column such as a<b<c<d, make sure the multiple terms are separated by
the separator you set up.
Lookup – The field type is lookup which represents fixed character strings. You are able
to specify two values. First one is the name of the list or library where it gets
information from. The second one is the name of column which it points to. Note that
the list or library must exist, the corresponding values of this column it points to must
exist, and the second value is case-sensitive.
Currency – The value can be any number or the number with the currency unit, such as
100.
*Note: In the generated metadata file, by default the Full Path column is the first row. If you delete the
entire Full Path column or clear the values of the specific files in the Full Path column, the specific files
DocAve 6: File System Migrator
55
will not be migrated to the destination. In the following situations, the metadata will not be migrated to
the destination:
If the column value does not match with the column type, the column value will not be
migrated to destination.
If there were a column in the destination with the same name but in different types, the
column will not be created.
If there is no value in an entire column, this column will not be created in the
destination.
You can also use the following features by editing the Excel file:
Feature Name (Column Name in Excel)
New File Name
Version Sequence
Custom Folder
Content Approval
Content Type:=ContentType
Format of Value
Random Character String
Positive integer
Random Character String
One of the approval status
(Approved, Denied, Pending,
Draft)
Random Character String
Example
abc.docx
1
Folder A
Approved
Document
New File Name – Define a new name for the source file when it is migrated to
SharePoint.
Version Sequence – When multiple source files have the same file name, the value of
Version Sequence determines the migration sequence and file version in the
destination. For example, the file name of two files is abc.docx. The values of Version
Sequence is defined as 1 and 2. The file whose Version Sequence value is 1 will be
migrated to the destination first and the file version in destination is version 1. The file
whose Version Sequence value is 2 will be migrated to the destination next and the file
version in destination will be updated.
Custom Folder – Places the source file in a custom folder after the file is migrated to the
destination. The source file will be migrated to a new folder named by the value of
Custom Folder. This feature will collapse the source folder structure. You can create
folder structure by entering \ between folder names.
Content Approval – Define the approval status for the file when it is migrated to the
destination. To use this feature, make sure the Require content approval for submitted
items? feature is enabled in the destination, and the value of the attribute
LoadModerationStatus is true. If the attribute value is false, Content Approval will be
migrated to the destination as a Single Line of Text column. The attribute resides in a
configuration file. For more information, refer to Configuring the
FileMigrationConfiguration.xml.
*Note: This feature is not supported for SharePoint Online.
56
DocAve 6: File System Migrator
Content Type:=ContentType – Define a content type for the file. If a content type
mapping is also configured for this file in Profile Settings, the content type mapping
configured in the metadata file will take effect.
*Note: The content type must exist in the destination node.
Configuring the Add Schedule Interface
To configure the schedule settings, complete the following steps:
Options – Select a type of migration for this schedule.
Full migration – Migrates with all content from the source to the destination according
to the settings of the profile.
Incremental migration – Migrates the newly created or updated content in the source
node since the last migration job.
*Note: If you select the Incremental migration option, the Remigrate the objects
whose metadata/securities failed to be migrated in the last migration job option in the
Conflict Resolution section will be enabled, and you are required to decide whether or
not to remigrate the objects whose metadata/securities failed to be migrated in the last
migration job.
Conflict Resolution –Specify the conflict resolution action that occurs when the item names in
file system conflicts with an existing item in SharePoint. For the Container level, the conflict
resolutions provided are Merge and Skip. Merge requires you to check the lower objects, and
configure the content level conflict resolution. Skip provides the configuration of the content
level conflict resolution as optional. For more detailed information of Conflict Resolution, refer
to Appendix C: Conflict Resolution.
Schedule Settings – Specify the frequency to run this recurring schedule. Enter an integer into
the text box, and select Minute(s), Hour(s), Day(s), Week(s), Month(s) from the drop-down
menu.
Range of Recurrence – Specify when to start the job, and the schedule ending.
Start Time – Select the date and time for applying the rules of this profile and collecting
the data. Note that the start time cannot be earlier than the current time.
Schedule ending – Designate when to stop the scheduled job. Select No end date for
the setting of this profile to be applied repeatedly until you stop it manually. Select End
after __ occurrence(s) to have the job stopped after the defined occurrences that you
configured in the text box. Select End by Date + Time to specify the exact date and time
for the data to stop being collected.
Job Status Option – Specify whether or not to take the metadata/security exceptions into
consideration for the file system migration job status. If the content metadata or security fails to
migrate and you select Ignore metadata/security exceptions checkbox, the migration job status
will be finished. Otherwise, the job status will be Finished with Exceptions.
*Note: This section only appears when High Performance Conversion is disabled.
DocAve 6: File System Migrator
57
Click OK on the ribbon to save the schedule setting configurations. Click Cancel on the ribbon to
return to the Plan setting interface without saving any changes.
Repeat the configurations above to create more schedules.
58
DocAve 6: File System Migrator
Managing Plans
The Plan Manager interface allows users to view, edit, test run, and run plans. To access the Plan
Manager, after launching the migration module, click Plan Manager next to the Home tab. In the Plan
Manager interface, any plans that you have previously created are displayed in the main display pane.
In this interface, you can change the number of plans displayed per page. To change the number of
plans displayed per page, select the desired number from the Show rows drop-down menu in the lower
right-hand corner. To sort the plans, click the column heading such as Plan Name, and Plan ID.
Perform the following actions in the Plan Manager interface:
Select a plan and click View Details. The source node and the destination node are
displayed on the data tree. You can also click Settings on the ribbon to view the
migration settings of this plan. When you want to change the nodes you selected or
want to modify the migration settings, click Edit on the ribbon.
Select a plan and click Edit on the ribbon to change the configurations for the selected
plan. You can change the nodes you selected and modify the migration settings. Besides,
you can click Profile Settings or Create Container to performing the corresponding
actions.
Select the plans that you want to delete and click Delete on the ribbon. A confirmation
window appears, confirming that you want to proceed with the deletion. Click OK to
delete the selected plans, or click Cancel to return to the Plan Manager interface
without deleting the selected plans.
Click Test Run to perform a test run job that simulates the real migration job. By viewing
the job report of the test run, you can find whether the source content can be migrated
to the destination successfully, and then adjust the plans or optimize the settings.
*Note: Test Run results may differ from the results of an actual migration. Investigate
Test Runs that display Finished with Exceptions results by reviewing the log file. If no
obvious content, metadata, or permission errors are found, it is likely that the actual
migration will complete successfully.
Click Run Now to perform the migration job.
Generate Excel – When selecting a file system migration plan, you can click Generate
Excel to generate the Excel file to customize your own metadata file. For details of using
the generated Excel file, refer to Metadata Excel File.
DocAve 6: File System Migrator
59
File System Migrator Tools
The file system migration tools are provided in the …AvePoint\Agent\bin. This tool is used to test the
connection to the Net Share path, explore the file information of permissions and properties, run a test
migration job to scan the source data, and configure the domain mapping, group mapping, and user
mapping which can be used during File System migration. Refer to the DocAve 6 Supplementary Tools
User Guide for instructions on using these tools.
60
DocAve 6: File System Migrator
Accessing File System Migration Using Hot Key Mode
To work faster and improve your productivity, DocAve supports Hot Key mode to perform
corresponding actions quickly by using only the keyboard.
To access Hot Key mode, in DocAve interface, use the key combinations of Ctrl + Alt + Z on the
keyboard, and then press 1 to direct to the products pane. To access the Migration products, press M.
The following is a list of hot keys for the top level. Using the hot key listed below to access to the
corresponding product interface.
For example, continue pressing F, you will be brought to the File System Migration Interface.
SharePoint Migration
File System Migration
Lotus Notes Migration
eRoom Migration
Livelink Migration
Exchange Public Folder Migration
Quickr Migration
EMC Documentum Migration
Functionality Name and Hot Key
SM
F
N
E
L
P
Q
D
File System Migration
To access Hot Key mode, in the File System Migration interface, use the key combinations of Ctrl +Alt +
Z on the keyboard.
The following is a list of hot keys for the top level, each time you want to go back to the top level after
accessing the interface of lower level, press Ctrl + Alt + Z on the keyboard.
For example, continue pressing H, you are brought to the Home tab.
Operation Interface
Home
Plan Manager
DocAve Home Page
DocAve Online Community
Control Panel
Job Monitor
Plan Group
Health Analyzer
Account Information
Help and About
DocAve 6: File System Migrator
Hot Key
H
P
1
2
3
4
5
6
9
0
61
Home Page
To access the Home page by using hot keys, in the File System Migration interface, use key combination
of Ctrl + Alt + Z to access the Hot Key mode, and then press H on the keyboard to enter the Home page.
The following is a list of hot keys for functionalities on the ribbon of the Home page.
For example, press O to view the Online Migration page.
Functionality Name and Hot Key
F
O
PS
CF
MD
J
File System Migration
Online Migration
Profile Settings
Configure Connection
Migration Database
Job Monitor
File System Online Migration
Online Migration
New Plan
Create Container
Profile Settings
Configure Connection
Migration Database
Job Monitor
Save As New
A
Plan
Run Now
62
CC
Functionality Name and Hot Key
O
N
OK
O
Cancel
C
CP
CF
MD
J
Save
S
Save
Save and Run Now
Cancel
C
R
A
R
DocAve 6: File System Migrator
Profile Settings
Filter Policy
F
Mappings
M
Dynamic Rule
Set as Default
Edit Sub-profile
Upload
Download
New
Delete
Save
S
Discard Changes
Close
Functionality Name and Hot Key
Create
N
OK
Cancel
View
V
Edit
Cancel
Edit
E
OK
Cancel
Delete
D
Close
X
Domain Mapping
DO
User Mapping
U
Group Mapping
G
Permission Mapping
P
DY
DF
ES
U
DL
N
DE
Save
S
Save as
A
DC
X
O
C
E
C
O
C
Configure Connection
Create
View Details
V
Edit
Delete
Close
DocAve 6: File System Migrator
Functionality Name and Hot Key
N
OK
Cancel
Edit
E
OK
Cancel
Close
X
E
OK
Cancel
D
X
O
C
O
C
O
C
63
Migration Database
Configure
C
View Details
V
Close
Functionality Name and Hot Key
OK
Cancel
Configure
Close
X
O
C
C
X
Plan Manager
To access the Plan Manager page by using hot keys, in the File System Migration interface, use key
combinations of Ctrl + Alt + Z to access the Hot Key mode, and then press P on the keyboard to enter
the Plan Manager page.
For example, press V to access the View Details interface.
64
DocAve 6: File System Migrator
View Details
Edit
V
E
Functionality Name and Hot Key
Source & Destination
SD
Settings
SE
Edit
Close
Edit
E
Source
Destination
Settings
Save
Close
Source &
Destination
Settings
Delete
Test Run
D
TR
Run Now
R
Generate
Excel
G
OK
Cancel
OK
Cancel
DocAve 6: File System Migrator
SD
SE
E
X
SD
SE
SA
Cancel
X
Create
Container
Save
C
Cancel
Save
C
SA
Cancel
C
CC
SA
Save
Save As
Save
and
Run
Now
SA
A
SR
OK
Cancel
Save
Save As
Save
and
Run
Now
O
C
SA
A
SR
Save
Save As
Save
and
Run
Now
SA
A
SR
O
C
O
C
65
Appendix A: File System Migration Database
Information
Refer to the following tables to view the detailed job information stored in the migration database. In
Job Detail, you can view the job details of each migrated source object, the source/destination object ID,
the URL of the source/destination object, the size of the source object, the owner of the
source/destination object, the migration start time, the end time, and so on. In Job Notification, you can
view the status of the migration job and view the comment related to the migration job. In Job Statistic,
you can view the statistical information of the migration job, such as, the job ID, the plan ID, the
source/destination start time, the source/destination end time, the source/destination Agent name, the
number of migrated/failed/skipped items/folders/lists, and so on.
66
DocAve 6: File System Migrator
Job Detail
View the job details information in the table below.
Column Name
JobId
Description
It is the ID of the job.
Value
The prefix of the job ID facilitates
the distinction of different
migrations. The job ID for File
System migration is FM.
For example,
FM20120702184324729287.
SequenceId
It is the sequence ID of
each migrated source
object.
SourceObjectId
It is the ID of the source
object.
The value represents the sequence
of each migrated source object.
For example, 1, it indicates that
this source object is the first
migrated object.
The value is the ID of the source
object.
The value is the ID of the parent of
the source object.
The value is the GUID of each
target object level from site
collection level to item level. For
example, df3f11c6-c499-4597b4fc-d482a2fc9f56 is the GUID of
the target folder.
The value is blank.
The value is the full URL of the
source object. Use the value to
find the source object.
The value is the full URL of the
target object. Use the full URL to
find the target object. If the source
object is not migrated to the
target, the column value is blank.
The value is the title of the source
object.
The value is the title of the target
object.
The value represents the type of
the source object, which is
different according to the source
you selected.
10006– Folder
SourceObjectParentID
TargetObjectId
TargetObjectParentID
SourceFullUrl
It is the ID of the target
object.
It is the full URL of the
source object.
TargetFullURL
It is the full URL of the
target object.
SourceObjectTitle
It is the title of the source
object.
It is the title of the target
object.
It is the type of the source
object.
TargetObjectTitle
SourceObjectType
DocAve 6: File System Migrator
10007 – Document
67
Column Name
TargetObjectType
Description
It is the type of the target
object.
Value
The value represents the type of
the target object.
10006 – Folder
SourceObjectSizeBytes
TargetObjectSizeBytes
SourceObjectOwner
TargetObjectOwner
SourceObjectVersion
TargetObjectVersion
Operation
68
It is the size of the source
object. The unit is byte.
It is the size of the target
object. The unit is byte.
It is the owner of the
source object.
It is the owner of the
target object.
It is the version of the
source object.
It is the version of the
target object.
It is the operation
performed for each source
object during migration.
10007 – Document
The value is the real size of the
source object.
The value is the size of the target
object.
The value represents the user who
creates the source object.
The value represents the user who
creates the target object.
The column value is blank.
The value represents the version
of the current object in the
destination.
The value represents the
operation performed when
migrating the source object to the
target.
0 – None
1 – Skipped
2 – New Created
3 – Overwritten
4 – Appended
5 – Filtered
6 – Collapsed
7 – Merge
DocAve 6: File System Migrator
Column Name
Status
StartTime
EndTime
FilteredOutPolicy
Description
It is the migration status of
the source object.
It is the time when the
backup starts.
It is the time when the
restore completes.
It is the status of using
filter policy.
Value
The value represents the status of
the job.
0 – Starting
1 – Successful
2 – Backup Failed
3 – Restore Failed
4 – Filtered Out
5 – Skipped
6 – Exceptional
The value represents the time
when the backup starts.
The value represents the time
when the restore completes.
The value represents the status of
using filter policy.
0 – Not Used
TruncatedPolicy
It is the truncated policy
that is applied to the
source object.
TruncatedOrRenamedAs
It is the new name of the
object in the target.
CustomMetadata
It is the status of using
custom metadata.
1 – Used
The value represents the
truncated policy that is applied to
the source object.
None – No truncated
policy.
Truncated – The object
name is truncated.
Renamed – The object
name is renamed.
MoveUp – The object is
moved up to the higher
level.
The value is the new name of the
object in the target after
truncating or renaming.
The value represents the status of
using custom metadata.
0 – Not Used
1 – Used
The default value is false.
DocAve 6: File System Migrator
69
Column Name
MetadataMapping
Description
It is the statues of using CBased Object Oriented
Language (C# Language)
Mapping.
Value
The value represents the status of
using C-Based Object Oriented
Language (C# Language) Mapping.
0 – Not Used
Message
It displays the migration
message of the source
object.
1 – Used
The value is the migration message
of the source object.
Job Notification
View the job notifications information in the table below.
Column Name
SequenceId
Description
It is the ID of the sequence for
each job.
JobId
It is the ID of the job.
Status
It is the status of the job.
Message
70
It displays the job comment.
Value
The value represents the
sequence of each job. For
example, 1, it indicates that this
job is the first migration job.
The prefix of the job ID
facilitates the distinction of
different migrations. The job ID
for File System Migration is FM.
For example,
FM20120702184324729287.
The value represents the status
of the job.
0 ‒ In Progress
2 ‒ Finished
3 ‒ Failed
4 ‒ Stopped
7 ‒ Finished With
Exception
8 – Paused
The value displayed is the same
as the comment in Statistics of
Job Details.
DocAve 6: File System Migrator
Job Statistic
View the job statistics information in the table below.
Column Name
JobId
Description
It is the ID of the job.
PlanId
It is the ID of the plan.
PlanName
It is the name of the plan.
PlanGroupId
It is the ID of the plan group.
PlanGroupName
It is the name of the plan
group.
SourceAgentType
It is the source Agent type.
TargetAgentType
It is the target Agent type.
Value
The prefix of the job ID
facilitates the distinction of
different migrations. The job ID
for File System migration is FM.
For example,
FM20120702184324729287.
The value is the plan ID, for
example,
PLAN20120702184321934938.
The value is the plan name. If
you run a job without saving it
as a plan, the value is Instance
Plan.
The value is the ID of the
executed plan group. The value
appears when the entire plan
group is executed.
The value is the name of the
executed plan group. The value
appears when the entire plan
group is executed.
The value represents the source
Agent type. 1 indicates the
source Agent type is File System.
The value represents the target
Agent type.
5 – SharePoint 2010
SourceAgentName
It is the source Agent name.
TargetAgentName
It is the target Agent name.
Status
It is the status of the job.
DocAve 6: File System Migrator
6 – SharePoint 2013
The value is the source Agent
name.
The value is the target Agent
name.
The value represents the status
of the job.
0 ‒ In Progress
2 ‒ Finished
3 ‒ Failed
4 ‒ Stopped
71
Column Name
Description
Value
7 ‒ Finished With
Exception
Run Type
It is the type of the job.
The value represents the type of
the job.
0 ‒ Run
SourceStartTime
SourceFinishTime
TargetStartTime
TargetFinishTime
Description
UserName
JobOption
JobType
It is the time when the backup
starts.
It is the time when the backup
completes.
It is the time when the restore
starts.
It is the time when the restore
completes.
It is the description of the job.
It is the DocAve user who runs
the job.
It is the option of the job.
It is the type of the job.
It is the container conflict
resolution.
MigratedBytes
72
It is the content conflict
resolution.
1 ‒ Incremental
Migration
The value represents the
resolution of container conflict.
0 – Skip
ContentConflictResoltuion
1 ‒ Test Run
The value represents the time
when the backup starts.
The value represents the time
when the backup completes.
The value represents the time
when the restore starts.
The value represents the time
when the restore completes.
The value is the description of
the job.
The value is the username who
runs the job.
The value is 0.
The value represents the type of
the migration job.
0 ‒ Full Migration
ContainerConflictResolution
8 ‒ Paused
5 – Merge
The value represents the
resolution of content conflict.
0 – Skip
2 – Append
3 – Overwrite
8 – New Version
It is the size of the migrated
data. The unit is byte.
DocAve 6: File System Migrator
Column Name
FailedBytes
SkipedBytes
FilteredBytes
MigratedSiteCollectionCount
MigratedSiteCount
MigratedListCount
MigratedFolderCount
MigratedItemCount
FailedSiteCollectionCount
FailedSiteCount
FailedListCount
FailedFolderCount
FailedItemCount
SkippedSiteCollectionCount
SkippedSiteCount
SkippedListCount
SkippedFolderCount
SkippedItemCount
FilteredOutSiteCollectionCount
FilteredOutSiteCount
FilteredOutListCount
DocAve 6: File System Migrator
Description
It is the size of the data that
are failed to be migrated. The
unit is byte.
It is the size of the skipped
data. The unit is byte.
It is the size of the data that is
filtered out. The unit is byte.
It is the number of migrated
site collections.
It is the number of the
migrated sites.
It is the number of the
migrated lists.
It is the number of migrated
folders.
It is the number of migrated
items.
It is the number of site
collections that are failed to be
migrated.
It is the number of the sites
that are failed to be migrated.
It is the number of the lists
that are failed to be migrated.
It is the number of the folders
that are failed to be migrated.
It is the number of the items
that are failed to be migrated.
It is the number of the skipped
site collections.
It is the number of the skipped
sites.
It is the number of the skipped
lists.
It is the number of the skipped
folders.
It is the number of the skipped
items.
It is the number of site
collections that are filtered
out.
It is the number of sites that
are filtered out.
It is the number of lists that
are filtered out.
Value
N/A
N/A
N/A
N/A
N/A
N/A
N/A
N/A
N/A
N/A
N/A
N/A
73
Column Name
FilteredOutFolderCount
FilteredOutItemCount
ExceptionFolderCount
ExceptionItemCount
74
Description
It is the number of folders that
are filtered out.
It is the number of items that
are filtered out.
It is the number of folders that
are migrated with exception.
It is the number of items that
are migrated with exception.
Value
DocAve 6: File System Migrator
Appendix B: Advanced Settings in File System Migrator
Configuration Files
You are allowed to customize the file system migration settings by configuring the attribute of the
corresponding node in the FileMigrationConfiguration.xml file. Navigate to
to …\Agent\data\Migrator\FileMigrator\ on the machine where the DocAve agent is installed and locate
the FileMigrationConfiguration.xml file.
Configuring the FileMigrationConfiguration.xml
To configure the FileMigrationConfiguration.xml file in order to use the advanced settings of File
System Migration, complete the following steps:
Open the FileMigrationConfiguration.xml file with Notepad. Refer to the information below to
configure the attribute in the FileMigrationConfiguration.xml file.
GeneratePerformanceLog ─This node allows you to choose whether to collect the
performance log, which records the performance about migrated items when
performing a file system migration job. Enable/Disable this feature according to the
AvePoint representative’s suggestion. Set the value of the Flag attribute as explained
below:
true ─ true means that the performance log will be collected when performing a
file system migration job.
false ─ false means that the performance log will not be collected when
performing a file system migration job. By default, the value of the Flag
attribute is set to False.
You can go to the DocAve Agent installation path
…\AvePoint\DocAve6\Agent\jobs to find the file system migration job folder, for
example, FM20121229190052401100_Restore. The performance log, for
example, FMRestorePerformance.xml, is generated in this job folder.
ExternalSecurity ─ This node allows you to choose whether to apply the mapping XML
files generated by Migrator Tool to file system migration jobs.
true ─ true means that the mapping XML files generated by Migrator Tool will
be applied to file system migration jobs.
false ─ false means that the mapping XML files generated by Migrator Tool will
not be applied to file system migration jobs.
CreateNewTermIfDoesNotExist – This node allows you to choose whether to create
new terms in the destination when the source property values do not exist in the
destination.
DocAve 6: File System Migrator
75
True – True means File System Migration will create new terms in the
destination when the source property values do not exist in the destination.
False – False means File System Migration will not create new terms in the
destination when the source property values do not exist in the destination.
CompressZip – This node allows you to choose whether to migrate the source file whose
type is set as blocked file in SharePoint as a ZIP file.
True – True means the source file blocked by SharePoint will be migrated as a
ZIP file.
False – False means the source file blocked by SharePoint will not be migrated
to the destination.
LoadModerationStatus – This node allows you to choose how to migrate the content
approval status that is defined in the customized Metadata file.
True – True means the value defined in the Metadata file will become the file’s
approval status in the destination.
False – False means the value defined in the Metadata file will be migrated as
the value of a Single Line of text column.
IsOffice365MultiThread – This node allows you to choose whether to migrate the
source file to SharePoint Online using multiple threads.
True – True means using multiple threads to migrate the source to SharePoint
Online is supported.
False – False means using multiple threads to migrate the source to SharePoint
Online is not supported.
ThreadNumber – Enter a positive integer to specify how many threads will be
used to migrate the source to SharePoint Online.
UpdateContentTypeFields –This node allows you to choose whether to migrate the
customized columns of a file which contain values in the metadata file to the specified
content type in SharePoint.
True –True means the customized columns of a file which contain values in the
metadata file will be migrated to the specified content type.
False – False means the customized columns of a file which contain values in the
metadata file will not be migrated to the specified content type.
*Note: When the content type is not specified in the metadata file, the columns will be
migrated to the default content type in SharePoint.
*Note: This node is only supported for the content types at the library level.
Save the modifications and close the XML file.
76
DocAve 6: File System Migrator
Appendix C: Conflict Resolution
In this appendix, each resolution is described in detail. View the tables below for your reference.
Container Level Conflict Resolution
Resolution
Skip
Object
Configuration
Security
Merge
Configuration
Security
DocAve 6: File System Migrator
Conflict
Ignore the conflicting
configuration and do
nothing on the
destination.
Ignore the conflicting
security and do nothing
on the destination.
Merge the settings in
the destination node
with settings from the
source node.
Permissions – Source
permissions that do not
already exist in the
destination node will
be added to the
destination node.
Permission Levels – the
permission levels that
do not already exist in
the destination node
will be added to the
destination node. The
permission levels that
already exist in the
destination node will
not be replaced.
No Conflict
A new SharePoint
object will be created.
A new SharePoint
object will be created.
A new SharePoint
object will be created.
A new SharePoint
object will be created.
77
Content Level Conflict Resolution
Resolution
Overwrite
Object
Content
Skip
Content
Append
Content
New Version
Content
Security
78
Conflict
Delete the conflicting
content on destination
first and overwrite it
with the source
content.
Ignore the conflicting
content and do nothing
on destination.
The conflicting content
will not be deleted; and
the conflicting data will
be migrated to the
destination by adding a
suffix (_1, _2,…,
increasing in numerical
value).
The conflicting content
will be migrated to the
destination as a new
version.
Permissions – Source
permissions that do not
already exist in the
destination node will
be added to the
destination node.
Permission Levels – The
permission levels that
do not already exist in
the destination node
will be added to the
destination node. The
permission levels that
already exist in the
destination node will
not be replaced.
No Conflict
A new SharePoint
object will be created.
A new SharePoint
object will be created.
A new SharePoint
object will be created.
A new SharePoint
object will be created.
A new SharePoint
object will be created.
DocAve 6: File System Migrator
Notices and Copyright Information
Notice
The materials contained in this publication are owned or provided by AvePoint, Inc. and are the property
of AvePoint or its licensors, and are protected by copyright, trademark and other intellectual property
laws. No trademark or copyright notice in this publication may be removed or altered in any way.
Copyright
Copyright © 2012-2015 AvePoint, Inc. All rights reserved. All materials contained in this publication are
protected by United States and international copyright laws and no part of this publication may be
reproduced, modified, displayed, stored in a retrieval system, or transmitted in any form or by any
means, electronic, mechanical, photocopying, recording or otherwise, without the prior written consent
of AvePoint, 3 Second Street, Jersey City, NJ 07311, USA or, in the case of materials in this publication
owned by third parties, without such third party’s consent. Notwithstanding the foregoing, to the extent
any AvePoint material in this publication is reproduced or modified in any way (including derivative
works and transformative works), by you or on your behalf, then such reproduced or modified materials
shall be automatically assigned to AvePoint without any further act and you agree on behalf of yourself
and your successors, assigns, heirs, beneficiaries, and executors, to promptly do all things and sign all
documents to confirm the transfer of such reproduced or modified materials to AvePoint.
Trademarks
AvePoint®, DocAve®, the AvePoint logo, and the AvePoint Pyramid logo are registered trademarks of
AvePoint, Inc. with the United States Patent and Trademark Office. These registered trademarks, along
with all other trademarks of AvePoint used in this publication are the exclusive property of AvePoint and
may not be used without prior written consent.
Microsoft, MS-DOS, Internet Explorer, Office, Office 365, SharePoint, Windows PowerShell, SQL Server,
Outlook, Windows Server, Active Directory, and Dynamics CRM 2013 are either registered trademarks or
trademarks of Microsoft Corporation in the United States and/or other countries.
Adobe Acrobat and Acrobat Reader are trademarks of Adobe Systems, Inc.
All other trademarks contained in this publication are the property of their respective owners and may
not be used without such party’s consent.
Changes
The material in this publication is for information purposes only and is subject to change without notice.
While reasonable efforts have been made in the preparation of this publication to ensure its accuracy,
AvePoint makes no representation or warranty, expressed or implied, as to its completeness, accuracy,
or suitability, and assumes no liability resulting from errors or omissions in this publication or from the
use of the information contained herein. AvePoint reserves the right to make changes in the Graphical
User Interface of the AvePoint software without reservation and without notification to its users.
AvePoint, Inc.
Harborside Financial Center, Plaza 10
3 Second Street, 9th Floor
Jersey City, New Jersey 07311
USA
DocAve 6: File System Migrator
79