1
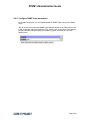
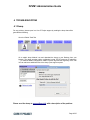
PZVM1 Administration Guide
V1.1
February 2014
Alain Ganuchaud
Page 1/27
PZVM1 Administration Guide
Table of Contents
1 GENERAL INFORMATION......................................................................................................... 3
1.1 System Overview................................................................................................................ 3
1.2 Software.............................................................................................................................. 5
2 GETTING STARTED................................................................................................................... 6
2.1 Deploy OVF........................................................................................................................ 6
2.2 Logging On......................................................................................................................... 7
2.3 Configure TCP/IP parameters............................................................................................. 7
2.3.1 Network interfaces...................................................................................................... 8
2.3.2 Routing and Gateways................................................................................................ 8
2.3.3 Hostname and DNS Client.......................................................................................... 9
2.3.4 Host Adresses............................................................................................................. 9
2.4 Configure Time zone......................................................................................................... 10
2.5 Change the passwords...................................................................................................... 11
2.5.1 Change the Webmin password.................................................................................11
2.5.2 Change the Linux root password..............................................................................12
2.6 Configure zabbix settings.................................................................................................. 13
2.6.1 Select your zabbix version........................................................................................13
2.6.2 Configure zabbix proxy parameters..........................................................................14
2.6.3 Configure zabbix agent parameters..........................................................................15
2.6.4 Configure zabbix java parameters............................................................................15
2.7 Configure Crypted Connection.......................................................................................... 16
2.8 Configure Database Plugins............................................................................................. 17
2.8.1 Configure DB2 Monitoring parameters......................................................................17
2.8.2 Configure Oracle Monitoring parameters..................................................................18
2.8.3 Configure MS SQL Server Monitoring parameters....................................................19
2.8.4 Configure MYSQL Monitoring parameters................................................................20
2.8.5 Configure POSTGRESQL Monitoring parameters....................................................21
2.9 Configure other Plugins..................................................................................................... 22
2.9.1 Configure ESX Monitoring parameters.....................................................................22
2.9.2 Configure SNMP Traps parameters..........................................................................23
3 TEMPLATES............................................................................................................................. 24
3.1 Proxy Template................................................................................................................. 24
3.2 Other templates................................................................................................................ 24
4 TROUBLESHOOTING.............................................................................................................. 25
4.1 Dump................................................................................................................................ 25
5 SSH CONNECTION.................................................................................................................. 26
6 CAVEATS AND EXCEPTIONS.................................................................................................26
7 ROADMAP................................................................................................................................ 27
8 SUPPORT................................................................................................................................. 27
Page 2/27
PZVM1 Administration Guide
1 GENERAL INFORMATION
1.1 System Overview
This documentation describes the zabbix proxy VM designed by CORE IT PROJECT. The proxy
is produced in OVF format (primary developped on ESXi 5.0).
A Zabbix proxy is the ideal solution for centralized monitoring of:
• remote locations
• branches
• secured networks
• with zero administration
Main Features
Embedded Debian 6.0
Whole configuration with Web Interface
Lowcost (from 50 euros)
Zero Admin Solution
Provide main 1.8, 2.0 & 2.2 Zabbix versions
Option Installation Assistance
Option Remote Support
Product Description
Embedded Debian 6.0
Backend Database SQLite3
Compiled Zabbix Proxy with :
– Zabbix Agent
– Zabbix Java Gateway
– Zabbix ssh Agent
– Zabbix IPMI Agent
– Zabbix SNMP Agent
– Zabbix Web Monitoring Agent
– Zabbix Databases Agents: MYSL, DB2, Postgresql, Oracle & MSSQL
– Zabbix ESX Agent
– SNMP Traps
Supported 1.8 versions : 1.8.13 → 1.8.last
Supported 2.0 versions : 2.0.0 → 2.0.last
Supported 2.0 versions : 2.2.0 → 2.2.last
Recommended max load : 100 items/s
1 X CPU (could be extended on Virtualization Host platform)
RAM 256MB - Storage 4GB (could be extended on Virtualization Host platform)
1 Ethernet 1000 (could be extended on Virtualization Host platform)
Support & updates provided during 1 year
Applications
Monitoring remote sites
Monitoring secured networks
Lighten the load of Zabbix server
Centralize the monitoring
JVM, SNMP, Databases & ESX Monitoring out of the Box
Page 3/27
PZVM1 Administration Guide
Architecture
Zabbix proxy is a process that collects monitoring data from monitored devices and send the
information to the Zabbix server. All collected data is buffered locally and then transferred to the
Zabbix server the proxy belongs to, you can consider Zabbix proxy as a black box with zero
admin.
Two modes are supported for proxy:
– active mode, the proxy will connect first to the server and request its configuration
– passive mode, the server will connect first to the proxy and downloads the proxy
configuration
Thus, with those two modes, you can comply your network architecture.
Licence
All programs developed by CORE IT PROJECT contained in the Proxy box are free softwares;
you can redistribute them and/or modify them under the terms of the GNU General Public License
as published by the Free Software Foundation; either version 2 of the License, or (at your option)
any later version.
See the GNU General Public License for more details.
Page 4/27
PZVM1 Administration Guide
1.2 Software
Software is based on :
• Linux Debian
• Zabbix software, Zabbix SIA is a company registered in Latvia, owns the Zabbix
trademark.
• CORE IT software, CORE IT PROJECT is a company registred in France:
◦ Databases Monitoring (DB2, Oracle, MSSQL, MYSQL & Postgresql)
◦ Zabbix_* Webmin modules
• Dmitry Maksimov software for ESX Monitoring
Linux Debian version
Zabbix version
Proxy VM version (embedded by Core IT)
Debian 6.0.6 Squeeze
Nov 15th Upgrade
1.8.13
1.8.14
1.8.15
2.0.0
2.0.1
2.0.2
2.0.3
V0.1 – first release
2012 Nov 28
Debian 6.0.6 Squeeze
Dec 15th Upgrade
1.8.13
1.8.14
1.8.15
2.0.0
2.0.1
2.0.2
2.0.3
2.0.4
V1.0 – second major release
2012 Dec 23
1.8.13
1.8.14
1.8.15
2.0.0
2.0.1
2.0.2
2.0.3
2.0.4
2.2.0
2.2.2
V1.1
2014 Jan 23
Debian 6.0.6 Squeeze
Dec 15th Upgrade
- Add crypted connection with Zabbix Server
- Add ESX Monitoring
- Add Databases Monitoring for Oracle, DB2,
MYSQL, Postgresql & MSSQL Server
- Add JVM monitoring
- Add SNMP Traps
- Add dump facility
- Add Zabbix 2.0.4 update
- Add related monitoring Zabbix templates
Page 5/27
PZVM1 Administration Guide
2 GETTING STARTED
Below is the configuration sequence, proceed in this order, step by step:
1.
2.
3.
4.
5.
Deploy the OVF on your favorite Virtualization Host Platform
Change the TCP/IP parameters
Change the passwords
Configure Time zone
Change the Zabbix parameters:
1. version
2. proxy
3. agent
4. java
6. Configure the crypted connection between Proxy and zabbix server
7. Configure the monitoring plugins:
1. Databases monitoring: Oracle, DB2, MYSQL, MSSQL & Postgresql
2. ESX monitoring
3. SNMP Traps
2.1 Deploy OVF
In the OVF zip file, you will find:
– The Proxy VM
– Proxy Zabbix Template
– Databases (Oracle, DB2, MYSQL, MSSQL Server, Postgresql) Zabbix Templates
– ESX Zabbix Template
– DB Monitoring V6 documentation
– Zabbix Proxy VM Admin Guide (this document)
You deploy the ovf from your favorite Virtualization platform. Below is an example from a
VMWARE vSphere client.
Then, you can boot the VM, the default IP is 192.168.111.70.
Page 6/27
PZVM1 Administration Guide
2.2 Logging On
Connect your favorite browser to the following URL:
http://192.168.111.70
username: admin
paswword: coreit.fr
2.3 Configure TCP/IP parameters
Click on the Networking Tab and then on the Network configuration icon.
Change the TCP/IP parameters according your network.
Page 7/27
PZVM1 Administration Guide
2.3.1 Network interfaces
Through Network interfaces icon, change eth0 IP address and mask, we recommend
static IP configuration for your proxy.
Save your configuration.
2.3.2 Routing and Gateways
Through Routing and gateways icon, change default gateway and add routes if needed.
Save your configuration.
Page 8/27
PZVM1 Administration Guide
2.3.3 Hostname and DNS Client
Through Hostname and DNS Client, change hostname, domain and DNS servers.
Save your configuration.
2.3.4 Host Adresses
Through Host adresses, change hosts info according your previous changes.
Update the Hosts file (local name resolution), change the default IP with your proxy's IP and
configure the Fully Qualified Name & Short Name (alias).
Example:
192.168.0.25
proxyname.mydomain.myorg
proxyname
Save your configuration.
Page 9/27
PZVM1 Administration Guide
2.4 Configure Time zone
Go to the System Time Tab and Hardware icon.
Configure the appropriate Time zone.
Save your configuration.
You can by-pass the next step if your VM is synchronized by another
mechanism like ntp synchronization from the Virtualization Host Platform.
Configure your ntp servers (could be internal ones). We recommend you schedule the
synchronization regularly and synchronize the hardware clock like on the below screenshot.
Sync and Apply your configuration.
Page 10/27
PZVM1 Administration Guide
2.5 Change the passwords
The proxy box is configured with the following passwords:
– Linux root : coreit.fr
– Webmin admin : coreit.fr
As those passwords are the same for all the proxy boxes, we strongly recommend you change
them.
2.5.1 Change the Webmin password
Go to the Webmin Tab and Webmin Users icon.
Click on admin user.
And change the admin password.
Save your configuration.
Page 11/27
PZVM1 Administration Guide
2.5.2 Change the Linux root password
Go to the System Tab and users and groups icon.
Click on root user.
And change the root password.
Save your configuration.
Reconnect your browser to the new URL, for example:
http://192.168.0.25
username: admin
paswword: newpasswordchain
Page 12/27
PZVM1 Administration Guide
2.6 Configure zabbix settings
Go to the Zabbix Tab.
2.6.1 Select your zabbix version
Go to zabbix version icon, in the following example, version 2.0.4 will be configured.
Remember that the zabbix proxy version must be the same as the zabbix
server or lower!
Page 13/27
PZVM1 Administration Guide
2.6.2 Configure zabbix proxy parameters
Go to zabbix proxy icon and configure the parameters according your zabbix network.
Clicking on the name of the parameter will return you an online help.
Only main proxy parameters are configurable by frontend, other parameters
must be configured via root ssh session, they are located in /etc/zabbix.
Take care, if you enable the crypted connection between the Zabbix proxy and
the Zabbix server, then the Server IP must be the one used in the VPN subnet
(see Zabbix_vpn module).
Page 14/27
PZVM1 Administration Guide
2.6.3 Configure zabbix agent parameters
Go to zabbix agent icon and configure the parameters according your zabbix network.
Clicking on the name of the parameter will return you an online help.
Only main agent parameters are configurable by frontend, other parameters
must be configured via root ssh session, they are located in /etc/zabbix.
2.6.4 Configure zabbix java parameters
Go to zabbix java icon and configure the parameters according your zabbix network.
Clicking on the name of the parameter will return you an online help.
Page 15/27
PZVM1 Administration Guide
2.7 Configure Crypted Connection
Go to the Zabbix Tools Tab. This configuration is not mandatory if you do not want
crypted connection between Zabbix server and Zabbix proxy; if you monitor a remote
office over Internet via the proxy, we recommend this configuration.
Go to zabbix vpn icon and configure the parameters according your zabbix
network. Clicking on the name of the parameter will return you an online help.
Zabbix_vpn is based on openvpn client ( http://openvpn.net ) , ie Zabbix server must be
configured as an OpenVPN server. Please, take a look at OpenVPN HowTo to understand how to
setup an OpenVPN server http://openvpn.net/index.php/open-source/documentation/howto.html
As proxy is based on debian, OpenVPN client was designed according the Debian OpenVPN
Wiki http://wiki.debian.org/OpenVPN
Page 16/27
PZVM1 Administration Guide
2.8 Configure Database Plugins
Go to Zabbix Plugins Tab.
2.8.1 Configure DB2 Monitoring parameters
Go to zabbix db2 icon and configure the parameters according your DB2 server. Clicking
on the name of the parameter will return you an online help.
Read Online Help, it will guide you for the Database Monitoring Setup. The
Version 1.0 frontend is not able to configure more than one Database Instance,
Page 17/27
PZVM1 Administration Guide
but you can configure the Zabbix Monitoring with ssh connection if you need more.
Database Templates are included in the OVF zip file.
2.8.2 Configure Oracle Monitoring parameters
Go to zabbix oracle icon and configure the parameters according your Oracle server.
Clicking on the name of the parameter will return you an online help.
Read Online Help, it will guide you for the Database Monitoring Setup. The
Version 1.1 frontend is not able to configure more than one Database Instance,
but you can configure the Zabbix Monitoring with ssh connection if you need
more. Database Templates are included in the OVF zip file.
Page 18/27
PZVM1 Administration Guide
2.8.3 Configure MS SQL Server Monitoring parameters
Go to zabbix mssql icon and configure the parameters according your MS SQL server.
Clicking on the name of the parameter will return you an online help.
Read Online Help, it will guide you for the Database Monitoring Setup. The
Version 1.1 frontend is not able to configure more than one Database Instance,
but you can configure the Zabbix Monitoring with ssh connection if you need
more. Database Templates are included in the OVF zip file.
Page 19/27
PZVM1 Administration Guide
2.8.4 Configure MYSQL Monitoring parameters
Go to zabbix mysql icon and configure the parameters according your MYSQL server.
Clicking on the name of the parameter will return you an online help.
Read Online Help, it will guide you for the Database Monitoring Setup. The
Version 1.1 frontend is not able to configure more than one Database Instance,
but you can configure the Zabbix Monitoring with ssh connection if you need
more. Database Templates are included in the OVF zip file.
Page 20/27
PZVM1 Administration Guide
2.8.5 Configure POSTGRESQL Monitoring parameters
Go to zabbix Postgresql icon and configure the parameters according your Postgresql
server. Clicking on the name of the parameter will return you an online help.
Go to zabbix postgresql icon and configure the parameters according your Postgresql
server. Clicking on the name of the parameter will return you an online help.
Read Online Help, it will guide you for the Database Monitoring Setup. The
Version 1.1 frontend is not able to configure more than one Database Instance,
but you can configure the Zabbix Monitoring with ssh connection if you need
more. Database Templates are included in the OVF zip file.
Page 21/27
PZVM1 Administration Guide
2.9 Configure other Plugins
Go to Zabbix Plugins Tab.
2.9.1 Configure ESX Monitoring parameters
Go to zabbix esx icon and configure the parameters according your ESX server. Clicking
on the name of the parameter will return you an online help.
Read Online Help, it will guide you for the ESX Monitoring Setup. The Version
1.1 frontend is not able to configure more than one ESX server, but you can
configure the Zabbix Monitoring with ssh connection if you need more.
Database Templates are included in the OVF zip file.
Page 22/27
PZVM1 Administration Guide
2.9.2 Configure SNMP Traps parameters
Go to zabbix snmptraps icon and enable/disable the SNMP Traps routing to the Zabbix
server.
We do recommend to centralize SNMP Traps Analysis directly on the Zabbix Server that
is able to dispatch traps among servers (since version 2.0.0), the purpose of this plugin is
just the automatic routing according your network (crypted connection or not) to the
Zabbix Server.
Page 23/27
PZVM1 Administration Guide
3 TEMPLATES
3.1 Proxy Template
In the OVF directory, you will find a template T-ZABBIX-PROXY designed for proxy monitoring,
we recommend you configure it for monitoring your proxy, but this is not mandatory.
On your zabbix frontend, Go the Tab Configuration > HOSTS > Choose the proxy and configure
the template from the Templates Tab.
3.2 Other templates
Usage of other templates is explained in Zabbix Plugins paragraphs.
Page 24/27
PZVM1 Administration Guide
4 TROUBLESHOOTING
4.1 Dump
For any problem, please report it to Core IT Project support by sending the dump that will be
generated as following.
Go to the Zabbix Tools Tab.
Go to zabbix dump Module icon and download the dump to your Desktop from your
browser. The dump contains nothing confidential except TCP/IP ergonomy (IP adresses,
…), it contains Zabbix configuration, zabbix & system logs and the ergonomy of the VM.
You can add some additional files to the dump upon support request.
Please send the dump to [email protected] with a description of the problem.
Page 25/27
PZVM1 Administration Guide
5 SSH CONNECTION
You must connect via ssh for every operation that is not not supported via frontend, for example:
• adding a Debian package
• configuring a zabbix parameter that is not configurable via frontend
• Managing several Database Instances (frontend will be able to manage them from
version 2.0)
• ….
As the console keyboard is configured as AZERTY, you may want to
reconfigure it with the following command: dpkg-reconfigure console-data
6 CAVEATS AND EXCEPTIONS
Caution, some operations are not yet supported.
•
•
As the solution is highly embedded with webmin, we strongly discourage you to
update webmin.
Normally Debian updates must be supported by the solution but we recommend
you test it before
•
Page 26/27
PZVM1 Administration Guide
7 ROADMAP
Roadmap
V.0.1 first Major version – November 2012
V.0.x minor versions (corrections & & zabbix new versions)
V.1.0 second Major version – January 2013
- Debian/Webmin Updates
- Zabbix new versions
- Crypted connection between zabbix server & zabbix proxy
- Add more fields in admin GUI instead of storing values in default config file
- Add ESX & Database Monitoring V6 on Proxy
- Add snmp traps facility
- V.1.x corrections versions & zabbix new versions
V.2.0 third Major version – Summer 2014
- Debian/Webmin Updates
- V.2.4 Zabbix monitoring
8 SUPPORT
All support requests must be sent by mail at
[email protected]
CORE IT PROJECT
12 rue Seraphin MARTIN
Les Echevins
38430 MOIRANS
FRANCE
Tél: +33 6 08 00 61 11
Fax: +33 9 72 13 23 34
Page 27/27