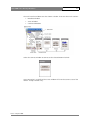
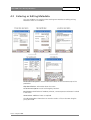
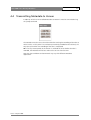
1
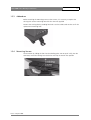
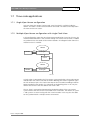
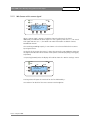
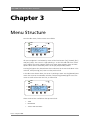
User’s Guide
3922 496 30561
Version 2.0 June 2006
POW
ER
REA
DY
BT
ESC
VE
NO
M
Fla
shP
ak
PLAY
SEL
REC
ORD
UP
REC
STO
P
DOW
PLAY
REV
DCR 4000
Venom FlashPak
SAVE
N
DCR 4000 User’s Guide
ii
Declaration of Conformity
We, Grass Valley Nederland B.V., Kapittelweg 10, 4827 HG Breda, The Netherlands, declare under our sole
responsibility that this product is in compliance with the following standards:
•
EN60065
: Safety
•
EN55103-1
: EMC (Emission)
•
EN55103-2
: EMC (Immunity)
following the provisions of:
a. the Safety Directives 73/23//EEC and 93/68/EEC
b. the EMC Directives 89/336/EEC and 93/68/EEC
FCC Class A Statement
This product generates, uses, and can radiate radio frequency energy and if not installed and used in accordance with
the instructions, may cause interference to radio communications.
It has been tested and found to comply with the limits for a class A digital device pursuant to part 15 of the FCC rules,
which are designed to provide reasonable protection against such interference when operated in a commercial
environment.
Operation of this product in a residential area is likely to cause interference in which case the user at his own expense
will be required to take whatever measures may be required to correct the interference.
Copyright
Für diese Unterlage behalten wir uns alle Rechte vor (Gemäß DIN 34). Technische Änderungen im Zuge der
Weiterentwicklung vorbehalten.
Copying of this document and giving it to others, and the use or communication of the contents thereof, are forbidden
without express authority. Offenders are liable to the payment of damages. All rights are reserved in the event of the
grant of a patent or the registration of a utility model or design. Liable to technical alterations in the course of further
development.
Toute communication ou reproduction de ce document, toute exploitation ou communication de son contenu sont
interdites, sauf autorisation expresse. Tout manquement à cette règle est illicite et expose son auteur au versement de
dommages et intérêts. Tous nos droits sont réservés pour le cas de la délivrance d'un modèle d'utilité. Sous réserve de
modification au cours de l'évolution technique.
Grass Valley website
Please visit our public internet website to download the latest user’s guide updates and additional information:
http://www.thomsongrassvalley.com
© Copyright Grass Valley Nederland B.V. 2006
DCR 4000 User’s Guide
iii
Table of Contents
Chapter 1 – Installation
1.1
1.2
1.3
1.4
1.5
1.6
1.7
Introduction . . . . . . . . . . . . . . . . . . . . . . . . . . . . . . . . . . . . . . . . . . . . . . . . . 1-1
Specifications . . . . . . . . . . . . . . . . . . . . . . . . . . . . . . . . . . . . . . . . . . . . . . . . 1-2
Connectors and Switches . . . . . . . . . . . . . . . . . . . . . . . . . . . . . . . . . . . . . . . 1-3
1.3.1 Connectors on Venom . . . . . . . . . . . . . . . . . . . . . . . . . . . . . . . . . . . 1-3
1.3.2 Connectors on Docking Adaptor . . . . . . . . . . . . . . . . . . . . . . . . . . . . 1-3
Controls on Venom . . . . . . . . . . . . . . . . . . . . . . . . . . . . . . . . . . . . . . . . . . . 1-4
Assembly . . . . . . . . . . . . . . . . . . . . . . . . . . . . . . . . . . . . . . . . . . . . . . . . . . . 1-5
1.5.1 Docking Kit . . . . . . . . . . . . . . . . . . . . . . . . . . . . . . . . . . . . . . . . . . . . 1-5
1.5.2 Assembling the Docking Kit. . . . . . . . . . . . . . . . . . . . . . . . . . . . . . . . 1-5
1.5.3 Addendum . . . . . . . . . . . . . . . . . . . . . . . . . . . . . . . . . . . . . . . . . . . . 1-7
1.5.4 Mounting Venom . . . . . . . . . . . . . . . . . . . . . . . . . . . . . . . . . . . . . . . 1-7
1.5.5 Connecting DC Power. . . . . . . . . . . . . . . . . . . . . . . . . . . . . . . . . . . . 1-8
Synchronizing with other devices . . . . . . . . . . . . . . . . . . . . . . . . . . . . . . . . . 1-9
1.6.1 Genlock . . . . . . . . . . . . . . . . . . . . . . . . . . . . . . . . . . . . . . . . . . . . . . 1-9
1.6.2 Time Code . . . . . . . . . . . . . . . . . . . . . . . . . . . . . . . . . . . . . . . . . . . . 1-9
Time code applications . . . . . . . . . . . . . . . . . . . . . . . . . . . . . . . . . . . . . . . . 1-10
1.7.1 Single Viper-Venom configuration . . . . . . . . . . . . . . . . . . . . . . . . . . 1-10
1.7.2 Multiple Viper-Venom configuration with single Clock-It box. . . . . . 1-10
1.7.3 Multiple Viper-Venom configuration with multiple Clock-It boxes . . 1-11
Chapter 2 – Using Venom with Viper
2.1
2.2
2.3
2.4
2.5
Initial Screen Displays . . . . . . . . . . . . . . . . . . . . . . . . . . . . . . . . . . . . . . . . . . 2-1
2.1.1 Idle Screen without source signal. . . . . . . . . . . . . . . . . . . . . . . . . . . . 2-1
2.1.2 Idle Screen with source signal . . . . . . . . . . . . . . . . . . . . . . . . . . . . . . 2-2
Formats recorded on Venom . . . . . . . . . . . . . . . . . . . . . . . . . . . . . . . . . . . . 2-3
Making a recording . . . . . . . . . . . . . . . . . . . . . . . . . . . . . . . . . . . . . . . . . . . 2-3
2.3.1 Recording Display . . . . . . . . . . . . . . . . . . . . . . . . . . . . . . . . . . . . . . . 2-4
Playback from Venom. . . . . . . . . . . . . . . . . . . . . . . . . . . . . . . . . . . . . . . . . . 2-4
Erasing Takes . . . . . . . . . . . . . . . . . . . . . . . . . . . . . . . . . . . . . . . . . . . . . . . . 2-5
Chapter 3 – Menu Structure
3.1
3.2
3.3
Take menu . . . . . . . . . . . . . . . . . . . . . . . . . . . . . . . . . . . . . . . . . . . . . . . . . . 3-2
Metadata menu . . . . . . . . . . . . . . . . . . . . . . . . . . . . . . . . . . . . . . . . . . . . . . 3-3
Tools & Settings menu . . . . . . . . . . . . . . . . . . . . . . . . . . . . . . . . . . . . . . . . . 3-3
Chapter 4 – Metadata
4.1
4.2
4.3
4.4
version 2.0 | June 2006
Connecting to Venom . . . . . . . . . . . . . . . . . . . . . . . . . . . . . . . . . . . . . . . . . 4-1
Accessing Take information . . . . . . . . . . . . . . . . . . . . . . . . . . . . . . . . . . . . . 4-3
Entering or Editing Metadata . . . . . . . . . . . . . . . . . . . . . . . . . . . . . . . . . . . . 4-5
Transmitting Metadata to Venom . . . . . . . . . . . . . . . . . . . . . . . . . . . . . . . . . 4-6
DCR 4000 User’s Guide
iv
Important information
Read this information carefully before installing this equipment and retain them for
future reference. Read and comply with the warning and caution notices that appear
in the manual
Any changes or modifications not expressly approved in this manual could void your
authority to operate this equipment.
Safety Summary
This informaton is intended as a guide for trained and qualified personnel who are
aware of the dangers involved in handling potentially hazardous electrical/electronic
equipment. It is not intended to contain a complete list of all safety precautions which
should be observed by personnel in using this or other electronic equipment.
The installation of this equipment involves risks both to personnel and equipment and
must be performed only by qualified personnel exercising due care.
Whenever it is likely that safe operation is impaired, the apparatus must be made
inoperative and secured against any unintended operation. The appropriate servicing
authority must then be informed. For example, safety is likely to be impaired if the
apparatus fails to perform the intended function or shows visible damage.
Warnings
Warnings indicate danger that requires correct procedures or practices to prevent
death or injury to personnel.
• Do not modify this equipment.
• Installation of this equipment must only be performed by qualified personnel.
• To prevent risk of overheating, ventilate the units correctly.
• In case of an emergency ensure that the power is disconnected.
• Mount equipment so that power lead can be accessed to disconnect power.
• Any interruption of the protection conductor inside or outside the apparatus, or
disconnection of the protective earth terminal, is likely to make the apparatus
dangerous. Intentional interruption is prohibited.
• Use only fuses of the type and rating specified.
• To prevent fire or shock hazard, do not expose the unit to rain or moisture. Note
that the unit is not completely waterproof.
• There are no user servicable parts inside. Refer servicing to qualified personnel only
or contact your local Grass Valley representative.
• Whenever it is likely that safe operation is impaired, the apparatus must be made
inoperative and secured against any unintended operation.
version 2.0 | June 2006
DCR 4000 User’s Guide
v
Cautions
Cautions indicate procedures or practices that should be followed to prevent damage
or destruction to equipment or property.
• Always switch off the camera before changing the power supply.
• Be extremely careful with the connectors between the camera head and the
adapter. Do not allow the guide pins to damage the pins of the connector. Follow
these steps in the order given. Tightening the screws in the wrong order could
result in mechanical damage to the camera. Loosening the screws in the wrong
order could result in mechanical damage to the camera.
• Do not subject the unit to severe shocks or vibration.
• Do not expose the unit to extremes of temperature.
• Do not leave the unit in direct sunlight or close to heating appliances for extended
periods.
• Connection panel position in the rack should ensure that the plug and power cord
are within easy reach for switching off purposes.
• To prevent risk of overheating, ventilate the product correctly.
• Connect the product only to a power source with the specified voltage rating.
version 2.0 | June 2006
DCR 4000 User’s Guide
version 2.0 | June 2006
vi
DCR 4000 User’s Guide | Installation
1-1
Chapter 1
Installation
1.1
Introduction
Venom FlashPak is a solid-state recorder designed to be used in conjunction with Grass
Valley's Viper FilmStream Camera. The use of Venom gives an on-board recording
capability matched to the outputs of the Viper, with full quality uncompressed
recording of all formats supported by Viper.
Venom FlashPak mounts on to Viper using a docking adaptor, which gives direct
connection such that a FlashPak can be quickly removed and replaced. Each recording
is given a "Take" number and metadata can be attached to identify and describe each
Take.
After recording, data is downloaded directly from Venom into a long-term storage
device and backup recordings can also be made. After data has been transferred, the
Venom can be erased and re-used immediately.
version 2.0 | June 2006
DCR 4000 User’s Guide | Installation
1.2
1-2
Specifications
Table 1-1. DCR 4000 Venom FlashPak specifications
General
Power requirements
battery operated: 14 Vdc or
external supply: 15 Vdc, 4A max. (8A when Viper
is powered from the same power supply)
Power consumption
23 W (standby), 26 W (playback), 28 W (record)
Operating temperatures
-20°C to +40°C (-4°F to +104°F)
Storage temperatures
-20°C to +60°C (-4°F to +140°F)
Weight (approx.)
2.3 kg (4.6 lbs.)
Dimensions
235 (L) x 90 (W) x 145 mm (H)
Video
S/N ratio (Y-signal)
typical 58 dB TBC
Modulation depth
55%
Storage
Technology
solid-state flash memory
Recorder/video format
auto-sensing to follow output from camera (all
Viper modes are supported)
Quantization
10-bit
Recording time
up to 15 min (HDTV), up to 10 min (FilmStream)
Metadata
includes camera settings and user settings
Connections
version 2.0 | June 2006
Video ouput
26-pin multicore connector
Docking connector
D-type 24 pin (7 coaxial, 23 regular)
HD-SDI output
2x BNC, SMPTE 292M, 0.8Vpp, 1.5Gb/s, 75 Ohm
Dual HD-SDI output
2x BNC, SMPTE 292M, 0.8Vpp, 1.5Gb/s, 75 Ohm
Audio monitor output
3.5mm phono jack, line level
DC input (docking plate)
XLR 4 pin male, 12Vdc
DC input (recorder)
XLR 4 pin male, 12Vdc
Reference input
1x BNC, on docking plate
Time code input
1x 5 pin LEMO input (suits Clock-It box or similar)
Bluetooth interface
provides access to metadata, transport control, clip
selection and playback functions.
DCR 4000 User’s Guide | Installation
1.3
1-3
Connectors and Switches
1.3.1 Connectors on Venom
AUDIO OUT
12 V DC
HDSDI A -> HDSDI B ->
HDSDI A & B : BNC connectors give playback or monitoring outputs according to the
format recorded. When a Dual Link 4:4:4 signal is used, these two connectors give one
Dual Link output. If a single HDSDI (4:2:2) format is recorded, these give two identical
outputs.
12V DC: input XLR-4p used when Venom is not mounted on the camera, e.g. for
playback.
Audio out: 3.5mm Jack. Stereo output of the two audio channels
1.3.2 Connectors on Docking Adaptor
Genlock: BNC connector. Genlock signal can be either HD Tri-level sync, or Analog
Black reference. The genlock signal must be of the same format as that selected on the
camera.
Time Code: Hirose 5p connector for external time code signal.
DC In: XLR-4p connector for 12V DC input.
Multicore connector: 26 pin connection for cable to Viper camera.
version 2.0 | June 2006
DCR 4000 User’s Guide | Installation
1.4
1-4
Controls on Venom
power ready play
record
VENOM
Bluetooth
POWER
FlashPak
LIGHT
escape
BT
select
ESC
UP
SEL
DOWN
READY
STOP
UP
RECORD
PLAY
REC
PLAY
record stop play navigate
version 2.0 | June 2006
menu
backlight
DOWN
DCR 4000 User’s Guide | Installation
1.5
1-5
Assembly
1.5.1 Docking Kit
The LDK 6506/30 Docking Kit contains the following parts:
• Docking Plate;
• Mounting Frame;
• 1x 0.50m connecting cable;
• 4x Mounting bolts
1.5.2 Assembling the Docking Kit
The Docking Plate can be mounted on the Mounting Frame in one of two positions
and is fixed in place using the four bolts supplied.
To mount the Venom on top of the Viper, the Docking Plate is fixed using the four
holes on the Mounting Frame nearest the V-Block. If it is required to mount the Venom
behind the camera, the Docking Plate is fixed using the four holes at the rear of the
Mounting Frame.
Check the orientation of the plate relative to the camera position. The Multicore
connector must be towards the rear or base of the mounting frame.
version 2.0 | June 2006
DCR 4000 User’s Guide | Installation
Top mounting position
1-6
Rear mounting position
Connect the cable to the camera before attaching the Mounting Frame to the camera.
Insert the connector fully, aligning the red dots on both parts, and turn the locking ring
to firmly hold it in place.
Attach the Mounting Frame to the camera by first inserting the locating pin in the hole
on the camera mounting foot, then push the V-plate firmly forward into the camera's
V-block until the locking bar clicks into place.
Connect the multicore cable to the connector on the Docking Plate. The red dots must
be aligned and the cable pushed fully into the connector.
In order to correctly align the cable it is necessary to twist the cable so that it forms a
loop. This also ensures that the cable does not have too sharp a corner and put strain
on the connectors. The following pictures show how the cable is routed in each case.
version 2.0 | June 2006
DCR 4000 User’s Guide | Installation
1-7
1.5.3 Addendum
Before attaching the Mounting Frame to the camera, it is necessary to replace the
existing rear camera mounting foot with the new one supplied.
Remove the existing foot by undoing four bolts. Use these bolts and washers to fix the
replacement mounting foot.
1.5.4 Mounting Venom
Locate Venom by sliding the foot into the docking plate. Do not push it fully into the
connector, rotate the locking lever clockwise to clamp the Venom into position
version 2.0 | June 2006
DCR 4000 User’s Guide | Installation
1-8
1.5.5 Connecting DC Power
Power is connected to the Docking Adaptor from either a battery pack or a power
supply. From the Docking Plate power is supplied both to the Venom and the Viper via
the multicore cable. No separate power supply is needed for the camera.
If the system voltage falls below 10.0V the power LED on the Venom will flash to give
a warning. If the voltage falls below 9.5V, the Venom system will close down and
show the following message on the display.
POWER
LIGHT
READY
RECORD
PLAY
ESC
SEL
BATTERY LOW
SYSTEM HALTED
Ub=9.49 V
CHANGE BATTERY
REC
STOP
UP
DOWN
PLAY
If power loss occurs during recording the current take will be lost. If it occurs while
erasing Takes, the erase process will need to be repeated once power has been
restored. If the power is lost while playing back a Take, or in idle mode, no data is lost
or affected.
☞
Note
Because it is necessary to reduce noise during recording, the cooling fan is set to low
speed while recording is in progress. The fan will run at full speed again when
recording stops.
When an external DC power supply is used to power the Venom and the Viper
follow these recommendations to prevent power loss during high current
demanding operations:
• Use a DC power supply that can supply at least 15 V / 8A continuously.
• Keep the power cable to the Docking Plate as short as possible (less than
2m is recommended).
When the Venom is powered separately follow this recommendation to
prevent power loss during high current demanding operations:
• Use a DC power supply that can supply at least 15 V / 4A continuously.
version 2.0 | June 2006
DCR 4000 User’s Guide | Installation
1.6
1-9
Synchronizing with other devices
When the Viper and Venom are to be synchronized with other cameras for a multicamera shoot or with other devices such as audio recorders or motion control rigs, it is
necessary to connect Genlock and/or Time Code.
1.6.1 Genlock
The Genlock signal required is HD Tri-level sync or Analog black reference, which must
be connected to the Venom via the docking plate BNC connector, not to the Viper. The
reference signal used must be of the same format as that selected on the camera.
1.6.2 Time Code
Both an internal TC run mode and an external TC mode are available:
• Internal run mode: time code is set to actual real time code. From the start, time
code is generated in sync with the incoming video signal and sent to the LTC
output.
• Time code is set to the time code of the external TC generator and begins
counting up when a new recording starts.
version 2.0 | June 2006
DCR 4000 User’s Guide | Installation
1.7
1-10
Time code applications
1.7.1 Single Viper-Venom configuration
Only one Viper plus Venom is being used. A real time clock is available inside the
Venom. This clock is used to creat the SMPTE time code. The clock can be adjusted in
the menu on the LCD screen.
1.7.2 Multiple Viper-Venom configuration with single Clock-It box
In this configuration, more than one Viper-Venom combination is used. In this case, the
method mentioned above is not accurate enough. An external master clock is needed
to synchronize the time codes of the Venom recorders. The diagram below shows the
mechanism that is available:
VENOM
VIPER#1
Power
Gen-lock
2xHD-SDI
Docking Kit
LTC in
Clock It
VENOM
VIPER#2
Docking Kit
Gen-lock
A Clock-It box is connected to the first camera system containing a Viper and a Venom
recorder. Both the Clock-It box and the Venom docking plate receive a genlock signal
on their reference input. The Clock-It box outputs the time code (according to SMPTE
266M standard) to the Venom via a connector on the docking plate. In this way the
Venom takes over the the time code of the Clock-It box.
The LTC input is removed and connected to the docking plate of the next camera
system and this one takes over the time code of the Click-It box. The Venoms in system
1 and system 2 are now running with the same time code. In this way the time code
can be synchronized in a multiple camera environment.
version 2.0 | June 2006
DCR 4000 User’s Guide | Installation
1-11
1.7.3 Multiple Viper-Venom configuration with multiple Clock-It boxes
The mechanism described under 2 had the disadvantage that the time code and
synchronization are lost when the camera and Venom are switched off. In a ‘battery
powered situation’ this often occurs. So solve this, we have to use a Clock-It box for
each Viper - Venom combination. This is shown in the diagram below:
Venom
2
Confidence Out
Multicore Cable
(no power in cable if Viper
power plug is used)
Viper #1
Power
HD-SDI
HD-SDI
Genlock
2
2
HD-SDI
Audio LTC
2 2
Power
Genlock
Scratch Audio Transmission
LTC
LockIt
Viper #n
LockIt
Audio
Recorder
Genlock
LTC
LockIt
Master
Clock
- will be wired to LockIt once a day ( session ... )
At the start of a working day, all Venom-Viper combinations are brought together. The
Clock-It boxes are connected to a master clock (this can be one of the Clock-It boxes),
and to one reference (gen-lock) signal. This way all Clock-It boxes are synchronized
both in the reference signal and in the time code. Each Viper-Venom camera is
connected to a Clock-It box, which provides both the gen-lock and LTC-in signal to the
docking plate. The clock in the Clock-It box is stable enough to allow for
synchronization at the start of a working day only. When the Viper and Venom are
switched off, the internal clock in the Clock-It box continues running.
*) Clock-It is a registered trademark of Ambient Recording GmbH, Germany.
version 2.0 | June 2006
DCR 4000 User’s Guide | Installation
version 2.0 | June 2006
1-12
DCR 4000 User’s Guide | Using Venom with Viper
2-1
Chapter 2
Using Venom with Viper
2.1
Initial Screen Displays
When power is first connected, the following screen will appear for approximately 3
seconds.
POWER
LIGHT
READY
RECORD
PLAY
FLASHPAK Nr. xxxxx
SC firmware: 2.7
BT firmware: 1.14xxx
FP xxxxx
ESC
SEL
REC
STOP
UP
DOWN
PLAY
This screen gives information about the status of the installed firmware, also the
Manufacturer's Serial number of the FlashPak is shown as FlashPak Nr xxxxx and the
Bluetooth identification number for the FlashPak as FPxxxxx
After the internal initialisation has taken place and the FlashPak is ready for use, the
LCD screen will show one of the following displays depending on whether or not there
is a source signal.
2.1.1 Idle Screen without source signal
POWER
LIGHT
READY
RECORD
PLAY
ESC
SEL
REMAINING TIME 35%
NO SOURCE/SYNC******
> TAKE 009
03:28
NO METADATA
↓
REC
STOP
UP
DOWN
PLAY
The remaining recording capacity is shown as a percentage of total storage.
version 2.0 | June 2006
DCR 4000 User’s Guide | Using Venom with Viper
2-2
2.1.2 Idle Screen with source signal
POWER
LIGHT
READY
RECORD
PLAY
REMAINING TIME 02:12
IN:1080psf24 **
> TAKE 009
03:28
NO METADATA
↓
ESC
SEL
REC
STOP
UP
DOWN
PLAY
When a source signal is present, the display shows the format of the signal,
additionally an indication of which signal is in use is given by two stars ( ** ) for a Dual
Link signal and one star ( * ) for HDSDI. For more information see below: Formats
Recorded on Venom.
The remaining recording capacity is now shown as the time available for the current
input signal format.
On the left of the screen the cursor (>) shows the current line. Up and down arrows on
the right hand side show when further menu options can be displayed by pressing [UP]
or [DOWN].
On pressing [DOWN] twice the display will scroll to show the "Tools & Settings" menu.
POWER
LIGHT
READY
RECORD
PLAY
ESC
SEL
REMAINING TIME 35%
TAKE 009
03:28 ↑
NO METADATA
> TOOLS AND SETTINGS
REC
STOP
UP
DOWN
PLAY
Pressing Select will open the next level for the line indicated by >
See Section 3 for details of the menu structure and navigation
version 2.0 | June 2006
DCR 4000 User’s Guide | Using Venom with Viper
2.2
2-3
Formats recorded on Venom
The Venom FlashPak can record all formats that can be output from a Viper FilmStream
Camera. FilmStream gives the highest quality recording, but the intended workflow of
the production or the need for longer record times may make an alternative format the
better choice. For details of the formats see the Viper User’s Guide; the recording times
available in each case are shown in the table below.
Table 2-1 Video formats and recording time
Viper
Viewfinder
Venom
Recording time (min)
dual link
single link
1
1080i50
1080i50
1
1080i50/psf25 10:06
15:07
2
1080i59
1080i59
2
1080i59/psf29 8:25
12:37
3
1080psf23SW
1080psf23
3
1080psf23
10:31
15:45
4
1080psf24SW
1080psf24
4
1080psf24
10:31
15:44
5
1080psf25SW
1080psf25
1
1080i50/psf25 10:06
15:07
6
1080psf29SW
1080psf29
2
1080i59/psf29 8:25
12:37
7
1080i59-23
1080i59-23
2
1080i59/psf29 8:25
12:37
8
720p50
720p50
5
720p50
11:21
16:59
9
720p59
720p59
6
720p59
9:28
14:11
10
720p59-23
720p59-23
6
720p59
9:28
14:11
11
720p50-25
720p50-25
5
720p50
11:21
16:59
12
720p59-29
720p59-29
6
720p59
9:28
14:11
When the camera and recorder are switched on, the LCD display shows the line and
frame rate for the format being received.
Different Takes on one Venom FlashPak can be of different formats. During record or
play, the remaining time display is adjusted according to the current input format..
2.3
Making a recording
To START Recording, press either the VTR button on the lens, the VTR Start button on
the side of the camera, or the REC button on the Venom FlashPak.
STOP Recording using the same device, so if the lens or camera button was used to
start recording, either one of these can be used to stop, but if recording was started on
the Venom, it must also be stopped by pressing STOP on the Venom.
version 2.0 | June 2006
DCR 4000 User’s Guide | Using Venom with Viper
2-4
2.3.1 Recording Display
Before recording starts the idle display will show remaining recording time and the last
Take number and duration.
POWER
LIGHT
READY
RECORD
PLAY
REMAINING TIME 08:10
IN:1080psf24 **
> TAKE 001 01:50
METADATA AVAILABLE
ESC
SEL
REC
STOP
UP
DOWN
PLAY
When recording starts, the first available Take number will be used. If an earlier Take
has been erased, that number will be re-used otherwise the next number in sequence
will be used.
NB: If Metadata is to be recorded for the new take, it must be sent to the FlashPak
before the take is recorded. See section 5 for Metadata information.
During recording the display will show Date and Time (Time Code) plus duration of this
Take and available record time remaining for the current format. Record Light on
Venom will be lit and the Tally lights on the camera will be active.
POWER
LIGHT
READY
RECORD
PLAY
ESC
SEL
* Recording *
TAKE 010 00:27 07:43
1080psf24 **
07.02.06 14:22:31 ↓
REC
STOP
UP
DOWN
PLAY
When recording is stopped, the system is immediately available to start the next Take.
NB: In the event of power loss during a recording, either by removal of the power
source or by battery power being below the 9.5V threshold, the Take being recorded
will be lost. All previously completed Takes will be safeguarded and the FlashPak will
recover when power is restored.
2.4
Playback from Venom
Recorded material can be played back from Venom immediately after recording has
stopped, by pressing PLAY.
Output is by Dual Link HDSDI, or single HDSDI according to the format, using the two
BNC connectors on the Venom and connecting to a suitable monitor. This output will
be in the same format as the recorded signal.
version 2.0 | June 2006
DCR 4000 User’s Guide | Using Venom with Viper
2-5
Audio output is from the stereo jack plug on the Venom.
During playback the display will show the date and timecode, format and take number.
Counters show both the elapsed time and the remaining time for the Take being
played.
POWER
LIGHT
READY
RECORD
PLAY
* Playback *
TAKE 002 00:27 00:08
1080psf24 **
07.02.06 14:15:24 ↓
ESC
SEL
REC
STOP
UP
DOWN
PLAY
In addition to playing back the last Take, any previous Take can be played by pressing
[SEL] when the left hand arrow is pointing at the Take number as shown in the Idle
Menu
All Takes are then displayed with their durations and the required Take can be chosen
using [UP] and [DOWN] buttons and pressing [SEL], then [PLAY].
POWER
LIGHT
READY
RECORD
PLAY
ESC
SEL
>TAKE
001
TAKE
002
TAKE
003
PLAY ALL
REC
STOP
00:27
00:25
01:12
UP
DOWN
PLAY
At the end of the take list is PLAY ALL. If this is selected all Takes will be played in
sequence.
From the "Tools & Settings" Menu, a play loop function can be set ON or OFF. If this is
set ON, the selected Take or All Takes will be played continuously until [STOP] is
pressed.
2.5
Erasing Takes
Once a recording has finished, or a Take has been played back, the Take can be erased
immediately.
version 2.0 | June 2006
DCR 4000 User’s Guide | Using Venom with Viper
2-6
When the down arrow is shown next to the [DOWN] button, press [DOWN] to show
the message "Erase Take"
POWER
LIGHT
READY
RECORD
PLAY
REMAINING TIME 02:12
TAKE 010
00:27
1080psf24 **
07.02.06 14:22:31 ↓
ESC
SEL
REC
STOP
UP
DOWN
PLAY
POWER
LIGHT
READY
RECORD
PLAY
REMAINING TIME 02:12
1080psf24 **
↑
07.02.06 14:22:31
> erase take 010
ESC
SEL
REC
STOP
UP
DOWN
PLAY
Pressing [SEL] will show a further message asking for confirmation.
POWER
LIGHT
READY
RECORD
PLAY
ESC
SEL
ERASE TAKE 10 ?
TO ERASE THIS TAKE
PLEASE PRESS
[SELECT] + [UP]
REC
STOP
UP
DOWN
PLAY
To erase the selected Take, the two buttons [SEL] and [UP] must be pressed at the same
time.
After erasing, press any key to return to the Take menu.
From the Idle menu, any Take can be selected in the same way as for playback and
then erased as above.
Only the currently selected Take can be erased in this way, if it is required to erase All
Takes, this can only be achieved through the "Tools & Settings" Menu.
NB: In the event of power loss during any erase process, either by removal of the
power source or by battery power being below the 9.5V threshold, the erasing may
not have been completed correctly.
After such a power loss, when power has been restored, repeat the erase process to
ensure the recording space is completely cleared.
version 2.0 | June 2006
DCR 4000 User’s Guide | Menu Structure
3-1
Chapter 3
Menu Structure
From the Idle screen, further menus are available
POWER
LIGHT
READY
RECORD
PLAY
REMAINING TIME 02:12
IN:1080psf24 **
> TAKE 009 03:28
NO METADATA
↓
ESC
SEL
REC
STOP
UP
DOWN
PLAY
All menu navigation is carried out by means of the four buttons: [UP], [DOWN], [ESC]
and [SEL] (select). The cursor is a right pointing '>' at the left hand side of the screen.
At the right of the screen a down arrow or up arrow shows whether there are more
options which can be reached by means of the [UP] and [DOWN] buttons.
Pressing [SEL] opens the selected menu item and moves to the next level down in the
structure, while pressing [ESC} returns to the previous level.
In the Idle screen shown above, the cursor is pointing at TAKE. Pressing [DOWN] once
moves the cursor to the Metadata selection, and pressing [DOWN] again causes the
screen to scroll to show the next line, as shown here
POWER
LIGHT
READY
RECORD
PLAY
ESC
SEL
REMAINING TIME 35%
TAKE 009 03:28
↑
NO METADATA
> TOOLS AND SETTINGS
REC
STOP
UP
DOWN
PLAY
There are three lines available on the top menu level:
• TAKE
• METADATA
• TOOLS AND SETTINGS
version 2.0 | June 2006
DCR 4000 User’s Guide | Menu Structure
3.1
3-2
Take menu
Selecting opens a screen showing all recorded takes and their durations..
POWER
LIGHT
READY
RECORD
PLAY
>TAKE
TAKE
TAKE
TAKE
ESC
SEL
REC
001
002
003
004
STOP
00:27
00:25
01:12
00:59
UP
DOWN
PLAY
Using [DOWN], moves to the required Take Number.
[SEL] opens the Take Information screen.
POWER
LIGHT
READY
RECORD
PLAY
REMAINING TIME 02:12
TAKE 001
00:21
1080psf24 **
26.09.05 14:22:31 ↓
ESC
SEL
REC
STOP
UP
DOWN
PLAY
The selected take can now be played back using the [PLAY] button, or erased.
Press [DOWN] to give the 'ERASE TAKE' option
POWER
LIGHT
READY
RECORD
PLAY
ESC
SEL
REMAINING TIME 02:12
1080psf24 **
26.09.05 14:22:31
> erase take 001?
↓
REC
version 2.0 | June 2006
STOP
PLAY
UP
DOWN
DCR 4000 User’s Guide | Menu Structure
3-3
Press [SEL] to erase the take. For safety you are asked to confirm erasing by pressing
two buttons simultaneously.
POWER
LIGHT
READY
RECORD
PLAY
ERASE TAKE 1 ?
TO ERASE THIS TAKE
PLEASE PRESS
[SELECT] + [UP]
ESC
SEL
REC
STOP
UP
DOWN
PLAY
There is a confirmation message, after which pressing any key will return you to the
Take list screen.
3.2
Metadata menu
This will show whether Metadata has been recorded for the selected take.
No further menu actions are possible.
3.3
Tools & Settings menu
Press [SEL] to display the first three items:
POWER
LIGHT
READY
RECORD
PLAY
ESC
SEL
TOOLS AND SETTINGS
> RECORD: FAN SLOW
PLAY: LOOP OFF
SET PREROLL TIME
REC
STOP
UP
↑
↓
DOWN
PLAY
RECORD FAN: SLOW: is a fixed setting for the cooling fan. It cannot be changed.
PLAY LOOP: When this is set ON the selected Take or All Takes will play continuously
until [STOP] is pressed. Press [SEL] to toggle between ON and OFF.
version 2.0 | June 2006
DCR 4000 User’s Guide | Menu Structure
3-4
SET PREROLL TIME: On playback, the Venom can be set to give a preroll to allow
external devices to synchronise. Press [SEL] to allow preroll time entry.
POWER
LIGHT
READY
RECORD
PLAY
ESC
TOOLS AND SETTINGS
PREROLL TIME 4 SECS
UP
SEL
↓
DOWN
REC
-
+
STOP
PLAY
Press [PLAY] to increase or [STOP] to decrease preroll time.
Each press changes the value by 1 second in the range 0 to 8 seconds.
Press [ESC] to return to the Tools and Settings menu.
Scrolling down shows the next three items
POWER
LIGHT
READY
RECORD
PLAY
TOOLS AND SETTINGS
> BNC OUT
SUBD OUT
TIME AND DATE
ESC
SEL
REC
STOP
UP
↑
↓
DOWN
PLAY
BNC OUT: The two output BNCs can be set to give either one pair of Dual Link HDSDI
signals, or two single HDSDI signals. When a Dual Link signal (FilmStream or RGB) has
been recorded, selecting SINGLE will give two identical Y,Cr,Cb (4:2:2) outputs for
viewing purposes. Press [SEL] to toggle between DUAL & SINGLE.
SUBD OUT: The two HDSDI outputs on the SUBD connector can be set in the same
way as the two BNC connectors, to give either one pair of Dual Link HDSDI signals or
two identical Y,Cr,Cb signals for viewing. Press [SEL] to toggle between DUAL & SINGLE
TIME AND DATE: [SEL] to enter the date:
The current date set is shown as "Actual". Entry of the new date is by means of the
square cursor and buttons
POWER
LIGHT
READY
RECORD
PLAY
ESC
SEL
DATE ENTRY
ACTUAL
07.apr.06
NEW
12.apr.06
<+
->
REC
version 2.0 | June 2006
STOP
PLAY
UP
DOWN
DCR 4000 User’s Guide | Menu Structure
3-5
The cursor is moved by using the [REC] button to move left and the [spare] button to
move right. [STOP] will decrease the value, [PLAY] will increase it.
To move to Time Entry, press [SEL]
POWER
LIGHT
READY
RECORD
PLAY
TIME ENTRY
ACTUAL
14:52:12
NEW
14:52:12
<+
->
ESC
SEL
REC
STOP
UP
DOWN
PLAY
Time is entered in the same way as Date.
When entry is finished, press [ESC] to return to Tools & Settings menu.
Scrolling down show the next items:
POWER
LIGHT
READY
RECORD
PLAY
TOOLS AND SETTINGS
> LANGUAGE ENGLISH
TIME MODE
AUDIO IN: LEFT
ESC
SEL
REC
STOP
UP
↑
↓
DOWN
PLAY
LANGUAGE: Press [SEL] to toggle the display language between English and German.
TIME MODE: This menu contains settings for Time and Date formats.
POWER
LIGHT
READY
RECORD
PLAY
ESC
TIME MODE
> TIME FORMAT
24h
TIME AND DATE dmy
UP
DOWN
SEL
REC
STOP
PLAY
TIME FORMAT: Press [SEL] to toggle between 24h and 12h clock display. When 12h is
selected time will be displayed with AM/PM.
TIME AND DATE: Press [SEL] to toggle between date formats; dmy or mdy
AUDIO IN: Press [SEL] to choose between LEFT, RIGHT and STEREO. The default setting
is LEFT. This is the channel supplied by the Viper.
version 2.0 | June 2006
DCR 4000 User’s Guide | Menu Structure
3-6
Scrolling down shows the next three items:
POWER
LIGHT
READY
RECORD
PLAY
TOOLS AND SETTINGS
> ERASE ALL
FIRMWARE VERSION
SERVICE MODE
ESC
SEL
REC
STOP
UP
↑
DOWN
PLAY
ERASE ALL: To erase all takes on this FlashPak, press [SEL]
You will be asked to confirm the operation.
POWER
LIGHT
READY
RECORD
PLAY
ERASE ALL
?
TO ERASE ALL TAKES
PLEASE PRESS
[SELECT] + [UP]
ESC
SEL
REC
STOP
UP
DOWN
PLAY
To confirm erasing all takes, press [SEL} and [UP] buttons together. When erasing is
complete a confirmation message is displayed. Press any key to return to the Tools and
Setting menu.
FIRMWARE VERSION: Press [SEL] to display current Firmware versions. This
information may be required in case of any technical support questions.
POWER
LIGHT
READY
RECORD
PLAY
ESC
SEL
FIRMWARE VERSION
SC 2.14
MXF 1.11
MC 1.8
REC
STOP
UP
DOWN
PLAY
SERVICE MODE: This is reserved for service personnel use and is password protected.
Press [ESC] to return to the Idle screen.
version 2.0 | June 2006
DCR 4000 User’s Guide | Metadata
4-1
Chapter 4
Metadata
Venom FlashPak contains the ability to record Metadata for each take. According to
the application used, this can include Production information, names of the
participants and other identification details.
Before recording a Take, the information for Metadata is compiled off-line and
transmitted to Venom via Bluetooth. This data is then saved as part of the Take and
cannot later be edited or deleted without deleting the Take.
There are many systems available for compiling Metadata, the following describes a
particular system using a PDA.
4.1
Connecting to Venom
When the PDA is switched on, it searches for other Bluetooth devices within range,
and displays a list.
Venom FlashPaks available will be shown as FP plus a number. This is the unique
Bluetooth identity number shown when the Venom is switched on, and is preset at the
factory.
Select the appropriate Venom FlashPak
version 2.0 | June 2006
DCR 4000 User’s Guide | Metadata
4-2
The main interface windows are then shown as below. There are three main sections:
• Metadata Window
• Status Window
• Command Windows
Select the Connect window to connect to the selected Venom FlashPak.
Once connection is established, the Status window will show the current state of the
Venom - Ready / Record / Play.
version 2.0 | June 2006
DCR 4000 User’s Guide | Metadata
4.2
4-3
Accessing Take information
Selecting the FP Commands window will show Takes already recorded.
When a Take is selected it can be viewed using the PDA as a remote control to PLAY
and STOP that Take provided the Venom is currently in Ready mode, and not already
playing or recording.
Also in the FP commands window, Sync.Time sends the current time from the PDA to
synchronize the internal clock on Venom.
The Metadata window gives access to existing Metadata and allows entry and
transmission of new Metadata.
version 2.0 | June 2006
DCR 4000 User’s Guide | Metadata
4-4
After a TAKE has been selected [Recv] will download existing Metadata from that Take
on the FlashPak. This will be shown in a tree structure in the main Metadata window.
Existing data can be opened for editing by selecting [Edit MD]. By using this function,
Metadata from one take can be used as a basis for the information needed on the next
take, e.g. taking the data from Take 1 and just changing it to Take 2 may be sufficient
for a repeat shot.
The [Open] command opens Metadata files stored on the PDA for editing.
version 2.0 | June 2006
DCR 4000 User’s Guide | Metadata
4.3
4-5
Entering or Editing Metadata
The same windows are used for either entering new Metadata or editing existing
Metadata. There are 5 windows:
Production Description: Overall information about the title and ownership of the
production.
Clip Identification: Information about the Scene.
Locations Description: Actual and Imaginary locations.
Participants: Identification of Producer, Director, Camera operator and Actors involved
in the scene.
Annotations: Additional notes as required.
The edited Metadata information can now be saved as a file on the PDA using the
[Save] command.
version 2.0 | June 2006
DCR 4000 User’s Guide | Metadata
4.4
4-6
Transmitting Metadata to Venom
In order to write the new or edited Metadata to Venom it must be transmitted using
the [Send] command.
The Metadata must be sent to the FlashPak before starting the recording of the Take to
which it refers. At this point it has not been permanently recorded on the FlashPak, this
only takes place when the recording of the Take is completed.
NB. If for any reason power to the Venom is switched off or lost before the Take is
recorded, the Metadata will be lost and must be re-sent from the PDA
Note that these windows and commands may vary with different Metadata
applications.
version 2.0 | June 2006
DCR 4000 User’s Guide | Metadata
version 2.0 | June 2006
4-7
DCR 4000 User’s Guide | Metadata
version 2.0 | June 2006
4-8