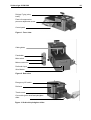
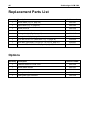
1
CCM 1200
Universal Automatic Cable Cutting
Machine
OPERATING INSTRUCTIONS
Version 06 / 96
Schleuniger AG
Bierigutstrasse 9
CH-3608 Thun
Switzerland
Tel. ++41 33 334 03 33
Fax ++41 33 334 03 34
www.schleuniger.com
[email protected]
2
Schleuniger CCM 1200
L + H Kabeltechnik GmbH
Hesselbachstrasse 13
D-75242 Neuhausen
Deutschland
Tel. 0049 7234 95 40-0
Fax 0049 7234 95 40-95
[email protected]
Schleuniger, Inc.
87, Colin Drive
Manchester, NH 03 103
USA
Phone (603) 668-8117
Fax
(603) 668-8119
[email protected]
Schleuniger Japan, Co.,Ltd.
Grand Palace Tamachi 1F
Shibaura 4-9-18, Minato-ku
Tokyo 108, Japan
Phone 0081 3 5442 1191
Fax
0081 3 5442 1195
[email protected]
© Schleuniger AG, Thun / Switzerland
Schleuniger CCM 1200
3
Index of Contents
Safety regulations english .............................................................................................................. 5
Sicherheitsvorschriften deutsch................................................................................................... 7
Prescriptions de sécurité français ................................................................................................ 9
Norme di sicurezza italiano........................................................................................................... 11
Instrucciones de seguridad español........................................................................................... 13
Veiligheidsvoorschriften nederlands ......................................................................................... 15
Sikkerhedsforskrifter dansk ......................................................................................................... 17
Säkerhetsföreskrifter svenska ..................................................................................................... 19
Machine Description....................................................................................................................... 21
Unpacking the CCM 1200.............................................................................................................. 21
Standard Equipment........................................................................................................................ 21
Operating Controls, Displays, Connections.............................................................................. 22
Operating Controls.......................................................................................................................... 22
Figure 1. Front view............................................................................................................. 23
Figure 2. Rear view ............................................................................................................. 23
Figure 3. Shaft with plexiglass slider .................................................................................. 23
Connections .................................................................................................................................... 24
Mains connection........................................................................................................................ 24
Prefeeder Input ........................................................................................................................... 24
Figure 4. Control contact S1............................................................................................... 24
Wire Marker ................................................................................................................................ 25
Pause function ............................................................................................................................ 25
Figure 5. Pause function..................................................................................................... 25
Single piece function................................................................................................................... 26
Figure 6. Single piece function ........................................................................................... 26
Internal Circuit on the Wire Marker Output................................................................................ 27
Figure 7. Internal circuit on the wire marker output ........................................................... 27
Electromagnetic Compatibility (EMC) ........................................................................................ 27
Control Panel................................................................................................................................... 28
Figure 8. Control panel........................................................................................................ 28
Setup .................................................................................................................................................. 30
Setting the mains voltage................................................................................................................ 30
Figure 9. Voltage selector................................................................................................... 30
Replacing the mains fuse ............................................................................................................... 31
Changing the unit of measure ........................................................................................................ 31
Display language............................................................................................................................. 31
Operation........................................................................................................................................... 32
Figure 10. Inserting the cable ............................................................................................. 32
Selecting the batch size.................................................................................................................. 33
Wire Marking................................................................................................................................... 34
Figure 11. Practical example of wire marking.................................................................... 34
Maintenance ..................................................................................................................................... 36
Cleaning, general ............................................................................................................................ 36
4
Schleuniger CCM 1200
Cleaning the cutting zone ............................................................................................................... 36
Replacing the feed roll V-belts ....................................................................................................... 37
Figure 12. Replacing the feed roll V-belts.......................................................................... 37
Replacing the V-belt, blade drive.................................................................................................... 38
Figure 13. Blade drive feed belt.......................................................................................... 38
Figure 14. Screws on blade drive motor ............................................................................ 38
Replacing upper blade .................................................................................................................... 39
Figure 15. Replacing upper blade....................................................................................... 39
Sharpening the blades .................................................................................................................... 39
Figure 16. Sharpening the blades....................................................................................... 39
Replacing the bottom blade ............................................................................................................ 40
Figure 17. Replacing the bottom blade............................................................................... 40
Aligning the blades .......................................................................................................................... 41
Figure 18. Aligning the blades............................................................................................. 41
Figure 19. Fitting position of lower blade............................................................................ 41
Special Settings .............................................................................................................................. 43
Unit of measure, changing the standard setting........................................................................ 43
Making the Hotprint mode the standard setting......................................................................... 43
Switching off the cable limit switch monitoring ........................................................................... 44
Troubleshooting, Fault Clearance, Repairs .............................................................................. 45
Error messages in the display........................................................................................................ 45
Faults ............................................................................................................................................... 46
Technical Data ................................................................................................................................. 47
Replacement Parts List .................................................................................................................. 48
Options ............................................................................................................................................ 48
Appendix ........................................................................................................................................... 49
Display Languages Comparison Table ......................................................................................... 49
Electrical Diagramm........................................................................................................................ 50
Index ................................................................................................................................................... 51
Schleuniger CCM 1200
5
Safety regulations english
1. Symbols
Please follow the jobs and procedures marked with this pictogram precisely.
Noncompliance can lead to death or severe injuries.
Please follow the jobs and procedures marked with this pictogram precisely.
Noncompliance can lead to minor injuries and to damage to the machine.
+
This pictogram indicates tips and tricks from our development department, production
department and customer service department.
2. Product description
The CCM 1200 automatic cropper cuts round cable, wires and tubing up to an external diameter of
10 mm into any desired length. The automatic unit is easy to program and to operate. Apart from
the opening of the feed rollers, mechanical settings and adjustments are not necessary. The CCM
1200 works without compressed air, and is therefore quiet in use. The automatic unit receives and
processes signals from upstream or downstream units via a control input. This allows, for example,
operation with a pedal or the control of an embossing machine.
3. Responsibilities
The operator of the machine bears the responsibility for ensuring that every person who works with
the Schleuniger CCM 1200 receives precise instruction from the operating instructions provided
(set-up, operation, maintenance). The training of the operation personnel must include the
following points:
• Intended use of the machine (see Section "2 Product description").
• Danger areas (see Section "5 Danger areas").
• Safety requirements (see Section "6 Safety requirements").
• Operation of the machine in accordance with the operating instructions provided.
6
Schleuniger CCM 1200
4. Personal qualifications
Inorder to that all the instructions be understood, the training must take place in the language of
the operating personnel. Consequently the following personal qualifications are required:
Installation, set-up,
instruction
Operation
Maintenance, service
Technical skilled personnel who have mastered English and/or German
as well as the language of the operating personnel.
Staff trained in accordance with "3 Responsibilities".
Technical skilled personnel who have mastered English or German
5. Danger areas
Please pay attention to the following danger areas with particular care:
• The area of the rollers which are used to feed the cable
• The area of the cable cutting equipment (cutter head)
• The area of the cable outlet (must always be kept free!)
- Special care of sensitive parts of the body, for example, the eyes, is necessary,
as
he cable can exit the CCM 1200 at high speed!
• The complete interior of the CCM 1200
- danger of electrical shock on contact
- danger from mechanically moving parts
6. Safety requirements
• This machine has been designed in accordance with the European Standard
EN294 for persons above the age of 14 years. It is strictly forbidden to allow
access to the machine to persons younger than this age.
• Never operate the machine in environments where there is a risk of fire or
explosion.
• The machine must only be operated in rooms that are dry and free from dust.
• Never operate the machine without its protective covers.
• Never work on the machine without wearing eye protection.
• Disconnect the machine from the electrical and/or compressed air supply before
carrying out any maintenance work.
• Never operate the machine with the mains earth disconnected.
• Do not make any modifications to the machine and only utilise it for its intended
purpose according to Paragraph "2. Product Description". Other applications are
only permitted with the written approval of the manufacturer. The manufacturer
will accept no liability for damage resulting from the disregard of this regulation.
• Never operate the machine without first having read through and understood all
instructions.
• Repair work may only be carried out by authorised persons who have been
specially trained for this work.
• Ensure that long hair is not worn loose, and do not wear loose clothing or
ornaments that could become caught in the moving parts of the machine.
• Only use the lubricant that was delivered with this machine according to these
operating instructions.
Schleuniger CCM 1200
7
Sicherheitsvorschriften deutsch
1. Symbole
Bitte befolgen Sie Arbeiten und Abläufe, die mit diesem Piktogramm markiert sind
genau. Nichtbefolgen kann zum Tod oder schweren Körperverletzungen führen.
Bitte befolgen Sie Arbeiten und Abläufe, die mit diesem Piktogramm markiert sind
genau. Nichtbefolgen kann zu leichten Körperverletzungen und zu Schäden an der
Maschine führen.
+
Dieses Piktogramm kennzeichnet Tips und Tricks aus unserer
Entwicklungsabteilung, aus der Produktion und von unserem Kundendienst.
2. Produktebeschreibung
Der Ablängautomat CCM 1200 schneidet Rundkabel, Drähte, Schläuche in jede gewünschte
Länge bis zu einem Aussendurchmesser von 10 mm. Der Automat ist komfortabel programmierund bedienbar. Mechanische Einstellungen und Justierungen sind bis auf den Durchlass der
Vorschubrollen nicht erforderlich. Der CCM 1200 arbeitet ohne Druckluft, und ist deshalb leise.
Über einen Steuereingang empfängt und verarbeitet der Automat Signale von einem vor- oder
nachgeschalteten Gerät. Dies erlaubt beispielsweise die Bedienung mit einem Pedal oder das
Steuern eines Prägegerätes.
3. Verantwortlichkeiten
Der Betreiber der Maschine trägt die Verantwortung, dass jede Person, die mit dem Schleuniger
CCM 1200 arbeitet, anhand der vorliegenden Betriebsanleitung genau instruiert worden ist
(setup, Bedienung, Instandhaltung). Die Ausbildung des Bedienpersonals muss folgende Punkte
enthalten:
• Verwendungszweck der Maschine (siehe Abschnitt "2. Produktebeschreibung").
• Gefährdungsbereiche (siehe Abschnitt "5. Gefährdungsbereiche").
• Sicherheitsbestimmungen (siehe Abschnitt "6. Sicherheitsbestimmungen").
• Bedienung der Maschine entsprechend der vorliegenden Betriebsanleitung.
8
Schleuniger CCM 1200
4. Personalqualifikationen
Damit alle Instruktionen verstanden werden, muss die Schulung in der Sprache des
Bedienpersonals erfolgen. Somit sind folgende Personalqualifikationen erforderlich:
Montage, Inbetriebnahme, Instruktion
Bedienung
Unterhalt, Service
Technische Fachkräfte, welche englisch und/oder deutsch sowie die
Sprache des Bedienpersonals beherrschen.
Gemäss "3. Verantwortlichkeiten" geschulte Mitarbeiter.
Technische Fachkräfte, welche englisch oder deutsch beherrschen
5. Gefährdungsbereiche
Bitte beachten Sie die folgenden Gefährdungsbereiche mit besonderer Vorsicht:
• Bereich der Rollen, welche der Kabelförderung dienen
• Bereich der Kabelschneidvorrichtung (Schneidkopf)
• Bereich des Kabelaustrittes (muss stets freigehalten werden!)
- Besondere Vorsicht ist bei empfindlichen Körperteilen geboten, z.B. Augen, da
das Kabel mit hoher Geschwindigkeit aus dem CCM 1200 austreten kann!
• Gesamter Innenraum des CCM 1200
- Gefahr durch elektrische Spannung bei Berührung
- Gefahr durch mechanisch bewegte Teile
6. Sicherheitsbestimmungen
• Die Maschine wurde gemäss der Europäischen Norm EN294 für Personen über 14
Jahre ausgelegt. Es ist strikte verboten, jüngeren Personen Zutritt zu der Maschine
zu gewähren.
• Betreiben Sie die Maschine nie in explosions- oder feuergefährdeter Umgebung.
• Die Maschine darf nur in trockenen, staubfreien Räumen betrieben werden.
• Betreiben Sie die Maschine nie ohne Schutzabdeckung.
• Arbeiten Sie nie ohne Augenschutz an der Maschine.
• Trennen Sie die Maschine vom elektrischen Stromanschluss und/oder von der
Druckluft, bevor Sie irgendwelche Unterhaltsarbeiten vornehmen.
• Betreiben Sie die Maschine nie ohne angeschlossene Schutzerde.
• Ändern Sie die Maschine nicht ab und setzen Sie sie nur für den vorgesehenen
Verwendungszweck ein, gemäss Abschnitt "2. Produktebeschreibung". Andere
Verwendungszwecke sind nur mit schriftlicher Zustimmung des Herstellers
zulässig. Für Schäden, die aus dem Missachten dieser Vorschrift entstehen, lehnt
der Hersteller jede Haftung ab.
• Betreiben Sie die Maschine nicht, bevor Sie alle Anweisungen gelesen und
verstanden haben.
• Instandhaltungsarbeiten dürfen nur berechtigte und für diese Tätigkeit ausgebildete
Personen durchführen.
• Tragen Sie lange Haare nicht offen, tragen Sie keine losen Kleider oder losen
Schmuck, damit Sie sich in beweglichen Teilen der Maschine nicht verfangen
können.
• Benutzen Sie mitgelieferte Schmiermittel ausschliesslich entsprechend der
vorliegenden Betriebsanleitung.
Schleuniger CCM 1200
9
Prescriptions de sécurité français
1. Symboles
Veuillez respecter exactement les travaux et les déroulements marqués par ce
pictogramme. Le non-respect peut entraîner la mort ou des blessures physiques
graves.
Veuillez respecter exactement les travaux et les déroulements marqués par ce
pictogramme. Le non-respect peut entraîner des blessures physiques légères ou
des détériorations de la machine.
+
Ce pictogramme signale des conseils et des astuces de notre service de
développement, de la production et de notre service après vente.
2. Description des produits
La tronçonneuse automatique CCM 1200 coupe les câbles ronds, les fils métalliques, les tubes
flexibles à la longueur souhaitée jusqu'à un diamètre extérieur de 10 mm. L'automate est facile à
programmer et à manipuler. Des réglages et ajustages mécaniques ne sont pas nécessaires à
part ceux des rouleaux d'avance. La tronçonneuse CCM 1200 travaille sans air comprimé et est
donc, en conséquence, silencieuse. L'automate reçoit et traite des signaux par une entrée de
commande provenant d'un appareil monté en amont ou en aval. Ceci permet, par exemple, la
commande à partir d'une pédale ou de piloter un appareil à gaufrer.
3. Responsabilités
L'exploitant de la machine est responsable du fait que toute personne travaillant avec le
Schleuniger CCM 1200 ait été informée de façon précise à l'aide du présent manuel
d'instructions de service (mise en service, commande, entretien). La formation des opérateurs
doit comporter les points suivants:
• Application de la machine (voir point "2. Description des produits").
• Zones de dangers (voir point "5. Zones de dangers").
• Dispositions de sécurité (voir point "6. Dispositions de sécurité").
• Commande de la machine conformément à ce manuel d'instructions de service.
10
Schleuniger CCM 1200
4. Qualifications du personnel
Afin que toutes les instructions soient comprises, la formation doit se faire dans la langue des
opérateurs. Les qualifications suivantes sont donc nécessaires pour le personnel:
Montage, mise en service,
instruction
Commande
Entretien, service après vente
Techniciens qualifiés qui maîtrisent l'anglais et/ou l'allemand
ainsi que la langue des opérateurs.
Employés formés conformément au point
"3. Responsabilités".
Techniciens qualifiés qui maîtrisent l'anglais ou l'allemand
5. Zones de dangers
Veuillez faire particulièrement attention aux zones de dangers suivantes:
• Zone des rouleaux qui servent au transport du câble
• Zone du dispositif de coupe du câble (tête de coupe)
• Zone de sortie du câble (doit être constamment maintenue libre!)
– Une prudence particulière est requise dans le cas de parties corporelles
sensibles, p.ex. les yeux, car le câble peut sortir à haute vitesse hors de la CCM
1200!
• Tout l'intérieur de la CCM 1200
- Danger en cas de contact avec la tension électrique
– Danger présenté par les pièces mobiles
6. Dispositions de sécurité
• La machine a été conçue pour des personnes âgées de plus de 14 ans
conformément à la norme européenne EN294. Il est strictement interdit d'accorder
l'accès à la machine à des personnes plus jeunes.
• Ne pas utiliser la machine dans un environnement déflagrant ou inflammable.
• La machine ne doit être mise en service que dans des locaux secs exempt de
poussière.
• Ne jamais faire fonctionner la machine sans capot protecteur.
• Ne jamais travailler sur la machine sans lunettes de protection.
• Avant de procéder à des tâches quelconques de maintenance, débrancher la
machine de l'alimentation électrique et/ou de celle d'air comprimé.
• Ne jamais se servir de la machine sans branchement de mise à la terre.
• Ne pas modifier la machine et ne l'employer que pour l'usage auquel elle a été
destinée, conformément au paragraphe "2. Description du produit". L'emploi à
d'autres usages n'est admis que moyennant autorisation écrite du constructeur.
Celui-ci décline toute responsabilité pour des dommages consécutifs à
l'inobservation de cette prescription.
• Ne pas mettre la machine en service avant d'avoir lu et compris les instructions s'y
rapportant.
• Seules des personnes autorisées et instruites à cet effet sont qualifiées pour
procéder aux travaux de maintenance de la machine.
• Ne pas porter de longs cheveux libres, de vêtements ou bijoux flottants afin de
n'être pas happé par des pièces mobiles de la machine.
• N'employer exclusivement que les lubrifiants inclus dans la fourniture
conformément au mode d'emploi.
Schleuniger CCM 1200
11
Norme di sicurezza italiano
1. Simboli
Vogliate osservare molto attentamente lavori e decorsi, che sono contrassegnati con
questo pittogramma. La non osservanza può provocare la morte o gravissime lesioni
personali.
Vogliate osservare molto attentamente lavori e decorsi, che sono contrassegnati con
questo pittogramma. La non osservanza può provocare lievi lesioni personali e danni
alla macchina.
+
Questo pittogramma contrassegna suggerimenti ed espedienti da parte de
l nostro reparto progettazione, della produzione e della nostra assistenza tecnica
clienti.
2. Descrizione del prodotto
La troncatrice automatica CCM 1200 taglia cavi a sezione circolare, fili metallici, tubi flessibili in
qualsiasi lunghezza desiderata fino ad un diametro esterno di 10 mm. Questa macchina
automatica è confortevole da programmare e utilizzare. Le impostazioni meccaniche non sono
necessarie fino al passaggio dei rulli di alimentazione. La CCM 1200 lavora senza aria compressa
e, pertanto, è silenziosa. La macchina riceve ed elabora i segnali di un apparecchio inserito a valle
o a monte attraverso un’entrata di comando. Questo consente ad esempio l’impiego della
macchina con un pedale o il comando di un apparecchio per stampaggio a rilievo.
3. Responsabilità
L'esercente della macchina è responsabile che ogni persona, che lavora con il Schleuniger
CCM 1200, sia stata correttamente istruita in base alle presenti istruzioni sull'uso (messa in
esercizio, comando, manutenzione). La formazione del personale addetto al comando della
macchina deve abbracciare i seguenti punti:
• Uso conforme della macchina (vedi sezione "2. Descrizione del prodotto").
• Campi di pericolosità (vedi sezione "5. Campi di pericolosità").
• Disposizioni di sicurezza (vedi sezione "6. Disposizioni di sicurezza").
• Comando della macchina secondo le presenti istruzioni sull'uso.
12
Schleuniger CCM 1200
4. Qualificazione del personale
Per essere sicuri che le istruzioni sono state capite, la formazione deve avere luogo nella lingua
del personale addetto alla macchina. A questo fine sono richieste le seguenti qualificazioni del
personale:
Montaggio, messa in
funzione, istruzioni
Comando
Manutenzione,
service
Personale tecnico specializzato, che padroneggia l'inglese e/o il tedesco
nonché la lingua del personale addetto alla macchina.
Collaboratori esperti secondo sezione "3. Responsabilità".
Personale tecnico specializzato, che padroneggia l'inglese o il tedesco.
5. Campi di pericolosità
Vogliate usare particolare precauzione nei seguenti campi di pericolosità:
• Zona dei rulli che servono all’alimentazione dei cavi.
• Zona del dispositivo di taglio dei cavi (testa di taglio).
• Zona di uscita dei cavi (deve sempre essere mantenuta libera!).
- È necessario prestare particolare cautela per le parti del corpo più delicate, ad
esempio gli occhi, poiché il cavo può uscire dalla CCM 1200 a velocità sostenuta!
• L’intera parte interna della CCM 1200 .
- Pericolo di folgorazione in caso di contatto.
- Pericolo per i pezzi mobili azionati meccanicamente.
6. Disposizioni di sicurezza
• La macchina è stata progettata secondo la Norma Europea EN294 per persone con più
di 14 anni d’età. È severamente vietato fare accedere alla macchina persone di età
inferiore.
• Non mettere mai in funzione la macchina in un ambiente a rischio di esplosione o
d’incendio.
• La macchina deve essere messa in funzione unicamente in locali asciutti e privi di
polvere.
• Non mettere mai in funzione la macchina quando la stessa è sprovvista dell’apposito
carter di protezione.
• Non lavorare alla macchina senza avere prima indossato l’apposita protezione per gli
occhi.
• Prima di effettuare qualsiasi lavoro di manutenzione, separare la macchina
dall’alimentazione della corrente elettrica e/o dall’aria compressa.
• Non mettere mai in funzione la macchina quando non è collegata alla terra.
• Non modificare la macchina e utilizzare la stessa unicamente per gli scopi descritti nel
paragrafo "2. Descrizione del prodotto". Scopi diversi da quelli qui riportati sono
ammessi solo con l’approvazione scritta del costruttore. Il costruttore declina qualsiasi
responsabilità per i danni derivanti dalla mancata osservanza di questa clausola.
• Non mettere in funzione la macchina prima di avere letto e compreso tutte le istruzioni.
• Gli interventi di riparazione devono essere eseguiti unicamente da persone autorizzate e
qualificate per quest’attività.
• Evitare di tenere sciolti i capelli lunghi, non indossare abiti troppo ampi o gioielli, affinché
gli stessi non possano restare impigliati negli elementi in movimento della macchina.
• Utilizzare i lubrificanti forniti in dotazione esclusivamente secondo quanto riportato in
queste istruzioni per l’uso.
Schleuniger CCM 1200
13
Instrucciones de seguridad español
1. Símbolos
Por favor, aténgase con exactitud a las tareas y procedimientos marcados con este
símbolo. El incumplimiento de estas instrucciones puede producir peligro de muerte o
graves lesiones corporales.
Por favor, aténgase con exactitud a las tareas y procedimientos marcados con este
símbolo. El incumplimiento de estas instrucciones puede producir lesiones corporales
leves o daños en la máquina.
+
Éste símbolo identifica sugerencias y trucos de nuestro departamento de desarrollo,
de producción o de nuestro servicio técnico.
2. Descripción del producto
La cortadora automática CCM 1200 corta cables redondos, alambres y mangueras al largo
deseado y hasta un diámetro exterior de 10 mm. La cortadora automática se puede programar y
manejar cómoda y sencillamente. No son necesarias regulaciones y ajustes mecánicos, con
excepción del paso de los rodillos de avance. La CCM 1200 trabaja sin aire comprimido y, por lo
tanto, sin ruido. A través de una entrada de mando, la cortadora recibe y trata señales enviadas
por aparatos conectados antes o detrás de ella. Esto permite, por ejemplo, el uso con un pedal o
el mando de una estampadora.
3. Responsabilidades
El usuario de la máquina se responsabilizará de que cualquier persona que trabaje con la máquina
Schleuniger CCM 1200 esté correctamente instruida según estas instrucciones de servicio
(puesta en servicio, manejo, mantenimiento). La formación del personal operario deberá
contemplar los siguientes puntos:
• Finalidad del uso de la máquina (véase el apartado "2. Descripción del producto").
• Zonas de peligro (véase el apartado "5. Zonas de peligro").
• Normas de seguridad (véase el apartado "6. Normas de seguridad").
• Manejo de la máquina según estas instrucciones de servicio.
14
Schleuniger CCM 1200
4. Cualificación del personal
La formación se deberá llevar a cabo en el idioma del personal operario para que puedan
comprender todas las instrucciones. Por ello será necesario contar con el siguiente personal
cualificado:
Montaje, puesta en
servicio, instrucción
Manejo
Mantenimiento, servicio
Personal técnico especializado que domine el inglés y/o alemán, así
como la lengua del personal operario.
Empleados formados según el apartado "3. Responsabilidades".
Personal técnico cualificado que domine el inglés o el alemán.
5. Zonas de peligro
Por favor, respete las siguientes zonas de peligro con especial precaución:
• Sector de los rodillos que sirven para el transporte del cable
• Sector del dispositivo de corte de cables (cabezal de corte)
• Sector de la salida del cable (¡tiene que estar siempre libre!)
- Es necesario actuar con mucha precaución en relación con partes del cuerpo
sensibles como los ojos, ya que el cable puede salir de la CCM 1200 a alta
velocidad.
• Todo el interior de la CCM 1200
- Peligro por tensión eléctrica en caso de contacto
- Peligro debido a piezas mecánicas en movimiento
6. Normas de seguridad
• La máquina ha sido concebida en conformidad con la Norma europea EN294 para
personas mayores de 14 años. Se prohíbe terminantemente permitir el acceso a la
máquina a personas de menor edad.
• No use nunca la máquina en entornos donde exista peligro de incendio o explosión.
• La máquina debe funcionar sólo en locales secos y exentos de polvo.
• No use nunca la máquina sin la correspondiente cubierta de protección.
• No trabaje nunca en la máquina sin la protección de ojos.
• Desconecte la máquina del sumunistro eléctrico y/o de aire comprimido antes de
efectuar en ella cualquier trabajo de mantenimiento.
• La máquina no debe usarse nunca sin la puesta a tierra conectada.
• No introduzca modificaciones en la máquina y úsela sólo para la finalidad prevista
según el punto "2. Descripción del producto". Otros usos sólo están permitidos si
se cuenta para ello con la autorización por escrito del fabricante. El fabricante
rechaza toda responsabilidad por daños que puedan resultar al no respetarse
esta disposición.
• No use la máquina antes de haber leído y comprendido todas las instrucciones.
• Las reparaciones sólo deben ser efectuadas por personas autorizadas y que
cuenten con la debida formación para realizar esas tareas.
• No lleve el cabello largo suelto ni use ropa o joyas sueltas que puedan quedar
enganchados o atrapados en piezas o partes móviles de la máquina.
• Use sólo los lubricantes entregados con la máquina y de acuerdo con las presentes
instrucciones de servicio.
Schleuniger CCM 1200
15
Veiligheidsvoorschriften nederlands
1. Symbolen
Volg de beschrijving bij werkzaamheden en processen die met dit pictogram zijn
gemarkeerd, nauwkeurig op. Het niet opvolgen van de instructies kan de dood of
ernstige verwondingen veroorzaken.
Volg de beschrijving bij werkzaamheden en processen die met dit pictogram zijn
gemarkeerd, nauwkeurig op. Het niet opvolgen van de instructies kan lichte
verwondingen en beschadiging van de machine veroorzaken.
+
Dit pictogram staat afgebeeld bij tips en handigheidjes van
ontwikkelingsafdeling, van de productieafdeling en van onze klantenservice.
onze
2. Productbeschrijving
De passnijautomaat CCM 1200 snijdt ronde kabels, draad, slangen op elke gewenste lengte tot
een buitendiameter van 10 mm. De automaat is comfortabel te programmeren en te bedienen.
Mechanische in- en afstellingen zijn, afgezien van de opening van de aanvoerrollen, niet nodig.
De CCM 1200 werkt zonder druklucht en maakt daardoor weinig lawaai. Via een
besturingsingang ontvangt en verwerkt de automaat signalen van een ervoor of erna
geschakeld apparaat. Dit maakt b.v. bediening met een pedaal of besturing van een
preegapparaat mogelijk.
3. Verantwoordelijkheid
De exploitant van de machine is ervoor verantwoordelijk dat iedereen die met de CCM 1200 van
Schleuniger werkt, grondig is geïnstrueerd aan de hand van deze bedieningshandleiding
(inbedrijfstelling, bediening, instandhouding). De scholing van het bedienend personeel dient de
volgende punten te omvatten:
• toepassingsdoel van de machine (zie punt "2. Productbeschrijving").
• gevarenzones (zie punt "5. Gevarenzones").
• veiligheidsvoorschriften (zie punt "6. Veiligheidsvoorschriften").
• bediening van de machine conform deze bedieningshandleiding.
16
Schleuniger CCM 1200
4. Kwalificaties van het personeel
Om te kunnen garanderen dat alle instructies worden begrepen, dient het bedienend personeel in
zijn moedertaal te worden geschoold. Daarnaast dient u zich beslist te houden aan onderstaand
schema over de kwalificaties van het personeel:
Montage, inbedrijfstelling,
instructie
Bediening
Onderhoud, service
Technisch vakpersoneel dat de Engelse en/of Duitse taal en de taal
van het bedienend personeel beheerst.
Conform "3. Verantwoordelijkheid" geschoolde medewerkers.
Technisch vakpersoneel dat de Engelse of de Duitse taal beheerst.
5. Gevarenzones
Wees bij onderstaande gevarenzones extra voorzichtig:
• Omgeving van de rollen voor het kabeltransport
• Gebied van de kabelsnij-inrichting (snijkop)
• Gebied van de van de kabeluitgang (moet altijd vrij gehouden worden!)
- Wees bijzonder voorzichtig met kwetsbare lichaamsdelen, zoals ogen, omdat de
kabel
met grote snelheid uit de CCM 1200 kan komen!
• Het gehele inwendige van de CCM 1200
- Gevaar door elektrische spanning bij aanraken
- Gevaar door mechanische bewegende delen
6. Veiligheidsvoorschriften
• De machine is conform de Europese norm EN294 geconstrueerd voor personen
boven 14 jaar. Het is streng verboden jongeren personen toegang tot de machine te
verlenen.
• Gebruik de machine nooit in een omgeving waar gevaar van explosie of brand
bestaat.
• De machine mag alleen in droge, stofvrije ruimtes worden gebruikt.
• Gebruik de machine nooit zonder veiligheidsafdekking.
• Werk nooit zonder veiligheidsbril aan de machine.
• Verbreek de verbinding van de machine met het stroomnet en/of de druklucht
voordat u onderhoudswerkzaamheden uitvoert.
• Gebruik de machine nooit zonder dat de aarde aangesloten is.
• Breng geen veranderingen aan de machine aan en gebruik de machine alleen voor
het in paragraaf "2. Productbeschrijving" beschreven doel. Andere
gebruiksdoeleinden zijn alleen met schriftelijke toestemming van de fabrikant
toegestaan. Voor schade die veroorzaakt wordt door het niet in acht nemen van dit
voorschrift wijst de fabrikant elke aansprakelijkheid van de hand.
• Gebruik de machine niet voordat u alle aanwijzingen gelezen en begrepen hebt.
• Onderhoudswerkzaamheden mogen alleen door bevoegde en voor dit werk
geschoolde personen worden uitgevoerd.
• Draag lang haar niet los en draag geen los hangende kleren of sieraden, om te
voorkomen dat deze in bewegende delen van de machine terechtkomen.
• Gebruik de bijgeleverde smeermiddelen uitsluitend in overeenstemming met deze
handleiding.
Schleuniger CCM 1200
17
Sikkerhedsforskrifter dansk
1. Symboler
Overhold nøje de arbejder og forløb, som er markeret med dette symbol. Manglende
overholdelse kan medføre døden eller alvorlige kvæstelser.
Overhold nøje de arbejder og forløb, som er markeret med dette symbol. Manglende
overholdelse kan medføre lette kvæstelser og beskadigelser på maskinen.
+
Dette symbol kendetegner gode råd og henvisninger fra vores udviklingsafdeling,
produktion og kundetjeneste.
2. Produktbeskrivelse
Afkortningsautomaten CCM 1200 skærer runde kabler, tråde og slanger i enhver ønsket længde
indtil en udvendig diameter på 10 mm. Automaten er nem at programmere og betjene. Det er –
bortset fra åbningen til fremføringsrullerne - ikke nødvendigt at gennemføre mekaniske indstillinger
og justeringer. CCM 1200 er næsten lydløs, da den arbejder uden trykluft. Via en styreindgang
modtager og behandler automaten signaler fra en for- eller efterkoblet maskine. Dette muliggør
f.eks. betjening med en pedal eller styring af en prægemaskine.
3. Ansvar
Maskinens ejer bærer ansvaret for, at alle personer, som arbejder med Schleuniger CCM 1200
har fået en indgående instruktion ved hjælp af den foreliggende driftsvejledning (idrifttagning,
betjening, istandsættelse). Uddannelsen af det personale, som betjener maskinen, skal omfatte
følgende punkter:
• Maskinens anvendelsesformål (se afsnit "2. Produktbeskrivelse").
• Farlige områder (se afsnit "5. Farlige områder").
• Sikkerhedsbestemmelser (se afsnit "6. Sikkerhedsbestemmelser").
• Betjeningen af maskinen i overensstemmelse med den foreliggende driftsvejledning.
18
Schleuniger CCM 1200
4. Personalets kvalifikationer
For at alle instruktioner skal blive forstået, skal undervisningen foregå på betjeningspersonalets
sprog. Desuden er følgende kvalifikationer nødvendige for personalet:
Montering, idrifttag- ning, Tekniske fagfolk, som behersker engelsk og/eller tysk samt
instruktion
betjeningspersonalets sprog.
Betjening
Medarbejdere, som er indstrueret i overensstemmelse med afsnit "3.
Ansvar".
Vedligeholdelse, service Tekniske fagfolk, som behersker engelsk eller tysk.
5. Farlige områder
Ved de følgende farlige områder skal man være særligt forsigtig:
• Område i hvilket rullerne til kabeltransporten befinder sig
• Område i hvilket kabelskæreanordningen befinder sig (skærehoved)
• Område i hvilket kablet kommer ud (skal altid holdes fri!)
– Man skal især beskytte følsomme dele af kroppen som f.eks. øjnene, da kablet
kan komme ud af CCM 1200 med stor hastighed!
• Samlet indvendigt område på CCM 1200
- fare for elektrisk spænding, hvis det berøres
– fare fremkaldt af mekaniske dele, der bevæger sig
6. Sikkerhedsbestemmelser
• Maskinen er konstrueret til at blive betjent af personer på 14 år og derover iht. den
europæiske standard EN 294. Det er strengt forbudt at give personer under 14 år
adgang til maskinen.
• Benyt aldrig maskinen i eksplosions- eller brandfarlige omgivelser.
• Maskinen må kun benyttes i tørre, støvfrie rum.
• Benyt aldrig maskinen uden beskyttelsesskærm.
• Arbejd aldrig uden øjenværn på/ved maskinen.
• Afbryd maskinen fra strømforsyningen og/eller fra trykluften, før
vedligeholdelsesarbejde udføres på maskinen.
• Benyt aldrig maskinen uden tilsluttet beskyttelsesjording.
• Foretag ikke ændringer på maskinen og benyt den kun til de formål, den er
beregnet til (iht. afsnit "2. Produktbeskrivelse"). En anden benyttelse kræver
forudgående skriftlig tilladelse fra fabrikanten. Fabrikanten fraskriver sig ethvert
ansvar for skader, der opstår som følge af manglende overholdelse af denne
forskrift.
• Tag først maskinen i drift, når alle anvisninger er læst og forstået.
• Vedligeholdelsesarbejde må kun udføres af særligt personale, som er berettiget og
uddannet til at udføre et sådant arbejde.
• Beskyt langt hår under et hårnet, bær ikke løstsiddende tøj eller smykker, de kan
sætte sig fast i bevægelige maskindele.
• De medfølgende smøremidler må kun benyttes iht. nærværende
betjeningsvejledning.
Schleuniger CCM 1200
19
Säkerhetsföreskrifter svenska
1. Symboler
Följ noggrant de arbeten och förlopp, som är markerade med detta piktogram.
Underlåtelse att följa dem kan leda till död eller allvarliga kroppskador.
Följ noggrant de arbeten och förlopp, som är markerade med detta piktogram.
Underlåtelse att följa dem kan leda till lätta kroppskador och till maskinskador.
+
Detta piktogram kännetecknar tips och trick från vår utvecklingsavdelning, från vår
produktion och från vår kundtjänst.
2. Produktbeskrivning
Kapningsautomaten CCM 1200 skär av rund kabel, tråd och slang i varje önskad längd upp till en
ytterdiameter på 10 mm. Automaten är bekväm att programmera och betjäna. Mekaniska
inställningar erfordras inte förutom matningsrullarnas frammatning. CCM 1200 arbetar utan
tryckluft och är därför tystgående. Över en styringång mottager och bearbetar automaten signaler
från framför eller efteråt inkopplad utrustning. Detta möjliggör exempelvis manövrering med pedal
eller styrning av en präglingsutrustning.
3. Ansvarighetsområden
Maskinskötaren bär ansvaret för att varje person, som på basen av föreliggande bruksanvisning
arbetar med Schleuniger CCM 1200, har blivit noggrant instruerad (ibruktagning, användning,
underhåll). Skolningen av användar -personalen måste omfatta följande punkter:
• Maskinens användningsändamål (se avsnitt "2. Produktbeskrivning").
• Riskområden (se avsnitt "5. Riskområden").
• Säkerhetsföreskrifter (se avsnitt "6. Säkerhetsföreskrifter").
• Användning av maskinen i enlighet med föreliggande bruksanvisning.
20
Schleuniger CCM 1200
4. Personalens kvalifikationer
För att alla instruktioner skall förstås, måste skolningen ske på användarpersonalens språk
Därmed krävs att personalen har följande kvalifikationer:
Montering, ibruktagning
instruktion
Användning
Underhåll, service
Teknisk fackpersonal, som behärkar engelska och/eller tyska samt
betjäningspersonalens språk.
Anställda som skolats enligt "3. Ansvarsområden“.
Teknisk fackpersonal, som behärskar engelska eller tyska
5. Riskområden
Var speciellt försiktig inom följande riskområden:
• Området kring de rullar, som matar fram kabeln
• Området kring kabelkapningsanordningen (skärhuvud)
• Utmatningsområdet för kabeln (måste alltid hållas fritt!)
- Särskild försiktighet skall iakttas för känsliga kroppsdelar, t.ex. ögon, eftersom
kabeln kan matas ut från CCM 1200 hög hastighet!
• Invändigt i hela CCM 1200
- Fara vid beröring på grund av elektrisk spänning
- Fara på grund av mekaniskt rörliga delar
6. Säkerhetsföreskrifter
• Maskinen har enligt den europeiska normen EN294 konstruerats för personer
över 14 år. Det är strängt förbjudet att tillåta yngre personer att få tillträde till
maskinen.
• Kör aldrig maskinen i en omgivning där explosions- eller brandrisk föreligger.
• Maskinen får köras endast i torra, dammfria lokaler.
• Kör aldrig maskinen utan skyddskåpa.
• Arbeta aldrig utan skyddsglasögon vid maskinen.
• Skilj alltid maskinen från elnätet och/eller från tryckluftsnätet innan några som
helst underhållsarbeten utförs på maskinen.
• Kör aldrig maskinen utan ansluten skyddsjordning.
• Ändra inte maskinen och använd den endast för det avsedda ändamålet, enligt
avsnitt ”2. Produktbeskrivning“. Andra användningsändamål är tillåtna endast
efter skriftligt godkännande från tillverkaren. För skador som uppstår genom att
denna föreskrift ej har följts, avvisar tillverkaren allt ansvar.
• Använd inte maskinen förrän ni har läst och förstått alla anvisningar.
• Underhållsarbeten får endast utföras av behöriga och för detta arbete utbildade
personer.
• Bär inte löst hängande hår, löst sittande klädesplagg eller lösa smycken, för att
förhindra att de fångas upp av maskinens rörliga delar.
• Använd de medlevererade smörjmedlen uteslutande enligt föreliggande
driftsinstruktion.
Schleuniger CCM 1200
21
Machine Description
The CCM 1200 automatic cutter cuts round cables, wires, hoses to any length required. The
automatic unit can be programmed and operated via a user-friendly control panel. Once the CCM
1200 has been programmed it processes the material on a fully automatic basis. No settings or
adjustments are required right down to the compression pressure of the feed rolls on the material
to be cut.
The CCM 1200 operates without compressed air and so is quiet. The automatic unit receives and
processes signals from an up and downline unit via a control input. This allows the unit to for
example be operated using a pedal. In addition, the CCM 1200 can be used to control an external
wire marking machine and a prefeeder input can be connected for the cable feed.
Unpacking the CCM 1200
• Carefully unpack the CCM 1200 and place the packaging to one side. We recommend that you
keep the original packaging . This will protect the unit when it is subsequently being transported.
• Check that the consignment is complete in accordance with the standard equipment and your
additional order requirements (packaging list)
Standard Equipment
Quantity Description
Article number
1
CCM 1200 Automatic Cutter
902.1000
1
Operating Instructions
273.0000
1
Mains power cable
Switzerland
206.0001
or
Europe
206.0002
or
USA / Japan
206.0003
1
Socket head wrench
2 mm
272.0007
1
Socket head wrench
2,5 mm
272.0006
1
Socket head wrench
4 mm
272.0005
1
Skeet head wrench
5 mm
272.0004
1
Socket head wrench
8 mm
272.0003
1
Hexagonal pin wrench with handle
6 mm
272.0001
1
Hexagonal socket wrench
10 mm
272.0000
1
Open-ended wrench 8 / 10 mm
272.0002
22
Schleuniger CCM 1200
Operating Controls, Displays,
Connections
Operating Controls
Emergency-Off
switch
The Emergency-Off switch immediately shuts down all the functions
of the CCM 1200. To shut down the machine quickly press the
switch in until it engages. To reset, turn the switch in a clockwise
direction until it springs out of the engaged position.
T-grip for roll gap
The T-grip is used to adjust the opening between the feed rolls. If
you turn it in a clockwise direction, „UP“, the opening between the
feed rolls widens, turning it in an anticlockwise direction, „DOWN“,
the opening reduces.
Adjustment screw
feed roll compression
pressure
This hexagonal socket head screw (SW 8 mm) is used to adjust the
compression pressure of the feed rolls on to the cable. If you tighten
the screw the compression pressure is increased. If you loosen the
screw the pressure reduces. The basic setting is carried out at the
factory and only has to be adjusted in exceptional cases.
Roll lever
If you press the roll lever down then the upper feed roll is raised. This
enables you to remove material from the machine or to insert
material into it.
Plexiglass slider
The plexiglass slider is used for cutting lengths of more than 18 cm.
For shorter pieces the slider is pulled out.
Cable guides
The cable guides can be adjusted to the width of the material to be
cut. They are secured using the two milled screws.
Main switch
The master switch is used to switch the CCM 1200 on and off.
Control panel
The control panel can be folded out for convenient operation.
Schleuniger CCM 1200
Roll gap T grip (raise,
lower)
Feed roll compression
pressure adjustment screw
Control panel
Figure 1. Front view
Cable guides
Fuseholder
Main switch
Mains connection
Prefeeder Input
Wire Marker
Figure 2. Rear view
Emergency-Off switch
Roll lever
Thumb screw
Cover with ejector shaft and plexiglass
slider
Figure 3. Shaft with plexiglass slider
23
24
Schleuniger CCM 1200
Connections
Mains connection
• Mains connection single-phase, earthed (2P + E)
• 115, 230, 240 V / 50 - 60 Hz
• Power consumption maximum 80 VA
• The CCM 1200 operates without compressed air.
The fuse holder (Figure 2, Page 23) also houses the voltage selector. See Page 31. for details
on how to change the fuses. The procedure for changing the voltage is described on Page 30.
Prefeeder Input
An electric or mechanical prefeeder can be connected to the prefeeder input. This allows the
cable feed to be monitored and processing to be stopped automatically in the event of an
emergency. With Schleuniger equipment the corresponding connector cable is supplied with the
prefeeder. Otherwise a D-Sub connector can be wired as follows:
Prefeeder
CCM 1200
D-Sub cable
Prefeeder Input
13
Prefeeder
Input
12
S1
11
10
Figure 4. Control contact S1
Once the D-Sub connector has been inserted and the control contact S1 is closed you can start
the CCM 1200 in the normal way. When the control contact S1 opens automatic processing is
interrupted and the error message CABLEFEEDER STOP appears in the display. Once the
control contact S1 has closed again the programme can be continued by pressing [run].
Schleuniger CCM 1200
25
Wire Marker
The Wire Marker connection enables the CCM 1200 to also receive and process control signals
from an up or downline machine. This control input can be used for example for the following
purposes:
• Connecting a wire marker in order to receive return messages from it
• Connection of a pedal for single piece production
The relevant control contact is closed in order to activate the various functions. Please only use
potential-free, gold-plated contacts (relays) or opto-couplers for this purpose.
Pause function
If the control contact S2 is open the CCM 1200 can be started in the normal way.
+ 24
1
2
4
5
S2
Socket Wire Marker
Figure 5. Pause function
If the control contact S2 is closed then the feed is interrupted but the LED above the [run] key
stays on. If the control contact S2 is opened again then the feed and processing is continued.
This function is particularly suitable for use with the connected wire marker. The CCM 1200 stops
the processing and issues the mark command to the wire marker. During the marking process the
wire marker triggers the control contact S2 to close so that the automatic unit does not continue
to feed the material forwards.
26
Schleuniger CCM 1200
Single piece function
This enables you to process single pieces via a connected pedal without pressing [run]. In
addition to the control input assignment, the function is activated as follows:
• Hold down both [speed] keys when switching on the automatic unit. (Or press [5], if the
machine has already been switched on).
• The word CODE ? appears in the display.
• Release the [speed] keys.
• Enter 20.
• Press [enter], then [STOP].
For safety reasons this individual step function only remains activated until the machine is
switched off.
+ 24
1
2
4
5
S2
Socket Wire Marker
Figure 6. Single piece function
When the control contact S2 closes the LED above the [run] key lights up. Once the control
contact S2 opens the single piece is processed and the LED goes out. The CCM 1200 also
takes into account the programme quantity when carrying out this function. Once the required
quantity has been processed the words END OF PROGRAM appears in the display.
Schleuniger CCM 1200
27
Internal Circuit on the Wire Marker Output
The circuit on the wire marker output is structured as follows:
The output is designed for an induction load of up
to 0.2 A at 24 V DC (relay, valve) and is protected
against voltage surges.
+ 24
1
2
4
5
Figure 7. Internal circuit on the wire marker
output
Socket Wire Marker
Electromagnetic Compatibility (EMC)
In order to meet the EMC regulations and consequently to reduce the affects of
interference, only cables made specially by Schleuniger may be used. In addition, the
interface connectors (D-Sub connectors) must be fixed with screws in accordance with
the regulations.
28
Schleuniger CCM 1200
Control Panel
All the functions of the control panel keys are explained below. In these Operating Instructions the
keys to be pressed are written in square [brackets].
Figure
8.
Control
panel
[quantity]
The [quantity] key is used to select the quantity (0 to 999’999). If you press the
key then a cursor appears in the display. The cursor flashes until you have keyed
in the required quantity on the numerical keyboard and confirmed it by pressing
[enter].
[length]
The [length] key is used to select the length of the pieces to be cut. If you press
the key a cursor appears in the display. The cursor flashes until you have keyed in
the required length on the numerical keyboard and confirmed it by pressing [enter].
The length can be entered in mm or in 1/100" (See the STOP key).
[correct - ]
Depending upon the composition of the material to be cut deviations in length can
occur when the material is being fed. The pieces are then either slightly too long
or too short. If the measurement is too short then press [correct + ] and enter the
difference from the programmed length. If the measurement is too long press the
[correct - ] and enter the difference from the programmed length. Confirm the
entry each time by pressing [enter]. Once you have programmed a corrected
value then a + or - symbol appears in the display under [length].
In order to display the entered corrected value press [correct +] or [correct - ]. By
pressing [enter] the set value is retained, pressing [clear] and [enter] the value is
set to 0.
If you select a new length by pressing [length] the value entered under [correct] is
deleted.
[correct +]
[clear]
Pressing [clear] sets a value to 0.
Schleuniger CCM 1200
29
[enter]
Each entry must be confirmed by pressing [enter].
[speed + ]
The selected feed speed is shown in the display with a line. If you increase the
feed speed the line moves to the right; if you reduce the feed speed the line
moves to the left.
It is not possible to alter the feed speed during processing. You can only enter a
new feed speed after stopping the machine by pressing [STOP]. By pressing [run]
you continue the processing.
[speed - ]
[feed]
By pressing [feed] you move the cable. The cable continues to be moved for as
long as you hold down the key.
[cut]
By pressing [cut] you carry out a single cut.
[run]
The [run] key is used to start processing. During processing the red LED on the
key lights up. The display continuously shows the quantity still to be cut under
[quantity]. Once the programmed quantity has been reached the words END OF
PROGRAMM appears in the clear view display.
[STOP]
The [STOP] key has three functions:
• If you press [STOP] when the machine is processing then the CCM 1200
immediately shuts off all functions. The word BREAK appears in the display.
• If you press [STOP] before the processing commences the words „Turn up“ or
„Turn down“ appear in the display. Turn the T-grip in line with the display. If the
roller gap has been correctly set the words "Turn Up" or "Turn down" disappear
from the display.
• If you hold down the [STOP] key and simultaneously switch on the automatic
unit via the master switch the unit of measure switches to mm or 1/100”. The
setting reverts to the standard setting if you switch the CCM 1200 off and back
on again.
30
Schleuniger CCM 1200
Setup
It is imperative to check whether the mains voltage on the CCM 1200 is the same as
that of the local mains voltage. If the voltages are different you must set the mains
voltage on the CCM 1200 using the voltage selector (next section “Setting the mains
voltage “).
• Place the CCM 1200 on a solid, even base (table, workbench etc.)
• If the master switch is on then switch it off.
• Insert the T-grip for the roller gap into the top of the CCM 1200.
• Connect the mains cable to the power supply.
The CCM 1200 is now ready for operation.
Setting the mains voltage
Switch the master switch off and disconnect the mains plug from the power supply.
• Pull out the fuseholder.
Fuseholder with
window
• Remove the voltage selector and reinsert
it into the required position in the
fuseholder. The selected voltage appears
in the small window (Figure 9).
• Note the new mains voltage on the rating
plate.
• Change the mains fuses (see next
section).
Voltage selector
• Insert the fuseholder into the CCM 1200.
• Insert the mains plug into the power
supply.
Figure 9. Voltage selector
Schleuniger CCM 1200
31
Replacing the mains fuse
Switch the master switch off and disconnect the mains plug from the power supply.
• Lever out the fuseholder with a screwdriver (Figure 9, Page 30).
• Always replace both fuses:
100 VAC, 115 VAC = 2 x 3,15 A/T
230 VAC, 240 VAC = 2 x 1,6 A/T
• Insert the fuseholder.
• Insert the mains plug into the power supply.
Changing the unit of measure
There are two setting options for changing the unit of measure to „mm“ or „inch“:
• Temporary change
• Changing the standard setting
With a temporary change the new unit of measure in each case only remains active until you
switch the master switch off and back on. For details on how to change the unit of measure
temporarily see the section entitled „Control panel “ on Page 28 under the description of the
[STOP] key. Any change in the standard setting may only be carried out by specially trained
personnel (Page 43).
Display language
• Hold down the two [speed] keys when switching on the automatic unit. (Or press [5] if the
automatic unit is already on).
• The word CODE ? appears in the display
• Release the [speed] keys.
• Enter "40, 41, 42 or 43".
40 = English
41 = German
42 = French
43 = Italian
• First press [enter] then [STOP]
32
Schleuniger CCM 1200
Operation
The CCM 1200 processes cables, hoses, wires and all kinds of flat material. For the purposes of
simplification however all the operating procedures in these Operating Instructions are described
using a cable. The quickest way to learn how to operate the CCM 1200 is by way of a practical
example. Let us assume that we want to produce 6 round cables, each 15 cm long. The cable
diameter is 4 mm:
• Switch the master switch on.
cable
guides
Thumb
screws
T-Grip
„UP“ / „DOWN“
• Undo the milled screws on the cable
guides and set the guides to the
diameter of the cable you wish to
process. Leave a play of approx 1 mm
between cable and guides.
• Feed the cable through the guides and
the automatic unit until it protrudes
slightly out of the other side. If the
cable is positioned against the feed
rolls then rotate the T-grip in the „UP“
direction until the cable moves between
and through the feed rolls.
• Turn the T-grip in the „DOWN direction
until the cable is clamped.
• Press [STOP]. The words „Turn Up“ or
„Turn down“ appear in the display.
Figure 10. Inserting the cable
• Turn the T-grip to correspond with the display until a „Beep“ is heard and „Turn Up“ or Turn
down“ disappears from the display. This means the correct distance between the feed rolls
has been set. The setting is important to ensure the cable limit switch functions properly.
• Press [cut]. The unit will now carry out a single cut and you will have a defined cable end.
• Press [quantity], [6] and [enter].
• Press [length], [1 5 0] and [enter]. We will leave the feed speed in the default setting. It can
however be easily adjusted using the „speed“ keys. (See also „Control panel “, Page 28).
• Press [run]. Once the 6 cables have been cut the words END OF PROGRAMM appear in the
display.
• Measure the length of one of the cut cables. If the cable has been cut too long or too short you
can correct this deviation using the two keys [correct + ] and [correct - ] . The keys are
explained on Page 28 in the section entitled „Control panel “.
Schleuniger CCM 1200
+
33
To restart the same programme you must first press [quantity] and [enter]. In our example
we have described how you can insert the cable into the CCM 1200 . There are two other
alternatives for this process which will save you time particularly in everyday use:
• Insert the cable between the cable guides until it touches the feed rolls. Press [feed].
The cable is moved until you release [feed]. You obviously cannot insert a 10 mm thick
cable if the feed rolls have been set to 3 mm, otherwise the unit will block. In this case
turn the T-grip in the „UP“ direction until the cable feed is functioning again.
• If you press the roller lever downwards the upper feed roll will be raised and you can
remove or insert a cable. This is helpful for example if you wish to process a number of
cable rolls using the same material.
Selecting the batch size
With the CCM 1200 you can select batch sizes of between 1 and 999'999 nos. The CCM 1200
stops each time a batch has been completed. To start the next batch press [run].
Programme step
Key sequence
Activate „Batch mode “.
Hold [1] down whilst
switching on the
master switch.
Display
quantity
length
HOTPRINT-MODE
speed
Select the length of the cable to be cut,
for example 450 mm.
[length]
quantity
[4 5 0]
PRINT 0 / 1
[enter]
speed
[clear]
quantity
Switch off the Hotprint mode if it has
been switched on. (If Hotprint mode
has been selected a 1 appears in the
right hand side of the display).
[enter]
Select the total quantity of 12 cables.
[quantity]
0
length
0
450
speed
[1 2]
[enter]
Select the batch size of 3 no.
length
[3]
quantity
length
BATCH ?
0
speed
quantity
length
12
[enter]
450
speed
Start the processing.
[run]
quantity
END
length
OF
BATCH
speed
Each time a batch is completed start
the new batch until the programme is
complete.
[run]
quantity
[run]
END OF PROGRAMM
[run]
speed
length
34
Schleuniger CCM 1200
Wire Marking
The CCM 1200 can control an upline wire marker. Position the function-ready wire marker to the
left of the CCM 1200. The distance between the wire marker stamps (marking wheels) and the
blades on the CCM 1200 should not exceed 1 m. Connect the wire marker to the CCM 1200
using the Wire Marker connection (Figure 2, Page 23). Ensure that the cable to be marked can
move smoothly. The best way to explain how to programme a wire marking procedure is by way of
an example. So let’s produce the following cables:
20 cables, each 380 mm long, 1 marking on the right hand side 35 mm from the end of the cable,
1 marking 40 mm from the left hand side of the cable, 1 marking in the middle of the cable.
END 40 mm
BETWEEN 155 mm
XXX
BEGIN 35 mm
XXX
XXX
380 mm
Figure 11. Practical example of wire marking
Programme step
Key
sequence
In order to activate the Hotprint mode hold
down [1] when switching on the CCM 1200.
Display
quantity
length
HOTPRINT-MODE
speed
Select the length of the cable to be cut, for
example 380 mm.
[length]
quantity
[3 8 0]
LENGTH ?
length
380
speed
Switch the Hotprint mode on if it is off. (If
the Hotprint mode is off a 0 appears in the
right hand side of the display).
[enter]
[1]
quantity
length
PRINT 0/1
1
speed
Select the distance from the right end of the
cable to the centre of the marking.
[enter]
[3 5]
quantity
BEGINN ?
speed
length
35
Schleuniger CCM 1200
Select the distance from the left end of the
cable to the centre of the marking.
35
[enter]
quantity
[4 0]
END ?
length
40
speed
Select the marking in the centre.
[enter]
quantity
(Cable length / 2) - BEGIN marking?
[1 5 5]
BETWEEN ?
= (380 / 2) - 35 = 155 mm
Enter the distance between the marking
stamps (marking wheels) and the CCM
1200 blades, for example 750 mm.
length
155
speed
[enter]
quantity
[7 5 0]
DISTANCE ?
length
750
speed
Select the marking duration. We
recommend 200 ms.
[enter]
quantity
[2 0 0]
PRTIME ?
length
200
speed
Select the total quantity.
[enter]
[quantity]
[2 0]
Select the batch size, in our example 0. If
you wis to select a different batch size then
enter the required quantity.
[enter]
[cut]
[run]
length
QUANTITY ?
20
speed
quantity
length
20
[clear]
[enter]
Insert a cable, carry out a single cut and
then start processing.
quantity
380
speed
quantity
length
END OF PROGRAMM
speed
36
Schleuniger CCM 1200
Maintenance
Cleaning, general
The CCM 1200 is very maintenance-friendly. Because the material is only cut and not stripped
virtually no dirt and dust etc. is produced. The best way to clean the casing is to use a damp cloth
and a standard general purpose cleaner. Do not use any corrosive solvents.
Cleaning the cutting zone
Switch the master switch off. Remove the mains plug from the power supply. The
following work should only be carried out by specially trained personnel (Schleuniger
representatives, the user’s trained specialist personnel).
• Remove the cover together with the ejection shaft (Figure 12, Page 37).
• Clean the cutting zone (Figure 15, Page 39) using a paintbrush and a vacuum cleaner
attachment.
Do not use any compressed air otherwise cable residues and dirt may be blown directly
into the electronics in the CCM 1200.
• Fit the cover and insert the mains plug into the power supply.
A cleaning interval of 6 months is normally sufficient.
Schleuniger CCM 1200
37
Replacing the feed roll V-belts
Switch the master switch off. Remove the mains plug from the power supply. The
following work should only be carried out by specially trained personnel (Schleuniger
representatives, the user’s trained specialist personnel).
• Remove the cover for the feed
roll drive. This is the cover next
to the control panel with the four
socket head screws (SW 2.5).
Gears
feed rolls
Belt tightener,
feed rolls
Twin power V-belt
• Loosen the “drive motor” belt
tightener slightly. After you have
pushed the belt tightener down
you can remove the smaller Vbelt (belt drive motor Fig 12).
• Loosen the “drive motor” belt
tightener slightly. After you have
pushed the belt tightener down
you can remove the double cog
belt (twin-power belt).
• Fit and set the tension for the
new double V-belt.
Belt, motor
drive
Belt tightener
drive motor
Cover with
ejection shaft
Figure 12. Replacing the feed roll V-belts
In order to set the correct tension for the double V belt the upper feed roll must be in the
bottom position. So turn the upper feed roll using the T-grip, downwards until it almost
touches the bottom feed roll.
• Now slide the belt tightener upwards until the required tension is achieved, then tighten the
screw.
• Fit and set the tension for the smaller V-belt.
• Fit the cover.
• Insert the mains plug into the power supply.
+
The procedure for replacing the “drive motor” V-belt can also be seen from the
description above.
38
Schleuniger CCM 1200
Replacing the V-belt, blade drive
Switch the master switch off. Remove the mains plug from the power supply. The
following work must only be carried out by specially trained personnel (Schleuniger
representatives, the user’s trained specialist personnel).
• Remove the cover together with the
ejector shaft (Figure 12, Page 37).
The V-belt for the blade drive is
shown in Figure 13.
V-belt
blade drive
Pouley
blade drive
• Remove the square-shaped cover
on the rear of the automatic unit.
• Undo both screws on the blade
drive motor (Figure 14). The motor
will slide downwards; if it doesn’t,
slide the motor down slightly using
your hand.
• Remove the defective belt from the
V-belt disc and fit the new belt.
Figure 13. Blade drive feed belt
Screws blade
drive motor
• To set the belt tension simply slide
the motor upwards until the required
tension has been achieved, then
tighten the screws.
• Fit the two covers.
Figure 14. Screws on blade drive motor
• Insert the mains plug into the power
supply.
Schleuniger CCM 1200
39
Replacing upper blade
Switch the master switch off. Remove the mains plug from the power supply. The
following work must only be carried out by specially trained personnel (Schleuniger
representatives, the user’s trained specialist personnel).
• Remove the cover
together with the ejector
shaft (Figure 12, Page
37).
Screws upper
blade
• Remove the upper screw
on the connector rod. It is
secured with a lock nut
(Figure 15).
upper blade
bottom blade
Caution: The upper
knife will now fall
down!!
• Clean the inside using a
paintbrush and vacuum
cleaner attachment
Nuts bottom
blade
Screw
connector rod
connectro
rod
• Remove the upper blade
(two M5 socket head
screws).
• After you have lightly
oiled the new or the
resharpened blade you
can fit it back.
Figure 15. Replacing upper blade
• Move the upper blade up and down. The blade should not jam or have any play. Carry out a
manual cutting test using a strip of paper. The strip should be cut evenly along the entire cutting
length. If the quality of the cut is poor then you must realign the blades. The procedure for
realigning is described on Page 41.
• Tighten the screws on the connector rod (!! Don’t forget the lock nut).
• Fit the cover and connect the mains plug to the power supply.
Sharpening the blades
Your Customer Service Department will be
pleased to sharpen your blades for you.
However, if you wish to sharpen the blades
yourself then you must do this on the front
edges.
oberes Messer
Stirnseiten
unteres Messer
Figure 16. Sharpening the blades
40
Schleuniger CCM 1200
Replacing the bottom blade
Switch the master switch off. Remove the mains plug from the power supply. The
following work should only be carried out by specially trained personnel (Schleuniger
representatives, the user’s trained specialist personnel).
• Remove the cover together with
the ejector shaft (Figure 12, Page
37).
Bolts bottom
blade
• Remove the bottom blade together
with the wedge (three M6 bolts with
nuts) and clean the inside using a
paintbrush and a vacuum cleaner
attachment (Figure 17).
• Slightly oil the wedge and new or
the resharpened blade and fit back
both components.
• Move the wedge together with the
pin fully to the left and very slightly
tighten the screws.
• Press the bottom blade against the
holder using a finger and slide the
wedge as far as possible to the
right (Figure 18, Page 41).
connector rod
upper blade
Wedge with pin
bottom blade
It is vital that you also read the
test for Figure 19, Page 41!!
Figure 17. Replacing the bottom blade
• Tighten the nuts.
• Move the upper blade up and down. The blades should just touch but not jam.
• Now carry out a manual cut on thin strips of paper across the whole width of the blade. The cut
should always be even and sharp. If necessary, repeat the alignment procedure until the
required cutting quality is achieved.
• Fit back the cover.
• Insert the mains plug into the power supply.
+
The blades may produce a poor cut in the middle. You can solve this problem using the
socket head screw in the middle of the upper blade (Figure 18, Page 41):
• If the paper is only jammed in the middle of the blade and not cut then tighten the
socket head screw slightly.
• If the blade jams in the middle then loosen the socket head screw slightly.
Schleuniger CCM 1200
41
Aligning the blades
Switch the master switch off. Remove the mains plug from the power supply. The
following work must only be carried out by specially trained personnel (Schleuniger
representatives, the user’s trained specialist personnel).
• Remove the cover together with the
ejector shaft (Figure 12, Page 37).
Bottom
blade
Upper
blade
Socked head screw
middle upper blade
• Clean the inside using a paintbrush
and vacuum cleaner attachment.
• Loosen three nuts on the bottom
blade - do not remove (Figure 17,
Page 40).
• Slide the wedge together with the pin
fully to the left.
Press bottom
blade in here
• Remove the upper screw on the
connector rod. This is secured with a
lock nut (Figure 15, Page 39).
Warning: The upper blade will
now fall down!!
Figure 18. Aligning the blades
• Press the lower blade against the holder using a finger and slide the wedge as far as possible
to the right (Figure 18).
The bottom blade must be kept in
the vertical position when carrying
out this alignment and should not
be allowed to tilt on any account.
Otherwise the lower blade will be
pressed against the upper blade
like a lever when the screws are
tightened. This can damage the
entire blade suspension. The
bottom blade must therefore be
pressed firmly in the holder.
Figure 19. Fitting position of lower
blade
42
Schleuniger CCM 1200
• Tighten the nuts.
• Move the upper blade up and down. The blades should just touch but not jam.
• Now carry out a manual cut on thin strips of paper across the whole width of the blade. The cut
should always be even and sharp. If necessary, repeat the alignment procedure until the
required cutting quality is achieved.
• Fit back the cover.
• Insert the mains plug into the power supply.
+
The blades may produce a poor cut in the middle. You can solve this problem using the
socket head screw in the middle of the upper blade (Figure 18, Page 41):
• If the paper is only jammed in the middle of the blade and not cut then tighten the
socket head screw slightly.
• If the blade jams in the middle then loosen the socket head screw.
Schleuniger CCM 1200
43
Special Settings
Unit of measure, changing the standard setting
Switch the master switch off. Remove the mains plug from the power supply. The
following work must only be carried out by specially trained personnel (Schleuniger
representatives, the user’s trained specialist personnel).
• Remove the control panel
or 6 screws).
(4
• On the rear of the control
panel you will find two Dip
switches next to the
connector terminal J7. One is
marked „mm“ and one „inch“
(Figure 20). Switch these
switches to the desired unit of
measure.
connector
J10
Dip-switch
mm and inch
Connector J7
• Fit back the control panel.
Dip-switch
Hotprint-Mode
• Insert the mains plug into the
power supply.
Figure 20. Setting the unit of measure
Making the Hotprint mode the standard setting
Switch the master switch off. Remove the mains plug from the power supply. The
following work must only be carried out by specially trained personnel (Schleuniger
representatives, the user’s trained specialist personnel).
In order to make the Hotprint mode the standard setting proceed exactly as described above in
the section entitled „Unit of measure, changing the standard setting “. See Figure 20 for the
correct Dip switch.
44
Schleuniger CCM 1200
Switching off the cable limit switch monitoring
Prior to and during processing a cable limit switch checks to see whether a cable has been
inserted. If there is no cable in the automatic unit, or if all the cable has been processed, then the
message NO CABLE appears in the display.
The monitoring can be switched off for trials carried out without material or on very thin material:
• Hold down both [speed] keys when switching on the automatic unit. (Or press [5] if the unit is
aleady on).
• CODE ? appears in the display.
• Release the [speed] keys.
• Enter "30".
• First press [enter] then [STOP].
• Before starting processing open the feed rolls so they do not suffer any unnecessary wear
and tear. To do this turn the T grip in the „UP“ direction.
To switch the monitoring back on you have to turn the master switch off and back on.
Schleuniger CCM 1200
45
Troubleshooting, Fault Clearance,
Repairs
Error messages in the display
Error message
Possible cause
Action
RAM ERROR
Error found in the memory
Switch off the CCM 1200, wait 10
secs. Then switch back on. If the
error message reappears then the
keyboard is faulty and must be
replaced.
NO CABLE
There is no cable between the Insert a cable into the automatic unit.
feed rolls.
Set the correct opening.
The compression pressure
setting is incorrect.
CUTTER IS BLOCKED
The material to be cut is too
thick or too hard.
Remove material from the automatic
unit.
The V-belt has been torn from Replace the blade drive V-belt (Page
the blade drive.
38).
The connected prefeeder
input is not working.
Repair prefeeder input, connect
correctly etc.
The cable has become
entangled and / or cannot be
fed through smoothly.
Untangle the cable. It must be able
to unwind smoothly.
SERVO IS BLOCKED
The feed is blocked.
Check the cable feed.
SET QUANTITY
No value entered.
Enter the required quantity and / or
length.
The corrected entry exceeds
the permitted value.
The total length of length and correct
+ must be less than 999'999.
CABLEFEEDER STOP
SET LENGTH
LENGTH OVERFLOW PTOO LARGE
The total length of length and correct
- must be greater than 0.
46
Schleuniger CCM 1200
Faults
Fault
Possible cause
Action
Poor cutting quality
Blades are blunt or defective.
Align the blades as described on
Page 41. (It obviously only makes
sense to re-align the blades if they
have no identifiable damage). If the
cutting quality is still poor then the
blades must be sharpened or
replaced (Page 39).
Blades are not properly
aligned.
The blade makes small,
jerky movements when a
[cut] command is given.
Replace the initiator.
Schleuniger CCM 1200
47
Technical Data
Power supply
230 / 240 VAC, 50 / 60 Hz
100 / 115 VAC, 50 / 60 Hz
80 VA
Dimensions
67 x 26 x 33 cm (L x B x H)
26.37 x 10.23 x 12.99" (L x W x H)
Weight
28 kg (61.81 lbs)
Adjustable batch size
1 to 999 999 nos.
Adjustable cutting
length
1 to 999 999 mm (1 to 9999.99")
Unit of measure
mm or inch
Feed speed
10 levels: 50 - 1200 mm / sec.
(1.968 - 47.244" / sec)
Processable material
dimensions
Round material maximum 10 mm external diameter
Noise level
< 75 dB(A)
Flat material maximum 120 mm wide
48
Schleuniger CCM 1200
Replacement Parts List
Quantity Description
Article number
1
Bottom blade (Fig. 15, page 39)
302.1041
1
Upper blade (Fig. 15, page 39)
302.1042
1
Bottom feed roll
302.1026
1
Upper feed roll
302.1025
1
Cable guide right (Fig. 2, page 23)
302.1047
1
Cable guide left (fig. 2, page 23
302.1048
1
Drive belt 100 XL 037 (Blade drive, Fig. 13, page 38)
254.0000
1
Drive belt (Twin Power) 170 XL 037 TP (Fig. 12, page 37)
254.0001
1
Drive belt HTD 345-3M-6 HTD (Fig. 12, page 37).
254.0002
Options
Quantity Description
Article number
1
Cableend switch for CCM 1200
402.1004
1
Bottom blade carbide
302.1001
1
Upper blade carbide
302.1033
1
Cable guide left, extended
302.1049
1
Cable guide right, extended
302.1050
Schleuniger CCM 1200
49
Appendix
Display Languages Comparison Table
english
deutsch
itailano
français
CCM 1200.B
CCM 1200.B
CCM 1200.B
CCM 1200.B
CCM 1200.B mm
CCM 1200.B mm
CCM 1200.B mm
CCM 1200.B mm
CABLEFEEDER
STOP
ABROLLER STOP
DEROULEUR STOP
STOP ALIMENT
NO PROTECT
KEIN SCHUTZ
ABSENCE CARTIER
MANCA PROTEZIONE
P- TOO LARGE
P- ZU LANG
C- TROP GRANDE
C- TROPPO LUNGO
NO CABLE
KEIN KABEL
ABSENCE CABLE
MANCA FILO
END OF PROGRAM
PROGRAMMENDE
FIN DE PROGRAMME
FINE PROGRAMMA
LENGTH OVERFLOW GESAMTL. ZU LANG
LONG. TROP GRAND
FUORI LUNGHEZZA
BREAK
UNTERBRUCH
PAUSE
INTERRUNZZIONE
µP - RAM ERROR
µP - RAM FEHLER
ERREUR MEMOIRE
µP - ERRORE DI RAM
SET QUANTITY
ANZAHL EINGEBEN
ENTREE PIECES
INSERIRE N. PEZZI
SET LENGTH
LAENGE EINGEBEN
ENTREE LONGUEUR
INSERIRE LUNGHEZ
QUANTITY ?
ANZAHL ?
PIECES ?
PEZZI ?
LENGTH ?
LAENGE ?
LONGUEUR ?
LUNGHEZ ?
PRINT 0/1 ?
PRAEG. 0/1 ?
PRINT 0/1 ?
STAMPA 0/1 ?
BEGIN ?
ANFANG ?
DEBUT ?
INIZIO ?
END ?
ENDE ?
FIN ?
FINE ?
BETWEEN ?
FORTL. ?
INTERVAL ?
INTERM ?
BATCH ?
T. SUMME ?
LOT. ?
LOT. PARZ. ?
TOTALCUT
TOTAL STK.
PROD. TOT.
LOT. TOTAL
PRTIME ?
PRQEGEZ. ?
PRTEMPS ?
TEMPORIZ ?
TURN UP
HOCHDREHEN
TOURNE UP
GIRARE SU
TURN DOWN
RUNTERDREHEN
TOURNE DOWN
GRARE GIU
CODE ?
CODE ?
CODE ?
CODE ?
SEVO IS BLOCKED
SEVO BLOCKIERT
SERVO BLOQUE
BLOCCO DEL SERVO
CORRECT + ?
KORR. + ?
CORR. + ?
CORR. + ?
CORRECT - ?
KORR. - ?
CORR - ?
CORR - ?
HOTPRINT MODE
PRAEGE MODUS
PRINT MODE
MODO STAMPA
LENGTH TO SHORT
LAENGE ZU KURZ
LONG. TROP COURT
LUNGHEZZA CORTA
END OF BATCH
ENDE TEILSUMME
FIN DE LOT.
FINE LOTTO PARZ.
KNIFE IS BLOCKED
MESSER BLOCKIERT
COUTEAU BLOQUE
COLTELLO BLOC.
DISTANCE ?
DISTANZ ?
DISTANCE ?
DISTANZA ?
50
Electrical Diagramm
Schleuniger CCM 1200
Schleuniger CCM 1200
51
Index
[clear] 28
[correct - ] 28
[correct +] 28
[cut] 29
[enter] 29
[feed] 29
[length] 28
[quantity] 28
[run] 29
[speed - ] 29
[speed + ] 29
[STOP] 29
Adjustment screw feed roll compression
pressure 22
Aligning the blades 41
Batch size, selecting 33
Blades, aligning 41
Bottom blade, replacing 40
Cable guides 22
Changing the unit of measure 31
Cleaning the cutting zone 36
Cleaning, general 36
CODE ? 26, 31, 44
Connections 24
Control panel 22
Control Panel 28
CUTTER IS BLOCKED 45
Deviations in length 28
Display language 31
Display Languages Comparison Table 49
Electrical Diagramm 50
Electromagnetic Compatibility (EMC) 27
Emergency-Off switch 22
Error messages in the display 45
Faults 46
Feed roll V-belts, replacing 37
Footpedal, control input 26
Hotprint mode as standard 43
instrucciones de seguridad Español 13
Int. Circuit on the Wire Marker Output 27
Language display 31
Language, comparsion table 49
LENGTH OVERFLOW P-TOO LARGE 45
Machine Description 21
Main switch 22
Mains connection 24
Mains fuses, replacing 31
Mains voltage, setting 30
Maintenance 36
Making the Hotprint mode the standard
setting 43
NO CABLE 44, 45
NORME DI SICUREZZA italiano 11
Operating Controls 22
Operation 32
Options 48
Originalverpackung 21
Pause function 25
Plexiglass slider 22
Prefeeder Input 24
PRESCRIPTIONS DE SECURITE français
9
RAM ERROR 45
Reinigung 36
Replacement Parts List 48
Replacing the bottom blade 40
Replacing the feed roll V-belts 37
Replacing the mains fuse 31
Replacing the V-belt, blade drive 38
Replacing upper blade 39
Roll lever 22
SAFETY REGULATIONS english 5
sÄKERHETSFÖREsKrifteR svenska 19
Selecting the batch size 33
SERVO IS BLOCKED 45
SET LENGTH 45
SET QUANTITY 45
Setting the mains voltage 30
Setup 30
Sharpening the blades 39
sicherheitsvorschriften Deutsch 7
sikkerhedsForsKrifteR dansk 17
Single piece function 26
Special Settings 43
Standard Equipment 21
Switching off the cable limit switch monitoring
44
Technical Data 47
T-grip for roll gap 22
Troubleshooting, Fault Clearance, Rep 45
Unit of measure, changing 31
Unit of measure, changing the standard
setting 43
Unpacking the CCM 1200 21
Upper blade, replacing 39
V-belt blade drive, replacing 38
Veiligheidsvoorschriften nederlands 15
Voltage selector 30
Wire Marker 25
Wire Marker Output, internal Cirquit 27
Wire Marking 34