1
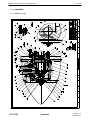
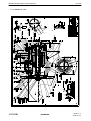
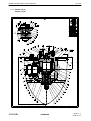
AVIA PROPELLER OPERATION AND INSTALLATION MANUAL HYDRAULICALLY CONTROLLED VARIABLE PITCH PROPELLER (CONSTANT SPEED) AV-842-( AV-844-( AV-843-( AV-803-( AV-723-( ) ) ) ) ) Document number: EN-1366 ATA 61-10-66 Avia Propeller s.r.o. Beranových 65/666 199 00 Praha 9-Letňany CZECH REPUBLIC Issue 3 May 19, 2010 Revision : June 1, 2010 Tel.: +420/296336511 Fax.: +420/296336519 [email protected] www.aviapropeller.com ATTENTION FOR OWNERS, USERS AND SERVICE STAFF This installation and operation manual contains descriptions, technical specifications and instructions for operation and maintenance of AV- propeller type series. All activities associated with propellers operation and maintenance must be practises according to this manual. Activities which be exceeden scope of this manual, shall be practises only by manufacturer or authorized service centre. CAUTION All activities contains in this manual shall be practises only by persons with commensurating qualification ! Breach of the operating instructions and procedures in this manual, exceeding of rated operational terms or performance limits can cause incorrect propeller function ! Manufacturer or authorized service centre doesn´t bear any responsibility for damages incurred non performance instructions or procedures stated in this manual ! SERVICE BULLETINS ,SERVICE INSTRUCTIONS , SERVICE LETTERS Product user is responsible for this manual up-dating according to issued changes. Implementation of changes it´s necessary to write in list of changes. Latest revision of this manual as well as Service Bulletins, Service Letters and Service Advisories associated with propellers in this manual are freely disposable at www.aviapropeller.com . NOTICE Illustrations, pictures and drawings in this manual are only by example for displayed object and it´s not to be regarded as binding on any propeller type or her section. GUARANTEE Guarantee conditions for each one propeller are determinated in contract of purchase. T HANK YO U FO R C HOO S ING AV IA P ROP E LLE R P ROD UCT Properly maintained it will give you many years of reliable service. OPERATION AND INSTALLATION MANUAL EN-1366 Table of content Page 1. AIRWORTHINESS LIMITATION 1-1 2. GENERAL 2-1 3. MODEL DESIGNATION 3-1 4. DESIGN AND OPERATION INFORMATION 4-1 5. INSTALLATION AND OPERATION INSTRUCTION 5-1 6. INSPECTIONS 6-1 7. MAINTENANCE 7-1 8. TROUBLESHOOTING 8-1 9. SHIPPING AND STORAGE 9-1 10. SPECIAL TOOLS 10-1 11. DRAWINGS 11-1 61-10-66 TABLE OF CONTENT Page I-1 2010-05-19 OPERATION AND INSTALLATION MANUAL EN-1366 This page is intentionally blank. 61-10-66 TABLE OF CONTENT Page I-2 2010-05-19 OPERATION AND INSTALLATION MANUAL EN-1366 LIST OF REVISIONS Revision number New page issue date Revised pages Date R-64/10 2010-05-19 all May 19, 2010 R-72/10 2010-06-01 II-1 , III-1 , 2-1 , 6-1 June 1, 2010 61-10-66 LIST OF REVISIONS Page II-1 2010-06-01 OPERATION AND INSTALLATION MANUAL EN-1366 This page is intentionally blank 61-10-66 LIST OF REVISIONS Page II-2 2010-05-19 OPERATION AND INSTALLATION MANUAL EN-1366 LIST OF EFFECTIVE PAGES 61-10-66 Page Date of issue Page Date of issue I-1 2010-05-19 11-1 2010-05-19 I-2 2010-05-19 11-2 2010-05-19 II-1 2010-06-01 11-3 2010-05-19 II-2 2010-05-19 11-4 2010-05-19 III-1 2010-06-01 11-5 2010-05-19 III-2 2010-05-19 11-6 2010-05-19 1-1 2010-05-19 11-7 2010-05-19 1-2 2010-05-19 11-8 2010-05-19 2-1 2010-06-01 11-9 2010-05-19 2-2 2010-05-19 3-1 2010-05-19 3-2 2010-05-19 4-1 2010-05-19 4-2 2010-05-19 4-3 2010-05-19 4-4 2010-05-19 5-1 2010-05-19 5-2 2010-05-19 5-3 2010-05-19 5-4 2010-05-19 5-5 2010-05-19 6-1 2010-06-01 6-2 2010-05-19 6-3 2010-05-19 6-4 2010-05-19 6-5 2010-05-19 7-1 2010-05-19 7-2 2010-05-19 8-1 2010-05-19 8-2 2010-05-19 8-3 2010-05-19 8-4 2010-05-19 9-1 2010-05-19 10-1 2010-05-19 LIST OF EFFECTIVE PAGES Page III-1 2010-06-01 OPERATION AND INSTALLATION MANUAL EN-1366 This page is intentionally blank 61-10-66 LIST OF EFFECTIVE PAGES Page III-2 2010-05-19 OPERATION AND INSTALLATION MANUAL 1.0. EN-1366 AIRWORTHINESS LIMITATION 1.1 . TBO limits and total service life For TBO limits and total service life refer to Service bulletin No.1 (latest revision) of Avia Propeller. All valid bulletins are freely disposable at www.aviapropeller.com. 1.2. Life limited parts Life limited parts (if defined) are mentioned in appropriate Overhaul manual. 61-10-66 AIRWORTHINESS LIMITATION Page 1-1 2010-05-19 OPERATION AND INSTALLATION MANUAL EN-1366 This page is intentionally blank 61-10-66 AIRWORTHINESS LIMITATION Page 1-2 2010-05-19 OPERATION AND INSTALLATION MANUAL 2.0. EN-1366 GENERAL 2.0.1 Statement of purpose This publication provides operation, installation and line maintenance information for the Avia Propeller hydraulically variable pitch propellers with single acting system, without reversing position of the blades. Propellers in this manual are designed entirely for reciprocating engines. In addition to the propeller assembly, the propeller governing system is addressed in this manual. Installation, removal, operation and trouble shooting data is included in this publication. However, the airplane manufacturer's manuals should be used in addition to this information. All informations, procedures, inspections and limits stated in this manual are valid to all propeller models listed on the cover of this manual, unless specifically noted. 2.1 Definiton of component life and service 2.1.1 Overhaul Overhaul is a periodic process and contains the following items: - disassembly - inspection of parts - reconditioning of parts - reassembly The overhaul interval is based on hours of service (operating time) or on calendar time. At such specified periods, the propeller assembly should be completely disassembled and inspected for cracks, wear, corrosion and other unusual or abnormal conditions. As specified, certain parts should be refinished, and certain other parts should be replaced. Overhaul is to be accomplished in accordance with the latest revision of the Overhaul Manual No. EN-1367). 2.1.2 Repair Repair is correction of minor damage caused during normal operation. It is done on an irregular basis, as required. 2.1.2.1 A repair does not include an overhaul. 2.1.2.2 Amount, degree and extent of damage determines whether or not a propeller can be repaired without overhaul. A blade damage due to a ground strike always requires an overhaul. 2.1.3 Component Life Component life is expressed in terms of total hours of service (TSN, Time Since New) and in terms of hours of service since overhaul (TSO, or Time Since Overhaul). Both references are necessary in defining the life of the component. Occasionally a part may be "life limited", which means that it must be replaced after a specified period of use. Life limited parts are listed in Overhaul Manual No. EN-1367). Overhaul returns the component or assembly to zero hours TSO (Time Since Overhaul), but not to zero hours TT (Total Time). 61-10-66 GENERAL Page 2-1 2010-06-01 OPERATION AND INSTALLATION MANUAL EN-1366 2.2.0 The pitch change is conducted by a propeller governor. Once an engine rotational speed is selected it will be held constant at variations of airspeed and power. Usually, this is called a constant speed propeller. Mechanical stops for low pitch and high pitch limit the pitch change travel. In case of the oil pressure of the governor to be lost, the blades return automatically to low pitch or, if counterweights are installed, to high pitch, enabling the pilot to continue the flight. The oil pressure is single acting. 2.3.0 Feathering position of the blades is possible as an option. With the propellers with counterweights oil pressure to decrease pitch is used. Feathering is reached with propeller control being pulled to feathering. Additionally there could be a safety system integrated in the propeller, to avoid unintended feathering with the engine running at high rpm. 2.4. Parts ordering Use the appropriate propeller drawing (see section Drawings) if any propeller part is need to order due to its damage or loss. See the item of the part you requested. Contact propeller manufacturer to original part information and/or delivery. NOTE: Not all propeller parts can be replaced in the field. Only outside mounted parts as the flange o-ring and the connecting hardware (screws, nuts, cables etc.) can be replaced in the field. Contact propeller manufacturer for more information. 61-10-66 GENERAL Page 2-2 2010-05-19 OPERATION AND INSTALLATION MANUAL 3.0. MODEL DESIGNATION 3.1. Hub designation EN-1366 AV-844-1-E-C-()-()-()-() 1 2 3 4 5 6 7 8 9 10 11 1 Avia Propeller (manufacturer) 2 A V G F 3 Blade root type 4 Number of blades 5 Number of variant of the propeller model 6 Code letter for flange type A = Motorglider engines, 7/16“-20 UNF bolts, circle dia 80 mm B = AS-127-D, SAE No.2 mod., 1/2"-20 UNF bolts C = SAE No.2 mod., 7/16"-20UNF bolts D = ARP 502, 1/2“-20UNF bolts E = ARP 880, 9/16“-18UNF bolts F = SAE No.1, 3/8"-24UNF bolts G = Walter/LOM flange, M10 bolts H = PW 115, 9/16"-18UNF bolts K = M14 flange 7 Code letter for counterweights blank = no or small counterweights for pitch change forces to decrease pitch C = counterweights for pitch change forces to increase pitch 8 Code letter for feather provision blank = no feather position possible F = feather position installed 9 Only applicable for reversible propellers = = = = automatic propeller variable pitch propeller ground adjustable propeller fixed pitch propeller 10 Only applicable for reversible propellers 11 Code letter for design changes small letter for changes which do not affect interchangeability capital letter for changes which restrict or exclude interchangeability 61-10-66 MODEL DESIGNATION Page 3-1 2010-05-19 OPERATION AND INSTALLATION MANUAL 3.2. EN-1366 Blades designation () () 245-407 () 1 2 3 4 5 1 Code letter for position of pitch change pin blank = pitch change pin position for pitch change forces to decrease pitch C = pitch change pin position for pitch change forces to increase pitch CF = pitch change pin position for feather provision ; pitch change forces to increase pitch 2 Code letter for blade design and installation blank = right-hand tractor RD = right-hand pusher L = left-hand tractor LD = left-hand pusher 3 propeller diameter in cm 4 Number of blade type (contains design configuration and aerodynamic data) according to the certified hub/blade - combinations 5 Code letter for design changes small letter for changes which do not affect interchangeability of blade set capital letter for changes which restrict or exclude interchangeability of blade set 3.3. The complete propeller designation is a combination of both designations, for instance AV-844-1-D-C/C245-407c. 3.4. The hub-serial No. starts with the year of manufacture. All records of the propeller are registered in respect to this number. 3.5. The propeller for a certain aircraft-engine combination is always defined according the hub-, blade- and spinner combination. For the actual blade settings, depending on the aircraft model, the propeller logbook must be considered. 61-10-66 MODEL DESIGNATION Page 3-2 2010-05-19 OPERATION AND INSTALLATION MANUAL 4.0. EN-1366 DESIGN AND OPERATION INFORMATION The variable pitch propeller consists of the following main groups: - 4.1. Hub with blade bearings and pitch change mechanism Propeller blades Counterweights (if applied) Spinner Propeller Governor Propeller de-icing Unfeathering accumulator Hub The one-piece hub is made from forged or milled aluminum alloy with the outer surface shot-peened and anodized. Propellers with non-threaded blades The blade bearings are special designed ball bearings, whereas the balls act as split retainers in order to hold the blades in the hub, creating an increased safety factor against blade loss. The outer bearing race is a one-piece part and pressed into the hub, while the inner race is split and installed on the blade ferrule or blade root. The blade preload is adjusted by the thickness of plastic shims. Blade and bearing are held in the hub by a retention ring. Propellers with threaded blades The inner bearing race is located on the blade bushing, whereas the blade are screwed into the bushing and tightened by the clamp. The outer bearing race is a one-piece part and pressed into the hub. The blade preload is adjusted by the prestressing nut, which holds the blade bearing and blade in the hub. The pitch change of the blades is obtained with a pin in the blade root or in the blade bushing face. A plastic block connects the blade with the piston and the axial movement of the servo piston turns the blades. On the front piston the return spring and the sleeve, which acts as high (low) pitch stop, are installed. Outside the hub are two check nuts with which the low (high) pitch stop can be adjusted. The inner part of the hub is used as the cylinder for the pressure oil. This arrangement allows a simple and lightweight design. The front spinner support is used to have the balance weights installed, if applied. Balance weights can be also installed on the spinner bulkhead. 4.2. Propeller blades Propeller blades are made from aluminium alloy. They are turning in the ball bearings with one or two sets of balls in the propeller hub. Connection with the pitch change mechanism is make through plastic pitch change blocks installed on the pins in the blade shanks (non-threaded blades) or on the blade bushings faces (threaded blades). Propeller blades can be designed with counterweights installed on the blade shank. Leading edges of the blades can be protected with polyurethane guards for mechanical damages prevention. 4.3. Counterweights Propellers may by equipped with counterweights on the blade shanks or as the part of the hub. If governor supplied oil is lost during operation, force from counterweights move the blades to high pitch and feather (if applied) to prevent propeller overspeed. 61-10-66 DESIGN AND OPERATION INFORMATION Page 4-1 2010-05-19 OPERATION AND INSTALLATION MANUAL 4.4. EN-1366 Spinner The spinnerdome is made from fiber reinforced composite or spinformed aluminum alloy. The bulkhead is spinformed or truncated aluminium alloy. If spinnerdome has stiffener no integrated, then the front support is installed as part of the hub. Filler plates increase the stiffness of the dome on the cutouts for the blades. The dome is mounted on the supports by means of screws. 4.5. Propeller Governor The necessary servo pressure of the engine oil is reached by a gear pump in the governor, which increases the oil pressure. Flyweight and a speeder spring move a pilot valve, allowing servo oil flow to and from the piston in the propeller. In on speed condition there is no oil flow. A speed adjusting lever changes the preload of the speeder spring. This results into an engine speed change. The following pictures are showing the system. Please note, that the propeller has a single acting system where the natural twisting forces of the blades always turn them into low pitch position. The governor produces oil pressure to increase pitch. Blades having counterweights installed for aerobatic aircraft or twin engine aircraft always turn them into high pitch position and use oil pressure to decrease pitch.The relief valve pressure should be set between 270 and 340 psi. 4.5.1. Propeller Governor with FADEC For the propellers installed on the TAE-engine the propeller control contains the following: A gear pump and a magnetic valve , allowing servo oil flow to and from the piston in the propeller. The maximum governor pressure is between 270 and 340 psi. The electronic RPM control is a FADEC system and designed according to DO 178B, Level C. The FADEC system is tested according to EMC test, CAT W and a HIRF test CAT R, equivalent to critically level hazardous. The governor designation is CSU TAE-125 TAE No.: 02 – 6120 - 16 001 R6 FADEC: 02 – 7610 - 55 001 R1 Table I – HIRF Environment II FIELD STRENGTH / (V/M) PEAK AVERAGE FREQUENCY 10 kHz 100 kHz 500 kHz 2 MHz 30 MHz 70 MHz 100 MHz 200 MHz 400 MHz 700 MHz 1 GHz 2 GHz 4 GHz 6 GHz 8 GHz 12 GHz 18 GHz 4.6. - 100 kHz 500 kHz 2 MHz 30 MHz 70 MHz 100 MHz 200 MHz 400 MHz 700 MHz 1 GHz 2 GHz 4 GHz 6 GHz 8 GHz 12 GHz 18 GHz 40 GHz 20 20 30 100 10 10 30 10 700 700 1,300 3,000 3,000 400 1,230 730 600 20 20 30 100 10 10 10 10 40 40 160 120 160 170 230 190 150 Propeller de-icing The propeller may have electrical or liquid de-icing systems installed. The de-icers are bonded onto the blades as usual. The rest of the electrical system is equal to existing components, with slip ring and wire harness. 61-10-66 DESIGN AND OPERATION INFORMATION Page 4-2 2010-05-19 OPERATION AND INSTALLATION MANUAL 4.7. EN-1366 Unfeathering Accumulator Figure 4-1 Figure 4-2 Feathering Propeller always have an unfeathering accumulator installed to the governor. This enables unfeathering without a running engine. An unfeathering accumulator can also be installed to the governor in some aerobatic airplanes, to prevent a decrease of RPM at special aerobatic maneuvers. This unfeathering accumulator maintains the oil supply of the propeller for 5-10 sec. at short loss of oil supply by the engine. 61-10-66 DESIGN AND OPERATION INFORMATION Page 4-3 2010-05-19 EN-1366 Figure 4-3 Figure 4-4 OPERATION AND INSTALLATION MANUAL 61-10-66 DESIGN AND OPERATION INFORMATION Page 4-4 2010-05-19 OPERATION AND INSTALLATION MANUAL 5.0. EN-1366 INSTALLATION AND OPERATION INSTRUCTION NOTE: If a TAE-125 engine is installed the CSUM-01-01 must be used for installation and operation of the CSU. 5.1. All propellers of these designs are only suitable for installation on flange type engines. The code for the flange type can be seen from the model designation (see section 3). 5.2. A governor with suitable oil pressure direction has to be installed on the engine, the control lever being mounted as shown below. WRONG Figure 5-1 ACCEPTABLE 5.2.1 If applicable, install the unfeathering akku to the governor and fix it onto the provided positions. 5.2.2 On the TAE-engine the CSU is already installed. Refer to the CSUM-02-01. 5.3. Electrical propeller deicing may be used optionally. Complete Goodrich kits have to be installed according to Manual 30-60-02. Complete McCauley kits have to be installed according to Manual 830415. Observe the limitations during ground operation in order to avoid damage of the de-icers (overheating). 5.4. Clean engine and propeller flange with solvent of gasoline. Both surfaces must be dry and clean. Remove all surface defects. 5.5. Check position of o-ring in propeller flange. WARNING: Use only original o-ring delivered by manufacturer. 5.6. Depending on spinner design, install backplate on crankshaft or on propeller hub. 5.7. Install the propeller carefully to the crankshaft. Observe the position of the spinner backplate for the blade position. If the design does not permit installing the flange bolts after the propeller has been fixed on the crankshaft, please observe that the propeller should not be pulled onto the crankshaft with the bolts in order to avoid damage to the hub and to avoid shearing off material causing oil leaks on the o-ring. 61-10-66 INSTALLATION AND OPERATION INSTRUCTION Page 5-1 2010-05-19 OPERATION AND INSTALLATION MANUAL EN-1366 CAUTION: Make sure that complete and true surface contact is established between the propeller hub flange and the engine flange. 5.8. Mounting bolts or stop nuts with washers should be tightened crosswise with equal force. If flange bolts installed with castle nuts in the hub recesses (flange type B and/or C), safety all mounting bolts with 0.032inch (0,8mm) stainless steel wire through the tubular lock pins (two bolts per safety) after installation on engine. Protect the safety wire with delivered protective tube to avoid hub surface damage. If the propeller is installed on the engine by using the drilled hexagon flange nuts, safety the nuts with 0.032inch (0,8mm) stainless steel wire through the holes in the nuts (two nuts per safety). Torque: B Flange C Flange D Flange D Flange K Flange K Flange 1/2" - 20 UNF bolts 7/16" - 20 UNF bolts 1/2" - 20 UNF stopnuts (< 300 HP) 1/2" - 20 UNF stopnuts (> 300 HP) 9/16" - 18 UNF stopnuts (Yak-18T only) 56 - 63 ftlb 41 - 44 ftlb 63 - 66 ftlb 80 - 85 ftlb 100 - 110 ftlb 70 - 81 ftlb 75 - 85 Nm 55 - 60 Nm 85 - 90 Nm 110 - 115 Nm 135 - 150 Nm 95 - 110 Nm NOTE: Torque values are valid for dry, free-moving threads only. 5.9. If the propeller has threaded blades separated from the hub install them into the hub as follows : Before the blades installation, check the inner surface of the blade bushings for damage or corrosion and clean it from all dirts. Inner surface of the bushing and the blade shank must be clean and dry before blade installation. Install the o-rings delivered by manufacturer into grooves on the blade shanks if they are not already installed (see Figure 5-2). CAUTION: It is important to install the blades into the hub in prescribed sequence. Prior to mounting, verify that the blade mounting number on the blade shank face (behind the serial number or the blade set number) correspond with number stamped on the hub arm. Incorrect installation of the blades can cause the unbalance of the propeller and incorrect blade angles. It can lead to abnormal vibration and the engine can be damaged. CAUTION: O-ring prevents moisture to get into the blade bushing thread. If the o-ring will not to be installed, the blade shank can be affected by corrosion. Use only original o-rings delivered by manufacturer. Figure 5-2 Figure 5-3 Lubricate the thread and centre diameter in the end of the blade shank slightly with grease. CAUTION: DO NOT APPLY ANY GREASE TO THE SURFACE WHERE THE BLADE IS CLAMPED IN THE BUSHING (CYLINDRICAL PORTION BETWEEN THE THREAD AND BLADE AIRFOIL - SEE FIGURE 5-2) ! THIS SURFACE MUST BE ABSOLUTELY DRY AND FREE FROM ANY GREASE AFTER BLADE IS INSTALLED IN THE BUSHING ! 61-10-66 INSTALLATION AND OPERATION INSTRUCTION Page 5-2 2010-05-19 OPERATION AND INSTALLATION MANUAL EN-1366 Screw the blade fully into the bushing and move it back into the right position. The position line on the blade shank must coincide with line on the blade bushing forehead (Figure 5-3). Slightly lubricate the thread of the clamp bolt with graphite grease and tighten with torque 65-70 Nm (48-52 ftlb). Secure the nut by cotter pin. CAUTION : If the blade clamp is not jointed with blade bushing by special pin (clamp is sliding on the blade bushing - relate to propellers manufactured up to February 2006), the line on the clamp must coincide with lines on the blade and blade bushing forehead (see Figure 5-3) prior to tightening. 5.10. Check the blade track. Refer to section 6.2 for blade track procedure and limits. Turn propeller for safety reasons (ignition) always opposite the usual direction of rotation. 5.11. Install spinner on support plates, observe mating marks. Torque screws with washers 3-5 Nm (27-44 inlb). Check runout of the dome. Max. 0,08 inch permissible. 5.12. Brush block installation - The distance between the brush assembly and the slip ring must be 0,82,4 mm (figure 5-4). - Brushes must be splayed at a 2° angle from the perpendicular on the copper rings (figure 5-4). - The entire face of each brush must contact the copper ring throughout full 360° slip ring rotation (figure 5-5). NOTE : After 2-3 operating hours there should be at least 80 contact between new brushes and slip ring ; 100 contact after 5-6 hours. Figure 5-4 Figure 5-5 5.13. Connect electrical propeller de-icing system, if required. Secure the screws with red paint - see slip ring contacts. CAUTION: Test runs of propellers with installed de-icing system are only allowed with mounted spinner because otherwise the de-icing wiring will be damaged. Before running the engine the ground must be cleaned to avoid stone nicks on propeller blade and the de-icers. 5.14. Carry out a functional check. NOTE: Engine and propeller manufacturers recommend not to use high engine speed on ground because it can result in an excessive engine temperature and blade damage. Adjust power lever for approx. 1700 rpm. Pull propeller lever back (out) until the rpm drops by 300 - 500. Push propeller lever full forward (in) for take off position and observe rpm increase. 61-10-66 INSTALLATION AND OPERATION INSTRUCTION Page 5-3 2010-05-19 OPERATION AND INSTALLATION MANUAL EN-1366 Decrease and increase of engine speed should have about the same time. Cycle three times to bleed air out of the system. If A TAE-125 engine is installed the functional check of the CSU must be carried out according to the CSUM-02-01. 5.15. Adjust power lever at approx. 2200 rpm now. Pull propeller lever back until rpm drops about 100 rpm. When the rpm is stabilized, increase manifold pressure by about 3 inhg and observe the governor function. rpm must stabilize. 5.16. Watch for a clean ground surface to avoid blade damage and advance power lever and propeller lever for take off power and rpm. The static rpm must be limited by the propeller and should be 50 - 100 rpm. lower than max. rpm. See chapter "Trouble shooting" to check, if the propeller or governor limits the rpm. If A TAE-125 engine is installed the functional check of the CSU must be carried out according to the CSUM-02-01. 5.17. Low and high pitch stops are adjusted during manufacture, according to the requirement of the aircraft/engine combination. Low pitch stop can be adjusted by varying the check nuts. High pitch can only be adjusted in a service station. For propellers with counterweight it is conversely. 5.17.1. Check function of the unfeathering akku at propeller AV-( )-C-F. For this select app. 1400 rpm with the throttle, pull propeller lever into feathering position. Stop engine with with propeller blades in feathering position. Wait a few minutes. Push the propeller lever full forward and the propeller blades must move into the start lock, do that without a running engine. Refer to page 14. 5.17.2. CSU TAE-125 Required adjustments are carried out by the manufacturer according to the requirements of the aircraft/engine-combination. 5.18. After the ground runs, check for oil leaks, blade shake and condition of the de-ice system. 5.19. Perform a test flight. 5.20. Operation Propeller and governor are selected as a result of tests. The governor must allow constant speed. On take off, the static rpm should be approx. 50 - 100 rpm. lower than max. rpm and the propeller must limit this rpm. If the governor limits rpm, it must be readjusted. During the take off run, the rpm must increase with airspeed and the governor must limit max. rpm. The rpm can be changed at all power and rpm settings and must be held constant automatically within the entire flight envelope. If oil pressure is lost and high speeds are used, overspeed is possible (none counterweighted propellers) and throttle must be retarded immediately to correct the situation. High pitch is set to such a value that in case the oil return line is blocked, or for propellers with counterweights installed if the oil pressure fails, it should be possible to continue flight with reduced power. Go around would be from limited to impossible. NOTE: Move power lever and rpm lever always slowly to avoid overspeed. 61-10-66 INSTALLATION AND OPERATION INSTRUCTION Page 5-4 2010-05-19 OPERATION AND INSTALLATION MANUAL EN-1366 5.21. Pre-flight check The propeller should be cycled at least twice to spill oil before every flight. In cruise flight an infinite number of power and rpm settings are possible because there is no restriction between the stops. Rpm restrictions from the engine or propeller manufacturer must be observed and the tachometer must be marked. If a TAE-125 engine is installed the pre-flight check must be performed according to the CSUM02-01. If necessary, use the warm air to remove ice from the spinnerdome. Spinnerdome surface can be heated to max.85°C for metal spinnerdome, max.60°C for composite spinnerdome. 5.22. Feathering: With the AV-( )-C-F feathering is achieved with propeller lever pulled to feathering at about 1500 propeller-rpm. The control must be pulled over a safety stop for unintended feathering. Before the engine is restarted in the air, move the lever to a low cruise rpm setting in order to avoid overspeed due to windmilling. During approach after speed and power is reduced accordingly, the propeller lever must be adjusted for take off (max. rpm) in order to have full climb power in case of a missed approach. For Motorgliders additionally refer to the given procedures in the original POH. 5.23. Propeller De-Icing Check ammeter reading after switching on the electrical propeller de-ice system. With running propeller, no time limit for "on" is required. With non-running engine the max. switch-on-time of the de-icing system is only 60 sec. Otherwise overheating will occur. 61-10-66 INSTALLATION AND OPERATION INSTRUCTION Page 5-5 2010-05-19 OPERATION AND INSTALLATION MANUAL 6.0. INSPECTIONS 6.1. Daily Inspection EN-1366 Before each flight inspect the condition of the blades and spinner. Manually (by hand) check the blades for the shake. Refer to section Annual/100-Hours Inspection for the blade play limits if abnormal shake is noticeable or suspected. Models with threaded blades only Check correct installation of the blades in the bushings. Verify that the position line on the blade shank coincide with the line on the blade bushing face. Maximum tolerance for blade and bushing mark straightness is one half of the blade mark thickness. Otherwise reinstall the blade according to section Installation and operation instruction in this manual. No critical cracks in the blades. PU-strip proper and existing. If not, replace within the next 2 hours after last inspection. No oil leaks. 6.1.1. SMA Application On the SMA application no blade shake is allowed. However, a blade angle play of 2° is acceptable. CAUTION: In case of blade shake send the propeller to an authorized service station for re-adjustment. 6.2 Annual/100-Hours Inspection Note: Detailed inspection must be made at 100 hour intervals of operation not to exceed 12 calendar months as follows: (1) Remove spinnerdome and check for cracks or damage. Check front and rear spinner plates for cracks and fixing. (2) Inspect outside condition of the hub and parts for cracks, corrosion, deterioration. Check all safety means to be intact. (3) Inspect blade shank and hub for oil and grease leaks. (4) Check tightness of flange bolts or nuts with appropriate torque (refer to section Installation). (5) If de-icing exist, check de-icers and wire harness for condition and fixing. Check brushes and slip ring for abnormal wear. (6) Use a clean cloth soaked in soap water to properly clean the blades from all dirts. Use 10x magnifying glass to inspect the blade surface for cracks with special attention to the leading edge and face side of the blade. If crack is detected or suspected or in case of any doubt remove the propeller from service and contact Avia Propeller. (7) Check the blade play according to blade play limits (see figure 6-1): Radial play (pitch change) : ±0,5 degree (1 degree total) - measured at reference station Blade end play : 1,5mm (0,06inch) Fore and aft play : 1,5mm (0,06inch) In and out play : 0,8mm (0,032inch) 61-10-66 INSPECTIONS Page 6-1 2010-06-01 OPERATION AND INSTALLATION MANUAL EN-1366 Figure 6-1 Figure 6-2 (8) Check the blade track as follows (see figure 6-2): Place a fixed reference point beneath the propeller, within 5 mm (0,2 inch) of the lowest point of the propeller arc. Rotate the propeller manually in the direction of normal rotation until a blade points directly at the paper. Mark the position of the blade tip in relation to the paper. Repeat this procedure with remaining blades. Tracking tolerance is 1,5 mm (0,06 inch), 3 mm (0,12 inch) total. NOTE: Abnormal blade track can be caused by dirts between the propeller and engine flange. If no foreign matter is detected, contact Avia Propeller. 6.2.1.1. SMA - Application Remove spinner and check for cracks. Check blade shake. Note: Blade shake is not allowed! Check blade angle play, max. 2°. If the check shows values above these tolerances, contact the service department of Avia Propeller. Inspect outside condition of the hub and parts for cracks, corrosion, deterioration. Inspect check nut for low pitch stop for tightness. Check all safety means to be intact. Check flange bolts or stopnuts for tightness. Check front and rear spinner plate for cracks and fixing. Inspect blade root and hub for oil and grease leaks. Check position of counterweights if applicable. Check electric de-ice boots and wire harness for connection and condition. Check brushes and slip ring for condition. 6.2.2. Check blades for nicks, gouges, and scratches on blade surface or on the leading or trailing edges of the blade, they must be removed before flight. Field repair of small nicks and scratches may be performed by qualified personnel in accordance with FAA Advisory Circular 43.13-1A, as well as the procedures specified below. 6.2.3. Repair of Nicks or Gouges on blades: Local repairs may be made using files, electrical or air powered equipment. Emery cloth, scotch brite, and crocus cloth are to be used for final finishing. 61-10-66 INSPECTIONS Page 6-2 2010-05-19 OPERATION AND INSTALLATION MANUAL EN-1366 Figure 6-3 WARNING: Blades which have been shot peened (as indicated by a “peeble grain” surface) that have damage in the shot peened areas in excess of 0,38 mm (.015 in) deep on the face or camber or 6,35 mm (0.250 in) on the leading or trailing edges must be removed from service, and the reworked area shot peened before further flight. Shot peening of an aluminum blade must be accomplished by an FAA approved repair facility in accordance with Avia Propeller Overhaul Manual for metal blades. WARNING: Rework which involves cold working the metal, resulting in concealment of a damaged area, is not acceptable. A stress concentration may exist which can result in a blade failure. Repairs to the leading or trailing edge are to be accomplished by removing material from the bottom of the damaged area. Remove material from this point out to both sides of the damage, providing a smooth, blended depression which maintains the original airfoil general shape. Repairs to the blade thrust or camber should be made in the same manner as above. Repairs that form a continuous line across the blade section (chordwise, blade leading to trailing edge) are unacceptable. The area of repair should be determined as follows: Leading and trailing edge damage: Depth of nick x 10. Face and camber: Depth of nick x 20. NOTE: Leading edge includes the first 10% of chord from the leading edge. The trailing edge consits of the last 20% of chord adjacent to the trailing edge. After filing or sanding of the damaged area, the area must then be polished, first with emery cloth, and finally with crocus cloth to remove any traces of filing. Inspect the repaired area to prevent corrosion. Properly apply chemical conversion coating and approved paint to the repaired area before returning the blade to service. Refer to painting after repair in this chapter. 61-10-66 INSPECTIONS Page 6-3 2010-05-19 OPERATION AND INSTALLATION MANUAL EN-1366 6.2.4. Repair of bent blades CAUTION: Do not attempt to “pre-straighten” a blade prior to delivery to an approved propeller repair station. This will cause the blade to be scrapped by the repair station. Repair of a bent blade or blades is considered a major repair. This type of repair must be accomplished by an approved propeller repair station, and only within approved guidelines. Painting after repair Propeller blades are painted with a durable specialized coating that is resistant to abrasion. If this coating becomes eroded, it is necessary to repaint the blades to provide proper corrosion and erosion protection. Painting should be performed by an authorized propeller repair staion in accordance with Avia Propeller internal specification. 6.3. Overspeed / Overtorque An overspeed has occurred when the propeller RPM has exceeded the maximum RPM stated in the applicable Aircraft Type Certificate Data Sheet. The total time at overspeed for a single event determines the corrective action that must be taken to ensure no damage to the propeller has occurred. When a propeller installed on a reciprocating engine has an overspeed event, refer to the Reciprocating Engine Overspeed Limits (figure 6-4) to determine the corrective action to be taken. Figure 6-4 For engine mounted accessories (for example, governors, pumps, and propeller control units) manufactured by Avia Propeller, any overspeed at a severity level and /or duration sufficient to require at minimum a search inspection for the propeller, will require the accessory to be disassembled and inspected in accordance with the applicable maintenance manual. Regardless of the degree of damage, make a log book entry to document the overspeed event. 6.3.1. Corrective Action The corrective action is based on the severity and the duration of an overspeed or overtorque for a single event. 61-10-66 INSPECTIONS Page 6-4 2010-05-19 OPERATION AND INSTALLATION MANUAL EN-1366 6.3.2. No Action Necessary Where no action is necessary, no maintenance is necessary other than to verify that the overspeed was not caused by a mechanical problem. 6.3.3. Overspeed Inspection An overspeed inspection requires the disassembly of the propeller in accordance with the appropriate propeller overhaul manual and performance of the following inspections: - General Visually inspect for signs of abnormal wear and/or damage. Evidence of wear and/or damage should be further evaluated using the inspection criteria from the appropriate propeller or blade overhaul manual. Special attention must be given to blade retention components. - Hub: Visually inspect the blade retention area of the blade socket. - Blades: Visually inspect the blade retention radius for evidence of damage or premature wear. This requires removal of the bearing races. 6.3.4. Overhaul When an overhaul is the corrective action for an overspeed or an overtorque, the Propeller must be overhauled in accordance with the appropriate overhaul manual. 6.3.5. Scrap When the corrective action requires scrapping the propeller, the propeller must be removed from service. 61-10-66 INSPECTIONS Page 6-5 2010-05-19 OPERATION AND INSTALLATION MANUAL EN-1366 7.0 MAINTENANCE 7.1. There are no frequent maintenance works required on the hub because all moving parts are inside the hub and not exposed to the environment. Blade bearings and pitch change mechanism are filled with special lubricants and there is no need to refill between overhauls. A corrosion protection of the hub with thinned engine oil or anticorrosion spray is recommended. 7.2. Repair of spinner parts is not permissible. Cracked spinner domes, filler plates and backplates are to be replaced by airworthy parts. 7.3. In case of a ground strike with Aluminum blades, refer to Blades Overhaul Manual for evaluation. 7.4. DYNAMIC BALANCE 7.4.1. Overview 7.4.1.1. Dynamic balance is accomplished by using an accurate means of measuring the amount and location of the dynamic imbalance. After such a undertake the remaining imbalance should be below 0,2 ips. 7.4.1.2. Follow the instructions from the equipment manufacturers for dynamic balance. 7.4.1.3. If the dynamic imbalance is bigger than 1,2 ips, the propeller must be removed and statically rebalanced. 7.4.2. INSPECTION PROCEDURES PRIOR TO BALANCING 7.4.2.1. Visually inspect the propeller assembly after it has been reinstalled on the aircraft prior to dynamic balancing. NOTE: The first run-up of a new or overhauled propeller assembly may leave grease on the blades and inner surface of the spinner dome. This is normal and do not mean that it will be a continuing grease leakage. Use a mild solvent to completely remove any grease on the blades or inner surface of the spinner dome. 7.4.2.2. Prior to dynamic balance record the number and location of all balance weights from the static balance. 7.4.2.3. It is recommended that placement of balance weights on aluminum spinner bulkheads which have not been previously drilled be placed in a radial location. 7.4.2.4. The radial location should be outboard of the slip ring and inboard of the bend at which point the bulkhead creates a flange to attach the spinner dome. 61-10-66 MAINTENANCE Page 7-1 2010-05-19 OPERATION AND INSTALLATION MANUAL EN-1366 7.4.2.5. Drilling holes for use with the AN3-( ) type bolts with self-locking nuts is acceptable. NOTE: Chadwick-Helmuth Manual AW-9511-2, „The Smooth Propeller“ specifies several generic bulkhead rework procedures. 7.4.2.6 All hole/balance weight locations must take into consideration, and must avoid, any possibility of interfering with the adjacent airframe, deice and engine components. 7.4.2.7 In case no spinner is installed, mount balance weights in the mounting threads in the hub, where normally the spinner bulkhead is mounted. 7.4.3. PLACEMENT OF BALANCE WEIGHTS FOR DYNAMIC BALANCE 7.4.3.1. The preferred method of attachment of dynamic balance weights is to add the weights to the rear spinner bulkhead. The static balancing weights are installed on the spinner front plate, if applicable. 7.4.3.2. Subsequent removal of the dynamic balance weights, if they exist, will return the propeller to its original static balance condition. The static balance weights are only allowed to remove exceptionally. 7.4.3.3. Use only stainless or plated steel washers as dynamic balance weights on the spinner bulkhead. 7.4.3.4. Do not exceed maximum weight per location of 32 g. This is approximately equal to eight AN970 style washers. 7.4.3.5. Weights are to be installed using aircraft quality 10-32 inch screws of bolts. 7.4.3.6. Balance weight screws attached to the spinner bulkheads must protrude through the selflocking nuts a minimum of one thread and a maximum of four threads. 7.4.3.7. All propellers which have been dynamically balanced must install a decal on blade no. 1. This will alert repair station personnel that the existing balance weight configuration may not be correct for static balance. 7.4.3.8. Record number and location of dynamic balance weights, and static balance weights if they have been reconfigured, in the Propeller Logbook. 61-10-66 MAINTENANCE Page 7-2 2010-05-19 OPERATION AND INSTALLATION MANUAL 8.0. EN-1366 TROUBLESHOOTING Attention : TAE-125 Triebwerk In case of trouble-shooting the CSUM-02-01 must be used. 8.1. Improper rpm There are means on propeller and governor to adjust pitch and rpm in the field. Before the original adjustments are changed, please calibrate the tachometer. Usually there are only two kinds of problems: - static rpm is too low and/or - rpm in flight is too high. 8.1.1. Static rpm too low: To find out whether the governor or the propeller limit the engine, proceed as follows. - Propeller control to max. rpm. Power lever to max. power. Pull propeller control back until rpm drops approx. 25 rpm. If there is a long way necessary to get the rpm drop, the pitch of the propeller will limit the static engine rotational speed. Remedy : Reduce pitch with the check nuts on the piston guide. Turning loose nut by ¼ turn will increase rpm by approx. 100 rpm. This is only applicable for non-counterweighted propellers! Low pitch of counterweighted or feathering propellers can be changed only by opening of the pitch change mechanism (in the factory). The checknuts will change coarse pitch only. If the rpm drops immediately after a small movement of the lever, the governor will limit the static rotational speed. Remedy : Increase governor rpm unscrewing the stop screw. One turn on the screw will change rpm by approx. 25 rpm Important: The control must be long enough to have the necessary way in order to contact the stop. Secure screw with safety wire. 8.1.2. Rpm in flight too high: If the static rpm is within the limits, only the governor allows overspeed. Adjust rpm to the desired value in flight an turn the stop screw in after landing until it touches the governor lever. Important: Do not change position of the rpm control during final approach. Secure screw with safety wire. 8.2. Blade shake 8.2.1. Fore and aft movement Cause : Blade bearing loose Remedy : If more than 3 mm, return propeller to the factory or any approved repair station to correct the pre-load of the blade retention bearing. 61-10-66 TROUBLESHOOTING Page 8-1 2010-05-19 OPERATION AND INSTALLATION MANUAL EN-1366 8.2.1.1. SMA Application Cause : Blade bearing loose Remedy : No blade shake is allowed. In case of blade shake return propeller to the factory or any approved repair station to correct the pre-load of the blade retention bearing. 8.2.2. Blade angle play Cause : Blade bearing loose by seating and/or increased play by wear in the pitch change mechanism (pitch change pin, pitch change block) Remedy : If more than 2°, return propeller to the factory or any approved repair station. 8.3. Sluggish rpm change Cause : 1. Oil is cold 2. Excessive friction Remedy : 1. Run the engine until the green arc of the oil temperature is reached. 2. Move blades by turning them with hands within the angular play. If excessive friction exists, the blade retention system has to be inspected, contact factory. 8.4. Surging rpm Cause : 1. Trapped air in propeller piston 2. Sludge deposit 3. Wrong speeder spring in the governor 4. Wrong pitch stops in the propeller 5. Abrupt movement of propeller or throttle control 6. Wrong carburetor setting 7. Oscillating tachometer Remedy : 1. Move propeller control at least twice every time before flying at about 1800 rpm with a drop of about 500 rpm. 2. Clean oil tubes in the motor, in the propeller piston and eventually in the governor (only possible at the manufacturer's). 3. Check that the governor part number corresponds to the aircraft data sheet. If the rpm does not stabilize after 5 periods this is an indication for a wrong speeder spring, contact factory. 4. Compare pitch values to those of the data sheet. Note static rotational speed. 5. Move the controls carefully and slowly. 6. Correct as specified in the engine manual. 7. Check tachometer and drive. 8.5. Rpm variations between ascend, cruise and descend although having identical propeller setting Up to ± 50 rpm normal condition. If more: Cause : 1. Excessive friction in the hub 2. Excessive friction in the governor 3. Worn rpm tachometer Remedy : 1. Contact manufacturer. 2. Contact manufacturer. 3. Replace/repair instrument. 61-10-66 TROUBLESHOOTING Page 8-2 2010-05-19 OPERATION AND INSTALLATION MANUAL 8.6. EN-1366 Rpm increase during normal operation without change of propeller lever position Cause : 1. Oil leakage or hot oil 2. Worn oil transfer system causes a decrease in blade angle of attack. 3. Internal leakage in the propeller. 4. Governor drive failure or broken relief valve spring. Remedy : 1. Check for oil leaks, replace gaskets, decrease oil temperature with higher airspeeds. 2. If the system works with cold oil and fails at high oil temperature, this will indicate high leakage in the oil transfer system on the propeller shaft. Repair engine. 3. Contact manufacturer. 4. Check governor drive and governor on the test bench. Attention: If sudden oil leakage occurs, move power lever back until the rpm will decrease. In this condition the propeller goes back to the low pitch stop automatically and no oil pressure is needed. Adjust the propeller control for take off position. Apply power again, no more than required to remain about 100 rpm below take off rpm. Note that the propeller rpm should be always lower than adjusted with the propeller control This will hold the governor in underspeed condition and no oil pressure will be transferred from the governor to the propeller. 8.7. Rpm decrease during normal operation without change of propeller lever position Cause : 1. Speeder spring in the governor broken or sticking pilot valve. 2. Dirt in the fuel system or carburetor. 3. Control inoperative. Remedy : 1. Check governor on the test bench. 2. Clean or repair. 3. Check free movement and positive stop contact. Attention: If the cause cannot be found in the fuel system the flight can be continued when throttle setting is reduced, avoiding excessive manifold pressure and overheating of the engine. The rpm will remain low because the propeller pitch is on the high pitch stop. 8.8. Extremely slow pitch change or no pitch change on ground (rpm changes with airspeed like a fixed pitch propeller) Cause : 1. Blocked oil line. 2. Sludge deposit in propeller piston. 3. Damaged pitch change mechanism. 4. Corrosion in the blade bearings. Remedy : 1. Check engine. 2. Clean propeller and crankshaft. Concerning 1 and 2: This behavior does not appear at once and gets worse after some time. It should be observed at the preflight inspection. 3. Contact manufacturer. This error may appear suddenly. 4. Repair propeller. 61-10-66 TROUBLESHOOTING Page 8-3 2010-05-19 OPERATION AND INSTALLATION MANUAL 8.9 EN-1366 Oil leakage (visible outside or hidden inside) Cause : Damaged gasket Remedy : Replace gaskets or repair propeller. 8.10. Rough running engine, possibly in limited rpm range only Cause : 1. Bad static balance. 2. Bad dynamic balance. 3. Operation in restricted rpm range. Remedy : 1. Rebalance statically, mount balance weights to forward spinner bulkhead. 2. Rebalance dynamically. Install balance weights to rear spinner bulkhead. 3. Refer to airplane flight manual. Check rpm gauge for correct reading. Repair or replace if necessary. 8.11. Propellers with counterweights or feathering Propellers with counterweights on the blade roots use oil pressure to decrease pitch. Therefore the information in chapter 8 has to be converted as a result of the changed direction of oil pressure. 8.12. Slow feathering If more than 10 sec. are needed for full feathering, there is one of the following problems: sticking blades or pitch change mechanism, control too long or wrong adjusted governor. If no discrepancies are found during inspection, readjustment of the liftrod/checknut is possible. Turn out lift rod only in steps of ¼ turn. If the lift rod is turned too far out, early feathering is possible and must be corrected. 8.13. Unfeathering accumulator Cause : No function of accumulator Remedy : 1. Increase or refill air at the accumulator 2. Repair leaking check valve of the governor Remark: The air pressure in the unfeathering accumulator should be 125 psi with the blades in the startlock position (low pitch position). 61-10-66 TROUBLESHOOTING Page 8-4 2010-05-19 OPERATION AND INSTALLATION MANUAL EN-1366 9.0. SHIPPING AND STORAGE 9.1. For any shipment of the propeller use original container. If this is impossible it will be very important to fix the propeller at the blades and the hub, if necessary, in a manner that avoids damage. In case of returning the propeller it is furthermore recommended to return all accessories and parts together with the propeller. They will also be inspected and not considered to be missing. 9.2. If the propeller is stored for a longer period of time, preferably use the original container or an equivalent one. Storage only in a controlled environment (temperature - 5°F to 95°F, rel. humidity 10 % to 75 %). Avoid extreme temperature/humidity differences or cycles. All metal surfaces should have anti-corrosion protection which is easy to remove. There is no need to protect the blades because its lacquer is sufficient. 9.3. The TBO starts immediately after the initial installation of the propeller to the aircraft and will not be interrupted by removals later on. 9.4. If the propeller is stored for longer than 24 months it has to be dismounted before installing to the aircraft and all seals have to be replaced. This will bring calendar time TBO back to zero. 9.5. Long-term storage could require additional preservation. All standard anti-corrosive preservation oils may be used if they do not affect the seals. Only metal parts have to be protected. 9.6. If the propeller is stored or transported in corrosive environment such as salt water or fog, it is recommendable to cover the visible outside surfaces of the metal parts with a thin film of light engine oil. 61-10-66 SHIPPING AND STORAGE Page 9-1 2010-05-19 OPERATION AND INSTALLATION MANUAL EN-1366 10.0. SPECIAL TOOLS Torque wrench with range 55-150Nm / 40-110 ftlb (Including all propeller models. See section Installation for torques needed to specific propeller installation). Insert tools for torque wrench : 19mm or 3/4inch - “B” and “D” flange / blade clamp (only models with threaded blades) 16mm or 5/8inch - “C” flange 22mm or 7/8inch - “K” flange Above-mentioned tools are possible to be delivered based on special order. 61-10-66 SPECIAL TOOLS Page 10-1 2010-05-19 OPERATION AND INSTALLATION MANUAL EN-1366 11.0. DRAWINGS 11.1. AV-723-1-( )-(C) 61-10-66 DRAWINGS Page 11-1 2010-05-19 OPERATION AND INSTALLATION MANUAL EN-1366 11.2. AV-723-1-( )-C-F 61-10-66 DRAWINGS Page 11-2 2010-05-19 OPERATION AND INSTALLATION MANUAL EN-1366 11.3. AV-803-1-B-(C) AV-803-1-D-(C) 61-10-66 DRAWINGS Page 11-3 2010-05-19 OPERATION AND INSTALLATION MANUAL EN-1366 11.4 AV-803-1-K-(C) 61-10-66 DRAWINGS Page 11-4 2010-05-19 OPERATION AND INSTALLATION MANUAL EN-1366 11.5. AV-842-1-B 61-10-66 DRAWINGS Page 11-5 2010-05-19 OPERATION AND INSTALLATION MANUAL EN-1366 11.6. AV-842-1-( )-C-F 61-10-66 DRAWINGS Page 11-6 2010-05-19 OPERATION AND INSTALLATION MANUAL EN-1366 11.7. AV-843-1-( )-( ) 61-10-66 DRAWINGS Page 11-7 2010-05-19 OPERATION AND INSTALLATION MANUAL EN-1366 11.8. AV-844-1-D-( ) 61-10-66 DRAWINGS Page 11-8 2010-05-19 OPERATION AND INSTALLATION MANUAL EN-1366 11.9. AV-844-1-D-C-F 61-10-66 DRAWINGS Page 11-9 2010-05-19 Avia Propeller Ltd. since 1919 Highly experienced engineering and manufacturing company. Our specialization is in research and development, manufacturing, repairs, overhauls, service and sales of aircraft, all metal in flight pitch changeable propellers and their parts. Our RD team has long term experiences with aircraft propeller design. One of the latest RD targets is to enlarge the new propeller AV product line (lighter aluminium hub and blades). Operations department is using up to date machinery incl. CNC devices, accompanied with traditional craftsmanship of staff, manufacturing products of the best quality. Quality department guarantees the highest quality level of the goods being delivered to our customers. Our quality system fulfilled requirements of the European Aviation Safety Agency (EASA). Our commercial department co-operate with customers from about 50 countries of the world. W e consider each and every customer to be of great importance for us. Our products and activities All metal aircraft propellers for piston and turboprop engines up to 2000 HP, used on regional airline airplanes, agricultural, general aviation, sport and aerobatic airplanes. Licensed blade and spinner manufacturing for propellers made by world famous U.S. company Hamilton Standard Ltd., for „W arbirds“ like the P-51 Mustang, T-6 Texan etc. High quality products certified in the Czech Republic, USA, and many European, Asian, Australian, Central and South American countries. Sales and Service Centers in the USA, Canada, Venezuela, Germany FOR MORE INFORMATION VISIT OUR WEBSITE www.aviapropeller.com