1
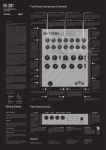
SYNTECNO
TeeBee Mark I
User manual
(V3.1)
Velocity sensitive Synthesizer.
Sync-box.
4-channel CV Gate.
Analog controller.
Fast digital Midi controller.
Mixable Analog Filter.
Syntecno
Admiralengracht 59
1057 EN Amsterdam
Phone
Fax
Chamber of commerce
Post bank
WWW
E-mail
: +31-(0)20-6739486
: +31-(0)20-6855681
: H259050
: 6932991
: www.xs4all.nl/~syntecno
: [email protected]
Sweden :
Conny Karlsson
Kullagatan 28
S-25220 Helsingbourg
Phone : 042-241812
Norway :
Ronny Jörgensen
Grenseveien 7
0571 Oslo
Phone : 0920-48577
Australia :
Mind Appliance, Ben Moyes
70 Upton Rd
Windsor Vic 3181
Phone : 0419 356 262
U.K. :
Blue Systems
Essex CB10 2HG
Tel : 1799-584095
INDEX
Page.
1)
Front panel & Back panel .........................................................
- The sound.
- Attack velocity.
- MIDI controllers
- The slide.
- Tips for using the TeeBee.
- The external input.
- Controlling a CV output with a controller.
3
4
4
4
5
5
5
6
2)
Programming the TeeBee with system exclusive .......................
- The Configuration table.
6
8
3)
Programming the TeeBee with Program mode ........................
- The internal MIDI sequencer.
- Resetting the TeeBee to its default values.
- The Program mode table.
9
10
10
11
4)
The Digital Potentiometers ........................................................
12
5)
The Sync-box ..............................................................................
12
6)
Specifications ..............................................................................
12
IMPORTANT !
Each time when you turn on the TeeBee, it plays a little start-up tune.
When the TeeBee has not been used for a few days, this start-up tune will often not be played well.
When the TeeBee has not been used for a few days, it needs some time to start-up the oscillator.
This is absolutely no problem.
1st TIMERS READ THIS 1st !
So you've read the book, seen the film, heard the sound and bought the synthesizer. This is cool, but...
For understanding some parts of this technical manual, and being able to use your new, wonderful and splendid TB303
to its full potential, you need to know a lot about : MIDI, MIDI-Channels and other mumbo-jumbo.
This is beyond the scope of this document, and to enjoy the full power of your new, splendid and worthwhile TB303 (or
any synthesizer for that matter) , we recommend that you buy a book about MIDI , in order to learn more about the
MIDI language.
2
(C) SYNTECNO 1996
FRONT PANEL
Below stands a short description of each button or potentiometer on the front panel ( left to right ) of the TeeBee.
- Power button
:
- Power LED
- Program button
:
:
- Square/Saw switch
- Analog in
- Tuning
- Cutoff Frequency
- Resonance
- Filter envelope
- Decay
:
:
:
:
:
:
:
Each time you turn on the TeeBee, it plays a startup tune,
so you can actually hear the TeeBee being turned on.
Power indication.
Used for system exclusive sound dumps or for getting
into "program mode". (also called "enter" )
Sets the TeeBee oscillator wave form.
External signal input.
Controls the frequency of the oscillator.
Controls the cutoff frequency of the analog filter.
Controls the resonance of the analog filter at the selected cutoff frequency.
Controls the voltage controlled filter (VCF).
Controls the decay of the VCF.
BACK PANEL CONNECTIONS
The back panel has a total of 14 connections. So even if you only use half of all the connections , it will surely be the
heart of your midi setup.
Following is a short description ( left to right, rear view ) of each connection.
- Audio
- CV 4
- CV 3
- CV 2
- CV 1
- Gate 4
- Gate 3
- Gate 2
- Gate 1
- Sync out
- Midi thru 2
- Midi thru 1
- Midi out
- Midi in
- DC in
:
:
:
:
:
:
:
:
:
:
:
:
:
:
:
Audio output of the TeeBee.
Control voltage output of CV/gate 4.
Control voltage output of CV/gate 3.
Control voltage output of CV/gate 2.
Control voltage output of CV/gate 1.
Gate output of CV/gate 4.
Gate output of CV/gate 3.
Gate output of CV/gate 2.
Gate output of CV/gate 1.
Synchronize output ( Roland standard ).
Midi thru output ( copy of midi in ).
Midi thru output ( copy of midi in ).
Midi out or midi out plus midi thru.
Midi input.
12V voltage supply connection.
3
(C) SYNTECNO 1996
THE SOUND by Reese & Santonio
The sound of the TeeBee is just as original as god can make it. Except for these extra's :
- The TeeBee is attack velocity sensitive.
- The slide effect lasts longer.
ATTACK VELOCITY
The TeeBee is attack velocity sensitive. So if you have a keyboard that is able to send attack velocity information, you
can control the volume of the notes being played on the TeeBee by pressing the keys more firmly.
The original accent function has not been omitted in the TeeBee :
When you make the attack velocity go higher (from 0 to 100) the TeeBee will make the volume go louder.
But at attack velocity values ranging from 100 till 127 the volume of the TeeBee does not change anymore, instead
above 100 the characteristic capability of the original synthesizer to set the decay of the VCF to zero, is enabled. In
other words : each note played with an attack velocity of 110 or more sets the decay to zero.
Note : When the attack velocity is above 100, the decay is set to zero. This means that the slide effect is not
heard at it’s best when a note is played with a velocity higher than 100 while the slide is on.
MIDI CONTROLLERS
All good sequencer software programs have the capability to send controllers (e.g. cubase : in the grid editor).
There are 128 different controllers, each with a given value ranging from 0 till 127, which can be send at one of the 16
MIDI channels. The TeeBee only responds to controllers sent at its own MIDI channel.
These controllers (sent by an other MIDI device) can control the following functions of the TeeBee :
- The Tuning
.........................................
- The Cutoff
.........................................
- The Resonance .........................................
- The Envelope
.........................................
- The Decay
.........................................
- The Slide (can only be turned on or off) ……
- The CV of a CV/Gate ……….……………….
MIDI controller 10
MIDI controller 11
MIDI controller 12
MIDI controller 13
MIDI controller 14
MIDI controller 00
(see : "Controlling a CV output with a controller").
THE SLIDE
If you want to make “original TB303 tracks” you must use lots of slides.
The TeeBee has just as the original a slide (portamento) function.
When you turn on the slide of the TeeBee, portamento effect is added to all the following notes and also, the filter of
the TeeBee is not triggered anymore. So when the slide is on, the TeeBee is constantly playing a note, even when you
are not playing one. You can turn on and off the slide by inserting a controller.
The controller number that controls the slide (configuration table), must be inserted in order to make the slide go on or
off ( it can only be turned on or off ). The default controller for the slide is controller number 0.
( See : "Configuration table" ).
When you insert this controller number ( in cubase ) the controller must also be given a value ( e.g. cubase : value 2).
When the value of the controller is equal to "1", the slide is on.
When the value of the controller is equal to "0" the slide is off.
4
(C) SYNTECNO 1996
TIPS FOR USING THE TeeBee
The most original trax are made by people who invest a lot of time into learning how to make the most 303-like trax.
One important thing to achieve this is to always use very short notes ( staccato ).
Secondly you should always use lots of slides and accents ( attack velocity ).
Third you should make trax like you would be using the "transpose up or transpose down buttons" on the original
TB303. This means that your trax should include sudden large jumps in frequency.
When you RESET the TeeBee, the internal sequencer will contain a default internal sequence. When you record this
sequence with your favorite sequencer software, you can see and learn how to program the slide and the attack
velocity of the TeeBee. You should really do this if you want to get the best out of you TeeBee !!!!!!!
Connect the MIDI out of the TeeBee with the MIDI in of your sequencer.
Set your sequencer software at external MIDI clocks and external MIDI start.
When you want the TeeBee to play its internal sequence :
- Turn off the TeeBee.
- Press and hold the program button.
- Turn on the TeeBee.
- Release the program button when the startup tune has stopped.
- Set the potentiometers : middle, middle, middle, middle, right.
- Press the program button.
- Record the played sequence with your favorite sequencer software and see how I program the slide & accent.
(See : "Programming the TeeBee with program mode" ).
THE EXTERNAL INPUT
The jack at the front is the external signal input of the TeeBee. When you insert a jack in this input, the internal Square
and Saw are not used anymore. Instead, the external signal is used.
The external signal goes through the filter of the TeeBee.
The filter of the TeeBee must also be triggered by MIDI. You can do this by setting the TeeBee and the external
sound source at the same MIDI channel.
All the potentiometers can still be used in order to filter the external sound.
5
(C) SYNTECNO 1996
PROGRAMMING THE TeeBee
Programming the TeeBee is very easy. Each time you change anything in the configuration of the TeeBee, the new
information is automatically stored into nonvolatile RAM and will stay in memory when you turn-off the TeeBee. So
actually you only have to program it once.
You can program the TeeBee in two ways :
I - By changing system exclusive information using a home-computer or PC and some sequencer software
II - By getting into "program mode" and doing the same thing without a computer.
PROGRAMMING THE TeeBee WITH SYSTEM EXCLUSIVE
- When you push the program button, the TeeBee dumps its total configuration table via its midi output port as
system exclusive information.
- Record this sys. ex. dump with your sequencer software.
- Edit this sys. ex. dump with your sequencer software.
- Send ( Play ) the new sys. ex dump to the TeeBee.
The sys.ex. dump of the TeeBee contains the following information :
- Which midi channel the TeeBee responds to.
- Which midi channel each CV/gate responds to.
- Whether a gate is normal or inverted triggered and whether a CV is Volt/Octave or
Volt/Hertz configured.
- Which control number each potentiometer responds to.
- Which control number the TeeBee slide responds to.
- The exact position of all the potentiometers.
- Whether the midi out port is configured as midi out only or as out plus thru.
You can record (at the midi output port of the TeeBee) and edit the system exclusive information with your favorite
sequencer software and send it back to the TeeBee, which will then store the new configuration table into its memory (
these setting will remain in memory after power-down ).
We advise you to record this sys.ex. dump once and then save it on a floppy for later use.
On the next page you'll find the configuration table with all the items, their default value, their range and whether you
can edit this item or not.
Follow the next four points when you want to change the TeeBee settings with System exclusive :
1)
2)
3)
4)
Press the program-button once, while recording at the MIDI-output port of the TeeBee.
Lookup the positions of the items you want to change in the Configuration table ( Page 8 ).
Change the values at these positions in the Sys.ex. dump (with your favorite sequencer program) to the
desired values.
Send this new sys.ex. to the TeeBee.
6
(C) SYNTECNO 1996
Here are some questions & answers about changing the settings of the TeeBee with system
exclusive :
Q:
A:
How do I change the midi channel of the TeeBee to midi channel 11 ?
In the Configuration table you can change the Midi channel of the TeeBee at position three.
Change the value at the third position in the sys.ex. dump to "11".
Send this new sys. ex. dump to the TeeBee.
Q:
A:
How do I change the midi channel of CV/Gate 2 to midi channel 1 ?
In the Configuration table you can change the Midi channel of CV/Gate 2 at position five.
Change the value at position five in the sys.ex. dump to "01".
Send this new sys. ex. dump to the TeeBee.
Q:
A:
How do I change CV/Gate 1 to normal gating and V/Octave mode ?
In the Configuration table you can change the gate and CV-mode of CV/Gate 1 at position 4.
In the *notes we see that "00" stands for normal gating and V/Octave mode.
Change the value at position 4 in the sys. ex. dump to "00".
Send this new sys. ex. dump to the TeeBee.
7
(C) SYNTECNO 1996
CONFIGURATION TABLE
Position
1
2
3
4
5
6
7
8
9
10
11
12
13
14
15
16
17
18
19
20
21
22
23
Item
Start of system exclusive Syntecno
TeeBee software version
MIDI channel of TeeBee sound module
MIDI channel of CV 1 / Gate 1
MIDI channel of CV 2 / Gate 2
MIDI channel of CV 3 / Gate 3
MIDI channel of CV 4 / Gate 4
Select Normal/invert Gate 1 and Lin/Log CV 1
Select Normal/invert Gate 2 and Lin/Log CV 2
Select Normal/invert Gate 3 and Lin/Log CV 3
Select Normal/invert Gate 4 and Lin/Log CV 4
Controller for TUNING
Controller for CUTOFF
Controller for RESONANCE
Controller for ENVELOPE
Controller for DECAY
Controller for SLIDE
Knob position for TUNING
Knob position for CUTOFF
Knob position for RESONANCE
Knob position for ENVELOPE
Knob position for DECAY
Select MIDI OUT or MIDI OUT + THRU
(Version 3.1)
Default
value
Range
Remark
61
31
15
01
02
03
04
00
00
11
11
10
11
12
13
14
00
30
30
30
30
30
00
01 - 16
01 - 16
01 - 16
01 - 16
01 - 16
00,01,10,11 *
00,01,10,11 *
00,01,10,11 *
00,01,10,11 *
00 - 79
00 - 79
00 - 79
00 - 79
00 - 79
00 - 79
00 - 7F **
00 - 7F **
00 - 7F **
00 - 7F **
00 - 7F **
00, 01 ***
not editable
not editable
editable
editable
editable
editable
editable
editable
editable
editable
editable
editable
editable
editable
editable
editable
editable
editable
editable
editable
editable
editable
editable
* 00 = Normal gate, V/Octave. (Roland)
01 = Inverted gate, V/Octave.
10 = Normal gate, V/Hertz
11 = Inverted gate, V/Hertz. (Korg)
** Knob position values are in hexadecimal (base 16).
*** 00 = MIDI out port is MIDI out only.
01 = MIDI out port is MIDI out plus MIDI THRU.
8
(C) SYNTECNO 1996
PROGRAMMING THE TeeBee WITH PROGRAM MODE
- If you press the program button before you turn on the TeeBee and hold it during the startup tune, you will get
into program mode. During program mode the TeeBee will play a melody.
- Now you can change the total configuration of the TeeBee by setting the potentiometers at a certain position
and then press the program button ( enter ).
The Program mode table at page 11 shows at what positions you have to set the potentiometers to change a certain
item of the TeeBee.
Follow the next six steps for changing the settings :
1)
2)
3)
4)
5)
6)
Get into Program mode (press and hold the program button during the startup tune).
The TeeBee will now play a melody.
Look up the item you want to change in the program table (page 11) and set the Tuning, Cutoff,
Resonance, Envelope and Decay corresponding to the POT settings at the left-side of this item.
Then press the program button ( enter ).
The TeeBee will now play another melody ( one octave higher ) to indicate it expects a value.
Look up the value you want to enter ( for this item ) in the value table (page 11) and set the
above potentiometers corresponding to the POT settings at the left-side of this value.
Then press the program button ( enter ).
The TeeBee will now return to the first melody.
Repeat steps 2 to 5 in order to change other items, or choose the "exit program mode" item.
After step 5 the TeeBee will return to the first program mode melody and other items can then be changed by
repeating the steps 2 to 5 ( or you can exit from program mode by choosing the "exit program mode" item ).
- If you enter a value the TeeBee can not accept, the TeeBee will play an error melody ( fast & high ).
- If at any time ( also while entering the second value ) you want to exit from program mode, set all the
potentiometers to the right and press enter. This will make the TeeBee return to normal operation.
Here are some questions & answers about changing the settings of the TeeBee with Program mode :
Q:
A:
How do I change the midi channel of CV/Gate 2 to midi channel 5 ?
Get into program mode by holding the program button during power-on.
Set the potentiometers : left, left, middle, left, left . ( Program the MIDI channel of CV/Gate 2 ).
Press enter.
Look up value 5 in the Value table and set the potentiometers corresponding to this value :
right, middle, left, left, left . Press enter.
Q:
A:
How do I change CV/Gate 3 to inverted gating and V/Octave mode ?
Get into program mode by pressing the program button during power-on.
Set the potentiometers : right, right, right, left, right.
Press enter.
In the *notes we see that "01" stands for inverted gating and V/Octave mode.
Look up value 01 in the Value table and set the potentiometers corresponding to this value :
middle, left, left, left, left. Press enter.
Q:
A:
How do I set the Cutoff to respond to controller number 61?
Get into program mode by pressing the program button during power-on.
Set the potentiometers : left, right, left, left, left.
Press enter.
Look up value 61 in the Value table and set the potentiometers corresponding to this value :
middle, right, left, right, left. Press enter.
9
(C) SYNTECNO 1996
The Internal MIDI Sequencer
In Program mode the TeeBee also has the special capability to record & play midi data, ( 50 notes or 100 controllers )
just like a sequencer.
After you get into program mode, set the potentiometers corresponding to "Record midi sequence".
Then press enter.
- All the midi in data (16 channels) will now be recorded ( midi clocks must be send ).
- A data compression algorithm will compress all the midi data into nonvolatile memory.
- When you want the TeeBee to stop recording, press enter.
- If you don't press enter before the nonvolatile memory is full, the error tune will be played.
If you want the TeeBee to play your recorded midi sequence, get into program mode and set the potentiometers
corresponding to "Play midi sequence" ( page 11 ).
Then press enter.
- The TeeBee will now play and loop the recorded midi sequence, from the beginning of the first note or event,
until the end of the last note or event ( all midi clocks at the end will be removed ) !!
- When you want the TeeBee to stop playing the midi sequence, press enter.
Note : Do not connect the midi out of the TeeBee with the midi in of your computer while playing the internal
sequence ! ( this will cause an infinite MIDI-loop )
Resetting the TeeBee to it's default values
Another special feature that is only available in Program mode, is the Reset feature.
When you want to reset the TeeBee, get into program mode, set the potentiometers corresponding to "Exit program
mode & RESET with default values" and then press enter.
If you want to RESET the TeeBee :
- Turn off the TeeBee.
- Press and hold the program button.
- Turn on the TeeBee.
- Release the program button when the startup tune has stopped.
- Set the potentiometers : left, right, left, right, left.
- Press the program button.
A RESET will :
- Set the TeeBee to the default values of the Configuration table ( Page 8 ).
- Load the default internal sequence from ROM into the sequencer memory.
Note : The Record midi sequence, Play midi sequence and Reset features are not available in the system
exclusive dump.
10
(C) SYNTECNO 1996
Program Mode Table
Required POT settings
Tuning
Cutoff
2
0
1
0
0
0
0
2
2
2
2
2
0
0
0
0
0
0
1
1
1
0 = POT Full
Resonance
Envelope
2
2
2
0
0
0
1
0
0
1
0
0
0
0
0
2
2
0
2
2
2
2
0
0
2
0
0
2
0
0
0
0
2
2
1
1
1
1
1
1
1
1
left 1 = POT Middle
Decay
2
2
0
0
0
1
0
2
2
0
2
0
0
0
2
0
2
1
1
1
1
2 = POT
Item
Steps following
2
Exit program mode
0
Exit program mode & RESET with default values
0
Program MIDI channel for TeeBee
0
Program MIDI channel for CV/Gate 1
0
Program MIDI channel for CV/Gate 2
0
Program MIDI channel for CV/Gate 3
1
Program MIDI channel for CV/Gate 4
2
Program Normal/Inverted Gate & V/Octave or V/Hertz for CV/Gate 1
2
Program Normal/Inverted Gate & V/Octave or V/Hertz for CV/Gate 2
2
Program Normal/Inverted Gate & V/Octave or V/Hertz for CV/Gate 3
0
Program Normal/Inverted Gate & V/Octave or V/Hertz for CV/Gate 4
0
Program Controller for TUNING
0
Program Controller for CUTOFF
0
Program Controller for RESONANCE
0
Program Controller for ENVELOPE
2
Program Controller for DECAY
2
Program Controller for SLIDE of TeeBee
1
Program MIDI OUT / MIDI OUT + THRU
1
Record midi sequence
2
Play midi sequence (internal clocked)
0
Play midi sequence (external clocked with midi clocks)
Full right
NONE
NONE
1
1
1
1
1
1
1
1
1
1
1
1
1
1
1
1
NONE
NONE
NONE
Value Table
Tuning
Cutoff
Resonance
Envelope
Decay
Value
Tuning
Cutoff
Resonance
Envelope
Decay
Value
0
1
2
0
1
2
0
1
2
0
1
2
0
1
2
0
1
2
0
1
2
0
1
2
0
1
2
0
1
2
0
1
2
0
1
2
0
1
2
0
0
0
0
1
1
1
2
2
2
0
0
0
1
1
1
2
2
2
0
0
0
1
1
1
2
2
2
0
0
0
1
1
1
2
2
2
0
0
0
1
0
0
0
0
0
0
0
0
0
1
1
1
1
1
1
1
1
1
2
2
2
2
2
2
2
2
2
0
0
0
0
0
0
0
0
0
1
1
1
1
0
0
0
0
0
0
0
0
0
0
0
0
0
0
0
0
0
0
0
0
0
0
0
0
0
0
0
1
1
1
1
1
1
1
1
1
1
1
1
1
0
0
0
0
0
0
0
0
0
0
0
0
0
0
0
0
0
0
0
0
0
0
0
0
0
0
0
0
0
0
0
0
0
0
0
0
0
0
0
0
00
01
02
03
04
05
06
07
08
09
10
11
12
13
14
15
16
17
18
19
20
21
22
23
24
25
26
27
28
29
30
31
32
33
34
35
36
37
38
39
1
2
0
1
2
0
1
2
0
1
2
0
1
2
0
1
2
0
1
2
0
1
2
0
1
2
0
1
2
0
1
2
0
1
2
0
1
2
0
1
1
1
2
2
2
0
0
0
1
1
1
2
2
2
0
0
0
1
1
1
2
2
2
0
0
0
1
1
1
2
2
2
0
0
0
1
1
1
2
2
1
1
1
1
1
2
2
2
2
2
2
2
2
2
0
0
0
0
0
0
0
0
0
1
1
1
1
1
1
1
1
1
2
2
2
2
2
2
2
2
1
1
1
1
1
1
1
1
1
1
1
1
1
1
2
2
2
2
2
2
2
2
2
2
2
2
2
2
2
2
2
2
2
2
2
2
2
2
2
2
0
0
0
0
0
0
0
0
0
0
0
0
0
0
0
0
0
0
0
0
0
0
0
0
0
0
0
0
0
0
0
0
0
0
0
0
0
0
0
0
40
41
42
43
44
45
46
47
48
49
50
51
52
53
54
55
56
57
58
59
60
61
62
63
64
65
66
67
68
69
70
71
72
73
74
75
76
77
78
79
11
(C) SYNTECNO 1996
THE DIGITAL POTENTIOMETERS
Each potentiometer of the TeeBee can be set to a controller number ( 0 - 79 ).
When you turn a potentiometer, the TeeBee will send out this controller number via its midi out port.
When the TeeBee receives this controller number, it will set the corresponding potentiometer at the value of the
received controller. ( The potentiometer will not move mechanically ).
When you want to control an other device (by midi) with the controllers of the TeeBee, set the controller of one of the
potentiometers of the TeeBee at the same controller number as the controller of the other device.
The Tuning, Cutoff, Resonance and Decay have a linear scaling. The Envelope has a logarithmic scaling.
Note : The potentiometers can also be set to "Local off". When Local off is turned on, the potentiometers will no longer
change the sound of the TeeBee, but will still transmit controllers at the midi out port if turned.
Local off is turned on or off by (during normal operation) pressing the Program button for 3 seconds.
THE SYNC BOX
The Sync module of the TeeBee provides synchronization with older Roland products by means of 'Roland Sync24'. In
the pre-midi years this was a protocol for synchronizing drum-machines with sequencers. Our Sync module has the
ability to convert midi timecode to Sync24.
SPECIFICATIONS.
Tempo SYNC24.
20 to 250 beats per measure (min./max.).
Sequencer memory.
500 events ( 50 notes or 100 controllers ).
Control section. [Front panel].
Power switch.
Program knob.
Square/Saw switch
Tuning control knob. (midi controller 10)
Cutoff control knob. (midi controller 11)
Resonance control knob.
(midi controller 12)
Envelope control knob. (midi controller 13)
Decay control knob. (midi controller 14)
Analog input.
Mono input jack.
Output TeeBee.
Mono output jack TeeBee.
Connection jacks.
SYNC24 out.
MIDI sockets (in, soft-out, thru, thru).
DC adapter socket (12V DC , 500 mA).
Dimensions.
19" enclosure, 1 unit.
48 x 25.5 x 4.5 CM ( W x D x H )
Power consumption.
500mA.
Weight.
3.0 Kg
Accessories.
AC adapter (dedicated to the TeeBee).
Owner's manual.
12
(C) SYNTECNO 1996
13
(C) SYNTECNO 1996