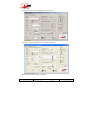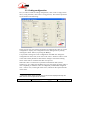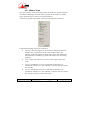
1
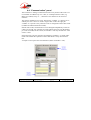
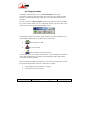
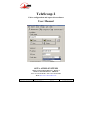
TeleScoop 2
Codec configuration and supervision software
User Manual
AETA AUDIO SYSTEMS
18-22, avenue Edouard Herriot – Kepler 4
92350 Le Plessis Robinson – FRANCE
Tél. +33 1 41 36 12 00 – Fax +33 1 41 36 12 69
Web: http://www.aeta-audio.com
55 000 032 – Ed. E
TeleScoop 2 - User Manual
This document is the property of AAS and can not be duplicated without authorisation
October 2008
55 000 032-E TeleScoop 2 (en).doc
Table of contents
1.
Introduction – Functions of TeleScoop................................. 1
2.
Installation............................................................................... 2
2.1. Required system configuration.................................................................. 2
2.2. Installation of the software ........................................................................ 3
2.3. Connecting the codecs to supervise........................................................... 3
3.
Quick start............................................................................... 5
3.1. Launching the software ............................................................................. 5
3.2. Installation of a codec................................................................................ 6
3.3. Coding configuration................................................................................. 8
3.4. Setting up an ISDN link ............................................................................ 9
4.
Detailed operating instructions ........................................... 10
4.1. Basic principles and definitions............................................................... 10
4.2. “Maintenance” panel ............................................................................... 11
4.3. “Configuration” Panel ............................................................................. 15
4.4. “Communication” panel .......................................................................... 17
4.5. “Status” area............................................................................................ 20
4.6. Display modes ......................................................................................... 22
5.
Menus – Shortcut keys ......................................................... 23
5.1. File Menu ................................................................................................ 23
5.2. Panel Menu.............................................................................................. 23
5.3. Tools Menu ............................................................................................. 24
5.4. Display Menu .......................................................................................... 24
5.5. Link Menu............................................................................................... 24
5.6. Help Menu............................................................................................... 24
5.7. Shortcuts.................................................................................................. 24
6.
Miscellaneous applications................................................... 26
6.1. Simultaneous supervision of several codecs ........................................... 26
6.2. Directory Import/Export.......................................................................... 27
55 000 032 – Ed. E
TeleScoop 2 - User Manual
This document is the property of AAS and can not be duplicated without authorisation
October 2008
55 000 032-E TeleScoop 2 (en).doc
1. Introduction – Functions of TeleScoop
The TeleScoop software is used for configuring and supervising AETA
AUDIO SYSTEMS codecs thanks to a PC.
With a leased line transmission codec (like Hifiscoop 3 LL), it is used
especially when setting up the codec, for programming the operation
parameters of the codec. Used with a codec for ISDN or IP transmission (like
the Scoop 4+), one can also manage the setting up of communication links with
the codec.
TeleScoop proposes the following functions:
•
Reading the current configuration and status of the equipment
•
Changing the coding configuration parameters of the equipment
•
Loading predefined configurations, which are described in
configuration files that can be edited and recorded thanks to
TeleScoop
•
Changing installation parameters of the codec, especially network
access parameters
•
Managing the communication links: call set up from the codec,
incoming call monitoring; a directory eases the handling of dial
numbers and the identification of incoming calls
•
Supervision of several units from the same computer, via serial links
and/or TCP/IP connections
In this manual, the reader is expected to be aware of the functions, capabilities
and limits of the codecs that TeleScoop controls. Whenever needed, please refer
to the user manuals dedicated to these codecs.
55 000 032 – Ed. E
TeleScoop 2 – User Manual
This document is the property of AAS and can not be duplicated without authorisation
October 2008
1
55 000 032-E TeleScoop 2 (en).doc
2. Installation
2.1. Required system configuration
The system minimal requirements for proper operation of the software are as
follow:
•
Pentium PC computer
•
Windows operating system (all versions including Windows Vista)
•
10 Mb available on hard disk
•
Display 1024x768, 256 colours
•
CD-ROM reader
At least one serial port must be available for linking the PC with a codec,
except if controlling the codec(s) through TCP/IP connection(s). In such case,
the PC must be granted access to a network enabling such link(s). Winsock
must be installed on the PC to allow this link mode.
You must have administration rights on the computer to be allowed to install
this software; otherwise the installation will be aborted.
2
TeleScoop 2 - User Manual
This document is the property of AAS and can not be duplicated without authorisation
October 2008
55 000 032 – Ed. E
55 000 032-E TeleScoop 2 (en).doc
2.2. Installation of the software
The installation CD-ROM1 is needed. To install the software:
•
Close all unused applications on the PC
•
Insert the CD-ROM in the reader
•
If the installation program does not start automatically at this moment,
open the CD-ROM in Windows Explorer, then launch the SETUP.MSI
file (in the CD-ROM root)
•
Installation starts, and successive windows are shown; accept the
proposed choices or make possible desired changes when asked.
•
The last Setup Complete window signals that installation is complete.
Click Finish.
The installation program has created the TeleScoop icon in the Start Menu and
the Desktop. An icon linking to this manual (pdf format) is also created in the
Start Menu.
2.3. Connecting the codecs to supervise
As mentioned above, there exist two ways of linking the PC to the codec(s) to
supervise (PC serial ports, or TCP/IP connections), and these lead to very
different hardware architectures. However, it should be noted that combining
these two techniques is allowed as well, i.e. a number of codecs can be
controlled via direct serial links while at the same time other codecs are
supervised through TCP/IP connections.
2.3.1. Using serial ports on the PC
In such case, TeleScoop directly controls each codec via a COM port on the PC
(COM1 to COM99). The PC can control as many codecs as COM ports are
available for this purpose.
Each codec to supervise must be linked to the PC via a serial link cord. The
cable must include a 9 pin female sub-D plug (to be connected on the serial port
of the PC) and a 9 pin male sub-D plug (to be connected on the “Remote” port
of the codec). The cable is “straight”, pin-to-pin (a PC to modem cable is
adequate, a “null-modem” cable is not).
1 Or possibly other installation media
55 000 032 – Ed. E
TeleScoop 2 – User Manual
This document is the property of AAS and can not be duplicated without authorisation
October 2008
3
55 000 032-E TeleScoop 2 (en).doc
2.3.2. Using TCP/IP connections
In this case, TeleScoop controls each codec via a TCP/IP connection. The PC
must be connected to an IP network the codec is also connected to. There is
almost no limit to the number of codecs that can be reached from the PC in this
way.
There is a large variety of network access configurations, and setting up such
system is beyond the scope of this manual; we can just mention two typical
cases:
•
Access to an Ethernet local area network under IP
•
Remote access to Internet via a telephone or ISDN connection
The codec can access the network in two ways:
•
Either the codec includes an Ethernet interface (as is the case for a
Scoop 4+ codec), and it can be connected directly to an Ethernet LAN
•
Either a serial terminal server is used, that can provide access to a
number of serial ports via TCP/IP connections.
This latter method is interesting for controlling a number of codecs grouped in
the same place. The compatibility of the multiport server with TeleScoop
should be checked. Each codec must be connected to the multiport server using
a serial cable connected on the “Remote” port of the codec. The wiring of the
cable on the server side depends of its type and configuration; refer to the
installation and configuration instructions provided by the server manufacturer.
The serial port linked to a codec must be configured 4800 bauds, 8 bits, 1 stop
bit, no parity, no flow control.
4
TeleScoop 2 - User Manual
This document is the property of AAS and can not be duplicated without authorisation
October 2008
55 000 032 – Ed. E
55 000 032-E TeleScoop 2 (en).doc
3. Quick start
3.1. Launching the software
Check first (see above, « Connecting the codecs to supervise ») that at least one
codec can be accessed, either via a serial link between the PC and the codec, or
via a TCP/IP connection (in which case the IP address and TCP/IP allocated to
the codec are known).
Launch the software by selecting it in the Start menu or double-clicking the
TeleScoop icon. On the first use, if necessary switch the language to English
(menu: Outils, then English); the control panel appears as follows.
The “Maintenance” panel is proposed. The next step is to “install” a codec, i.e.
supply the TeleScoop software the parameters for setting a control link with
this codec.
55 000 032 – Ed. E
TeleScoop 2 – User Manual
This document is the property of AAS and can not be duplicated without authorisation
October 2008
5
55 000 032-E TeleScoop 2 (en).doc
3.2. Installation of a codec
In the “Installation” area, select or enter the parameters corresponding to the
codec:
•
Serial port: the ports available on the PC appear in the dropdown list;
select the COM port the codec is connected to. For a TCP/IP
connection, select nothing there.
•
IP address: enter here the IP address allocated to the codec (or the
terminal server the codec is linked to). For a direct link via a COM
port, do not enter anything in this field.
•
TCP port: enter the TCP port number allocated to the codec1. For a
direct link via a COM port, do not enter anything in this field.
•
Codec type: select the type of codec in the dropdown list.
Whenever needed, enter the password protecting access to the device in the
“Current password” field2.
Then click the “Save as…” button and enter a name for the codec that was just
“created”. TeleScoop then creates a file with this name. From this moment, all
the above parameters can be instantly recalled by loading this “codec
description” file into TeleScoop, and there is no need to enter these parameters
again.
Important notice: as the codec description files are stored in the program
installation directory by default, depending on your system configuration you
may be refused the right to save such files. If this happens, then save the file in
another directory where you have full access rights.
As soon as the file is saved, TeleScoop sets up a control link with the codec,
and updates the display to reflect the codec status, especially in the “? Status”
area.
A message is displayed if TeleScoop fails to establish this control link.
Depending on the message, especially check whether the selected serial port is
the right one, or if the TCP/IP addressing is correct, or simply whether the
codec is properly connected. The two following screen captures show examples
of the result when the PC/Codec link is properly set:
1 The port number is 6000 for a Scoop 4+ when it is controlled via its Ethernet interface
2 in the standard factory configuration, this password is 1234 for a Hifiscoop 3 LL; it is
“blank” for other codec types.
6
TeleScoop 2 - User Manual
This document is the property of AAS and can not be duplicated without authorisation
October 2008
55 000 032 – Ed. E
55 000 032-E TeleScoop 2 (en).doc
1) Hifiscoop 3 LL codec connected via a serial port:
2) Scoop 4+ codec connected via a TCP/IP connection:
Now the codec can be totally controlled.
55 000 032 – Ed. E
TeleScoop 2 – User Manual
This document is the property of AAS and can not be duplicated without authorisation
October 2008
7
55 000 032-E TeleScoop 2 (en).doc
3.3. Coding configuration
First, in order to check the coding configuration, click on the “Configuration”
tab (or, using the menu, select Panel / Configuration). The software presents a
layout similar to the following:
In the previous step, the software normally has read from the codec its current
configuration. Anyway, the configuration can be read again at any time by
clicking the “Read” button (or pressing the F5 key).
It is possible to change the codec configuration if needed: first change the
configuration on the screen1, then click on the “Write” button in order to send
to the codec all the parameters after all these changes. The actual resulting
status of the codec is read back after this write process.
When the codec is connected to a permanent transmission link (normal
situation e.g. for a codec like the Hifiscoop 3 LL), the setting up of the codec is
now completed, provided the codec was adequately installed and configured.
The “? Status” area, on the right of the screen, informs on the operation status
of the codec.
1 Note that the “Read” button changes colour to warn that the displayed data may then
differ from the actual configuration of the device.
8
TeleScoop 2 - User Manual
This document is the property of AAS and can not be duplicated without authorisation
October 2008
55 000 032 – Ed. E
55 000 032-E TeleScoop 2 (en).doc
3.4. Setting up an ISDN or IP link
In case the codec under control is used for transmission via a switched network
or IP network, TeleScoop will now enable the management of links established
thanks to the codec, and especially allow to send calls to remote equipment.
Click on the “Communication” tab (or, using the menu, select Panel /
Communication). The proposed window has following layout:
The most straightforward way of setting a call is to enter the necessary dial
number(s) (“Dial number” fields on a white background), then to click on the
“Call” button. It is recommended to check the “Cycle” checkbox (in the Status
area) so as to permanently monitor the codec operation, and especially for
monitoring call progress and to be warned of incoming calls.
In daily operation, using the directory functions of TeleScoop should be
preferred. To prepare a call, one just has to pick up a name in the “Profile”
dropdown list to get directly all the numbers for a remote device that was
already registered in the directory.
To go beyond this quick start, the following chapters include further details
about all the capabilities and behaviour of TeleScoop.
55 000 032 – Ed. E
TeleScoop 2 – User Manual
This document is the property of AAS and can not be duplicated without authorisation
October 2008
9
55 000 032-E TeleScoop 2 (en).doc
4. Detailed operating instructions
4.1. Basic principles and definitions
The TeleScoop application controls (configuration and supervision) one codec
at a time, but several “copies” of the programme may run in parallel, which
allows to control several codecs simultaneously. This is similar to e.g.
simultaneously opening several documents on a text editor.
To take control over a codec, the software needs some “installation” parameters
that define the codec type and addressing:
•
Type of the codec
•
COM port number, or IP address + TCP port number
These parameters can be saved in a « codec description file » or simply
« codec file », whose name can be selected. Afterwards it is only needed to
open this file for the software to get linked with the codec, without having to
enter again the installation parameters.
TeleScoop also uses “configuration files”: a configuration file includes
parameters relating to:
•
The audio coding configuration
•
The configuration of auxiliary functions (ancillary data channel, relay
transmission, audio coordination channel1)
A given combination of these parameters can be directly loaded just by opening
a configuration file saved previously.
Lastly, a third type of file handled by TeleScoop is the directory. This includes
a number of profiles. Each profile in the directory includes a name, one or a
few dial numbers2, and possibly reference to a linked configuration file.
Selecting a profile directly recalls all the parameters useful for setting a link
with a remote device.
1 This function is an option available on AETA AUDIO SYSTEMS codecs
2 A “dial number” is an ISDN number (which may itself include a sub-address), or (for
audio over IP mode) an IP address or a SIP URI.
10
TeleScoop 2 - User Manual
This document is the property of AAS and can not be duplicated without authorisation
October 2008
55 000 032 – Ed. E
55 000 032-E TeleScoop 2 (en).doc
4.2. “Maintenance” panel
This tab is used for the following needs:
•
“Installation” of a codec and creation of its codec file;
•
Selection of the active network (for units which have more than one
transmission interface);
•
Configuration of the ISDN interface (ISDN codecs only);
•
Maintenance and supervision : checking version numbers, activating
test loops, password programming …
Two screen capture samples are shown on page 7 above. The following areas
can be found on the panel:
4.2.1. Installation
This area groups the installation parameters, those needed to access a codec and
take control over it. These parameters are saved1 in a codec file, with .aet
extension. It is mandatory to save such a file (or have it available already) in
order to control a codec (please read the “important notice” in chapter 3.2
above).
1 Note that the password and the dial prefix are also stored in the codec file.
55 000 032 – Ed. E
TeleScoop 2 – User Manual
This document is the property of AAS and can not be duplicated without authorisation
October 2008
11
55 000 032-E TeleScoop 2 (en).doc
Details on the fields included in this area:
•
Codec name: the dropdown list shows all the codec files available in
the TeleScoop installation directory. When a file is selected, its data
are extracted and the software immediately tries to get control over the
corresponding codec.
•
Serial port: only those COM ports actually existing in the PC and
available (i.e. not currently used by another application) are shown in
the dropdown list. Select nothing if the codec is linked via a TCP/IP
connection.
•
IP address: enter an address, either in numerical format i.j.k.l, or in
symbolic format (if a name server can resolve the symbol entered in
this field). Select nothing if the codec is linked via a direct serial link.
•
TCP port: enter the TCP port number for access to the codec. Not
relevant and don’t care if accessing the codec via a direct serial link.
•
Codec type: select the type of codec.
Details on the buttons included in this area:
•
Save triggers the saving of possible changes in the selected codec file.
•
Save as… proposes to save the parameters in a file whose name can be
defined.
•
New clears all the fields, preparing for the creation of a new codec file.
•
Delete allows to delete the selected codec file. A confirmation is asked
for.
•
cancels all new inputs or changes and comes back to the original
parameters of the last selected codec file.
12
TeleScoop 2 - User Manual
This document is the property of AAS and can not be duplicated without authorisation
October 2008
55 000 032 – Ed. E
55 000 032-E TeleScoop 2 (en).doc
4.2.2. System information
After reading the codec, this area shows the version numbers of the codec
software:
•
ISDN board: version of the ISDN interface board software (not
relevant for all models)
•
µC: version of the micro controller software.
•
DSP: version of the signal processing software (not relevant for all
models). The version number is different for each coding algorithm.
4.2.3. Security
The current password of the codec is displayed in this area. It is saved in the
codec file. The Change password… button can be used for changing the
password in the device as well. It is obviously recommended to handle this
parameter with utmost care.
4.2.4. Tests
Depending on the codec type, a test loop can be activated by selecting it in the
list. The loop is immediately activated and a yellow indicator in the ? Status
area recalls the activation of the test loop.
55 000 032 – Ed. E
TeleScoop 2 – User Manual
This document is the property of AAS and can not be duplicated without authorisation
October 2008
13
55 000 032-E TeleScoop 2 (en).doc
4.2.5. Network configuration
This area enables to select the active transmission network and configure the
ISDN interface. It is inactive for a codec such as the Hifiscoop 3 LL which only
has a leased line interface.
The area is updated each time the codec is read, and its contents is copied onto
the codec whenever a “write” is done with the “Write” button. The codec is
read on its first installation, or when the codec file is selected, or when clicking
the “Read” button.
•
Prefix: contrary to the others, this parameter is stored in the codec file.
The prefix is systematically added before every dial number.
•
The
button allows direct copying of the number in the line above.
This proves useful as usually only the last digits differ even when
there are several local numbers.
•
The ISDN numbers of lines 2 and 3 must be configured only if the
codec is actually equipped with these interfaces.
Please refer to the user manual of the codec for details regarding the network
settings.
14
TeleScoop 2 - User Manual
This document is the property of AAS and can not be duplicated without authorisation
October 2008
55 000 032 – Ed. E
55 000 032-E TeleScoop 2 (en).doc
4.2.6. “Maintenance” panel buttons
•
Read enables to read the current configuration of the codec and update
the window: Network configuration, System information, Tests,
and ? Status areas. The F5 key has same effect.
•
Write sends to the codec the network parameters as they were edited.
This button is inactive for a codec such as the Hifiscoop 3 LL. The F6
key has same effect.
4.3. “Configuration” Panel
This tab is used for programming the codec operating mode:
•
Algorithm and coding parameters;
•
Parameters of the auxiliary functions;
•
Configuration of the audio inputs/outputs
A sample screen capture is visible on page 8 above. The following areas can be
found:
4.3.1. Mode, Codec 1, Codec 2
These areas enable the basic coding configuration. The choice can be restricted
depending on the selected coding algorithm, e.g.:
•
Only G711 and G722 algorithms are available in dual codec mode ; in
addition codec 2 must be the same setting as codec 1 in some
codec/transmission mode combinations (e.g. Hifiscoop 3 LL).
•
The sampling rate is selectable only for MPEG coding.
For more details regarding these parameters, refer to the user manual of the
codec.
All these coding parameters can be saved in a configuration file, or loaded from
such a file (see the function of the buttons on this panel).
55 000 032 – Ed. E
TeleScoop 2 – User Manual
This document is the property of AAS and can not be duplicated without authorisation
October 2008
15
55 000 032-E TeleScoop 2 (en).doc
4.3.2. Auxiliary functions
This area allows to activate, when needed, the auxiliary functions and to select
the baud rate of the data channel. Here again, the valid choices depend on the
type of the codec and the coding algorithm; a message warns about a possible
invalid combination.
These parameters can be saved in a configuration file, or loaded from such a
file (see below the function of the buttons).
4.3.3. Audio I/O
The format and setting of the audio inputs/outputs can be selected in this area.
For details on these settings, please refer to the user manual of the codec.
Important notice: Saving or opening configuration files has no influence on
these parameters.
4.3.4. “Configuration” panel buttons
•
Save as… proposes to save the coding and auxiliary functions settings
(Mode, Codec 1, Codec 2 and auxiliary functions areas) into a coding
configuration file, whose name can be selected.
•
Open conversely allows to load such parameters from a configuration
file previously saved.
•
Read allows to read the current configuration of the codec and update
the whole window, including the ? Status area (on the right of the
screen). Key F5 has same effect.
•
Write sends to the codec all the configuration parameters (coding,
auxiliary functions, audio inputs/outputs) as they were edited. Key F6
produces the same result.
The Save as… and Open buttons have no influence on the audio inputs/outputs
settings, as these settings are not saved in the coding configuration files.
16
TeleScoop 2 - User Manual
This document is the property of AAS and can not be duplicated without authorisation
October 2008
55 000 032 – Ed. E
55 000 032-E TeleScoop 2 (en).doc
4.4. “Communication” panel
This tab allows to manage communication links set by means of the codec. It is
not available for a Hifiscoop 3 LL codec, or a multiple network codec (e.g.
Hifiscoop 3 ISDN, Scoop 4+…) when the active interface is the X21/V35
interface.
The panel is divided into two areas. The left part “CODEC 1” is always active,
and only this one is active in normal “single codec” mode. The right part
“CODEC 2” is operative only when the codec is configured in dual codec mode
(available for ISDN transmission mode).
In dual codec mode, communication can be managed independently on the two
codecs. Each codec only transmits on one B channel, and only one dial number
per codec is needed; for this reason, the CODEC 2 area only includes one “Dial
number” field.
In the following, only the operation for managing “CODEC 1” in single codec
mode is described. The operation in dual codec mode is easily derived from
this.
A sample screen capture can be found below (detail of CODEC 1 area):
55 000 032 – Ed. E
TeleScoop 2 – User Manual
This document is the property of AAS and can not be duplicated without authorisation
October 2008
17
55 000 032-E TeleScoop 2 (en).doc
The window includes the following fields and selections:
•
Call progress: this area informs about the progress of outgoing or
incoming calls, by showing: current status or step, dial number of
remote device (called or calling party depending on the situation),
name of corresponding profile. Either the profile has been selected for
setting the (outgoing) call, or it was recognised on receiving the
(incoming) call, thanks to the caller identification.
•
Summary of initial configuration: this describes the coding
configuration prior to establishing a link. After establishing a J52 link,
the actual configuration may eventually differ from this so-called
“initial” configuration.
•
Auto answer: when this box is checked, the codec automatically
answers an incoming call. It is recommended to select “Cycle” codec
status read (in the ? Status area) in order to monitor possible incoming
calls.
•
Profile: this dropdown list enables the selection of a profile from the
directory. On selecting a profile in the list, the “dial numbers” of this
profile are loaded, as well as a possible linked coding configuration
(see further).
•
Dial number: here the dial numbers1 for calling a remote device can
be entered directly, or a profile can be selected to load all the numbers.
The numbers actually needed for the current coding configuration
have a white background, while the others have a yellow background.
In the example shown above, the codec is configured for MPEG at
192 kbit/s, so three numbers are needed for calling another codec.
The
icon makes it easy to copy a number from one line onto the
following one.
•
S.A.: these are the sub-addresses possibly allocated to the dial numbers
(Note: not relevant for IP transmission mode).
1 A “dial number” is an ISDN number, or (for audio over IP mode) an IP address or a SIP
URI
18
TeleScoop 2 - User Manual
This document is the property of AAS and can not be duplicated without authorisation
October 2008
55 000 032 – Ed. E
55 000 032-E TeleScoop 2 (en).doc
•
Linked coding configuration: if this box is checked, when the user
asks for a call, the codec first loads the linked coding configuration,
then calls the remote device as required. Using this feature, the profile
of a remote device describes both its addressing and the coding
configuration needed for a link. This function is not available in
double codec mode.
•
Selection of linked configuration: this dropdown list enables to select,
among the configuration files saved on disk, the one to be linked to the
profile.
Several buttons are available for the following functions:
•
Foldback…: this button appears when an MPEG link ends up with a
configuration different from the initial one. If clicking on the button, a
message window describes the current configuration of both the
encoder and the decoder (they can happen to be different). Note:
although a foldback is an alarm condition, the link does not necessarily
fail! Foldback may have little consequence in some cases (example:
foldback to mono in one direction of the link).
•
Call button: this button has two functions: it is used for setting a call,
or hanging up when a link is active, and it also displays the link status.
In manual answering mode, the button is also used for accepting an
incoming call.
•
New button: click on this button to clear the profile selection as well as
all the dial numbers.
•
Save button: click on this button to save in the selected profile all the
dial numbers and sub-addresses as they are displayed, and the linked
configuration if there is one selected.
•
Save as… button: click on this button to save all the dial numbers and
sub-addresses, and the possible linked configuration, into a new
profile whose name can be defined at will.
•
button: click on this button to delete the selected profile from the
directory. A confirmation is required.
•
The
icon on each line (dial number + SA) allows copying the dial
number and sub-address from the line just above.
55 000 032 – Ed. E
TeleScoop 2 – User Manual
This document is the property of AAS and can not be duplicated without authorisation
October 2008
19
55 000 032-E TeleScoop 2 (en).doc
4.5. “Status” area
This area is always visible on the right end of the window. It includes a number
of indicators that display the codec status, possible alarm conditions, and the
status of the links (for a codec on a switched network).
After having read the codec status, the area generally appears as follows:
Function and meaning of the items in this area:
•
PC-Codec link: this indicator is green when the link between the PC
and the codec is operating correctly, and red when it fails. The
indicator “lights off” when closing the link or if the data displayed in
the area have low reliability (e.g. if this information was not recently
updated).
•
Power supply: red indicator in case of a power supply alarm in the
codec.
•
Clock 1: red indicator in case of a clock fault on X24/X21/V35
transmission interface n° 1. This indicator is relevant only for a leased
line interface.
•
Clock 2: red indicator in case of a clock fault on X24/X21/V35
transmission interface n° 2. This indicator is relevant only for a leased
line interface, and only in dual codec mode.
20
TeleScoop 2 - User Manual
This document is the property of AAS and can not be duplicated without authorisation
October 2008
55 000 032 – Ed. E
55 000 032-E TeleScoop 2 (en).doc
•
Codec 1 : this indicator is off when the codec is idle, green when it is
on line with no error, red when it is on line but with errors (decoder
fault). An encoder or decoder foldback alarm may also switch this
indicator to red, in which case the foldback condition is specified.
•
Codec 2 : this indicator is off when the codec is idle or does not exist
(single codec mode), green when it is on line with no error, red when it
is on line but with errors (decoder fault). An encoder or decoder
foldback alarm may also switch this indicator to red, in which case the
foldback condition is specified.
•
Clipping: yellow indicator, on in case of clipping at the encoder input,
whatever the (A or B) audio input of the codec.
•
AES : red indicator, on in case of a fault on the AES input, except if
not relevant (e.g. if the digital audio interfaces are not used).
•
Test loop: this yellow indicator reminds of the possible activation of a
test loop.
•
Cycle: when this box is checked, TeleScoop periodically reads the
codec status and updates the ? Status area. Note that the rest of the
window is not updated.
•
Read button: click on this button to read and update the codec status.
(? Status area, the rest of the window is not updated). The software
queries the codec only once, except if “cycle read” is activated.
55 000 032 – Ed. E
TeleScoop 2 – User Manual
This document is the property of AAS and can not be duplicated without authorisation
October 2008
21
55 000 032-E TeleScoop 2 (en).doc
4.6. Display modes
The display described up to now is the normal display mode of the
application. TeleScoop can also display the codec status in a smaller window,
in order to ease the simultaneous supervision of several units from the same
computer.
One can switch to a compact display mode, using either the menu or the F8
key. In the compact mode, the very small sized window only shows the “codec
OK” status, as can be shown in the example below:
In both display modes, the title bar of the TeleScoop window includes an icon
which changes depending on the global status of the codec:
•
when operation is OK,
•
in case of a fault,
•
when an ISDN or IP link is running.
This variable icon is also visible in the task bar, so the information is available
even when the application is running in the background, without the need to
restore the TeleScoop window.
Please note that some display parameters are saved into the codec files, so they
are restored automatically each time a codec file is opened:
•
Current display mode (normal or compact)
•
Window position on the screen
22
TeleScoop 2 - User Manual
This document is the property of AAS and can not be duplicated without authorisation
October 2008
55 000 032 – Ed. E
55 000 032-E TeleScoop 2 (en).doc
5. Menus – Shortcut keys
5.1. File Menu
•
New codec file is equivalent to clicking on the New button in the
Installation area (Maintenance panel), and it allows to clear all
installation parameters, in order to prepare the definition of a new
codec.
•
New profile for codec 1 is equivalent to clicking on the New button in
the CODEC 1 area (Communication panel), and it allows to clear all
the profile fields, ready to create a new one.
•
New profile for codec 2 is equivalent to clicking on the New button in
the CODEC 2 area (Communication panel).
•
Open coding configuration file is equivalent to the Open button in the
Configuration panel.
•
Open codec file has the same function as the dropdown list of the
Installation area (Maintenance panel).
•
Recent gives a quick access to the most recently used codec files.
•
Quit closes the application. This has no effect on the codec operation,
as its operation parameters are all saved in the codec memory.
5.2. Panel Menu
This menu is one way of selecting the desired active panel (Maintenance,
Configuration or Communication). The Communication panel is not available
for a Hifiscoop 3 LL codec.
55 000 032 – Ed. E
TeleScoop 2 – User Manual
This document is the property of AAS and can not be duplicated without authorisation
October 2008
23
55 000 032-E TeleScoop 2 (en).doc
5.3. Tools Menu
•
Cyclic check allows to activate or deactivate the periodic monitoring
of the codec status.
•
English allows to select the English language for all the texts
displayed by the software.
•
Français allows to select the French language for all the texts
displayed by the software.
•
Reset enables to reset the codec (this control may be inoperative on
older versions of the Hifiscoop 3 LL).
5.4. Display Menu
This menu allows to switch the display mode to compact and vice-versa.
5.5. Link Menu
With this menu it is possible to close the communication channel, i.e. either
close and release the COM port (when a serial port is used), or close the
TCP/IP connection. Conversely, it is possible to restore the channel.
5.6. Help Menu
•
About shows the version number of the TeleScoop software.
•
Help allows to open the user manual (present document). This
document is an Acrobat pdf file, in the same language as the one
selected for the user interface of TeleScoop.
5.7. Shortcuts
The menu items can be accessed by using the keyboard (Alt key, then hit the
letter underlined in the menu or sub-menu item. Example: Alt F O: open codec
file).
24
TeleScoop 2 - User Manual
This document is the property of AAS and can not be duplicated without authorisation
October 2008
55 000 032 – Ed. E
55 000 032-E TeleScoop 2 (en).doc
Besides, four function keys can be used:
•
F3
•
F5
Read the configuration and status of the codec and update the
window.
•
F6
“Write”: send to the codec the parameters on screen and write
them into the codec memory.
•
F8
Activate/deactivate cyclic check
Toggle the display mode (normal or compact)
To manage the communication links, the following key combinations are also
available (when the Communication panel is active):
•
Alt 1
Unhook / hang up codec 1
•
Alt 2
Unhook / hang up codec 2
•
Alt 3
Unhook / hang up both codecs1
Note that no confirmation is asked by the software when using a shortcut to
hang up.
The software can be launched by “double-clicking” a codec file (.aet
extension). This loads the software and directly opens the codec file; then the
control link with the codec is opened.
1 Warning: if only one codec is on line, this will systematically hang it up.
55 000 032 – Ed. E
TeleScoop 2 – User Manual
This document is the property of AAS and can not be duplicated without authorisation
October 2008
25
55 000 032-E TeleScoop 2 (en).doc
6. Miscellaneous applications
6.1. Simultaneous supervision of several codecs
It is possible to manage several codecs simultaneously from the same
computer. The supervision is especially eased by the compact display mode.
First, of course, the necessary physical links between the PC and the codecs
have to be set. One approach consists in fitting the PC with extension boards to
provide it with asynchronous serial ports (one COM port for each codec). In
another approach, the PC is connected to an IP network (for example an
Ethernet/IP local area network), and each codec is connected to a serial port
server connected to the same network (in addition, Scoop 4+ codecs can be
directly connected to an Ethernet LAN). As an advantage of this second
technique, the codecs need not be close to the PC; they may even be located at
a long distance if the link goes via Internet, as an example.
The next step is to “install” (in the TeleScoop application), the various codecs,
i.e. create definition files corresponding to the codecs. From this point,
TeleScoop can take control over any codec by merely opening the
corresponding codec file.
Beyond quickly accessing any codec in the pool, it is also possible to open
several codec files at the same time, or even all the codec files. One “copy” of
TeleScoop is active for every open file. One can instantly access every codec,
by just switching the computer to the task supervising this codec.
Using the compact display mode and adequately setting the windows on the
screen, one can get an overview of all the supervised codecs, and get a visual
warning in case of a fault on a codec. At this time, just clicking on the window
signalling an error will switch the window to normal display mode, thus
providing detailed monitoring on this codec. Once the intervention is finished,
hitting F8 key brings back to compact display and the overall view.
26
TeleScoop 2 - User Manual
This document is the property of AAS and can not be duplicated without authorisation
October 2008
55 000 032 – Ed. E
55 000 032-E TeleScoop 2 (en).doc
6.2. Directory Import/Export
It is possible in some cases to import or export the data of the TeleScoop
directory file from or to another application.
The process consists in importing or exporting the data to/from the directory
file Numbers.ann (this file resides in the TeleScoop installation file)1. One
simple way to do so is to use a spreadsheet editor (capable to import data in text
format).
As a guide for such purpose, the following sample files can be found in the
TeleScoop installation directory:
•
example.ann file: sample directory file, with same format as the
TeleScoop directory file;
•
example.xls file: resulting file after importing example.ann to Excel
format; a title row was added to help understand the format.
These sample files can be edited with no consequence on the operation of
TeleScoop.
1 Important notice: this file must be saved prior to importing/exporting data to/from the
TeleScoop directory. Doing so, in case of a problem it is still possible to restore the
original data, by restoring the file in its original location. Unless taking such precaution,
part or all of the information initially included in the directory might be lost because of
incorrect or erroneous handling. AETA AUDIO SYSTEMS cannot be held responsible for
the loss of data caused by failing to import/export data to/from TeleScoop.
55 000 032 – Ed. E
TeleScoop 2 – User Manual
This document is the property of AAS and can not be duplicated without authorisation
October 2008
27
55 000 032-E TeleScoop 2 (en).doc