1
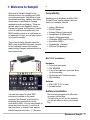
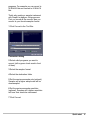
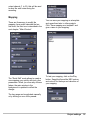
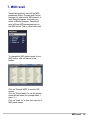
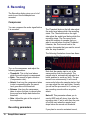
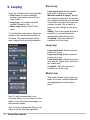
SAMPLIT
USER MANUA L
Table of Contents
1
1 Welcome to Samplit
2
2 Quick start
4
3 Project
7
4 Typical session
8
5 Project settings
9
6 Main window
11
7 MIDI recall
14
8 Recording
15
9 Looping
17
10 Player
18
11 Conversion
19
Samplit User manual
1. Welcome to Samplit
Welcome to Samplit. Samplit is the
ultimate solution for sampling your MIDI
and real instruments. Everything is here:
automated recording, naming, truncating,
compression, normalization, looping,
resampling and even playing. There are
several ways to use Samplit to create
Sampler programs, but the most common
one is to capture the sounds from your
MIDI hardware (such as a synthesizer or
an expander) so that you can play them in
your favorite sampler.
This is how it works: Samplit sends the
MIDI notes to the MIDI hardware, records
all the individual sounds and creates
ready-to-play Sampler instruments with a
few mouse clicks.
it.
Compatibility
Samplit runs on Windows and Mac OSX
(PowerPC and Intel processor) and can
export to 9 sampler formats:
·
·
·
·
·
·
·
·
·
Halion (Steinberg)
EXS24 (Apple)
Kontakt (Native Instruments)
Sampletank (IK Multimedia)
Reason (Propellerheads)
VSampler (MAZ Sound Tools)
Soundfont (EMU)
Gigasampler (Tascam)
Structure (Digidesign)
MAC OS X Installation
Hardware
· G4 or Intel processor
· 256 MB RAM
· A lot of free space on your hard drive
for the recording
· Soundcard with CoreAudio driver
· Midi interface
Software
· Mac OSX 10.3.9 or later
· Acrobat reader
Software installation
You can also record a virtual MIDI
instrument installed on the same
computer. But Samplit is not limited to
recording from sources that can be
controlled by MIDI. You can use Samplit to
record any kind of sound. It could be a
real instrument, a human voice, special
effects (hammer hits, birds...). You name
Run the setup program and follow the
on-screen instructions
The first time you will run the software,
you will be asked to enter your license
key
Welcome to Samplit
2
Windows Installation
Hardware
· Intel Pentium III processor
· 256 MB RAM
· A lot of free space on your hard drive
for the recording
· Soundcard with Asio driver
· Midi interface
Software
· Windows XP
· Acrobat reader
Software installation
Run the setup program and follow the
on-screen instructions.
The first time you will run the software,
you will be asked to enter your license
key.
3
Samplit User manual
2. Quick start
Creating a new project
The first step in beginning a Samplit
project is creating a new project.
To create a new project:
1 Choose File > New Project or click on
New in the toolbar:
recording parameters. On Windows you
can choose between Multimedia drivers
and Asio drivers, we recommend you to
select an Asio driver in order to have a low
latency and to be able to record at higher
sample rates and resolution.
5 Set the MIDI parameters (optional). If
you plan to record from a source that can
be controlled by MIDI, then you have to
select the MIDI input and output devices.
You can turn on or off every MIDI channel.
Note that there must be at least one active
MIDI channel.
6 Click on the Mapping tab to display the
mapping editor and templates:
New Project dialog
2 Enter a name for this new project and
click Create.
Settings dialog: Mapping
3 A new dialog will be be displayed. This
dialog has four parts that you can access
by clicking on the top tabs.
7 Set the key range, the number of notes
and the number of velocities to record.
When you change any of these
parameters, you see the result on the
main screen in the background. Keep in
mind that you can always modify this
mapping later.
8 Click Done
Project Files and Folders
Settings dialog: MIDI and Audio
4 Select the recording source for your
project: MIDI Instrument, Real Instrument
(No MIDI) or MIDI Pliugin. Set the audio
When you create a new project, Samplit
creates one project folder with the
extension .spt and create a folder for all
the each program of that project.
Quick start
4
A backup file is also created and will be
used when necessary.
Programs
When you create a new project, Samplit
creates one program named after the
name of the project. Each Samplit program
can be converted to one sampler
instrument. You can also combine several
programs together into a key switch.
Record
The most important parameters are the
ones around the audio tape. These
parameters allow you to precisely define
how and when Samplit will record the
sounds. The Threshold knob on the left
side adjust the audio level above which
the recording will start. The Threshold
knob on the right side adjust the audio
level below which the recording will stop.
The Pre-record knob adjust the number of
samples that you want to record before the
start Threshold. Likewise, the Post-record
knob is the number of seconds that you
want to record after the stop threshold. Set
the start threshold to "Auto" for now, this
will set the start and stop thresholds
automatically. If you are recording a
sustained sound (flute, organ, strings...),
the audio level will never go below the
stop threshold, in that case you have to
set the maximum recording time with the
Max Rec knob.
Here are some typical settings:
Percussive sounds:
· Threshold: Auto
· Post-record: 2 seconds
Sustained sounds:
· Threshold: Auto
· Max Rec: 3 seconds
Click on the Record button and Samplit
will record all the samples one by one.
To start recording your project, click
Record in the toolbar.
Convert
Record dialog
5
Samplit User manual
After a sample has been recorded, all the
other operations are non-destructives
(normalize, compress, fade in, loop, down
sampling...). New samples are created
during the conversion process to keep the
original samples unaltered. This allows
you to create different versions of your
programs. For example you can record in
96 KHz/24 bits and convert to 44 KHz/16
bits.
That's why creating a sampler instrument
with Samplit is always a 2 step process.
First you record all the sounds, then you
convert to your favorite sampler format.
1 Click Convert in the Tool Bar:
Conversion dialog
2 Select which programs you want to
convert (with a green check mark in front
of them)
3 Select the sampler format
4 Select the destination folder
5 Set the maximum sample rate (optional).
Samples will a higher sample rate will be
downsampled.
6 Set the maximum sample resolution
(optional). Samples will a higher resolution
will have their resolution decreased.
7 Click Convert
Quick start
6
3. Project
A project is made up of one mapping and
one or several programs. The mapping
defines which notes and velocities to
record. The same mapping is shared by all
the programs inside a project. Each
program has its own list of samples.
After a sample has been recorded, all the
other operations are non-destructives
(normalize, compress, fade in, loop, down
sampling...). New samples are created
during the conversion process to keep the
original samples unaltered. This allows
you to create different versions of your
work. For example you can record in 96
KHz/24 bits and convert to 44 KHz/16 bits.
An instrument allows you to combine
several programs together with a key
switch.
A project folder has the extension ".spt" A
program folder is also created for each
program.
7
Samplit User manual
4. Typical session
1 Create a new project
2 Set the audio parameters (Audio In,
Audio Out, Sample Rate, Bit Depth...)
3 (Optional) Set the MIDI parameters
(MIDI In, MIDI Out, channels...)
4 Edit the mapping (note interval, number
of velocities, velocity curve...)
5 Let Samplit record all the samples
6 (Optional) Auto loop the samples
7 (Optional) Test the recorded program
with the built-in player and adjust the
parameters to make it sound the way you
want
8 Convert the program(s) to your favorite
sampler format
9 (Optional) combine several programs
together to create a new key switch
instrument
Typical session
8
5. Project settings
Every time you create a new project,
Samplit will display the project settings
dialog. This dialog is divided into three
parts: Audio, Midi and Mapping.
Audio
only be adjusted for Multimedia drivers. If
you want to change the audio buffer size
for ASIO drivers or CoreAudio drivers, you
have to do it from the respective control
panels.
You can always record at the highest
quality and reduce the sample rate and
the resolution later during the conversion.
For example you can record in 96 KHz/24
bits, and convert the program to 44
KHz/16 bits
Midi
Here you can select which kind of audio
driver you want to use. On Windows you
can choose between Multimedia drivers
and ASIO drivers. We recommend you to
use an ASIO driver unless your audio card
does not have one. ASIO drivers have a
low latency and support more sample
rates and resolutions than Multimedia
drivers.
Select the audio device (input and output),
the sample rate, the resolution and the
channels to record from. The in meter
displays the audio received on the current
audio device. The Audio buffer size can
9
Samplit User manual
Select your midi-in device, the meter
below the midi-in device name monitors
the activity on all 16 channels. The midi-in
device will allow you to set the program
change and control change for a given
program and to use the player with an
external midi keyboard.
Select the midi-out device and select the
output channel (1 to 16), this will be used
to send the midi notes during the
recording.
Mapping
There are three ways to modify the
mapping, here we will describe the two
first ones, the third one is described in the
next chapter: "Main Window".
The "Quick Edit" mode allows to create a
new mapping very quickly with just a few
parameters. When you move any of these
faders, the main window in the
background is updated to reflect the
change.
You can save your mapping as a template
and reuse them later in other projects.
Click "Save mapping as a template" and
give a name to your mapping.
To test your mapping, click on the Play
button. Samplit will send the MIDI note on
and note off for the keys and velocities of
your mapping.
The key range can be adjusted manually
or by clicking on one of the presets:
Project settings
10
6. Main window
The main window is divided into three
main parts. All the parameters (project,
program, sample, loop) are on the left, the
mapping view is in the right upper side
and the sample view is in the right lower
side.
change the vertical position of the zone
split between two samples (yellow dots).
Program
Special icons
When you see this icon
next to a MIDI
note, click it to change the MIDI note by
pressing a key on your MIDI keyboard.
When you see this icon
next to a
sample position, click it to zoom the
waveform display, click a second time to
unzoom.
Project
The first line displays the name of the
current program, click on it to edit the
program name. Just below the program
name is the list of all the MIDI program
changes and MIDI control changes
associated with that program. When you
select one program, all these parameters
are sent to the MIDI devices.
Sample
The first line displays the name of the
project, it cannot be changed.
Low and High Note: The initial key range
is set when you create a new project.
There are 3 ways to change the key range
after a project has been created: Opening
the Project Settings Window, editing the
values directly and clicking on the MIDI
icon and pressing a key on your MIDI
keyboard.
Key adjust: This fader allows you to
change the horizontal position of the zone
split between two samples (yellow dots).
Key adjust: This fader allows you to
11
Samplit User manual
The first line displays the name of the
sample, it cannot be changed. To rename
all the samples at once, just rename the
program.
Size: This is the size of the sample in
frames
Start: This is the first frame to play
End: This is the last frame to play
Loop
and you would rather set all the notes and
velocities manually. Click on the EDIT
button on the bottom right corner and
select "Edit the mapping (mouse)"
Loop Type: No loop, Forward,
Forward+Release, Alternate
Loop Start: The loop start point.
Loop End: The loop end point
CrossFade: This is the amount of
crossfade for the loop
Mapping View
You can now click on one of the velocities
on the right side and move it up or down to
change its value. To remove one velocity,
move it outside of the velocity window. To
add a new velocity, just click anywhere
and a new one will appear.
To add or remove a note, just click on it.
Selected notes are marked with a red
spot.
On the bottom of the mapping view, there
is a keyboard with some red spots. A red
spot on a key
means that you want to record this note.
On the right side there is the list of
velocities that you
have selected. At the intersection of every
selected velocity and every selected note
there is a
sample represented by a small yellow dot.
Around that sample is a zone which is
represented by
a rectangle, the rectangle is blue when
there is a recorded sample and grey
otherwise.
Editing the mapping
Sometimes the mapping created by the
Quick Editor is not exactly what you want
You can also set the notes and velocities
using your MIDI keyboard. Click on the
EDIT burron and select "Edit the notes
(MIDI)" or "Edit the velocities (MIDI)".
Note: Everytime you record a new sample,
the mapping is automatically locked, this is
done on purpose to prevent any unwanted
mapping modification.
Deleting a sample
Click on one zone to select it and display
the sample recorded for that zone. You
can then use the arrow keys to move to
another zone.
Press the "delete" key to delete the
sample of the selected zone. This will
remove this sample from the program and
Samplit will ask you if you want to delete
the audio file as well.
Main window
12
You can select several zones at the same
time, click on the upper left zone that you
want
to select and while holdind down the left
button, move the mouse lowest right zone.
You can
then delete several samples at once.
Importing an external sample
Usually the audio samples are created by
Samplit, but it is also possible to import
external samples.
Drag any audio file (Wav or Aif) from
another location on your computer to the
mapping view and drop it on one zone.
Note that the file will not be duplicated, so
you need to make sure this audio file still
exists next time you work on the same
project. Imported samples do not need to
have the same parameters (sample rate,
resolution, channels) than the project.
Sample view
Click on the yellow icon on the top left
corner to view the sample in a bigger size.
To zoom inside the sample, just click
anywhere in the sample and move the
mouse up or down.
The green markers represent the sample
13
Samplit User manual
start and end.
The yellow markers represent the loop
start and end.
You can click and move any of these
markers, you can also change all these
values directly in the Sample and Loop
parameters on the right of the sample
view.
The purple marker represents the amount
of loop crossfade.
7. MIDI recall
Samplit automatically save all the MIDI
parameters (Bank, Program and Control
changes) for each active MIDI channel of
each Samplit program. And when you
select a different program, Samplit will
send all these MIDI parameters back to
the MIDI device. This is called total recall.
To change the MIDI patch names of your
MIDI device, click on Names in the
toolbar:
Click on "General MIDI" to use the GM
names.
Click on "Project name" to use the project
name with an index (for example piano 1,
piano 2...)
Click on "Load .txt" to load your own list of
MIDI patch names.
MIDI recall
14
8. Recording
The Recording dialog gives you a lot of
control over how the samples are
recorded.
Compressor
You can compress the audio signal before
it is recorded.
The Threshold knob on the left side adjust
the audio level above which the recording
starts. The Threshold knob on the right
side adjust the audio level below which the
recording stops. The Pre-record knob
adjust the number of samples that you
want to record before the start Threshold.
Likewise, the Post-record knob is the
number of seconds that you want to record
after the stop threshold.
The following illustration shows how these
parameters affect the recording:
Turn on the compressor and adjust the
following parameters:
· Threshold: This is the level above
which the audio signal is compressed.
· Ratio: The amount of gain reduction
(Compression ratio).
· Attack: How long the compressor takes
to start compressing after the sound
level goes above the threshold.
· Release: How long the compressor
takes to return the gain to normal after
the sound level drops back below the
threshold.
· Gain: Adjust the gain at the output of
the compressor.
Recording parameters
15
Samplit User manual
Note that the sample start is not at the
same position than the threshold. The
sample start is automatically adjusted to a
better position to avoid any click. The pre
record is an extra security, it will record
some audio before the sample start so that
you can adjust the start point later. Usually
you will set the pre record to 0, unless you
are recording sounds with a very slow
attack.
Note off: This parameter allows you to
send a MIDI note off at any time after the
recording start. If set to auto then the note
off will be sent when the sample level
drops below the record out threshold.
If you plan to record a sustained sound,
then it's likely that the audio level will
never go below the out threshold, in this
case you can set a maximum recording
time.
Max Rec: Maximum recording time in
seconds
Max (Hi): Maximum recording time for the
highest note, if you set this parameter to a
different value than Max Rec, then Samplit
will calculate the maximum recording time
for every sample according to their
position on the keyboard.
You can click on any of these samples to
display it in the main window and to hear
it. To delete this sample click on the
Delete button below the list. This allows
you to delete any sample you don't like
without having to close the recording
window. Next time you click Record,
Samplit will record the deleted samples
again.
Control bar
The control bar is where you set some
global options for the recording and the
Record, Test and Stop button.
Rec Pause: Pause between 2 recordings.
If you set it to Auto, then Samplit will wait
until the audio level goes below the in
Threshold.
Recording History
Record: Program/Project: In Record
mode, only the current program will be
recorded. In project mode, all the
programs of this project will be recorded.
Priority: Velocity/Note: Allows you to
record note by note or velocity by velocity.
This could be usefull when recording real
instruments.
Stereo: Turn this option off if you want to
record in mono.
Record: Click on this button to start the
recording (or press the * key)
Test: Record simulation, use it to adjust
all the parameters
Stop: Stop the current recording (or press
the Space bar)
On the right side, there is a list of the
samples that have just been recorded.
Recording
16
9. Looping
There are 3 different auto-loop algorithms:
· Short Loop: for simple sustained
sounds or percussive sounds (Piano,
Harp, Guitar, ...)
· Long Loop : for complex sustained
sounds (Orchestra, choir, ...)
· Music Loop: Mostly used for Drum
loops
To use the Auto-Loop feature, select one
sample in the main window and click on
AutoLoop. The selected sample will be
used to adjust the AutoLoop paremeters.
Short Loop
Loop search start: Set the position
from which to search for a loop
Minimum number of cycles: Samplit
will analyse the sample to find its pitch
(also called fundamental) and will make
sure that the loop size has a minimum
number of cycles. This is usefull to
avoid any pitch change in a too short
loop.
Quality: This is the number of loops to
search for, of course Samplit will
automatically select the best one.
Crossfade: This is the amount of
crossfade for all the loops.
Long Loop
Loop search start: Set the minimum
position for a loop.
Loop search end: Set the maximum
position for a loop.
Loop Search size: Set the size of the
area after the "search start" and befor
the "search end".
Crossfade: This is the amount of
crossfade for all the loops.
Music Loop
This mode is similar to the Long Loop
mode, but it uses a different algorithm
more appropriate for drum loops or
music.
Note: To edit the parameters in the
AutoLoop dialog, you can either move the
faders or move the colored rectangles on
the waveform display.
Here is the list of parameters that you can
adjust for all the auto-loop algorithms:
17
Samplit User manual
10. Player
The player module is a basic sample
player that allows you to adjust the
following parameters:
Volume: Volume of the program
Velo: Velocity response, this is how the
velocity will change the level.
0 means the velocity has no impact on the
level (eg. organ).
100 means the velocity has the maximum
impact on the level (eg. piano, drum...)
Attack: is the VCA envelope attack
Release: is the VCA envelope release
Normalize: Is the amount of normalization
to apply on all the samples, 100% means
that the loudest sound is normalized.
Compress: allows you to reduce the level
difference between all the sounds.
If you set both faders to 100%, then all
sounds will be normalized. Suggested
values are 90% and 40% but you are
encouraged to tweak these faders and
listen to the results.
Fade in : Just in case there are some
clicks at the beginning of the sounds, this
fader allows you to set an initial fade in of
up to 20 samples.
Player
18
11. Conversion
In the Program list you can select all the
programs that you want to convert.
Select the destination format and the
destination folder. If you check the "Create
sample folder" option,
then a sample folder called "samples" will
be created in the same folder than the
converted program.
In this dialog you can also adjust the
sample rate and resolution. You can only
reduce not increase, for
example if you have recorded in 96 KHz
you can set the sample rate to any rate
lower or equal to 96 KHz.
Key switch
If you want to create a keyswitch
instrument with 2 or more programs, then
drag and drop some programs into the
instrument window.
19
Samplit User manual
The new keyswitch instrument will be
given a default name of the first program
name completed with "_ks". You can of
course rename the instrument the way you
want. Samplit will also calculate a default
first key according to the key range of the
project. You can change this key but it has
to be outside of the key range of your
project.