1
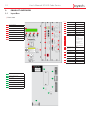
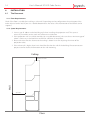
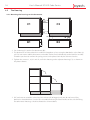
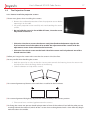
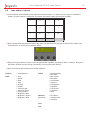
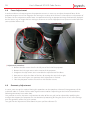
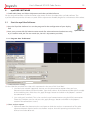
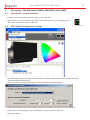
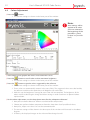
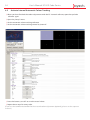
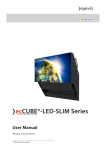
) EC CUbe Series User’s Manual eyevis Cubes with LED Projection Engine Version 1.0 (Nov/09) 2 User’s Manual EC LED Cube Series Contents 1. 1.1 1.2 1.3 1.4 1.5 1.6 1.7 1.8 SAFETY INSTRUCTIONS General Instructions Power Installation Use Unused for long periods of time Cleaning Storing Notes & Cautions fur Use 2. FEATURES 2.1 Packaging 2.1.1 3. 3.1 3.2 3.3 Unpackaging Product Overview Input Box Projector Back Plane 4. iNSTALLATION 4.1 The Basement 5 5 5 6 7 7 8 8 8 10 10 11 12 12 13 13 14 14 4.1.1 Floor Requirements 14 4.1.2 Space Requirements 14 4.1.3 Basement Assembly 15 4.2 The Housing 4.2.1 Mounting the housings on the basements 4.3 The Projection Screen 4.3.1 4.4 4.5 4.6 4.7 4.8 4.9 How to install the projection screens Grounding the wall structure Cabling Principle Cube address scheme Focus Adjustment Geometry Adjustment Mirror Adjustments 5. eyeCube Software 5.1 Start the eyeCube Software 16 16 17 17 18 18 19 20 20 22 23 23 5.1.1 Program Area “Preference“ 23 5.1.2 Program area “User” 24 5.1.3 Program area “Setup” 26 User’s Manual EC LED Cube Series 3 5.1.4 Program area “Status” 28 5.1.5 Program area “Gamma” 30 5.1.6 Program Area “Reports” 30 6. 6.1 6.2 6.3 6.4 EC Lcontrol - colour adjustment for eyevis led cubes Start the EC_Lcontrol Software Wall setup & configuration settings Colour Adjustment Fine adjustment for selected cubes 6.4.1 CIE Adjustment 6.4.2 Colour Adjustment (Saturation / Gain) 6.5 Activate Internal Automatic Colour Tracking 7. Technical Specification 31 31 31 32 33 33 33 34 35 8. A Guide to simple Problem Solving 8.1 Malfunction or Trouble 36 36 9. Warranty Information 37 10. Correct Disposal 39 11. Additional Support 40 4 User’s Manual EC LED Cube Series User’s Manual EC LED Cube Series 1. SAFETY INSTRUCTIONS 1.1 General Instructions ))Installation and preliminary adjustments should be performed by qualified service personnel or authorized service dealers. )) All warnings on the system parts and in the documentation manual should be adhered to. ))All instructions for operating and use of this equipment must be followed precisely. ))All local installation codes should be adhered to. 1.2 Power ))The power cord must be correctly connected to a grounded power outlet. If not, this may result in electric shock or personal injury. ))Make sure that the power plug is plugged into the power outlet firmly and correctly. If not, this may result in fire. ))Do not connect multiple appliances to the same power outlet. This may result in fire caused by overheating. ))Never use a damaged power cord or plug or a damaged or loose power outlet. This may result in electric shock or fire. ))Do not touch the power plug with wet hands when removing or plugging the plug into the outlet. This may result in electric shock. ))Do not forcefully bend or pull the power plug and do not place any heavy material on it. This may result in fire. ))Do not disconnect the power cord while using the product. This may result in damage to the product due to electric shock. ))When the device is disconnected from the mains, the plug must be pulled out from the mains socket. Therefore the mains plug shall be easily accessible. If, not, this may cause electric shock or fire. ))Do only use the power cord provided by eyevis. Do not use the power cord of another product. Improper power cords may lead to fire or electric shock. 5 6 User’s Manual EC LED Cube Series 1.3 Installation ))Do not install the device in areas where humidity is high. If the unit is installed in direct sunlight, closed car or near a stove the cabinet or other parts may distort or be damaged, and electric shock may result. If the unit is installed next to a humidistat, a stove or in a location where there is a large quantity of dust, it may cause a fire or electric shock ))Take measures to prevent the unit from falling down. If not, the unit may fall down and cause injury. ))Do not block the ventilation holes on the unit: The inside of the unit will overheat if the ventilation holes are sealed, which may cause fire. When installing the unit near a wall, keep the unit at least 10 cm from the wall. Do not place the unit in a closet or bookshelf where ventilation is poor. ))Precautions for moving the unit When moving the unit, be sure to remove the plug from the wall outlet and disconnect wiring cables between equipment and detach any securing anchors. If not, fire or electric shock may result if the power cord is damaged, injury may occur by the unit falling down. When unpacking or carrying the unit, at least two people are needed. Make sure the units are carried upright. Do not carry the unit with the screen installed. Handle the unit so as not to jolt the unit. ))Do not overload outlets or cables beyond their capacity. Do not use extension cords. Electric shock or fire may result ))When installing the unit, use the specified basement. If not, the unit may fall down and cause an injury. ))Do not place the unit in locations of high humidity or close to a humidifier. This may cause a fire or an electric shock. ))Do not place the unit in an unstable location, such as unappropriate double-floors or incline. The unit may fall down and cause injury or damage. Install the unit on a horizontal, stable surface. ))Do not place the unit in a location subject to vibration, unless you have a special vibration absorbing basement. Geometry adjustments may get disaligned due to the vibrations. The unit may fall down because of the vibration and may cause an injury. ))Insert the power plug fully into a 100 ~ 250 V AC outlet. If you use an outlet other than 100 ~ 250 V AC, it may cause fire or electric shock. Improper insertion of the plug may cause heat and fire. Do not use a damaged power plug or worn outlet. ))Do not place objects on the unit. if metal or liquid (when putting vase, glass or cosmetics) get into the unit, it may cause fire or electric shock. If you put heavy objects on the unit, it may fall down and cause injury. ))When installing the unit, have your dealer arrange for professional installations. If the installation work is not correct, it may cause injury. User’s Manual EC LED Cube Series 1.4 7 Use ))Never repair, modify or disassemble the unit by yourself. It may cause a fire or an electric shock because dangerous voltages exist in the unit. Consult your dealer for internal inspection and repairs. ))Follow these precautions for the power cord. Always plug power cord into appliance before plugging into outlet Do not allow anything to rest on the power cord. Do not locate this product where persons will walk over the cord. Do not operate appliance with a damaged cord or if the appliance has been dropped or damaged, until it has been examined by a qualified serviceman Position the cord so that it will not be tripped over, pulled, or contact hot surfaces. ))Follow these precautions for the plug Do not damage, or modify e.g. by extending, or heat (such as by pressing near heating equipment). Do not pull, place heavy objects or pinch. Do not bend, twist or bunch up. Fire or electric shock may result ))Precautions for the extension cord If an extension cord is necessary, a cord with a current rating at least equal to that of the appliance should be used. Cord rated for less amperage than the appliance may overheat. ))Do not insert objects inside the unit. If metallic materials or combustibles such as paper get inside the unit from ventilation holes and other places, it may cause a fire or an electrical shock. ))If there is thunder or lightning, do not touch the unit or the power plug. You may suffer an electric shock. ))Do not pull the power cord when removing the plug from the wall outlet. If the power cord is yanked, the cord may become damaged and fire or electric shock may occur. Always hold the plug firmly when removing it. ))Never spill liquid of any kind on the product. Should any liquid or solid object fall into the cabinet, unplug the set and have it checked by qualified service personnel before resuming operations. ))Do not climb or stand on the unit. It may drop, fall down, break or cause an injury. ))If the unit will not be used for a long period of time, remove the power plug from the wall outlet for safety. If not, in the case of malfunction, it may cause fire. ))Do not push or jolt the screen unit of the rear projection cube. The material of the screen may break and cause injury ))Water drops on screen surface. Please do not leave the screen with water drop. When the screen surface gets water drop, please wipe it off with cotton swab or soft cloth immediately, otherwise display surface will be deteriorated. If water gets inside the rear projection cube, circuit may be damaged. 1.5 Unused for long periods of time For added protection for this video product during a lightning storm, or when it is left unattended and unused for long periods of time, unplug it from the wall outlet. This will prevent damage to the rear projection cube due to lightning and AC power-line surges. 8 User’s Manual EC LED Cube Series 1.6 Cleaning ))If dust has collected on the power plug connectors, remove the plug from the outlet and clean off the dust. 33 This dust may cause a fire due to reduced insulation of the plug. ))Remove the power plug before cleaning. 33 Always unplug appliance from electrical outlet before cleaning and servicing and when not in use. Never yank cord to pull plug from outlet. Grasp plug and pull to disconnect. 33 If not, it may cause electric shock. ))Consult your dealer for internal cleaning once a year. 33 if you allow dust to accumulate on the unit, it may cause fire or malfunction when you operate it. 33 Cleaning is effective especially before the rainy season when humidity is high. 33 Refer to your dealer about the internal cleaning. ))Cabinet cleaning 33 Do not use liquid cleaners or aerosol cleaners. Use a damp cloth for cleaning. 33 To keep the cabinet looking brand-new, periodically clean it with a soft cloth. Stubborn stains may be removed with a cloth lightly dampened with mild detergent solution. Never use strong solvents, such as thinner or benzene, or abrasive cleaners, since these will damage the cabinet. ))Display surface cleaning. 33 Please only use the screen cleaner spray provided by eyevis. Avoid using other cleaners, since they may damage the surface of the screen of the rear projection cube. 33 When display surface of the screen of the rear projection cube is contaminated, please wipe the surface softly with cotton swab or clean cloth. If the contaminate is not easy to remove, clean cloth with the special screen cleaner is needed. Please be careful so that the screen cleaner does not get inside the rear projection cube, because it may be damaged. 1.7 Storing ))Let the appliance cool completely before storing. Remove cord from appliance when storing. ))Please use the original packing to store the cubes best. ))Observe the storing conditions for the rear projection cubes, c.f. „Technical Speification“ 1.8 Notes & Cautions fur Use ))On usage 33 Some parts of the device are hot during operation. Please be careful. 33 In case of moving long-distance, wrap the unit with blanket to avoid damages. Be careful not to bump the unit. 33 Do not spray on the unit volatile liquid like insecticide. Do not expose long time to rubber or vinyl. It will damage the coating. ))On disposal 33 Do not mix with other general waste User’s Manual EC LED Cube Series 9 ))Exemptions 33 This rear projection cube is not liable for any damage caused by natural disaster (such as earthquake, thunder, etc.), fires, acts by third parties, accidents, owner’s intentional misuse and fault, or uses in other improper conditions. 33 This rear projection cube is not liable for incidental damages (such as profit loss or interruption in business, modification or erasure of record data, etc.) caused by use or inability to use of this product. 33 This rear projection cube is not liable for any damage caused by neglect of the instructions described in the owner’s manual. 33 This rear projection cube is not liable for any damage caused by misuse or malfunction through simultaneous use of this product and the connected equipment of software. 33 This rear projection cube is not liable for any damage caused by neglect of the instructions described about the installation stand in the owner’s manual. 33 This rear projection cube is not liable for any damage caused by improper installation. 10 2. User’s Manual EC LED Cube Series FEATURES ))eyevis DLP® rear projection cube with LED illunmination technology ))Available types: 33 EC-xx-LXT: with native XGA resolution 1024x768px 33 EC-xx-LSXT+: with native SXGA+ resolution 1400x1050px 33 EC-xx-LHD: with native full HD resolution 1920x1080px 33 EC-xx-LWXT: with native WUXGA resolution 1920x1200px ))LED-lit projection technology The new LED cube shares all benefits of the DLP® technology, just like conventional lamp-based cubes. Therefore there has not been a necessity to create an absolutely new technology to generate the image. The technology has been only adapted to be operated with LED light sources. So the only difference between LED cubes and lamp-based cubes is the light source used for the rear projection. The DMD™ Chip used in the new LED cubes is exactly the same type as in any other DLP® cubes. Compared with traditional lamp-based cubes, LED-based DLP systems do not require wear parts like colour wheels and lamps. ))Standard Input Connection Possibilities 33 1 x DVI-D ))Optional Input Connection Possibilities with Scaler Board 33 2x DVI 33 2x RGB 33 2x Composite Video 33 1x S-Video 33 1x Component Video (Optional) 2.1 Packaging (Measures and technical values may vary depending on the product version.) ))Box Content: EC-XX-LYY (XX: screen diagonal / YY: display resolution standard) 33 1 rear projection unit type EC-XX-LYY (ready-mounted incl. input box and projection engine) 33 1 power cord 33 1 serial cable 33 1 user‘s manual 33 1 eyevis cube adjustment software on CD 33 1 screen cleaner set 33 Covers for service holes to avoid light and dust entering the rear projection unit 33 Screws for fixing Cube and basement together ))Box Content: Screen 33 Screen (ready-mounted on screen frame) User’s Manual EC LED Cube Series ))Box Content: Basement (Optional) 33 2 side-frames 33 5 crossbars 33 4 levelling feet 33 4 corner plates 33 2 screen adjustment plates 33 Mounting material 2.1.1 Unpackaging The EC-XX-LYY is packed in a carton box. To provide protection during transportation, the EC-XX-LYY is surrounded with foam. The packaging is secure with banding. ))To unpack 33 1. Remove the banding 33 2. Take off the top cover of the shipping carton 33 3. Remove the mantle carton 33 4. Remove the protection foam 33 5. Take the EC-XX-LYY of the bottom of its shipping carton 11 12 User’s Manual EC LED Cube Series 3. Product Overview 3.1 Input Box ))Front view 1 2 Control Display Menu Button 3 Enter Button 4 Down Button 5 Up Button 6 Main Power Switch 7 5V Power Outlet 8 Main Power Input 17 9 1 10 2 3 4 5 18 11 12 13 22 6 20 15 16 1 4 Serial number 2 Power outlet to fans 3 Grounding 4 DVI connection to projector 5 Low voltage power engine 6 eyevis databus to projector 7 Main power engine 5 6 2 3 7 10 Network RJ45 11 AUX 2 RJ45 12 AUX 1 RJ45 13 Keyboard PS/2 14 COM 2 Out D-Sub 9pin 15 COM 1 In D-Sub 9pin DIP Switches 1. Force Address 1 2. -5. DIP switch functions vary depending on firmware 16 23 24 7 8 Status LEDs 19 14 1 21 9 6. Service: Flash Scaler Firmware 17 Digital/ Analog RGB In 1 DVI-I 18 Analog RGB In 2 HD15 19 Digital RGB Out DVI-I 20 Digital RGB In 2 DVI-I 21 Component Video BNC (YPRPB) 22 S-Video Mini-DIN 4pol 23 C-Video 1 BNC 24 C-Video 2 BNC User’s Manual EC LED Cube Series 3.2 Projector ))Front view 1 Optic 2 Service cover for focus adjustment 3 Serial Connector for external sensor 4 DVI IN from inputbox 5 Low voltage power engine 6 eyevis databus to projector 7 Main power engine 8 Service lid for 3.3 Back Plane ))Front view 1 Backplane cover mirror adjustment 2 Ventilation inlet 3 Backplane cover inputbox 4 Input box 5 Ventilation out 6 Backplane Cover Projection Engine & Geometry Adjustment 13 14 User’s Manual EC LED Cube Series 4. iNSTALLATION 4.1 The Basement 4.1.1 Floor Requirements Check if the floor is suitable for installing a video wall. Depending on the configuration the underground has to be adjusted to the load. If you use a double bottom there has to be a fixed connection of the boards to the supports. 4.1.2 Space Requirements 33 Leave a gap of ~60 cm to the building wall when installing the projection wall. This space is necessary to enable service work and sufficient air circulation. 33 If the projection-wall is installed movably (on a suitable basement), take care that a minimum gap of 10 cm is necessary at the backside to allow for sufficient air circulation. 33 Please take care that the distance to the ceiling is about 15 cm for adjusting the mirror of the projection-cube. 33 If the video wall is higher than 3m it should be fixed to the wall of the building. Please contact our project team for detailed information on the wall mounting. Ceiling Wall at least 15 cm at least 60 cm Floor 15 User’s Manual EC LED Cube Series 4.1.3 Basement Assembly 33 The components of the basement have to be screwed together with the Allen screws. Each basement consists of two side-frames (A+B) and five crossbars (C, D, E, F and G). When mounting the upper two crossbars, take care that the upper front crossbar (F) has two provided screw threads. Mount this cross bar so that these threads look downwards to enable the mounting of the screws for the adjustments of the screens later on (c.f. 4). 33 Screw the corner plates in each corner of the basement. Use the provided screws. 33 Now install the levelling feet for the height-adjustment of the basement on the corner plates, as illustrated in picture 3. Please observe the order of nuts and washers in the picture to guarantee a safe hold of the levelling screws. 33 Mount the adjustment screws for the adjustment of the screens to the bottom of crossbar F, as illustrated in picture 4. 33 Take care that the basement is levelled out horizontally when it is in its final position. This makes the installation of further basements and the final installation of the cube housings a lot easier. B1 B2 33 When the basements are levelled horizontally, they have to be fixed together with the provideed screws before stacking the cubes on top of them. 16 4.2 User’s Manual EC LED Cube Series The Housing 4.2.1 Mounting the housings on the basements d2 c2 C1 C2 d1 c1 a1 B1 b1 a2 b2 B2 33 Set a housing (C1) on the first basement (B1). 33 The basements and the cubes have to be fixed together at least using the boreholes at the front (a1, a2). For even more stability basements and cubes can be fixed additionally on the back (b1 and b2). Therefore you have to remove the spring-screws and replace them by the delivered screws. 33 Tighten the screws c1, c2, d1 and d2, to fix this housing to the adjacent housing (C1) as shown on the picture above. 33 !!! If you have to assemble a three by three video wall (or bigger) and you do not have a lifter, proceed as described here. Use the first assembled housing and the handles on the side for lifting the other outer housings a little bit. Proceed as shown above. User’s Manual EC LED Cube Series 4.3 17 The Projection Screen 4.3.1 How to install the projection screens ))Please wear gloves when installing the screens. 33 Remove the cardboard protections from the projection screen before mounting it on the cube. 33 Lift up the projection screen carefully and avoid touching the screen surface. 33 Do not hold the screen in the middle of frame, since the screen may break or fall out !!! 33 !!!Caution: Use those screens that have a steel plate fixed to the bottom edge for the first horizontal row of the cube wall to enable the adjustment of the screens with the adjustment screws that are fixed to the basement. 33 !!!Caution: Turn the 4 screws on the back side of the screen until only about 5 mm of the thread remain visible. ))Before you hang in the screen make sure that the screen is dirt/dust free. ))Be very careful when handling the screen. 33 Hold the screen by its sides so that the 4 screws point towards the housing. Insert the screen with the help of the 4 intended long wholes at the housing. 33 !! Observe bottom and top of the screen!! ))For screen alignment up/down use the tool that is installed in the basement. ))For screen alignment left/right try to push the screen carefully in the correct position. 33 Take care to have a minimal gap betweeen the screens. ))For fixing the screen one person should take position in front of the cube-wall and tell the other person, standing behind the cube-wall, which of the 4 screws have to be tightened with a 5mm Allen key. Begin with the cube in the middle. 18 4.4 User’s Manual EC LED Cube Series Grounding the wall structure 33 The housings have to be daisy chained with the delivered grounding cables to guarantee the electrical safety of the cube-wall. The cables for the grounding are pre-installed bottom left and right in each housing. 4.5 Cabling Principle RS232 Ethernet 1 2 3 4 5 6 7 8 9 (optional) ))RS232 – CABLES 33 The data will be transmitted via the RS232. 33 Use the supplied RS232 data cable to transmit the data from cube to cube, as shown on the picture. 33 Connect RS232 OUT with RS232 IN. ))RS232 – CONTROL-PC 33 The cube-wall is controlled by a Control-PC via RS232. 33 Connect the Control-PC via RS232-cables with the cube-wall. ))Ethernet – CONTROL PC (optional) 33 The cube wall can be controlled with a control-PC via Ethernet. 33 Therefore use a CAT5-cable to connect the control-PC with the cube wall (Cube 1) User’s Manual EC LED Cube Series 4.6 19 Cube address scheme ))For the control and communication with the individual cubes it is importatnt to assign an individual address to each cube in a video wall. The cubes are addressed by consecutive numbers. 1 2 3 4 5 6 7 8 9 10 11 12 ))When viewed from the front the addressing starts on the left in the top row of cubes of the video wall and continues as shown on the picture above. ))After pressing the “Menu”-button at the display off the Inputbox, the Display shows “Cube ID“. Now press the “Enter”-button and use the up-/down-keys to insert the cube address. ))Menu structure of the control panel at the inputbox: CUBE ID -> Cube Address SETUP USER -> User -> Power -> Pixel -> Line -> H-Shift -> V-Shift -> Contrast Red -> Contrast Green -> Contrast Blue -> Brightness Red -> Brightness Green Network -> Brightness Blue (Optional) Save Exit -> Picture Mode -> Bias Red -> Bias Green -> Bias Blue -> Orientation -> Gamma -> LED Pattern -> LED Red -> LED Green -> LED Blue -> Grid -> IP Address -> Subnet Mask -> Gateway 20 4.8 User’s Manual EC LED Cube Series Focus Adjustment In order to achieve a sharp image on the projection screen it is necessary to adjust the optical focus of the projection engine. In case the image on the screen gets unsharp over the time it also requires re-adjustment of the focus. For the adsjustment of the focus we recommend using an appropriate image with content displayed on the screen, e.g. an image that has writing in all corners or similar. Appropriate test patterns can be found on your eyeCube software CD. ))Adjustment procedure: 33 Remove the four screws that fix the left part of the lid of the projector. 33 Remove the lid to get access to the interior of the projector. 33 Untighten the adjustment screw to enable the adjustment of the focus 33 Now you can adjust the focus of the lens by turning the screw left or right. 33 Secure the screw again in its position when adjustment is finished. 33 Close the projector with the lid and fix it with the four screws. 4.9 Geometry Adjustment A native, static test grid is required during this procedure on the complete video wall. Now geometry of the individual cubes in a video wall has to be aligned to one another. Depending on the kind of distortion the following corrections have to be done. Size, position as well as keystone- and rotation-mistakes of the test grid can be adjusted by modifying the carriage that supports the projector. This can be done by loosening or fixing the screws A to F at the carriage until the geometry of the test grid is correct. Test grids for the adjustment can be found on your eyeCube software CD. User’s Manual EC LED Cube Series 21 ))Back view 6-axis adjustment carriage Screwing Direction clock-wise A Horizontal Image Position F Rotation C Vertical Image Positon D E B Image Size D E Vertical Keystone B Horizontal Keystone E D counter-clock-wise 22 User’s Manual EC LED Cube Series 4.10 Mirror Adjustments If necessary, remaining geometrical mistakes between the transitions of the single modules can be compensated with the nuts on the mirror suspension. X1 X2 Y1 Z1 X3 Y2 Z2 Y3 Z3 ))For example: 33 If you screw Z1 / Y1 / X1 clockwise, the image goes like in the picture shown above. 33 If you lose the screws the image goes towards the inside of the screen. User’s Manual EC LED Cube Series 5. 23 eye Cube Software ))Comfortable Setup and Colour Adjustment with the eyeCube Software For the setup of the cubes and for the colour adjustment we have developed the eyeCube software. The eyeCube software provides all necessary tools for the adjustment of colour, brightness and contrast of the cubes. 5.1 Start the eyeCube Software ))Open the “EyeCube Software” to start the program for the configuration of your display wall ))Enter your password for full administration mode (for advanced trained technicians only), or just confirm with „OK“ for user mode (no „Service“ adjustments possible). eyeCube.exe 5.1.1 Program Area “Preference“ ))Communication Settings Set the COM-Port to which the video wall is connected in the entry field “Serial Port”. 33 „Use local area network“ (optional): You can use this commnication option when you have connected your cube over Ethernet cable. Type the IP address of the connected cube (the first cube) in the according entry field. Press the „apply changes“ button and check in the „Reports“ section if the connection is active. 33 „Use serial port“ (standard): This is the standard way of commnication using the RS232 connection. Select the COM-port you use and press the „apply changes“ button and check in the „Reports“ section if the connection is active. ))Colour analyser option 33 Communication Port determines the serial port to which the analyser is connected to. The other adjustment options depend on the used colour analyser. Here the operating instructions of the devices have to be observed. 24 User’s Manual EC LED Cube Series ))Pattern generator The pattern generator is a tool which is useful for the colour adjustment of the cubes. 33 Create a connection between your control PC and the source PC via Ethernet (eyePattern Generator has to be installed on the source PC) 33 Open the eyePattern Software on the source PC. If the software is not running you cannot create a connection to the source PC. 33 Type the IP address of the source PC in the according entry field and check in the „Reports“ section if the connection is active. 5.1.2 Program area “User” ))File Configuration With the „Load“ button you can load a saved configuration file from your PC, for example the file saved on your initiate system configuration. With the „Write“ button you can create a configuration file with your actual settings. ))Wall Size Here you have to enter the size of your video wall. Enter the number of columns in the first entry field and the number of rows in the second. In the upper right part of the window the video wall is illustrated. A single cube can be selected with the mouse to work with it. When a cube is selected, the adjustments, can be read by the button “Read current”. User’s Manual EC LED Cube Series 25 Caution: When the cube is in Power Up – or Power Down Sequence it is not possible to communicate with the software. In this case an error will be reported. The button “Read default” reads the default values of the cube. So it is always possible to return to the adjustments of the manufacturer, if the values have been misadjusted too much. The current data of the cube is saved with the button “Write”. With “Load” they can be called up again. ))Color Adjustment: 33 Contrast_Red: Set the contrast level colour red 33 Contrast_Green: Set the contrast level colour green 33 Contrast_Blue: Set the contrast level colour blue 33 Brightness_Red: Set the brightness level colour red 33 Brightness_Green: Set the brightness level colour green 33 Brightness_Blue: Set the brightness level colour blue 33 Saturation: Set the saturation level for the colours of the displayed image 33 Gain: Set the gain level for the brightness of the displayed image ))Signal Adjustment 33 Pixel: Set the number of horizontal pixels in the active area (horizontal resolution) 33 Lines: Set the number of vertical lines in the active area (vertical resolution) 33 H-Shift: Shift displayed picture horizontally 33 V-Shift: Shift displayed picture vertically 33 Scan Source: Scan for available sources 33 Input Switch (optional): Select input signal of the multi input board (RGB-1, RGB-2, DVI-1, DVI-2, V1, V2, YC, Return) ))Scaler Adjustment 33 M_Size_X: Set horizontal size of cube matrix (in number of displays) 33 M_Size_Y: Set vertical size of cube matrix (in number of displays) 33 M_Pos_X: Set horizontal matrix postion of the selected display 33 M_Pos_Y: Set vertical matrix postion of the selected display 33 M_Function: Switch matrix function ON / OFF 33 M_Scaling: Set scaling options of the image content for the matrix (1:1 / Fill-All/Fill-Ratio) 33 M_Execute: Press „Send“ to confirm your settings! ))Power Control 33 Power: Activate/Deactivate check box to switch the display on/off 26 User’s Manual EC LED Cube Series 5.1.3 Program area “Setup” ))Security Setting 33 User password: Admins can enter a password for users here, when logged in as Admin. 33 Admin password: Admins can change the admin password here, when logged in as Admin. ))Bias 33 Bias_Red: Adjustment of the basic brightness for red (shifts the brightness curve of the colour) 33 Bias_Green: Adjustment of the basic brightness for green (shifts the brightness curve of the colour) 33 Bias_Blue: Adjustment of the basic brightness for blue (shifts the brightness curve of the colour) ))Projector Setup 33 Orientation: Projection mode as rear, front, top, or bottom projection 33 Gamma: Load default pre-configured gamma curves 33 Boot Mode: Show / hide startup sequence of the projector 33 V_Freq: Select input signal frequency for the colour sensors (50 Hz or 60 Hz signal). 33 Picture_Mode: Show picture, activate freeze, activate blank, activate LED pattern User’s Manual EC LED Cube Series 27 33 LED_Pattern: Choose the colour of the LED pattern 33 Test_Grid (Opional only with scaler board): Choose between various test grids 33 ACT_Control: „Automatic Color Tracking“ system, activates the internal sensor for color tracking 33 ACT_Reference: Set the reference for the „Automatic Colour Tracking“ after colour adjustment 33 Security_Mode: Activate operation mode of the „Colour Rescue Control“ if one LED breaks - Mode 1: Displays image in black/white mode - Mode 2: Displays image slowly blinking in black/white mode - Mode 3: The missing colour is displayed by a mixture of the remaining primary colours - Mode 4: The missing colour is displayed by a mixture of the remaining primary colours. The image content is blinking. 33 Security_Level: Set the level of colour replacement for the Colour Rescue Control and frequency for the blinking (standard: 5 / 0 = off / 10 = highest level) ))LED Unit 33 R_Red: Manual colour adjustment for red LED 33 G_Green: Manual colour adjustment for green LED 33 B_Blue: Manual colour adjustment for blue LED ))Scaler Setup (Only available with scaler board for the cubes. Control buttons for OSD menu. OSD pops up when any button is pressed) 33 Menu_Left: Leave OSD sub menu 33 Menu_Right: Open OSD sub menu 33 Down: Navigate down in OSD menu 33 Up: Navigate up in OSD menu 33 Left: Scroll left for Menu items 33 Right: Scroll right for Menu items 33 + : Increase selected value 33 - : Decrease selected value 33 Escape: Leave OSD menu 28 5.1.4 Program area “Status” User’s Manual EC LED Cube Series User’s Manual EC LED Cube Series 29 ))Projector Info 33 Database_Version: Shows the version ID of the database 33 Projector: Shows the projector type 33 CPU_Temperature: Temperature of the CPU Board in °C 33 PLED_Temperature: Temperature of the PLED Board in °C 33 LED_on: Number of startup sequences of the LED 33 LED_Timer: Total operating hours of the LEDs 33 Firmware_CPU: Firmware version of the CPU Board 33 Firmware_PLED: Firmware version of the PLED Board 33 LED Driver_FW: Shows LED driver firmware 33 Firmware_CS: Shows colour sensor firmware ))Status info 33 Engine_Ready: 1 indicates normal operation, 0 indicates faulty operation 33 Engine_OK: 1 indicates normal operation, 0 indicates faulty operation 33 Fan _PS: 1 indicates normal operation, 0 indicates faulty operation 33 Fan_LED_Driver: 1 indicates normal operation, 0 indicates faulty operation 33 Fan_DMD: 1 indicates normal operation, 0 indicates faulty operation 33 Fan_LED_1: 1 indicates normal operation, 0 indicates faulty operation 33 Fan_LED_2: 1 indicates normal operation, 0 indicates faulty operation 33 Ledlit: 1 indicates normal operation, 0 indicates faulty operation 33 Status: Shows service code. ))LED Info 33 LED_red_Temp: Temperature of the red LED in °C (first value) / raw parameter (second value) 33 LED_green_Temp: Temperature of the green LED in °C (first value) / raw parameter (second value) 33 LED_blue_Temp: Temperature of the blue LED in °C (first value) / raw parameter (second value) 33 Heatpipe_Temp: Temperature of the heatpipe system in °C 33 LED_driver_Temp: Temperature of the LED driver in °C (first value) / raw parameter (second value) 33 LED_PG: 1 indicates normal operation, 0 indicates faulty operation 33 LED_Driver_PG: 1 indicates normal operation, 0 indicates faulty operation ))Serial Number 33 Engine_Serial: Shows engine serial number 33 CS_Serial: Shows serial number of the colour sensor 33 LED_Type: Shows the LED type 33 CPU_Serial: Shows the serial number of the CPU board 33 PLED_Serial: Shows the serial number of the PLED board ))Colour Info 33 Sensor_Light: Shows the reference values in percent (%) for R, G and B 33 CS_Resolution: Shows the resolution of the colour sensor 33 CS_Time: Shows the integration time of the colour sensor /frequency of the colour sensor 33 Sensor_Data: Firmware data for sensor 1 33 Sensor2_Data: Firmware data for sensor 2 30 User’s Manual EC LED Cube Series 5.1.5 Program area “Gamma” ))The Program area „Gamma“ gives you full control over the gamma curve of the individual colours (red, green, blue). 33 With the new LED cubes the program area „Gamma“ is less important. The colour adjustment of the LED-lit cubes is performed with the special colour adjustment software „eyevis projector control“ for the LED cube series (open EC_Lcontrol.exe to launch the software) 5.1.6 Program Area “Reports” All status reports of the Software are collected here. Diverse services are observed. Commands can be sent directly from the input box to the cube “Send”). Complete data files with commanding sequences can be sent to the cube (“File”). 31 User’s Manual EC LED Cube Series 6. EC Lcontrol - colour adjustment for eyevis led cubes 6.1 Start the EC_Lcontrol Software ))Create a serial connection to the first cube in the video wall ))Open the “EC_Lcontrol Software“ (file name: EC-Lcontrol.exe) to start the program for the colour adjustment of your video wall 6.2 Wall setup & configuration settings EC_Lcontrol.exe ))The information field in the bottom of the software window shows the number of cubes which are connected with the control PC. ))Select tab „Wall“ and open „Wall Setup“, the window illustrated below opens ))Choose the COM-port and set ID number of the first and of the last cube you want to control. ))Choose the scanning options: scan all COM ports or only selected COM ports. ))Close the window 32 6.3 User’s Manual EC LED Cube Series Colour Adjustment ))Press the -button. 33 The current settings are shown in the lower part of the window Note: Your settings will be applied to all cubes you have selected at the beginning of the procedure („Serial ID Start“ to „Serial ID End“.) ))In the colour space graphic the value is illustrated with a cross ))Press the -button to set all cubes to their maximum brightness 33 The current settings are shown in the lower part of the window ))Press the -button to get the values suggested by the software. 33 The current settings are shown in the lower part of the window 33 These values are automatically entered in the entry fields. The suggested values are calculated by the software to achieve the optimal over-all brightness for each cube. 33 With this step the brightness settings for your video wall are complete. The brightness of the cubes may be reduced again during the colour settings in order to achieve an optimal colour representation. ))For the colour adjustment, use the drop down menu for the „whitepoint reference“ 33 Now you can choose between different standard colour temperatures. 33 Choose your preferred colour temperature from the drop-down list of predefined values. 33 Now press „Adjust new values“ to start the communication 33 The current settings will be shown in the lower part of the window and illustrated in the colour diagram. 33 Of course, the displayed images on the video wall be changed aswell. User’s Manual EC LED Cube Series 6.4 33 Fine adjustment for selected cubes 6.4.1 CIE Adjustment ))Choose the cube you want to fine adjust manually ))With the arrows in the colour space graphic you can shift the white point in the desired direction. ))The values in the entry fields above (CIE x/CIE y/CIE Y) change according to the adjustments made with the arrow buttons. ))With a click on „adjust“ the values are applied and the image displayed on the cubes is changed accordingly 6.4.2 Colour Adjustment (Saturation / Gain) ))If the colours appear to strong (primarily red and green colours may be affected) their representation can be reduced with the adjustment possibilities for „Saturation“ and „Gain“. ))If you want to change the „Saturation“/“Gain“ for all cubes tic the checkbox „Do an all cubes“. ))Close the „Colour fine Adjust“ window. ))Press the „Save all“ button in the main menu window. 34 6.5 User’s Manual EC LED Cube Series Activate Internal Automatic Colour Tracking ))When you have finished the colour adjustment with the EC-Lcontrol software, open the eyeCube software again. ))Open the „Setup“ menu. ))Set the automatic colour tracking reference ))Set the automatic colour tracking control to „Internal“ ))Press the button „save all“ to save the actual values ))Repeat these steps for every cube. (If you use the communication box for the external colour adjustment (optional), please see the separate manual.) User’s Manual EC LED Cube Series 7. 35 Technical Specification Type: EC-50-LSXT+, eyevisCube 50” with LED illumination and native SXGA+ resolution Description: Digital 50” DLP®-rear-projection unit, stackable and addible, for data and video representation Resolution: 1,400 x 1,050 Pixel (SXGA+) Brightness: typ. 370 cd/m² (max. 410 cd/m2) Image Size (WxH): 1,000 x 750 mm Dimensions (WxHxD): 1,000 x 980 x 620 mm Weight: ca. 90 kg Type: EC-70-LSXT+, eyevisCube 70” with LED illumination and native SXGA+ resolution Description: Digital 70” DLP®-rear-projection unit, stackable and addible, for data and video representation Resolution: 1,400 x 1,050 Pixel (SXGA+) / Chip: DMD-Chip SXGA+ / LVDS 0.95“ Brightness: typ. 164 cd/m² (max. 205 cd/m2) Image Size (WxH): 1,400 x 1,050 mm (ca. 70” screen diagonal) Dimensions (WxHxD): 1,400 x 1270 x 750 mm Weight: ca. 105 kg Type: EC-60-LHD, Description: Digital 60” DLP®-rear-projection unit, stackable and addible, for data and video representation Resolution: 1,920 x 1,080 Pixel (full HD) / Chip: DMD-Chip Texas Instruments DDP3021 Brightness: typ. 217 cd/m² (max. 279 cd/m²) Image Size (WxH): 1,344 x 756 mm (= 1540 mm diagonal = 60,6”) Dimensions (WxHxD): 1,344 x 956 x 820 mm Weight: ca. 90 kg Type: EC-67-LHD, eyevisCube 67” with LED illumination and native full HD resolution Description: Digital 67” DLP®-rear-projection unit, stackable and addible, for data and video representation Resolution: 1,920 x 1,080 Pixel (full HD) / Chip: DMD-Chip Texas Instruments DDP3021 Brightness: typ. 186 cd/m² (max. 279 cd/m2) Image Size (WxH): 1,460 x 821 mm (ca. 67” diagonal) Dimensions (WxHxD): 1,460 x 1,055 x 850 mm Weight: ca. 95 kg eyevisCube 60” with LED illumination and native full ) eyevis LED cubes are available in more sizes and resolutions on request. Contrast Ratio: 1,500:1 Brightness Uniformity: ≥ 95% Input: 1 DVI Projection Screen: Seamless CrossPrism Screen Frame: 0.34 mm Power Consumption: 250 Watt at 110/235 V Lamp Life-Time: 55,000 hrs (in recommmended operating conditions) Software: eyevisCubeManager Environmental: Operating Conditions: recommended 15 – 25 °C; 5 – 35 °C; for Seamless Screen 18 – 25 °C; Storing: 0 – 50 °C Humidity: 0 % – 80 % noncondensing Altitude: 0 – 3,000 m Noise Level: ≤ 36 dB Options: Scaler Board (internal split controller up to 10 x 10 Matrix, with 2x DVI, 2x RGB, 2x Video) Multi-Cube Color-Brightness Adjustment Network Board Service and Maintenance Contracts HD resolution 36 8. User’s Manual EC LED Cube Series A Guide to simple Problem Solving Before calling service personnel, please check the following chart for a possible cause to the trouble you are experiencing. Symptom ))No picture Check these things 33Make sure the power cord is plugged in 33Maybe the power is OFF or Standby 33Check whether the auxiliary equipment is connected properly 33Check if the input setting is correct ))Unsharp picture 33Signal may not be suitable 33Check the cable connections between projector and Input Box 33Check the focus adjustment of the cube ))No commnication between control PC and cube 33Check if you have selected the right COM port ))The Projector starts not up 33Check the COM port settings 33Check the serial cable connection for commnunication 8.1 Malfunction or Trouble ))If smoke or peculiar smells comes from the unit, remove the power plug from the outlet immediately. 33 If the unit is still used in this condition, it may cause a fire or an electric shock. 33 Make sure that the smoke or smell has stopped, then contact your dealer for inspection. ))If water is spilled or objects are dropped inside the unit, remove the power plug from the outlet immediately. 33 If the unit is still used in this condition, it may cause a fire or an electric shock 33 Contact your dealer for inspection. ))If the unit is dropped or the cabinet is damaged, remove the power plug from the outlet immediately. 33 If the unit is still used in this condition, it may cause a fire or an electric shock. 33 Contact your dealer for inspection. ))To turn off the power of the unit, unplug the unit from the mains connection. 33 To disconnect the unit completely from the power supply, remove the power plug from the outlet. ))If the power cord or plug is damaged or becomes hot, turn off the main power switch of the unit, make sure the power plug has cooled and remove the power plug from the outlet. 33 If the unit is still used in this condition, it may cause a fire or an electric shock. Contact your dealer for replacement. User’s Manual EC LED Cube Series 9. 37 Warranty Information ))Duration of Guarantee and Area of Validity The specified product is guaranteed for twenty-four (24) months, beginning from the date of delivery by the Eyevis GmbH. Guarantee services within the duration of guarantee do not extend the duration of guarantee. This guarantee applies to products that were purchased in the European Union. Guarantee services can only be claimed in these countries. The bill of sale or receipted invoice (original invoice with serial number) of the first purchaser must be presented as proof of purchase to obtain warranty service. If the customer cannot provide this evidence of purchase the period of guarantee is calculated from the date of purchase by the specialist supplier (first seller) plus one (1) month. ))Guaranteeing If the product shows any faults or defects during the warranty duration, eyevis GmbH provides the following services from which the customer can choose: ))Equipment Exchange Bring-in warranty. The defective equipment is sent or brought to Eyevis by the customer and replaced by an equivalent product, if the product brought can not be repaired within 14 days. Any costs of a return delivery of the exchange equipment, are borne by the customer. ))Repair and Return The defective product is sent to eyevis by the customer and is repaired within 14 days. In this case eyevis bears the costs for eventually required components or the arising working time, as well as for the costs for the reshipment to the customer. ))Warranty Exclusions 1.) This warranty covers only malfunction due to any defect in material and/or workmanship of a product put into circulation by the eyevis GmbH. Guaranteeing is therefore excluded for any faults and defects beyond the responsibility of the eyevis GmbH, particularly in cases of: 33 Improper use, mechanical damages (e.g. marks caused by scratching, pressure or breaking), improper storing or cleaning, transport damages, misuse or any other reason the customer or a third is to blame for, especially if the instructions contained in the manual are not adhered to; ))A product that’s serial number is damaged, changed or removed is no-longer covered by this warranty. ))Reaction Time The reaction time to claim a right given by this warranty starts with the customer’s announcement of the claim to the eyevis GmbH. It is calculated in accordance to the standard service hours of the eyevis GmbH (daily 9.00 AM to 5.00 PM, except Saturdays, Sundays and Bank Holidays). 38 User’s Manual EC LED Cube Series ))Advised Procedure for Raising a Claim 1.) See the sections on “Troubleshooting” and “Support” in the manual and check whether the problem might be solved on-site before raising a claim referring to this warranty. 2.) If the problem still exists the customer should try to get support from his regional eyevis GmbH partner. Please prepare the following information: • Product identification and serial number of the device • A description of the problem in hand • Pick-up address and contact information; • Date and place of purchase; • A description of the required service work; 3.) After performing an analysis of the faults and damages of the device the eyevis GmbH will approve your warranty claim if the necessary requirements are fulfilled. The customer will receive a service code and the eyevis GmbH will prepare the service work chosen by the customer. It is the customer’s duty to keep the product ready for collection (in cases of DOA the product has to be equipped with all cablings and mains adaptors before it is put in its box or packed). If the customer fails have the device ready for collection he has to bear the costs for the replacement-device. 4.) The eyevis GmbH can provide a suitable transport box on request if the customer can not ensure to be able to pack the defect device correctly and to label t as a breakable good. The customer is liable for damages caused by the use of an improper or unsuitable packing by the customer. 5.) The customer arranges for the transport of the display to the eyevis GmbH 6.) The customer should have his service code ready for any further contacts with the eyevis GmbH in connection with this warranty claim. 7.) The eyevis GmbH reserves the right to charge the customer for incurred costs caused by complains concerning defects or faults that are not covered by this warranty. ))Legal and other Claims There are no express or implied warranties, representations or conditions other than those stated in this warranty. Other legal or contractual claims, also towards the seller of the product, are excluded as far as the eyevis GmbH has provided service based on this warranty. This warranty does not affect nor has influence on other legal guarantee claims or other contractual claims of the customer towards the seller of the product. These claims can be made alternatively to the claims referred to in this warranty document. ))Limitations of Liability In cases of slight negligent breaches of duty the liability of the eyevis GmbH is limited to the direct, foreseeable and contract-typical average damage. The slightly negligent breach of minor contractual obligations excludes the liability. As far as the liability of the eyevis GmbH is excluded or limited, this applies also to the personal compensation liability of its staff, employees, associated employees, agents and auxiliary persons. The preceding limitations of liability do not apply to the customer’s claims derived from the Product Liability Act and to claims concerning damages to the body or health or in case of the loss of the life of the customer. User’s Manual EC LED Cube Series 10. 39 Correct Disposal )) Correct Disposal of This Product (Waste Electrical & Electronic Equipment) (Applicable in the European Union and other European countries with separate collection systems) This marking on the product, accessories or literature indicates that the product and its electronic accessories (e.g. charger, headset, USB cable) should not be disposed of with other household waste at the end of their working life. To prevent possible harm to the environment or human health from uncontrolled waste disposal, please separate these items from other types of waste and recycle them responsibly to promote the sustainable reuse of material resources. Household users should contact either the retailer where they purchased this product, or their local government office, for details of where and how they can take these items for environmentally safe recycling. Business users should contact their supplier and check the terms and conditions of the purchase contract. This product and its electronic accessories should not be mixed with other commercial wastes for disposal. 40 11. User’s Manual EC LED Cube Series Additional Support For additional support for eyevis displays products, please contact: SER VICE eyevis GmbH Hundsschleestrasse 23 D-72766 Reutlingen Germany Phone: +49 (0) 7121 / 43303-291 Fax: +49 (0) 7121 / 43303-22 SU PPORT e-mail: [email protected] www: www.eyevis.de As at: September 2009 Copyright © 2009 eyevis GmbH. All Rights reserved. ))eyevis User‘s Manual This manual, as well as the software described in it, is furnished under license and may be used or copied only in accordance with the terms of such license. Except as permitted by this license, no part of this publication may be reproduced, stored in a retrieval system, or transmitted, in any form or by any means, electronic, mechanical, recording, or otherwise, without prior written permission of eyevis GmbH. Please remember that the content of this manual is protected by copyright, even when not distributed together with software not furnished under license. The content of this manual is furnished for information use only, is subject to change without notice, and should not be construed as a commitment by eyevis GmbH. eyevis GmbH resumes no responsibility or liability for any errors or inaccuracies that may appear in this documentation. eyevis, the eyevis Logo and eyecon are either registered trademarks or trademarks of eyevis GmbH Deutschland. All other trademarks are the property of their respective owners.