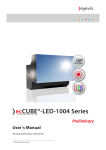
1
) EYE-LCD7000 / 8200 User’s Manual Version 2.0 (Nov/09) 2 EYE-LCD7000 / 8200 EYE-LCD7000 / 8200 3 Contents 1. 1.1 1.2 1.3 1.4 1.5 1.6 1.7 1.8 1.9 SAFETY INSTRUCTIONS General Instructions Power Installation Use Unused for long periods of time Precautions for the remote control batteries Cleaning Storing Notes & Cautions fur Use 2. FEATURES 2.1 Packaging 2.1.1 Way of Packaging 2.2 Dimensions 2.2.1 2.2.2 2.2.3 2.2.4 3. 3.1 3.2 3.3 Mounting holes Linking the Displays Example Video Wall Matrix 3x3 Displays Example Video Wall Matrix 4x4 Displays Connectors & Control Power Cord Connection Input Source Connections The Remote Control 3.3.1 Selecting a Display 3.4 OSD Menu Functions 3.4.1 3.4.2 3.4.3 3.4.4 3.4.5 3.4.6 3.4.7 3.4.8 3.4.9 Source Display Matrix Setup Protect Tools Thermal Information Display Information Infos 5 5 5 6 7 8 8 8 9 9 10 10 10 11 12 13 13 13 14 14 14 15 15 16 16 17 18 19 20 21 22 23 23 4 EYE-LCD7000 / 8200 3.5 GETTING STARTED & MENU FUNCTION 3.5.1 3.5.2 3.5.3 3.5.4 3.5.5 3.5.6 3.5.7 3.5.8 3.5.9 EYE-LCD Control Software Program Area “Preference” Communication Settings Program Area “Setup” Program Area “User” Program Area “Service” Program Area “Status” Program Area “Gamma” Program Area “Reports” 24 24 24 24 25 26 27 28 29 29 4. FIRMWARE UPDATES 4.1 Firmware Update CPU 4.2 Firmware Update Scaler 30 30 32 5. 33 Technical Specification 6. A Guide to simple Problem Solving 6.1 Malfunction or Trouble 34 34 7. 7.1 7.2 7.3 7.4 7.5 7.6 7.7 7.8 Guidelines for the Use of the Displays to avoid undesired effects 35 Introduction 35 Advantages of the EYE-LCD Series over other display technologies 36 The LCD/TFT Technology of the EYE-LCD Series 36 How to minimize the Danger of Image Retention 37 Integrated Security Features of the EYE-LCDM/W Series 38 Re-arranging the display content with eyecon basic wall management software 39 Possibilities with similar display contents 42 Résumé 42 8. Warranty Information 43 9. Correct Disposal 46 10. Additional Support 47 EYE-LCD7000 / 8200 1. SAFETY INSTRUCTIONS 1.1 General Instructions ))Installation and preliminary adjustments should be performed by qualified service personnel or authorized service dealers. )) All warnings on the system parts and in the documentation manual should be adhered to. ))All instructions for operating and use of this equipment must be followed precisely. ))All local installation codes should be adhered to. 1.2 Power ))The power cord must be corrctly connected to a grounded power outlet. If not, this may result in electric shock or personal injury. ))Make sure that the power plug is plugged into the power outlet firmly and correctly. If not, this may result in fire. ))Do not connect multiple appliances to the same power outlet. This may result in fire caused by overheating. ))Never use a use a damaged power cord or plug or a damaged or loose power outlet. This may result in electric shock or fire. ))Do not touch the power plug with wet hands when removing or plugging the plug into the outlet. This may result in electric shock. ))Do not forcefully bend or pull the power plug and do not place any heavy material on it. This may result in fire. ))Do not disconnect the power cord while using the product. This may result in damage to the product due to electric shock. ))When the device is disconnected from the mains, the plug must be pulled out from the mains socket. Therefore the mains plug shall be easily accessible. If, not, this may cause electric shock or fire. ))Do only use the power cord provided by eyevis. Do not use the power cord of another product. Improper power cords may lead to fire or electric shock. 5 6 EYE-LCD7000 / 8200 1.3 Installation ))Do not install the device in areas where humidity is high. If the unit is installed in direct sunlight, closed car or near a stove the cabinet or other parts may distort or be damaged, and electric shock may result. If the unit is installed next to a humidistat, a stove or in a location where there is a large quantity of dust, it may cause a fire or electric shock ))Take measures to prevent the unit from falling down. If not, the unit may fall down and cause injury. ))Do not block the ventilation holes on the unit: The inside of the unit will overheat if the ventilation holes are sealed, which may cause fire. When installing the unit near a wall, keep the unit at least 5-10 cm from the wall. Do not place the unit in a closet or bookshelf where ventilation is poor. Do not spread a newspaper, tablecloth or curtain over the unit. Do not place the unit on an unstable surface, such as a rug, or a cushion, etc. Do not place the unit so that it is facing up or down, or on its side. ))Precautions for moving the unit When moving the unit, be sure to remove the plug from the wall outlet and disconnect wiring cables between equipment and detach any securing anchors. If not, fire or electric shock may result if the power cord is damaged, injury may occur by the unit falling down. When unpacking or carrying the unit, at least two people are needed. Make sure the units are carried upright. Do not carry the unit with the screen facing up or down. Handle the unit so as not to jolt the unit. ))Do not overload outlets or cables beyond their capacity. Do not use extension cords. Electric shock or fire may result ))When installing the unit, use the specified stand. If not, the unit may fall down and cause an injury ))Do not place the unit in locations of high humidity, such as a bathroom or close to a humidifier. This may cause a fire or an electric shock. ))Do not place the unit in an unstable location, such as a shaky table or incline. The unit may fall down and cause injury or damage. Install the unit on a horizontal, stable surface. ))Do not place the unit in a location subject to vibration. The unit may fall down because of the vibration and may cause an injury. ))Insert the power plug fully into a 100 ~ 240 V AC outlet. If you use an outlet other than 100 ~ 240 V AC, it may cause fire or electric shock. Improper insertion of the plug may cause heat and fire. Do not use a damaged power plug or worn outlet. ))Do not place objects on the unit. if metal or liquid (when putting vase, glass or cosmetics) get into the unit, it may cause fire or electric shock. If you put heavy objects on the unit, it may fall down and cause injury. ))When installing the unit, have your dealer arrange for professional installations. If the installation work is not correct, it may cause injury. EYE-LCD7000 / 8200 1.4 7 Use ))Never repair, modify or disassemble the unit by yourself. It may cause a fire or an electric shock because dangerous voltages exist in the unit. Consult your dealer for internal inspection and repairs. ))Follow these precautions for the power cord. Always plug power cord into appliance before plugging into outlet Do not allow anything to rest on the power cord. Do not locate this product where persons will walk over the cord. Do not operate appliance with a damaged cord or if the appliance has been dropped or damaged, until it has been examined by a qualified serviceman Position the cord so that it will not be tripped over, pulled, or contact hot surfaces. ))Follow these precautions for the plug Do not damage, or modify e.g. by extending, or heat (such as by pressing near heating equipment). Do not pull, place heavy objects or pinch. Do not bend, twist or bunch up. Fire or electric shock may result ))Precautions for the extension cord If an extension cord is necessary, a cord with a current rating at least equal to that of the appliance should be used. Cord rated for less amperage than the appliance may overheat. ))Do not insert objects inside the unit. If metallic materials or combustibles such as paper get inside the unit from ventilation holes and other places, it may cause a fire or an electrical shock. ))If there is thunder or lightning, do not touch the unit or the power plug. You may suffer an electric shock. ))Do not pull the power cord when removing the plug from the wall outlet. If the power cord is yanked, the cord may become damaged and fire or electric shock may occur. Always hold the plug firmly when removing it. ))Never spill liquid of any kind on the product. Should any liquid or solid object fall into the cabinet, unplug the set and have it checked by qualified service personnel before resuming operations. ))Never insert or remove the power plug with wet hands. This may cause electric shock. ))Do not climb or stand on the unit. It may drop, fall down, break or cause an injury. ))If the unit will not be used for a long period of time, remove the power plug from the wall outlet for safety. If not, in the case of malfunction, it may cause fire. ))Do not push or jolt the LCD panel The glass of the LCD panel may break and cause injury If the screen glass breaks, crystalline liquid leakage may occur. Do not touch crystalline liquid. If leaked liquid gets into your eyes or comes in contact with your skin, rinse the contacted area with clean water immediately and consult your doctor. Should the leaked liquid come in contact with your clothes, rinse the contacted area with clean water immediately. Should the leaked liquid come in contact with other equipment, clean them without touching the leaked liquid. ))Water drops on LCD surface. Please do not leave LCD module with water drop. When the display surface gets water drop, please 8 EYE-LCD7000 / 8200 wipe it off with cotton swab or soft cloth immediately, otherwise display surface will be deteriorated. If water gets inside the LCD module, circuit may be damaged. ))This product contains chemicals, including lead, known to cause birth defects or other reproductive harm. 33 Wash hands after handling. 1.5 Unused for long periods of time For added protection for this video product during a lightning storm, or when it is left unattended and unused for long periods of time, unplug it from the wall outlet. This will prevent damage to the display due to lightning and AC power-line surges. 1.6 Precautions for the remote control batteries: ))Only use the specified battery type ))Be sure to insert batteries by matching the + and -. ))Do not recharge, heat, disassemble, short or throw batteries into a fire. ))Do not use the batteries beyond their usage period (designated on the batteries), do not leave worn out batteries in the unit. ))Do not mix different types of batteries together. ))Do not mix a new battery with a used one. ))If these precautions are not observed, it may lead to battery leakage or explosion and cause burn and injury. ))If leaked liquid gets into your eyes or gets in touch with your skin, it may hurt your eyes or your skin. If leaked liquid gets into your eyes or mouth or comes in contact with your skin, rinse the contacted area with clean water immediately and consult your doctor. If the leaked liquid comes in contact with your cloth, rinse the contacted area with clean water immediately. If the leaked liquid comes in contact with other equipments, clean them without touching the leaked liquid. 1.7 Cleaning ))If dust has collected on the power plug connectors, remove the plug from the outlet and clean off the dust. 33 This dust may cause a fire due to reduced insulation of the plug. ))Remove the power plug before cleaning. 33 Always unplug appliance from electrical outlet before cleaning and servicing and when not in use. Never yank cord to pull plug from outlet. Grasp plug and pull to disconnect. 33 If not, it may cause electric shock. ))Consult your dealer for internal cleaning once a year. 33 if you allow dust to accumulate on the unit, it may cause fire or malfunction when you operate it. 33 Cleaning is effective especially before the rainy season when humidity is high. 33 Refer to your dealer about the internal cleaning. ))Cabinet cleaning 33 Do not use liquid cleaners or aerosol cleaners. Use a damp cloth for cleaning. EYE-LCD7000 / 8200 9 33 To keep the cabinet looking brand-new, periodically clean it with a soft cloth. Stubborn stains may be removed with a cloth lightly dampened with mild detergent solution. Never use strong solvents, such as thinner or benzene, or abrasive cleaners, since these will damage the cabinet. ))Display surface cleaning. 33 When display surface of LCD module is contaminated, please wipe the surface softly with cotton swab or clean cloth. If the contaminate is not easy to remove, clean cloth with the solvent of 50% alcohol is needed. Please be careful so that 50% alcohol does not get inside the LCD module, because it may be damaged. 1.8 Storing )) Let the appliance cool completely before storing. Remove cord from appliance when storing. 1.9 Notes & Cautions fur Use ))On usage 33 Some parts of the body are hot during operation. Please be careful. 33 In case of moving long-distance, wrap the unit with blanket to avoid damages. Be careful not to bump the unit. 33 Do not spray on the unit volatile liquid like insecticide. Do not expose long time to rubber or vinyl. It will damage the coating. ))On disposal or handing over to a new owner 33 It is recommended to initialize the unit by resetting “PICTURE” and “SETUP” menu. 33 Do not mix with other general waste 33 Do not dispose LCD monitor in waste treated by a waste treatment centre. 33 This unit has a lamp inside which includes mercury. For disposal, please follow regulation of your district. ))Exemptions 33 This display is not liable for any damage caused by natural disaster ( such as earthquake, thunder, etc.), fires, acts by third parties, accidents, owner’s intentional misuse and fault, or uses in other improper conditions. 33 This display is not liable for incidental damages (such as profit loss or interruption in business, modification or erasure of record data, etc.) caused by use or inability to use of this product. 33 This display is not liable for any damage caused by neglect of the instructions described in the owner’s manual. 33 This display is not liable for any damage caused by misuse or malfunction through simultaneous use of this product and the connected equipment of software. 33 This display is not liable for any damage caused by neglect of the instructions described about the installation stand in the owner’s manual. 33 This display is not liable for any damage caused by improper installation. 10 2. EYE-LCD7000 / 8200 FEATURES ))High-resolution wide-screen panel With a resolution of 1920 x 1080 pixels (full HD) and 16.7 Mio colours you can display extremely fine pictures with this TFT LCD display. ))PVA technology TFT LCD panel PVA (Patterned Vertical Alignment) is an alternative version of MVA technology. PVA can offer good black depth and wide viewing angles. The TFT LCD panel offers bright and wide images with colour contrast. Even placed near the window, the unit shows bright and clear images with little reflection. The viewing angles of the monitor are as wide as 176° both horizontally and vertically, enough to enjoy clear images from almost any point of view. ))Input Connection Possibilities 33 RGB 1 ANALOG -> DVI-I (Adapter) 33 RGB 2 ANALOG -> D-Sub 15pin 33 RGB Digital -> DVI-I 33 FBAS Video -> RCA 33 S-Video -> Mini Din 4pin ))Operating temperature: 5°C to 40°C (41°F to 104°F) ))Humidity: max. 90% 2.1 Packaging (Measures and technical values may vary depending on the product version.) ))Box Content EYE-LCD7000 / 8200 33 1 display unit EYE-LCD7000 / 8200 33 1 power cord 33 1 user‘s manual 33 1 eyevis display adjustment software on CD 33 1 remote control (optional) 2.1.1 Way of Packaging The EYE-LCD7000 / 8200 is packed in a carton box. To provide protection during transportation, the EYELCD7000 / 8200 is surrounded with foam. The packaging is secure with banding and fastening clips. ))To unpack 33 1. Release the fastening clips 33 2. Remove the banding 33 3. Take the EYE-LCD7000 / 8200 out of its shipping carton 11 EYE-LCD7000 / 8200 2.2 Dimensions ))Dimensions EYE-LCD7000 (front / bottom view) 882mm 1002mm 1677.7mm 1560mm ))Dimensions EYE-LCD8200 (front / bottom view) 12 EYE-LCD7000 / 8200 2.2.1 Mounting holes ))EYE-LCD7000 30mm 1677.7mm 100mm 970mm 200mm 400mm 800mm 800mm 600mm Connections 600mm 1002mm 300mm M8 Thread 200mm M12 Thread 1886mm 1636.5mm 800mm 30mm M12 Thread ))EYE-LCD8200 1926mm 30mm M8 Thread 200mm 400mm 200mm 800mm 1097mm 800mm 800mm Connections 600mm 200mm 200mm M12 Thread 1886mm 1886mm 800mm 30mm 1137mm 400mm 100mm M12 Thread EYE-LCD7000 / 8200 13 2.2.2 Linking the Displays ))The EYE-LCD7000 / 8200 displays can be used in „tiled“ video wall applications. ))The size of the video wall matrix may range from 1x1 up to 10x10 displays ))Displays within a video wall matrix have to be addressed consecutively from 0 - 99 ))Signal-Daisy-Chain DVI: DVI signals can be daisy-chained through up to 9 displays (depending on the resolution, cabel lengths, cable quality, graphic cards, etc.). For video wall sizes comprising more than 9 displays, the signal hasto be split up (c.f. 2.2.4 Example video wall matrix 4x4). ))No Daisy-Chain for video signals 2.2.3 Example Video Wall Matrix 3x3 Displays ))Direct signal-daisy-chain for DVI signals in a display matrix comprising up to 9 displays. DVI / RGB RS232 1 2 3 4 5 6 7 8 9 2.2.4 Example Video Wall Matrix 4x4 Displays ))In a video wall made up of more than 9 dsiplays, the DVI signal has to be split up into several daisychains, e.g. 2 chains for 4x2 displays each. DVI / RGB DVI Splitter RS232 1 2 3 4 5 6 7 8 9 10 11 12 13 14 15 16 14 EYE-LCD7000 / 8200 3. Connectors & Control 3.1 Power Cord Connection 33 AC power cord connection 33 Use the supplied power cord to connect your LCD panel to the wall outlet. 33 Plug the female power connector into the male connector at the back of the LCD panel 3.2 Input Source Connections 1 2 9 8 10 11 No. 4 3 12 13 14 Name 6 5 15 Remarks 1 Digital/ Analog RGB In 1 DVI-I 2 Analog RGB In 2 HD15 3 Digital RGB Out DVI-I 4 Digital RGB In 2 DVI-I 5 S-Video Mini-DIN 4pol 6 C-Video 1 BNC 7 C-Video 2 BNC 8 Status LEDs 9 NETWORK RJ45 10 AUX 2 RJ45 11 AUX 1 RJ45 12 Keyboard PS/2 13 COM 2 Out D-Sub 9pin 14 COM 1 In D-Sub 9pin 15 DIP Switches 1. Force Address 1 2. -5. DIP switch functions vary depending on firmware 6. Service: Flash Scaler Firmware 16 IR Mini Jack 2.5mm 17 AUX 3 Mini Jack 3.5mm 16 7 17 1. Mains Connection 2. Main Fuse Use only 5A fuse (Cclass) 3. Main Power ON/OFF Switch with integrated 5A fuse (C-Class) 1. Addressing Turn-switches for setting the display address left switch -> 0...90 right switch -> 0...9 Example: display address is 16: left switch -> 1 right switch -> 6 2. Push for Auto Source Scan 3. Standby ON/OFF 1. 2. 3. 1. 2. 3. EYE-LCD7000 / 8200 3.3 15 The Remote Control ))The menu Functions of the OSD Menu can also be accessed with the eyevis Remote Control Unit (RCU), see picture below. ))To use the RCU connect the IR Sensor (see picture on the right) with the IR Input socket of the first LC display of the RS232 daisy-chain in the video wall. 3.3.1 Selecting a Display ))Press the ADDRESS Button (red-marked on the picture on the left) on the RCU ))The address window appears on the Displays ))Set the address of the display with the numeric keys 0-9 of the remote unit and press SELECT. ))Now you have control over the selected Display. With MENU you can activate or deactivate the menu of the display. Use the EXIT option in tge OSD to deactivate the OSD Menu ))With the number buttons 1-9 you can directly select the input source (1 - Analog RGB 1 / 2 - ANalog RGB 2 / 3 - Digital RGB 1 / 4 - Digital RGB 2 / 5 - Composite Video 1 / 6 - Composite Video 2 / 7 - Component Video RGB / 8 - Componenent Video YUV / 9 - S-Video) ))Use the arrow buttons (►/▼/◄/▲) to navigate in the menu. ))Press the checkmark button () to select a menu item. ))Use left and right arrow buttons (◄/►) to increase or decrese values. Push once for numeric steps, hold button down for larger steps. 16 3.4 EYE-LCD7000 / 8200 OSD Menu Functions Access the OSD Menu with the included software or with the Menu button on the remote control unit. Note: Illustrated values may differ from your displayed OSD menu settings, depending on the firmware version and connected signal sources Do not forget to enter the “Memory” section of the menu and to select “Save_Exit”, if you want to save your changes for future startups. 3.4.1 Source Main / Source Input Auto_Scan Brightness_Data Contrast_Data Return Main menu Functions Source Input Auto_Scan Brightness_Data Contrast_Data Return Adjustment function / value / range RGB-1 RGB-2 DVI-1 DVI-2 V1 V2 YC Return On Off Return 0 - 255 0 - 255 Description Select input signal of the multi input board Activate/Deactivate automatic scanning for input signals Set brightness value of the input signal Set contrast value of the input signal Return to previous menu EYE-LCD7000 / 8200 3.4.2 Display Main / Display Backlight 83 Scaling 1 Adv_Scale_H-Size 768 Adv_Scale_H-Lin 4095 Adv_Scale_H-Offset 800 Adv_Scale_V-Size 472 Adv_Scale_V-Lin 4095 Adv_Scale_V-Offset 600 Return << 0 // 768 // 5000 >> Main menu Functions Display Backlight Scaling Adv_Scale_H-Size Adv_Scale_H-Lin Adv_Scale_H-Offset Adv_Scale_V-Size Adv_Scale_V-Lin Adv_Scale_V-Offset Return Adjustment function / value / range 0 - 255 1:1 Fill-All Fill-Ratio User Return 0 - 5000 0 - 5000 0 - 5000 0 - 5000 0 - 5000 0 - 5000 Description Activate/Deactivate LCD panel backlight Set scaling mode for the input signal source Advanced scaling horizontal size Advanced scaling horizontal linearity Advanced scaling horizontal offset Advanced scaling vertical size dvanced scaling vertical linearity Advanced scaling vertical offset Return to previous menu 17 18 EYE-LCD7000 / 8200 3.4.3 Matrix Main / Matrix Matrix-Function 1 M_Size_X 3 M_Size_Y 3 M_Pos_X 1 M_Pos_Y 1 M_Scaling 1 M_Frame_X 0 M_Frame_Y 0 M_Execute 0 Return M_Frame_X Adjustment function / value / range On Off Return 1 - 10 1 - 10 1 - 10 1 - 10 1:1 Fill-All Fill_Ratio Return 0 - 300 M_Frame_Y 0 - 300 M_Execute Execute Return Main menu Functions Matrix Matrix-Function M_Size_X M_Size_Y M_Pos_X M_Pos_Y M_Scaling Return Description Switch matrix function ON / OFF Set horizontal matrix size Set vertical matrix size Set horizontal matrix postion of the selected display Set vertical matrix postion of the selected display Set scaling options of the image content for the matrix Adjust horizontal size of the bezel elimination according to your display Adjust vertical size of the bezel elimination according to your display Select „Execute“ to confirm your settings! Return to previous menu EYE-LCD7000 / 8200 19 3.4.4 Setup Main / Setup Color_Temp_Select 1 Red_C_Temp 128 Green_C_Temp 128 Blue_C_Temp 128 Framelock_RGB 1 Return 1 << 0 // 128 // 255 >> Red_C_Temp Adjustment function / value / range 9300 7300 5000 User Return 0 - 255 Green_C_Temp 0 - 255 Blue_C_Temp 0 - 255 Framelock_RGB Off On Return Main menu Functions Setup Color_Temp_Select Return Description Set colour temperature, choose from predefined values (select „User“ to enable manual settings) Set colour temperature for „red“ (only available if Color_Temp_ Select is set to user) Set colour temperature for „green“ (only available if Color_ Temp_Select is set to user) Set colour temperature for „blue“ (only available if Color_Temp_ Select is set to user) Activate framelock for RGB input signals Return to previous menu 20 EYE-LCD7000 / 8200 3.4.5 Protect Main / Protect Fan1_Status 1 Fan2_Status 1 Fan_Control 1 Fan_Out 28 Fan_In 28 Screensaver 0 S_Saver_Speed 15 S_Saver_Intensity 10 Return Main menu Functions Protect Fan1_Status Fan2_Status Fan_Control Fan_Out Fan_In Screensaver S_Saver_Speed S_Saver_Intensity Return Adjustment function / value / range 1 (On) / 0 (Off ) 1 (On) / 0 (Off ) Manual Auto Return 24 - 63 24 - 63 Off On Return 0 - 200 0 - 200 Description Shows operation or failure of the fans Set control options for fans Set speed of fans (only available when „Fan_Control is set to „Manual“) De-/Activate screen saver Set speed of the screen saver lin Set opacity of the screen saver lin Return to previous menu EYE-LCD7000 / 8200 21 3.4.6 Tools Main / Tools Auto_Adjust 0 Pattern_Off 0 Pattern 6 Factory_Reset 0 RGB_Mode 3 Return Main menu Functions Tools Auto_Adjust Pattern Factory_Reset RGB_Mode Return Adjustment function / value / range Scan Now! Return Off 1 (colour gradient) 2 (white frame) 3 (red frame) 4 (green frame) 5 (blue frame) 6 (grid) Return Execute Return Auto Mode1 Mode2 Manual Return Description Activate automatic adjustment of the device Show predefined patterns on the display. Select „off“ to show no pattern. Set all values back to factory settings Return to previous menu 22 EYE-LCD7000 / 8200 3.4.7 Thermal Information Main / Thermal_Info CPU_Temperature 31 Board_Temperature 33 Sensor1_Temperature 33 Sensor2_Temperature 31 Sensor3_Temperature 33 Sensor4_Temperature 31 Return Main menu Functions Thermal_Info CPU_Temperature Board_Temperature Sensor1_Temperature Sensor2_Temperature Sensor3_Temperature Sensor4_Temperature Return Adjustment function / value / range °C °C °C °C °C °C Description Temperature of the CPU in °C Temperature of the DBPVM Board in °C Temperature of Sensor 1 in °C Temperature of Sensor 2 in °C Temperature of Sensor 3 in °C Temperature of Sensor 4 in °C EYE-LCD7000 / 8200 23 3.4.8 Display Information Main / Display_Info Database_Version 200 LCD_Panel 100 FW_CPU 20010 HW_CPU 210 HW_DBPVM 211 Power_Time 132 Backlight_Time 79 Input_Mode 60 H_Resolution 800 V_Resolution 600 Return Main menu Functions Display_Info Database_Version LCD_Panel FW_CPU HW_CPU HW_DBPVM Power_Time Backlight_Time Input_Mode H_Resolution V_Resolution Return Adjustment function / Description value / range Version ID of the data base Version ID of the LCD panel Firmware version of the CPU Hardware versionn of the CPU Hardware version of the DBPVM Board (board for data base and fans) Operating hours of the device Operating hours of the backlight of the device Code number of the input mode (necessary for service issues) Horizontal resolution of the input signal Vertical resolution of the input signal Return to previous menu 3.4.9 Infos Main / Memory Save_Exit Return Main menu Functions Memory Save_Exit Return Adjustment function / Description value / range Select „Save_Exit“ to save your settings and write them to the data base! Return to previous menu 24 3.5 EYE-LCD7000 / 8200 GETTING STARTED & MENU FUNCTION 3.5.1 EYE-LCD Control Software ))Open the “EyeCube Software” to start the program for the configuration of your display wall ))Enter your password 3.5.2 Program Area “Preference” Example: COM-Port Connection (loopthrough signal) 1 3 COM 1 2 4 Control PC In the upper part of the window the display-wall is shown visually. A single display can be selected with the mouse to work with it. When a display is selected, the adjustments, can be read by the button “Read current”. Caution: When the display is in Power Up – or Power Down Sequence it is not possible to communicate with the software. In this case an error will be reported. The button “Read default” reads the default values of the display. So it is always possible to return to the adjustments of the manufacturer, if the values have been misadjusted too much. The current data of the display is saved with the button “Write”. With “Load” they can be called up again. 3.5.3 Communication Settings Set the COM-Port to which the display wall is connected in the entry field “Serial Port”. The option button “Use local area network” is currently not available. ))Colour analyser option Communication Port determines the serial port to which the analyser is connected to. The other adjustment options depend on the used colour analyser. Here the operating instructions of the devices have to be observed. ))Pattern generator So that gccEyecube is able to create a connection to gccPattern the IP address or the name of the computer must be fed into the network here. If the network has no DNS service the IP address has to be fed here. EYE-LCD7000 / 8200 25 3.5.4 Program Area “Setup” ))Security Setting 33 Enter the required passwords ))Matrix 33 Matrix-Function: Switch matrix function ON / OFF 33 M_Size_X / M_Size_Y: Set horizontal and vertical size of your display matrix (in number of displays) 33 M_Pos_X / M_Pos_Y: Set horizontal and vertical matrix postion of the selected display 33 M_Frame_X / M_Frame_Y: Adjust horizontal/vertical size of the bezel elimination according to your display 33 M_Scaling: Set scaling options of the image content for the matrix (1:1 / Fill-All/Fill-Ratio) 33 M_Execute: Press „Send“ to confirm your settings! ))Setup 33 Color_Temp_Select: Set colour temperature, choose from predefined values (9300/7300/5000/User) 33 Red_C_Temp: Set colour temperature for „red“ (only available if Color_Temp_Select is set to user) 33 Green_C_Temp: Set colour temperature for „green“ (only available if Color_Temp_Select is set to user) 33 Blue_C_Temp: Set colour temperature for „blue“ (only available if Color_Temp_Select is set to user) 33 Framelock_RGB: Activate framelock for RGB input signals 33 Framelock_Video: Activate framelock for Video input signals 26 EYE-LCD7000 / 8200 3.5.5 Program Area “User” ))Source: 33 Input: Select input signal of the multi input board (RGB-1, RGB-2, DVI-1, DVI-2, V1, V2, YC, Return) 33 Scan Source: Scan for available sources 33 Auto Scan: Activate/Deactivate automatic scanning for input signals (on / off ) 33 Backlight: Activate/Deactivate LCD panel backlight (on / off ) 33 Brightness Data: Set brightness value of the input signal (Range 0 - 255) 33 Contrast Data: Set contrast value of the input signal (Range 0 - 255) 33 Scaling: Set scaling mode for the input signal source (1:1 / Fill-All / Fill-Ratio / User) 33 Auto Adjust: Adjust source automatically 33 Adv Scale H Size: Advanced scaling horizontal size (0 - 5000, only availabe if scaling is set to user) 33 Adv Scale H Lin: Advanced scaling horizontal linearity (0 - 5000, only availabe if scaling is set to user) 33 Adv Scale H Offset: Advanced scaling horizontal offset (0 - 5000, only availabe if scaling is set to user) 33 Adv Scale V Size: Advanced scaling vertical size (0 - 5000, only availabe if scaling is set to user) 33 Adv Scale V Lin: Advanced scaling vertical linearity (0 - 5000, only availabe if scaling is set to user) 33 Adv Scale V Offset: Advanced scaling vertical offset (0 - 5000, only availabe if scaling is set to user) ))Power Control 33 Power: Activate/Deactivate check box to switch the display on/off EYE-LCD7000 / 8200 3.5.6 Program Area “Service” ))Advanced Command 33 At program startup: Action to be performed at program startup (do nothing, read default values, read current values, read a file) 33 Field by Field scanning: Do not use accelerated protocol (tic checkbox to disable). 33 Max. number of fields: Depends on the eprom size. 33 Use error dialog: Report communication errors as dialog boxes (tic checkbox to disable). 33 Wait for acknoledgement: Acknoledge each command (tic checkbox to enable). 33 Stop on any error: Stop commnunication on any error (tic checkbox to disable). 33 Command delay: Delay between eych command to be sent (set value) 33 Support READ ALL: Support the READ ALL protocol (tic checkbox to disable). 33 Manage ordering: Manage the field ordering into the files (tic checkbox to disable). ))Security Setting 33 User password: Enter your user password, no authorisation if blank. 33 Admin password: Enter your administrator password, no authorisation if blank. 27 28 EYE-LCD7000 / 8200 3.5.7 Program Area “Status” ))Display panel 33 Database Version: Shows the version ID of the database 33 LCD Panel: Shows the version ID of the LCD panel 33 FW CPU: Firmware version of the CPU 33 HW CPU: Hardware versionn of the CPU 33 HW DBPVM: Hardware version of the DBPVM Board (board for data base and fans) ))Display info 33 Power Time: Operating hours of the device 33 Backlight Time: Operating hours of the backlight of the device 33 Input Mode: Code number of the input mode (necessary for service issues) 33 H Resolution: Horizontal resolution of the input signal 33 V Resolution: Vertical resolution of the input signal ))Thermal Info 33 CPU Temperature: Temperature of the CPU in °C 33 Board Temperature: Temperature of the DBPVM Board in °C 33 Sensor 1 Temperature: Temperature of Sensor 1 in °C 33 Sensor 2 Temperature: Temperature of Sensor 2 in °C 33 Sensor 3 Temperature: Temperature of Sensor 3 in °C 33 Sensor 4 Temperature: Temperature of Sensor 4 in °C 33 Fan 1 Status: Fan 1 status (1 indicatea active / 0 indicates inactive) 33 Fan 2 Status: Fan 2 status (1 indicatea active / 0 indicates inactive) EYE-LCD7000 / 8200 29 3.5.8 Program Area “Gamma” ))The manual correction of the gamma-curve is currently not available. This program area will be available with future display versions. 3.5.9 Program Area “Reports” All status reports of the Software are collected here. Diverse services are observed. Commands can be sent directly from the input box to the display “Send”). Complete data files with commanding sequences can be sent to the display (“File”). 30 EYE-LCD7000 / 8200 4. FIRMWARE UPDATES 4.1 Firmware Update CPU ))Switch off the LCD Display. ))Create a direct serial connection with a cable between the display and a COM port of your PC. ))Open the eyeBootLoader software ))The window shown below appears. ))Select the COM port you use in the “Setup Menu” and press “OK”. EYE-LCD7000 / 8200 ))Open the drop-down menu and select the according hardware. ))Choose the firmware version you want to install. ))Switch the LCD on and the firmware update starts. ))You can see the progress in the status bar. ))Wait till the update is finished. ))Close the software and restart the Display. 31 32 EYE-LCD7000 / 8200 EYE-LCD 4.2 Firmware Update Scaler ))Create a cable connection between the display you want to update and your control PC connection as illustrated in the picture on the right. USe a regular COM cable for the connection between the COM 1 port of the control PC and the COM 1 port of the LCD display. ))Use the cable shown in the picture below for the connection between the “AUX 1” port of the display and port “COM 2” of the control PC. ))Set DIP Switch No. 6 “ON” ))Start the eyecube software version 3.4.x.x or higher 33 Open menu tab “Preference” 33 Set “COM 1” in the Communication Settings ))Start the “Flash Upgrader” software 33 Select COM port “COM 2” 33 Select “Flash” ))Open the “Setup” menu tab in the eyeCube Software 33 Press the “LCD Reset” button 33 The Flash-Upgrader starts (see status bar in the software window) ))Put DIP switch 6 back to “OFF” when finished. AUX 1 COM1 IN M CO 2 M CO 1 Control PC EYE-LCD7000 / 8200 5. 33 Technical Specification LCD Panel Technology Max. Image Resolution EYE-LCD7000 EYE-LCD8200 S-PVA LCD 1,920 x 1,080 (full HD) Display Features Colours Aspect Ratio Viewing Angle H/V Response Time 1Contrast Ratio Brightness Connectors & Control Inputs: 16.7 Millionen (8bits-true) 16:9 178° / 178° 8 ms (Grey-to-Grey) 1500:1 1200:1 600 cd/m (Typical) 2 Power Supply 100-250V 50/60Hz 2 x DVI IN (DVI) 2 x RGB IN (HD15 + DVI) 2 x Composite Video (BNC) 1 x S-Video (Mini-DIN 4pol) 2 x AUX (RJ45 / Mini Jack 3.5 mm) 1 x IR (Mini Jack 2.5 mm) 1 x PS/2 (Keyboard) Outputs: 1 x DVI-D Control IR Remote Control, buttons on device, software control via RS232 Power Supply Input Voltage Power Consumption 100-120 V / 220-240 V; Integrated Mains Adapter 700 Watt (max. 1000 Watt) 950 Watt (max. 1400 Watt) Environmental Temperature Humidity 0-40°C (<50%RH) 20-80%RH (T<40°C) More Screen Diagonal Screen Area Dimensions (WxHxD) Weight 177.8 cm (70”) 1560 x 882 mm 1677.7 x 1002 x 150 mm 95 kg 208.3 cm (80“) 1808 x 1019 mm 1926 x 1137 x 150 mm 110 kg 34 6. EYE-LCD7000 / 8200 A Guide to simple Problem Solving Before calling service personnel, please check the following chart for a possible cause to the trouble you are experiencing. Symptom ))No picture Check these things 33Make sure the power cord is plugged in 33Maybe the power is OFF or Standby 33Check whether the auxiliary equipment is connected properly 33Check if the input setting is correct ))The remote control does not operate 33Signal may not be suitable 33Make sure the batteries are inserted matching the + and - marks of the battery compartment 33The batteries may be exhausted ))The picture colour is pale, or not clear 33Use the remote control aiming at the remote control sensor 33Check the picture quality adjustment 33If you are using YUV terminals, make sure cables are connected correctly 6.1 Malfunction or Trouble ))If smoke or peculiar smells comes from the unit, remove the power plug from the outlet immediately. 33 If the unit is still used in this condition, it may cause a fire or an electric shock. 33 Make sure that the smoke or smell has stopped, then contact your dealer for inspection. ))If there is no picture or sound, remove the power plug from the outlet immediately. 33 If the unit is still used in this condition, it may cause a fire or an electric shock. 33 Contact your dealer for inspection. ))If water is spilled or objects are dropped inside the unit, remove the power plug from the outlet immediately. 33 If the unit is still used in this condition, it may cause a fire or an electric shock 33 Contact your dealer for inspection. ))If the unit is dropped or the cabinet is damaged, remove the power plug from the outlet immediately. 33 If the unit is still used in this condition, it may cause a fire or an electric shock. 33 Contact your dealer for inspection. ))To turn off the power of the unit, unplug the unit from the mains connection. 33 The power standby/on indicator goes out and you cannot turn the unit on/off by using the POWER button on the remote control. 33 To disconnect the unit completely from the power supply, remove the power plug from the outlet. ))If the power cord or plug is damaged or becomes hot, turn off the main power switch of the unit, make sure the power plug has cooled and remove the power plug from the outlet. 33 If the unit is still used in this condition, it may cause a fire or an electric shock. Contact your dealer for replacement. EYE-LCD7000 / 8200 7. 35 Guidelines for the Use of the Displays to avoid undesired effects 7.1 Introduction 7.2 Advantages of the EYE-LCD Series 7.3 The LCD/TFT Technology of the EYE-LCD Series 7.4. How to minimize the Danger of Image Retention 7.5 Integrated Security Functions 7.6 Re-arranging the display content using eyecon basic software 7.79 Possibilities with similar display contents 7.8 Résumé 7.1 Introduction Thanks to their flexible possibilities of usage, their minor space requirement and their reliable display performance the displays of the EYE-LCD Series have become more and more popular for a wide range of applications. Whether you wish to display video or computer signals - any kind of data can be shown on our TFT LCD screens - highly reliable and in perfect image quality. The displays have been especially designed for the sophisticated use in professional long-time applications. All included technologies, components and functions were chosen for their durability for continuous operation and capability to create best display performance. Even so we have tried our best to provide a perfect display using latest technology and high-end components, it is possible that certain circumstances, especially inappropriate usage of the display, may cause sustainable damage to the image quality of the display. The panels contained in LCD displays (Liquid Crystal Display) may cause so-called “memory effects” (or “ghost images”) if static images are displayed for longer periods. This phenomenon occurs quicker on bigger LCD monitors (>30”). On smaller LCD monitors it needs more time to occur. As far as we know today, it is not possible that the image gets “burnt-in”, but there are hardly any long-term experiences with this problem. What can be said is that there is the possibility of “memory- effects” if the displays are switched on for longer periods showing the same static image. These memory-effects look similar to “burnt-in” images on traditional CRT’s. The longer and LCD cell is stimulated mode without a pause, the slower it gets when the stimulating currency is taken away (-> “memory-effect”). The LCD cell does not return completely to its stand-by mode and therefore still lets pass some of the incoming light which leads to these ghosting images. Unlike real burnt-in images on CRT screens these ghost images on LCD screens disappear when the display is switched off for a while. The ideal solutions would be to switch the screen of for the same time as it has been operated with the static image. In fact the ghost image will disappear after this procedure, but the more often such memory effects occur the shorter gets the time until they appear again. If you think about the monitors on your desk, even if they are smaller, a screen saver is used and this is to avoid the memory effect. This brochure contains several tips and tricks that help you to avoid this memory-effect. These advices do not guarantee that there will never be any memory-effects on your display. These unwanted effects that may happen to the displays are not a specific problem of the EYE-LCD Series. The problem is caused by the LCD/TFT technology itself and therefore applies to the products of all LCD producers. As noted in all our offers, memory effects are not covered by any granted warranties. Memory effects are not considered as defects or faults in terms of our warranty conditions, even not if you have strictly adhered to the instruction given in this brochure. This is today’s state of art. As far as we know there is no provider of LCD display panels who can guarantee that no memory effects occur with these panels when static images are displayed. 36 EYE-LCD7000 / 8200 7.2 Advantages of the EYE-LCD Series over other display technologies 33 No “Burn-in”-effects as with plasma displays 33 Less power consumption 33 Perfect colour, brightness and contrast characteristics even in difficult light conditions 33 Reduced image reflections 33 Little weight 33 Longer life-time ))The LCD/TFT-technology used for the EYE-LCD Series offers all possibilities to reduce the danger of Image Retention effects. 7.3 )) Differences TFT/LCD vs. Plasma All displays from the EYE-LCD Series are based on the LCD/TFT technology (“Liquid Crystal Display“/ “Thin Film Transistor“). Unlike plasma displays that bear the risk of irreversible “burn-in”-effects, it is almost impossible that similar effects happen to LCDs. But it is possible that temporary “ghost images” can be seen on a LCD when static image content is represented for longer periods. This effect is called “Temporary Image Retention” (TIR) or in its worst version “Image Sticking“. To get a comprehensive understanding of the “image retention” effect it helps to have a closer look on the LCD/TFT technology. The LCD/TFT Technology of the EYE-LCD Series: The light for the LCD/TFT technology used for the displays from eyevis comes from several small fluorescent tubes. These tubes are placed behind several different filter layers and a polarisation filter. In colour LCDs each individual pixel is divided into three cells, or sub-pixels, which are coloured red, green, and blue, respectively, by additional filters (pigment filters, dye filters and metal oxide filters). Each sub-pixel can be controlled independently to yield thousands or millions of possible colours for each pixel. If voltage is connected to a pixel, its polarisation gets changed. This changes the light-flow and the pixel on the screen gets its colour. To achieve a harmonic brightness over the entire screen area it is important to provide a balanced distribution of the light from the tubes. Then again, the light is transmitted through the back polarisation filter which is passable in only one direction. Single sub-pixels can be activated or deactivated by connecting a small voltage to the thin film transistor (= TFT ) of each of these sub-pixels. This small voltage turns the liquid crystals. This allows transmitting varying amounts of light through the colour filters and the front polarisation filter. Sub-pixels typically distinguish 6- or 8-Bit grey levels between completely off and on. If the sub-pixel TFT is not activated no light will pass the front polarisation filter which has a 90° turned phase compared to the back polarisation filter. In contrast to the irreversible “burn-in”-effects with static images on plasma screens, LCD/TFT screens are only affected by temporary image disturbances when they are used in the same way. This temporary image retention can be eliminated by following the advice given below. The image retention-effect is caused by a persistence of the displayed image. This persistence is caused by minimal electric rest voltage inside the LCD module. Hence the previously displayed image remains visible on the next image. As already mentioned, this image retention-effect is reversible. The best advice we can give you is probably not to let this effect occur to your display at all. This leaflet gives you the relevant information you need to avoid the appearance of image retention on your LCD/TFT display. EYE-LCD7000 / 8200 7.4 37 How to minimize the Danger of Image Retention ))Reduce Ambient Temperature The ambient temperature and therefore the temperature inside the LCD display plays a decisive role for the appearance of image retention. The risk of image retention increases the higher the surrounding temperature is. If possible, the ambient temperature should not exceed 35°C. It is also possible to ensure that the ventilation slots of the display are not covered or full of dust. ))Reduce the Display Brightness by 50 % Most applications do not require the highest brightness of the displays. The displays can be used with half of the brightness in the same efficient way and do still provide perfect visibility of their content. Half of the brightness of our LCDs is still more than what you can expect from a plasma screen. In addition to that, the reduced brightness enlarges the life-time of the display, saves a lot of energy and allows later readjustments of the brightness level. full brightness half brightness ))Stand-by-Mode and Switching Off the Device If the display is not in operation it should always be switched to stand-by mode, or even better, completely switched off. Operating the device even without images displayed shortens the life-time of the display and is an unnecessary waste of energy. Switching off the display or turning it to Stand-by-mode for about six to eight hours per day enlarges the life-time of the product decisively and reduces the risk of image retention. ))Power Off, Screen Saver, or Power Save Mode 33 Turn the power off for 4 hours after 20 hours in use 33 Turn the power off for 2 hours after 12 hours in use 33 Set the Monitor to power off with the PC Display Properties Power Scheme. 33 Use a Screen saver if possible - Screen saver in one color or a moving image is recommended. ))Screen Saver for Static Images Certain fields of application depend on the display of static image contents. If possible you should activate a screen saver on the computer for these signals if they do not have to be surveyed as long as they do not change their content. ))Scaling of the Input Signals Since they might also cause image retention you should avoid black image borders on the display. Signals that do not have the same native aspect ratio as the display should always be scaled up to use the entire screen area. This guarantees that the entire display surface is used and no black borders can occur. For example, a 4:3 image signal should be scaled up to 16:9 format to fill the complete screen. To avoid image retention the displayed contents/ signals should be changed in size and position from time to time. 38 7.5 EYE-LCD7000 / 8200 Integrated Security Features of the EYE-LCDM/W Series ))PSS (Panel-Security-System): The displays provide a range of security functions for long-term operation to avoid so called “image sticking“-effects (e.g. “Line Move” and the “Power Save Regeneration”). The PSS functions enable time-scheduled and automatic inversion of the colours of the input signal. ))PSC (Panel-Self-Control): Includes functions like panel dimming, automatic adjustment of temperature and ventilation and emergency cut-out to protect the equipment. ))Displaying static images What certainly applies to all types of LCD displays is the fact that the more dynamic the image content the lower is the risk of memory effects. A moving image would be ideal. Displays that are used for the representation of moving images do not need special protection measures against memory effects. Moving images means a movement of the complete display content not only movement of the displayed content in a certain area of the display. If you want to or if you have to display static images we advise to re-arrange the display content several times per day. When re-arranging the images, please keep in mind to change the images with images that do not have similar content. For example, if you have two displays showing a map of Germany with different items of information on them, it makes no sense to interchange these two maps on the displays, since the both images have a congruent background using the same pixels. A memory effect will occur rather soon with these images. ))Removing “Image Retention“-Effects If image retention has caused ghost images on your display the fastest way to transfer the electric rest voltage from the LCD modules to the liquid crystal solution is to represent a screen-filling completely black or white image on the display. It is also possible to transfer the voltage back to the liquid crystal solution by switching the device off. In many cases image retention effects are only visible if the background image has a low brightness level. The visibility of a luminescent image or a shadow can be reduced by choosing a brighter background. The use of complementary colours does also reduce the risk of image retention and should be applied as often as possible. ))Image Sticking Image Sticking is the resistant form of image retention. If shadow images or luminescent images are not removed for longer periods the electric voltage accumulates as ionic clusters inside the LCD modules. This kind of effect that is most likely to happen at image borders with a high contrast, as between white and black areas, is irreversible. Therefore it is very important to follow the advice given to avoid image retention, so image sticking can not occur at all. ))Avoid prolonged presentation of static pictures The best way to avoid image sticking is to prevent the prolonged presentation of static images on the screen. Try not to display the same static image on a LCD panel for more then 2 hours when working at normal ambient temperature. However, some manufactures recommend reducing this to as little as 30 minutes when working in an elevated temperature environment (above 95 deg. Fahrenheit or 35 deg. Celsius). Make use of a dynamically changing screen saver and adjust its settings accordingly. Some applications do realize that prolonged presentation of those vertical or horizontal grey or black bars, say when viewing 4:3 program content over a wide-screen LCD panel, is also a form of semi-static image. These should be avoided by choosing an aspect ratio or zoom setting that expands the image to fill the entire screen. Similarly, try not to freeze a picture on your LCD for too long, nor allow station logos, program menus, etc., to remain still on the screen for an extended period. If for some reason, you need to pause a film or any other video frame, it is better to turn off your LCD. Finally you should always power down the display panel during periods of inactivity. EYE-LCD7000 / 8200 7.6 39 Re-arranging the display content with eyecon basic wall management software The use of the eyecon wall management software makes the re-arrangement of the display content very easy. All necessary settings can be done in the operating software “eyecon Admin“. Please start the software (standard => c:\eyevis\eyecon\gccAdmin.exe) and register with a user login that has the following authorisations: ))Access to the according wall ))Access to the resources that are displayed on the wall ))Authorised to create presets ))Authorised to use the scheduler The following screen shots show an exemplary configuration. ))On your wall you have a certain arrangement of the displayed signals: 40 EYE-LCD7000 / 8200 ))This arrangement normally is saved as a preset. If not, please save your arrangement giving it a name of your choice. Please remind the “Clean Option” and the “Play Option” when virtual walls or several real walls are connected to one graphic controller. Now you can re-arrange your sources. Remind not to interchange sources that have almost the same image content. ))This creates a new arrangement on the video wall. EYE-LCD7000 / 8200 ))Save this new arrangement giving it a different name. You can even save it to another group. Now select the “Clean Option“ “Clean partial hidden“ and the “Play option“ “Add“. Now open the integrated scheduler: Here you can define that the preset is changed every six hours, for example. 41 42 EYE-LCD7000 / 8200 ))To do so, fill in the various fields as described below: 33 “Day of week” > choose a day 33 “Hour” > the starting time, depending on your schedule 33 Select "Repeat each day" and take care that the check boxes “Exclude Saturday" and “Exclude Sunday” are inactive. 33 Select “Play a wall preset” from the menu “Event Type" and choose the preset from the list you want to use. With the button “Add event to the list” the entry is created for every day automatically. Of course, you can define the time for the start of the preset independently for each day. Perform the preceding steps for the other daytimes accordingly. 7.7 Possibilities with similar display contents Even if the display content is similar (e.g. maps showing different information on the same country) it is possible to change the content. Please proceed as described in chapter 3.1, but do not change the entire image content, but only the size of the representation of the image. Reduce the size of the representation by e.g. 20 % on every screen and save this setting as a new preset. This shifts the static borders of the image content and therefore reduces the risk of memory effects on your display. 7.8 Résumé Unlike permanent burn-in in phosphor-based displays, which is the result of a premature aging of the phosphors of individual pixels, and thus, is irreversible, image sticking in LCD panels can often be reversed to a point of total invisibility. However, the extent to which image sticking can be reversed depends on the severity of the causes that eventually led to image retention; top in the list is the environmental temperature at which image sticking took place. A way to remove a retained image on an LCD panel is to run an all-white screen saver for several hours. It would generally help if this image sticking reversal operation were run at an elevated temperature of around 100° Fahrenheit or 40° Celsius. This should help speed up the reversal process. Another way could be turning off the LCD display for a longer period than the time it took for the static image to cause image retention. As on a desktop monitor it is also possible to use a screen saver. Please remember the bigger the size of an LCD monitor, the bigger is the danger for image retention, image sticking or memory effect. If you don’t use the eyecon software, please consider the other described ways to prevent from image sticking. ))Please remember, image sticking, image retention or memory effects are not covered with your product warranty. ))IMPORTANT! Image Retention is not a sustainable damage of your LCD display. The “image retention“-effect can not be compared with the “burn-in“ effect that can happen with static image contents on plasma displays. Image retention does also take much longer to occur than the “burn-in“-effect. Image retention does not affect the length of the life-time of your display. The risk of image retention can be reduced to a minimum by adhering to the given advice. EYE-LCD7000 / 8200 8. 43 Warranty Information ))Duration of Guarantee and Area of Validity The specified product is guaranteed for twenty-four (24) months, beginning from the date of delivery by the Eyevis GmbH. Guarantee services within the duration of guarantee do not extend the duration of guarantee. This guarantee applies to products that were purchased in the European Union. Guarantee services can only be claimed in these countries. The bill of sale or receipted invoice (original invoice with serial number) of the first purchaser must be presented as proof of purchase to obtain warranty service. If the customer cannot provide this evidence of purchase the period of guarantee is calculated from the date of purchase by the specialist supplier (first seller) plus one (1) month. ))Guaranteeing If the product shows any faults or defects during the warranty duration, eyevis GmbH provides the following services from which the customer can choose: ))Equipment Exchange Bring-in warranty. The defective equipment is sent or brought to Eyevis by the customer and replaced by an equivalent product, if the product brought can not be repaired within 14 days. Any costs of a return delivery of the exchange equipment, are borne by the customer. ))Repair and Return The defective product is sent to eyevis by the customer and is repaired within 14 days. In this case eyevis bears the costs for eventually required components or the arising working time, as well as for the costs for the reshipment to the customer. ))Warranty Exclusions 1.) This warranty covers only malfunction due to any defect in material and/or workmanship of a product put into circulation by the eyevis GmbH. Guaranteeing is therefore excluded for any faults and defects beyond the responsibility of the eyevis GmbH, particularly in cases of: 33 Improper use, mechanical damages (e.g. marks caused by scratching, pressure or breaking), improper storing or cleaning, transport damages, misuse or any other reason the customer or a third is to blame for, especially if the instructions contained in the manual are not adhered to; 33 Display damages caused by the permanent representation of static images (or partially static images). 33 Image Sticking (Memory) Effects: Static images* may lead to “Image Sticking”. “Image Sticking” caused by the representation of static image contents for a longer period is not covered by this warranty. Image Sticking depends on the kind and the contrast of the displayed image. Follow the instructions for operation below to reduce, respectively to prevent “Image Sticking“ with static images: - do not exceed the maximum operation time of the panel (20 hours) - dim the backlight - change the image content regularly 44 EYE-LCD7000 / 8200 *static images: - Frames of program windows - Freeze images - Video cameras without rotating mechanism - Superimposed logos / texts If an image sticking-effect has already occurred, it can be altered by displaying the inverted video signal fort he same duration. Image sticking caused by the display of static images is not covered under this warranty. 33 Failures or fluctuations of the electric power supply or the electric circuit, the air-conditioning or other environmental conditions. 33 Abnormal operating conditions, including operation in smoky (from cigarettes etc.) and dusty areas. 33 Force majeure, fire, flooding, chemical or biological influence, acts of war, and acts of violence or similar occasions. 33 Any kinds of defects and faults of accessories and components (even if they were delivered by the eyevis GmbH) that are not part of the product covered by this warranty. 33 Attempts to adjust, change, install the product or to perform service works on the product by a person that is not authorised by the eyevis GmbH. 2.) Accessories, such as cardboard boxes, packaging, batteries and other components that are used in connection with this product and that expected to be exchanged re not covered by this warranty. 3.) Failures of pixels can not be totally avoided with LCD-technology products. They are only considered as failures covered by this warranty if their number exceeds the value determined in Pixel Error Class II in ISO 13406-2 (The number of pixel failures refers to a screen area of 1 Mega-pixel.). ))A product that’s serial number is damaged, changed or removed is no-longer covered by this warranty. ))Reaction Time The reaction time to claim a right given by this warranty starts with the customer’s announcement of the claim to the eyevis GmbH. It is calculated in accordance to the standard service hours of the eyevis GmbH (daily 9.00 AM to 5.00 PM, except Saturdays, Sundays and Bank Holidays). ))Advised Procedure for Raising a Claim 1.) See the sections on “Troubleshooting” and “Support” in the manual and check whether the problem might be solved on-site before raising a claim referring to this warranty. 2.) If the problem still exists the customer should try to get support from his regional eyevis GmbH partner. Please prepare the following information: • Product identification and serial number of the device • A description of the problem in hand • Pick-up address and contact information; • Date and place of purchase; • A description of the required service work; 3.) After performing an analysis of the faults and damages of the device the eyevis GmbH will approve your warranty claim if the necessary requirements are fulfilled. The customer will receive a service code and the eyevis GmbH will prepare the service work chosen by the customer. It is the customer’s duty to keep the EYE-LCD7000 / 8200 45 product ready for collection (in cases of DOA the product has to be equipped with all cablings and mains adaptors before it is put in its box or packed). If the customer fails have the device ready for collection he has to bear the costs for the replacement-device. 4.) The eyevis GmbH can provide a suitable transport box on request if the customer can not ensure to be able to pack the defect device correctly and to label t as a breakable good. The customer is liable for damages caused by the use of an improper or unsuitable packing by the customer. 5.) The customer arranges for the transport of the display to the eyevis GmbH 6.) The customer should have his service code ready for any further contacts with the eyevis GmbH in connection with this warranty claim. 7.) The eyevis GmbH reserves the right to charge the customer for incurred costs caused by complains concerning defects or faults that are not covered by this warranty. ))Legal and other Claims There are no express or implied warranties, representations or conditions other than those stated in this warranty. Other legal or contractual claims, also towards the seller of the product, are excluded as far as the eyevis GmbH has provided service based on this warranty. This warranty does not affect nor has influence on other legal guarantee claims or other contractual claims of the customer towards the seller of the product. These claims can be made alternatively to the claims referred to in this warranty document. ))Limitations of Liability In cases of slight negligent breaches of duty the liability of the eyevis GmbH is limited to the direct, foreseeable and contract-typical average damage. The slightly negligent breach of minor contractual obligations excludes the liability. As far as the liability of the eyevis GmbH is excluded or limited, this applies also to the personal compensation liability of its staff, employees, associated employees, agents and auxiliary persons. The preceding limitations of liability do not apply to the customer’s claims derived from the Product Liability Act and to claims concerning damages to the body or health or in case of the loss of the life of the customer. 46 9. EYE-LCD7000 / 8200 Correct Disposal )) Correct Disposal of This Product (Waste Electrical & Electronic Equipment) (Applicable in the European Union and other European countries with separate collection systems) This marking on the product, accessories or literature indicates that the product and its electronic accessories (e.g. charger, headset, USB cable) should not be disposed of with other household waste at the end of their working life. To prevent possible harm to the environment or human health from uncontrolled waste disposal, please separate these items from other types of waste and recycle them responsibly to promote the sustainable reuse of material resources. Household users should contact either the retailer where they purchased this product, or their local government office, for details of where and how they can take these items for environmentally safe recycling. Business users should contact their supplier and check the terms and conditions of the purchase contract. This product and its electronic accessories should not be mixed with other commercial wastes for disposal. )) Correct disposal of batteries in this product - Europe only (Applicable in the European Union and other European countries with separate battery return systems.) This marking on the battery, manual or packaging indicates that the batteries in this product should not be disposed of with other household waste at the end of their working life. Where marked, the chemical symbols Hg, Cd or Pb indicate that the battery contains mercury, cadmium or lead above the reference levels in EC Directive 2006/66. If batteries are not properly disposed of, these substances can cause harm to human health or the environment. To protect natural resources and to promote material reuse, please separate batteries from other types of waste and recycle them through your local, free battery return system. The rechargeable battery incorporated in this product is not user replaceable. For information on its replacement, please contact your service provider. EYE-LCD7000 / 8200 10. 47 Additional Support For additional support for eyevis displays products, please contact: SER VICE eyevis GmbH Hundsschleestrasse 23 D-72766 Reutlingen Germany Phone: +49 (0) 7121 / 43303-291 Fax: +49 (0) 7121 / 43303-22 SU PPORT e-mail: [email protected] www: www.eyevis.de As at: November 2009 Copyright © 2009 eyevis GmbH. All Rights reserved. ))eyevis LCD User‘s Manual This manual, as well as the software described in it, is furnished under license and may be used or copied only in accordance with the terms of such license. Except as permitted by this license, no part of this publication may be reproduced, stored in a retrieval system, or transmitted, in any form or by any means, electronic, mechanical, recording, or otherwise, without prior written permission of eyevis GmbH. Please remember that the content of this manual is protected by copyright, even when not distributed together with software not furnished under license. The content of this manual is furnished for information use only, is subject to change without notice, and should not be construed as a commitment by eyevis GmbH. eyevis GmbH resumes no responsibility or liability for any errors or inaccuracies that may appear in this documentation. eyevis, the eyevis Logo and eyecon are either registered trademarks or trademarks of eyevis GmbH Deutschland. All other trademarks are the property of their respective owners.