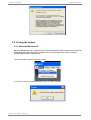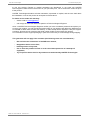
1
LASTER Technologies Zone d'Activité de Courtaboeuf 7 Avenue de l'Atlantique 91969 COURTABOEUF CEDEX Tél. : +33 (0)1 64 46 37 58 Fax. : +33 (0)9 81 40 37 24 Pro Mobile Display G2 Development Reference Kit (DRK) User Manual Release v.1.3 – September 2011 LASTER Technologies Pro Mobile Display G2 Version Date Rédaction 1.0 29/12/10 Z. Liu / S. Denoual / L. Luong 1.1 27/05/11 S.Denoual Observations/Modifications Creation EV Driver activation suppression Dazzle DVC100 USB converter introduction 1.2 19/08/11 L. Luong 1.3 01/09/11 B.Froissard UCD-110 USB converter introduction UCD-110 USB converter update PMD G2 User's Manual - Release v1.3 -2- LASTER Technologies Pro Mobile Display G2 Table of Contents 1.Overview.............................................................................................................................6 1.1. Introduction and main features........................................................................................................ 6 1.2.Technical data.................................................................................................................................. 6 1.2.1.Specifications............................................................................................................................. 6 1.2.2.SDK Add-on (options)................................................................................................................. 7 1.2.3.System Requirements ................................................................................................................ 7 2.Safety Instructions...............................................................................................................7 2.1.Health concerns .............................................................................................................................. 7 2.2.General safety recommendations..................................................................................................... 8 2.3.Warning for electrical products......................................................................................................... 8 3.Content of Pro Mobile Display DRK ...................................................................................9 3.1.Content of Pro Mobile Display HMD.................................................................................................9 3.2.CD-ROM content.............................................................................................................................. 9 3.3.Description..................................................................................................................................... 10 3.4.General operating instructions........................................................................................................ 11 3.4.1.Preparation............................................................................................................................... 11 3.4.2.Connecting to external video sources......................................................................................... 11 3.4.3.Adjusting the PMD.................................................................................................................... 12 3.4.4.Focus adjustment & image brightness control ............................................................................14 4.Enhanced View Driver guide (EV Driver)..........................................................................16 4.1.Install.............................................................................................................................................. 16 4.1.1.Microsoft .Net framework........................................................................................................... 16 4.1.2.EV Driver setup........................................................................................................................ 16 4.2.Using EV Driver.............................................................................................................................. 17 4.2.1.Principle................................................................................................................................... 17 4.2.2.Windows « extended desktop » mode.......................................................................................17 4.2.3.EV Driver launch....................................................................................................................... 18 4.3.EV Driver Interface......................................................................................................................... 19 4.3.1.User level................................................................................................................................. 19 4.3.2.Information group box............................................................................................................... 19 4.3.3.Parameters............................................................................................................................... 20 4.3.4.Tool group box – visual target.................................................................................................... 22 4.4.Uninstall.......................................................................................................................................... 23 5.Camera..............................................................................................................................24 5.1.Install the camera........................................................................................................................... 24 5.1.1.Microsoft Windows Vista / Microsoft Windows 7.........................................................................24 5.1.2.Microsoft Windows XP.............................................................................................................. 24 5.2.Testing the camera......................................................................................................................... 26 5.2.1.Microsoft Windows XP.............................................................................................................. 26 5.2.2.Microsoft Windows Vista / Microsoft Windows 7.........................................................................27 6.Augmented reality applications.........................................................................................28 6.1.Background transparency............................................................................................................... 28 PMD G2 User's Manual - Release v1.3 -3- LASTER Technologies Pro Mobile Display G2 6.2.Undistortion in 3D full screen applications......................................................................................28 6.3.Optical see-trough modelisation, camera / eye offsets...................................................................29 7.Maintenance and Cleaning Instructions ...........................................................................30 8.Warranty............................................................................................................................30 9.Troubleshooting................................................................................................................32 PMD G2 User's Manual - Release v1.3 -4- LASTER Technologies Pro Mobile Display G2 WARNING WE STRONGLY RECOMMEND YOU TO READ THIS HANDBOOK AND GET FAMILAR WITH THE PMD DEVICE (PRO MOBILE DISPLAY) AND ITS CAPABILITIES BEFORE YOU USE IT FOR THE FIRST TIME. IN PARTICULAR, PLEASE READ THIS USER'S MANUAL CAREFULLY AND PAY PARTICULAR ATTENTION TO THE SAFETY INSTRUCTIONS, IN ORDER TO PREVENT ANY DAMAGE TO YOUR EYE, OTHER INJURY, LOSS OF VISUAL FUNCTIONS, PROPERTY DAMAGE OR DEATH. THIS PRODUCT IS MADE FOR PROFESSIONAL USE ONLY. CHILDREN UNDER THE AGE OF 18 YEARS OLD MAY ONLY USE THIS PRODUCT UNDER THE SUPERVISION OF QUALIFIED PERSONNEL. PMD G2 User's Manual - Release v1.3 -5- LASTER Technologies Pro Mobile Display G2 1. Overview 1.1. Introduction and main features The Pro Mobile Display G2 (PMD G2) is a new generation of monocular optical see-through head mounted display for augmented reality. It provides a 40 x 30° field of view equivalent to a 34'' diagonal screen at a distance of 1 meter. The PMD can be associated with software for navigation and display in augmented reality and group-ware platforms. Made for professionals, the PMD allows users to see information, video, images or other data directly in the user's natural field of view. It also can be used for augmented reality applications with appropriate software using the integrated micro-camera or other movement detectors (e.g : accelerometers, gyroscopes, magnetic sensors, optical or hybrid trackers). 1.2. Technical data 1.2.1. Specifications Display definition 800 x 600 pixels Display frequency (electronic) 30 to 85 Hz Field of view (FOV) Approx. 50° diagonal (in 4/3 format, approx. 40° x 30°) Accommodation distance (adjustable) Approx. 30cm to 3m Image format 4/3 or 16/9 Colour 16,7 millions Grey scale Up to 256 (in option) Types of information displayable Texts, images, video Camera Yes Video input ◦ Number of Effective Pixels : 648 x 488 ◦ Scanning System : 2:1 interlace ◦ Synchronization : Internal ◦ Resolution : 400 TVL ◦ S/N Ratio : >50dB ◦ Minimum Illumination : 0.2 lux @ F1.2 ◦ Video Output : 1NTSC / PAL ( composite ) ◦ Built-in Lens : ~ 40°x 54° ◦ Power Supply : 5 to 12 Vdc ◦ Power Consumption : 100 mA max • VGA compatible with VESA VSIS standard • SMTPTE-170 & PAL : monochrome display (in option) Compatibility with spectacles Weight Partial (some spectacles legs can obstruct light propagation and limit the display FOV) • PMD : 65 g • Head fixation : 30 g Mechanical HMI • ON/OFF button • brightness control (+/- buttons), ultra-brightness mode • scan direction control (vertical/horizontal flip) PMD G2 User's Manual - Release v1.3 -6- LASTER Technologies Pro Mobile Display G2 Power 300 to 500 mW , via USB port or external DC 5V power supply Storage temperature - 20°C à + 60°C Working temperature - 10°C à + 45°C 1.2.2. SDK Add-on (options) Micro – camera Add-on for various uses such as job recording, or remote collaboration. It is essential for the gesture command and the object recognition add-ons. Gesture command Add-on for more sophisticated, speedy and fluid navigation. It allow usage in noisy environments. This feature replaces the mouse. Object recognition Add-on to complement the various command modes. It provide accurate information to the operator corresponding to the referenced object. This is augmented reality in real-time with the matching and tracking of items. Vocal command Add-on for navigation in “hands-free” mode, following a tree menu on the display device by triggering keywords vocally. 1.2.3. System Requirements • For analog RGB inputs : a PC capable of producing a VGA or SVGA signal • For composite inputs (grey scale) : An NTSC, PAL, or SMPTE-170 video source (in option) • Power supply : via computer USB cable (included) or external DC 5V power supply (in option) • Computer Operating System : Windows XP, Vista, Seven 2. Safety Instructions 2.1. Health concerns • WARNING : Eye Disease, Eye Injury, and Glaucoma If you have been diagnosed with or are susceptible to eye disease, eye injury, or glaucoma, consult your doctor before use this product and do not use without your doctor’s approval. • CAUTION : Heart Disease, High Blood Pressure If you have an history of heart disease or high blood pressure consult your doctor before you use this product and do not use it without your doctor's approval. • CAUTION : Seizures If you have a history of temporary spasm, unconsciousness, or epileptic seizures from light stimulation, consult your doctor before use and do not use it without his approval. If any of the following symptoms occur while using the PMD DRK, stop using it immediately and consult a doctor if necessary : • eye fatigue or irritation, • headaches or dizziness, • aches and pain in the neck or shoulders, • double vision, • nausea or motion sickness, PMD G2 User's Manual - Release v1.3 -7- LASTER Technologies • Pro Mobile Display G2 inability to focus on the displays after using focus adjustment button, Misuse or overuse of this product may result in eye damage, or loss of visual functions. Overlong use or inappropriate focus adjustment or HMD position can cause eye-strain or irritation, Headaches, dizziness or other problems. If any discomfort appear, do not continue to use the PMD and take a break. If symptoms persist for period of some hours, consult a doctor. 2.2. General safety recommendations Avoid getting the cable entangled around your neck, body or arms. Wear the cable close to your body. To ensure that the device does not fall off during use, always ensure that it is correctly adjusted 2.3. Warning for electrical products To avoid any risk of electrocution, do not bring any part of the PMD in contact with water when it is connected to an AC outlet or a PC. Avoid using and storing the PMD in wet, humid, dusty or smoky surroundings or in extreme temperatures. Do not use PMD in too low or too high temperatures (below -10°C and above +40°C). This product is optimized for a temperature range between +15°C to 30°C. Avoid dropping or mechanical shock, as frame and displays may be deformed. Always unplug the PMD when it is not in use. In case of damage contact your retailer. There are no user serviceable parts. Only qualified service personnel should perform any service or maintenance on this product. PMD G2 User's Manual - Release v1.3 -8- LASTER Technologies Pro Mobile Display G2 3. Content of Pro Mobile Display DRK 3.1. Content of Pro Mobile Display HMD 1 Monocular Pro Mobile Display G2 (PMD G2) optical device 1 PMD G2 external electronic box 1 PMD G2 headset 1 VGA Cable 1 USB to Power Input Cable 1 UCD 110 (Video USB converter for camera) 1 CD-ROM with driver software installer, user's manual and license 3.2. CD-ROM content Folder <Augmented Reality> Tools and informations for augmented reality applications development. Folder < Doc > Documentation PMD G2 User's Manual - Release v1.3 -9- LASTER Technologies Pro Mobile Display G2 Folder <EV Driver> Sub folder < .NET framework > Microsoft .NET 3.5 installer Sub folder < EV Driver Installer> EV Driver Installer Sub folder < VS 2008 redist> Visual Studio 2008 redistributable package Eula.rtf End User License Agreement for EV Driver software Folder <UCD 110 USB Driver> UCD USB converter installer (for embedded video camera) 3.3. Description Rotation adjustment Buttons Velcro Tightening PMD Headband Focus adjustment Wheel Linear Guide Micro-camera Translation adjustment Ring Video source Informative glass Monocular PMD optical device Luminosity setting VGA input On/off button Pow er input PMD electronic module PMD G2 User's Manual - Release v1.3 - 10 - Image flip LASTER Technologies Pro Mobile Display G2 3.4. General operating instructions 3.4.1. Preparation 1. Turn on your computer 2. To simplify the PMD set-up, choice a “non-dark” wallpaper for your desktop (uniform white or blue for example). 3. Install the EV driver as described in section 4.1. 4. Attach the PMD optical device to the headset : A. Rotate the translation adjustment ring (1) as shown below until it stops. B. Push the linear guide of the PMD optical device into the linear guide of the headset (2) 2 1 C. To check if it is correct, rotate the translation adjustment ring (1), the PMD optical device will move in translation into the linear guide of the headset. If it is not the case, the PMD optical device is probably not well inserted in the linear guide. Please restart from step 4. 3.4.2. Connecting to external video sources • Check that the EV Driver is installed (see 4.1.). Check that the computer is correctly configured and that the EV Driver is running (see 4.2.). • Connect one side of the VGA cable to the PMD external electronic box and the other side on the VGA port of your computer. • Connect the USB power cable to the PMD external electronic box and plug it into your computer USB external port. PMD G2 User's Manual - Release v1.3 - 11 - LASTER Technologies Pro Mobile Display G2 • Turn on the “O/I” button on the PMD external electronic box. • Check that the PMD video source is “lightening”, see following image : The PMD display source is “lightening” 3.4.3. Adjusting the PMD The PMD G2 must be correctly positioned to allow the user to see a full image. Follow theses guidelines to ensure fast and easy positioning : • Before placing the PMD on your head, open the scratch and increase or decrease the size of the headset to fit to your head . • Place the PMD on your head, and position the headset as shown below. The rotational plate (in blue on the picture) must be placed between the eye and ear (the nearest as possible of the ear). • Use the scratch to adjust the headset to your head. PMD G2 User's Manual - Release v1.3 - 12 - LASTER Technologies Pro Mobile Display G2 • The headset (with the PMD optical device) should not slip when you move. • Display a image from your video souce (e.g. your PC desktop for example). You can also use the following visual target (see 4.3.4.). This pattern will help to position the PMD correctly . When correctly positioned, the user should see the full target image on the PMD device (the black color will appear transparent) : • Unlock the rotation plate by pressing buttons as shown below and position the center of the informative glass approximately in front of your eye. • In keeping the buttons of the rotation plate pushed, you can adjust the device with your two hands (see the following figure). Carefully move the PMD around this position until you see the full image. Rotation plate PMD G2 User's Manual - Release v1.3 - 13 - LASTER Technologies Pro Mobile Display G2 • Once you have see the whole image, release the button to lock the device in position. • If the image is not fully visible, turn the Translation Ring to move the informative glass closer to your eye or more far from your eye. • If the picture is missing a part, push the buttons of the rotation plate and move the glass in the direction of the missing area. 3.4.4. Focus adjustment & image brightness control • Turn the wheel to left or right to adjust the focus distance corresponding to your view or the accommodation distance required for your application. • To control the brightness, press the “+” or “-” buttons on the side of the PMD electronic box to adjust the brightness of the image PMD G2 User's Manual - Release v1.3 - 14 - LASTER Technologies Pro Mobile Display G2 • Ultra-brightness mode : To activate the ultra-brightness mode, press the “-” and “Image flip” P buttons on the side of the PMD electronic box simultaneously, and then press “+” button to increase the brightness of the image. Push these two buttons simultaneously to activate the ultra-bright mode CAUTION : • Ultra-brightness mode decreases the lifetime of the PMD optical device. • Be careful in using ultra-brightness because of the high intensity of the light. Long-time use in maximal brightness can cause eye fatigue or irritation, headaches or dizziness or others troubles. If any discomfort appears, do not use the PMD any longer and take a break. If symptoms persist after a few hours, consult a doctor. 3.4.5. To unfasten the PMD optical device from the headset : Rotate the Translation Ring until it stops on the top (1). Then, push the PMD optical device out of the linear guide of the headset (2) 1 PMD G2 User's Manual - Release v1.3 - 15 - 2 LASTER Technologies Pro Mobile Display G2 4. Enhanced View Driver guide (EV Driver) 4.1. Install 4.1.1. Microsoft .Net framework The EV Driver requires Microsoft .Net framework 3.5 to be installed. If it is already installed, skip this step. This step isn't necessary if the computer is connected to the Internet : the EV Driver installer will detect the required components and will download and install them. Otherwise, it is necessary to install the framework before EV Driver : go to folder < .NET framework > of the CD-ROM and launch the < dotnetfx35.exe > program. 4.1.2. EV Driver setup Go to sub folder < EV Driver Installer > on the CD-ROM and launch the the <setup.exe> program. No installation serial number is required during setup. However, an activation process will be launched when the software will be used. The installer will offer to add the EV Driver to the startup folder. Accept this option if you want the driver to be launched at Windows startup : PMD G2 User's Manual - Release v1.3 - 16 - LASTER Technologies Pro Mobile Display G2 4.2. Using EV Driver 4.2.1. Principle EV Driver allows the computer to output the correct video stream to the PMD device. As a result, the user can see an exact copy of the current Windows desktop through the PMD device. The driver software runs in real time on most modern PC (>30 ips, up to 80 ips). EV Driver runs on Windows XP, Windows Vista, and Windows 7. Due to Windows XP differences concerning front-buffer manipulations, the EV Driver has lower performances on Windows XP. EV Driver is a background process. When a PMD device is detected, it performs some display manipulations and image processing to output the correct video stream. Important note : Windows must be configured in extended desktop mode to allow EV Driver to work correctly. 4.2.2. Windows « extended desktop » mode Once a PMD device has been connected to a computer, the display properties of this computer must be set to « extended desktop ». This mode can be set using specific graphics card software, or also with Windows interface. Open the Windows Display Properties box. Select the secondary monitor ( that is, the PMD device), and then select « Extend my Windows desktop to this monitor ». Click yes to apply settings. PMD G2 User's Manual - Release v1.3 - 17 - LASTER Technologies Pro Mobile Display G2 4.2.3. EV Driver launch Depending on installer options, a shortcut should be present on the desktop. Double click the shortcut to start EV Driver program : The program can also be started from the Windows start menu, as well as the PMD documentation : When EV Driver is running, a tray icon is shown in Windows task bar : Double click on the tray icon to show the EV Driver interface. PMD G2 User's Manual - Release v1.3 - 18 - LASTER Technologies Pro Mobile Display G2 4.3. EV Driver Interface EV Driver interface is composed of four part : User Level group box Tools group box Information group box Parameters group box 4.3.1. User level EV Driver has three possible user level : – Restricted : The user can not interact with the software, except to enter a password to change user level mode. – Admin : Administrator mode. The user can change parameters of the parameters group box. The default password for this mode is « admin ». Contact LASTER Technologies to obtain a different one. – Manufacturer : reserved to LASTER Technologies. 4.3.2. Information group box This box provides information about the current EV Driver state and shows some performances informations : PMD G2 User's Manual - Release v1.3 - 19 - LASTER Technologies Pro Mobile Display G2 Status LED : The status LED is green when a PMD has been detected and the driver is working correctly. The status LED is red when a problem occurs. The text on the right inform about the error type : – Error -111 : the primary (desktop) device cannot be found (should never happen) – Error -112 : the driver failed to get current settings for the primary display device – Error -113 : modifications to primary display device settings are not allowed – Error -114 : the driver failed to modify the primary display device settings – Error -121 : the PMD device cannot be found (i.e. it is probably not connected) – Error -122 : the driver failed to get the current settings for PMD device – Error -123 : modification of PMD device settings are not allowed – Error -124 : the driver failed to modify the PMD device settings – Error -200 : the driver failed to locate the PMD screen – Unknown Error : unexpected error... Most of the time, the only error that should appear is error -121, which reports that the PMD device is not detected : check that the PMD device is correctly connected (see 3.4.2.) and that Windows is configured in extended mode (see 4.2.2.). If other error types occurs, please contact LASTER Technologies. Max reachable frequency : Indicates the maximum frequency that the driver can reach using the current settings (this is estimated by measuring the average treatment time to process a frame and display it on the PMD device). It can be seen as the performance limit of the driver : even if the user asks for a higher rate, it will be difficult or impossible to reach. The frequency unit is Hertz (equivalent to image/seconds) Current frequency : Indicates the mean measured frequency reached to display the video stream on the PMD device. This value depends on the « desired frequency » parameterized by the user, and/or the performance limits of the driver (see the previous paragraph concerning the « max reachable frequency »). 4.3.3. Parameters Theses parameters can be accessed only in administrator mode. All modifications to these parameters are automatically saved in memory. There is three kind of parameters : the desired frequency, the image quality factor, and the zoom/offset parameters : Desired frequency Image quality Zoom / offsets parameters PMD G2 User's Manual - Release v1.3 - 20 - LASTER Technologies Pro Mobile Display G2 Desired frequency : The desired frequency is the frequency that the EV Driver will try to reach when displaying video stream on a PMD device. This parameter is very important for performance : effective display frequency and CPU consumption. For this reason, the user should take care in choosing the correct value for this parameter, depending on their needs. The best way to choose a correct value is to analyze the performance of the EV Driver. This can be done by checking the information group box when the driver is running (see 4.3.2.) : – if the user asks for a desired frequency which is greater than the current measured frequency, the driver can reach this desired frequency. Consequently, the effective measured frequency will be approximately equal to the desired frequency, and the CPU usage will not be too high. For example : – If the user asks for a desired frequency which is less than the current measured frequency, the driver will probably not reach this desired frequency. As a result, the effective frequency will be lesser than expected, and the CPU usage may be high. PMD G2 User's Manual - Release v1.3 - 21 - LASTER Technologies Pro Mobile Display G2 Quality : The user can choose between three different image qualities. As well as quality, this setting impacts performance : the treatment time increases with desired quality. The possibilities are : – Low quality : image quality is poor, with significant aliasing. However this mode is the fastest. This mode is only recommended for video playback. – Medium quality : this is the normal operating mode. The image quality is good, and the treatment time is low. – High quality : this mode provides a little boost in quality, but the treatment time increases significantly. On old computers, this mode can be slow (especially if Windows XP is used). Zoom / offsets : These settings allows the position of the desktop in the PMD display to be changed. It also provides some zooming capability (quality optimized). The reset button returns to the default state ( no offset, no zoom). 4.3.4. Tool group box – visual target These parameters can be accessed in all user modes. This group box allows a specific image pattern to be displayed on the PMD device. This image is composed of three rectangles with different color (red, green and blue). This visual target is used to : – help the user to find the correct position of the PMD on the head – check that there is no problem with colours To enable the test pattern, just check the « Display visual target » check box : The following image is then displayed on the PMD device (note that the black color appears transparent) : PMD G2 User's Manual - Release v1.3 - 22 - LASTER Technologies Pro Mobile Display G2 4.4. Uninstall The EV Driver can be uninstalled by using the standard uninstall process under Windows. Go to configuration panel and select « programs » : Select the EV Driver program and select « uninstall ». PMD G2 User's Manual - Release v1.3 - 23 - LASTER Technologies Pro Mobile Display G2 5. Camera 5.1. Install the camera 5.1.1. Microsoft Windows Vista / Microsoft Windows 7 Go to sub folder <UCD 110 USB Driver> choose the folder for your operating system, connect the usb video converter on the computer and execute the setup.exe file. The driver is normally setup on all usb port of the computer on Windows Vista or Windows 7. 5.1.2. Microsoft Windows XP The USB video converter driver is in Folder <UCD 110 USB Driver> and folder <Windows XP Driver>. You need to execute setup.exe. Run setup.exe If you have some warning message click on continue : PMD G2 User's Manual - Release v1.3 - 24 - LASTER Technologies Pro Mobile Display G2 At the end, connect the USB converter on the computer. The computer ask you to install the driver for each USB port. Bug fix 1 ( Windows XP only ) : If you disconnect and connect later the video converter on the same usb port, windows XP ask you each time to setup the driver. You just need to click cancel, if you have already setup the driver on this usb port. Bug fix 2 ( Windows XP only ) : In order to use the video converter with all usb port of the computer you MUST connect the video converter and install the driver on each usb port as below. Choose the third option and click on next. Choose the first option and click on next. If you have some warning message as below, click on continue : PMD G2 User's Manual - Release v1.3 - 25 - LASTER Technologies Pro Mobile Display G2 5.2. Testing the camera 5.2.1. Microsoft Windows XP Bug fix 1 ( Windows XP only ) : If you disconnect and connect later the video converter on the same usb port windows XP ask you each time to setup the driver. You just need to click cancel, if you have already setup the driver on this usb port. Choose USB EM2861 VIDEO as below with AMCAP. If you have an warning message as below click ok, the driver run well. PMD G2 User's Manual - Release v1.3 - 26 - LASTER Technologies Pro Mobile Display G2 5.2.2. Microsoft Windows Vista / Microsoft Windows 7 Choose USB EM2861 VIDEO as below with AMCAP. PMD G2 User's Manual - Release v1.3 - 27 - LASTER Technologies Pro Mobile Display G2 6. Augmented reality applications 6.1. Background transparency On the PMD device, the black color gives transparency. When developing an augmented reality application, all things that should not appear in the user field of view must be set to black color (for example : the background of an HMI application). 6.2. Undistortion in 3D full screen applications The EV Driver is useful for many tasks. It allows working on classic Windows desktop, its frequency can be adjusted, it proposes some zoom and offsets capabilities... On most modern computers, video or 3D applications can also be rendered in real time. Anyway, for 3D real time and full screen applications, the EV Driver may not be the ideal solution. Customers programs can achieve the same undistortion result by using some post processing rendering methods. The advantage is a performance increase compare to EV Driver, since theses program don't need to do all EV Driver stuff (screen capture, frequency adjustment, zoom and offsets). Developper's program can also take advantages of graphic hardware accelerations. The post processing method suggested by LASTER Technologies can be done in two step : – Render the 3D scene to a 800x600 texture – Render the previous texture to a specific object that represent the undistortion of the screen. The application and the computer must be configured in 800x600 resolution mode. The “undistortion object” provided by LASTER Technologies is expressed in the .OBJ format. This format is easily convertible to most of existing 3D formats. The file can be found on the CD-ROM, inside <Augmented Reality> folder, with the name PMD_XXXXXXXXXXXX_undistort.obj : PMD G2 User's Manual - Release v1.3 - 28 - LASTER Technologies Pro Mobile Display G2 The undistortion object represents the exact image undistorted of the screen in the 800x600 format : the vertices of the object lies on a 2D plane, the (X,Y) coordinates of each vertex represent the position of the « undistorted » pixel in the original 800x600 image... The second step requires the undistortion object to be correctly positioned in the 3D world, relatively to the virtual camera. One way to do this is : – put the virtual camera in orthogonal projection, with a view port resolution of 800x600. Set virtual camera direction to be the Z axis. – position the undistortion object at X=0 and Y=0 relatively to the virtual camera. Here is an example of a simple image, displayed normally on the left, and displayed using undistortion on the right : The green border represent the full 800x600 source image. The whole rectangle represent the image sent to the PMD device. Theses two images can be found on the CD-ROM inside the <Augmented Reality> folder. 6.3. Optical see-trough modelisation, camera / eye offsets Since PMD is an “optical see-trough” device, display augmented reality contents requires additional work compare to classical “video see-trough” devices, in particular when user need to merge virtual and real objects with coherency. Basically the following points must be fulfilled : – Detection of 3D real contents relatively to the PMD, using embedded or external sensors – The position of the 3D virtual scene is determined, using the relative position between the display (eye theoretical position) and sensors. – The 3D scene is rendered using the projection model of the display (eye) – Post processing rendering methods for undistortion (see 6.2.). Different kind of sensors may be used with a PMD device to display augmented reality contents. The CD-ROM and this user manual will only shortly introduce the use of the PMD integrated camera sensor. The file 'PMD_XXXXXXXXXXXX_AR_datas.xls' inside <Augmented Reality> folder provides all data that LASTER use to make augmented reality applications with a given PMD device. Theses data have been computed using a LASTER calibration process. This file contains 3 types of informations : – The pinhole camera model used for image processing. Focal length and principal point values are divided by camera axis resolution (width, height), making them independent of camera resolution. To retrieve focal or principal point for a given camera resolution, one just need to multiply by the camera width (for horizontal axis) or by camera height (for vertical axis). Four PMD G2 User's Manual - Release v1.3 - 29 - LASTER Technologies Pro Mobile Display G2 coefficients are used to represent the camera distortion : two for radial distortion, two for tangential distortion. – The vertical field of view of the perspective projection (display device). This is used for rendering the virtual scene in 3D environment (openGL, DirectX...). The view port has a 800x600 size. – The relative position and orientation between the display (eye theoretical position) and the camera sensor. This must be used to obtain a correct position of the 3D virtual scene. Here is a basic example of an augmented reality application with a PMD device (a camera is used to replace the human eye) : 7. Maintenance and Cleaning Instructions To preserve your PMD and keep a good optical quality of the augmented display, do not touch the informative glass with fingers or other object. If the device or the informative glass is dirty, clean the PMD device by using a damp cloth. Do not use any detergents. To clean the optics of the HMD use a dry, clean cloth. A cleaning kit for this purpose is provided with the PMD kit. Commercial eyeglass cleaning kit can also be used. Be sure that these kit are a good quality. In case of damage, contact LASTER Technologies. There are no user serviceable parts. Only qualified service personnel should perform any service required on this product. 8. Warranty This product has been produced with the utmost care and was checked at each stage of its manufacture. LASTER Technologies warrants your product to be free from physical defects in material and workmanship for a period of 1 year from the date of your purchase. If you discover a defect covered by thy warranty, we will repair or replace the product at our option using new or refurbished components. This warranty covers defects in manufacturing that arise from the correct use of the device. It is limited to defects in materials or workmanship and does not cover damage caused by abuse, misuse, unauthorized modification, lightning or power surge damage, extreme heat or cold, and corrosive environments. The warranty also does not cover the normal wear or tear on cases, housing, connector, and accessories. The warranty does not apply to any product with a missing, altered, or defaced serial number. We will not be liable to you or anyone else for any damages that result from the failure of this product. These damages include, but are not limited to, the following : lost profits, lost savings, lost data, damage to other equipment, and incidental or consequetial damages arising from the use of or inability PMD G2 User's Manual - Release v1.3 - 30 - LASTER Technologies Pro Mobile Display G2 to use this product. Express or implied warranties are disclaimed. In not event will LASTER Technologies be liable for than the amount of your purchase price, not to exceed the current list price of the product. LASTER Technologies disclaims all other warranties, expressed or implied, and the user shall deem the installation or use of this product an acceptance of these terms. To obtain service under this warranty : – send a email to [email protected] – call +33(0)1 64 46 37 58 and ask to speak to a Technical Support Engineer. Once a LASTER Technical Support Engineer verifies you have a hardware problem that requires you to return your product, you will provide the serial number of your product and deliver the defective unit to LASTER to obtain service under this warranty. A sales receipt will be required to verify the original purchase. All returned unit must have the serial number visible on the outside of th product. You must either use the original packaging or pack the unit securely to avoid damage during shipping. This guarantee will not apply if the customer (the following cases are not exhaustive) : • Did not follow the instructions of the PMD user manual, • Dropped the device on the floor, • Inflicting shocks of any kind, • Use or store the product in water or in the rain without protection of a waterproof equipment, • Try to open the device itself or by someone not authorized by LASTER Technologies. PMD G2 User's Manual - Release v1.3 - 31 - LASTER Technologies Pro Mobile Display G2 9. Troubleshooting T1 - No images seen on PMD device Check that the display source of the PMD is lit : PMD display source If the output light of the PMD display source cannot be seen, go to PMD display source trouble-shootings(see T4). Otherwise, you may encounter PMD positioning problems. Follow the PMD adjusting process (see User Manual 3.4.3. and 3.4.4.). T2 - Truncated images on PMD device Possible causes : 1. EV Driver has been configured with some offsets : reset the EV Driver offsets (see User Manual 4.3.3.) 2. The PMD is not correctly positioned : follow the PMD adjusting process (see User Manual 3.4.3. and 3.4.4.). T3 – Image quality/geometry T3.1 - Image inverted/flipped First, use the visual target (see User Manual 4.3.4.), and check the resulting image on the PMD device : If the visual target is flipped, the PMD electronic box has been configured to flip output video (see User Manual 3.3.) : push the « flip » button of the electronic box (push it several times if necessary, until the image is correctly displayed). Otherwise, check your video source (the dysfunction is not due to the PMD device) T3.2 – Image luminosity low Possible causes : 1. The source video stream has a low luminosity. Check your video source and correct the luminosity setting if needed. 2. The PMD luminosity setting is too low : increase luminosity setting by pushing the « + » button of the PMD electronic box (see User Manual 3.3. and User Manual 3.4.4.). If external light is too intense, the ultra-brightness mode can be used. Note : an incorrect PMD position can also lead to low luminosity T3.3 – Image deformation Possible causes : 1. The EV Driver is not running or is not configured correctly(see 4.2.) 2. The PMD is in flipped mode. See T3.1. 3. A displacement or shock on the glass and/or on internal optics can lead to image deformation issues. Contact LASTER Technologies. T3.4 – Colour missing Use the visual target (see User Manual 4.3.4.), and check the resulting image on the PMD device. If no colour is missing, check your source video stream. Otherwise : 1. Check the VGA cable. Try another one. 2. Electronic issues : contact LASTER Technologies. T3.5 – Image quality (aliasing) Possible causes : 1. The source video stream is of low quality (not PMD dependant) 2. The EV Driver is running in low quality mode : change the quality mode of the EV Driver (see User Manual 4.3.3.) T3.6 – Image sharpness Possible causes : 1. The focus setting is not configured properly. See User Manual 3.4.4. 2. Dust on the glass or PMD optics. Clean the PMD. T4 – PMD display source off Possible causes : 1. PMD powered off : check that the PMD is powered ON. 2. Video input not connected : check that a video source is correctly connected to the PMD (see User Manual 3.4.2.) PMD G2 User's Manual - Release v1.3 - 32 - LASTER Technologies Pro Mobile Display G2 3. The computer video source is not configured properly (see User Manual 3.4.2. and 4.2.) 4. The video stream (computer) is completely black : use a coloured video stream like the visual target (see User Manual 4.3.4.) . The black colour is seen as transparent in the PMD device. T5 – No real time display Possible causes : 1. The EV Driver target period is too large : try to reduce the target period of the EV Driver. 2. The computer performance is not sufficient to achieve a real time display (see User Manual 4.3.2. and 4.3.3.) : - try to analyse and optimize computer CPU use : close all applications that are not required. - If it is acceptable, decrease the quality factor of the EV Driver (see User Manual 4.3.3.) LASTER Technologies Zone d'Activité de Courtaboeuf 7 Avenue de l'Atlantique 91969 COURTABOEUF CEDEX Tél. : +33 (0)1 64 46 37 58 Fax. : +33 (0)9 81 40 37 24 PMD G2 User's Manual - Release v1.3 - 33 -