Transcript
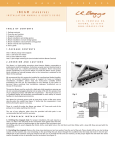
L
.
R
.
B
VIOLIN
INSTALLATION
A
G
G
S
P
I
C
K
U
P
S
PICKUP
MANUAL
&
USER'S
GUIDE
4 8 3
N .
F R O N T A G E
N I P O M O ,
C A
R D .
9 3 4 4 4
W W W . L R B A G G S . C O M
1.OVERVI E W
AN D
C AUT IO NS
We recommend that this product be installed by a professional
dealer/installer. We do not provide installation advice or support for home or
hobbyist installations. Installers: please read the instructions carefully before
proceeding. We will not be responsible for any damage to the guitar or personal injury resulting from installation, improper installation, use or
misuse of the product.
2.INSTALL ATION
1. Loosen strings and remove old bridge. Fit the feet of the pickup bridge to the violin. Make sure the pickup wire faces the chin rest for proper
balance.
2. For proper string alignment and action of the new bridge, place the old bridge on top of the pickup and trace its outline on the new bridge.
Trim excess wood from the top of the new bridge and cut proper notches for the strings.
3. You may remove as much as .032" from the entire front face of the bridge to voice the violin. Carefully sand the bridge on its face on a flat
surface. Above the heart,. remove as much material as needed to match the old bridge. Do not sand or shape the bridge's back side.
4. Place the new bridge on the violin and bridge the strings up to pitch very slowly. Be sure that that the bridge does not bow, flex or tip during
this process. Exercise care during this delicate process. The sensors are vulnerable to damage here.
5. Attach the Carpenter jack to the area next to and just in front of the chin rest. Carefully solder the pickup to the jack following the instructions
provided with the jack.
Do not put any pressure on the wire where it meets the bridge when shaping and fitting the pickup.
A preamp is not necessary when plugged into most acoustic instrument amplifiers, but the "input impedance" of whatever you plug your violin
pickup into first must be at least 1 megohm or higher to get the most out of this pickup. If you sound thin and screechy, check the impedance. For
superior results use a Baggs preamp such as the Para Acoustic D.I. or Gigpro, then send the signal to a high-quality full-range P.A. Use as short a
cord as practical between the pickup and the preamp. Do not put passive volume or tone controls between the pickup and the preamp; this will
destroy the sound of the pickup.
Unless otherwise specified, the violin pickup package includes a Carpenter Jack. This professional-quality 1/4" jack attaches next to the chinrest
with the same type of hardware. This jack makes a perfect mounting point to add a microphone.
If a slight bend starts to develop in the bridge, straighten it carefully. Also, do not tug on the wire. With proper care, your Baggs pickup should
last for many years.